Contents
Client applications that send OAuth requests to the API Gateway’s Authorization Server must be registered with the Authorization Server. This topic describes the OAuth 2.0 endpoints used to manage client applications and the pre-registered examples provided with the API Gateway. It describes the registry used to store these client applications, and provides details how to manage them using a REST API-based HTML interface. This topic also includes details on the database schema, and SSL commands used for the example client applications.
The API Gateway provides the following endpoints used to manage OAuth 2.0 client applications:
|
Description |
URL |
|
Authorization Endpoint (REST API) |
|
|
Token Endpoint (REST API) |
|
|
Token Info Endpoint (REST API) |
|
|
Revoke Endpoint (REST API) |
|
|
Oracle API Manager (HTML Interface) |
|
|
Oracle API Manager (REST API) |
|
where
GATEWAY
is the machine on which the API Gateway is installed.
![[Important]](../common_oracle/images/admon/important.png) |
Important |
|---|---|
|
You must first enable the OAuth listener port in the API Gateway before these endpoints are available. |
Enabling OAuth Endpoints
To enable the OAuth management endpoints on your API Gateway, perform the following steps:
-
In the Policy Studio tree, select Listeners -> API Gateway -> OAuth 2.0 Services -> Ports.
-
Right-click the OAuth 2.0 Interface in the panel on the right, and select Edit.
-
Select Enable Interface in the dialog.
-
Click the Deploy button in the toolbar.
-
Enter a description and click Finish.
![[Note]](../common_oracle/images/admon/note.png) |
Note |
|---|---|
|
On Linux-based systems, such as Oracle Enterprise Linux, you must open
the firewall to allow external access to port
If you need to change the port number, set the value of the
|
The API Gateway ships with a number of pre-registered example client applications.
|
Note |
|---|---|
|
These client applications are for demonstration purposes only and should be removed before moving the Authorization Server into production. |
The default example client applications include the following:
|
Client ID |
Client Secret |
|
|
|
|
|
|
Every client application that sends OAuth requests to the API Gateway's OAuth Authorization Server must be registered with the Oracle API Manager. The API Gateway provides the API Manager Web-based HTML interface for managing registered client applications. It also provides the API Manager REST API that enables you to manage registered clients on the command line.
Accessing the API Manager Web Interface
You can access the API Manager Web interface at the following URL:
https://localhost:8089
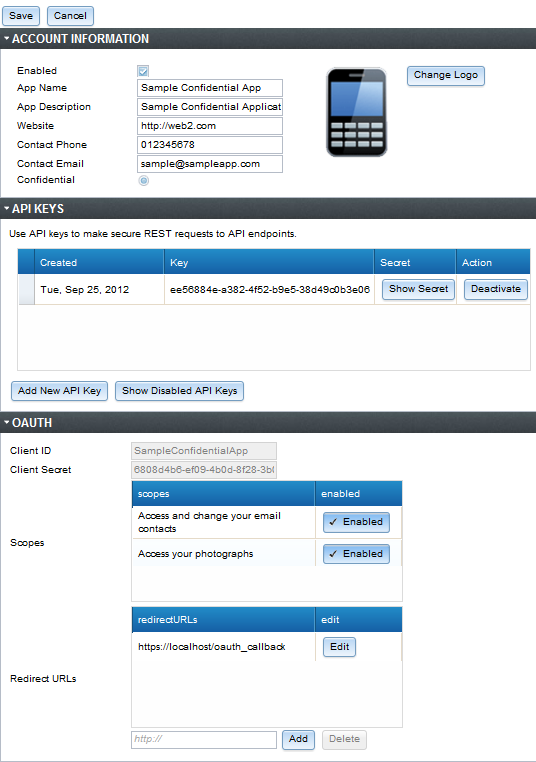
This interface is displayed as follows:
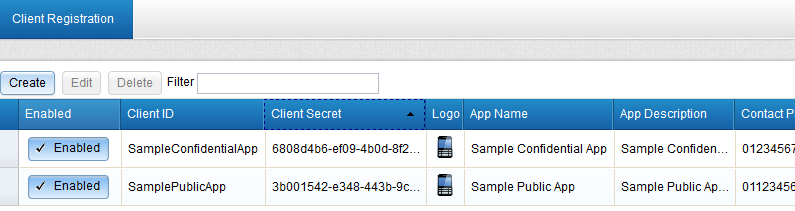
You can select a registration entry and click Edit to update its details. For example, you can can select the scopes that an application requires access to, and configure API keys or certificates. Remember to click Save when finished.
By default, the API Manager back-end is file-based and uses the API Gateway’s Key Property Store (KPS). For more details, see Key Property Stores. You can also store this data in a database. For more details, see the section called “Token Management”.
Accessing the API Manager REST API
For details on using the API Manager REST interface on the command line, see the section called “API Manager REST API”.
The API Gateway includes sample Jython client applications for all supported OAuth flows in the following directory your API Gateway installation:
INSTALL_DIR/samples/scripts/oauth
To run a sample script, open a UNIX shell or DOS command prompt in the following directory:
INSTALL_DIR/samples/scripts
Windows
For example, run the following command:
> run.bat oauth\implicit_grant.py
Linux/Solaris
For example, run the following command:
> sh run.sh oauth/implicit_grant.py
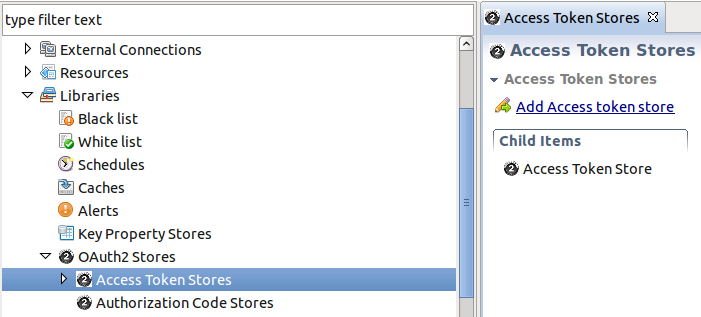
The API Gateway can store generated authorization codes and access tokens in its caches or in a central database. The Authorization Server issues tokens to clients on behalf of a Resource Owner for use in authenticating subsequent API calls to the Resource Server. These issued tokens need to be persisted so that subsequent client requests to the Authorization Server can be validated.
The following screen shows the OAuth stores in the Policy Studio:
 |
|
Note |
|---|---|
|
The Authorization Server can cache authorization codes and access tokens depending on the OAuth flow. The steps for adding an authorization code cache are similar to adding an access token cache. |
The Authorization Server offers the following token persistent storage options:
-
Database
-
Cache
The following screen shows these options in the Policy Studio:
 |
The Purge expired tokens every 60 secs setting enables you to configure the time in seconds that a background process will polls the database or cache looking for expired access/refresh tokens or authorization codes.
Caching Tokens using a Database
Perform the following steps:
-
Right-click Access Token Stores in the Policy Studio tree, and select Add Access Token Store.
-
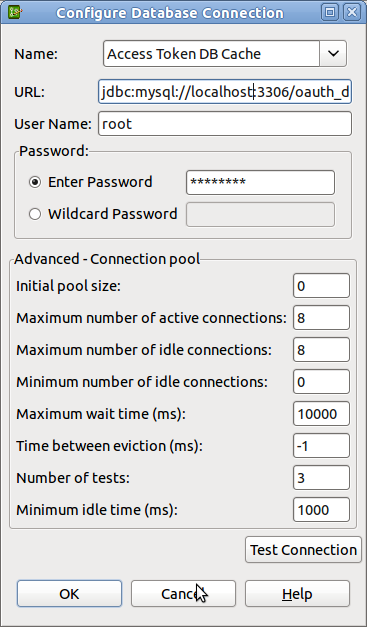
This displays the dialog that enables you to choose the persistence type. Select Store in a database, and select the browse button to display a database configuration dialog.
-
Complete the database configuration details. The following example uses a MySQL database, and a database instance named
oauth_db. For more details, see Database Connection.
 |
|
Note |
|---|---|
|
On first use of the database for caching access tokens, the following tables are
created automatically: |
For more details, see the section called “Database-Backed API Manager”.
Caching Tokens using EHCache
-
Right-click Access Token Stores in the Policy Studio tree, and select Add Access Token Store.
-
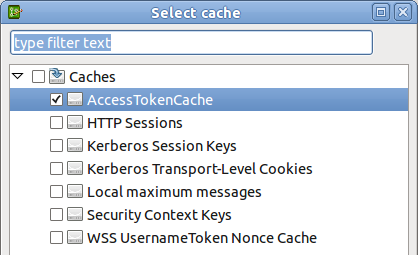
This displays a dialog that enables you to choose the persistence type. Select Store in a cache, and select the browse button to display the cache configuration dialog.
-
Add a new cache (for example,
AccessTokenCache). For more details, see Global Caches.
 |
This section desribes a set of commands that enables you to use the API Manager REST API to manage client applications.
Register a Client Application
You can register client applications using a command line utility such as
curl. For example, to register a new client application, use the
following command:
curl -v --header "Content-Type:application/json" -X POST -d @newobj.json
  --user admin:changeme
where newobj.json is something like the following:
{
      "storeId": "ClientApplicationRegistry",
      "typeId": "AppDetails",
      "objects": [
          {
             "enabled": true,
             "logo": "http://localhost:8090/logos/logo.gif",
             "scopes": [
                 "https://localhost:8090/auth/userinfo.email",
                 "https://localhost:8090/auth/userinfo.profile"
               ],
             "contactPhone": "012345678",
             "contactEmail": "sample@sampleapp.com",
             "description": "Oracle Sample Confidential Application",
             "name": "Oracle Sample Confidential App",
             "clientID": "SampleConfidentialApp",
             "clientSecret": "NjgwOGQ0YjYtZWYwOS00YjBkLThmMjgtM2IwNWRhOWM0OGVj",
             "redirectURLs": [
                 "http://localhost:8080/auth/redirect.html"
               ],
             "base64EncodedCert":
		     "-----BEGIN CERTIFICATE-----
	         MIIDpTCCAw6gAwIBAgIJAKqGffYjCdSiMA0GCSqGSIb3DQEBBQUAMIGUMQswCQYD
			 .....
			 -----END CERTIFICATE-----\n",
             "clientType": "confidential"
           }
       ]
   }
Retrieve all Registered Clients
Use the following command:
curl --user admin:changeme | python -mjson.tool
Viewing a Registered Client
This is similar to retrieving all registered clients except you are passing in a
registered client_id (in this example,
95574d66-f115-4c9b-b93e-526d383b4b6a). Use the following command:
curl --user admin:changeme
  https://localhost:8089/api/kps/ClientApplicationRegistry/
  95574d66-f115-4c9b-b93e-526d383b4b6a | python -mjson.tool
To access one of the preregistered clients, you can call the following:
curl --user admin:changeme
  https://localhost:8089/api/kps/ClientApplicationRegistry/
  SampleConfidentialApp | python -mjson.tool
Removing a Registered Client
To delete a client, pass in the client ID at the end of the request. For example:
curl -v -X DELETE --user admin:changeme
  https://localhost:8089/api/kps/ClientApplicationRegistry/
  95574d66-f115-4c9b-b93e-526d383b4b6a
Verify Client Deletion is Successful
This is the same request as viewing a register client application, but this time the API Manager KPS returns a JSON error. For exmaple:
curl --user admin:changeme
  https://localhost:8089/api/kps/ClientApplicationRegistry/
  95574d66-f115-4c9b-b93e-526d383b4b6a | python -mjson.tool
The following JSON error is returned:
{
    "errors": [
        {
            "code": 102,
            "message": "Unexpected exception:
              com.vordel.kps.ObjectNotFound : id:
              95574d66-f115-4c9b-b93e-526d383b4b6a"
         }
    ]
}
Disabling a Client Application
curl -v --header "Content-Type:application/json" -X PUT -d '{"enabled" : false}'
  --user admin:changeme https://localhost:8089/api/kps/ClientApplicationRegistry/
    c5659b84-8524-4592-aed8-c7fa77c8eb26
Alternatively, you can upload a full update by passing in a file using
-d @updatedObject.json.
The Oracle API Manager KPS can also be backed by a database. For more details,
see Key Property Stores. The default file-based KPS that ships in the
samples directory of the API Gateway is displayed as follows in the Policy Studio:
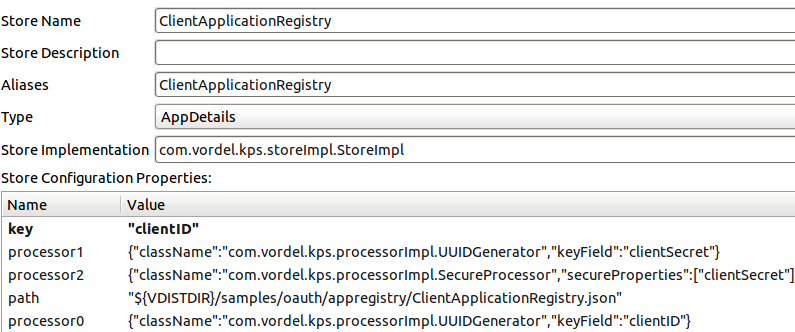
To change this definition to use a database for storage, add the following property
name:value pairs:
-
Database username:
username: root -
Database password:
password: password -
Database URL:
url: jdbc:mysql://localhost:3306/oauth_db -
Database driver:
driver: com.mysql.jdbc.Driver
|
Note |
|---|---|
|
Alternatively, you can set the |
For details on adding KPS properties in the Policy Studio, see Key Property Stores.
This section shows the OAuth database schemas displayed by example mysql commands.
oauth_access_token schema
The following shows the result from the show columns from auth_access_token;
command:
    +---------------+--------------+------+-----+---------+-------+
    | Field         | Type         | Null | Key | Default | Extra |
    +---------------+--------------+------+-----+---------+-------+
    | id            | varchar(2    | NO   | PRI | NULL    |       |
    | auth_request  | blob         | NO   |     | NULL    |       |
    | client_id     | varchar(255  | NO   |     | NULL    |       |
    | expiry_ti     | datetime     | NO   |     | NULL    |       |
    | token         | blob         | NO   |     | NULL    |       |
    | refresh_token | varchar(2    | YES  |     | NULL    |       |
    | user_auth     | varchar(255  | NO   |     | NULL    |       |
    | user_name     | varchar(255  | NO   |     | NULL    |       |
    +---------------+--------------+------+-----+---------+-------+
oauth_refresh_token schema
The following shows the result from the show columns from oauth_refresh_token;
command:
    +--------------+--------------+------+-----+---------+-------+
    | Field        | Type         | Null | Key | Default | Extra |
    +--------------+--------------+------+-----+---------+-------+
    | token_id     | varchar(255) | NO   | PRI | NULL    |       |
    | auth_request | blob         | NO   |     | NULL    |       |
    | expiry_time  | datetime     | NO   |     | NUL     |       |
    | token        | blob         | NO   |     | NULL    |       |
    | user_name    | varchar(255) | NO   |     | NULL    |       |
    +--------------+--------------+------+-----+---------+-------+
oauth_refresh_token schema
The following shows the result from the show columns from oauth_refresh_token;
command:
    +---------------+--------------+------+-----+---------+-------+
    | Field         | Type         | Null | Key | Default | Extra |
    +---------------+--------------+------+-----+---------+-------+
    | id            | varchar(255) | NO   | PRI | NULL    |       |
    | authorization | blob         | NO   |     | NULL    |       |
    | expiry_time   | datetime     | NO   |     | NULL    |       |
    +---------------+--------------+------+-----+---------+-------+
The following example openssl command shows generating a client
application certificate and private key:
$ openssl req -x509 -nodes -days 365 -newkey rsa:1024 -keyout mykey.pem
-out mycert.pem
Generating a 1024 bit RSA private key
...................................................................
...........++++++
.....++++++
writing new private key to 'mykey.pem'
-----
You are about to be asked to enter information that will be incorporated
into your certificate request.
What you are about to enter is what is called a Distinguished Name or a DN.
There are quite a few fields but you can leave some blank.
For some fields there will be a default value.
If you enter '.', the field will be left blank.
-----
Country Name (2 letter code) [AU]:US
State or Province Name (full name) [Some-State]:MA
Locality Name (eg, city) []:Newton
Organization Name (eg, company) [Internet Widgits Pty Ltd]:Oracle
Organizational Unit Name (eg, section) []:API Gateway
Common Name (eg, YOUR name) []:SampleConfidentialApp
Email Address []:support@widgits.com
Most of the OAuth 2.0 policy filters in the API Gateway generate message attributes that can be queried further using API Gateway selector syntax. The message attributes generated by the OAuth filters are as follows:
-
accesstoken -
accesstoken.authn -
authzcode -
authentication.subject.id -
oauth.client.details
accesstoken methods
The following methods are available to call on the accesstoken
message attribute:
${accesstoken.getValue()}
${accesstoken.getExpiration()}
${accesstoken.getExpiresIn()}
${accesstoken.isExpired()}
${accesstoken.getTokenType()}
${accesstoken.getRefreshToken()}
${accesstoken.getOAuth2RefreshToken().getValue()}
${accesstoken.getOAuth2RefreshToken().getExpiration()}
${accesstoken.getOAuth2RefreshToken().getExpiresIn()}
${accesstoken.getOAuth2RefreshToken().hasExpired()}
${accesstoken.hasRefresh()}
${accesstoken.getScope()}
${accesstoken.getAdditionalInformation()}
The following example shows output from querying each of the accesstoken
methods:
so0HlJYASrnXqn2fL2VWgiunaLfSBhWv6W7JMbmOa131HoQzZB1rNJ
Fri Oct 05 17:16:54 IST 2012
3599
false
Bearer
xif9oNHi83N4ETQLQxmSGoqfu9dKcRcFmBkxTkbc6yHDfK
xif9oNHi83N4ETQLQxmSGoqfu9dKcRcFmBkxTkbc6yHDfK
Sat Oct 06 04:16:54 IST 2012
43199
false
true
https://localhost:8090/auth/userinfo.email
{department=engineering}
accesstoken.authn methods
The following methods are available to call on the accesstoken.authn
message attribute:
${accesstoken.authn.getUserAuthentication()}
${accesstoken.authn.getAuthorizationRequest().getScope()}
${accesstoken.authn.getAuthorizationRequest().getClientId()}
${accesstoken.authn.getAuthorizationRequest().getState()}
${accesstoken.authn.getAuthorizationRequest().getRedirectUri()}
${accesstoken.authn.getAuthorizationRequest().getParameters()}
The following example shows output from querying each of the accesstoken.authn
methods:
admin
[https://localhost:8090/auth/userinfo.email]
SampleConfidentialApp
343dqak32ksla
https://localhost/oauth_callback
{client_secret=6808d4b6-ef09-4b0d-8f28-3b05da9c48ec,
  scope=https://localhost:8090/auth/userinfo.email, grant_type=authorization_code,
  redirect_uri=https://localhost/oauth_callback, state=null,
  code=FOT4nudbglQouujRl8oH3EOMzaOlQP, client_id=SampleConfidentialApp}
authzcode methods
The following methods are available to call on the authzcode message
attribute:
${authzcode.getCode()}
${authzcode.getState()}
${authzcode.getApplicationName()}
${authzcode.getExpiration()}
${authzcode.getExpiresIn()}
${authzcode.getRedirectURI()}
${authzcode.getScopes()}
${authzcode.getUserIdentity()}
The following example shows output from querying each of the authzcode
methods:
F8aHby7zctNRknmWlp3voe61H20Md1
sds12dsd3343ddsd
SampleConfidentialApp
Fri Oct 05 15:47:39 IST 2012
599 (expiry in secs)
https://localhost/oauth_callback
[https://localhost:8090/auth/userinfo.email]
admin
oauth.client.details methods
The following methods are available to call on the oauth.client.details
message attribute:
${authzcode.getCode()}
${authzcode.getState()}
${authzcode.getApplicationName()}
${authzcode.getExpiration()}
${authzcode.getExpiresIn()}
${authzcode.getRedirectURI()}
${authzcode.getScopes()}
${authzcode.getUserIdentity()}
The following example shows output from querying each of the oauth.client.details
methods:
F8aHby7zctNRknmWlp3voe61H20Md1
sds12dsd3343ddsd
SampleConfidentialApp
Fri Oct 05 15:47:39 IST 2012
599 (expiry in secs)
https://localhost/oauth_callback
[https://localhost:8090/auth/userinfo.email]
admin
Example Use
If you add additional access token parameters to the OAuth 2.0 Access Token Info filter, you can return a lot of additional information about the token. For example:
{
   "audience" : "SampleConfidentialApp",
   "user_id" : "admin",
   "scope" : "https://localhost:8090/auth/userinfo.email",
   "expires_in" : 3567,
   "Access Token Expiry Date" : "Wed Aug 15 11:19:19 IST 2012",
   "Authentication parameters" : "{username=admin,
    client_secret=6808d4b6-ef09-4b0d-8f28-3b05da9c48ec,
    scope=https://localhost:8090/auth/userinfo.email, grant_type=password,
    redirect_uri=null, state=null, client_id=SampleConfidentialApp,
    password=changeme}",
   "Access Token Type:" : "Bearer"
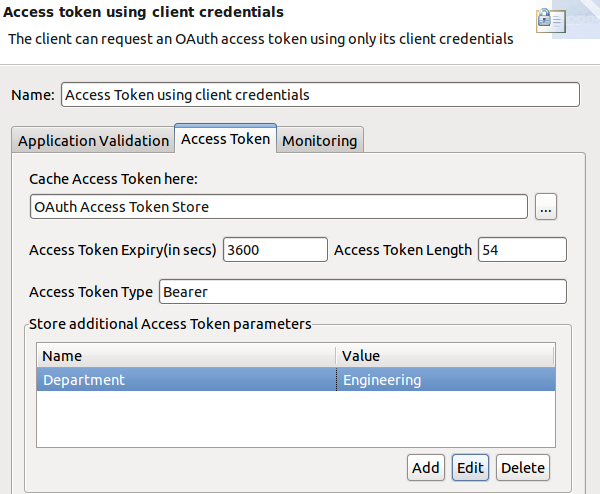
You also have the added flexibility to add extra name/value pair settings to access tokens
upon generation.The OAuth 2.0 access token generation filters provide an option to store
additional parameters for an access token. For example, if you add the name/value pair
Department/Engineering to the Client Credentials filter:
You can then update the Access Token Info filter to add a name/value pair using a selector to get the following value:
Department/${accesstoken.getAdditionalInformation().get("Department")}For example:
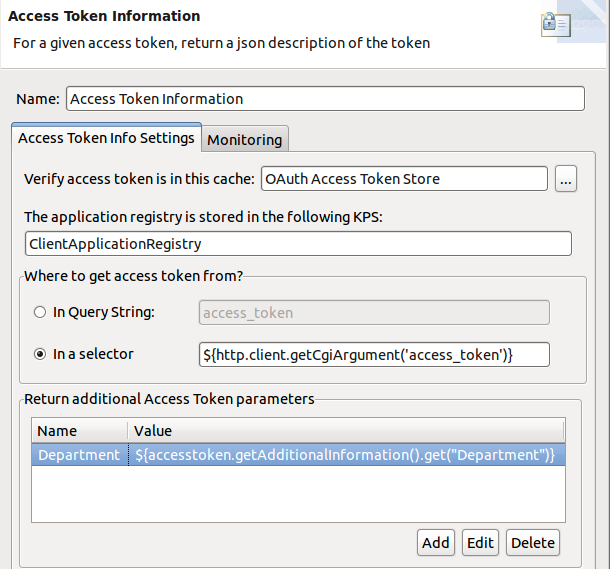
Then the JSON response is as follows:
{
  "audience" : "SampleConfidentialApp",
  "user_id" : "SampleConfidentialApp",
  "scope" : "https://localhost:8090/auth/userinfo.email",
  "expires_in" : 3583,
  "Access Token Type:" : "Bearer",
  "Authentication parameters" :
  "{client_secret=6808d4b6-ef09-4b0d-8f28-3b05da9c48ec,
    scope=https://localhost:8090/auth/userinfo.email, grant_type=client_credentials,
    redirect_uri=null, state=null, client_id=SampleConfidentialApp}",
  "Department" : "Engineering",
  "Access Token Expiry Date" : "Wed Aug 15 12:10:57 IST 2012"
You can also use API Gateway selector syntax when storing additional information with the token. For more details on selectors, see Selecting Configuration Values at Runtime.
