13 Working with Reports
This chapter provides information about how to work with the different Oracle Privileged Account Manager reports.
This chapter includes the following sections:
Note:
You can manage Oracle Privileged Account Manager reports from the command line or by using Oracle Privileged Account Manager's RESTful interface.
-
For information about using the Oracle Privileged Account Manager Command Line Tool (CLI), refer to Appendix A, "Working with the Command Line Tool."
-
For information about using the Oracle Privileged Account Manager RESTful interface, refer to Appendix B, "Working with Oracle Privileged Account Manager's RESTful Interface."
13.1 Viewing a Report
Oracle Privileged Account Manager reports are real-time reports that provide information about the current status of accounts and targets being managed by Oracle Privileged Account Manager.
Note:
You must be an Oracle Privileged Account Manager administrator with the Security Auditor Admin Role to open and review Oracle Privileged Account Manager reports.
To view a report, expand the Reports accordion and click a Report link. The report information is displayed in the Reports page on the right.
13.2 Working with Deployment Reports
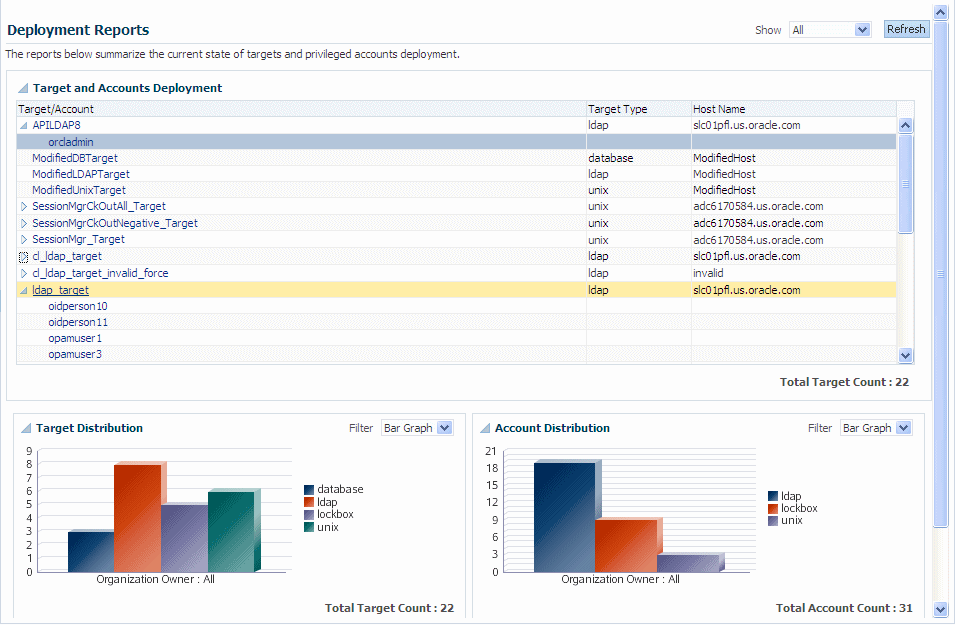
Select the Deployment Reports link to view information about how targets and privileged accounts are currently deployed. Figure 13-1 shows a sample report.
Information about the deployment is organized into the following portlets:
-
Target and Accounts Deployment table. Provides a list of targets, including their target type and host names. Expand the arrow icon next to a target name to view the accounts associated with that target.
Tip:
You can click a link in the Target/Account column to open the configuration page for that target or account.
-
Target Distribution. This portlet illustrates how targets are distributed within your deployment.
-
Account Distribution. This portlet illustrates how accounts are distributed within your deployment, by Organization.
You can use the Show and Filter drop-down menus to control how the report content is displayed.
-
Use the Show menu to view all targets or to just view a particular target.
-
Use the Filter menu to view the report information as a bar graph, pie chart, or in tabular format.
13.3 Working with Usage Reports
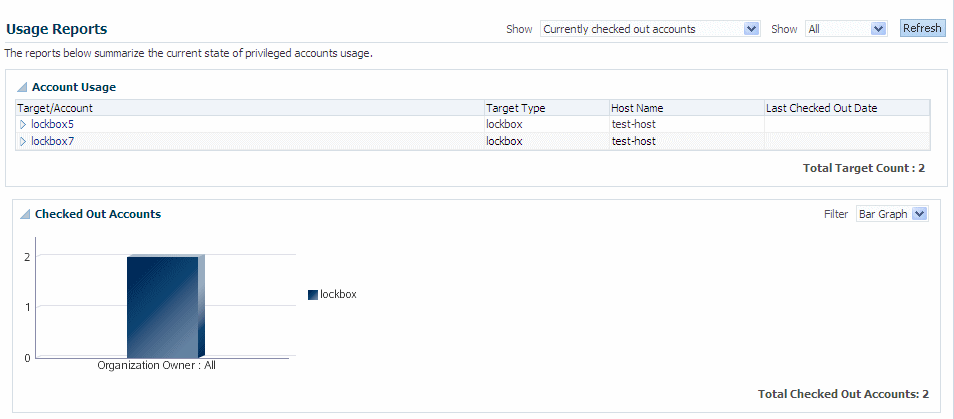
Select the Usage Report link to view information about how privileged accounts are currently being used in your deployment.
This usage information is organized into the following portlets:
-
Account Usage. This portlet provides a list of targets and accounts, including the target types, host names, and the last checked out date.
-
Expand the arrow icon next to a target name to view the accounts associated with that target.
-
Use the Show menus to constrain the view to just currently checked out accounts or accounts that were checked out in the last hour, day, or week. Also you can view all accounts or a subset of accounts.
-
-
Checked Out Accounts. This portlet illustrates which accounts are checked out within your deployment. You can use the Filter menu to display the report information as a bar graph, pie chart, or in tabular format.
13.4 Working with Failure Reports
Select the Failure Report link to view information about the current state of target and account failures.
Information about target or account failures is organized into the following portlets:
-
Targets and Accounts Failures. This portlet provides a list of targets, the target status, last error message, and the last failure date. Expand the arrow icon next to a target to view the accounts associated with that target.
-
Target Failures. This portlet illustrates the target failures within your deployment.
-
Account Failures. This portlet illustrates the account failures within your deployment.
You can use the Show and Filter drop-down menus to control how the report content is displayed.
-
Use the Show menu to view the errors that occurred during the last 24 or 48 hours, the last week, or the last 30 days.
-
Use the Filter menu to view the report information as a bar graph, pie chart, or in tabular format.
13.5 Working with Checkout History Reports
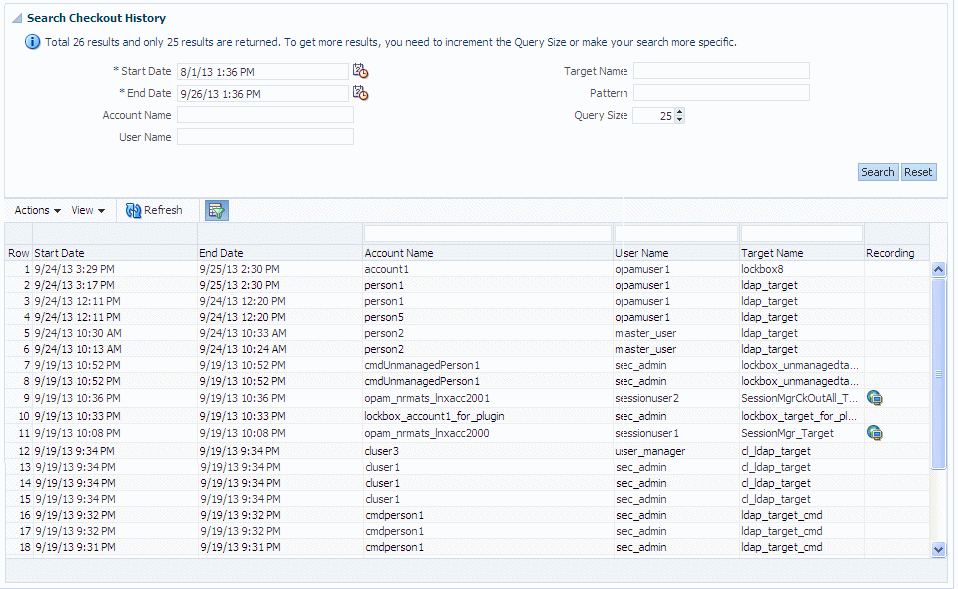
Use the Checkout History report to view information about the account checkouts performed over a specified period of time. This report consists of the following information:
-
Start Date and End Date: Date that the account was checked out and checked back in, respectively.
-
Account Name: Name of the checked out account.
-
User Name: Name of the user who checked out the account.
-
Target Name: Name of the target associated with the account.
-
Recording: Indicates a recording (or transcript) of the user's actions during the checkout is available for viewing.
Note:
Only an administrator can view session recordings. Refer to Section 8.7, "Viewing a Session Recording" for more information.
To view a Checkout History report,
-
Select the Checkout History Report link from the Reports accordion to open the Checkout History page.
-
Use the Search Checkout History portlet to configure search parameters:
-
You must specify a Start Date and an End Date range in which to search for checkouts. Type the date and time into the blank fields or use the Calendar icons.
-
Enter information into one or more of the Account Name, User Name, Target Name, or Pattern fields.
Note:
Use the Pattern field to search for a string in the recording of a checkout event.
-
Enter a value into the Query field to limit the number of returned results.
-
-
Click Search and the results will display in the table. For example,
Note:
Click the Recording icon (
 ) to open a transcript of the user's actions during the checkout.


