3 Getting Started
This chapter describes how to get started using Oracle Entitlements Server, including information about how to use and navigate the graphical interface. It contains the following sections.
-
Section 3.5, "Upgrading from Oracle Entitlements Server Basic"
-
Section 3.6, "Accessing Oracle Entitlements Server Examples"
3.1 Before You Begin
Before getting started using Oracle Entitlements Server, the following tasks must be done. They include installing the product and its components (for example, remote Security Modules), and configuring features like high availability and Secure Sockets Layer (SSL), if applicable. After finishing with these tasks, you can begin with Section 3.2, "Understanding The Graphical Interface."
-
Install and configure Oracle Entitlements Server according to the instructions in Oracle Fusion Middleware Installation Guide for Oracle Identity and Access Management.
-
The policy store managed by Oracle Entitlements Server must be a relational database.
-
The identity store associated with Oracle Entitlements Server must be an LDAP-based directory.
-
-
After installation, the Oracle Entitlements Server identity store is associated with the WebLogic Server embedded LDAP directory. While this embedded LDAP directory is fine for development purposes, a supported LDAP directory must be used in production. The following procedure reconfigures the default identity store settings. More specific information on configuring LDAP authentication providers can be found in the Oracle Fusion Middleware Securing Oracle WebLogic Server.
-
Launch the WebLogic Server console.
-
Click Security Realms.
-
Click the settings for myrealm.
-
Click the Provider tab.
-
Click the Authentication tab as displayed in Figure 3-1.
Figure 3-1 The Authentication Provider Tab
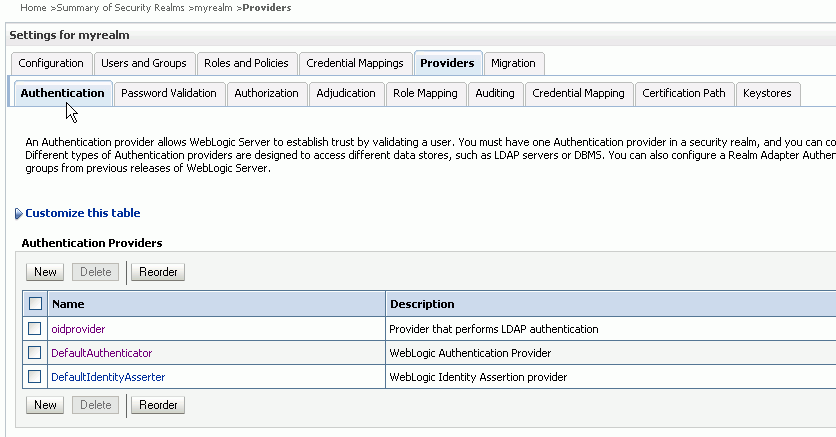
Description of "Figure 3-1 The Authentication Provider Tab"
-
Click the New button to create a new provider.
-
Enter a name and select the type of LDAP-based directory.
For example,
OracleInternetDirectoryAuthenticator. -
Configure the provider-specific attributes of the LDAP-based directory.
This might include the host name and port, credentials, group search base, user search base and the like.
-
Save the provider information.
-
Change the order of the providers so that the LDAP-based directory is first.
-
Click the new provider name to configure it.
-
Click the Configuration tab.
-
Click the Common tab.
-
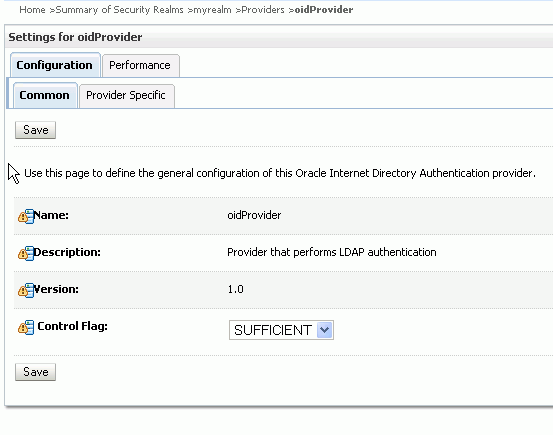
Set the Control Flag to SUFFICIENT and click Save as displayed in Figure 3-2.
-
Click the Provider Specific tab.
-
Enter the LDAP configuration information for your identity store and click Save.
-
-
Return to the Providers tab.
-
Click DefaultAuthenticator to change its configuration.
-
Set the Control Flag to SUFFICIENT and click Save as displayed in Figure 3-3.
Figure 3-3 DefaultAuthenticator Tab in WebLogic Server Console
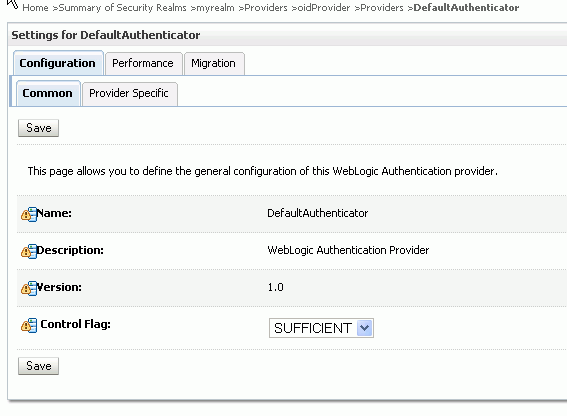
Description of "Figure 3-3 DefaultAuthenticator Tab in WebLogic Server Console"
-
Restart WebLogic Server.
-
-
For information about configuring high availability for Oracle Entitlements Server, see Oracle Fusion Middleware High Availability Guide
-
For information regarding the authentication of users, see Oracle Fusion Middleware Securing Oracle WebLogic Server.
Note:
Oracle Entitlements Server is not involved in the authentication of users. This is normally done as part of the WebLogic Server security realm configuration. -
For information about configuring one-way SSL for connections that Oracle Entitlements Server establishes with the policy store, the identity store, and the database, see Oracle Fusion Middleware Securing Oracle WebLogic Server. Access to Oracle Entitlements Server using a browser can also be secured through one-way SSL. These settings are similar to those of any other application running in the Oracle WebLogic Server.
-
Refer to the system requirements and certification documentation for information about hardware and software requirements, platforms, databases, and other information.
-
The system requirements document covers information such as hardware and software requirements, minimum disk space and memory requirements, and required system libraries, packages, or patches:
http://www.oracle.com/technetwork/middleware/ias/downloads/fusion-requirements-100147.html -
The certification document covers supported installation types, platforms, operating systems, databases, JDKs, and third-party products:
http://www.oracle.com/technetwork/middleware/ias/downloads/fusion-certification-100350.html
These documents are available on Oracle Technology Network (OTN).
-
3.2 Understanding The Graphical Interface
Oracle Authorization Policy Manager is a sub-component of Oracle Entitlements Server that is the graphical management tool for administrators. It is a browser-based interface for managing policies and related policy objects. The following sections contain information to help understand the Authorization Policy Manager Administration Console.
-
Section 3.2.1, "Assigning Oracle Entitlements Server Administrators"
-
Section 3.2.4, "Displaying Oracle Platform Security Services Application Grants"
3.2.1 Assigning Oracle Entitlements Server Administrators
Only users with sufficient privileges can log in to the Oracle Entitlements Server Administration Console or use administrative command-line tools such as the WebLogic Scripting Tool (WLST). An Oracle Entitlements Server system-level Administrator Role named SystemAdmin is created during installation and is mapped to the WebLogic Server administrator user (weblogic). The password is set during installation. SystemAdmin has extensive privileges that includes the rights to create additional Administrative Roles and delegating administrative rights to others.
Note:
At first log in to the Oracle Entitlements Server Administration Console,SystemAdmin must use the credentials set during installation. The identifier and password can be changed by using your identity store's management tool.You can create separate administrative users with different access rights for administering Oracle Entitlements Server and your environment. For more information, see Section 11.6, "Managing System Administrators Using Administrator Roles.".
3.2.2 Using the Identity Store
Oracle Entitlements Server administrator and user identities are stored in an identity store, typically an LDAP directory server. Users and external roles defined in the identity store are read-only; Oracle Entitlements Server reads and displays the data but cannot perform management operations on it. Management of the identity data is accomplished using the identity store's tools or an identity management product such as Oracle Identity Manager.
Note:
After installation, the Oracle Entitlements Server identity store is associated with the WebLogic Server embedded LDAP directory. See Section 3.1, "Before You Begin" for the procedure to reconfigure Oracle Entitlements Server to use a supported LDAP directory.Oracle Entitlements Server will use the Oracle Platform Security Services (OPSS) Identity Store Service to allow for the configuration and support of multiple identity stores. The Identity Store Service allows access to, and management of, multiple identity types (users, groups, roles) and is extensible to support new identity types. For information on the Identity Store Service, see the Oracle Fusion Middleware Application Security Guide. See Section 10.3, "Configuring Identity Directory Service Profiles" for details specific to Oracle Entitlements Server.
3.2.3 Accessing the Policy Store
The Policy Store used to maintain security objects and defined policies must be a relational database. For links regarding hardware requirements, see Section 3.1, "Before You Begin." Basic information about the Policy Store can be found in the Oracle Fusion Middleware Application Security Guide.
3.2.4 Displaying Oracle Platform Security Services Application Grants
The Administration Console displays advanced Authorization Policies created using Oracle Entitlements Server as well as the simpler Application Grants (application policies) created using Oracle Platform Security Services (OPSS). The OPSS Application Grants can be displayed for viewing, modification and deletion only. When created using OPSS, Application Grants are defined with a principal and target only. Figure 3-4 is a screenshot of the Oracle Entitlements Server screen when an OPSS Application Grant is displayed using one of the search functions.
Figure 3-4 OPSS Application Grants Display Screen
Description of "Figure 3-4 OPSS Application Grants Display Screen"
Note the Name, Display Name and Description fields are not displayed as they would be if the Authorization Policy was created using Oracle Entitlements Server. OPSS Application Grants can only be removed or modified using Oracle Entitlements Server; they cannot be created using Oracle Entitlements Server. For more information on Application Grants, see the Oracle Fusion Middleware Application Security Guide.
3.3 Accessing the Administration Console
The following sections contain information on the Authorization Policy Manager graphical interface (also referred to as the Administration Console).
3.3.1 Signing In to the Administration Console
Follow this procedure to sign in to the Authorization Policy Manager Administration Console.
-
Enter the Authorization Policy Manager Administration Console URL in the address bar of your browser. For example:
https://hostname:port/apm/where:
-
httpsrepresents the Hypertext Transfer Protocol (HTTP) with Secure Socket Layer (SSL) enabled to encrypt and decrypt user page requests and the pages returned by the Web server. -
hostname refers to the fully qualified domain name of the computer hosting the Oracle Authorization Policy Manager Administration Console.
-
port refers to the designated bind port for the Authorization Policy Manager Administration Console. (This is the same as the bind port for the WebLogic Server Administration Console.)
-
/apm/refers to the context-root of the Authorization Policy Manager application which redirects to the login page.
-
-
Enter the System Administrator credentials.
The default system administrator identifier is
weblogic. The password is the same one supplied during installation. Figure 3-5 is a screenshot of the Sign In page.Figure 3-5 Administration Console Sign In Page
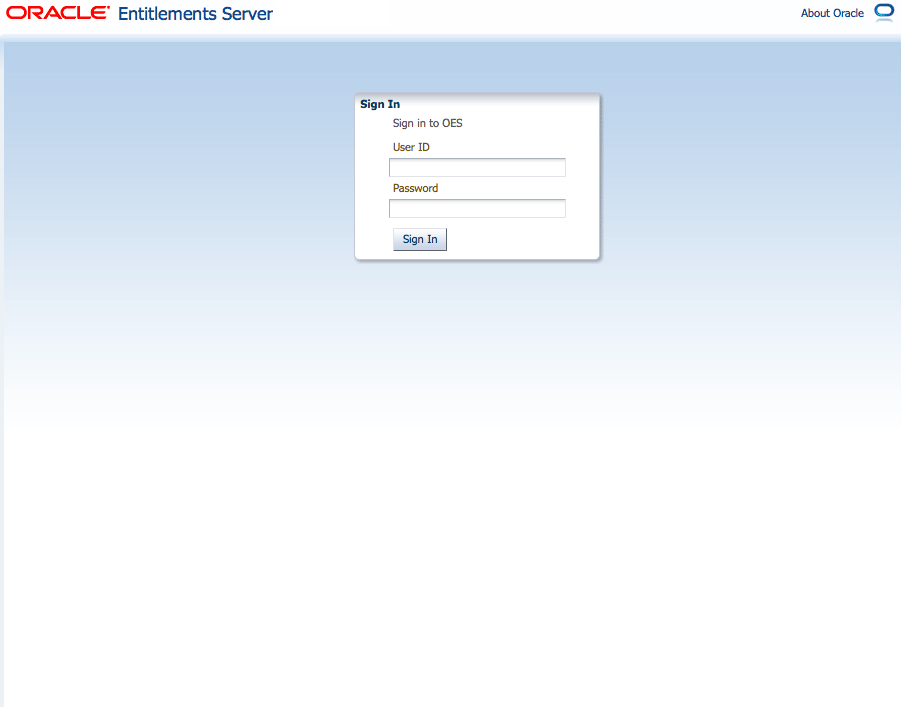
Description of "Figure 3-5 Administration Console Sign In Page"
-
Click Sign In.
3.3.2 Signing Out of the Administration Console
Follow this procedure to sign out of the Authorization Policy Manager Administration Console.
-
Click the Sign Out link located in the upper right corner of the Administration Console.
Figure 3-6 is a screenshot of the Sign Out link.
Figure 3-6 Administration Console Sign Out Link

Description of "Figure 3-6 Administration Console Sign Out Link"
-
Close the browser window.
3.4 Navigating the Administration Console
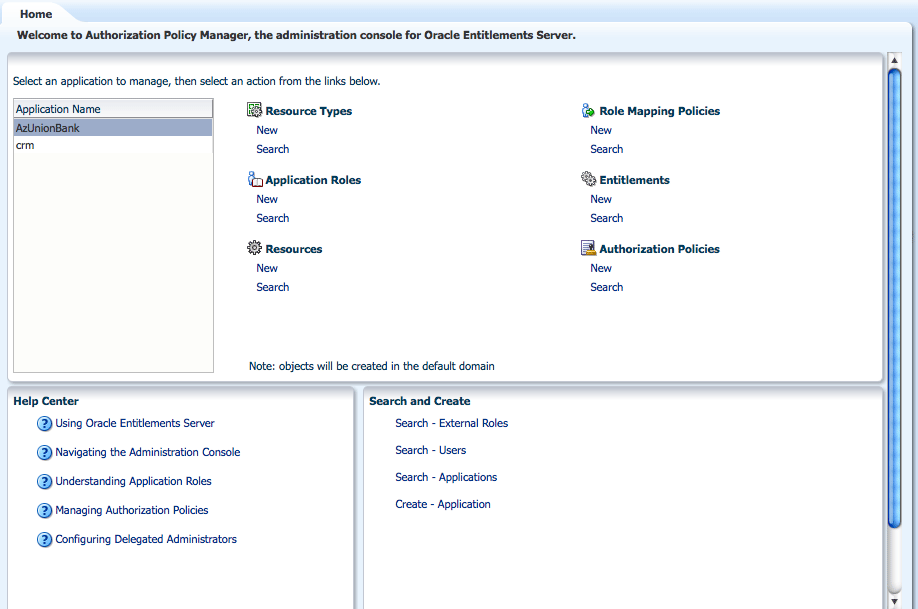
After a successful log in, the Authorization Policy Manager Administration Console is displayed with the Authorization Management Tab active. The Navigation Panel is on the left side and the Home tab is displayed on the right side. Objects selected in the Navigation Panel are opened and displayed in new tabs next to the Home tab on the right. Figure 3-7 is a screenshot of the Administration Console after an administrative user has successfully signed in.
Figure 3-7 Oracle Entitlements Server Administration Console
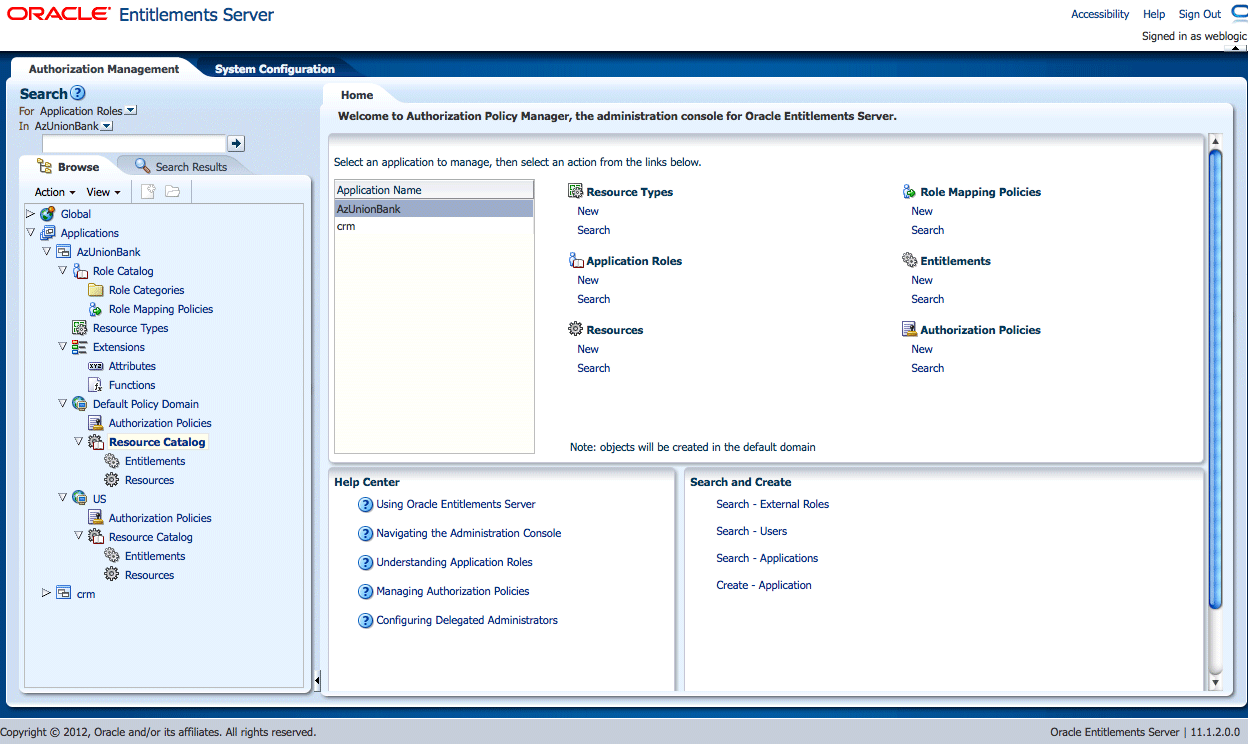
Description of "Figure 3-7 Oracle Entitlements Server Administration Console "
The following list contains descriptions of the top-level items displayed in Figure 3-7. See the appropriate links for more information.
3.4.1 Understanding the Main Tabs
See the following sections for information on the organizational tabs used in the Administration Console. Each tab is comprised of a Navigation Panel and Home area.
3.4.1.1 Authorization Management Tab
The Authorization Management tab is used to search and manage policy objects. This tab is active upon successful log in to the Administration Console. Figure 3-8 is a screenshot of the Authorization Management tab.

Under Authorization Management, the left side is the Navigation Panel and the right side is Home. The Home display changes based on what is selected from the Navigation Panel. For more information, see Section 3.4.2, "Using The Navigation Panel" and Section 3.4.3, "Using the Home Tab."
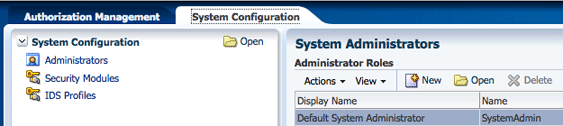
3.4.1.2 System Configuration Tab
The System Configuration tab is used to manage administrative and system type objects for the Oracle Entitlements Server deployment. Figure 3-9 is a screenshot of an active System Configuration tab. The object selected in the Navigation Panel is displayed using tabs in the Home area.
The following tasks are performed under System Configuration:
-
Creating Security Module definitions and binding them to Applications
-
Managing system administrators (for example, creating additional system administrator roles, assigning users to system administrator roles, and assigning rights to system administrator roles)
-
Managing Identity Store profiles
For more information, see Chapter 10, "Managing System Configurations".
3.4.2 Using The Navigation Panel
The Navigation Panel is used to find security objects by browsing the Global or Applications information trees, or by conducting a simple search. It lists all Global and Application policy objects in a navigatable tree. You can browse the tree or display objects as Search Results based on defined search criteria. Figure 3-7 is a screenshot that displays the Navigation Panel with its nodes collapsed. Figure 3-10 displays the Navigation Panel with its nodes expanded and many policy objects in view.
Figure 3-10 Navigation Panel Browse Tab With Nodes Expanded
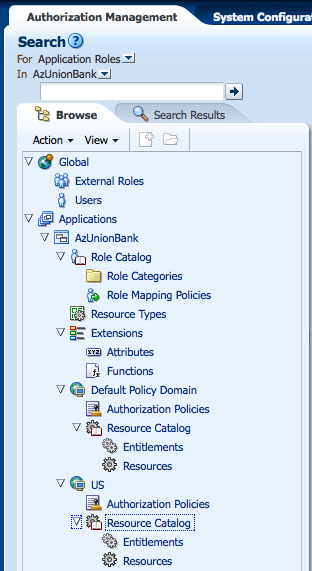
Description of "Figure 3-10 Navigation Panel Browse Tab With Nodes Expanded"
The Navigation Panel contains, from top to bottom, the following elements:
-
A pull-down list to select the policy object for a simple search. For more information, see Section 5.2, "Finding Objects with a Simple Search."
-
A pull-down list to select the scope of a simple search. For more information, see Section 5.2, "Finding Objects with a Simple Search."
-
A text box to enter the simple search string. The string is compared against both the Name and Display Name of policy objects; those that match are displayed in the Search Results tab.
-
The Browse tab displays the following expandable and collapsible nodes:
-
The Global node collects global objects such as external roles and users.
-
The Applications node contains one or more Applications being managed by the administrator that is logged in. (Only Applications which the logged in user is authorized to access are displayed.) From any of those displayed, the administrator can access application-specific policy objects such as resource types, entitlements, resources, policies, and roles. For more information, see Chapter 10, "Managing System Configurations".
-
-
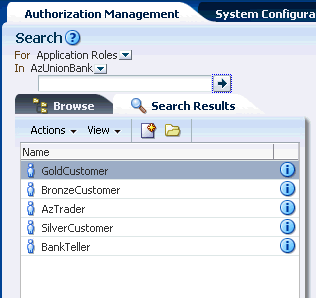
The Search Results tab displays the results of the last simple search as seen in Figure 3-11.
-
Action and View drop downs to select operations on the chosen policy object.
From the Navigation Panel, there are two methods for displaying the New and Open options comprised in the Actions drop-down list.
-
Locate the desired Application, expand the node, and select the desired object. Click the Actions drop-down menu and select New or Open.
-
Locate the desired Application, expand the node, right-click the desired object and select New or Open.
Select New to create a new object of the same type and select Open to display a search tab in the Home area. Double-clicking an object from the node also opens a Search tab in the Home area.
3.4.3 Using the Home Tab
The Home tab displays on the right side of the Navigation Panel and contains quick access links to New and Search screens for the most commonly used policy objects. As displayed in Figure 3-12, the Home tab of the Administration Console is divided into the following sections.
-
The Application area is the upper region of the Home tab. The Application Name pane displays all applications available to the logged in user. To the right of this pane are links to screens for performing common operations such as creating new policy objects (entitlements, resources, resource types, application roles, and authorization policies) or searching defined policy objects.
-
The Global section is the lower right region of the Home tab. This section is for objects shared across all applications and includes external role search.
-
The Entitlements Resource Center section is the lower left region of the Home tab. It contains links to information regarding the most commonly used procedures.
3.4.4 Accessing Help
To get more information while using the Administration Console, click the Help link located in the upper right corner (as seen in Figure 3-6). A separate window opens. From this window you can access both the online help and an embedded version of this book in HTML. After the window displays, select either Oracle Entitlements Server Administration Console Online Help or Administrator's Guide for Oracle Entitlements Server from the drop-down Book list. The help topics link to the corresponding section of the embedded book as do the links in the book's Table of Contents.
3.5 Upgrading from Oracle Entitlements Server Basic
Oracle Entitlements Server can be licensed separately from other Oracle products with an agreement that defines usage restrictions. Oracle Entitlements Server Basic replaces the embedded authorization engine within Oracle Platform Security Services (OPSS) and is used to define, enforce and audit basic Role Based Access Control and Java/JAAS permission based authorization policies. A Basic license allows the use of a limited set of features provided by Oracle Entitlements Server and the Oracle Entitlements Server Security Modules, and is included and available for use only with Oracle products that list this component in their respective licensing documentation. More information is in the Oracle Fusion Middleware Licensing Information.
In the simplest scenario, nothing other than licensed Oracle Fusion Middleware or Fusion Applications technologies that include Oracle Entitlements Server Basic need be installed. Oracle Fusion Middleware products that include Oracle Entitlements Server Basic contain:
-
The Oracle Entitlements Server authorization engine (Policy Decision Point)
-
A default policy store (not supported for production environments) is configured based on the
system-jazn.xmlfile. You must configure either the Oracle Relational Database Management System or Oracle Internet Directory based policy store for production environments.
The Oracle Entitlements Server Administration Console (Authorization Policy Manager) can optionally be installed to provide centralized policy management.
3.5.1 Changing From Basic to Advanced Policy Authorization
When Authorization Policy Manager is installed for Oracle Fusion Applications, it is configured to allow for Oracle Entitlements Server Basic authorization. Basic authorization is based on the permissions policy model in which permissions are granted to users, groups, and code sources. For users and groups, the permissions determine what a user or a group member is allowed to access. For code sources, they determine what actions the code is allowed to perform. Advanced authorization allows for the use of more fine-grained policy objects including Role Mapping Policies and hierarchical resources.
Use the following procedure to reconfigure Authorization Policy Manager for advanced authorization. It assumes WebLogic Server is installed and the Fusion Middleware home directory is available.
-
Change to the Fusion Middleware home directory at
$FMW_HOME/oracle_common/common/bin. -
Connect to the WebLogic Server using the
wlst.shcommand.connect ('weblogic','weblogic1','t3://localhost:7101')The command takes the following arguments: user name (weblogic), password associated with the user (weblogic1) and the T3 connection URL for the Administration Server. In this example, it is running locally on port 7101.
-
Export the Authorization Policy Manager configuration file using the
exportMetadatacommand.exportMetadata(application='oracle.security.apm', server='AdminServer', toLocation='/tmp/repository/', docs='/oracle/security/apm/config/apm-config.xml')
This command will export the
apm-config.xmlconfiguration file to the/tmp/repositorysub-directory on the machine that hosts the Administration Server. The command takes the following arguments:-
The application owner of the document being exported; in this case, the default value is
oracle.security.apm. -
The name of the WebLogic Server Administration Server.
-
The directory to which
apm-config.xmlwill be exported. Be sure you have access rights to this directory. -
The document being exported; in this example,
oracle/security/apm/config/apm-config.xmlwill be exported, so please make sure you have access right to that file path in the AdminServer machine once you downloaded the documents
-
-
Open the
apm-config.xmlconfiguration file in a text editor.The file is in the
/tmp/repositorydirectory as previously specified. -
Change the value of the
oracle.security.apm.oes.modeattribute in this file from basic to advanced. -
Save the changes and close the file.
-
Upload the modified file back to the repository.
importMetadata(application='oracle.security.apm', server='AdminServer',
 fromLocation='/tmp/repository/',
 docs='/oracle/security/apm/config/apm-config.xml')
This command will import the
apm-config.xmlconfiguration file back to the machine that hosts the Administration Server. The command takes the following arguments:-
The application owner of the document being imported; in this case, the default value is
oracle.security.apm. -
The name of the WebLogic Server Administration Server.
-
The directory from which
apm-config.xmlwill be imported. -
The document being imported; in this example,
apm-config.xmlwill be imported to the oracle/security/apm/config/ directory.
-
-
Issue the exit command.
exit()
3.6 Accessing Oracle Entitlements Server Examples
http://www.oracle.com/technetwork/indexes/samplecode/index.html is the repository on Oracle Technology Network from which developer and administration examples for Oracle Entitlements Server can be accessed.