20 Managing Policies to Protect Resources and Enable SSO
Access Manager Application Domains and policies can be accessed and managed through the Oracle Access Management Console. This chapter describes how to create and manage policies, and identify the resources to be governed by these policies. It includes the following topics:
-
Validating Authentication and Authorization in an Application Domain
-
Understanding Remote Policy and Application Domain Management
20.1 Prerequisites
Preview:
System level requirements for tasks in this chapter include the following:
-
OAM Server should be running
-
Users and groups who can access a protected resource should already be created in the User Identity Store associated with Oracle Access Management.
-
Policy-enforcement Agents should be registered as described in Chapter 15.
-
Shared components for use in any Application Domain should be defined, as described in Chapter 19.
20.2 Introduction to Application Domain and Policy Creation
Application domains are the top-level constructs of the Access Manager 11g policy model. Each Application Domain provides a logical container for resources or sets of resources, and the associated policies that dictate who can access specific protected resources. Certain shared components are used within each Application Domain. Each Application Domain represents a singular application on a particular host or Administrators can define different Application Domains for resources that reside on the same Web server and are closely tied to each other in one way or another. For example, an Administrator can create a single Application Domain for a financial application and an accounts receivable application, or have a different Application Domain for each. Configurable policies allow or deny access to the resources.
Note:
To enhance security, Access Manager, by default, will deny access when a resource is not protected by a policy that explicitly allows access.Each Access Manager Application Domain contains information regarding:
-
Resource Definitions
Each resource definition in an Application Domain requires a Resource Type, Host Identifier (for HTTP resources), and a URL to the specific resource. You can have as many resource definitions as you need in an Application Domain.
-
Authentication Policies and Responses for Specific Resources
Each authentication policy includes a unique name, one authentication scheme, success and failure URLs, one or more resources to which this policy applies, and Administrator-defined responses to be applied after successful authentication.
-
Authorization Policies, Conditions, Rules, and Responses for Specific Resources
Each authorization policy includes a unique name, success and failure URLs, and one or more resources to which this policy applies. In addition, Administrators can define specific conditions that must be fulfilled for a successful authorization and define responses to be applied after successful authorization.
-
Token Issuance Policies, Conditions, and Rules for Specific Resources
A Token Issuance Policy defines the rules under which the Security Token Service can issue a token for a resource (Relying Party Partner) based on the client's identity, with the client either being a Requester Partner or an end user.
-
Policy Ordering
Policy ordering is a new feature in which the administrator manually designates the order in which policies within an application domain will be matched to incoming requests for access to protected resources. Previous versions of Access Manager used the best match algorithm for this purpose.
When a new application is placed behind an existing agent, the Administrator must decide if the application should be protected by a separate (new) Application Domain and policies or an existing Application Domain and policies. This section provides information in the following sections to inform your choice.
20.2.1 Generating Application Domains and Policies Automatically
When you register a policy-enforcement Agent with Access Manager, you can choose to have the domain and policies generated automatically or decline the automatic generation. An automatically generated Application Domain is named for the Agent and seeded with default resources and basic policies (authentication and authorization). No Token Issuance Policy is defined, though an empty container is provided.
During Agent registration, it is presumed that the Agent resides on the same Web Server as the application it protects. However, the Agent can be on a proxy Web server and the application can be on a different host. Default resources are protected by basic policies until an Administrator adds more resources or modifies or adds policies.
Note:
IAMSuiteAgent is a pre-registered Java Agent filter that provides an Application Domain (IAMSuite) to protect the Oracle Fusion Middleware console and other consoles. For more information, see "Bundled 10g IAMSuiteAgent Artifacts".20.2.2 Managing Application Domains and Policies Remotely
Access Manager provides two modes to manage Application Domains and their policies without registering or modifying the companion agent. Remote policy and Application Domain management supports only create and update functions. Remote management does not support removing Application Domains or policies. For more information, see "Understanding Remote Policy and Application Domain Management".
20.2.3 Creating or Managing an Application Domain and Policies
The following overview outlines the procedures that must be performed to manually create or manage an Application Domain and policies, and identifies the topics that provide the steps to complete the procedure.
Task overview: Managing an Application Domain
-
Get acquainted with the following details:
-
Perform all prerequisite tasks for this chapter, as described in:
-
Start a fresh Application Domain (or view an existing one), as described in:
-
Add resource definitions to your Application Domain as described in:
-
Define your Authentication Policy, as described in:
-
Define your Authorization Policy, as described in:
-
Define your Token Issuance Policy, as described in:
-
Configure SSO settings and policy evaluation caches, as described in:
-
Validate your policies and configuration, as described in:
20.3 Understanding Application Domain and Policy Management
Whether you create an Application Domain manually or you accept automatic policy generation when registering an Agent, the elements of an Application Domain are the same. All policies and Application Domains are managed using the Oracle Access Management Console. For details, see the following topics:
20.3.1 About Application Domain Pages and Navigation
Regardless of the method you choose to create an Application Domain, a unique name is required to be used as an identifier. When you click Application Domains, a Search page is displayed. The Create Application Domain button in the upper-right corner enables you to start a fresh domain definition. Otherwise, enter a name (or leave the Name field blank) and click the Search button to list existing Application Domains. Figure 20-1 is the Application Domains Search page, controls, and the Search Results table with its own tool bar.
Figure 20-1 Application Domains Search Page

Description of "Figure 20-1 Application Domains Search Page"
20.3.2 About the Application Domain Summary Page
When you display an Application Domain by clicking its name in the Search results, the Name, an optional description and Policy Ordering configuration are displayed on the Summary tab. Other information is organized in the following tabs.
-
Resources
-
Authentication Policies
-
Authorization Policies
-
Token Issuance Policies
-
Administration
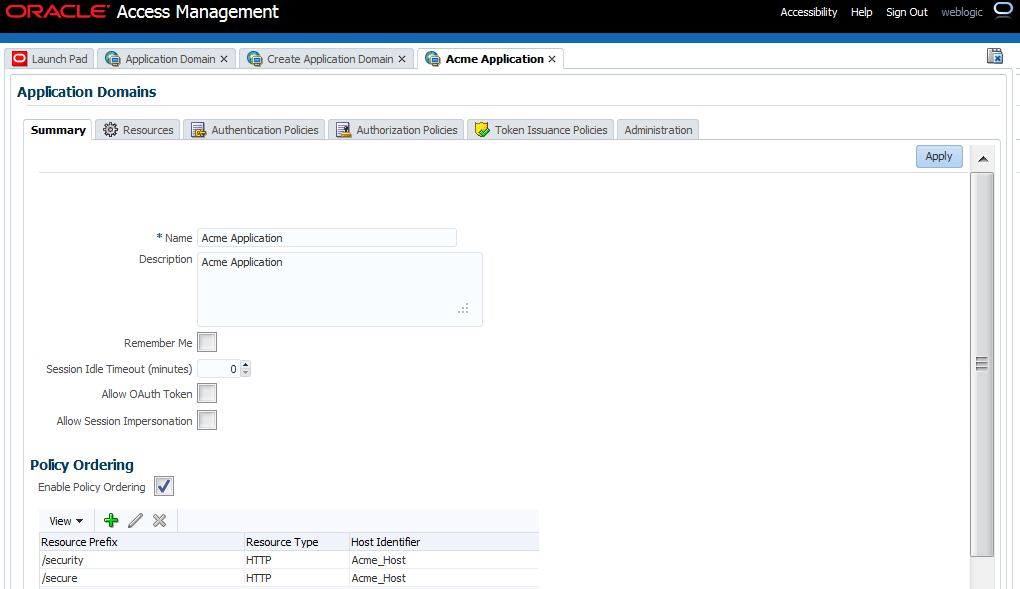
Figure 20-2 is a screenshot of the Application Domain page for the Acme Application Application Domain. In a generated Application Domain, the Name and Description are populated as shown. When you create an Application Domain manually, the Description is entered by the Administrator.
Figure 20-2 Application Domain Page for Acme Application
Description of "Figure 20-2 Application Domain Page for Acme Application"
20.3.3 About the Resource Container in an Application Domain
The Resources tab in the Application Domain represents the container for all resource definitions in that domain. When the Resources tab is displayed, the Search controls are available to help you find specific definitions quickly.
Figure 20-3 illustrates Search controls that you can use to refine your resource definition search. There is also a New Resource button in the upper-right corner. The Search Results table provides key information about each definition found.
Figure 20-3 Search Results for Resources in an Application Domain
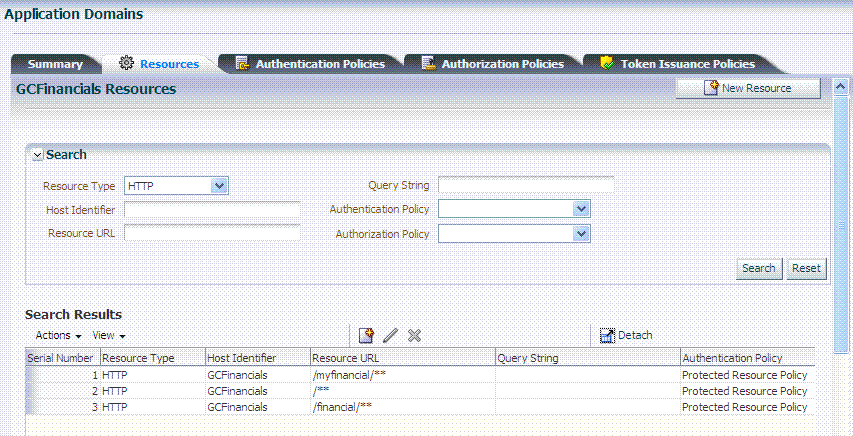
Description of "Figure 20-3 Search Results for Resources in an Application Domain"
The default Resource Type is HTTP; default Resource URL is /**. With HTTP resource definitions you can also search on a query string defined for that resource. The query string can be only the Base URL and can include optional pattern-matching special characters to represent a set of URLs. In this generated domain, the Host Identifier matches the name of the HTTP agent that was registered. Basic information about the policies is also provided.
20.3.4 About Authentication Policy Pages
The Authentication Policies tab provides access to defined or generated policies with no search controls needed. When an Administrator creates an Application Domain manually she must also manually create all policies. In a generated Application Domain, two Authentication policies are created automatically, as shown in Figure 20-5:
-
Authentication Policy: Protected Resource Policy
-
Authentication Policy: Public Resource Policy
Authentication policies are local, which means that each policy applies only to the resources specified for the policy. Each resource can be protected by only a single authentication policy.
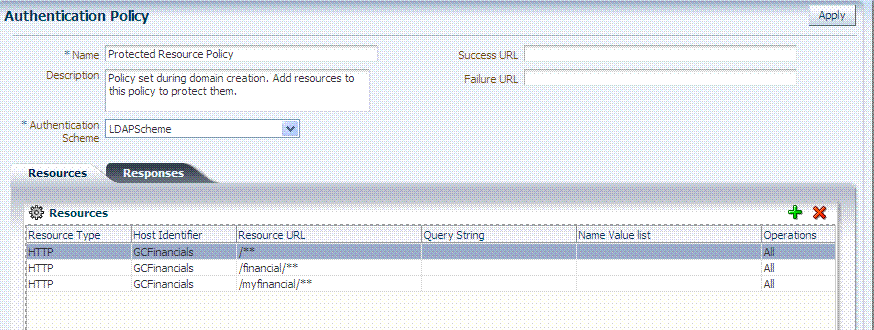
Figure 20-5 shows the Protected Resource Policy and the columns of information displayed automatically on the policy's Resources tab. The Responses tab is available.
Figure 20-5 Authentication Policy Page: Resources and Responses
Description of "Figure 20-5 Authentication Policy Page: Resources and Responses "
Note:
Initially, all resources are protected. Success and Failure URLs and Responses must be added manually; no default values are supplied.A description is provided during automatic generation:
"Policy set during domain creation. Add resources to this policy to protect them."
This generated policy uses the LDAPScheme as the authentication scheme. However, the optional elements of the policy are not yet defined.
Protected Resources are identified on the Resources tab as HostIdentifier/**.
Note:
Administrators can change the authentication scheme, specify Success and Failure URLs, add other resources, and define SSO Responses.Public Resource Policy: A second authentication policy is also generated automatically. This policy uses AnonymousScheme as the default scheme for authentication, which allows anyone access.
Initially, this Public Resource Policy does not include or serve any Resources. The Description tells Administrators what is needed:
Policy set during domain creation. Add resources to this policy to allow anyone access.
20.3.5 About Authorization Policy Pages
The Authorization Policies tab also provides access to defined or generated policies with no search controls needed. In a generated Application Domain, two Authorization policies are created automatically; however, each resource can be protected by only a single authorization policy:
-
Protected Resource Policy
-
Public Resource Policy
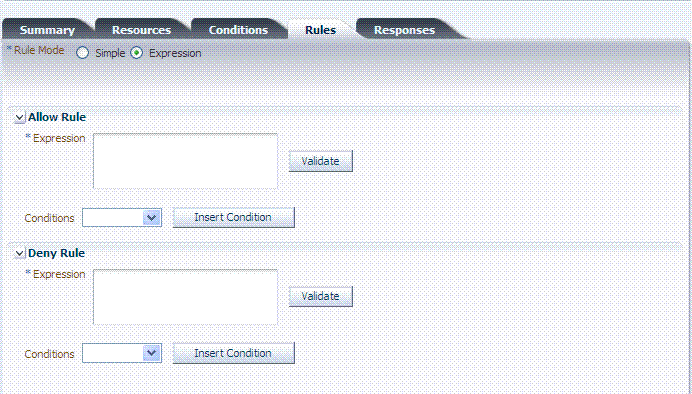
The Authorization Policy tab is shown in Figure 20-7. From this tab, you can select a policy to edit or create a new policy.
The Authorization Policy page is shown Figure 20-7. It provides several tabs where you can define the various components of this Authorization policy. Initially, all resources are protected and access is denied. Success and Failure URLs Conditions, Rules, and Responses must be added manually (no default are supplied).
Figure 20-7 Individual Authorization Policy Page

Description of "Figure 20-7 Individual Authorization Policy Page"
The Authorization Policy Resources tab is shown in Figure 20-8. You use this page to add (or remove) resources for this policy.
Administrators can also define Conditions, Rules, and Responses for this policy. None are generated automatically.
20.3.6 About Token Issuance Policy Pages
By default, only a container for Token Issuance Policies is provided in a generated Application Domain. Any Resources, Conditions, Rules, and Responses must be added manually.
For specific information on this policy type, see:
20.4 Managing Application Domains and Policies Using the Console
This section describes how to create and manage an Application Domain using Oracle Access Management Console. It includes the following topics:
20.4.1 About Application Domains Summary Page
Managing an Application Domain involves adding, modifying, or deleting general and resource-related settings and policies.
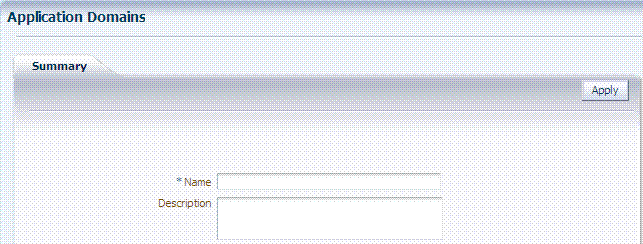
When creating or editing an Application Domain using the Oracle Access Management Console, several pages are involved. Initially, you add general details (name and optional description) on the form show in Figure 20-10.
Each Application Domain must have a unique name that matches the agent name. After applying the name and optional description for the new Application Domain, it is created. If this was a manual creation, the complete series of tabs becomes available: Summary, Resources, Authentication Policies, Authorization Policies, Token Issuance Policies. If this was created using remote registration or while registering an agent, basic policy information is generated with it.
20.4.2 Creating a Fresh Application Domain
Decide whether you need a fresh Application Domain or if you can add resources to an existing Application Domain. You can protect multiple applications using the same Agent by manually creating one Application Domain and manually adding resources and policies.
Users with valid Administrator credentials can perform the following task to manually create an Application Domain using the Oracle Access Management Console.
Alternatively, Application Domains can be generated automatically during agent registration, as described in Chapter 15 and Chapter 16.
See Prerequisites at the beginning of this chapter.
To create a fresh Application Domain
-
From the Oracle Access Management Console, click Application Domains, and then click the Create button.
-
On the Create Application Domains page, add a unique name, an optional description and other details, then click Apply and close the Confirmation window.
-
View and manage the following containers (tabs) within the Application Domain container:
-
Resources: See "Adding and Managing Policy Resource Definitions".
-
Authentication Policies: See "Defining Authentication Policies for Specific Resources".
-
Authorization Policies: See "Defining Authorization Policies for Specific Resources".
-
Token Issuance Policies: See "Managing Token Issuance Policies, Conditions, and Rules".
-
20.4.3 Searching for an Existing Application Domain
Users with valid Administrator credentials can use the following procedure to search for a specific Application Domain.
Note:
This Search operation is case sensitive.To search for an Application Domain
-
From the Oracle Access Management Console, click Application Domains.
-
In the field provided, enter the name of the Application Domain you want to find (or partial name and wild card, *, or leave the field blank to retrieve all domains). For example:
DesiredDomain -
Click the Search button to initiate the search.
-
Choose a name in the Search Results table to perform the desired task. For instance:
-
Edit: Click the Edit button in the tool bar to display the configuration page and go to "Viewing or Editing an Application Domain".
-
Delete: See "Deleting an Application Domain and Its Contents" before you perform this task.
-
Detach: Click Detach in the tool bar to expand the table to a full page.
-
View: Select a View menu item to alter the appearance of the results table.
-
20.4.4 Viewing or Editing an Application Domain
Users with valid Administrator credentials can perform the following task to view or modify an Application Domain (including its resources, policies, conditions, and responses) using the Oracle Access Management Console.
Oracle recommends that you consider grouping similar applications into the same Application Domain. While editing the Application Domain, be aware that different applications are using the same domain. Editing the description and domain name are supported.
To view or modify an Application Domain and its content
-
Locate the desired Application Domain as described in "Searching for an Existing Application Domain".
-
Click to open each of the following tabs to add, view, modify, or delete specific details:
-
Resources: See "Adding and Managing Policy Resource Definitions".
-
Authentication Policies: See "Defining Authentication Policies for Specific Resources".
-
Authorization Policies: See "Defining Authorization Policies for Specific Resources"
-
Token Issuance Policies: See "Managing Token Issuance Policies, Conditions, and Rules".
-
20.4.5 Deleting an Application Domain and Its Contents
Users with valid Administrator credentials can perform the following task to delete an Application Domain (including its resources, policies, conditions, and responses) using the Oracle Access Management Console.
Deleting the Application Domain and its content removes all referenced objects, including the Agent registration. Using this method, if you later need to re-register the same Agent, you can because there are no remaining references to the previous Application Domain and its content.
Note:
During a Delete operation, if the Application Domain contains any policy elements, you are alerted.Ensure that resources in the domain to be deleted are placed in another Application Domain for protection.
To delete an Application Domain
-
Locate the desired Application Domain as described in "Searching for an Existing Application Domain".
-
Ensure that resources in the domain to be deleted are placed in another Application Domain for protection.
-
In the Search Results table, click the Serial Number beside the desired name, and then click the Delete (x) button in the tool bar.
-
In the Warning window, click Delete (or click Cancel to dismiss the window).
-
Check the results table to confirm the Application Domain has been removed.
20.5 Configuring Policy Ordering
Previous releases of Access Manager used a policy matching algorithm to match incoming resource URLs with the stored patterns in an Application Domain. A best match is arrived at based on a predefined algorithm. (This algorithm can not be changed.) If multiple patterns are matched with an incoming URL, the best match pattern is selected and its associated policy is evaluated.
With this 11gR2 PS2 release, rather than the best match algorithm, an Administrator manually designates the order of policies within an Application Domain. To turn on Policy Ordering, the Administrator must first add one or more resource prefixes to the Application Domain. Once these have been added, you can click the Enable Policy Ordering flag. (See Figure 20-2, "Application Domain Page for Acme Application".)
Note:
You may create resource prefixes and not enable policy ordering. In this case, the resource prefixes are ignored and the best match algorithm is used.Figure 20-11 is a screenshot of the Resource Prefix configuration pop up.
Figure 20-11 Adding a Resource Prefix for Policy Ordering
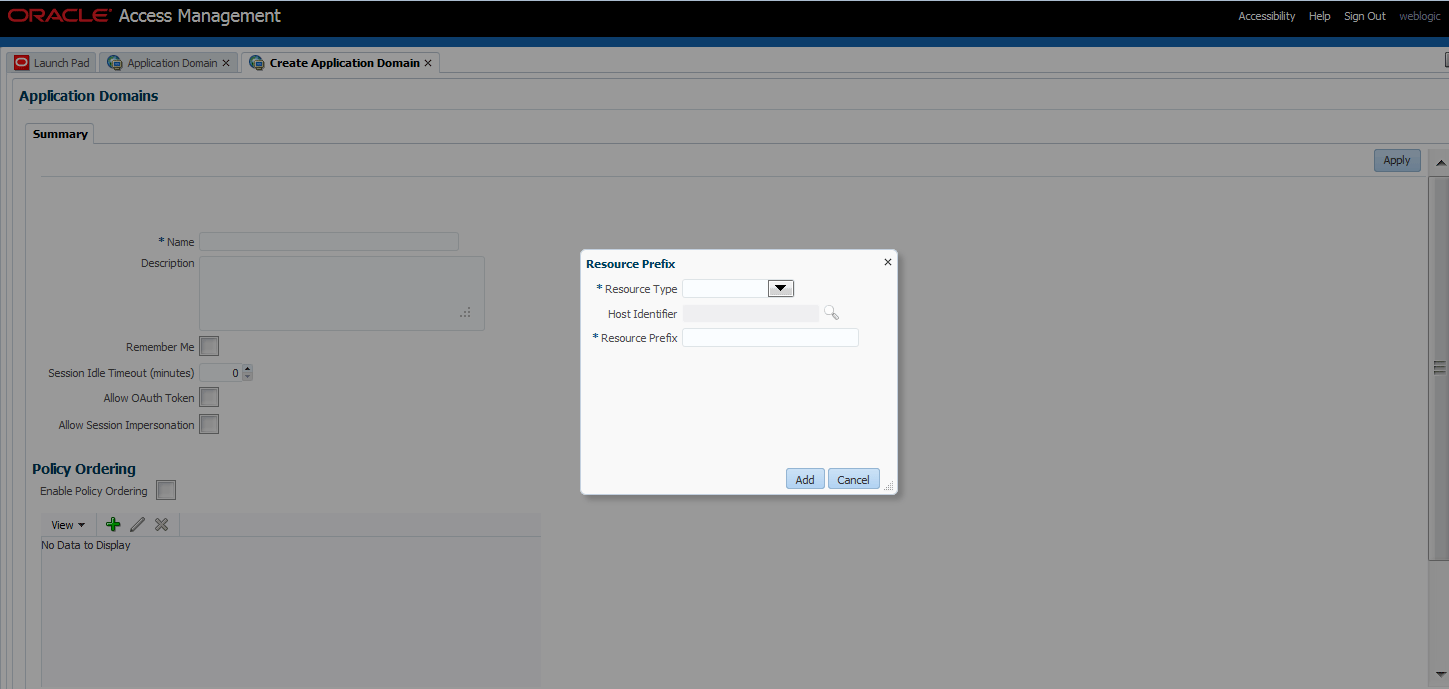
Description of "Figure 20-11 Adding a Resource Prefix for Policy Ordering"
During runtime, the incoming URL of the protected resource is checked to determine if it starts with any resource prefix defined in the Application Domain. If the URL matches a resource prefix, the policies in the Application Domain configured with that resource prefix are checked (in the order defined by the Administrator) to see if any resource in the policy matches the incoming resource. If the incoming resource matches a particular policy, it is evaluated and the results are returned; the other policies are not checked.
-
From the Oracle Access Management Console, click Application Domains, and then click the Create button.
-
On the Create Application Domain page, add a unique name and an optional description.
-
Click Add to add a Resource Prefix.
-
Tick the Enable Policy Ordering box.
-
Select the ResourceType from the drop down list.
See Table 20-1 for definitions of the default Resource Types.
-
Add an optional host identifier.
Host identifier is mandatory for an HTTP Resource Type.
-
Add the Resource Prefix.
For example, if the policy Resource being protected is /em/**, the Resource Prefix is /em. If the policy Resource being protected is /blog/**, the Resource Prefix is /blog.
-
Click Add.
20.6 Adding and Managing Policy Resource Definitions
Each Application Domain includes a container for resource definitions, the Resources tab. Once you have defined a resource in this container, you can add it to a policy in the Application Domain.
Protecting resources requires an Application Domain containing specific resource definitions. With OAM, you can protect different types of resources, including non-HTTP/HTTPS-based resources and HTTP/HTTPS-based resources such as:
-
An entire external Web site
-
Specific pages in a Web site
-
Partner portals
-
A parts order application
-
Invoice applications
-
A benefits enrollment application on Web servers of an enterprise in many countries
This section provides the following topics:
20.6.1 Defining Resources in an Application Domain
Each resource must be defined separately in an Application Domain. Within an Application Domain, resource definitions exist as a flat collection of objects. Each resource is defined as a specific type, and the URL prefix that identifies the resource (document or entity) stored on a server and available for access by a large audience. The location is specified using an existing shared Host Identifier.
Note:
If a resource that is not explicitly marked as excluded, is not associated with a policy, then access is denied to all users because there is no policy match.Resource Definition Guidelines
-
No URL prefixes. Resource definitions are treated as complete URLs.
-
Pattern matching (with limited features) for:
' * ' and '...' are supported
-
Resources need not be unique across domains.
-
Query-string protection for HTTP URLs.
-
Each HTTP resource is defined as a URL path, and associated with a host identifier. However, resources of other types are associated with a specific name (not a host identifier).
-
Non-HTTP resource types are supported, with definition of specific operations. Non-HTTP resource types are never associated with a host identifier.
-
Resources can designated as either Protected, Unprotected, or Excluded.
-
Custom resource types are allowed.
Figure 20-12 illustrates a fresh Resources definition page.
Figure 20-12 Fresh Resources (Definition) Page in the Application Domain
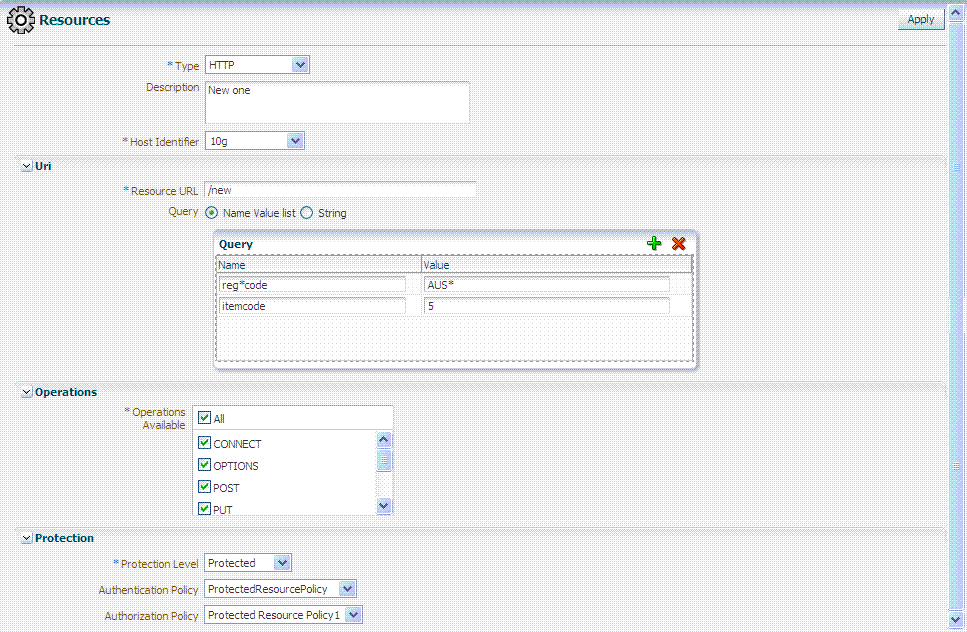
Description of "Figure 20-12 Fresh Resources (Definition) Page in the Application Domain"
Table 20-1 describes elements that comprise a resource definition.
Table 20-1 Resource Definition Elements
| Elements | Description |
|---|---|
|
Resource Type |
The The The Any custom resource type that has been defined is listed with default resource types when you add a resource definition (or search for resources). See Also: "About the Resource Type in a Resource Definition". |
|
Host Identifier |
A list of host identifiers is available, which contains all identifiers that were defined as a shared component. You must choose a host identifier to assign this resource. Note: The combination of the host identifier and URL string that make up a resource definition must be unique across all Application Domains. See Also: "Managing Host Identifiers". |
|
Description |
An optional unique description for this resource. |
|
URI Section |
Information will differ depending on the selected Resource Type. |
|
Query Name-Value list |
For HTTP resource types only. You can provide a list of Name and Value pairs for use in access policies. See Also: "About Query String Name and Value Parameters for Resource Definitions". |
|
Query String |
For HTTP resources, you can provide a query string for literal full query string matching within access policies. See Also: "About Literal Query Strings in Resource Definitions". |
|
Resource URL |
The value must be expressed as a single relative URL string that represents a path component of a full URL composed of a series of hierarchical levels separated by the '/' character. The URL value of a resource must begin with / and must match a resource value for the chosen host identifier. Based on its contents, a URL is matched in response to an incoming request as a literal or a wild card pattern. The special characters available to define a pattern, if included, are:
See Also Table 20-2. |
|
Operations Section |
You can define specific allowed operations to customize you own resource definitions. Note: Oracle-provided Resource Types are read-only. Operations associated with Oracle-provided Resource Types need not be defined and cannot be modified. Policies developed and applied to resources of Oracle-provided types apply to all operations. |
|
Operations Available |
Identify all HTTP operations that are allowed for this resource definition. Policies developed and applied to this customized resource apply to only the operations you identify. Unless explicitly noted, all of the following possible operations are for HTTP resource types:
Note: During Agent registration, if no operation is specified for the resource definition itself, then All operations for that resource type are supported. See Also: "About Resource Types and Their Use". |
|
Protection |
Using the controls in this section of the Resource Definition, you can identify the desired level of protection for this resource and name the policies to be used. |
|
Protection Level |
Choose the appropriate protection level from the following:
|
|
Authentication Policy |
A list of Authentication policies based on the specified resource protection level becomes available. Only policies within this domain, and that match the specified protection level, are listed. |
|
Authorization Policy |
A list of authorization policies defined in the domain become available from which you can choose the one to protect this resource. |
After adding the resource, it is grouped under the Resources node of the named Application Domain. When you create policies all defined resources for the domain are listed and you can choose one or more for inclusion in the policy.
For more information about different specifications within a resource definition, see the following topics:
20.6.1.1 About the Resource Type in a Resource Definition
When adding a resource definition to an Application Domain, Administrators must choose from a list of defined Resource Types. Native Resource Types are read-only cannot be modified or deleted; these include HTTP, TokenserviceRP, and wl_authen.
See Also:
"About Resource Types and Their Use"When adding an HTTP type resource to an Application Domain, Administrators choose from a list of existing host identifiers and then add the resource URL. Operations associated with the HTTP resource type need not be defined by an Administrator. Instead, policies apply to all HTTP operations.
Table 20-2 shows sample URL values for resources. For more information, see "About the Resource URL, Prefixes, and Patterns".
20.6.1.2 About the Host Identifier in a Resource Definition
Administrations identify resources in an Application Domain by the host where the resources reside and the resource URL.
Note:
Non-HTTP resource types are not associated with a host identifier. Instead, Administrators must enter the type's name into the Resource URL field of the resource definition page.Host identifiers create a context for each resource, which is useful when adding resources that have the same URL paths on different computers. Administrations can protect all of these resources in the same way within the same Application Domain. The only variable that distinguishes one set of resources from another is identification of its host computer.
All defined host identifiers appear on the Host Identifiers list on the Resources page. When adding a resource to an Application Domain, administrations must choose one host identifier for the computer hosting the resource.
To ensure that Access Manager recognizes the URL for a resource, Access Manager must know the various ways used to refer to that resource's host computer.
20.6.1.3 About the Resource URL, Prefixes, and Patterns
During automated Application Domain generation, a URL prefix is defined under which all resources are protected. Resources are linear, not hierarchical. Resource definitions are treated as complete URLs.
Note:
No host identifier is associated with a non-HTTP resource type.Administrations identify individual resources in the Application Domain using a specific resource URL. Individual resource URLs need not be unique across domains. However, the combination of a resource URL, Query String, and a host identifier must be unique across domains.
An HTTP type resource is expressed as a single relative URL string representing a path. The string is composed of a series of hierarchical levels separated by the '/' character. Based on its content, a URL is matched in response to an incoming request as a literal or a wild card pattern.
The Access Manager policy model does not support a resource prefix. In other words, there is no policy inheritance.
If a policy is defined for /mydirectory/projects/, it only applies to this URL (and does not apply to /mydirectory/projects/index.html, for example).
If you need a policy for all resources with the same prefix string, you can define the resource using special characters (three periods ... (ellipsis) or * (asterisk) for instance: /mydirectory/projects/.../*.
Note:
The Access Manager policy model does not support a resource prefix. In other words, there is no policy inheritance.URL Patterns, Matching, and Precedence
Administrators can create granular URL patterns to specify the fine-grained portion of a resource's namespace. All matching is case insensitive.
-
Supported wildcard matching is provided for the patterns in Table 20-3
-
Sample Resource URLs and their correctness are shown in Table 20-4
Table 20-3 Supported Wildcards in Resource URL Patterns (Precedence Order)
| Pattern | Description | Example |
|---|---|---|
|
/** |
The default. Matches any sequence of zero or more characters that starts with the forward slash character (/). You can use this pattern to protect a path under a specific, named directory. Note: This is not an existing 10g wildcard. In 10g, the /.../* pattern yielded an exclusive match that did not include the root of the level at which the pattern was defined. For example, /foo/.../* matched /foo/bar but not directory /foo/ itself. 10g had the notion of a prefix (the "root"), and most evaluation occurred after striping off the prefix. |
· /** Matches /foo/bar /foo/ Compare with |
|
Literals |
The resource's pattern contains no special characters. |
|
|
{pattern1,pattern2,...} |
Matches one from a set of patterns. The patterns inside the braces can themselves include any other special characters (except braces; sets of patterns cannot be nested). |
|
|
[range or set] |
Matches one from a set of characters. A set can be specified as a series of literal characters or as a range of characters. A range of characters is any two characters (including -) with a hyphen (-) between. A range of characters is any two characters (including -) with a hyphen (-) between them. The forward slash character (/) is not a valid character to include in a set. A set of characters will not match / even if a range that includes / is specified. |
|
|
Single Character Wildcard ? |
The ? (question mark) matches any one character other than /. This is not treated as a query string delimiter. |
a?b matches aab and azb but not a/b. |
|
Wildcard * |
The * (asterisk) wildcard matches any sequence of zero or more characters. However, the * (asterisk) does not match the forward slash character (/). |
a*b matches ab, azb, and azzzzzzb but not a/b. |
|
* |
The * (asterisk) can be used only at the lowest, terminating level of the path. It matches zero or more characters. Every character in a URL pattern must match the corresponding character in the URL path exactly. Exceptions:
|
The following URL pattern: /.../update.html Matches: /humanresources/benefits/update.html /corporate/news/update.html update.html See Also: Table 20-4 |
|
/.../ Hierarchy /.../* Host wide |
Matches any sequence of one or more characters that starts and ends with the forward slash character (/). Evaluation descends from the root /. At each directory level, resources matching the highest precedence level are selected as candidates for continued evaluation and then descend to the next level. This continues until resources representing the best match possible, based solely on the path information, is obtained. Host wide; the entirety of the pattern. |
|
|
\ |
The backslash character is used to escape special characters. Any character preceded by a backslash matches itself.
|
|
Table 20-4 illustrates a number of resource definitions within an Application Domain, organized alphabetically according to the Host Identifier and Resource URL. The right-hand column in Table 20-4 declares whether the form is correct or not.
20.6.1.4 About Query String Name and Value Parameters for Resource Definitions
The Policy Model supports Query String Name and Value parameters in a Resource pattern definition:
-
Name: A string literal that can contain any characters, including symbols; all characters are treated as literal.
-
Value: Can be a string literal with any characters and can contain a wildcard (* only) to match a sequence of 0 or more characters. Asterisk (*) is treated as a wildcard.
-
Amount: There is no limit to the number of name and value pairs in a query string. However, for a single resource there will be only a few pairs.
-
Order: Any order can be used for name and value pairs because at run time these might come in any order as part of the query string.
Resource Matching and Precedence: Query String Name and Value Parameters
Access Manager uses an algorithm that locates the least specific match and continues to the most specific possible resource. When you have candidates defined with both a single-query string and query parameters, those with the single string take precedence.
For resources containing parameter lists, the best match is determined as follows:
-
Path Matching: Access Manager attempts to match the path of the requested resource. There may be multiple candidates matched, differing by query component and/or operations declared.
-
Query String Matching: For matches obtained, Access Manager attempts to match the query string (if present in the requested URL). If candidates are defined with both single query string and query parameters, those with the literal string take precedence. There may be multiple candidates remaining, differing by operation.
-
Operation Matching: For matches obtained, attempt to match the requested operation. If there is no exact match present, then check for resources for which no specific operation(s) have been defined. In other words, they apply to any operation defined as part of the resource's type. In either case, this yields a single, best match.
Path Matching: Defined resources are evaluated for potential match, against the requested URL's path component, in the following precedence order:
-
Literals (as in, the resource's pattern contains no special characters)
-
Choice: {pattern1,pattern2,...} , each of which may itself contain the below special characters and is evaluated, in turn, using this same precedence order
-
Range: [ ]
-
Single-char wildcard: ?
-
Wildcard: *
-
Hierarchy: /.../
-
Hostwide: /…/* is the entirety of the pattern
Evaluation descends from the root '/'. At each directory level, resource(s) matching with the highest precedence level are selected as candidates for continued evaluation and then descent to the next level occurs. This continues until resource(s) representing the best match possible, based solely on the path information, is obtained.
Note:
All matching in 11g has been, and remains, case insensitive.Table 20-5 illustrates the matching pattern for each of several requested URLs.
Table 20-5 Pattern Matching for Requested URLs
| Requested URL | Matching Pattern |
|---|---|
|
/oam/sales/oam/page8.html |
/oam/.../*.html |
|
/oam/Dept1/page8.html |
/oam/Dept?/page8.html |
|
/oam/DeptQ/page8.html |
/oam/Dept[A-Z]/page[1-8].html |
|
/oam/DeptQ/page8.html |
/oam/Dept[A-Z]/page?.html |
|
/oam/saals/foo/aba/zzz/indexp.html |
sa{*,le,l?,a[k-m],[a-f-m]}s/.../{*b,?a}{a,/../ii}/.../{index,test}[pa].?tml |
When you have candidates defined with both single query string and query parameters, those with the single string take precedence. Single query strings are scored using the algorithm already-mentioned.
For resources containing parameter lists, the best match is determined as follows:
-
Resources with parameter values without wildcards are given higher order of precedence; the combined length of the parameter names and values is used to determine the best match among the set of such resources.
-
As for query string literals, if there are two or more matches with the same combined length, then matching will fail.
-
Resources with parameter values containing wildcards are considered next. The total number of wildcards within each resource is used to determine the best match among such resources. If there are two or more matches having same number of wildcards, then the combined length of the parameter names and values determines the best match
-
Matching fails if multiple resources contain the same combined length.
Query String Matching Patterns: Second and subsequent patterns use parameter lists:
/oam/index.html::a=*d (a single query string)
/oam/index.html::a:b
/oam/index.html::a:b,c:d
/oam/index.html::a:b*
/oam/index.html::a:b*,c:d
/oam/index.html::a:b*,c:d*
/oam/index.html::a:b*,c:*d*
Table 20-6 illustrates the matching pattern for each of several requested URLs.
Table 20-6 Query String Matching: Examples
| Requested URL | Matching Pattern |
|---|---|
|
/oam/index.html?a=b&c=d |
/oam/index.html::a=*d |
|
/oam/index.html?a=b1&c=d |
/oam/index.html::a:b*,c:d |
|
/oam/index.html?a=b1,c=d1 |
/oam/index.html::a:b*,c:d* |
|
/oam/index.html?a=b1,c=1d1 |
/oam/index.html::a:b*,c:*d* |
Operation Matching Examples: At this point in request processing, there are one or more candidate resources, all of which match the requested URL path and query string components equally. Access Manager now matches the requested operation to one of those candidates: a resource defined to protect that operation specifically (as well as other, specific operations). As only a single resource can be defined to protect any given operation, this will give the single best match.
Run Time Evaluation: Name value pairs are evaluated at run time as follows:
NAME VALUE
a aba a*Same Resource URL Specified Differently: Resources with the same URL and with the same characters in the query string (although specified differently in the console (one as a key and value and the other as a single string)) are considered different and are allowed. For example, the two following resource patterns are considered as different:
Resource URL:
/test.htmlQuery string:
area=*&dept=*Resource URL:
/test.htmlQuery NAME VALUE
area *dept *Resource Matching During Policy Evaluation: The order in which name and value pairs arrive at run time does not matter. As long as all the names and values match the query string, the match is successful. The incoming request can have more name and value parameters than defined and still have a successful match.
Example 1: The following pattern matches the incoming URL if no other pattern is defined with the same URL, query string variables, and the extra query string variable (revenue=1000):
Incoming URL =>
/test.html?area=emea&dept=engg&revenue=1000resource pattern =>
/test.htmlQuery String NAME VALUE
area emeadept enggExample 1: For a resource with the same resource URL and the same query string, with one defined as a single string and the other defined as name and value pairs, the policy evaluation preference matches the literal query string before considering name and value pairs. For instance, in the following example, a) is matched:
Runtime Request: URL =>
/test.html?area=emea&dept=enggResource Patterns:
a)
Resource:
/test.htmlQuery string:
area=emea&dept=enggb)
Resource:
/test.htmlQuery String NAME VALUE
area emeadept enggBest Match, Multiple Resources: When you have multiple resources with query string name and value pairs defined, the best resource match is the pattern that matches the most number of query string parameters. When wildcard values are used, this is followed by how closely each parameter value matches.
For example: With the following two query string patterns defined:
Query String NAME VALUE
area e*dept e*and
area em*dept en*Run Time Query String Parameters:
area emeadept enggResult: The second name and value pattern match order is higher.
Figure 20-13 shows the resource definition page. Here, "rev*" is a valid name (the asterisk character is allowed and treated as a literal character, which is equivalent to 10g behavior). The Oracle Access Management Console enables you to add query strings as name and value pairs. You can also add the query string as a literal string. If If you select a literal query string, then the name and value option is disabled (and vice versa).
Figure 20-13 HTTP Resources, Query String Resource URL Controls
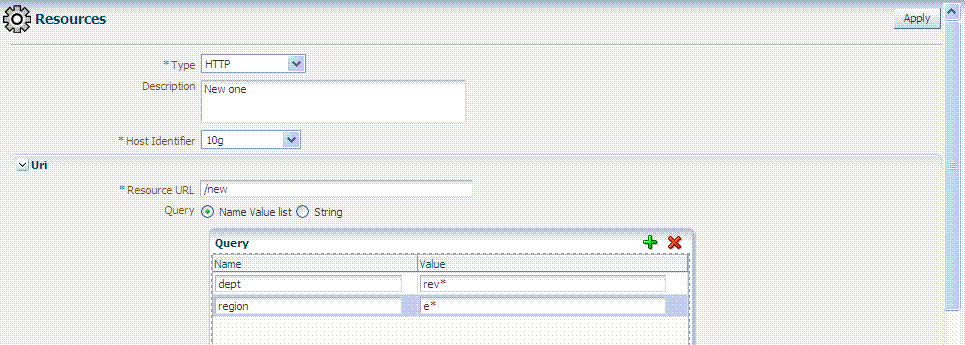
Description of "Figure 20-13 HTTP Resources, Query String Resource URL Controls"
Behavior When Migrating to Access Manager: If you upgrade to Access Manager (from 10g), previous query strings are created in 11g appropriately (whether a single string or a name and value pair). The appropriate type of query string is created in Access Manager.
20.6.1.5 About Literal Query Strings in Resource Definitions
The Policy Model supports resource protection based on matching literal, full query-string-based HTTP resource definitions within Access Policies.
A single Query String Pattern that would be matched against the entire input Query string (as opposed to matching only portions (selected name and value pairs) of the query string. For example:
status=active&adminrole=*
A Query String pattern specified as a regular free form string with these extra features:
-
Optional: Special character (*) that matches zero or more characters, which is applied to a set of names in the run time Query String.
-
Two resource definitions can exist with same URL base path pattern and different Query String patterns. These two are independent and non-equal resources. For example, these are all valid and can exist at same time:
/foo
/foo?bar=true
/foo?bar=false
The Query String is free form with no restriction in terms of format or characters. It is not required to specify Query String as key/value pairs
At run time, only the Query String that is part of HTTP GET requests is processed; Query String pattern does not apply to HTTP POST data.
Resource Matching at run time:
-
The base URL path is matched and then the Query String is matched
-
Multiple resource patterns that contain matching Query Strings: The best match is determined based on the number of tokens (pattern delimited by '*') and the length of the token at each position. Patterns with longer tokens in the beginning are preferred and then the pattern that contains more number of tokens. (If there are matching patterns that contain same number of tokens and same length at each position then the match would fail.)
Conflicts:
-
Super Set: The input resource definition contains a set of name-value Query String patterns that are a super set of patterns of an existing resource definition in the policy store.
-
Overlap: The input resource specification contains a set of name-value Query string patterns that overlap a set of patterns of an existing resource definition in the policy store.
Remote Registration: For OAM Agents, the remote registration tool (oamreg) accepts Query-string based HTTP resource definitions and generates the relevant policy objects for securing access of these resources. If any conflicts are encountered during policy provisioning, only policies for resources that do not have any conflicts are provisioned. This feature does not apply to 10g OSSO agent-based partners and applications. OSSO agents are not capable of enforcing authentication scheme per resource. Instead, a single authentication scheme is applied to all resources of an application.
20.6.1.6 About Run Time Resource Evaluation
While processing requests for resources, an evaluation is made to ensure that the proper policy is invoked for the resource.
See Also:
Other processing details in the following topics:Process overview: Resource evaluation
-
A user specifies the URL for a requested resource.
-
Access Manager creates a fully qualified URL that includes the URL pattern, based on the host identifier and URL.
-
Access Manager compares the incoming URL for the requested resource to the fully-qualified URL constructed from Application Domain information and the policy's URL pattern:
-
If there is a match, the various policies are evaluated to determine whether the requester should be allowed or denied access to the resource.
-
If the requester is allowed access, the resource is served.
-
Table 20-7 describes the possible outcomes.
Table 20-7 Resource Evaluation Outcomes
| Outcome | Description |
|---|---|
|
Best Match |
The best match is when a resource definition has the least resource scope compared to other possible matches to the run time resource. The term resource scope represents all possible resources that could be matched using a particular resource definition |
|
No Match1 |
If no match is found, the default evaluation outcome is FAILURE. Depending on what kind of policy was being evaluated, this could mean no authentication is attempted, or no resource access is granted. |
-
The default resource URL in an Application Domain defines the broadest scope of content possible (all directories and below):
/.../* -
The pattern /.../index.html matches:
/index.html
/oracle/index.html
/oracle/sales/index.html
index.html
It does not match, for example,
xyzindex.html. -
/oracle/.../*.html matches:
/oracle/index.html
/oracle/sales/order.html
and so on
-
Resource scope of the following resource definition (includes the asterisk):
/mybank/…/*
includes all URLs prefixed with "/mybank/"
-
Resource scope of the following resource definition (no special characters in the definition):
/mybank/account.html
includes only one URL: "/mybank/account.html"
20.6.2 Defining Resources in an Application Domain
Users with valid Administrator credentials can use the following procedure to add the resource definitions to protect to the corresponding Application Domain.
Resource protection based on a list of discrete query parameters is more secure and easier to administer than literal query strings. You might want to create a policy based on resource URL with query parameters (string and name-value pairs).
Note:
An error can occur if you specify a host identifier value that is invalid:The challenge URL is invalid.The Resource Type must be defined as a Shared Component. Several elements in the Resource definition page are based on the defined and selected Resource Type. For details, see "Managing Resource Types".
To add resource definitions to an Application Domain
-
In the Oracle Access Management Console, locate and view the desired Application Domain, as described in "Searching for an Existing Application Domain".
-
In the Application Domain, click the Resources tab, then click the New Resource button in the upper-right corner of the Search page.
-
On the Resource Definition page:
-
Select or enter your details for a single resource (Table 20-1):
Type
Description
Host Identifier
Resource URL (Table 20-4)
Operations
Query String (Table 20-6)
Protection Level
Authentication Policy (if level is Protected)
Authorization Policy (if level is Protected and Authentication Policy is chosen) -
Click Apply to add this resource to the Application Domain.
-
Repeat this procedure to add other resources to this Application Domain.
-
-
Proceed by adding defined resources to specific policies in the
Application domain as described in:
20.6.3 Searching for a Resource Definition
This section provides the following topics:
20.6.3.1 About Searching for a Specific Resource Definition
Figure 20-14 shows the default Search elements and Search Results table for resource definitions in an Application Domain.
Figure 20-14 Sample Resource Definitions Search within an Application Domain

Description of "Figure 20-14 Sample Resource Definitions Search within an Application Domain"
You can simply click the Search button using the defaults or refine your search by supplying as much or as little of the information in Table 20-8 as needed to find the resource.
Table 20-8 Search Elements for a Resource in an Application Domain
| Search Elements | Description | |
|---|---|---|
|
Resource Type |
Provides a list of defined resource types from which you can choose. You can also leave this blank. Default: HTTP |
|
|
Host Identifier |
Enter a host identifier here, if desired. You can leave this blank Default: blank |
|
|
Resource URL |
Enter a resource URL, if desired. You can leave this blank Default: blank |
|
|
Query String |
Enter a query string for the resource, or leave this blank. You can include this in the search criteria if a query string was defined for the resource when it was added to the Application Domain. Default: blank |
|
|
Authentication Policy |
Provides a list of defined authentication policies for this Application Domain. You can choose one or leave the space blank. Default: blank |
|
|
Authorization Policy |
Provides a list of defined authorization policies for this Application Domain. You can choose one or leave the space blank. Default: blank |
You can click Reset to clear the form or Search to initiate the search. The results table is shown in Example 20-0. Each resource listed includes everything specified when it was added to the domain. The Actions and View menus are available for use with the table. Also you can click the Create command button to add a new resource definition to this domain.
Figure 20-15 Sample Search Results for Resource Definitions in an Application Domain
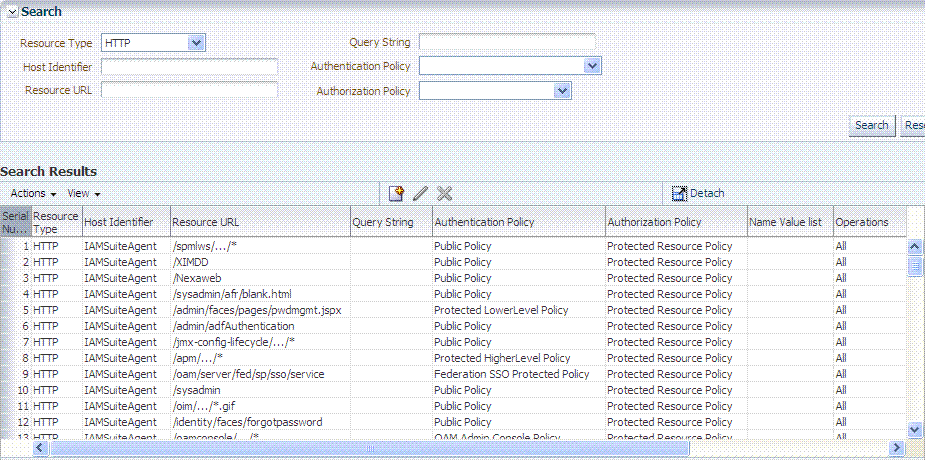
Description of "Figure 20-15 Sample Search Results for Resource Definitions in an Application Domain"
20.6.3.2 Searching for a Specific Resource Definition
Users with valid Administrator credentials can use the following procedure to search for a specific resource definition.
-
In the Oracle Access Management Console, locate and view the desired Application Domain, as described in "Searching for an Existing Application Domain".
-
Click the Resources tab to display Resources Search controls.
-
Fill in your search criteria (Table 20-8), and click the Search button.
-
In the Search Results table, click the desired resource definition and take the desired action:
-
Actions Menu: Select an item to Create, Edit, or Delete the selected resource.
-
View Menu: Select an item to alter the appearance of the results table.
-
Edit Button: Click the button in the tool bar to display the configuration page.
-
Delete: See "Viewing, Editing, or Deleting a Resource Definition".
-
Detach: Click Detach in the tool bar to expand the table to a full page.
-
20.6.4 Viewing, Editing, or Deleting a Resource Definition
Users with valid Administrator credentials can use the following procedure to modify resource definitions within a specific Application Domain.
If a resource protection level is modified from "Protected" to "Excluded" while it is associated with a policy, the modification will fail. First, remove the resource from the policy, make the change, and add the resource to the policy.
Note:
During a Delete, you are alerted if the resource is associated with a policy. Without a policy association, the resource is deleted.You must have the desired resource type defined as a shared component. For details, see "Managing Resource Types".
To view, modify, or delete resource definitions
-
Find the Resource, as described in "Searching for a Resource Definition".
-
View Only: Close the page when you finish.
-
Modify: Alter the definition as desired and then click Apply to submit changes (or close the page without applying changes).
-
Delete:
-
Open the resource definition and confirm this is the one to be deleted, then close the page.
-
Click the name of the desired resource definition and then click the Delete button in the tool bar.
-
In the Confirmation window, click Delete (or click Cancel to dismiss the window).
If the Resource is associated with a policy, remove it from the policy first.
-
Repeat as needed to delete other resources in the Application Domain.
-
-
20.7 Defining Authentication Policies for Specific Resources
Each resource assigned to an Application Domain can be protected by only one authentication policy. After adding a resource definition to the Application Domain, the Administrator can begin refining a default authentication policy, adding a new policy, and assigning resources to the authentication policy.
In an automatically generated Application Domain, the following authentication policies are seeded as defaults to help streamline the Administrator's tasks:
-
Protected Resource
-
Public Resource
This section provides the following topics:
20.7.1 About the Authentication Policy Page
Administrators use authentication policies to protect specific resources. The authentication policy provides the sole authentication method for resources governed by the policy.
Each authentication policy defines the type of verification that must be performed to provide a sufficient level of trust for Access Manager to grant access to the user making the request.
Authentication policies are local. A single policy can be defined to protect one or more resources in the Application Domain. However, each resource can be protected by only one authentication policy.
Authentication Policy Guidelines
-
Authentication policies include resources, success responses, and an authentication scheme.
-
Authentication and Authorization policies can evaluate to Success or Failure.
-
Query Builder and support for LDAP filters (for retrieving matches based on an attribute of a certain display type, for example).
-
Define a policy for resource: /…/* which can be used within a determined scope.
-
Token Issuance Policies can be defined using resources and user- or partner-based conditions.
Figure 20-16 shows the Authentication Policies page of an Application Domain.
Figure 20-17 shows a specific Authentication Policy. The resources assigned to this policy are displayed on the Resources tab of the policy. This example is from the IAM Suite Application Domain.
Figure 20-17 Sample Individual Authentication Policy Page
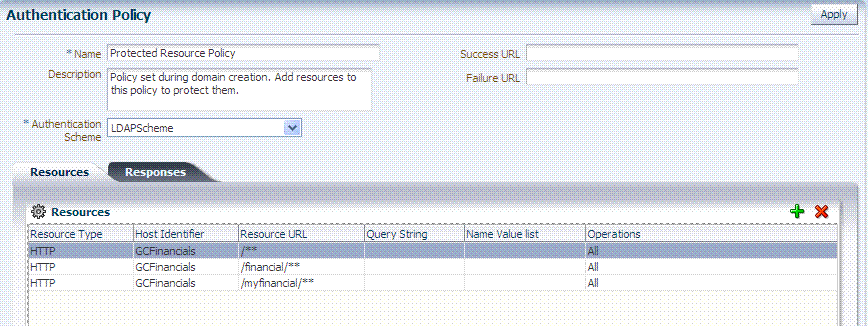
Description of "Figure 20-17 Sample Individual Authentication Policy Page "
Table 20-9 describes authentication policy elements. The IAM Suite Application Domain is shown simply as an example.
Table 20-9 Authentication Policy Elements and Descriptions
| Element | Description |
|---|---|
|
Name |
A unique name used as an identifier. |
|
Description |
Optional unique text that describes this authentication policy. |
|
Authentication Scheme |
A single, previously-defined authentication scheme to be used by this policy for user authentication. See Also: "Managing Authentication Schemes" for details. |
|
Success URL |
The redirect URL to be used upon successful authentication. |
|
Failure URL |
The redirect URL to be used if authentication fails. |
|
Resources |
The URL of a resource chosen from those listed. The listed URLs were added to this Application Domain earlier. You can add one or more resources to protect with this authentication policy. The resource definition must exist within the Application Domain before you can include it in a policy. |
|
Responses |
The obligations (post authentication actions) to be carried out by the Web agent. After a successful authentication, the application server hosting the protected application should be able to assert the User Identity based on these responses.After a failed authentication, the browser redirects the request to a pre-configured URL See Also: "Introduction to Policy Responses for SSO". |
20.7.1.1 About Resources in an Authentication Policy
You can choose to add one or more resources to be protected by the authentication policy. The Resources tab on the Authentication Policy page provides a table where you can enter resource URLs. A list is also provided from which you can choose from defined resources within the Application Domain.
To add a resource, click the + button and select from the list. To delete a resource, select the name from the Resources table and click the Delete button in the table.
20.7.2 Creating an Authentication Policy for Specific Resources
Users with valid Administrator credentials can use the following procedure to add an authentication policy and resources to an Application Domain. You can use a pre-configured authentication scheme or a custom authentication scheme in the authentication policy.
Any resource to be added to a policy must be defined within the same Application Domain as the policy.
To add an authentication policy for specific resources
-
Locate the desired domain as described in "Searching for an Existing Application Domain".
-
Click the Authentication Policies tab, then click the Create Authentication Policy button to open a fresh page.
-
Required Elements: Add your information for this policy.
-
Name
-
Authentication Scheme
-
-
Optional Elements (Table 20-9): Add as needed for your policy.
-
Description (optional)
-
Success URL
-
Failure URL
-
-
Add Resources: A Resource must be defined within the Application Domain before you can add the resource to a specific policy.
-
Click the Resources tab on the Authentication Policy page.
-
Click the Add button on the Resources tab.
-
Click the Search button.
-
Click a URL in the Results table, then click Add Selected.
-
Repeat these steps as needed to add more resources.
-
-
Click Apply to save changes and close the Confirmation window.
-
Responses: Add policy Responses as described in "Adding and Managing Policy Responses for SSO".
-
Close the page when you finish.
20.7.3 Searching for an Authentication Policy
Users with valid Administrator credentials can use the following procedure to search for a specific authentication policy.
To search for an authentication policy in an Application Domain
-
Locate the desired domain as described in "Searching for an Existing Application Domain".
-
Click the Authorization Policies tab and:
-
Delete: "Deleting an Authentication Policy".
-
Detach Table: Click Detach in the tool bar to expand the table to a full page.
-
View Menu: Select a menu item to alter the appearance of the results table.
20.7.4 Viewing or Editing an Authentication Policy
Users with valid Administrator credentials can use the following procedure to modify an authentication policy in an Application Domain. This includes changing the authentication scheme, adding or removing resources or responses, and altering the Success or Failure URLs.
See Also:
"About the Authentication Policy Page"To view or modify an authentication policy
-
Locate the desired policy as described in "Searching for an Authentication Policy".
-
Click the desired policy name to display its configuration.
-
Edit Policy Elements (Table 20-9):
-
Resource: Click the Resources tab and:
-
Add: Click the Add button on the Resources table, click a URL in the list, click Apply.
-
Delete: Click a URL in the Resources table, click the Delete button on the table.
-
-
Click Apply to submit changes and close the Confirmation window (or close the page without applying changes)
-
Responses: View or edit responses as described in "Adding and Managing Policy Responses for SSO".
-
Close the page when you finish.
20.7.5 Deleting an Authentication Policy
Users with valid Administrator credentials can use the following procedure to delete an authentication policy from an Application Domain.
When you remove the policy, all resource definitions remain within the Application Domain. However, the policy and all responses are eliminated.
Note:
During a Delete operation, you are alerted to confirm removal of the policy. Confirmation is required to complete the operation.The following procedure describes how to delete the entire policy. To simply alter an element in the policy, see "Viewing or Editing an Authentication Policy".
See Also:
"About the Authentication Policy Page"To delete an authentication policy
-
Locate the desired policy as described in "Searching for an Authentication Policy".
-
Click the desired policy name to display and confirm this configuration.
-
Ensure that resources governed by this policy are added to a different policy.
-
Delete all responses, as described in "Adding and Managing Policy Responses for SSO".
-
On the Authentication Policies tab, click the Serial Number beside the policy, then click the Delete button in the tool bar.
-
In the Confirmation window, click Delete to confirm (or click Cancel to dismiss the window).
20.8 Defining Authorization Policies for Specific Resources
Each resource assigned to an Application Domain can be protected by only one authorization policy.
In an automatically generated Application Domain, the following authorization policies are seeded as defaults:
-
Protected Resource
-
Public Resource
After adding resource definitions to the Application Domain, Administrators can begin refining a default authorization policy, adding a new policy, and adding resources to authorization policies. This section provides the following topics:
20.8.1 About Authorization Policies for Specific Resources
Administrators can create an authorization policy to protect access to one or more resources based on attributes of an authenticated user or the environment. The authorization policy provides the sole authorization protection for resources included in the policy.
Authorization policies are local, which means that each policy applies only to the resources specified for the policy. A policy cannot be derived or applied to any other resource.
A single policy can be defined to protect one or more resources in the Application Domain. However, each resource can be protected by only one authorization policy.
Figure 20-18 shows the Authorization Policy page within an Application Domain. The resources assigned to this policy are displayed on the Resources tab of the policy.
Figure 20-18 Sample Individual Authorization Policy Page
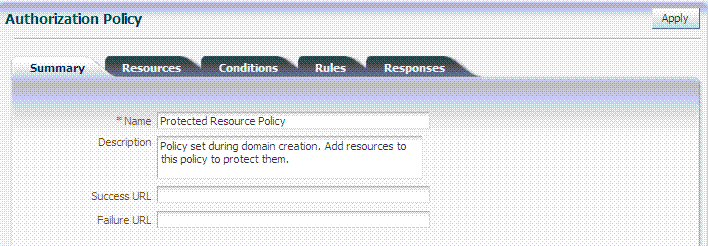
Description of "Figure 20-18 Sample Individual Authorization Policy Page"
Table 20-10 describes authorization policy elements. The elements are the same regardless of the domain; only the details will differ.
Table 20-10 Authorization Policy Elements and Descriptions
| Element | Description |
|---|---|
|
Name |
A unique name used as an identifier in the navigation tree. |
|
Description |
Optional unique text that describes this authorization policy. |
|
Success URL |
The redirect URL to be used upon successful authorization. |
|
Failure URL |
The redirect URL to be used if authorization fails. |
|
Summary |
General information (usually Name and optional Description). |
|
Resources |
One or more previously-defined resource URLs to be protected by this authorization policy. |
|
Conditions |
See Also "Introduction to Authorization Policy Rules and Conditions". |
|
Rules |
See Also "Introduction to Authorization Policy Rules and Conditions". |
|
Responses |
20.8.2 Creating an Authorization Policy and Specific Resources
Users with valid Administrator credentials can use the following procedure to add an authorization policy to an Application Domain.
Any resource to be added to a policy must be defined within the same Application Domain as the policy.
To create an authorization policy and resources
-
Locate the desired domain as described in "Searching for an Existing Application Domain".
-
Click the Authorization Policies tab, then click the Create Authorization Policy button to open a fresh page.
-
Summary Tab: Add your information to the Summary tab (Table 20-10).
-
Add Resources: The Resource must be defined in the Application Domain before you can add the resource to a specific policy.
-
Click the Resources tab on the Authorization Policy page.
-
Click the Add button on the Resources tab.
-
Click the Search button.
-
Click a URL in the Results table, then click Add Selected.
-
Repeat these steps to add more resources.
-
-
Click Apply to save changes and close the Confirmation window.
-
Responses: Add policy Responses as described in "Adding and Managing Policy Responses for SSO".
-
Conditions: Add authorization conditions, as described in "Defining Authorization Policy Conditions".
-
Rules: Add authorization rules, as described in "Defining Authorization Policy Rules".
-
Close the page when you finish.
20.8.3 Searching for an Authorization Policy
Users with valid Administrator credentials can use the following procedure to locate a specific authorization policy.
To search for an authorization policy
-
Locate the desired domain as described in "Searching for an Existing Application Domain".
-
Click the Authorization Policies tab and:
-
Edit: See "Viewing or Editing an Authorization Policy and Resources".
-
Detach Table: Click Detach in the tool bar to expand the table to a full page.
-
View Menu: Select a menu item to alter the appearance of the results table.
-
20.8.4 Viewing or Editing an Authorization Policy and Resources
Users with valid Administrator credentials can use the following procedure to view or modify an authorization policy within an Application Domain.
To view or edit an authorization policy
-
Locate the desired domain as described in "Searching for an Authorization Policy".
-
Summary: Edit as needed (Table 20-10):
-
Resource: Click the Resources tab and add or delete resources as needed:
-
Add: Click the Add button on the Resources table, click a URL in the list, click Apply.
-
Delete: Click a URL in the Resources table, click the Delete button on the table then confirm.
-
-
Click Apply to submit changes and close the Confirmation window (or close the page without applying changes).
-
Conditions: See "Viewing, Editing, or Deleting Authorization Policy Conditions".
-
Rules: See "Defining Authorization Policy Rules".
-
Responses: See "Viewing, Editing, or Deleting a Policy Response for SSO".
-
Close the page when you finish.
20.8.5 Deleting an Entire Authorization Policy
Users with valid Administrator credentials can use the following procedure to delete an authorization policy or simply delete resources within the policy.
Note:
During a Delete operation, you are alerted to confirm removal of the policy. Confirmation is required to complete the operation.When you remove the entire policy, all resource definitions remain within the Application Domain. However, the authorization policy and the conditions and rules governing access are eliminated.
To simply alter an element in the policy see "Viewing or Editing an Authentication Policy".
Assign resources governed by this policy to another authorization policy, either before or after deleting the policy.
To delete an authorization policy
-
Locate the desired domain as described in "Searching for an Authorization Policy".
-
Optional: Double-click the policy name to review its content, and then close the page when finished.
-
Delete: Click the policy name, and then click the Delete button in the tool bar.
-
In the Confirmation window, click Delete (or click Cancel to dismiss the window).
-
Confirm that the policy is no longer listed in the navigation tree.
20.9 Introduction to Policy Responses for SSO
Each policy can optionally contain one or more authentication or authorization responses, or both. Responses are post-processing actions (obligations) to be carried out by the web agent.
Note:
There are no responses in Token Issuance Policies.This section provides the following information:
20.9.1 About Authentication and Authorization Policy Responses for SSO
Administrators can define responses that declare the actions that must be fulfilled after successful authentication or authorization. Authentication and authorization data is returned to the client (typically a Web Agent).
Policy responses enable the insertion of information into a session or application and the ability to withdraw the information at a later time to enable SSO. For instance, identity mappings can be inserted into the customer's application or actions can be carried out by the Agent or the application.
Depending on the responses specified for authentication or authorization success and failure, the user might be redirected to a specific URL, or user information might be passed on to other applications through a header variable or a cookie value.
Note:
Oracle Access Manager 10g provided data passage to (and between) applications only by redirecting to URLs in a specific sequence.There are no default response provided. Figure 20-20 illustrates an Authorization Policy Response defined by an Administrator in the Oracle Access Management Console. Authorization responses can operate in conjunction with authorization conditions.
Figure 20-20 Authorization Policy Response in the Console
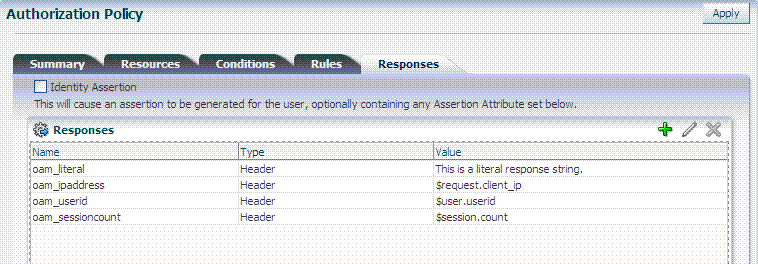
Description of "Figure 20-20 Authorization Policy Response in the Console"
Each response consists of two inputs (a type and an expression) and a single output (the value of the evaluated expression). The expression declares how the value should be constructed when the expression is processed. The response type defines the form of action to be taken with the value string.
-
The authentication policy determines the identity of the user. Each authentication policy requires an authentication scheme and responses (expressions).
-
The authorization policy determines whether the user has the right to access the resource. Each authorization policy requires authorization conditions and responses (expressions).
-
Cookie, Header, and Session responses are supported.
-
URL redirection can be set.
-
Response definitions are part of each policy. Response values can be literal strings or can contain additional embedded expressions that derive values from request, user, and session attributes.
Administrators set Responses in the Oracle Access Management Console, as described Table 20-11.
| Element | Description |
|---|---|
|
Name |
A unique name to distinguish this response from other responses that use the same mechanism (type). |
|
Type |
The mechanism used to convey the response. form of the action to be taken with the value string:
|
|
Value |
The response expression, set as a variable. For more information, see "About the Policy Response Language". |
|
Identity Assertion |
Identity Assertion is required for ID propagation for any issued token from Access Manager that represents an end user (and possibly its Access Manager session). Security Token Service clients that are Web applications protected by Access Manager requesting tokens to gain proxy access to a Relying Party (ID Propagation use case) are required to pass an Access Manager Identity Assertion token that represents the end user. The Identity Assertion Token is generated and returned as a policy response (HTTP HEADER named "OAM_IDENTITY_ASSERTION", value as a SAML token) after a successful authentication. As you add each (non-Asserted Attribute Type) Response, you might be informed that See Also: |
20.9.2 About the Policy Response Language
Access Manager authentication and authorization responses are defined using a very small, domain-specific language (DSL) with two main constructs:
-
Literal strings: For example:
This is a valid expression -
Variable references:
-
Declared using a dollar sign prefix
$ -
Scoped to a namespace: $
namespace.var_nameNote:
Certain variables include an attribute:$ns.name.attribute
-
20.9.3 About the Namespace and Variable Names for Policy Responses
With the namespace mechanism, the following variable types are to enable single sign-on:
-
Request: Information on the requested resource, the client making the request, and the policy matched during evaluation
-
Session: User session details
-
User: User details (user ID, group, and attribute information)
For details of each, see:
-
Table 20-12, "Namespace Request Variables for Single Sign-On"
-
Table 20-13, "Namespace Session Variables for Single Sign-On"
Table 20-12 Namespace Request Variables for Single Sign-On
| Namespace | Description |
|---|---|
|
agent_id |
Name of the requesting agent |
|
client_ip |
IP address of the user browser |
|
policy_appdomain |
Name of the Application Domain holding the policy matched for the request |
|
policy_eval_success_conditions |
List of policy conditions that evaluated to true, separated by COLON or configured response separator |
|
policy_eval_failure_conditions |
List of policy conditions that evaluated to false, separated by COLON or configured response separator |
|
policy_res |
Resource host ID and URL pattern matched for the request |
|
policy_name |
Name of the specific policy matched for the request |
|
res_host |
Requested resource's hostname |
|
res_port |
Requested resource's port number |
|
res_type |
Requested resource's type |
|
res_url |
Requested resource URL |
Table 20-13 Namespace Session Variables for Single Sign-On
| Namespace | Description |
|---|---|
|
attr |
Reference to an arbitrary session attribute, the name of which is passed to us as a variable attribute. Its value has been bound to the session by executing a session response during a previous request |
|
authn_level |
Current authentication level for the session |
|
authn_scheme |
Name of the authentication scheme executed to achieve the current authentication level |
|
count |
Session count for the user bound to this session |
|
creation |
Session creation time |
|
expiration |
Session expiration time |
Table 20-14 Namespace User Variables
| Namespace | Description |
|---|---|
|
attr.<attrName> |
Value of user attribute attrName. If attrName is multivalued, contains a list of attr values, separated by COLON or configured response separator |
|
groups |
List of user's group membership, separated by COLON or configured response separator |
|
userid |
The user ID |
|
user.id_domain |
The user's identity domain (essentially the same as the identity store) |
|
guid |
A unique identifier that locates the user entry in an Identity Store |
20.9.4 About Constructing a Policy Response for SSO
This section is divided as follows:
20.9.4.1 Simple Responses
After deciding on the response type and determining which namespace and variable, you simply enter the response attributes in the Oracle Access Management Console. A simple response might look like one of the several authorization responses shown in Figure 20-21.
Simple responses stand alone. Each is preceded with the dollar sign ($), followed by the namespace, which is separated from the variable Value by a dot (.). For example:
$namespace1.var1
Table 20-15 illustrates several simple responses and a description of what each one returns.
Table 20-15 Simple Responses and Descriptions
| Name | Type | Value (Simple $Namespace.Variable) | Returned Environment Variables and Values |
|---|---|---|---|
oam_literal |
Header |
This is a response string. |
HTTP_OAM_LITERAL This is a response string |
|
oam_sessioncount |
Header |
$session.count |
HTTP_OAM_SESSIONCOUNT integer |
|
oam_userid |
Header |
$user.userid |
HTTP_OAM_USERID name |
|
oam_ipaddress |
Header |
$request.client_ip |
HTTP_OAM_IPADDRESS nnn.nn.nn.nnn |
20.9.4.2 Compound and Complex Responses
When crafting a compound or complex policy response, Administrators can combine literals and variables arbitrarily using braces { } to construct an expression. A colon (:) is used as a separator. For example:
${namespace1.var1}:${namespace2.var2}
Literal String (LS): ${namespace1.var1}:${namespace2.var2}
LS: ${namespace1.var1}, LS:${namespace2.var2}
Figure 20-22 illustrates several complex responses defined by an Administrator. All are Header type responses, which set values in a header variable of an HTTP request for consumption by a downstream application.
Table 20-16 describes the complex responses shown in Figure 20-22.
| Name | Value | Returned Environment Variables and Values |
|---|---|---|
|
oam_resinfo |
Runtime resource: ${request.res_host}:${request.res_port}${request.res_url} |
HTTP_OAM_RESINFO Runtime resource: myhost.domain.com:1234/cgi-bin/myres3 |
|
oam_clientinfo |
Runtime client: Agent ID: ${request.agent_id}, Browser IP: $request.client_ip |
HTTP_OAM_CLIENTINFO Runtime client: Agent ID: RREG_OAM, Browser IP: 123.45.67.891 |
|
oam_userinfo |
${user.userid}'s groups: ${user.groups}, description: ${user.attr.description} |
HTTP_OAM_USERINFO WebLogic's groups: Administrators, description: This user is the default Administrator |
|
oam_sessioninfo |
Session creation/expiration/count: ${session.creation}/${session.expiration}/${session.count} |
HTTP_OAM_SESSIONINFO Session creation/expiration/count: Tue Oct 23 17:47:42 PST 2011/Wed Oct 24 01:47:42 PST 2011/7 |
|
oam_app_user |
$user.userid |
HTTP_OAM_USERID name |
For more information, see "About Policy Response Processing".
20.9.4.3 Multi-Valued Responses
Access Manager 11g supports responses with multiple values. These can be multivalued user attribute responses, user's group membership responses and the like. For multivalued responses, Access Manager uses a COLON as the separator and a BACKSLASH as the escape character. For example, if a user attribute genType has the values "Gold", "Platinum" and "Silver", the policy response for $user.attr.genType would be:
"Gold:Platinum:Silver"
If a COLON appears in any of the attribute values, it will be escaped with BACKSLASH. For example, for a user with group memberships as "Administrators", "Special:Users", the policy response for $user.groups would be
"Administrators:Special\:Users"
It is possible to change the default separator and escape character using the configurePolicyResponses(responseSeparator, responseEscapeChar) WLST command. Refer to the Oracle Fusion Middleware WebLogic Scripting Tool Command Reference for details.
20.9.5 About Policy Response Processing
Policy response processing occurs during the authorization request for which the authentication responses are replayed. Variable references are filled with appropriate values to ensure that all variables have a value set, and can be set consistently with authorization values.
Processing a response expression is done through a series of steps:
-
Scanner/tokenizer
-
Parser
-
Interpreter
During interpretation, variable references are resolved to values. The result after processing is a simple String value, which is propagated to the Agent or saved within the session for future use.
Authentication success responses are saved and then "replayed" along with any authorization responses on the first applicable authorization request.
Authorization response expressions create the actions to be taken, depending on the evaluation of the expression: success, failure, or inconclusive.
Note:
Oracle Access Manager 10g exhibits the same behavior in the "authenticating Webgate" configuration. This is also employed by Access Manager 11g with 10g Webgates: The 10g Webgate always redirects to the Access Manager 11g credential collector which acts like the authenticating Webgate.When referencing a variable, either the value is returned, or the following is returned:
-
NOT FOUND is returned if the variable is not set
-
NULL is returned if the variable is set to a null value
Note:
Verify the Responses.Pass Through Without Processing
A value that must be passed through without processing, can be identified using a \. For example:
\$1000
results in the value $1000 appearing in the returned value.
20.9.6 About Assertion Claims and Processing
For details, see Chapter 48, "Using Identity Context".
20.10 Adding and Managing Policy Responses for SSO
Policies and responses enable single sign-on and can override other directives. Before starting activities in this section, be sure to review the "Introduction to Policy Responses for SSO".
Unless explicitly stated, information in this section applies equally to authentication and authorization responses.
20.10.1 Adding a Policy Response for SSO
Users with valid Administrator credentials can use the following procedure to add a policy response for authentication or authorization to the Protected Resource Policy.
For example, you can collect the DN of the realm that is created when Oracle Internet Directory is installed. Optionally, you can also configure the global user ID of the subscriber in Oracle Internet Directory or a subscriber name rather than the default company as shown in Table 20-17.
Table 20-17 Fresh OSSO Installation: Protected Policy Response (Header)
| Response Parameter | Collect Realm DN when OID is Installed | Configure GUID of Subscriber IN OID to Different Company | Configure GUID of Subscriber IN OID to Default Company |
|---|---|---|---|
|
Name |
osso-subscriber-dn (lowercase) |
osso-subscriber (optional) |
osso-subscriber-guid (optional) |
|
Type |
Header |
Header |
Header |
|
Value |
dc=country,dc=example,dc=com |
dc=country_or_region,dc=com |
,dc=default_company,dc=com Go to the subscriber DN (in Oracle Internal Directory for example) and find the value (of orclguid for the DN, for example). |
Analyze desired conditions before crafting authorization responses to ensure the appropriate actions are taken by the response. You need an Application Domain with an existing authentication or authorization policy.
-
Locate the desired domain as described in "Searching for an Authorization Policy".
-
In the individual policy page, click to activate the Responses tab, then click the Add button and:
-
In the Name field, enter a unique name for this response.
-
From the Type list, choose a response type (Session or Header or Cookie).
-
In the Value field, enter a value for this response. For example: $namespace1.var1
-
Repeat as needed.
-
-
Click Apply, then close the Confirmation window.
-
Close the page when you finish.
-
Verify the Responses based on your definitions.
20.10.2 Viewing, Editing, or Deleting a Policy Response for SSO
Users with valid Administrator credentials can use the following procedure to view or edit a policy response for authentication or authorization.
You must have an Application Domain with an existing authentication or authorization policy.
To view, modify, or delete a policy response
-
Locate the desired domain as described in "Searching for an Existing Application Domain".
-
Click the Authentication (or Authorization) Policies tab, then click the desired policy name.
-
On the individual policy page, click the Responses tab and proceed as needed:
-
Add: See "Adding a Policy Response for SSO"
-
Edit: Click the desired Response Name, Type, or Value, edit as needed, and click Apply.
-
Delete: Click the desired response, then click the Delete button for the Response table.
-
-
Close the Confirmation window.
-
Close the page when you finish.
-
Verify Responses based on your definitions for:
-
Header
-
Session
-
Cookie: Use a browser plug-in tool or turn on the browser "show cookies" settings.
-
Assertion Claim
-
20.11 Introduction to Authorization Policy Rules and Conditions
In Access Manager 11g, each Authorization policy includes a rule that defines whether the policy allows or denies access to resources protected by the policy. The rule references conditions that define the user or population to be granted or denied access and other considerations for authorization. Authorization rules and conditions apply to all resources within a specific authorization policy.
Evaluation of conditions and rules determines if the authorization policy applies to the incoming request. The appropriate obligations take affect after successful authentication and work in concert with defined authorization rules, conditions, and responses. For each incoming request, the authorization policy determines if there are any conditions that apply. If so, these conditions are evaluated.
This section provides the following topics:
20.11.1 About Allow or Deny Rules
In an authorization policy, a Rule contains all (or a subset) of conditions defined for the policy. The effect of the Rule determines the effect of the policy.
You can set one or more rule effects (outcomes) per policy. However, you can specify only one Rule per outcome. The following outcomes can be applied to authorization and token issuance policies:
-
Allow authorized users access to a protected resource. If Allow conditions do not apply to a user, the user is not qualified by the policy and, by default, the user is denied access to the requested resource.
-
Deny authorized users access to a protected resource.
You can develop simple rules that rely on a single condition, or use expressions to define more complex rules based on multiple conditions. For more information, see "About Expressions and Expression-Based Policy Evaluation".
20.11.2 About Authorization Policy Conditions
A condition is an element that specifies one or more criteria to be satisfied by the access request. In structure, conditions are similar to constraints (in 11.1.1.3 and 11.1.1.5). However, earlier constraints included Allow and Deny rules that are now specified independently on the Rules tab.
Each authorization policy can contain one or more conditions. Using different condition types, you can:
-
Identify the users or groups of users who are either allowed or denied access (based on the rule) to protected resources.
-
Stipulate the range of IP addresses who are either allowed or denied access to protected resources.
Note:
If the user's IP address falls outside the range of denied addresses, this by itself is not enough for authorization to be successful. For authorization to be successful, the user must specifically be granted access based on an Allow rule. -
Set a time period defining when the condition applies.
-
Specify attributes that enforces evaluation of request context, user session state, and user attributes
The Conditions tab provides a table of defined conditions, organized by name, and a table of details for the selected condition, as shown in Figure 20-23.
Figure 20-23 Individual Authorization Policy Conditions Tab
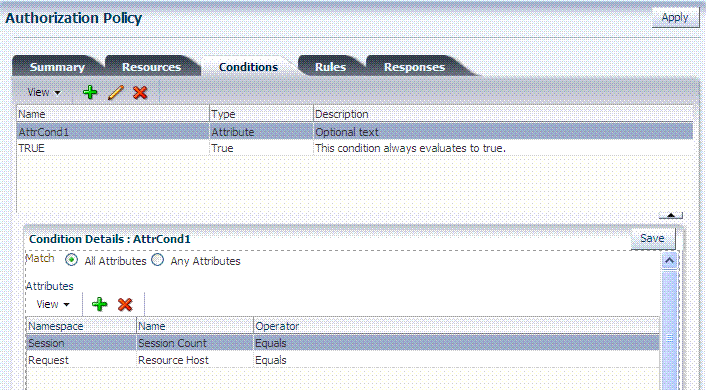
Description of "Figure 20-23 Individual Authorization Policy Conditions Tab"
Table 20-18 describes elements and controls on the Conditions tab.
Table 20-18 Authorization Policy Condition Tab
| Element | Description |
|---|---|
|
Conditions Table Elements |
Lists all conditions defined for this policy. |
|
Name |
A unique name used as an identifier for the condition. |
|
Type |
The kind of condition you want to use. Only one Type can be specified:
|
|
Description |
Optional unique text that describes this condition. |
|
Condition Details Section |
Depending on the Type of the selected condition, the information in this table will differ. For details, see: |
20.11.3 About Classifying Users and Groups for Conditions
Oracle recommends that you consider the same information for the policies and conditions when analyzing users and groups to determine who is explicitly allowed or denied access. For example, one authorization policy might be constrained to a particular time of day (Temporal Type) while another might be constrained to a specific group of users (Identity Type).
Note:
Do not be concerned about users who are denied access under any conditions. Users are denied access by default if none of the conditions qualify them for access.When classifying users Oracle recommends that you divide the users, and groups of users, into groups for whom different conditions apply. For example, conditions can determine when the users can access the resources, the computers from which they must make their requests, and so on.
If some users fall into multiple categories, for example, a user in the marketing group belongs to a certain project group, or a user in the human resources group also belongs to the project group, put the user in both categories. You can require that the user meet the conditions of two conditions.
To create policies for subsets of resources in an Application Domain and protect them with different authorization rules and conditions, consider the same information: who can access the resources protected by this policy and under what conditions you want explicitly to allow or deny access to the resources.
20.11.4 Guidelines for Authorization Responses Based on Conditions
For each condition type, consider the response actions that you want to occur for authorized users. For example, you might want the system to return user profile information and pass that information to a downstream application. For example:
-
If the user is authorized, you might want to pass the user's common name (cn) to another application so that the application can present a customized greeting to the user.
-
If the user is not authorized, you might also want to return information about the user for security purposes.
20.12 Defining Authorization Policy Conditions
You use conditions in an authorization policy to:
-
Identify the users by user name, role, or an LDAP filter whose criteria the user must satisfy.
-
Stipulate the computers where users can access resources.
-
Set a time period when the rule applies.
-
Specify attributes that enforces evaluation of request context, user session state, and user attributes
The mechanism to add a condition is the same regardless of the type you choose. A dialog box pops up where you define the name and type to create the condition container. Afterward you are presented with controls to define the specifics of the condition.
This section is divided as follows:
20.12.1 Choosing a Condition Type
This section provides the following topics:
20.12.1.1 About Choosing a Condition Type
You can have more than one instance of a given type of condition within a policy.
When an Administrator adds a condition to an authorization policy, a window (Figure 20-24) appears where you enter capture the Name, Type, and optional Description. When submitted, this information is used to create a container for condition details that must be also specified.
Table 20-19 describes the Add Condition elements.
Table 20-19 Add Condition Window Elements
| Element | Description |
|---|---|
|
Name |
A unique name for this condition. |
|
Type |
Only one Type can be specified:
|
|
Description |
Optional. |
After the container is added it is displayed on the Condition tab as shown in Figure 20-25. The Name, Type, and Description are displayed in the Results table at the top of the tab. The lower panel contains the details of the condition
Figure 20-25 Condition Containers on the Authorization Policy Page
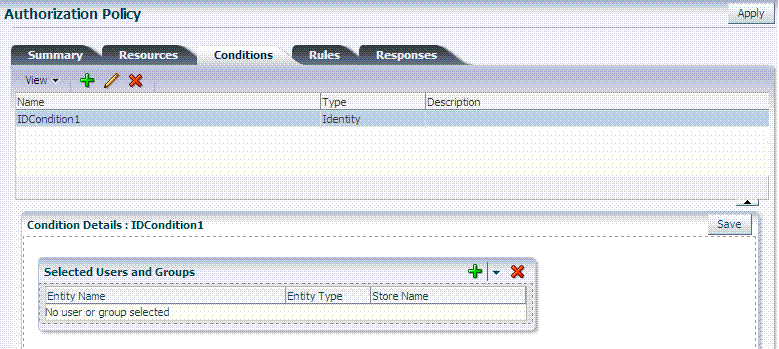
Description of "Figure 20-25 Condition Containers on the Authorization Policy Page"
See Also:
"Defining Authorization Policy Conditions" for information and procedures20.12.1.2 Choosing a Condition Type
Users with valid Administrator credentials can use the following procedure to choose a condition class for the authorization policy.
Note:
You can have more than one instance of a given class of condition in a policy.The Application Domain must exist.
See Also:
"About Choosing a Condition Type"-
Locate the desired policy as described in "Searching for an Authorization Policy".
-
Click the policy name to open its configuration.
-
On the individual policy page, click the Conditions tab.
-
Click the Add (+) button and (Table 20-19):
-
Name: Enter a unique name.
-
Type list, choose the kind of condition (Identity, for example).
-
Click the Add Selected button.
-
-
Proceed to one of the following topics to complete your definition:
20.12.2 Defining Identity Conditions
This section provides all information about Identity Conditions in the following topics:
20.12.2.1 About Identity Conditions
When defining an Identity Condition, you must add one or more members of a user population from one or more User Identity Stores. You can add the user population as a list of users or groups. Alternatively, you can add LDAP search filters to be used at runtime to identify the user population. LDAP search filters provide a simple way to specify a target identity population without having to reorganize or create new groups in the identity store (directory server). For details see:
20.12.2.1.1 About Identity Conditions and User Populations
After opening the condition container, any defined user population is displayed. As with the other condition types, the Identity type can be used in conjunction with identity and temporal conditions.
When adding an identity condition, you open the popup menu beside the Add (+) button (labeled 1 in Figure 20-26), choose to Add Users and Groups or Add Search Filter (2). Figure 20-26 shows the popup menu and the Add Identities window that appears (3). After locating the desired identities, select the desired Identities and click Add Selected (4).
Table 20-20 describes the Add Identities elements.
Table 20-20 Add identities Elements
| Element | Description |
|---|---|
|
Store Name |
Select the desired LDAP store for this search from the list of registered LDAP stores. |
|
Entity type |
Choose either Users, Groups, or All to define your search criteria. |
|
Entity Name |
Enter information to further refine your search criteria. |
|
Search |
Click this button when your search criteria are defined. |
|
Results table |
Displays the results of your search. |
|
Add Selected |
Click to add the selected users or groups from the results table to the Condition's Details. |
After selecting one or more identities and clicking the Add Selected button, your Conditions tab might look something like Figure 20-27.
Figure 20-27 Identity Condition and Details
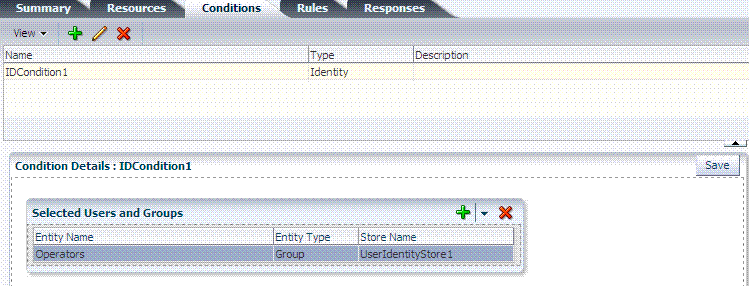
Description of "Figure 20-27 Identity Condition and Details"
To save these details as a condition, click the Save button in the upper-right corner of the tab.
20.12.2.1.2 About LDAP Search Filter Support in Identity Conditions
Access Manager 11g authorization conditions accept a list of users, groups, and LDAP search filters as part of allowed or denied identities. An LDAP filter is a text string that expresses specific criteria for the search operation. LDAP search filters provide a simple way to specify a target population without reorganizing or creating new groups in the identity store (directory server).
Access Manager 11g accepts LDAP search filter data for the following conditions and resource types:
-
Identity Conditions
-
Token Requestor Identity Conditions
-
All resource types (HTTP, TokenServiceRP, and other custom resource types)
When a user tries to access a resource protected by a condition containing an LDAP search filter, Access Manager performs a directory lookup (LDAP search) on the identity domain (identity store) specified as a part of the filter. Search results are cached to avoid repeated directory server lookups.
If you choose Add Search Filter ..., the controls shown in Figure 20-28 appear. You can add more than one LDAP Search Filter in an authorization rule for evaluation at runtime. The field where you enter your LDAP search filter is used to identify allowed/denied users.
Table 20-21 describes elements associated with adding a Search Filter.
Table 20-21 Add Search Filter Elements
| Element | Description |
|---|---|
|
Domain |
The Identity Domain (registered user identity store) in which the search should be conducted during runtime. Each filter must be associated with a specific user identity store. With Access Manager 11g, a directory lookup (LDAP Search) is performed only on the specified identity domain (identity store). |
|
Search Filter |
The field where you enter your LDAP search filter. For example: ((|dept=sales)(dept=support)) See Also: "About LDAP Search Filter Syntax" |
|
Test Filter |
This button enables you to test your LDAP Search Filter to ensure it returns the expected result. |
|
Test Results |
The results of your filter test are displayed with your own designations for:
|
|
Add Filter |
Click to Add the filter to this identity condition. |
|
Cancel |
Click to dismiss the Add Search Filter dialog without adding a filter. |
Figure 20-29 shows the Identity Conditions: Details page, displayed after adding an LDAP Search Filter.
20.12.2.1.3 About LDAP Search Filter Syntax
Only standard LDAP attributes can be used when defining an LDAP search filter. Exact syntax depends on your identity store; see your vendor documentation. Table 20-22 illustrates LDAP Search Filter examples for Access Manager.
Table 20-22 LDAP Search Filter Examples for Access Manager
| Filter Type and Operators | Description | Syntax Example |
|---|---|---|
|
Static LDAP Search Filters |
When you implement a static search filter, all search results must match a fixed value. For example, you can restrict a search to return only people whose directory profiles show an organizational unit of Sales. As an example of a simple static filter, suppose you want to provide Selector searches for the seeAlso attribute. The filter returns search results that show only people whose directory profiles contain a businessCategory value of dealership. |
(attribute=value) For example: (businessCategory=dealership) |
|
Static Searches Using Wild Cards |
As an example of a static filter that uses wild cards, suppose you want only people with the word Manager in their title to be returned on a search using the Selector. You can create a filter that searches for the string Manager with the asterisk (*) wildcard. |
(attribute=*value*) For example: (title=*manager*) |
|
Dynamic LDAP Search Filters |
A dynamic filter allows a search to return results that are based on a user profile. A dynamic filter is a conventional LDAP search filter with filter substitution syntax. |
(attribute=$attribute$) |
|
Substitution syntax |
Substitution syntax is evaluated dynamically, according to the person executing a task. For instance, you can enter substitution syntax where the attribute value for the source DN (the person logged into the application) is substituted and evaluated against the target DN (the entry you are trying to view). Note: Setting a searchbase can present significant administrative overhead. A filter-based approach accomplished by substitution syntax can provide the same functionality in a more scalable and simplified design. Using substitution syntax, you can create a function that starts searches higher in the directory structure, but filters the search data by comparing an attribute of information from the search initiator's record (for example, using the substitution Note: For the selected searchbase, users can search only for entries from the same |
(attribute=$attribute$) For example: The following filter finds all those in the same organizational unit as the person logged in to the application: (ou=$ou$) |
|
Dynamic Searches Using Wild Cards |
Wildcards are supported in a dynamic filter. For example, suppose you want to supply a contactPerson attribute in an organizationalUnit object. The contactPerson attribute should return people in same Zip code as the organizationalUnit object. If the organizationalUnit profile contains an attribute zipCode, and the Zip code is specified at the end of a postalAddress directory attribute. |
(attribute=*$attribute$) For example: (postalAddress=*$zipCode$) |
|
Searches Using the Not Operator: (!) |
The Not operator is supported when constructing a filter. The optimized algorithm causes the filter (!(sn=white)) to not give the expected result. |
((!(sn=white))(objectclass=personOC)) |
See Also:
"Specifying Identity Type Conditions"During migration to Access Manager 11g (from 10g), each LDAP Rule maps to corresponding 11g identity domains (user identity stores) based on Oracle Access Manager 10g directory profiles. Access Manager 11g identity domains (user identity stores) must be associated with each LDAP search filter.
See Also:
Oracle Fusion Middleware Upgrade Guide for Oracle Identity Management20.12.2.2 Specifying Identity Type Conditions
Users with valid Administrator credentials can use the following procedure to add identity type conditions to an Application Domain.
Note:
You must save each condition definition individually, before adding or selecting another condition.The Application Domain must exist.
To add identity conditions to an authorization policy
-
Locate the desired policy as described in "Searching for an Authorization Policy".
-
Click the Conditions tab, click the Add (+) button.
-
Enter a Name, select Identity from the Type list (or Token Requestor Identity) and click Add Selected.
-
Add Users/Groups:
-
In the Condition Details section click the Add (+) button.
-
Choose Add Users and Groups from the list.
-
Store Name: Choose the desired name from the list of registered LDAP stores.
-
Enter criteria (Identity Type and Identity Name) for the population you want to find, and click the Search button.
-
Select desired results.
-
Click Add Selected.
-
Repeat to add another User or Group condition.
-
-
Add Search Filter:
-
In the Condition Details section click the Add (+) button.
-
Domain Name: Choose the desired user identity store for this filter.
-
Search Filter: Enter your search filter syntax (Table 20-21).
-
Test: Click the Test Filter button and review the results table.
-
Click the Add Selected button.
-
Repeat to add another LDAP Search Filter condition.
-
-
Click Apply and then close the Confirmation window.
-
Close the page when you finish.
-
Verify the Conditions by logging in as different users and test access to the resource.
20.12.3 Defining IP4 Range Conditions
This section provides the following information:
20.12.3.1 About IP4 Range Condition Types
With the IP4 Range condition type, Administrators can specify a list of IP address ranges that will either be allowed or denied access. Like the other authorization conditions, IP4 Range condition types can be used in conjunction with identity and temporal conditions.
Explicit Addresses: Each IP address you specify must be an explicit, valid address (format nnn.nnn.nnn.nnn): 192.2.2.2, for example.
Note:
Oracle Access Manager 10g accepts a wildcard as the last entry (192.2.2.* or 192.2.*, for example). IP4 Ranges with no wildcards can be easily ported to 11g by creating a Condition containing multiple IP4 Range values. However, 10g IP4 Ranges with wildcards are expanded by upgrade tooling into multiple ranges relevant to the wildcard.IP4 Range: You define a range by entering From (start) and To (end-range) address values. Each IP address you specify must be an explicit, valid address (format nnn.nnn.nnn.nnn): 192.2.2.2, for example. The address specified in the To field should be greater than the address specified in the From field. During authorization, Access Manager checks to ensure that the client IP address falls between the From (start)) and To (end-range) addresses specified. If multiple overlapping ranges are specified, and the client's IP address falls within even one of the ranges, the condition evaluates to "true" and allows (or denies) access based on the condition that was set for the condition.
If multiple overlapping ranges are specified, and the client's IP address falls within any one of the ranges, the condition evaluates to "true" and allows (or denies) access based on the condition.
Note:
If theFrom IP address is greater than the To address, the condition cannot match any client IP address.Figure 20-30 illustrates the IP4 Range Conditions table with a sample starting and ending IP4 Range. If you enter an invalid range, you are notified and unable to save it.
20.12.3.2 Defining IP4 Range Conditions
Users with valid Administrator credentials can use the following procedure to add IP4 Range type conditions to an Application Domain. You must save each condition definition individually, before adding or selecting another condition.
Note:
If the user's IP address falls outside the range of denied addresses, this by itself is not enough for authorization to be successful. For authorization to be successful, the user must specifically be granted access based on an Allow rule.The Application Domain must exist.
See Also:
"About IP4 Range Condition Types"To add IP4 Range type conditions to an authorization policy
-
Locate the desired policy as described in "Searching for an Authorization Policy".
-
Click the Conditions tab, click the Add (+) button.
-
Enter a Name, select IP Range from the Type list, enter an optional Description, and click Add Selected.
-
Add the desired IP address range (Table 20-22):
-
In the Details panel, click the Add (+) button to display the Add IP Range dialog.
-
From: Enter the start of the range. -
To: Enter the end of the range. -
Click the Add button to include this range in the Condition Details section.
-
Repeat these steps to add another range.
-
-
Click Apply and then close the Confirmation window.
-
Verify your IP4 Range Conditions by logging from different clients with different IP addresses to test access to the protected resource.
20.12.4 Defining Temporal Conditions
This section provides the following topics:
20.12.4.1 About Temporal Conditions
With the Temporal condition type, Administrators must add the start and end time and the range of days. Like the other conditions, this one can be used in conjunction with identity and IP4 Range conditions.
By default, all days in the range are enabled (though none are checked in the form as shown in Figure 20-31.
Figure 20-31 Temporal Condition Type Details Page
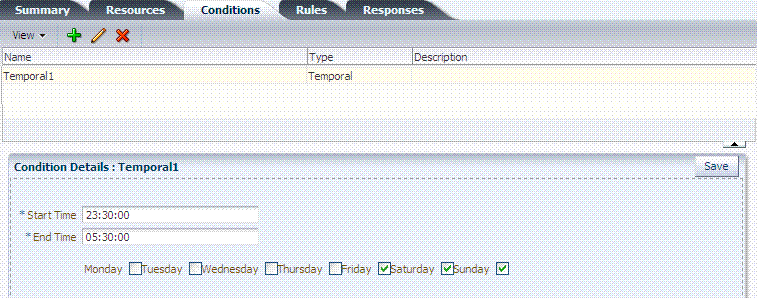
Description of "Figure 20-31 Temporal Condition Type Details Page"
Time periods must be specified in the HH:MM:SS (hour, minute, and second) format based on a 24-hour clock based on Greenwich Mean Time (GMT). Midnight is specified as 00:00:00 (start). The day ends at 24:59:59.
Table 20-23 Temporal Condition Details
| Elements | Description |
|---|---|
|
Start Time Notes: Time is specified using a full 24-hour range. For instance, midnight is specified as 00:00:00 and 11:00 PM is specified as 23:00:00. |
Specifies the hour, minute, and second that this condition begins. Notes: Time is based on Greenwich Mean Time (GMT). GMT is the same all year with no adjustments for daylight savings time or summer time. |
|
End Time |
Specifies the hour, minute, and second that this condition concludes. |
|
Days |
Specifies the days where this policy is active. Default: All Days (even though these are not checked). |
Save the details before closing this page.
See Also:
"Defining Temporal Conditions"20.12.4.2 Defining Temporal Conditions
Users with valid Administrator credentials can use the following procedure to add temporal type conditions to an Application Domain.
Note:
You must save each condition definition individually, before adding or selecting another condition.The Application Domain must exist.
See Also:
"About Temporal Conditions"To add temporal conditions to an authorization policy
-
Locate the desired policy as described in "Searching for an Authorization Policy".
-
Click the Conditions tab, click the Add (+) button.
-
Enter a Name, select Temporal from the Type list, enter an optional Description, and click Add Selected.
-
In the Details panel (Table 20-23): Click the condition name in the table to open the details panel:
-
Enter the Start time.
-
Enter the End time.
-
Click the days of the week to which this condition applies (or leave all blank to specify every day of the week).
-
Click Save.
-
-
Click Apply and then close the Confirmation window.
-
Verify the Temporal Conditions by logging in at different times to validate access to the protected resource.
20.12.5 Defining Attribute Conditions
This section provides the following topics:
20.12.5.1 About Attribute Conditions
An attribute-type condition enforces the evaluation of request context, user session state and user attributes for Allow or Deny access pertaining to all resource types and authorization policies in the Application Domain. With an attribute-type condition defined, access is based on a list of name-value pairs scoped by the:
-
Request context: Information on the requested resource, the client making the request, and the policy that was matched during evaluation.
-
Session: User Session details (pre-defined session attributes or a reference to an arbitrary session attribute) when the user has an established session.
-
User: User attribute information (reference to a LDAP attribute). This condition is used to define a condition on a reference to a user's arbitrary LDAP attribute only. However, conditions based on userID or groupID are defined using Identity Conditions.
Attribute type conditions are required when access is based on one of the situations described in Table 20-24.
Table 20-24 Access Conditions that Require Attribute-Type Conditions
| When Access is based on ... | Description |
|---|---|
|
Session attribute |
A user is authorized to access the resource if the session attribute "Authentication level" is xx and Session Attribute "s1" = "v1" and Session Start Time = "xxxx". |
|
Requested resource |
hostname and port number |
|
User details |
A user is authorized to access the resource if its "Empno" = "xxxx" (department=sales, for example) See: Table 20-28, "Attribute Condition Data (Aggregation of Conditions)" |
|
Token Issuance based on a session attribute |
The Requester Partner can issue a token to the Relying Party if the claim contains an attribute "SessionActiveTime" = "15000". You define claims-based conditions of the Token Issuance policy based on the assertions created using session data. |
An Administrator defining attribute type conditions enters data into fields for built-in attributes and known attributes. The attribute name can be entered in a text field or selected from a list of values. The condition to be executed is constructed using "AND" or "OR" conjunctions on the condition. Figure 20-32 illustrates the Attribute Conditions page.
Figure 20-33 shows the Add Attributes dialog box. Each attribute condition is defined by the fields described in Table 20-25.
See Also:
"Defining Attribute Conditions"Table 20-25 Attribute Condition Elements
| Condition | Description |
|---|---|
|
Namespace |
Supported namespaces:
|
|
Name |
Attribute name, which can be added as follows, depending on the:
|
|
Operator |
Allowed operators:
|
|
Value |
Literal value with no special wildcard characters. |
Table 20-26 identifies the list of built-in attribute names for Request Built-ins:
Table 20-26 Attribute Names for Request Built-ins
| Attribute Name | Description |
|---|---|
|
agent_id |
Name of the requesting agent. |
|
client_ip |
IP address of the user browser. |
|
Policy_appdomain |
Name of the Application Domain holding the policy matched for the request. |
|
Policy_res |
Resource host ID and URL pattern matched for the request. |
|
policy_name |
Name of the specific policy matched for the request. |
|
res_host |
Requested resource's hostname. |
|
res_port |
Requested resource's port number. |
|
res_type |
Requested resource's type. |
|
res_url |
Requested resource URL. |
Table 20-27 identifies the list of attribute names for Session-based attribute-type conditions.
Table 20-27 Attribute Names for Session Built-ins
| Attribute Name | Description |
|---|---|
|
Authentication Level |
Current authentication level for the session. |
|
Authentication Scheme |
Name of the authentication scheme executed to achieve the current authentication level. |
|
Session Count |
Session count for the user bound to this session. |
|
Session Creation Time |
Session creation time. |
|
Session Expiry Time |
Session expiration time. |
Example: Attribute Condition Data (Aggregation of Conditions)
Table 20-28 illustrates sample condition data for each allowable namespace.
20.12.5.2 Defining Attribute Type Conditions
Users with valid Administrator credentials can use the following procedure to add attribute type conditions to an Application Domain.
Note:
You must save each condition definition individually, before adding or selecting another condition.The Application Domain must exist.
See Also:
"About Attribute Conditions"To add attribute type conditions to an authorization policy
-
Locate the desired policy as described in "Searching for an Authorization Policy".
-
Click the Conditions tab, click the Add (+) button.
-
Enter a Name, select Attribute from the Type list, enter an optional Description, and click Add Selected.
-
Add Details for Attribute Condition: Click the name of the condition to expand the details panel, and:
-
Match: Click either All or Any.
-
Namespace: Select from the list (Table 20-25).
-
Name: Select from the list or enter manually (Table 20-26 or Table 20-27).
-
Operator: Select from the list (Table 20-25).
-
Value: Enter manually (Table 20-28).
-
Click Save.
-
Repeat as needed.
-
-
Click Apply and then close the Confirmation window.
-
Verify the Attribute Conditions by logging in with different scenarios.
20.12.6 Viewing, Editing, or Deleting Authorization Policy Conditions
Users with valid Administrator credentials can use the following procedure to add identity type conditions to an Application Domain.
The Application Domain and authorization policy exist.
To view, edit, or delete authorization policy conditions
-
Locate the desired policy as described in "Searching for an Authorization Policy".
-
Click the Conditions tab.
-
Edit Condition Details: Click the desired condition, click the Edit button to display the Details panel. Depending on the condition type, perhaps only the Description can be edited.
-
True: Click the name, click the Edit button; only the Description can be edited.
-
Delete Conditions: Click the condition to remove and click the Delete button on the Condition tab.
-
Click Apply and then close the Confirmation window.
-
Close the page when you finish.
-
Verify the Conditions by accessing the resource and evaluating the results.
20.13 Defining Authorization Policy Rules
When Allow access rules, Deny access rules, or both are specified and do not apply to a user, the user is not qualified by the rule, and is denied access to the requested resource by default.
To specify who is allowed or denied access to the resource, the rule can do the following:
-
Identify the users by user name, role, or an LDAP filter whose criteria the user must satisfy.
-
Stipulate the computers where users can access resources.
-
Set a time period when the rule applies.
This section provides the following topics:
20.13.1 About Defining Rules in an Authorization Policy
Rules are new constructs in the Access Manager 11g policy model. A Rule specifies of how to combine condition evaluation outcomes. Each Rule also contains a rule effect (ALLOW or DENY), which determines the overall policy outcome.
Authorization rules define the actions to take during evaluation of the policy, conditions, and rules as well as what to do based on the outcome. There are three possible outcomes:
-
True (Allow access): If the user meets the Allow access condition, the user qualifies for the Allow access part of the rule.
-
False (Deny access): If the user meets the Deny access condition, the user qualifies for the Deny access part of the rule.
-
Inconclusive: If the user satisfies neither the Allow access nor the Deny access conditions, the rule is said to be unqualified for that user. You can also think of this as the user not qualifying for the rule. If evaluation of a rule results in an unqualified user, the user is denied access to the resource based on that rule.
In some cases, a single authorization rule is all that is required to protect the resources of an Application Domain or a policy. You can configure a rule to identify who is allowed access to the resources it protects, who is denied access to them, and under what conditions these controls apply (for example, when they apply and from which computer). An authorization rule does not need to cover all users in its Allow access and Deny access conditions. Users who request access to a resource that is protected by the rule but do not qualify for any of the conditions are, by default, denied access to the resource.
For other cases, it may be necessary to configure multiple authorization conditions into rules to protect resources. You can impose complex conditions on different users. For example, you can define a rule that includes several authorization conditions, one or more of which a user must meet to qualify for access to a protected resource (or to qualify for denial of access to it). For example, you might require the user to meet two conditions—such as belonging to one group and using a computer assigned a specific IP address—to be granted access to the resource.
Oracle Access Management Console makes it easy for you to form expressions for an authorization rule. Conditions are declared outside of rules and are referenced within rules. Evaluation outcomes are combined in either Simple mode or Expression mode. Figure 20-34 shows the Rules tab in an authorization policy.
Table 20-29 describes the elements and controls on the Rules tab for Simple Mode evaluations.
Table 20-29 Authorization Policy Rules Elements
| Element | Description |
|---|---|
|
Rule Mode |
The method used for evaluation of conditions and rules:
|
|
Allow Rule |
The rule that allows access based on evaluation of your rules and the Selected Conditions list. |
|
Deny Rule |
The rule that denies access based on the evaluation of your rules and the Selected Conditions list. |
|
Match |
Criteria you choose to either match All conditions in the Selected Conditions list or Any conditions the Selected Conditions list. |
|
Available Conditions |
A list of all defined conditions for this authorization policy. |
|
Selected Conditions |
A list of the specific conditions that you build by moving items from the Available Conditions list to this list for use during the policy evaluation process. |
|
|
Controls in the form of arrows enable you to add a condition to the Selected Conditions list (or vice versa to remove a condition from those selected). |
20.13.2 About Expressions and Expression-Based Policy Evaluation
When a user requests access to a resource that is protected by an authorization condition and rule, information about the user is checked against the rule. If the condition stipulates other information, such as time period or time of day the condition applies, that, too, is checked. This process is referred to as evaluation of the rule.
An authorization expression consists of a single rule or a group of rules combined to express more complex conditions. For example, you can create an expression that requires a user to meet the Allow access conditions of two rules to be granted access to the resource. You use the Oracle Access Management Console to create these expressions, which include the following elements:
-
Authorization conditions that you select from those that are defined and available in the authorization policy
-
Operators that you use to combine rules to provide the kind of authorization protection that you want (Table 20-31)
For expressions that contain multiple conditions, a user may qualify for none of the expression's conditions, one of the conditions, or for the conditions of multiple rules. In any case, it is the result of evaluation of the expression—all of its conditions and how they are combined—not any one condition, that determines whether a user is allowed or denied access to a resource.
About the Definitive Result of an Authorization Expression: Access Manager evaluates the rules of an expression until it can produce a definitive result. Evaluation of an authorization expression may produce a definitive Allow access result, a Deny access result, or an Inconclusive result.
Figure 20-35 shows the Rules tab when you use Expression as a Rule Mode.
Table 20-30 describes the elements on the Rule tab in Expression mode.
Table 20-30 Rule Tab in Expression Mode
| Element | Description |
|---|---|
|
Rule Mode |
The method used for evaluation of conditions and rules:
See Also: Table 20-31, "Operators for Expressions in Authorization Rules" |
|
Allow Rule |
The rule that allows access based on evaluation of your rules and the Selected Conditions list. |
|
Deny Rule |
The rule that denies access based on the evaluation of your rules and the Selected Conditions list. |
|
Conditions |
Provides a list of all conditions defined for this authorization policy. |
|
Insert Condition |
Adds the selected Condition to the expression window. |
|
Validate |
Automatically tests the validity of the expression and reports results. |
Table 20-31 identifies the operators you can use when building an authorization expression.
Table 20-31 Operators for Expressions in Authorization Rules
| Operator | Description |
|---|---|
|
( ) |
By default, two rules on either side of an AND operator compose the compound AND condition. Rules on either side of an OR operator are alternatives. When no parenthesis are used to enforce grouping of rules, the AND operator takes precedence over the OR operator. You can use parenthesis to override the default way in which the rules of an expression are grouped. Evaluation still occurs from left to right, but the rules are organized within the couplings and groups you create through use of parenthesis. |
|
& |
The AND operator, which you use to form a compound condition which combines authorization rules. Any number of rules can be combined using the AND operator to implement the full scope of conditions a user must meet to satisfy the authorization requirement. However, a user must satisfy the same kind of condition—either Allow Access or Deny Access—of all of the rules of the AND compound condition for the AND clause to produce a definitive result. An authorization expression can contain more than one coupling or grouping of rules combined using AND. For example, it may contain several AND clauses, one connected to another by an OR operator. |
|
| |
The AND operator. An authorization expression can include a complex rule containing two or more alternative authorization conditions. Authorization rules forming a complex condition are combined using the OR operator. Each of the authorization rules specified by a complex OR condition stands on its own. Unlike compound conditions using the AND operator, the user need qualify for the condition of only one of the authorization rules connected by OR operators. An authorization expression can contain as many authorization rules connected using the OR operator as are required to express the authorization policy for the resources it protects. You can use the OR operator to connect authorization rules all of which have Deny Access conditions, all of which have Allow Access conditions, or which specify a mix of Deny Access and Allow Access conditions. You can connect single rules to single rules using OR, and you can connect a single rule to a clause containing rules combined using AND. |
20.13.2.1 Expression Evaluation in Authorization Rules
The result of evaluation of an authorization rule, in conjunction with other authorization rules, if more than one is included in the expression, determines if a user is granted access to the requested resource. Evaluation of the rule occurs as follows:
-
Each authorization rule specified in the expression is evaluated from left to right. The outcome is combined progressively with the previously evaluated rules.
-
When the evaluation outcome is good enough to decide the overall policy outcome without having to evaluate any more rules, evaluation stops and the overall outcome is returned.
-
Each evaluation outcome can be either True, False, or Inconclusive.
Authorization Success: In this case, the user succeeds in gaining access to the requested resource. This result is associated with the Allow Access condition of the expression.
Authorization Failure: In this case, the user fails to gain access to the requested resource. This result is associated with the Deny Access condition of the expression.
Authorization Inconclusive: In this case, the rules of the expression produce conflicting results, and the user is denied access to the resource. If the match for Identity, IP4 address, or timing condition fails then expression evaluation stops and the result of the overall evaluation is deemed Inconclusive. However, based on the other rules present in the expression, this result might not affect the overall policy evaluation.
For example, the following expression:
(Rule1 AND Rule 2) OR (Rule 3 AND Rule 4)
Yields the following outcomes:
-
Rule1 - INCONCLUSIVE
-
Rule2 - FALSE
-
Rule3 - TRUE
-
Rule4 - TRUE
-
Overall: TRUE (Allow)
The following sample expression uses (in order of type) Identity, Temporal, IP4Range, and Attribute conditions:
(IsEMEAemployee & IsEMEAWorkingHours & !(ConnectedOverVPN |NotReadDisclaimer))
Condition names that include spaces, tabs, or special characters (if properly escaped when defining the expression) are properly handled
20.13.3 Defining Rules in an Authorization Policy
Users with valid Administrator credentials can use the following procedure to add rules to an authorization policy.
Defining Authorization Policy Conditions.
To define authorization policy rules
-
Locate the desired domain as described in "Searching for an Authorization Policy".
-
Click the Rules tab.
-
Expression:
-
Click Expression as the Rule Mode.
-
In the Allow Rule Expression field, build your expression by entering operators (Table 20-31) and choosing and inserting conditions (Table 20-30).
-
Click the Validate button to confirm your expression.
-
Repeat Steps b and c for the Deny Rule.
-
Click Apply.
-
-
Simple Rule Mode:
-
Click Simple as the Rule Mode.
-
Allow Rule:
Click to Match either:
All selected conditions
Any of the selected conditions
Using arrows for Allow (or Deny) Rule, move desired conditions from the Available Conditions column into the Selected Conditions column.
Click Apply.
-
Repeat step b for the Deny Rule.
-
-
Click Apply and then close the Confirmation window.
-
Verify the rules by accessing the resource and evaluating the results.
20.14 Validating Authentication and Authorization in an Application Domain
The procedure here provides several methods for confirming that Agent registration and authentication and authorization policies are operational. The procedures are nearly identical for both OAM Agents and OSSO Agents (mod_osso). However, OSSO Agents use only the authentication policy and not the authorization policy.
-
Users and groups who are granted access must exist in the primary LDAP User Identity Store that is registered with Oracle Access Management
-
Agents must be registered to operate with Access Manager. After registration, protected resources should be accessible with proper authentication without restarting the Administration or Managed Server.
-
Application domain, authentication policies, and authorization policies must be configured.
-
Logout should be configured as described in Chapter 22, "Configuring Centralized Logout for Sessions Involving 11g WebGates"
To verify authentication and access
-
Using a Web browser, enter the URL for an application protected by the registered Agent to confirm that the login page appears (proving that the authentication redirect URL was specified appropriately). For example:
http://exampleWebserverHost.example.com:8100/resource1.html -
Confirm that you are redirected to the login page.
-
On the Sign In page, enter a valid username and password when asked, and click Sign In.
-
Confirm that you are redirected to the resource and proceed as follows:
-
Success: If you authenticated successfully and were granted access to the resource; the configuration is working properly.
-
Failure: If you received an error during login or were denied access to the resource, check the following:
-
Authentication Failed: Sign in again using valid credentials.
-
Access to URL ... denied: This userID is not authorized to access this resource.
-
Resource not Available: Confirm that the resource is available.
-
Wrong Redirect URL: Verify the redirect URL in the Oracle Access Management Console.
-
-
20.15 Understanding Remote Policy and Application Domain Management
Several remote management modes enable Administrators to update, or validate, or delete an existing agent registration. This section provides the following topics:
20.15.1 About Managing Policies Remotely
Access Manager provides two modes to manage Application Domains and their policies without registering or modifying the companion agent. Remote policy and Application Domain management supports only create and update functions. Remote management does not support removing Application Domains or policies.
Note:
Application Domain removal is a manual task that must be performed using the Oracle Access Management Console.Table 20-32 describes these remote Application Domain management modes. Again, command parameters include the mode, and an input *Request.xml file using a relative path with respect to $OAM_REG_HOME, the preferred location for input files):
./oamreg.sh <mode> <input_file> [prompt_flag] [component.oam.config_file] <mode> value
Table 20-32 Remote Policy Management Modes, Templates, and Flags
| Mode and Template | Description |
|---|---|
|
policyCreate $OAM_REG_HOME/input/ CreatePolicyRequest.xml |
Allows Administrators to create Host Identifiers and an Application Domain without registering an Agent.
./bin/oamreg.sh policyCreate input/myCreatePolicyRequest.xml
|
|
policyUpdate $OAM_REG_HOME/input/ UpdatePolicyRequest.xml |
Allows Administrators to update existing Host Identifiers and Application Domain without updating an Agent. ./bin/oamreg.sh policyUpdate input/UpdatePolicyRequest.xml |
|
Flag |
Optional |
|
[prompt_flag] value: [-noprompt] |
When the optional - Examples from $OAM_REG_HOME location: (echo username; echo password; echo webgate_password;) | ./bin/oamreg.sh inband input/Request.xml -noprompt component.oam.conf (echo username; echo password; echo webgate_password; echo httpscert_trust_prompt;) | ./bin/oamreg.sh inband input/Request.xml -noprompt (echo username; echo password; echo webgate_password; echo cert_password;) | ./bin/oamreg.sh inband input/Request.xml -noprompt (echo username; echo password; echo webgate_password; echo httpscert_trust_prompt; echo cert_password;) | ./bin/oamreg.sh inband input/Request.xml -noprompt |
|
component.oam.config_file |
Optional. Remote registration accepts a configuration file with a URI list as an argument. component.oam.config_file defines the full path to a file containing any number of protected or public URIs. Ensure that the file uses the following syntax and format:
Note: You can configure the authentication scheme for a policyusing the following format (the policy name and authentication scheme name must be separated by a Tab character): <Policy Name> 'tab' <Authentication Scheme Name> For example: ######################## protected_uris ######################## protected policy1 Basic Over LDAP /finance/protected1/** /finance/protected2/** protected policy2 Client Certificate /finance/protected3/*.js,*.png,*.gif ######################## public_uris ######################## /finance/public /finance/test1/public |
20.15.2 About the Create Policy Request Template
The CreatePolicyRequest.xml file with the remote policyCreate mode allows Administrators to create Host Identifiers and an Application Domain without creating or updating an agent registration.
-
Create a Host Identifier add multiple
hostPortVariations(host port pairs). -
Create an Application Domain.
-
Add multiple protected, public, and excluded resources. Resources can be with or without query strings, both are supported.
-
Create default authentication and authorization policies for the resources that do not require customized policies.
Many of the same parameters are found in the CreatePolicyRequest.xml file and the expanded (full) Agent registration templates discussed earlier. CreatePolicyRequest.xml provides elements for Authentication and Authorization Policies and resources (with no <agentName> element).
Some parameters in the CreatePolicyRequest.xml file are new and not included in the full agent registration XML files, while certain elements in the original agent registration file are used to create or update. However, some elements are The primary differences of CreatePolicyRequest.xml are specific to:
-
Elements for Authentication and Authorization Policies and resources are provided
-
No <agentName> element or related elements are provided
20.15.3 About the Update Policy Request Template
UpdatePolicyRequest.xml and CreatePolicyRequest.xml are nearly identical. Both provide the same elements, with the exception of the <protectedAuthnScheme> element.
Using UpdatePolicyRequest.xml, Administrators can:
-
Update a Host Identifier add multiple
hostPortVariations(host port pairs) -
Update an Application Domain
-
Add multiple protected, public, and excluded resources.(with or without query strings).
-
Update default authentication and authorization policies for the resources that do not require customized policies
-
Create customized policies that include:
-
Policy display name
-
Policy description
-
Authentication scheme (Authentication policies only)A subset of resources to be associated with the policy
-
20.15.4 About Remote Policy Management and Templates
This section describes the unique remote management elements for Application Domain management found in the CreatePolicyRequest.xml and UpdatePolicyRequest.xml files. These elements are described in Table 20-33.
See Also:
Table 16-8, "Common Elements in Remote Registration Requests" for a description of elements common to remote registration and remote management.Table 20-33 Remote Management Template Elements
| Element | Description | Example |
|---|---|---|
<rregAuthenticationPolicies> <rregAuthenticationPolicy> |
Specifies the name and description for the Authentication Policy (to use when creating a new policy or updating an existing policy). |
 <rregAuthenticationPolicies>
  <rregAuthenticationPolicy>
     <name>AuthenticationPolicy1</name>
     <description>Authentication policy
     created using policyUpdate mode of
     rreg tool</description>
  .
  .
  </rregAuthenticationPolicy>
 </rregAuthenticationPolicies>
|
<authnSchemeName>
|
Specifies the Authentication Scheme to use in the Authentication Policy. |
 <rregAuthenticationPolicies>
  .
  .
      authnSchemeName>LDAPScheme
      </authnSchemeName>
  .
  .
  </rregAuthenticationPolicy>
 </rregAuthenticationPolicies>
|
|
<uriList> |
Identifies a resource that requires authentication using the policy. |
 <rregAuthenticationPolicies>
  .
  .
     <uriList>
       - <uriResource>
           <uri>/res1</uri>
           <queryString />
         </uriResource>
      </uriList>
  .
  .
  </rregAuthenticationPolicy>
 </rregAuthenticationPolicies>
|
<rregAuthorizationPolicies> <rregAuthorizationPolicy> |
Specifies the name and description for the Authorization Policy (to use when creating it anew or updating an existing policy). |
 <rregAuthorizationPolicies>
  <rregAuthorizationPolicy>
     <name>AuthorizationPolicy1</name>
     <description>Authorization policy
     created using policyUpdate mode of
     rreg tool</description>
  .
  .
  </rregAuthorizationPolicy>
 </rregAuthorizationPolicies>
|
|
<uriList> |
Identifies a resource that requires Authorization using the Authorization Policy. |
 <rregAuthorizationPolicies>
  .
  .
     <uriList>
       - <uriResource>
           <uri>/res1</uri>
           <queryString />
         </uriResource>
      </uriList>
  .
  .
  </rregAuthorizationPolicy>
 </rregAuthorizationPolicies>
|
20.16 Managing Policies and Application Domains Remotely
The following procedure describes how Administrators can create or update existing policies remotely, without revising an agent's registration.
Review About Managing Policies Remotely
To managing policies or an Application Domain remotely without an Agent
-
Set up the registration tool as described in, "Acquiring and Setting Up the Remote Registration Tool".
-
Copy the appropriate request template and develop your own policy-management request (including any Application Domain revisions needed):
-
Create Policy Request File
-
Update Policy Request File
-
-
On the Agent host, run the following command with the appropriate mode and your own *Request*.xml input file. For example:
policyCreate Mode:
./bin/oamreg.sh policyCreate input/myCreatePolicyRequest.xmlpolicyUpdate Mode:
./bin/oamreg.sh policyUpdate input/myUpdatePolicyRequest.xml -
Provide the registration Administrator user name and password when asked.
-
Confirm success by reading on-screen messages, then use the Oracle Access Management Console to manage the domain and policies:
agentUpdate process completed successfully!Native Configuration File Location: "... created in output folder ..."The output folder is in the same location where RREG.tar.gz was expanded: .../rreg/output/AgentName/
20.17 Defining an Application
Application is a new concept introduced in PS2. An Application contains:
-
launch-url (that will be used by the end user of the application)
-
icons, description and other meta-data that is used to display it in the Access Portal (which is user facing)
The following Application types are supported:
-
SSO Agent Application (protected by a WebGate)
-
Federation Service Provider Partner Application (through Federation, launch a third-party partner application)
-
Form-Fill Application (Access Portal Application template based application)
The Application should have the configuration required to SSO enable it. However, for PS2, only Form-Fill application and Federation SP applications have their configuration in the Application. SSO applications have only the launch URL. Additional functionality will be added in subsequent releases.
Note:
Application registration will work only if ESSO is configured and enabled. In order to register an Application, an ESSO IDS Profile must be created because the Application's policy information is stored in the ESSO directory store.


