47 Configuring the
Access Portal Service
The Access Portal Service is a hosted single sign-on proxy service that enables intranet and extranet applications with Oracle's form-fill single sign-on technology. It also provides the REST interfaces that implement the Web Logon Manager end-user web application. Web Logon Manager, available as a standalone download from Oracle Support, provides end-users with the ability to create, modify, and delete application credentials as well as log on to provisioned applications through both desktop and mobile browsers.
This chapter contains the following sections.
47.1 Prerequisites for Deploying the Access Portal Service
Before completing the steps in this section, you must have completed the following prerequisites. Refer to the documentation for the respective supporting software for instructions on configuring that software. The documentation is available on the Oracle Support web site.
-
Install and configure an Oracle database instance
-
Install and configure a supported repository (refer to the Certification Matrix for a list of supported repositories)
-
Install and configure an instance of the WebLogic Administration server
-
Install and configure an instance of Oracle Access Manager managed server
-
Install the Oracle Enterprise Single Sign-On Administrative Console
-
(Optional) If you're planning to use the Detached Credential Collector, install and configure an instance of Oracle HTTP Server
47.2 Overview of the Access Portal Service Deployment Process
The Access Portal Service provides form-fill single sign-on functionality to intranet and extranet Web applications by acting as a proxy between the target application and the user's browser.
Through the Oracle Traffic Director proxy, the Access Portal Service intercepts user connections to the target application, fetches the application's logon or password change page, and injects JavaScript code necessary to perform form-fill single sign-on tasks (such as credential capture or injection), then delivers the modified page to the user's browser.
The Access Portal Service utilizes the following components:
-
Oracle Traffic Director - intercepts user connections to the target application and provides path-proxy and DNS-proxy functionality, allowing for path and DNS rewriting. Also hosts the Webgate and Access Proxy plugins.
-
Webgate plugin - a plugin that monitors whether the intercepted user connections require authentication via Oracle Access Manager (based on the assigned authentication policy) and redirects the user to the authentication page as necessary.
-
Access Proxy plugin - a plugin that enables single sign-on functionality (logon, password change, and credential capture) in internal and external Web applications.
-
Oracle Access Manager - provides the authentication service to users as defined in the authentication policy.
-
An LDAP Directory - serves as a data repository for the Access Proxy plugin and as the authentication back-end mechanism for Oracle Access Manager. For a list of supported directories, see the Certification Matrix accessible via the Oracle Support site.
-
(Optional) Web Logon Manager - a reference client application that acts as a launchpad for applications enabled with Oracle's single sign-on technologies.
Web Logon Manager supports Web applications enabled with the Access Portal Service's form-fill single sign-on technology and is available for download on the Oracle Technology Network web site. For more information, please contact Oracle Support. -
Oracle Enterprise Single Sign-On Administrative Console - provides the means to create and edit form-fill application policies (templates), password generation policies, delegate credentials, and configure other Access Proxy features not accessible via the Oracle Access Manager Console.
-
(Optional) Oracle HTTP Server - hosts the Detached Credential Collector Web pages.
The following is a high-level overview of the deployment process:
-
Deploy the Java Cryptography Extension files on your Oracle Access Manager server. These files enable unlimited strength jurisdiction policy encryption on Oracle Access Manager.
-
Create the identity store configuration file. This file contains the connection specifics for the directory that will host the Access Portal Service data repository.
-
Prepare and enable the Access Portal Service. You must use the IDM Configuration Tool to extend the directory schema, create the necessary users and groups, create the Webgate profile, create and assign an authentication scheme, and create a data repository; then, you must enable the Access Portal Service.
-
Set the Oracle Access Manager policy cache refresh interval. If you plan to use the Enterprise Single Sign-On Administrative Console to create and modify Access Portal Service application policies (templates), you must configure the Oracle Access Manager policy cache refresh interval to ensure that Oracle Access Manager periodically checks for updated policies in the Access Portal Service repository.
-
(Optional) Install the Oracle Protected Account Manager certificates. If you plan to enable Oracle Privileged Account Manager-protected applications with the Access Portal Service, you must install the Oracle Protected Account Manager certificates into the instance of Oracle Access Manager running the Access Portal Service. (Only supported on WebLogic.)
-
Deploy the Oracle Traffic Director Administration Server instance. This instance will provide the means to administrate Oracle Traffic Director proxy instance(s) (such as configuring listeners, origin servers, and server pools).
-
Deploy the Webgate binaries and Oracle Access Manager secure trust artifacts. You will run the Webgate installer to deploy the required plugin binaries into Oracle Traffic Director and copy the Oracle Access Manager secure trust artifacts into the deployed Webgate instance.
-
(Optional) Deploy the ESSOProvisioning plugin. This plugin enables provisioning of LDAP credentials as application credentials for single sign-on and the automatic updating of stored application credentials when the directory-provided credentials change. This plugin is optional and is not required by the Access Portal Service.
-
Create an Oracle Traffic Director configuration. An Oracle Traffic Director configuration is a collection of elements that define the run-time behavior of an Oracle Traffic Director instance. A configuration contains information about various elements of an Oracle Traffic Director instance such as listeners, origin servers, failover groups, and logs.
-
Protect the Oracle Traffic Directory instance with the Webgate and Access Proxy plugins. To allow the Webgate and Access Proxy plugins to process user traffic and provide authentication and single sign-on services, you must place them "in front of" your Oracle Traffic Director instance. This is called "protecting" the instance with the selected plugins.
-
(Optional) Enable the Detached Credential Collector for the Webgate.
The Detached Credential Collector adds a layer of security by intercepting user authentication requests normally sent directly to Oracle Access Manager, collecting the user's credentials, and passing them to Oracle Access Manager.
This avoids the need for users to connect directly to your Oracle Access Manager instance. The Detached Credential Collector pages run on an instance of Oracle HTTP Server. -
Enable target applications for form-fill single sign-on. Once the Access Portal Service has been successfully deployed, you can begin enabling your target applications with form-fill single sign-on functionality. This includes configuring the necessary proxy rules in Oracle Traffic Director, and creating and publishing a form-fill application policy in Oracle Access Manager.
47.3 Deploying the Access Portal Service
This section describes the steps necessary to configure the environment and deploy Access Portal. It covers the following tasks.
-
Preparing and Enabling the Access Portal Service on an Oracle Repository
-
Preparing and Enabling the Access Portal Service on Microsoft Active Directory
-
(Active Directory Only) Deploying the OAMAgent Web Application
-
Protecting the Oracle Traffic Director Instance with the Webgate and Access Proxy Plugins
-
(Optional) Enabling the Detached Credential Collector for the Target Webgate
47.3.1 Deploying the Java Cryptography Extension Policy Files
In order to enable unlimited strength jurisdiction policy encryption on your Oracle Access Manager server, you must download the appropriate policy files and place them into your server's Java Runtime Environment.
-
Download the latest policy files from one of the following locations, depending on your Java Runtime Environment version:
-
For Java 7:
http://www.oracle.com/technetwork/java/javase/downloads/

jce-7-download-432124.html -
For Java 6:
http://www.oracle.com/technetwork/java/javase/downloads/

jce-6-download-429243.html -
For IBM JDK on WebSphere:
http://www.ibm.com/developerworks/java/

jdk/security/60/
-
-
Decompress the downloaded archive and place the
US_export_policy.jarandlocal_policy.jarin$JDK_Home/jre/lib/security/within the target Java Runtime Environment (replace any existing files when prompted). -
Reboot the Weblogic Administration Server and the Oracle Access Manager Managed Server.
47.3.2 Creating the Identity Store Configuration File
Use the guidelines below to create the idstore.props file that will configure the identity keystore for the Access Portal Service. You will pass this file to the IDM Configuration Tool in Preparing and Enabling the Access Portal Service on an Oracle Repository.
Oracle Unified Directory Example
# Common
IDSTORE_HOST: IDMHOST1.mycompany.com
IDSTORE_PORT: 1389
IDSTORE_ADMIN_PORT: 4444
IDSTORE_KEYSTORE_FILE: OUD_ORACLE_INSTANCE/OUD/config/admin-keystore
IDSTORE_KEYSTORE_PASSWORD: Password key
IDSTORE_BINDDN: cn=oudadmin
IDSTORE_GROUPSEARCHBASE: cn=Groups,dc=mycompany,dc=com
IDSTORE_SEARCHBASE: dc=mycompany,dc=com
IDSTORE_USERNAMEATTRIBUTE: cn
IDSTORE_LOGINATTRIBUTE: uid
IDSTORE_USERSEARCHBASE: cn=Users,dc=mycompany,dc=com
IDSTORE_NEW_SETUP: true
POLICYSTORE_SHARES_IDSTORE: true
# OAM
IDSTORE_OAMADMINUSER:oamadmin
IDSTORE_OAMSOFTWAREUSER:oamLDAP
OAM11G_IDSTORE_ROLE_SECURITY_ADMIN:OAMAdministrators
# OAM and OIM
IDSTORE_SYSTEMIDBASE: cn=systemids,dc=mycompany,dc=com
# OIM
IDSTORE_OIMADMINGROUP: OIMAdministrators
IDSTORE_OIMADMINUSER: oimLDAP
# WebLogic
IDSTORE_WLSADMINUSER : weblogic_idm
IDSTORE_WLSADMINGROUP : WLSAdmins
Oracle Internet Directory Example
# Common
IDSTORE_HOST: OIDHOST1.mycompany.com
IDSTORE_PORT: 3060
IDSTORE_BINDDN: cn=orcladmin
IDSTORE_GROUPSEARCHBASE: cn=Groups,dc=mycompany,dc=com
IDSTORE_SEARCHBASE: dc=mycompany,dc=com
IDSTORE_USERNAMEATTRIBUTE: cn
IDSTORE_LOGINATTRIBUTE: uid
IDSTORE_USERSEARCHBASE: cn=Users,dc=mycompany,dc=com
POLICYSTORE_SHARES_IDSTORE: true
IDSTORE_NEW_SETUP: true
# OAM
IDSTORE_OAMADMINUSER:oamadmin
IDSTORE_OAMSOFTWAREUSER:oamLDAP
OAM11G_IDSTORE_ROLE_SECURITY_ADMIN:OAMAdministrators
# OAM and OIM
IDSTORE_SYSTEMIDBASE: cn=systemids,dc=mycompany,dc=com
# OIM
IDSTORE_OIMADMINGROUP: OIMAdministrators
IDSTORE_OIMADMINUSER: oimLDAP
# WebLogic
IDSTORE_WLSADMINUSER : weblogic_idm
IDSTORE_WLSADMINGROUP : WLSAdmins
Microsoft Active Directory Example
# Common
IDSTORE_HOST: <AD-server-hostname>IDSTORE_PORT: <AD-server-port>IDSTORE_DIRECTORYTYPE: adIDSTORE_BINDDN: <domain>\AdministratorIDSTORE_PASSWD: <password>IDSTORE_USERNAMEATTRIBUTE: cnIDSTORE_LOGINATTRIBUTE: cn (or another login attribute)>IDSTORE_USERSEARCHBASE: CN=Users,DC=essodev,DC=idc,DC=localIDSTORE_SEARCHBASE: DC=essodev,DC=idc,DC=localIDSTORE_GROUPSEARCHBASE: CN=Users,DC=essodev,DC=idc,DC=localIDSTORE_SYSTEMIDBASE: CN=Users,DC=essodev,DC=idc,DC=localIDSTORE_OAMSOFTWAREUSER: oamSoftwareUserIDSTORE_OAMADMINUSER: oamAdminUserOAM11G_CREATE_IDSTORE: trueESSO_IDSTORE_HOST : <AD-server-hostame>ESSO_IDSTORE_PORT : <AD-server-port>ESSO_IDSTORE_BINDDN : <domain>\AdministratorESSO_IDSTORE_TYPE : adIS_ESSO_PRESENT : trueESSO_IDSTORE_PASSWD : <password>
Where:
-
IDSTORE_HOSTandIDSTORE_PORTare, respectively, the host and port of your Identity Store directory. Specify the back end directory here, rather than OVD. In the case of OID and OUD, specify, respectively, one of the Oracle Internet Directory or Oracle Unified Directory instances, for example:OID:
OIDHOST1and3060OUD:
IDMHOST1and1389 -
IDSTORE_ADMIN_PORT(LDAP_DIR_ADMIN_PORT) is the administration port of your Oracle Unified Directory instance. If you are not using Oracle Unified Directory, you can leave out this parameter. -
IDSTORE_KEYSTORE_FILEis the location of the Oracle Unified Directory Keystore file. It is used to enable communication with Oracle Unified Directory using the Oracle Unified Directory administration port. It is calledadmin-keystoreand is located inOUD_ORACLE_INSTANCE/OUD/config. If you are not using Oracle Unified Directory, you can leave out this parameter. This file must be located on the same host that theidmConfigToolcommand is running on. The command uses this file to authenticate itself with OUD. -
IDSTORE_KEYSTORE_PASSWORDis the encrypted password of the Oracle Unified Directory keystore. This value can be found in the fileOUD_ORACLE_INSTANCE/OUD/config/admin-keystore.pin. If you are not using Oracle Unified Directory, you can leave out this parameter. -
IDSTORE_BINDDNis an administrative user in the Identity Store Directory -
IDSTORE_GROUPSEARCHBASEis the location in the directory where Groups are Stored. -
IDSTORE_SEARCHBASEis the location in the directory where Users and Groups are stored. -
IDSTORE_USERNAMEATTRIBUTEis the name of the directory attribute containing the user's name. Note that this is different from the login name. -
IDSTORE_LOGINATTRIBUTEis the LDAP attribute which contains the users Login name. -
IDSTORE_USERSEARCHBASEis the location in the directory where Users are Stored. -
IDSTORE_NEW_SETUPis always set to true for Oracle Unified Directory. If you are not using OUD, you do not need to specify this attribute. -
POLICYSTORE_SHARES_IDSTOREis set totruefor IDM 11g. -
IDSTORE_OAMADMINUSERis the name of the user you want to create as your Access Manager Administrator. -
IDSTORE_OAMSOFTWAREUSERis a user that gets created in LDAP that is used when Access Manager is running to connect to the LDAP server. -
OAM11G_IDSTORE_ROLE_SECURITY_ADMINis the name of the group which is used to allow access to the OAM console. -
IDSTORE_SYSTEMIDBASEis the location of a container in the directory where users can be placed when you do not want them in the main user container. This happens rarely but one example is the Oracle Identity Manager reconciliation user which is also used for the bind DN user in Oracle Virtual Directory adapters. -
IDSTORE_OIMADMINGROUPIs the name of the group you want to create to hold your Oracle Identity Manager administrative users. -
IDSTORE_OIMADMINUSERis the user that Oracle Identity Manager uses to connect to the Identity store. -
IDSTORE_WLSADMINUSER: The username to be used for logging in to the web logic domain once it is enabled by SSO. -
IDSTORE_WLSADMINGROUP: is the name of the group to which users who are allowed to log in to the WebLogic system components, such as the WLS Console and EM, belong.
Use OIM entries only if your topology includes Oracle Identity Manager. Use OAM entries only if your topology includes Access Manager.
47.3.3 Creating the Oracle Access Manager Configuration File
Use the guidelines below to create the config-oam.props file that will configure your Oracle Access Manager instance. You will pass this file to the IDM Configuration Tool in Preparing and Enabling the Access Portal Service on an Oracle Repository.
Note that the Access Portal Service requires the Simple mode security posture.
To enable this posture, set the parameters below as follows:
OAM11G_OAM_SERVER_TRANSFER_MODE: simple
OAM_TRANSFER_MODE: simple
The file will have the following structure:
Create a properties file called config_oam.props with the following contents:
WLSHOST: ADMINVHN.mycompany.com
WLSPORT: 7001
WLSADMIN: weblogic
WLSPASSWD: Admin Password
IDSTORE_DIRECTORYTYPE: OUD
IDSTORE_HOST: IDSTORE.mycompany.com
IDSTORE_PORT: 389
IDSTORE_BINDDN: cn=oudadmin
IDSTORE_USERNAMEATTRIBUTE: cn
IDSTORE_LOGINATTRIBUTE: uid
OAM11G_SERVER_LOGIN_ATTRIBUTE: uid
IDSTORE_USERSEARCHBASE: cn=Users,dc=mycompany,dc=com
IDSTORE_SEARCHBASE: dc=mycompany,dc=com
IDSTORE_GROUPSEARCHBASE: cn=Groups,dc=mycompany,dc=com
IDSTORE_SYSTEMIDBASE: cn=systemids,dc=mycompany,dc=com
IDSTORE_OAMSOFTWAREUSER: oamLDAP
IDSTORE_OAMADMINUSER: oamadmin
PRIMARY_OAM_SERVERS: IDMHOST1.mycompany.com:5575,IDMHOST2.mycompany.com:5575
WEBGATE_TYPE: ohsWebgate11g
ACCESS_GATE_ID: Webgate_IDM
OAM11G_OIM_WEBGATE_PASSWD: password to be assigned to WebGate
COOKIE_DOMAIN: .mycompany.com
OAM11G_WG_DENY_ON_NOT_PROTECTED: true
OAM11G_IDM_DOMAIN_OHS_HOST: SSO.mycompany.com
OAM11G_IDM_DOMAIN_OHS_PORT: 443
OAM11G_IDM_DOMAIN_OHS_PROTOCOL: https
OAM11G_SERVER_LBR_HOST: SSO.mycompany.com
OAM11G_SERVER_LBR_PORT: 443
OAM11G_SERVER_LBR_PROTOCOL: https
OAM11G_OAM_SERVER_TRANSFER_MODE: simple
OAM_TRANSFER_MODE: simple
OAM11G_IDM_DOMAIN_LOGOUT_URLS: /console/jsp/common/logout.jsp,/em/targetauth/emaslogout.jsp
OAM11G_IDSTORE_ROLE_SECURITY_ADMIN: OAMAdministrators
OAM11G_SSO_ONLY_FLAG: false
COOKIE_EXPIRY_INTERVAL: 120
OAM11G_IMPERSONATION_FLAG: false
OAM11G_OIM_INTEGRATION_REQ: false
OAM11G_OIM_OHS_URL:https://SSO.mycompany.com:443
SPLIT_DOMAIN:true
Where:
-
WLSHOST(ADMINVHN) is the host of your administration server. This is the virtual name. -
WLSPORTis the port of your administration server. -
WLSADMINis the WebLogic administrative user you use to log in to the WebLogic console. -
WLSPASSWDis the WebLogic administrator password. -
IDSTORE_DIRECTORYTYPEisOUD,OIDorOVD. -
IDSTORE_HOSTandIDSTORE_PORTare the host and port of the Identity Store directory when accessed through the load balancer. -
IDSTORE_BINDDNis an administrative user in the Identity Store directory. -
IDSTORE_USERSEARCHBASEis the location in the directory where Users are stored. -
IDSTORE_GROUPSEARCHBASEis the location in the directory where Groups are stored. -
IDSTORE_SEARCHBASEis the location in the directory where Users and Groups are stored. -
IDSTORE_SYSTEMIDBASEis the location of a container in the directory where the user oamLDAP is stored. -
IDSTORE_OAMSOFTWAREUSERis the name of the user account to be used to interact with LDAP. -
IDSTORE_OAMADMINUSERis the name of the user account that can access your OAM Console. -
PRIMARY_OAM_SERVERSis a comma separated list of your OAM Servers and the proxy ports they use, for example: IDMHOST1:OAM_PROXY_PORTNote:
To determine the proxy ports your OAM Servers use:-
Log in to the OAM console.
-
Click the System Configuration tab.
-
Expand Server Instances under the Common Configuration section
-
Click an OAM Server, such as WLS_OAM1, and select Open from the Actions menu.
-
Proxy port is the one shown as Port.
-
-
ACCESS_GATE_IDis the name you want to assign to the WebGate. -
OAM11G_OIM_WEBGATE_PASSWDis the password to be assign to the WebGate. -
OAM11G_IDM_DOMAIN_OHS_HOSTis the name of the load balancer which is in front of the OHS's. -
OAM11G_IDM_DOMAIN_OHS_PORTis the port that the load balancer listens on (HTTP_SSL_PORT). -
OAM11G_IDM_DOMAIN_OHS_PROTOCOLis the protocol to use when directing requests at the load balancer. -
OAM11G_WG_DENY_ON_NOT_PROTECTED, when set tofalse, allows login pages to be displayed. It should be set totruewhen using webgate11g. -
OAM_TRANSFER_MODEis the security model that the Oracle Access Manager Servers function in. Valid values aresimpleandopen. If you use thesimplemode, you must define a global passphrase. -
OAM11G_OAM_SERVER_TRANSFER_MODEis the security model that the OAM Servers function in. -
OAM11G_IDM_DOMAIN_LOGOUT_URLSis set to the various logout URLs. -
OAM11G_SSO_ONLY_FLAGconfgures Access Manager as authentication only mode or normal mode, which supports authentication and authorization.If
OAM11G_SSO_ONLY_FLAGistrue, the OAM Server operates in authentication only mode, where all authorizations return true by default without any policy validations. In this mode, the server does not have the overhead of authorization handling. This is recommended for applications which do not depend on authorization policies and need only the authentication feature of the OAM Server.If the value is
false, the server runs in default mode, where each authentication is followed by one or more authorization requests to the OAM Server. WebGate allows the access to the requested resources or not, based on the responses from the OAM Server. -
OAM11G_IMPERSONATION_FLAGis set totrueif you are configuring OAM Impersonation. -
OAM11G_SERVER_LBR_HOSTis the name of the load balancer fronting your site. This and the following two parameters are used to construct your login URL. -
OAM11G_SERVER_LBR_PORTis the port that the load balancer is listening on (HTTP_SSL_PORT). -
OAM11G_SERVER_LBR_PROTOCOLis the URL prefix to use. -
OAM11G_OIM_INTEGRATION_REQshould be set totrueif you are building a topology which contains both OAM and OIM. Otherwise set tofalseat this point. This value is only set to true when performing Access Manager/Oracle Identity Manager integration and is set during the integration phase. -
OAM11G_OIM_OHS_URLshould be set to the URL of your load balancer. This parameter is only required if your topology contains OAM and OIM. -
COOKIE_DOMAINis the domain in which the WebGate functions. -
WEBGATE_TYPEis the type of WebGate agent you want to create. -
OAM11G_IDSTORE_NAMEis the Identity Store name. If you already have an Identity Store in place which you wish to reuse (rather than allowing the tool to create a new one for you), then set the value of this parameter to the name of the Identity Store you wish to reuse. -
OAM11G_SERVER_LOGIN_ATTRIBUTEwhen set touid, ensures that when users log in, their username is validated against theuidattribute in LDAP. -
SPLIT_DOMAINshould be set totrueIf you are creating a domain with just OAM or OAM located in a different domain from OIM (Split Domain). Otherwise, it is not necessary to specify this parameter.
47.3.4 Understanding the Access Portal Service Repository Objects
The vGoLocator object is required for all repositories and the value of its vGOLocatorAttribute attribute specifies the path to the People container in which the Access Portal Service stores application credentials for each user. The vGOLocator object must point to the same data store instance as the Oracle Access Manager instance on which the Access Portal Service is deployed.
For Oracle LDAP directories, the following applies:
-
If there is a single object under the
vGOLocatorcontainer, thevGoLocatorAttributevalue is parsed regardless of the object's name. -
If there are multiple objects under the
vGOLocatorcontainer, the object named default is parsed. If no object nameddefaultexists, the request will fail. -
If
thevGOLocatorAttributeattribute has no value or does not exist, or if thevGOLocatorcontainer does not exist, the request will fail.
When using Microsoft Active Directory, the Access Portal Service stores application credentials under the USERS container as described below:
-
If there is a single object under the
vGOLocatorcontainer, thevGoLocatorAttributevalue is parsed regardless of the object's name. -
If there are multiple objects under the
vGOLocatorcontainer, the object named default is parsed. If no object nameddefaultexists, the data will be within theUSERScontainer. -
If
thevGOLocatorAttributeattribute has no value or does not exist, or if thevGOLocatorcontainer does not exist, the data will be stored within theUSERScontainer.
You must explicitly enable the storage of user credentials under respective user objects using the Oracle Enterprise Single Sign-On Suite Administrative Console. This makes the following changes to the repository:
-
The User class is added as a possible superior to the vGOUserData class.
-
All users are granted the right to create vGOUserData objects. These rights are granted at the directory root and are recursively inherited down to the user objects.
47.3.5 Preparing and Enabling the Access Portal Service on an Oracle Repository
Before completing this procedure, make sure you have created the required configuration files as described in Creating the Identity Store Configuration File and Creating the Oracle Access Manager Configuration File.
The idmConfigTool is located at:
IAM_ORACLE_HOME/idmtools/bin
Note:
When you run theidmConfigTool, it creates or appends to the file idmDomainConfig.param. This file is generated in the same directory that the idmConfigTool is run from. To ensure that each time the tool is run, the same file is appended to, always run the idmConfigTool from the directory:
IAM_ORACLE_HOME/idmtools/bin
The syntax of the command on Linux is:
idmConfigTool.sh -configOAM input_file=configfile
For example:
idmConfigTool.sh -configOAM input_file=config_oam1.props
When the command runs you are prompted to enter the password of the account you are connecting to the Identity Store with. You are also asked to specify the passwords you want to assign to these accounts:
-
IDSTORE_PWD_OAMSOFTWAREUSER -
IDSTORE_PWD_OAMADMINUSER
-
On the machine running your target Oracle Access Manager instance, change into the following directory:
/Oracle/Middleware/Oracle_IDM1/idmtools/bin -
Set the following environment variables:
setenv ORACLE_HOME /Oracle/Middleware/Oracle_IDM1setenv MW_HOME /Oracle/Middlewaresetenv JAVA_HOMEJDKPath(where JDKPath is the full path to the Java Development Kit used by the Oracle Access Manager instance)
-
Pre-configure the identity store to extend the directory schema with the required object classes by running the following command:
./idmConfigTool.sh -preConfigIDStore input_file=idstore.propswhere
idstore.propsis a property file containing configuration parameters specific to your environment. For information on assembling this file, see Creating the Identity Store Configuration File. -
Create the required users and groups by running the following command:
./idmConfigTool.sh -prepareIDStore mode=all input_file=idstore.propswhere
idstore.propsis a property file containing configuration parameters specific to your environment. For information on assembling this file, see Creating the Identity Store Configuration File.This command does the following:
-
Adds the Access Portal Service object classes and attributes to the schema
-
Creates the
CO,People, andvGoLocatorcontainers (with create permissions only, including children). For more information on these containers, see Understanding the Access Portal Service Repository Objects.
-
-
Create and configure the required Webgate profile by running the following command:
./idmConfigTool.sh -configOAM input_file=config_oam.propswhere
config_oam.propsis a property file containing configuration parameters specific to your environment. For information on assembling this file, see Creating the Oracle Access Manager Configuration File. -
Add conditions to the Admin role in the Security Realm as follows:
-
Log in to the WebLogic Administration Server Console.
-
In the left pane of the console, click Security Realms.
-
On the "Summary of Security Realms" page, click myrealm under the Realms table.
-
On the "Settings" page for myrealm, click the Roles & Policies tab.
-
On the "Realm Roles" page, expand the Global Roles entry under the Roles table. This brings up the entry for Roles.
-
Click the Roles link to go to the Global Roles page.
-
On the "Global Roles" page, click the Admin role to go to the Edit Global Role page:
-
On the "Edit Global Roles" page, under Role Conditions, click Add Conditions.
-
On the "Choose a Predicate" page, select Group from the predicates list and click Next.
-
On the Edit Arguments Page, specify
OAMAdministratorsin the Group Argument field and click Add. -
Click Finish to return to the "Edit Global Rule" page.
The Role Conditions now show the
OAMAdministratorsGroup as an entry. -
Click Save to finish adding the Admin role to the
OAMAdministratorsGroup.
-
-
Check the log file for any errors or warnings and correct them. A file named
automation.logis created in the directory where you run the tool. -
Restart the WebLogic Administration Server.
-
Enable the Access Portal Service:
-
Log on to the Oracle Access Manager Console.
-
Select the Launch Pad tab.
-
In the Configuration section, click Available Services.
-
In the screen that appears, click Enable next to Access Portal Service.
-
Note:
After you runidmConfigTool, several files are created that you need for subsequent tasks. Keep these in a safe location.
Two 11g WebGate profiles are created: Webgate_IDM, which is used for intercomponent communication and Webgate_IDM_11g, which is used by 11g Webgates.
The following files exist in the directory ASERVER_HOME/output/Webgate_IDM_11g. You need these when you install the WebGate software.
-
cwallet.sso -
ObAccessClient.xml -
password.xml
Additionally, you need the files aaa_cert.pem and aaa_key.pem, which are located in the directory ASERVER_HOME/output/Webgate_IDM.
47.3.6 Preparing and Enabling the Access Portal Service on Microsoft Active Directory
The following LDIF file is required for extending the Active Directory schema with Access Portal Service classes and attributes:
<ORACLE_HOME>/idmtools/templates/ad/esso_schema_extn.ldif
The file is a template file; before proceeding, modify the values such as domain names and paths to match the target environment.
Complete the following steps to prepare and enable the Access Portal Service with Microsoft Active Directory:
-
Extend the Active Directory schema by running the following command on the server machine hosting the repository:
ldifde –i –f esso_schema_extn.ldifUpon completion, a message will confirm that importing data was successful:
-
Use the
ADSIEdittool to create containers namedCO,People, andvGoLocatorunder the repository root. -
Under the
vGoLocatorcontainer, create an object nameddefaultof classvGoLocatorClassand set its attribute value to the DN of the container that holds thePeoplecontainer. For more information, see Understanding the Access Portal Service Repository Objects. -
Enable the storage of user credentials under user objects:
-
Launch the Oracle Enterprise Single Sign-On Suite Administrative Console and connect to the target repository.
-
In the Console, select Enable Storing Credentials Under User Object (AD Only) from the Repository menu.
-
The Console displays a dialog informing you of the changes about to be made to your Active Directory schema. Click OK.
-
Wait for a dialog confirming the changes to appear, then click OK to dismiss it.
Note:
Members of protected groups (i.e., users whose ACLs are governed by the AdminSDHolder object) will not be able to store credentials under their user objects until the AdminSDHolder ACL is updated with permissions required by this feature. See the guide Deploying Logon Manager with a Directory-Based Repository for instructions on how to remedy this issue. -
-
Create the target users with object class
InetOrgPerson. -
Create a user data store:
-
Log on to the Oracle Access Manager console and select the Launch Pad tab.
-
In the Configuration section, click User Identity Stores.
-
In the screen that appears, click Create under OAM ID Stores.
-
In the dialog that appears, fill in the following required values, leaving the rest at their defaults:
Field Value Store Name ESSOAuthnStoreStore Type Microsoft Active Directory Location ad-server-hostname:port Bind DN domain\username Password password Login ID Attribute cnUser Search Base Fully qualified DN of the Users container Object Search Base Fully qualified DN of the Groups container
-
-
Test the connection and correct any errors if necessary, then click Apply.
-
Update the LDAP plugin:
-
Log on to the Oracle Access Manager console.
-
Select the Launch Pad tab.
-
In the Access Manager section, click Authentication Modules.
-
In the screen that appears, click Search.
-
In the list of search results, select the LDAPPlugin module.
-
In the Steps tab, select the stepUI step.
-
In the KEY_IDENTITY_STORE_REF drop-down list, select the user data store you created in step 5 of this procedure.
-
Repeat the above for the stepUA step.
-
Click Save to save your changes.
-
-
Create the identity data store (IDS) profile in Oracle Access Manager:
-
Log on to the Oracle Access Manager console.
-
Select the Launch Pad tab.
-
In the Configuration section, click User Identity Stores.
-
In the IDS Profile section, click Create Form Fill Application IDS Profile.
-
In the form that appears, fill in the fields as follows:
Field Value Name meaningful profile name Description meaningful profile description Repository Options Create New Repository Name meaningful repository name Directory Type Microsoft Active Directory Host name Active Directory server host name Port Active Directory server port Bind DN domain/user name of repository account Bind password password of repository account Base DN fully qualified DN of the repository root User search base fully qualified DN of the Users container App template search base fully qualified DN of the CO (ESSO policy data) container Top search base fully qualified DN of the repository root -
Test the connection, then click Apply.
-
-
Configure the relational mapping of users and groups:
-
Edit the IDS profile you just created.
-
Select the Entity Attributes tab.
-
Add the following new attributes, one at a time (adding multiple attributes at once is not supported):
member,memberOf,distinguishedName -
Select the Entities tab.
-
Under Users and Groups, enable the
member,memberOf, anddistinguishedNameentity attributes. -
Set the User Base, Group Base, Search Base, and Create Base entities to the fully qualified DNs of the respective containers in the repository.
-
Select the Relationships tab.
-
Configure the entity relationships as shown in the following illustration:

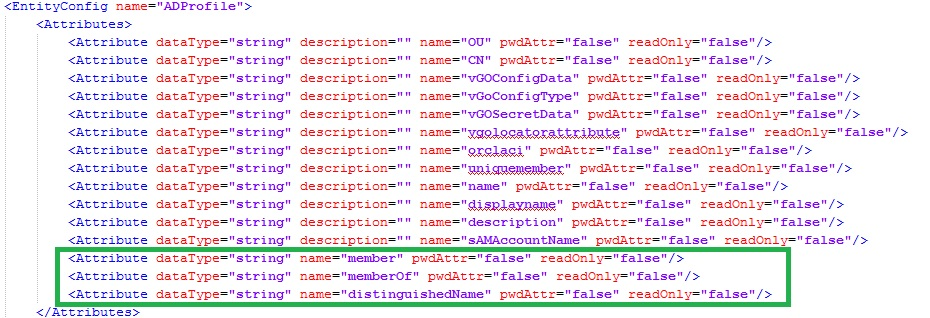
This makes the following changes in the file
DOMAIN_HOME/config/fmwconfig/ids-config.xml: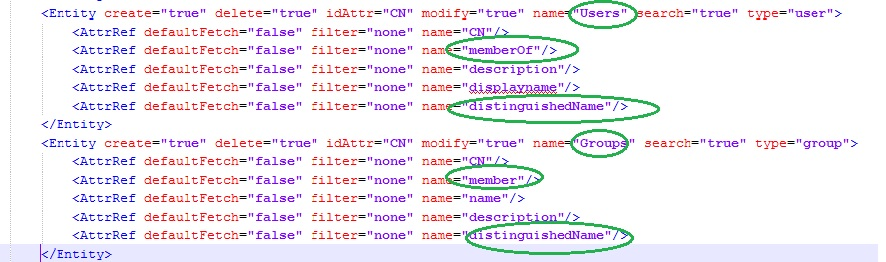

-
-
Enable the IDS profile:
-
Select the Launch Pad tab in the main console window.
-
In the Configuration section, click Access Portal Service Settings.
-
In the screen that appears, select the IDS profile you created earlier
from the IDS Profile drop-down list. -
Click Apply.
-
-
Add the Active Directory schema XML definition file to the IDS server configuration file:
-
Open the following file in a text editor:
DOMAIN_HOME/config/fmwconfig/ovd/ids/server.os_xml -
Locate the
<schema check="true">section and add the following
line inside it:<location>schema.ms.xml</location> -
Save and close the file.
-
Restart the managed server instance to apply your changes.
-
47.3.7 (Active Directory Only) Deploying the OAMAgent Web Application
The OAMAgent web application provides the means to configure Access Control Lists within an Active Directory-based Access Portal Service repository via a web interface running on Microsoft Internet Information Server.
To deploy th OAMAgent web application, do the following:
-
Extract the
OAMAgent.zipfile (available in the Logon Manager folder of the Enterprise Single Sign-On Suite ZIP archive) into a directory. -
Using the IIS Manager application, create a new IIS web site; when prompted, in the Physical Path field, enter the full path to the directory into which you extracted the
OAMAgent.ziparchive. -
Edit the newly created web application's
Web.configfile as follows:-
Add the following to the
system.webServersection:<configuration><system.webServer><httpHandlers><add type="ColumbiaWindowsAgent.Rest.AgentAcl, OAMAgent" path="ColumbiaWindowsAgent/V1/AgentAcl" verb="POST"/></httpHandlers> </system.webServer></configuration>
-
Add the following to the
system.websection:<compilation targetFramework="4.0"><assemblies><add assembly="Interop.ActiveDs, Version=1.0.0.0, Culture=neutral"/></assemblies></compilation>
-
Save and close the file.
-
-
In the IIS Manager application, navigate to IIS Manager > Target Site > .NET Compilation > Assemblies and ensure that the new assembly appears in the list of assemblies (i.e., that the
Interop.ActiveDs.dllfile appears in the web root directory). -
Create a new handler mapping:
-
In the IIS Manager application, navigate to IIS Manager > Target Site > Handler Mappings and click Add Managed Handler in the right-hand pane.
-
In the dialog that appears, fill in the fields as follows and save your changes:
Field Value Path ColumbiaWindowsAgent/V1/AgentAclType ColumbiaWindowsAgent.Rest.AgentAcl, OAMAgentName OAMAgent
-
-
Enable 32-bit application support:
-
In the IIS Manager application, navigate to IIS Manager > Application Pools.
-
Right-click the target site and select Advanced Settings from the context menu.
-
Set the Enable 32-bit Applications option to True and save your changes.
-
-
Make the following site configuration changes:
-
In the IIS Manager application, navigate to IIS Manager > Application Pools.
-
Select the target site.
-
Set the .NET Version to 4.0.
-
Set the Identity option to LocalSystem.
-
Save your changes.
-
-
In the IIS Manager application, select the host machine, click Server Certificates, and click Import a Certificate, and provide the path to a root CA certificate trusted by both the IIS server running the
OAMAgentweb application as well as the server running the target Access Portal Service instance.Additionally, the Access Portal Service server must have a certificate signed by that CA in its keystore. That CA must also be present in the server's
cacertfile (trust store). -
Create a https binding using the newly installed certificate:
-
In the IIS Manager application, right-click the target site and select Edit Bindings from the context menu.
-
Click Add New Site Binding.
-
Select https from the Type drop-down list.
-
Select the certificate you imported in step 8.
-
Click Close.
-
-
Enable SSL for the target site:
-
In the IIS Manager application, select the target site.
-
Click SSL Settings.
-
Select the Require SSL check box.
-
Select the Require client certificates check box.
-
Click Apply in the right-hand pane.
-
-
Add the following to the
oam-config.xmlfile on the Access Portal Service server instance, then restart the instance to apply your changes:<Setting Name="RestServicePath" Type="xsd:string">ColumbiaWindowsAgent/V1/AgentAcl</Setting><Setting Name="IPAddress" Type="xsd:string">iis-server-hostname</Setting><Setting Name="Protocol" Type="xsd:string">https</Setting><Setting Name="Port" Type="xsd:string">iis-server-port</Setting><Setting Name="Version" Type="xsd:string">1</Setting><Setting Name="ADPath" Type="xsd:string">AD-server-hostname:port</Setting>
-
Add the following keystore parameters to the managed server's startup script
JAVA_OPTIONSline:-Djavax.net.ssl.keyStore=keystore-location-Djavax.net.ssl.keyStorePassword=keystore-password
47.3.8 Setting the Policy Cache Refresh Interval
When using the Oracle Enterprise Single Sign-On Administrative Console to create and modify Access Portal Service application policies, the Access Portal Service must periodically fetch the modified policies from the repository to keep the policy cache up to date. By default, the cache refresh interval is set to -1 (never refresh).
To set a custom policy cache refresh interval, complete the steps below. A value of 0 disables the policy cache and causes every request to fetch the corresponding policy from the repository.
-
Open the following file in a text editor:
OAMDomainHome
/config/fmwconfig/oam-config.xml -
Locate the following setting string (or add it if it does not already exist):
<Setting Name="TimeToLive" Type="xsd:long">-1</Setting> -
Change the default value (
-1) to the desired number of minutes. -
Save and close the file.
-
Increment the file's version and restart both the administration server and the managed server to apply the new refresh interval.
47.3.9 Integrating with Oracle Privilege Account Manager
When integrating with Oracle Privileged Account Manager, keep the following in mind:
-
Only Oracle Privileged Account Manager templates of type "Privileged" are supported. Templates of type "Delegated" are not supported when created on the server side; creating such a template will result in unpredictable behavior.
-
You must specify the Oracle Privileged Account Manager server URL in the Access Portal Service settings in the target Oracle Access Manager server instance.
47.3.9.1 Installing the Oracle Privileged Account Manager Certificates
You must import the certificates into the identity keystore of the application server running the Oracle Access Manager instance. This procedure is currently only available for WebLogic; do not perform it on other application servers.
Note:
Keystore passwords can be obtained by running the following command from the WebLogic Console:listCred(map='oracle.wsm.security',key='keystore-csf-key');
-
Obtain the location and name of the identity keystore by examining the value of the following environment variables in the WebLogic console (where OAMServerName is the name of the target Oracle Access Manager instance):
environment-servers-OAMServerName-keystoresenvironment-servers-OAMServerName-ssl -
Import the certificate into the identity keystore using the following command:
keytool -importcert -aliasCertificateAlias-fileCertificateName.crt-keystore./IdentityStoreName.jks-storepassIdentityStorePasswordwhere CertificateAlias is a meaningful alias you want to assign to the certificate for identification, CertificateName is the name of the certificate file, IdentityStoreName is the name of the target identity store and IdentityStorePassword is the password for that identity store.
-
Obtain the location and name of the CA certificate by examining the value of the following environment variable via the WebLogic console:
environment-servers-oam_server1-keystores -
Import the CA certificate into the identity keystore using the following command:
keytool -importcert -aliasCertificateAlias-fileCertificateName.der-keystore ./cacerts-storepassIdentityStorePasswordwhere CertificateAlias is a meaningful alias you want to assign to the certificate for identification, CertificateName is the name of the certificate file, IdentityStoreName is the name of the target identity store and IdentityStorePassword is the password for the
cacertsidentity keystore. -
Export the target Oracle Access Manager domain's private key certificate (used for generating the SAML assertion) using the following command:
Note:
If a keystore type is not explicitly specified in the embedded trust provider configuration section of the following file:OAMDomainHome
/config/fmwconfig/jps-config.xmlthen the Oracle Key Store Service keystore type is assumed.
If no application stripe name is specified for that KSS keystore, the service defaults to the following location:
OAMDomainHome
/config/fmwconfig/default-keystore.jkskeytool -export -alias orakey -file orakey.der -keystore ./IdentityStoreName.jks-storepassIdentityStorePasswordwhere IdentityStoreName is the name of the target identity store and IdentityStorePassword is the password for that identity keystore.
-
Change to the following directory:
OPAMDomainHome
/config/fmwconfig -
Import the target Oracle Access Manager domain's private key into the target Oracle Privileged Account Manager domain using the following command:
keytool -importcert -alias orakey -file orakey.der -keystore ./IdentityStoreName.jks-storepassIdentityStorePasswordwhere IdentityStoreName is the name of the target identity store and IdentityStorePassword is the password for that identity keystore.
-
Restart the affected Oracle Access Manager instance and the affected Oracle Privileged Account Manager instance.
47.3.9.2 Configuring the Oracle Privileged Account Manager Server
Before completing the steps below, make sure you have created a provider on the target Oracle Access Manager instance for the desired Oracle Privileged Account Manager instance and placed it as the first provider in the provider list.
On the Oracle Privileged Account Manager instance, do the following:
-
Create a target with the following parameter values:
Field Value Storage Type Deployed repository type Server Hostname:port of the repository server Root DN Fully qualified DN of the repository root User Path Fully qualified DN of the Users container Connect as User CN of the repository connection account Password Password of the repository connection account Use secure connection (SSL) Disabled Use configuration objects instead of application list Enabled Role/Group support Enabled Configuration and role/group objects root DN Fully qualified DN of the CO container Admin Group DN (not applicable; leave blank) User Name Prepend UID -
Search for targets and click the target you created in step 1.
-
Click the Privileged Accounts tab.
-
In the Privileged Accounts tab, add the desired privileged account (stored on the target you created in step 1).
-
Add the desired grantees to the privileged account.
-
Restart both the admin and the privileged Oracle Privileged Account Manager server instances to apply your changes.
47.3.9.3 Configuring the Provisioning Gateway Server
To create the required template mapping on the Provisioning Gateway server, do the following:
-
Run the following command on the Provisioning Gateway server machine:
certutil -setreg chain\minRSAPubKeyBitLength 512 -
Restart the Provisioning Gateway server machine.
-
Log on to the Provisioning Gateway Administrative Console.
-
Select the Settings tab, then the Template Mapping section.
-
Click Edit and select the privileged template associated with your Oracle Privileged Account Manager target, then save your changes. This will create the required
cn=OpamTemplateMapmapping in the repository. -
Test the configuration:
-
Log on to Web Logon Manager as one of the grantees assigned to the target privileged account.
-
Click Add next to the target privileged template. The privileged account details will appear in a separate tab.
-
47.3.10 Deploying the Oracle Traffic Director Administration Server
The Oracle Traffic Director Administration Server provides the means to deploy and manage Oracle Traffic Director proxy instance(s).
Before beginning this procedure, delete all previous Oracle Traffic Director 11g installations; the installer will fail if it encounters a non-empty installation directory.
Linux security restricts the opening of ports under 1024 to the root user. If you wish to run Oracle Traffic Director proxies on ports 80 or 443, follow the configuration gudielines for running as the root user described in the "Creating an Administration Server and Administration Node" chapter of the Oracle Traffic Director Installation Guide.
WARNING:
Oracle highly recommends against running Oracle Traffic Director as the root user due to increased security risk; you should limit the use of the root user to development environments only.
-
Launch the installer:
./OTD11.1.1.1.7/Disk1/runinstaller -
In the screen that appears, click Next.
-
In the screen that appears, select Skip Updates and click Next.
-
In the screen that appears, set the Oracle Traffic Director home directory to the following and click Next:
/OTD11g/trafficdirector_Home_1 -
Wait for the installation to complete, then change into the following directory:
/OTD11g/trafficdirector_Home_1/bin -
Create an Oracle Traffic Director administration server instance using the following command (only include
--server-user=rootif you want to run the server as therootuser):./tadm configure-server --user=admin --host=otd.hostname--server-user=root --instance-home=/OTD11g/trafficdirector_Home_1/instancesOracle recommends using the default port (
8989) for the Oracle Traffic Director administration server. -
Start the Oracle Traffic Director administration server with the following command:
./OTD11g/trafficdirector_Home_1/instances/admin-server/bin/startserv -
Log on to the Oracle Traffic Director Admin Console at the following URL:
https://otd.hostname:8989
For detailed information on installing Oracle Traffic Director, see the Oracle Traffic Director Installation Guide.
47.3.10.1 Applying the Required Oracle Traffic Director Patch
You must apply patch ID 17025628 (available from Oracle Support) which addresses the following issues that are required by the Access Portal Service to function:
-
Forward proxy functionality. Required if your organization utilizes an enterprise-wide Web proxy that filters all Internet traffic.
-
Rewriting of HTTP page content using
sed. Required for rewriting HTML, CSS, and JavaScript code referencing relative paths to objects and hosts.
47.3.11 Deploying the Webgate Binaries and Secure Trust Artifacts
Before completing this procedure, make sure you have created a Webgate profile in your Oracle Access Manager server as described in Preparing and Enabling the Access Portal Service on an Oracle Repository; the secure trust artifacts generated during that procedure are required to complete the steps below.
-
Decompress the Webgate binaries installer into a local directory on the Oracle Traffic Director host and launch the installer with the following command:
./runInstaller -
When prompted, specify the full path to your Java runtime environment.
For example:/usr/local/packages/jdk16 -
In the installer's "Prerequisite Checks" screen, click Next.
-
Specify the installation path and click Next:
/MW_HOME/OAM_OTD_WebGate_HOME -
Click Install and wait for the installation to complete.
-
Change into the following directory:
/MW_HOME/OAM_OTD_WebGate_HOME/webgate/iplanet/tools/deployWebGate -
Deploy the Webgate binaries using the following command:
./deployWebGateInstance.sh -w /MW_HOME/wginst1 -oh /MW_HOME/OAM_OTD_WebGate_HOME -ws otd -
Copy the Oracle Access Manager artifact files (generated while completing the steps in Preparing and Enabling the Access Portal Service on an Oracle Repository as follows:
-
Copy the
ObAccessClient.xml,cwallet.sso, andpassword.xmlartifact files to:/MW_HOME/wginst1/webgate/config -
Copy the
aaa_key.pemandaaa_cert.pemartifact files to:/MW_HOME/wginst1/webgate/config/simple
-
-
(Optional) If you deployed your Oracle Traffic Director administration server instance as the root user, grant that instance permissions to the Webgate (otherwise, skip this step).
WARNING:
Oracle highly recommends against running Oracle Traffic Director instances as the
rootuser due to increased security risk; you should limit the use of therootuser to development environments only.-
Change into
/MW_HOME/wginst1 -
Execute
chmod -R 777 .
-
47.3.12 (Optional) Configuring the ESSOProvisioning Plugin
When you successfully log on to Oracle Access Manager, the ESSOProvisioning plugin will provision your directory credentials to a specific application in your Access Proxy (ESSO) wallet. It will also update the target application credentials if your directory credentials change.
To enable the plugin, you must assign the ESSOProvAuthnScheme to the ESSOAuthnPolicy authentication policy in the IAMSuiteAgent application domain profile.
-
Log on to the Oracle Access Manager Console.
-
Select the Launch Pad tab.
-
In the Access Manager section, click Authentication Modules.
-
In the screen that appears, click Search.
-
From the list of search results, locate and double-click the ESSOProvisioningModule module.
-
In the screen that appears, select the Steps tab.
-
Edit the
ESSO_PROV_Stepstep and enter the name of the target application for which you want to provision directory credentials. -
Edit the
ESSO_UI_StepandESSO_UA_Stepsteps and add a User Identity Store value ofKEY_IDENTITY_STORE_REFto each. -
Click Save to save the steps, then click Apply to apply your changes to the module.
-
In the Access Manager section, click Application Domains.
-
In the screen that appears, click Search.
-
From the list of search results, locate and double-click the IAMSuiteAgent profile.
-
Select the Authentication Policies tab.
-
In the list of policies, select ESSOAuthnPolicy.
-
From the Authentication Scheme drop-down menu, select the ESSOProvAuthnScheme authentication scheme.
-
Click Apply to save your changes.
47.3.13 Creating an Oracle Traffic Director Configuration
-
Log on to the Oracle Traffic Director Admin Console at the following URL:
https://otd.hostname:8989 -
Create a new Oracle Traffic Director configuration with the following parameters:
-
Name: a descriptive name for the configuration
-
Server User: leave at the default value, unless you deployed the Oracle Traffic Director administration server as root
-
Select Origin Server Type:
HTTP
-
-
Create a listener (your Oracle Traffic Director instance will listen for requests from the user's browser on this port) with the following parameters:
-
Port:
8282 -
ServerName: otd.hostname
-
-
Create an origin server pool with the following parameters:
-
Add your target application host as applicationHostname:port
-
Select the target node as applicationHostname
-
-
Click the Instance node in the tree on the left and start the instance.
-
Test the page by accessing the following URL and logging on with your administrator credentials:
http://otd.hostname:8282/target_webgate_profile
47.3.14 Protecting the Oracle Traffic Director Instance with the Webgate and Access Proxy Plugins
To protect your Oracle Traffic Director instance with the Webgate and Access Proxy plugins, complete the steps below.
47.3.14.1 Generating the Secure Trust Artifacts
-
Change into the following directory:
/MW_HOME/OAM_OTD_WebGate_HOME/webgate/iplanet/tools/setup/InstallTools -
Set the
LD_LIBRARY_PATHvariable:bash export LD_LIBRARY_PATH=/MW_HOME/OAM_OTD_WebGate_HOME/libcsh setenv LD_LIBRARY_PATH /MW_HOME/OAM_OTD_WebGate_HOME/lib -
Run the following command to modify the
magnus.conffile to include the directives to load thewebgateandesso_webProxylibraries into the Oracle Traffic Director instance as well as modify the associated Oracle Traffic Director configuration file to include the directives to activate the two plugins../EditObjConf -f /OTD11g/trafficdirector_Home_1/instances/targetInstance/config/targetOTDconfiguration.conf -oh /MW_HOME/OAM_OTD_WebGate_HOME -w /MW_HOME/wginst1 -ws otd -enableESSO -enableWLM
Note:
Only include the-enableWLM flag if you have deployed the Access Portal reference application. Otherwise, the flag is not necessary.
If you do not include the -enableWLM flag and wish to deploy the Access Portal reference application later, you must manually modify the appropriate Oracle Traffic Director configuration file as described in the Access Portal reference application deployment instructions.
47.3.14.2 Loading the Required WebGate Libraries into the OTD Instance
-
Change into the following directory:
/OTD11g/trafficdirector_Home_1/instances/targetOTDConfiguration/bin -
Edit the
startsrvscript in a text editor and add the Webgate library path to theLD_LIBRARY_PATHvariable as follows:LD_LIBRARY_PATH="${SERVER_LIB_PATH}:/MW_HOME/OAM_OTD_WebGate_HOME/lib:${SERVER_JVM_LIBPATH}:${LD_LIBRARY_PATH}";
47.3.15 (Optional) Enabling the Detached Credential Collector for the Target Webgate
This section describes how to enable the Detached Credential Collector for the target Webgate and how to deploy the Detached Credential Collector pages on Oracle HTTP Server.
47.3.15.1 Creating and Applying the Detached Credential Collector Authentication Scheme
-
Select the Launch Pad tab.
-
In the Access Manager section, click Authentication Schemes.
-
In the screen that appears, click Search.
-
From the list of search results, locate and click the ESSOAuthnScheme authentication scheme.
-
In the screen that appears, click Duplicate.
-
Give the new scheme a descriptive name - for example
DCC-ESSOAuthnScheme. -
In the Challenge Method drop-down list, select FORM.
-
In the Challenge Redirect URL field, enter the Oracle Traffic Director host name and port in the format
http://otd.hostname:port/(including the trailing slash). -
In the Challenge URL field, enter
/oamsso-bin/login.pl -
In the Context Type drop-down list, select external.
-
Click Apply to save your changes.
-
Select the Launch Pad tab.
-
In the Access Manager section, click Application Domains.
-
In the screen that appears, click Search.
-
From the list of search results, locate and click the IAMSuiteAgent profile.
-
Select the Authentication Policies tab.
-
In the Authentication Scheme drop-down list, select the DCC authentication scheme you just created.
-
Click Apply to save your changes.
47.3.15.2 Deploying Detached Credential Collector Pages on Oracle HTTP Server
-
Enable CGI on the target instance of Oracle HTTP Server if you have not already done so.
-
Copy the files from the following location:
$WG_ORACLE_HOME/webgate/iplanet/oamssoTo the folowing location:
$OHS_INSTANCE_DIR/config/OHS/ohs1/htdocs -
Copy the files from the following location:
$WG_ORACLE_HOME/webgate/iplanet/oamsso-binTo the following location:
$OHS_INSTANCE_DIR/config/OHS/ohs1/ -
Enable CGI for the following directory:
$OHS_INSTANCE_DIR/config/OHS/ohs1/oamsso-bin -
Test your configuration by accessing the following URL:
http://ohs.host:port/oamsso-bin/login.pl
47.3.15.3 Routing Oracle Traffic Director Authentication Requests via the Detached Credential Collector
-
Under your target Oracle Traffic Director configuration, create a new origin server pool that points to the Oracle HTTP Server hostname and port.
-
Create a new route that points to the origin server pool created in step 1.
-
Add the following URI condition to the route:
/oamsso-binOR/oamsso -
Save your changes and restart the Oracle Traffic Director instance.
-
Test your configuration by accessing the target application's proxy URL.
47.3.16 Configuring Logon Manager for Compatibility with the Access Portal Service
Complete the steps below to enable interoperability between Logon Manager and the Access Portal Service.
If you have not already done so, install the Authentication Manager component of Logon Manager on each target end-user machine; this enables the MultiAuth authenticator within Logon Manager.
For more information on configuring Logon Manager repository settings, see the guide Deploying Logon Manager with a Directory-Based Repository.
47.3.16.1 Modifying the Access Portal Service Configuration
-
In the IDS profile you have configured for the Access Portal Service, ensure that you are connecting with a user who possesses root privileges (e.g.,
orcladmin). -
If you are using Oracle Internet Directory as your repository, set the following permissions to permit Logon Manager to its First Time Use wizard:
-
For the
vGoLocatorobject and itsdefaultchild object:orclaci = access to attr=(*) by * BindMode="Simple" (read,search,compare)orclaci = access to entry by * BindMode="Simple" (browse) -
For t he
Peoplecontainer:orclaci = access to attr=(*) by * BindMode="Simple" (read,write,search,compare)orclaci: access to entry by * BindMode="Simple" (browse,add,delete)
-
47.3.16.2 Modifying the Logon Manager Configuration
-
Launch the Enterprise Single Sign-On Suite Administrative Console and connect to the Access Portal Service repository.
-
If you are using Active Directory as your repository, do the following (otherwise, skip this step):
-
Navigate to Global Agent Settings > Live > Synchronization > ADEXT.
-
Select the check box next to the Use secure location for storing user settings option and select Yes from the drop-down menu.
-
-
Navigate to Global Agent Settings > Live > Authentication > Authentication Manager and configure the graded authenticators as required by your environment. For more information, refer to the Enterprise Single Sign-On Suite Administrator's Guide.
-
Navigate to Global Agent Settings > Live > Authentication and configure each authenticator as required by your environment, noting the following:
-
If using Oracle Internet Directory as your repository, set the Recovery Method option to Passphrase suppression using entryUUID.
-
If using Active Directory as your repository, set the Recovery Method option to Passphrase suppression using user's SID.
For more information, see the guide Deploying Logon Manager with a Directory-Based Repository.
-
-
Navigate to Global Agent Settings > Live > Synchronization and configure the appropriate synchronizer as required by your environment, noting the following:
-
Enable the Use aggressive synchronization option.
-
Enable the Resynchronize when network or connection status changes option.
-
Set the Interval for automatic resynchronization option to
1.
-
-
Publish your settings to the repository:
-
In the tree on the left-hand side right-click Live and select Publish from the context menu.
-
Click Browse and select the target path within the repository. (If prompted, enter the appropriate connection parameters and click OK to connect.)
-
In the Available configuration objects list, double-click Live to move it to the list of objects selected for publishing.
-
Click Publish and wait for the operation to complete.
-
47.4 Enabling Form-Fill Single Sign-On for an Application
This section describes the steps necessary to enable form-fill single sign-on functionality for an application with the Access Portal Service.
47.4.1 Configuring a Form-Fill Application Policy
This section describes how to configure a form-fill application policy. After you create the policy, you must add a proxy-enabled application URL to the policy to enable form-fill functionality. Once configured, you must you must publish the policy to the repository and test it to ensure that form-fill single-sign on is functioning as expected.
47.4.1.1 Creating a Form-Fill Application Policy
-
Launch the Oracle Enterprise Single Sign-On Administrative Console.
-
In the left-hand tree right-click the Applications node and select New Web Application from the context menu.
-
In the dialog that appears, enter a descriptive name and click Next. This will appear as the application policy name in Oracle Access Manager Console.
-
In the screen that appears, select the desired form type and click OK.
-
In the screen that appears, enter the URL of the target application.
-
Click Detect Fields. The application's logon form appears in the window and the appropriate fields are automatically detected and configured. Double-check the field list to ensure the fields have been detected and configured correctly.
For more information on creating application policies (also known as templates), see the guide Creating and Configuring Logon Manager Application Templates.
-
Click OK to save the application policy.
-
In the General tab, provide optional metadata describing the application (this metadata will appear in the Access Portal reference application or another user interface of your choice, if parsed):
-
Description – a meaningful description of the application for the user.
-
Reference – internal reference describing the version/variant of the application template.
-
Category – the category under which the application will appear in the Access Portal reference application; for example, "Finance," "Development," and so on.
-
Icon Image URL – URL to the icon image that will appear next to the application entry in the Access Portal reference application.
-
Logo Image URL – URL to the full-size application logo image that will appear in the Access Portal reference application.
-
Vendor – the vendor of the application.
-
Administrator – contact information for the application's administrator within your organization.
-
-
Select the desired users and/or user groups to whom this template will be available:
-
Select the Security tab.
-
Select the Access Portal Service repository from the Directory drop-down menu.
-
Click Add.
-
In the dialog that appears, enter the name of the target user or group.
-
Click Check Names to verify the user or group exists in the directory; if you receive an error, re-enter the name and try again.
-
Click OK to save your changes.
-
47.4.1.2 Adding a Proxy-Enabled URL to a Form Fill Application Policy
-
In the policy's General tab, double-click the target form.
-
In the dialog that appears, select the Identification tab and click Add.
-
In the dialog that appears, select the Regular Expression radio button and enter a launch URL in regular expression format for the target application.
You must trim any session IDs or other session-sensitive parameters from the URL, as they will become invalid as soon as the session expires. For example:
.*?https://otd_proxy_host\\.oracle\\.com:8282/target_webgate/login\\.jsp.* -
Click OK; then click OK in the parent dialog to save your changes.
47.4.1.3 Publishing the Policy to the Repository
-
In the left-hand tree, right-click the target application policy and select Publish from the context menu.
-
If prompted to connect to the repository, fill in the fields in the "Connect to Repository" dialog as required.
-
In the "Browse" dialog, navigate to the policies and credentials container you created in Preparing and Enabling the Access Portal Service on an Oracle Repository.
For example:
ou=CO,dc=us,dc=oracle,dc=com -
Click Publish.
47.4.1.4 (Optional) Importing the Policy into the Oracle Access Manager Console
Instead of publishing the policy to the repository, you can import it into the Oracle Access Manager Console to further edit its basic settings there. If you have already published it to the repository, you can skip this step, as the Oracle Access Manager console will retrieve it from the repository and display it in its policies list.
If you modify the policy in the Oracle Access Manager console and then decide to edit it in the Enterprise Single Sign-On Administrative Console, you will need to manually pull down the updated version from the Access Portal Service repository.
Note:
Oracle recommends creating and configuring the policy in the Enterprise Single Sign-On Administrative Console as not all Access Proxy features can be configured in the Oracle Access Manager Console.-
Launch the Enterprise Single Sign-On Administrative Console and load the desired policy (template) from the repository.
-
Export the policy to a file:
-
From the File menu, select Export.
-
In the "Export to .INI File" dialog that appears, select the policy from the list and click OK.
-
In the dialog that appears, provide the desired path and name for the exported file, then click Save.
-
-
Import the template file into Oracle Access Manager:
-
Log on to the Oracle Access Manager console.
-
In the "Access Manager" section of the page that appears, click Applications.
-
In the toolbar above the application list, click Import (blue down-arrow).
-
In the "Import Applications" pop-up that appears, click Browse.
-
In the dialog that appears, navigate to the policy file, and click Open.
-
Click OK in the "Import Applications" pop-up.
-
In the list of applications to import displayed by the pop-up, select the desired application and click Import.
-
In the application configuration page that appears, verify that the configuration settings in each tab have been properly carried over and make any changes if necessary. When you have finished, click Save.
The imported application policy appears in the application list.
-
47.4.1.5 Testing the Policy
Test the configuration of your policy as follows:
-
In a Web browser, navigate to
http://otd.hostname:8282/target_webgate and log on with your repository credentials.The logon form's fields will highlight indicating Access Proxy is ready to capture application credentials.
-
Enter your application credentials into the logon form and submit them.
-
Close the browser and access the application URL again. You will be automatically logged on to the application.
If either the credential capture or automatic logon (after credentials have been captured) do not occur, check your configuration for errors.
47.4.2 Guidelines for Configuring Proxy Rules in Oracle Traffic Director
This section provides the basic guidelines for creating the proxy rules necessary to intercept the user connections to the target application and redirect them to pass through the Webgate and Access Proxy plugins. For in-depth information on configuring Oracle Traffic Director, please see the Oracle Traffic Director Administrator's Guide.
Since the user connection requested is intercepted by Oracle Traffic Director and redirected to the origin server, all resources referenced within the page's code must have their path rewritten to point to the Oracle Traffic Director origin server instead of the original host; otherwise, those elements will not be loaded and the page will display improperly and likely not function as intended.This section contains guidelines for the following types of resources that must be rewritten for the page to function properly after proxy redirection:
47.4.2.1 Path Rewriting Guidelines for HTTP Request/Response Headers
HTTP request and response headers contain parameters that must be rewritten to point to the Oracle Traffic Director origin server. Oracle Traffic Directory can rewrite basic location headers that contain the origin server host name and exact protocol, or a relative path.
A typical HTTP request header looks as follows:
GET /web/en-US/default.aspx HTTP/1.1
Host: www.oracle.com
User-Agent: Mozilla/5.0 (Windows NT 6.1; WOW64; rv:23.0) Gecko/20100101 Firefox/23.0
Accept: text/html, application/xhtml+xml,application/xml;q=0.9,*/*;q=0.8
Accept-Language: en-US,en;q=0.5
Accept-Encoding: gzip, deflate
Referer: http://www.oracle.com/web/en-US/default.aspx ?root=1
Connection: keep-alive
This example header contains the following parameters that require path rewriting:
-
GET- contains the path of the requested page relative to the Web root, plus HTTP protocol version.For example:
GET /web/en-US/default.aspx HTTP/1.1An example proxy rule for rewriting the
GETparameter:NameTrans fn="map" to="/" from="/myLocalPath" -
Host- contains the URL of the page host.For example:
www.oracle.comAn example proxy rule for rewriting the
Hostparameter:Route fn="set-origin-server" origin-server-pool="myoriginserverpool"rewrite-host="true" -
Referer- contains the URL of the page that referred the request. For example:http://www.oracle.com/web/en-US/default.aspx ?root=1An example rule for rewriting the
Refererparameter:<If defined $referer and $referer =~ "https://myoriginserver.oracle.com/myLocalPath/(.*)$">AuthTrans fn="set-variable" set-headers="referer=https://www.oracle.com/$1"</If>
Note:
Since Web applications vary widely, in addition to the above examples, you must examine your HTTP headers to account for any other parameters referencing a URL or a relative path.A rewritten version of our example header would then look as follows:
GET /myLocalPath/web/en-US/default.aspx HTTP/1.1
Host: myoriginserver.oracle.com:8484
User-Agent: Mozilla/5.0 (Windows NT 6.1; WOW64; rv:23.0) Gecko/20100101 Firefox/23.0
Accept: text/html, application/xhtml+xml,application/xml;q=0.9,*/*;q=0.8
Accept-Language: en-US,en;q=0.5
Accept-Encoding: gzip, deflate
Referer: https://myoriginserver.oracle.com:8484/myLocalPath/

web/en-US/default.aspx?root=1
Connection: keep-alive
Oracle Traffic Director can not handle location redirects to another origin server.
For example, if a logon page hosted on one host redirects the user to a page on another host upon successful logon, you must configure the rewriting rules for this remapping manually. For example:
<Object name="route-oracle-travel-sso">
<If defined $srvhdrs{'location'} and $srvhdrs{'location'} =~ "(http|https)://portal.myapplication.com(.*)$">
Output fn="set-variable" $srvhdrs{'location'}="https://myoriginserver.oracle.com:8484/travel-portal$2"
</If>
Output fn="sed-response-header" name="set-cookie" sed="s|path=/travel-sso/|path=/|g"
</Object>
<Object name="route-travel-portal">
Route fn="set-origin-server" origin-server-pool="origin-server-portal-oracle-travle" rewrite-host="true"
</Object>
47.4.2.2 Path Rewriting Guidelines for Browser Cookies
The path and domain parameters in cookies need to be rewritten to point to the Oracle Traffic Director origin server instead of the target application host. For example:
Set-cookie: v1st=1666B5EACC906D6; path=/; expires=Wed, 19 Feb 2020 14:28:00 GMT; domain=.www.oracle.com
Must become:
Set-cookie: v1st=1666B5EACC906D6; path=/myLocalPath/; expires=Wed, 19 Feb 2020 14:28:00 GMT; domain=.myoriginserver.oracle.com
When configuring cookie rewriting rules, note the following:
-
Oracle Traffic Director cannot rewrite wildcarded domains, such as
.oracle.com. A target host name must be specified, for example:.www.oracle.com. -
If your application shares cookies across multiple domains, you must create separate cookie rewriting rules for each domain.
-
You must strip out the Oracle Authentication Manager cookie from the cookie set request, as it interferes with certain Web applications, such as Dropbox.
Example rule for stripping out the Oracle Authentication Manager cookie:
AuthTrans fn="sed-request-header" name="cookie" sed="s|OAMAuthnCookie[^;]*;| |g" sed="s|OAMRequestContext[^;]*;| |g" -
You must strip out Oracle Authentication Manager headers before sending them to the application host.
47.4.2.3 Path Rewriting Guidelines for Page Content
Oracle Traffic Director does not directly provide the means to rewrite host names and resource paths within the HTML code of the target page. You must use sed expressions to rewrite those values. Common HTML elements whose values will require rewriting include src, href, and action.
Example sed rule set for rewriting the src, href, and action elements:
Output fn="insert-filter" filter="sed-response" sed="s|\\(src\\)=\"/\\([^\"|^/]\\)|\\1=\"/myLocalPath/\\2|g" sed="s|\\(src\\)='/\\([^'|^/]\\)|\\1='/myLocalPath/\\2|g" sed="s|\\(href\\)=\"/\\([^\"|^/]\\)|\\1=\"/myLocalPath/\\2|g" sed="s|\\(href\\)='/\\([^'|^/]\\)|\\1='/myLocalPath/\\2|g" sed="s|\\(action\\)=\"/\\([^\"|^/]\\)|\\1=\"/myLocalPath/\\2|g" sed="s|\\(action\\)='/\\([^'|^/]\\)|\\1='/myLocalPath/\\2|g" type="text/html*"
Example rule for rewriting hardcoded host names:
Output fn="insert-filter" filter="sed-response" sed="s|https://www.oracle.com|https://myoriginserver.oracle.com:8484/myLocalPath|g" type="(text*|application*)"
Example rule for rewriting path references within CSS elements:
Output fn="insert-filter" filter="sed-response" sed="s|url(\"/\\([^\"|^/]\\)|url(\"/myLocalPath/\\1|g" sed="s|url('/\\([^'|^/]\\)|url('/myLocalPath/\\1|g" sed="s|url(/\\([^) |^/]\\)|url(/myLocalPath/\\1|g" type="text/css*"
Note the following when creating host name and path rewriting rules:
-
You must include the
"Content-Type"attribute values for content types used by the target page in your Oracle Traffic Director configuration file to provide maximum content compatibility when rewriting. -
Compressed content is not directly supported by sed; you must configure Oracle Traffic Director to decompress compressed HTML content before applying sed rewriting rules to the content, and recompress it afterwards.
Example rules for decompressing and recompressing HTML content:
Output fn="insert-filter" type="(text*|application*)" filter="http-decompression"Output fn="insert-filter" type="(text*|application*)" filter="http-compression" -
In some cases, you may be able to strip out the
"Accept Encoding"parameter in the request header to prevent the application host from sending compressed data in the first place.Example rule for stripping out the
"Accept Encoding"header:AuthTrans fn="set-variable" remove-headers="accept-encoding" -
JavaScript code varies widely in complexity and must be examined on a case-by-case basis in order to create clean, compatible rewriting rules.
47.4.3 Configuring the Access Proxy Request Filtering
The Access Proxy plugin provides the following HTTP request filtering mechanisms:
-
JavaScript tag injection into incoming (to the user browser) HTML pages
-
Mock credential substitution in outgoing POST requests
-
HTTP Basic Authentication credential injection and credential capture
-
Sanitization of outgoing HTTP requests to remove OAM/ESSO cookies and headers before the request is forwarded to the origin server
The proxy plugin uses the following Init directives in magnus.conf:
-
Loads NSAPI filters:
Init fn="load-modules" shlib="esso_webproxy.so" NativeThread="no" obinstalldir="WebGate_Home_Oracle" obinstancedir="WebGate_Instance_Dir" -
Loads NSAPI SAFs:
Init fn="load-modules" funcs="EssoBasicAuthInit,EssoBasicAuth,EssoClean" shlib="esso_webproxy.so" -
Enables HTTP Basic Authentication:
Init fn="EssoBasicAuthInit" obinstalldir="WebGate_Home_Oracle" obinstancedir="WebGate_Instance_Dir" Mode="PEER"
where:
| Parameter | Description |
|---|---|
shlib |
="esso_proxy.so"
Full path to the |
obinstalldir |
="WebGate_Oracle_Home"
full path to the target WebGate installation directory. |
obinstancedir |
="WebGate_Instance_Dir"
full path to the WebGate instances directory. |
ESSOEnable |
="On|Off" , default "On"
Enable or disable all plugins. |
47.4.3.1 Configuring the JavaScript Injection Filter
The JavaScript injection filter provides tag injection into pages incoming into the target user's Web browser. The following table describes the supported parameters.
| Parameter | Description |
|---|---|
ESSOEnable |
="on|off", default "on"
Add to either Enable or disable the JavaScript injection filter. Specifying this directive in |
ESSOSearchTag |
="str", default "</head>"
Add to HTML tag to match on for JavaScript injection. |
ESSOInjectTag |
="before|after", default "before"
Add to Determines whether to inject the JavaScript tag before or after the |
ESSOSearchCaseSensitive |
="yes|no", default "no"
Add to Determines whether the match is case sensitive. |
ESSOProxyType |
="str", default "DNS"
Add to Passed through to JavaScript as |
ESSOScriptPath |
="path", default "/oamsso/columbiaWeb.js"
Add to Passed through to JavaScript as |
ESSOConsoleLoggingLevel |
="n", default "0", "5" is trace.
Add to Passed through to JavaScript as |
ESSOPartnerId |
="str"
Add to Partner ID value. Passed through to JavaScript as |
For example:
Output fn="insert-filter" type="text/*" filter="esso_webproxy" ESSOSearchTag="</title>"
47.4.3.2 Configuring the Mock Credentials Filter
The Mock Credentials filter provides substitution of ESSO mock credentials in the outgoing POST request. By default, OAM headers are stripped before the request is passed on to the origin server, but they can be forwarded with the pass-oam-headers parameter.
To enable, add a directive with the parameter to your directive in obj.conf as follows:
pass-oam-headers="true|false", default "false"
This includes the following headers (by default, they are omitted):
-
OAM_IMPERSONATOR_USER -
OAM_REMOTE_USER -
OAM_LAST_REAUTHENTICATION_TIME -
OAM_IDENTITY_DOMAIN
For example:
Input fn="insert-filter" type="application/x-www-form-urlencoded" filter="esso_webproxy_input" pass-oam-headers="true"
47.4.3.3 Configuring HTTP Basic Authentication
HTTP Basic Authentication provides the ability to capture and inject credentials from and into Web browser basic authentication (modal) dialogs, using a SAF for header injection and a filter for credential capture.
For example, to configure all filters with the same directive:
Init fn="load-modules" shlib="/scratch/OTDWGHome/Oracle_OAMWebGate2/webgate/iplanet/lib/esso_webproxy.so" NativeThread="no" obinstalldir="/scratch/OTDWGHome/Oracle_OAMWebGate2/webgate/iplanet" obinstancedir="/scratch/OTDWGHome/wginst2
And, to configure the header injection SAF:
Init fn="load-modules" funcs="EssoBasicAuthInit,EssoBasicAuth" shlib="/scratch/OTDWGHome/Oracle_OAMWebGate2/webgate/iplanet/lib/esso_webproxy.so"
Init fn="EssoBasicAuthInit" obinstalldir="/scratch/OTDWGHome/Oracle_OAMWebGate2/webgate/iplanet" obinstancedir="/scratch/OTDWGHome/wginst2" Mode="PEER"
Then add one or more of the following parameters to obj.conf for the header injection SAF and the credential capture filter:
| Parameter | Description |
|---|---|
| policy | ="policy name"
Required. Name of the ESSO policy (application template) to use for authentication. |
| realm | ="realm name"
Optional. The desired authentication realm of the target website, if more than one realm is in use. |
For example:
NameTrans fn="EssoBasicAuth" policy="BasicAuth1" realm="realm1"
Output fn="insert-filter" filter="esso_output_capture" policy="BasicAuth1" realm="realm1"
47.4.3.4 Configuring the HTTP Request Sanitizer Directive
The HTTP request sanitizer directive sanitizes the proxied HTTP request of any cookies and headers added by Oracle Access Manager and the ESSO proxy plugin before the request is forwarded to the origin server.
The directive removes cookies with the following names:
-
OAM_Partner -
OAMAuthnCookie_* -
OAMRequestContext* -
OAMAuthnHintCookie -
OAM_* -
ESSO_BAH*(Basic Authentication Hint, caches policy, realm, and credential GUID)
Request-specific cookie names (for example, containing the server name) are matched using a wildcard, indicated above by the trailing asterisk.
The directive removes the following headers:
-
OAM_IMPERSONATOR_USER -
OAM_REMOTE_USER -
OAM_LAST_REAUTHENTICATION_TIME -
OAM_IDENTITY_DOMAIN
Note:
The Mock Credentials filter also provides this sanitization, but only while processing HTTP POST requests that contain mock credentials. The Access Proxy HTTP request sanitizer directive performs this function unconditionally on all requests.The directive definition in the magnus.conf file is as follows:
Init fn="load-modules" funcs="EssoClean"
shlib="esso_webproxy.so"
obinstalldir="WebGate_Oracle_Home"
obinstancedir="WebGate_Instance_Dir"
where:
-
esso_webproxy.so - full path to the
esso_webproxy.somodule -
WebGate_Oracle_Home - full path to the target WebGate installation directory
-
WebGate_Instance_Dir - full path to the WebGate instances directory
If EssoBasicAuth is also required, include both EssoBasicAuth and EssoClean in a single Init directive as follows:
Init fn="load-modules" funcs="EssoBasicAuthInit,EssoBasicAuth,EssoClean"

shlib= [...]"
The directive is enabled automatically during the installation of the Access Portal Service. The following is added to the obj.conf file:
<If not $uri =~ "/oamsso">
NameTrans fn="EssoClean"
</If>
The ESSO proxy plugin passes the target credential's GUID value in the proxied URL to the origin server. If the target application does not function properly due to this value being passed, add the following rewrite rule to the Oracle Traffic Director configuration to strip out the GUID value:
<If defined $query and $query =~ "(.*?)(ESSOCredGuid={.*?})(.*)$">
AuthTrans fn="set-variable" set-reqpb="query=$1$3"
</If>
47.5 Adding a Federated Partner Provider Application
To add a federated partner provider application to the Access Portal Service application catalog, do the following:
-
Log on to the Oracle Access Manager console.
-
In the Quick Start Wizards section of the Launch Pad tab, click Application Registration.
-
In the page that appears, fill in the fields as follows:
-
-
Vendor - the vendor of the application.
-
Name - a descriptive name for the application.
-
Type - select Federated Server Partner Provider Application from this drop-down menu, as desired.The application will be available to all Access Portal users.
-
Description - a meaningful description of the application for the user.
-
Reference - internal reference describing the version/variant of the application template.
-
Category - the category under which the application will appear; for example, "Finance," "Development," and so on.
-
Reference - an internal reference for the application template, such as a version number or features that are enabled.
-
Icon Image URL - URL to the icon image that will appear next to the application entry. A preview of the image is displayed below the field to confirm the URL is valid.
-
Logo Image URL - URL to the full-size application logo image. A preview of the image is displayed below the field to confirm the URL is valid.
-
When you have finished, click Next.
-
-
In the "Configuration" page that appears, do the following:
-
In the Partner field, enter the desired federated partner name. If you don't know the exact name, click the Search (magnifier) icon, enter the desired search term in the pop-up that appears, select the desired partner from the list of results, and click OK to add that partner to the template.
If you want to create a new partner, click Create and refer to the "Identity Federation" chapter for more information on creating a new federation partner.
-
In the Application URL field, enter the URL to the target application; obtain this URL from your application administrator.
-
Click Next.
-
-
In the summary page that appears, review your configuration choices. To make changes, click Back; otherwise, click Finish.
47.6 Adding an Oracle SSO Agent Application
To add an Oracle SSO Agent application to the Access Portal Service application catalog, do the following:
-
Log on to the Oracle Access Manager console.
-
In the Quick Start Wizards section of the Launch Pad tab, click Application Registration.
-
In the page that appears, fill in the fields as follows:
-
-
Vendor - the vendor of the application.
-
Name - a descriptive name for the application.
-
Type - select SSO Agent Application from this drop-down menu, as desired.The application will be available to all Access Portal users.
-
Launch URL - enter the URL of the target application; obtain this URL from your application administrator.
-
Description - a meaningful description of the application for the user.
-
Reference - internal reference describing the version/variant of the application template.
-
Category - the category under which the application will appear; for example, "Finance," "Development," and so on.
-
Reference - an internal reference for the application template, such as a version number or features that are enabled.
-
Icon Image URL - URL to the icon image that will appear next to the application entry. A preview of the image is displayed below the field to confirm the URL is valid.
-
Logo Image URL - URL to the full-size application logo image. A preview of the image is displayed below the field to confirm the URL is valid.
-
When you have finished, click Next.
-
-
In the summary page that appears, review your configuration choices. To make changes, click Back; otherwise, click Finish.
47.7 Common Interface Controls
The interface pages of the three features in the Access Portal Service group contain several common interface elements and controls. This section reviews these elements.
| Icon/Button | Name | Function |
|---|---|---|
 |
New Element dropdown | Available from the Access Portal Service section of the Oracle Access Management Launch Pad, this dropdown lets you quickly select which element you want to create from the main screen. |
| Credential Sharing Group icon | Indicates this is a Credential Sharing Group page. | |
| Password Generation Policies icon | Indicates this is a Password Generation Policy page. | |
| Global Agent Settings icon | Indicates this is a Global Agent Settings page. | |
| Create button | Available on each element's Search page; click to create a new element. | |
 |
Actions menu | Offers options to perform the following functions:
|
 |
View menu | Allows you to select which columns to view, and in what order. Also offers the option to detach the current tab and open it in a new browser window. |
 |
Reorder Columns dialog | Select a column from the list and click the up or down arrow to change its position in the Search Results list. |
| Add icon | Click to add applications to the current element. | |
| New icon | Click to create a new element of the same type as the page you are currently on. | |
| Edit icon | Select a line item in the list and click to edit it.
Alternatively, you can click directly on the name of the list item to open its configuration page. |
|
| Remove icon | Select a line item in the current list and click to remove that line item from the list. | |
| Import icon | Available only for Global Agent Settings. Select to locate an INI file with a settings configuration. | |
| Export icon | Available only for Global Agent Settings. Select to export an INI file with settings you have configured. | |
| Detach icon | Click to detach the current tab and open it in a new browser window. | |
| Close icon | Click to close multiple tabs simultaneously. |
47.8 Managing Password Generation Policies
Password policies facilitate user logons while ensuring the organization's security. the Access Portal Service lets administrators set policies that control automatic password generation.
Most applications have constraints for passwords: how long they can or must be, whether they must or must not include numbers or symbols, and so on. the Access Portal Service's password generation feature improves application logon security by automatically creating passwords made up of random characters according to predefined sets of constraints, stored as password policies. Each policy can apply to multiple applications or subscribers.
Using predefined password policies, you can completely automate password changes and implement sophisticated security schemes, including complex passwords and application-specific passwords unknown to users.
From the Launch Pad's Access Portal Service group, click Password Generation Policies. A new tab containing options to search and create opens.
Figure 47-1 Password Generation Policies Search/Create Tab
Description of "Figure 47-1 Password Generation Policies Search/Create Tab"
47.8.1 Searching for Password Generation Policies
To search for an existing policy:
-
Enter a name or partial string in the Name field, and click the Search button. The results appear in the Search Results table.
-
Click on any policy in the Search Results list to edit the policy configuration. Continue to 0in the next section to learn more about configuring these settings.
Figure 47-2 Password Generation Policies Search Results
Description of "Figure 47-2 Password Generation Policies Search Results"
47.8.2 Creating Password Generation Policies
To create a new policy:
Figure 47-3 New Password Generation Policy Summary Tab

Description of "Figure 47-3 New Password Generation Policy Summary Tab"
-
Click the Create Password Generation Policy button to launch the New Password Policy page, which contains two tabs:
-
Summary
-
Password Constraints
-
-
On the Summary tab, enter the following information:
-
A distinct name for the policy.
-
(Optional) A meaningful description to identify the policy.
-
(Optional) Internal reference information describing the version/variant of the policy.
-
-
Click the Password Constraints tab.
-
On the Password Constraints tab, specify the following:
-
Length Constraints
-
-
The minimum password length. Options are 1-128. Default is 8 characters.
-
The maximum password length. Options are 1-128. Default is 8 characters.
-
-
Alphabetic Characters
-
Check the box to allow uppercase characters. If you check the box, you must specify the minimum number required. Default is 0.
-
Check the box to allow lowercase characters. If you check the box, you must specify the minimum number required. Default is 0.
-
-
Special Characters
-
Check the box to allow non-alphabetical and/or non-numeric characters. If you check the box, you must specify the minimum and maximum number permitted. Default minimum is 0. Default maximum is 8.
-
Check the box(es) to allow a special character to start and/or end a password.
-
-
Excluded Characters
-
Enter a list of specific characters to exclude from a password. Do not use any delimiters.
-
-
Repeat Constraints
-
Enter the maximum number of times a given character can be repeated in a password (in any position). Options are 0-127. Default is 7.
-
Enter the number of times a given character can be repeated consecutively (adjacent to itself). Options are 0-127. Default is 7.
-
-
Numeric Characters
-
Check the box to allow numeric characters. If you check the box, you must specify the minimum and maximum number permitted. Default minimum and maximum is 0.
-
Check the box(es) to allow a numeric character to start and/or end a password.
-
-
Other Characters
-
Check to allow other characters to be included in a password.
-
-
Previous Password Constraints
-
Disallow use of previous password. Check the box to prohibit reusing the previous password entirely.
-
Limit use of previous password characters. Select to limit repetition of characters from the previous password.
-
Maximum previous password characters. If you checked the previous box to permit usage of some previous password characters, select the maximum number of characters to allow.
Note:
The Access Portal Service recognizes multiple occurrences of a character as the same character and will therefore permit more than one occurrence of that character in the new password.So, if the previous password contained three "A"s, and you specify that one character from the previous password can repeat, the Access Portal Service will allow more than one instance of "A" in the new password.
-
-
-
Click Save to complete policy configuration, or Cancel to close the tab without saving the policy.
Figure 47-4 Password Constraints Tab of a Password Generation Policy
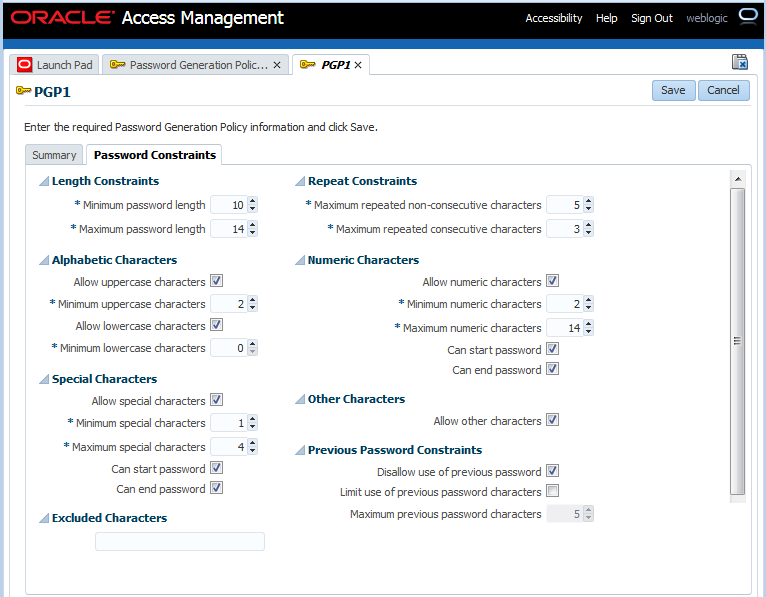
Description of "Figure 47-4 Password Constraints Tab of a Password Generation Policy"
47.8.3 Managing Policy Subscribers
Applications that use a password generation policy are called subscribers. You can add subscribers during creation of the policy or at any time thereafter. Following is the procedure to add subscribers to a policy.
-
On the Password Generation Policy Summary page, click the Add icon. The Add Applications dialog appears.
-
In the Name field, enter a name or text string and click Search. You can also leave this field blank to return every available application.
-
After a search, all applications that fit your search criteria appear in the Available Applications list. For each application, the list includes any policy to which it subscribes.
-
Select one or more applications from the Available Applications list, and click Add Selected. Or simply click Add All to add every application returned by the search.
If you select an application that is already a subscriber to another policy, it will no longer be subcribed to the other policy.
-
Click Add when you are finished, or Cancel to dismiss the dialog without making changes.
Figure 47-6 Add Applications Dialog Search Results
Description of "Figure 47-6 Add Applications Dialog Search Results"
47.9 Managing Credential Sharing Groups
Credential sharing groups are sets of applications that share the information of one or more fields to facilitate account management, allowing users to apply a credential change made in one application to other specified applications automatically. For each group that you create, you can include any number of applications and designate which credentials they have in common.
When the Access Portal Service handles a credential change for any application that is a member of the sharing group, it automatically applies the credential change to all other group members. Any number or combination of applications can share a single credential. You can also designate a key field; that is, a field that the Access Portal Service uses when updating shared credentials, changing credentials only for accounts with the same key value.
Note:
Applications will share credentials only for their initial deployment unless you enable credential sharing groups.the Access Portal Service provides flexibility and granularity for you to control how credential sharing groups work. You can configure the following options:
-
Sharing any or all fields for a group of applications:
-
Pre-filling all shared fields when a user first encounters an application in a sharing group, thus requiring the user to enter information only for fields that are not shared by the group.
-
Automatically creating an account when a user encounters an application for which all credentials are pre-determined.
-
Designating a key field; that is, a field that the Administrative Console uses when updating shared credentials, changing credentials only for accounts with the same key value.
The next sections describe how to create new groups or edit existing ones. After you create a group, the process for configuring it is the same as editing an existing one.
47.9.1 Searching for Credential Sharing Groups
To search for an existing group:
-
Enter a name or partial string in the Name field, and click the Search button. The results appear in the Search Results table.
-
Click on any group in the Search Results list to edit its configuration. Continue to 0in the next section to learn more about configuring these settings.
Figure 47-7 Credential Sharing Groups Search Results
Description of "Figure 47-7 Credential Sharing Groups Search Results"
47.9.2 Creating Credential Sharing Groups
To create a new group:
-
Click the Create Credential Sharing Group button to launch the New Credential Sharing Group page.
-
In the Name field, enter a name for the group. Optionally, you can add a description and reference information in the fields at the bottom of this section.
-
In the Shared credentials settings, select which credentials the group will share. You can include any or all fields:
-
Username
-
Password
-
Third Field
-
Fourth Field
-
-
From the Key Credential within group dropdown, select a field. The key credential field provides more granular criteria for updating shared credentials within a group. When a credential changes, updates will only occur for members that share the key field. to update shared credentials only for accounts that share this field value.s only for accounts that share this field value.:
If the user wants to create an account that is not constrained by the key field, that account must have a new key field to avoid updating all existing accounts.
Choose one of the following from the dropdown:
-
None (Default)
-
Username
-
Third Field
-
Fourth Field
-
-
If desired, select to pre-fill shared fields. This specifies that shared fields will be pre-populated with the shared credentials when the user creates a new account for an application. By default, this option is enabled.
-
If desired, select to automatically create accounts when all credentials are known. This means that the Access Portal Service will create an account automatically when the user encounters an application that has all fields pre-determined.
Note:
This field is available only if Key credential within group is set to None. -
Click Save to complete policy configuration, or Cancel to close the tab without saving the group.
Figure 47-8 New Credential Sharing Group Page
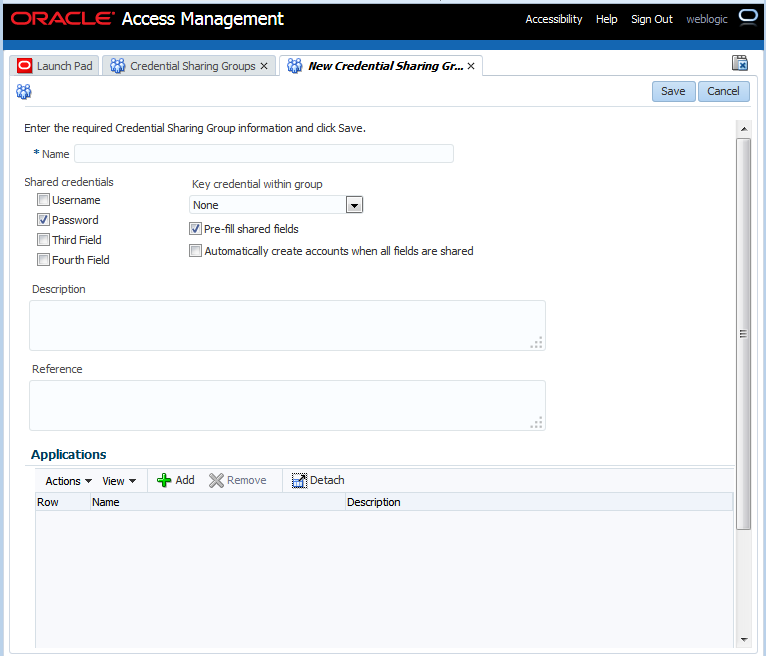
Description of "Figure 47-8 New Credential Sharing Group Page"
47.9.3 Managing Applications in Credential Sharing Groups
You can add applications to a group during creation of the group or at any time thereafter. Following is the procedure to add applications to a group.
-
In the Applications section of the group page, click the Add icon. The Add Applications dialog appears.
-
In the Name field, enter a name or text string and click Search. You can also leave this field blank to return every available application.
-
After a search, all applications that fit your search criteria appear in the Available Applications list. For each application, the list includes any credential sharing group to which it belongs.
-
Select one or more applications from the Available Applications list, and click Add Selected. Or simply click Add All to add every application returned by the search.
If you select an application that is already a member of another group, it will no longer be part of that group.
-
Click Add when you are finished, or Cancel to dismiss the dialog without making changes.
Figure 47-10 Add Applications Dialog Search Results
Description of "Figure 47-10 Add Applications Dialog Search Results"
47.10 Managing Global Agent Settings
Global Agent Settings determine single sign-on behavior when users encounter password-protected applications. With these settings you specify what the user sees and is allowed to do when navigating to an application.
The next sections describe how to create new sets of Global Agent Settings or edit existing sets. You can use existing sets created in the the Access Portal Service, or import preconfigured settings in the format of INI files. After you create a set, the process for configuring it is the same as that for editing an existing one.
47.10.1 Searching for Sets of Global Agent Settings
To search for an existing set:
-
Enter a name or partial string in the Name field, and click the Search button. The results appear in the Search Results table.
-
Click on any group in the Search Results list to edit its configuration. Continue to 0in Creating a Set of Global Agent Settings to learn more about configuring these settings.
Figure 47-11 Global Agent Settings Search Results
Description of "Figure 47-11 Global Agent Settings Search Results"
47.10.2 Importing an INI File with a Global Agent Settings Configuration
To import an INI file:
-
Click the Import icon to launch the Import Global Agent Settings dialog, and click the Browse button.
-
Navigate to an existing INI file, select it and click Open. Then click the Update button. The Global Agent Settings' configuration page opens. Continue to 0in Creating a Set of Global Agent Settings to learn more about configuring these settings
Figure 47-12 Import Global Agent Settings Dialog
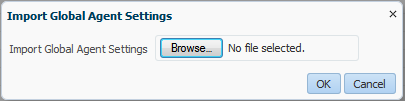
Description of "Figure 47-12 Import Global Agent Settings Dialog"
47.10.3 Creating a Set of Global Agent Settings
To create a new set:
Figure 47-13 New Global Agent Settings Page
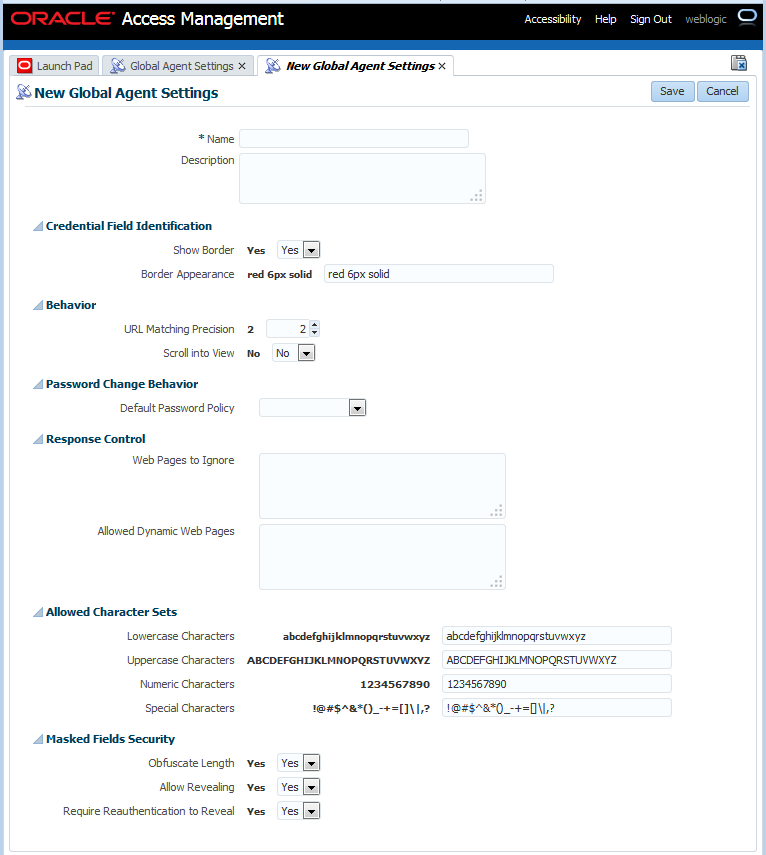
Description of "Figure 47-13 New Global Agent Settings Page"
-
Click the Create Global Agent Settings button to launch the Create Global Agent Settings page.
-
In the Name field, enter a name for the group. Optionally, you can add a description of this set.
-
In the Credential Field Identification settings, specify the following:
-
Whether to display a highlighted border around the credential fields of an application during logon. The default is to show the border.
-
The default border color/size/style for highlighting detected web page fields. The default is a solid red border, six pixels in width.
Following is an example of the results of using the default settings for this group.
-
-
In the Behavior settings, specify the following:
-
URL Matching Precision. The number of levels of the host portion of the URL used for application detection and response. Default is 2.
For example, for the URL
http://mail.company.co.uk:2=match to
*.co.uk3=match to
*.company.co.uk4=match to
*.mail.company.co.ukNote:
Values less than 2 are treated as 2. -
Scroll into View. Enables or disables scrolling the browser window to bring the logon fields into view. Default is No.
This setting disables scrolling when the user has not yet stored credentials for a Web application. Scrolling always occurs when injecting credentials into the logon fields for an account that already exists.
-
-
In the Password Change Behavior settings, select a Default Password Policy from the dropdown list, if desired. Default is None.
-
In the Response Control settings:
-
Enter the list of Web pages to Ignore. This is typically used when the BHO causes conflicts with specific Web applications or sites. Click the ellipsis ("…") button to enter the regular expressions that match the URLs to be ignored (one per line).
Examples:
-
-
.*http://login\.company\.com/.* -
.*http://.*\.company\.com/.*
-
-
Enter the list of Allowed Dynamic Web Pages. Use this setting to list the permissible dynamic (DHTML) Web pages. By default, the BHO does not detect changes made to a dynamic page after the initial presentation of the page.
Examples:
-
.*http://login\.company\.com/.* -
.*http://.*\.company\.com/.*
-
-
-
In the Allowed Character Sets settings, enter the permissible characters for each of the four types of fields. The fields are pre-populated with the defaults for each character set.
-
In the Masked Fields Security settings, specify the following.
-
Obfuscate Length. Specifies whether to display encrypted fields with a string of blank characters different from the length of the obfuscated data. Default is Yes.
-
Allow Revealing. Specifies whether the user is permitted to reveal masked fields. Default is Yes.
-
Require Reauthentication to Reveal. Specifies whether the user must enter the Access Portal Service credentials in order to reveal masked fields, assuming that you have set Allow revealing to Yes. Default is Yes.
-
-
Click Save to complete global agent setting configuration, or Cancel to close the tab without saving the set.