12 Managing Roles
Oracle Identity Manager administers role-based access controls. Roles make it easier to assign access levels to users and to audit those assignments on an ongoing basis. Rather than assigning access levels to users directly, access levels are assigned to a role. Roles are assigned to users, and a user's access level is determined by the roles assigned to that user.
Role-based administration typically grows and expands as new situations occur. The main advantage of using this approach is ease of implementation. Role-based administration can be established in a centralized fashion, distributed throughout your network, or hybridized.
Using this feature, you can:
-
Create, edit, and delete roles
-
Assign users to roles and remove users from roles
-
Assign a role as a parent role to an existing role
-
View access policies assigned to a role
-
Add, edit, or remove user membership rule of a role
-
Publish roles to organizations and unpublish roles from organizations
This chapter describes roles and functionalities related to roles in the following sections:
12.1 Role Membership Inheritance
Membership inheritance means that the members of the inheritor role inherit from the inherited role. For example:
Note:
The role that inherits membership is called the member-inheritor role. The role from which the member-inheritor role inherits membership is called the inherited-member role-
Role B inherits memberships from Role A. Role B is the member-inheritor role to Role A.
-
Role C also inherits memberships from Role A. Role C is also a member-inheritor role of Role A.
In this example, all members of Role A are also implicit or indirect members of Role B and Role C, but members of Role B are not automatically members of Role A. In other words, Roles B and C are the member-inheritor roles of Role A, and Role A is the inherited-member role of Role B and Role C. A real example for this is that the Employee Role(Role B) inherits memberships from the Manager Role(Role A).
Role membership inheritance is described with the help of the following scenario:
-
The role of CEO is an inherited-member role of the Manager role, as a list of managers will include the CEO role.
-
The role Manager is an inherited-member role of the Employee role.
-
The role Software Architect is an inherited-member role of the Software Engineer role.
-
The role Software Engineer is an inherited-member role of the Employee role.
-
The Employee role has two inherited-member roles - the Manager role and the Software Engineer role.
Figure 12-1 shows the parent and child roles in this example, along with the membership inheritance:
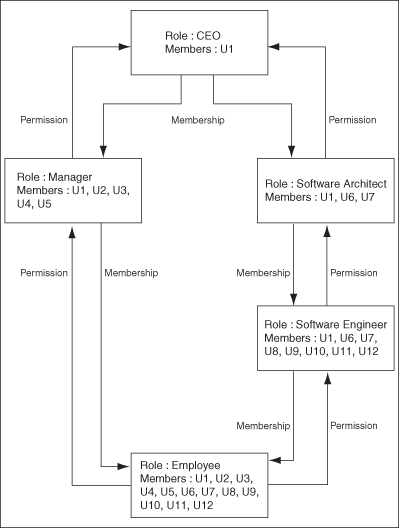
Each user in an inherited-member role automatically becomes a member in any of its member-inheritor roles. If that member-inheritor role is itself an inherited-member role, then the user is also added to its member-inheritor roles, and so on. This continues until there are no more member-inheritor roles in the inheritance chain. For example, a CEO is a manager and is automatically a member of the Manager role. Similarly, a manager is automatically an employee. This is why a member added to an inherited-member role gets inherited by its member-inheritor roles, and so on. This explains why the direct membership of the Employee role is empty, and considering membership inheritance, the Employee role has more members than all other roles.
A user can be a member of a role in one of the following ways:
-
The member has been inherited from the inherited-member role, which is called indirect membership.
-
The user is directly assigned to the role, which is called direct membership.
-
The user is directly assigned to the role by using membership rules, which is also called direct membership.
An indirect member can be assigned as a direct member as well. If a user's direct membership in a role is revoked, the user is still a member of that role because of inheritance.
12.2 Default Roles
In Oracle Identity Manager, the following types of roles are available:
-
Enterprise roles: These are roles that users (depending on the permissions granted) can create, modify, or delete in Oracle Identity Manager and request for the roles by using the request catalog.
-
Admin roles: These are predefined roles in Oracle Identity Manager that have a one-to-one mapping with the application roles defined in Oracle Entitlement Server. Admin roles are not visible to the end users. Therefore, admin roles cannot be requested. See "Admin Roles" for more information about admin roles.
Table 12-1 lists the default enterprise roles in Oracle Identity Manager. For a list of default admin roles, see "Admin Roles".
Note:
If you upgrade from Oracle Identity Manager 11g Release 1 (11.1.1), then the default roles of 11g Release 1 (11.1.1) will be available.Table 12-1 Default Roles in Oracle Identity Manager
| Role | Description |
|---|---|
|
ALL USERS |
Members of this role have minimal permissions, including the ability to access the user's own user record. By default, each user belongs to the ALL USERS role. |
|
SYSTEM ADMINISTRATORS |
This role is for internal use only, meaning it is for OIM users, and other users can only view it on UI. Members of this role have access to the UI to perform various tasks to manage attestation events. Note: By default, XELSYSADM and OIMINTERNAL users are members of this role. |
|
Administrators |
This role is for internal use only, meaning it is for OIM users, and other users can only view it on UI. Oracle WebLogic Server administrator is a member of this role. |
|
OPERATORS |
This role is for internal use only, meaning it is for OIM users, and other users can only view it on UI. |
|
SELF OPERATORS |
This role is for internal use only, meaning it is for OIM users, and other users can only view it on UI. It contains one user, XELSELFREG, who is responsible for modifying the privileges that users have when performing self-registration actions within Oracle Identity Manager. Note: Oracle Identity Manager recommends that you do not modify the permissions associated with the SELF OPERATORS user role. In addition, you should not assign any users to this role. |
12.3 Role Management Tasks
This section discusses the following topics:
Note:
A role, SELF OPERATORS, is added to Oracle Identity Manager by default. This role contains one user, XELSELFREG, who is responsible for modifying user permissions for performing self-registration in the Administration Console.Oracle recommends that you do not modify the permissions associated with the SELF OPERATORS role and do not assign users to this role.
12.3.1 Creating Roles
To create a role:
-
Log in to Identity Self Service.
-
Under Administration, click Roles. The Search Roles page is displayed.
-
From the Actions menu, select Create. Alternatively, click Create on the toolbar.
The Create Role page is displayed.
-
Enter values in the fields. Table 12-2 lists the fields in the Create Role page.
Table 12-2 Fields in the Create Role Page
Field Description Name
The name of the role
Display Name
The role name as displayed in the UI
Role E-mail
The e-mail ID of the role
Role Description
The description for the role
Role Category
The category to which the role belongs
If a role category is not specified in this field, then the role is created in the Default category. See "Creating and Managing Role Categories" for information about role categories.
Owned By
The owner of the role
The role owner is a user who has permissions to view, modify, and delete the role without having to create custom authorization policies. For information about authorization policies for role management, see "Security Architecture" in the Oracle Fusion Middleware Developer's Guide for Oracle Identity Manager.
Role Namespace
The namespace to which the role belongs
-
Click Save. The role is created successfully. The role details page for the created role is displayed.
12.3.2 Managing Roles
You can find roles, add information to them, and perform other administrative functions for roles.
This section discusses the following topics:
12.3.2.1 Searching for Roles
To search for roles:
-
In Identity Self Service, under Administration, click Roles. The Search Roles page is displayed.
-
Select any one of the following:
-
All: On selecting this option, the search is performed with the AND condition. This means that the search operation is successful only when all the search criteria specified are matched.
-
Any: On selecting this option, the search is performed with the OR condition. This means that the search operation is successful when any search criterion specified is matched.
-
-
In the searchable user attribute fields, such as Display Name, specify a value. You can include wildcard characters (*) in the attribute value.
For some attributes, select the attribute value from the lookup. For example, to search all roles in the Default role category, select Default in the Role Category field.
-
For each attribute value that you specify, select a search operator from the list. The following search operators are available:
-
Starts with
-
Ends with
-
Equals
-
Does not equal
-
Contains
-
Does not contain
The search operator can be combined with wildcard characters to specify a search condition. The asterisk (*) character is used as a wildcard character. For example, you can specify the value of the Display Name attribute to be Jo* as the search criteria, and select Equals as the search operator. The roles with Display Name that begins with Jo are displayed.
-
-
To add a searchable role attribute to the Search Roles page, click Add Fields, and select the attribute from the list of attributes.
For example, if you want to search all roles in a role namespace, then you can add the Role Namespace attribute as a searchable field and specify a search condition.
Note:
You can configure the attributes that are searchable. The attributes available for search must be a subset of the attributes defined for the role entity that are marked with the Searchable = Yes property. -
Optionally click Reset to reset the values that you specified as search conditions. Typically, you perform this step to remove the specified search conditions and specify a new search condition.
-
Click Search. The search results is displayed in a tabular format, as shown in Figure:
-
If you want to hide columns in the search results table, then perform the following steps:
-
Click View on the toolbar, select Columns, Manage Columns. The Manage Columns dialog box is displayed.
-
From the Visible Columns list, select the columns that you want to hide.
-
You can view the details of the role click the left arrow icon to add the columns in the Hidden Columns list.
-
Click OK. The selected columns are not displayed in the search results. A status message displays along the bottom of the search table to identify how many columns are currently hidden. Figure shows that two columns are hidden:
-
12.3.2.2 Viewing and Administering Roles
You can open the details of a role and edit the role attributes, modify the role inheritance and membership, and then publish roles to organization. To open the details of a role and modify it, perform one of the following:
-
In the Search Roles page, search and select the role that you want to open. From the Actions menu, select Open. Alternatively, click Open on the toolbar.
-
In the search results table of the Search Roles page, click the Display Name of the role.
The details of the role is displayed in a new page. The role display name is displayed at the top of the page. You can display the details of the role and modify role information in the following tabs of this page:
12.3.2.2.1 The Attributes Tab
The Attributes tab displays the role attributes. Except for the Role Namespace field (which is a read-only field), the rest of the fields in the Attributes tab are same as available in the Create Role page. The Role Namespace field displays the namespace to which the role is assigned. For information about the rest of the fields in the Attributes tab, see Table 12-2, "Fields in the Create Role Page".
To modify the role attributes, change the values in the fields, and click Apply.
Note:
Roles with same names are allowed with different name space.12.3.2.2.2 The Hierarchy Tab
The Hierarchy tab displays the role hierarchy information in the following sections:
-
Inherits From: This section displays the parent roles from which the open role is inherited. The base role has the same permissions and privileges on the members as the inherited roles. Only inherited roles can be added or removed from the base role, but the base role cannot be added or removed from the inherited role.
-
Inherited By: This section lists the child roles that are inherited by the open role. This is a read-only display of the roles. You can use the Open Role action to modify the relationship from the base role.
In the Hierarchy tab. you can perform the following:
12.3.2.2.3 Adding a Parent Role to a Child Role
To add a parent role to a role:
-
Open the role.
-
Click the Hierarchy tab. In the Inherits From section, this tab lists the parent roles of the opened role and the opened role inherits the permissions from these parent roles.
-
Verify that Inherits From is active.
-
From the Actions menu, select Add. Alternatively, click Add on the toolbar. The Search Roles dialog box is displayed.
-
From the Search list, select a role attribute based on which you want to search for the role. Then, select an attribute by using the lookup icon. You can also include wildcard characters (*) in your search criterion. Then, click the search icon. A list of roles that matches your search criterion is displayed.
-
Select one or more roles that you want to add as parent roles. Then, click Add Selected to move the selected roles to the Selected Roles list.
Alternatively, you can click Add All to add all the roles in the Selected Roles list.
-
Click Select. The selected roles are added as parent roles to the opened role and the role hierarchy is displayed in the Inherits From section of the Hierarchy tab.
-
Select the inherited role that is added. A summary information of the role selected is displayed below the table.
You can click the Display name of the parent roles to open the parent role details. Alternatively, from the Actions menu, select Open, or click Open on the toolbar to open parent role details.
12.3.2.2.4 Removing a Parent Role from a Role
To remove a parent role from a role:
-
In the Inherits From section of the Hierarchy tab, select the role that you want to remove.
-
From the Actions menu, select Remove. Alternatively, click Remove on the toolbar. A message box is displayed asking for confirmation.
-
Click Remove. The inherited role is removed from the Inherits From section of the Hierarchy tab.
12.3.2.2.5 Opening a Parent/Child Role
You can open parent roles from the Inherits From section and child roles from the Inherited By section of the Hierarchy tab.
You can also open the roles that are linked parent and child roles (similar to grand parent roles and grand child roles) of the current opened role from the Inherited From and Inherited By sections of the Hierarchy tab respectively.
To open a parent role:
-
In the Inherits From section of the Hierarchy tab, select the role that you want to open.
-
From the Actions menu, select Open. Alternatively, click Open on the toolbar.
A page with details about the inherited role is displayed. In this page, you can view and edit the role attributes, modify the role inheritance and membership, assign, edit, and remove membership rules, view access policies, and publish/unpu.blish to organizations.
To open a child role:
-
In the Inherited By section of the Hierarchy tab, select the role that you want to open.
-
From the Actions menu, select Open. Alternatively, click Open on the toolbar.
A page with details about the child role is displayed. In this page, you can view and edit the role attributes, modify the role inheritance and membership, assign, edit, and remove membership rules, view access policies, and publish/unpublish to organizations.
12.3.2.2.6 The Members Tab
The Members tab displays the members assigned to the open role. This information is displayed in the following sections:
-
Direct: This section displays the members that are directly assigned to the open role. It also displays all members that are assigned via membership rules.
-
Indirect: This section displays the members that are indirectly inherited by the role.
-
All: This section displays all the members, direct and indirect, assigned to the open role.
In the Members tab, you can perform the following:
12.3.2.2.7 Assigning Members to a Role
To assign members to a role:
-
In the Direct section of the Members tab, click Assign on the toolbar. The Catalog page is displayed.
-
In the Target Users section, click the green plus icon to select the members (users) to be assigned to the role. The Advanced Search for Target Users dialog box is displayed.
Note:
The role category affects the visibility of the role in the Catalog. A role is displayed in the Catalog only if the role is initially created within the Default role category. If the role is initially created within the OIM Roles category, then it is not displayed in the Catalog because there is no entry in the Catalog's table for the role. While creating a role, if you do not specify a value in the Role Category field, then the role is created in the Default category. For information about role categories, see "Creating and Managing Role Categories". -
Search and select one or more users that you want to add.
-
Click Add Selected to add the selected users to the Selected Users list. Alternatively, click Add All to add all the users in the Selected Users list.
-
Click Select. The selected users or beneficiaries are added to the Target Users section of the Request Cart Details page.
Note:
Select a user in target users, and click the red cross icon to remove that user from target users. -
In the Justification and Effective Date section, in the respective fields, specify a justification and effective date when the request will be active.
-
In the Cart Items section, if required, select a cart item and click Details to display the details of the item.
-
In the Cart Details section, modify the request details, if required. To do so, set or modify values in the Details section, and then click Ready to Submit.
-
After reviewing and modifying the details or each request in the cart, click Submit.
The request is submitted for approval, and the Request Summary page is displayed with summary information, target user or beneficiary information, and request and approval details. You can click Save as Draft to save the request for later submission.
12.3.2.2.8 Revoking Members from a Role
To revoke members from a role:
-
In any section of the Members tab, select the member that you want to revoke.
-
Click Revoke on the toolbar. The Remove Roles page is displayed.
-
In the Target Users section, verify the members to be revoked from the role.
-
Enter values for the Justification and Effective Date fields.
-
Click Submit. If you have the required authorization policies for revoking members from a role, then without any approval step, the users are removed from the role. If you do not have the required authorization policies, then the role will be revoked when an approver approves the request.
You can click Save as Draft to save the request for later submission.
12.3.2.2.9 Adding, Modifying, and Deleting Membership Rules
In the Members tab, you can add, modify, or delete the user membership rules by using the expression builder. The expression builder lets you specify a condition based on which users are dynamically assigned to roles. You can specify simple to complex condition expressions as the user membership rule. When you modify a user membership rule, the existing user memberships are evaluated, and then the existing role memberships that are not valid are revoked and new role memberships are granted.
To add a user membership rule:
-
In the Members tab, in the User Membership Rules section, click Add Rule. The Expression Builder is displayed.
-
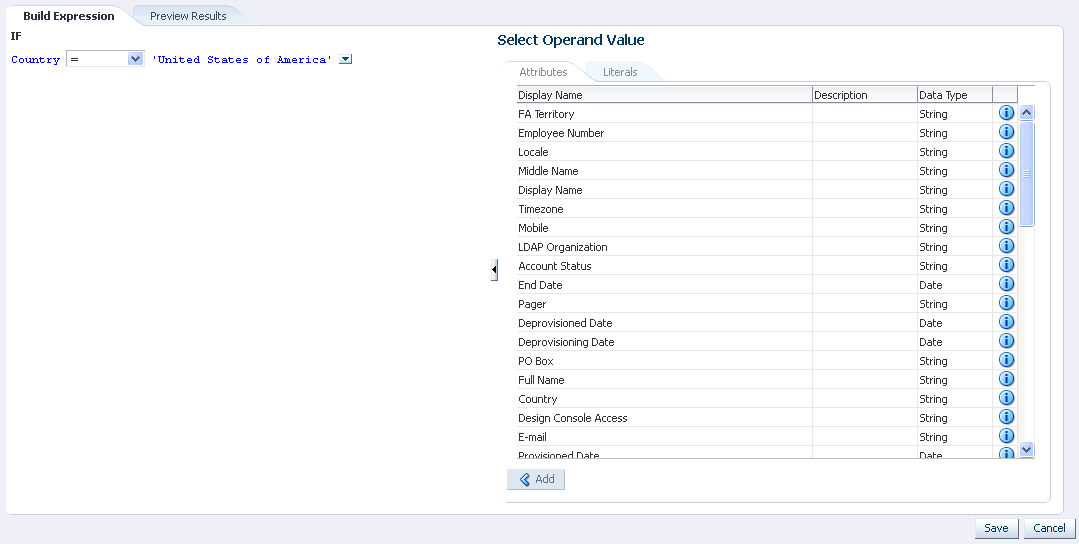
In the left pane, verify that <ADD> is selected. This is the placeholder to specify a user attribute for the condition.
-
Under Select Operand Value, in the Attributes tab, select a user attribute, for example, Country.
-
Click Add to add the attribute to the condition in the left pane.
-
From the list of operators, select a comparator. In Build Expression, select a comparator from the list of operators. If the attribute is of type integer, then comparators, such as = (equals), > (greater than), >= (greater than equal to), < (less than), => (less than equal to), and IN, are displayed.
If the attribute is of type String, then comparators, such as = (equals), != (not equals), Contains, Starts with, Ends with, and IN, are displayed.
-
Under Select Operand Value, in the Literals tab, specify a value in the Value field, such as
United States of America.When a checkbox or lookup type UDF or default attribute is used in membership rule, then it must be treated as shown in the following example:
( ( ( Last Name = "Klein" ) AND ( First Name Contains "Robert" ) )
OR ( ( User Login Starts with "rob" ) AND ( Common Name Ends with "ein" ) )
OR ( ( Robert2UserUDF111DL != "Robert2UserUDF111DL" ) AND ( Robert2UserNumberDL >= 99999 )
AND ( RobertUserDateDL =< 2013-12-31 ) AND ( Robert2UserchkboxDL = "1" )
AND ( Robert2UserLookupDL IN ["RobertLookUpCode3","RobertLookUpCode9"] ) ) )
Here:
-
Robert2UserchkboxDL is check box, which must be used in the rule as a string. Use "1" to check for True/yes/Selected/Checked, and use "0" to check for False/no/Unselected/unchecked.
-
Robert2UserLookupDL is lookup type. In the default userprofile, "Robert2LookUpMean3" will be displayed. But you must use its code value "Robert2LookUpCode3" in the expression.
-
For All type of Attributes, there is no way to check NULL or no value.
Note:
Checkbox fields are stored as strings in the backend. The data type for a checkbox field is a String and not Boolean. Therefore, all string operations will be displayed. -
-
Click Add to add the specified value to the condition expression. The expression now means that users belonging to United States of America will be dynamically assigned to the open role.
Figure 12-2 shows the expression builder with the condition.
-
If required, on the Preview Results tab, you can preview members to whom this rule will be applied.
-
Click Save. The expression builder closes, and the rule you defined has been saved.
-
Click any one of the following:
-
Apply: Clicking this button saves the membership rule for later evaluation. The users matching the rule criteria will be assigned to the selected role when you run the Refresh Role Memberships scheduled job. This scheduled job evaluates the changes in user-role membership rules since the last job run and assigns users to roles based on the rules. For more information about this scheduled job, see "Predefined Scheduled Tasks" in the Oracle Fusion Middleware Administrator's Guide for Oracle Identity Manager.
-
Apply and Evaluate: Clicking this button saves the membership rule and evaluates it against all users. As a result, the users that match the rule criteria are displayed in the list of members of the selected role.
Note:
The evaluation takes place in the back end. You can continue to perform other operations in Oracle Identity Self Service when the users are evaluated at the back end. -
Revert: Clicking this button reverts the changes to the rule done during adding or editing the rule.
WARNING:
The expression added will be lost if the role details is closed without clicking any one of the Apply, Apply and Evaluate, or Revert buttons.
-
To modify a user membership rule:
-
In the Members tab, in the User Membership Rules section, click Edit Rule. The expression builder is displayed.
-
Specify a condition to dynamically assign members, as described in the steps for adding membership rule.
-
If required, on the Preview Results tab, you can preview members to whom the modified rule will be applied.
-
Click Save. The expression builder closes, and the rule you modified has been saved. You can then click the Apply, Apply and Evaluate, and Revert buttons, as required.
To delete a user membership rule:
-
In the Members tab, in the User Membership Rules section, click Delete Rule. A dialog box asking to confirm whether you want to delete the membership rule is displayed.
-
Click Yes. The membership rule is deleted.
The deletion of the membership rule takes effect when the Role Memberships scheduled job is run.
12.3.2.2.10 The Organizations Tab
The Organizations tab allows you to assign and revoke organizations to and from the open role. By assigning an organization to the open role, you make the role available to the organization. This is called publishing the role entity to an organization.
All the organizations, to which the open role has been published, are displayed in the Organizations tab. For each organization, the include sub-orgs option is available for selection in the Hierarchy Aware column. Select this option if you want the open role to be available to the entire hierarchy of the organization. To make the open role available only to the organization and not its hierarchy, leave this option deselected.
In the Organizations tab, you can perform the following:
12.3.2.2.11 Publishing Roles to an Organization
To publish roles to an organization:
-
In the Role details page, click the Organizations tab. This tab displays the organizations that are assigned to the open role.
-
From the Actions menu, select Assign. Alternatively, click Assign on the toolbar. The Search Organizations dialog box is displayed.
-
Search for the organizations you want to add. The organizations are displayed in the Organization Results section.
-
Select the organizations that you want to add, and click Add Selected. The selected organizations are added to the Selected Organizations section.
-
For each selected organization, the Hierarchy option is selected by default. If you want to publish the role to the suborganizations of the selected organization, then leave the Hierarchy option selected.
To publish the role to the selected organization only, deselect the Hierarchy option.
-
Click OK. The role is published to the selected organizations. In other words, the selected organizations are assigned to the role.
12.3.2.2.12 Revoking Roles From an Organization
To revoke a role from an organization:
-
In the Organizations tab, select the organization from which you want to revoke the role.
-
From the Actions menu, select Revoke. Alternatively, click Revoke on the toolbar. A message is displayed asking for confirmation. Click Revoke. The organization is revoked from the role.
-
To revoke the role from sub organizations of the currently selected organization, select the Hierarchy Aware option, and then click Apply. A message is displayed. Click Revoke.
12.3.2.3 Viewing Access Policies
You can display all available access policies for this role. To view access policies assigned to the role:
In the Role details page, click Access Policy. The Access Policies page is displayed. This page displays the policy name and brief description of the policy.
See "Managing Access Policies" in the Oracle Fusion Middleware Administrator's Guide for Oracle Identity Manager for information about assigning access policies to roles and removing access policies from roles.
12.3.2.4 Deleting Roles
-
In the Search Roles page, search for a role as described in "Searching for Roles".
-
Select the role that you want to delete.
-
From the Actions menu, select Delete. Alternatively, click Delete on the toolbar.
A message is displayed asking for confirmation.
-
Click Delete to confirm.
Note:
-
You are not allowed to delete a role, which is the parent/child of some other role. To delete such a role, you must first remove the associated parent-child role relationships. When the role is no longer involved in any role relationships, it can be deleted.
-
You are not allowed to delete a role that has users associated with it.
-
12.3.3 Creating and Managing Role Categories
Role categories are a way of categorizing roles for the purpose of navigation and authorization. Role categories are internally stored in Oracle Identity Manager as an attribute of the role and is reconciled with the multivalued business category attribute in the LDAP identity store. If the value in LDAP is empty, then the role is assigned to the default role category. If the value in LDAP is an unrecognized value, then a role category (with the category name as the unrecognized value) is created, and then the role is assigned to this newly created role category. If the value in LDAP has multiple values, then the role reconciliation process does not reconcile the role and generates reconciliation errors in Oracle Identity Manager.
The default role categories in Oracle Identity Manager are:
-
OIM Roles: All the predefined roles in Oracle Identity Manager are assigned to this category. These are roles that exist in Oracle Identity Manager by default and are primarily used for managing permissions. There will not be any corresponding entity in LDAP store and catalog for these predefined roles. See Table 12-1, "Default Roles in Oracle Identity Manager" for information about the predefined roles in Oracle Identity Manager.
-
Default: A newly created role must have a role category. Therefore, if a role category is not specified at the time of creating the role, then the role is assigned to this category by default.
Note:
The default role categories cannot be localized.
This section describes the following topics:
12.3.3.1 Creating a Role Category
To create a role category:
-
In Identity Self Service, under Administration, click Role Categories. The Search Role Categories page is displayed.
-
From the Actions menu, select Create. Alternatively, click Create on the toolbar. The Create Role Category page is displayed.
-
In the Role Category box, enter the name of the role category.
-
In the Role Category Description box, enter a description for the role category. This step is optional.
-
Click Save. The role category is created, and the role category details page is displayed. The page consists of the Attributes and Roles tabs.
The Attributes tab displays the attributes of the role category. You can edit the fields in this tab to edit the role category.
The Roles tab displays the list of roles belonging to the role category.
12.3.3.2 Searching Role Categories
To search for role categories:
-
Under Administration, click Role Categories. The Search Role Categories page is displayed.
-
In the Role Category field, specify a value. You can include wildcard characters (*) in the attribute value.
-
For the attribute value that you specify, select a search operator from the list. The following search operators are available:
-
Starts with
-
Ends with
-
Equals
-
Does not equal
-
Contains
-
Does not contain
The search operator can be combined with wildcard characters to specify a search condition. The asterisk (*) character is used as a wildcard character. For example, you can specify the value to be D* as the search criteria, and select Equals as the search operator. The role categories that begins with D are displayed.
-
-
To add a searchable attribute to the Role Categories, click Add Fields, and select the attribute from the list of attributes.
-
Optionally click Reset to reset the values that you specified as search conditions. Typically, you perform this step to remove the specified search conditions and specify a new search condition.
-
Click Search. The search results is displayed in a tabular format.
12.3.3.3 Modifying a Role Category
To modify a role category:
-
In the Search Role Categories page, search and select the role category you want to modify.
-
From the Actions menu, select Open. Alternatively, click Open on the toolbar. A page with details about the role category is displayed.
-
The Attributes tab is open by default. Edit the fields in this tab to modify basic category information such as name and description. When finished, click Apply.
-
Click the Roles tab. In this tab, you can view all roles that are assigned to this category.
Note:
To add a role to the category, update the role details with this role category name. Alternatively, you can also remove the role category from its details page.
12.3.3.4 Deleting a Role Category
To delete a role category:
-
In the Search Role Categories page, search and select the role category you want to delete.
-
From the Actions menu, select Delete. Alternatively, click Delete on the toolbar.
If the role category detail page is open, then click Delete on the toolbar.
A message box is displayed asking for confirmation.
-
Click Delete. The role category is deleted. Alternatively, you can also delete the role category from its details page.
Note:
You cannot delete a role category that has roles associated with it.