2 Secure Installation and Configuration
This chapter describes how to plan an installation and then how to configure the software so that you use the software securely.
2.1 Planning the Deployment
This section outlines the options for a secure installation and describes several recommended deployment topologies for the systems.
2.1.1 High Availability
The simplest deployment architecture is a single-system deployment in which the Enterprise Controller and a Proxy Controller are installed on the same system. Although the simplicity is appealing, this type of deployment creates a single point of failure and cannot provide high availability because all components are stored on the same computer.
The High Availability configuration uses multiple Enterprise Controllers with Oracle Clusterware and a remote database. The active Enterprise Controller is used for all operations. The standby Enterprise Controllers are configured as backups. If the active Enterprise Controller must be taken offline, make another Enterprise Controller active. One of the standby Enterprise Controllers is also activated if the active Enterprise Controller fails.
Each asset is managed by a specific Proxy Controller. If a Proxy Controller fails or is uninstalled, Oracle Enterprise Manager Ops Center gives you the option to migrate the failed Proxy Controller's assets to another Proxy Controller. At any time, move an asset from one functional Proxy Controller to another Proxy Controller. The destination Proxy Controller must either be connected to the networks of the assets being moved, or be associated with those networks and have them enabled.
2.1.1.1 Requirements for Enterprise Controller High Availability
-
Use two or more systems of the same model and configured identically:
-
Processor class
-
Operating system
-
Oracle Enterprise Manager Ops Center software version, including updates
-
Network interfaces that are cabled identically to the same subnets
-
-
Use the Edit Asset action to add an asset tag that identifies the active Enterprise Controller and distinguishes it from the standby Enterprise Controller.
-
Maintain the standby Enterprise Controller's system in the same way as the active Enterprise Controller. The active and standby Enterprise Controllers must use the same version of Oracle Enterprise Manager Ops Center software.
2.1.1.2 Limitations of High Availability
-
User accounts and data that are not associated with Oracle Enterprise Manager Ops Center are not part of the relocate process. Only Oracle Enterprise Manager Ops Center data is moved between the active and standby Enterprise Controllers.
-
Any customizations of the PAM configuration on the primary node must be repeated on the standby node. Oracle Enterprise Manager Ops Center does not replicate PAM configuration.
-
UI sessions are lost in a relocation.
-
The Enterprise Controller HA configuration applies only to the Enterprise Controller and not to Proxy Controllers.
See the Oracle Enterprise Manager Ops Center Administration Guide for instructions in configuring and maintaining an High Availability installation.
2.1.2 Network Configuration
Network connections are needed for data operations, for management operations, and for provisioning operations. The minimum configuration, but least secure, is to combine all operations on one network. Separate networks, as shown in Figure 2-1, provide the highest security and the lowest number of points of failure. However, additional network interface cards (NIC) are needed to support this configuration. Network connection (net0) can be physical NIC, a link aggregate, or an IPMP group.
Figure 2-1 Separate Management, Provisioning, Data Networks
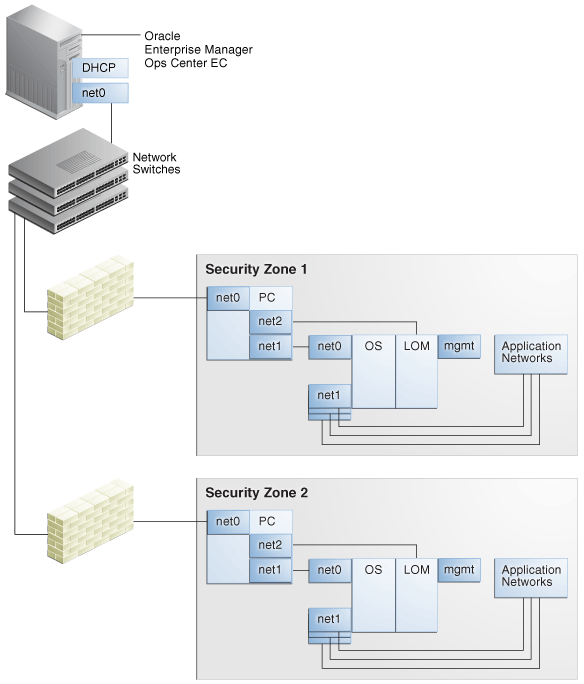
Description of "Figure 2-1 Separate Management, Provisioning, Data Networks"
2.1.3 Infrastructure and Operating Systems
Oracle Enterprise Manager Ops Center manages and monitors assets in multiple locations and on multiple platforms. The responsibility for securing the network, hardware, and operating system of the server that runs the Enterprise Controller is that server's system administrator. The responsibility for securing the hardware, network, and operating system of Proxy Controllers and all assets falls on various sites' system administrators.
2.1.4 Storage Configuration
Oracle Enterprise Manager Ops Center stores its data and metadata in Software and Storage Libraries. These libraries can reside in local file systems or on the shares of an NFS server. Because the Enterprise Controller does not mount the NFS share, install the NFS server on a system that is close to the systems that will use the NFS share, that is, the systems that host global zones and Oracle VM Servers.
2.1.5 Remote Database
This version of the product software provides the capability to use a remote, customer-managed database. The Enterprise Controller interacts with the remote, customer-managed database using the Oracle*Net protocol over TCP/IP.
Oracle Enterprise Manager Ops Center provides scripts to create the database schema and users. Before you install Oracle Enterprise Manager Ops Center, your database administrator creates the database and then runs the createOCSchema_remote.sqlscript to create the Ops Center Schema and to grant the CREATE DATABASE privilege. The database administrator provides the database credentials and the connection information to you and you create the remoteDBCreds.txt file. The file can be located in a directory of your choice on the system that hosts the Enterprise Controller.
When you install the Oracle Enterprise Manager Ops Center software, you use the -remoteDBprops flag and provide the location of the remoteDBCreds.txt file. During installation, the connection between the Enterprise Controller and the remote database is created.
Starting with Release 12.2.2.0.0, you have the option to prevent the remote database's Enterprise Controller application schema from viewing or executing public database objects.
Note:
Preventing access to public database objects might affect other application schemas if they require public privileges.To add this security enhancement, use the following procedure to execute the update_pub_privs_12.2.2.0.sql script:
-
Copy the
update_pub_privs_12.2.2.0.sqlscript from the Enterprise Controller's system to the Oracle account on the server where the customer-managed database instance is installed. The script is located in the following location of the Enterprise Controller's system:-
Oracle Solaris OS:
/opt/ORCLsysman-db/sql/update/diamond-update2/oracle/ -
Linux OS:
/opt/orcl/orcl-dbic/sql/update/diamond-update2/oracle/
-
-
On the customer-managed database's system, log into the database administrator account.
-
Execute the script using the following command:
sqlplus / as sysdba @update_pub_privs_12.2.2.0.sql
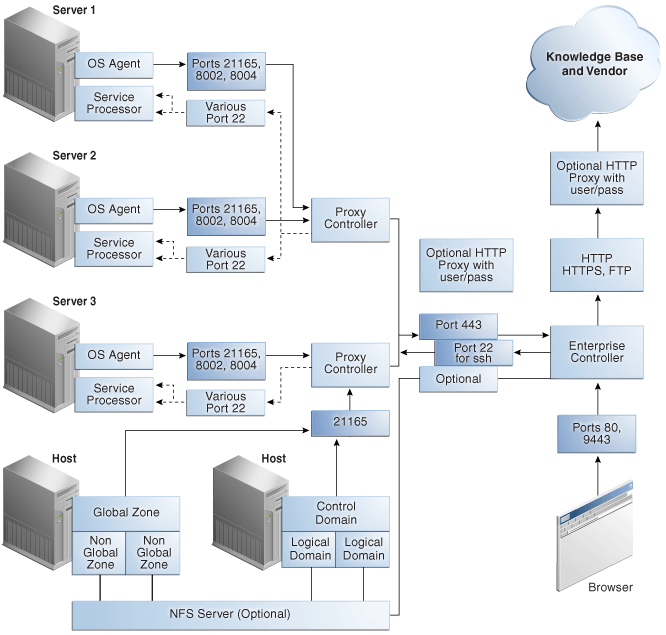
2.1.6 Typical Deployment
Figure 2-2 shows a deployment running the product software in Connected mode and with two Proxy Controllers.
2.2 Installing Oracle Enterprise Manager Ops Center
2.2.1 Control Access
Install the Enterprise Controller component only on a system where root access is controlled tightly because a root-privileged user must modify or create system services as part of the installation. To install the product on Linux systems, disable the SELINUX setting.
2.2.2 Substitute the Certificates for Internal Communication
Note:
You can substitute the certificates used by a web container after product installation. However, to substitute certificates for the communication between the Enterprise Controller and its remote Proxy Controllers or between a Proxy Controller and agents, you must perform the procedure before you configure the Proxy Controller.Oracle Enterprise Manager Ops Center has self-signed certificates that it uses for authentication between its components. Self-signed certificates are certificates that have not been registered with any third-party Certificate Authority (CA), and are therefore not guaranteed by a Certificate Authority. These certificates issue a warning when connecting with a browser and require users to accept the certificate.
To ensure that data being transmitted and received is private and not vulnerable to eavesdropping, a self-signed certificate is sufficient. However, to ensure that the sender and receiver are authentic, substitute the self-signed certificates with Class A or B certificates from a third-party Certificate Authority.
Oracle Enterprise Manager Ops Center's internal communication occurs between Java components and between Apache components so both types of certificates must be prepared and substituted for the self-signed certificates.
-
For Java certificates, use the
keytoolutility, included in the Java Development Kit, to manage the keystore, which stores your server's certificate, and the truststore, which stores the Certificate Authority's certificates. -
For Apache certificates, use the Oracle Solaris's OpenSSL utilities to create certificates for mutual authentication between a server and its clients. OpenSSL is a cryptography toolkit that implements the Transport Layer Security (TLS) network protocol. Oracle Enterprise Manager Ops Center does not use any version of SSL. All transactions with the web browser are in TLS.
Use the procedures in this section to replace private keys with a Certificate Authority's private keys, signed by the Certificate Authority. By replacing the certificates and keys, you change the trust relationship between components. To ensure authentic communication, substitute the certificates on the following:
-
The Enterprise Controller's server
-
The co-located Proxy Controller
-
Each additional Proxy Controller
2.2.2.1 Viewing the Enterprise Controller's Truststore and Keystore
To configure secure communications, you configure the Java keystore and truststore. The keystore stores the host server's private keys and local authority certificate, to provide the credentials for secure transactions. The truststore is similar to the keystore, but it stores certificates from remote servers, which allows the remote server to open a secure transaction.
At any time, use the following command to display the content of the keystore:
keytool -list -v -keystore keystore -storepass:file /etc/cacao/instances/oem-ec/security/password
Use the following command to display the content of the truststore:
keytool -list -v -keystore truststore -storepass trustpass
2.2.2.2 Obtaining a Certificate Authority's Certificate
To substitute the self-signed certificate with a Certificate Authority's certificate, you must obtain the CA's certificate and communicate with the Certificate Authority during the procedure. The following procedure is the general procedure:
-
Identify the Certificate Authority you want to use and follow their instructions for the specific steps of this general procedure.
-
Submit a request for a certificate to the Certificate Authority. The Certificate Authority returns a root certificate and a signed certificate.
-
Download a Chain Certificate from the Certificate Authority.
-
Verify the certificates' fingerprints. When you add a certificate to the keystore, any transactions using that certificate become trusted. You must be certain that the certificates you received are authentic before you import them. For a Java certificate, use the following command to see the fingerprints and then communicate with the Certificate Authority to compare the fingerprints:
keytool -printcert -file <path/filename> -
Replace the self-signed certificate with the CA certificates, as described in the following sections.
2.2.2.3 Substituting a Certification Authority's Certificate for the Enterprise Controller in a High Availability Environment
If the HA environment has not yet been configured, that is, no Enterprise Controllers have been configured as the Primary or Standby nodes, perform the procedure in Substituting a Certification Authority's Certificate for the Enterprise Controller on the Enterprise Controller that will be the Primary node. Then configure the HA environment as described in the Oracle Enterprise Manager Ops Center Installation Guide for Oracle Solaris Operating System or Oracle Enterprise Manager Ops Center Installation Guide for Linux Operating Systems. The certificates are copied from the Enterprise Controller that is the Primary node to the Enterprise Controllers that are the Standby nodes.
If the HA environment has been configured already, that is, there is one Enterprise controller as the Primary node and one or more Enterprise Controllers as Standby nodes, remove all nodes from the HA configuration in the following order:
-
Issue the following command on each standby Enterprise Controller:
ecadm ha-unconfigure-standby
-
Issue the following command on the primary Enterprise Controller:
ecadm ha-unconfigure-primary
Perform the procedure in Substituting a Certification Authority's Certificate for the Enterprise Controller and then re-configure the HA environment as described in the Oracle Enterprise Manager Ops Center Installation Guide for Oracle Solaris Operating System or Oracle Enterprise Manager Ops Center Installation Guide for Linux Operating Systems.
2.2.2.4 Substituting a Certification Authority's Certificate for the Enterprise Controller
-
Install the Enterprise Controller but do not connect to its browser.
-
Stop the Enterprise Controller's internal communication using the following command:
-
Oracle Solaris OS:
/opt/SUNWxvmoc/bin/ecadm stop -w -
Linux OS:
/opt/sun/xvmoc/bin/ecadm stop -w
-
-
Navigate to the keystore:
-
Oracle Solaris OS:
cd /etc/cacao/instances/oem-ec/security/jsse -
Linux OS:
cd /etc/opt/sun/cacao2/instances/oem-ec/security/jsse/
-
-
Delete the local authority certificate in the truststore:
keytool -delete -storepass trustpass -alias cacao_ca -keystore truststore
-
(Optional) Delete the private key and certificate for the cacao_agent:
keytool -delete -alias cacao_agent -keystore keystore -storepass:file /etc/cacao/instances/oem-ec/security/password
where
/etc/cacao/instances/oem-ec/security/passwordis the file that contains the keystore's password. Use theoption:filefilename modifier with options that require passwords such as-storepassto avoid copying or typing the password. -
Delete the Oracle Glassfish Server truststore used by the product's web server. This truststore is re-created when the Enterprise Controller is restarted.
rm truststore_gf
-
Delete the certificate used by agents. The certificate is re-created automatically.
rm agent.cert
-
If you deleted the private key in Step 5, generate a new private key. Use the
keytool -genkeycommand, according to its documentation and your site's security policy. Do not include the-keypassoption so that a prompt for the password will be displayed. The following is an example of the command:keytool -genkey -alias cacao_agent -keyalg RSA -sigalg SHA1withRSA -keysize 2048 -validity 7300 -keystore keystore -storepass:file /etc/cacao/instances/oem-ec/security/password -dname CN=ec-`uname -n`
where
-keyalgspecifies the algorithm to be used to generate the key pair.-sigalgspecifies the algorithm used to sign the self-signed certificate. This algorithm must be compatible with the algorithm specified by the-keyalgoption, as described in thekeytooldocumentation.-validityspecifies the number of days that the certificate remains valid.-dnamespecifies the X.500 Distinguished Name to be associated with alias, and is used as the issuer and subject fields in the self-signed certificate. If you do not include the distinguished name in the command, the user is prompted for one. -
At the prompt to enter the key password for cacao_agent, do not enter any characters. Instead, press the Enter key to set the cacao_agent key password to be the same password as the one used for the keystore. This method is the only way to ensure that the passwords match.
-
Create a signing request (CSR) using the
keytool -certreqcommand, according to its documentation and your site's security policy. The following is an example of the command:keytool -certreq -keyalg RSA -sigalg SHA256withRSA -alias cacao_agent -file agent.crq -keystore keystore -storepass:file /etc/cacao/instances/oem-ec/security/password
where:
SHA256withRSAspecifies the algorithm used to sign the self-signed certificate.agent.crqis the name of the file containing the signing request. -
If you have not already obtained a certificate from the Certificate Authority, see Obtaining a Certificate Authority's Certificate. After you have verified the certificate with Certificate Authority, you are ready to import it.
-
Import the Certificate Authority's root certificate,
your_ca, into the keystore. The root certificate is in the fileroot.cert.keytool -importcert -alias your_ca -keystore keystore -file root.cert -storepass:file /etc/cacao/instances/oem-ec/security/password -
At the prompt to confirm the certificate, enter
Yes. -
Import the signed certificate into the keystore. The signed certificate is in the file
agent.cert.keytool -importcert -v -alias cacao_agent -file agent.cert -keystore keystore -storepass:file /etc/cacao/instances/oem-ec/security/password
-
Remove the Certificate Authority's root certificate,
your_cafrom the keystore:keytool -delete -alias your_ca -keystore keystore- storepass:file /etc/cacao/instances/oem-ec/security/password -
Import the Certificate Authority's root certificate into the truststore:
keytool -importcert -v -alias your_ca -file root.cert -storepass trustpass -keystore truststore -
At the prompt to confirm the certificate, enter
Yes. -
If your certificate chain includes a private key, import its certificate into the truststore:
keytool -importcert -alias cacao_agent -file agent.cert -storepass trustpass -keystore truststore
-
Delete the signing request and the root certificate:
rm agent.crq
rm root.cert
-
Verify that the keystore has the new certificate:
keytool -list -v -keystore keystore -storepass:file /etc/cacao/instances/oem-ec/security/password
-
Restart the Enterprise Controller:
-
Oracle Solaris OS:
/opt/SUNWxvmoc/bin/ecadm start -w -
Linux OS:
/opt/sun/xvmoc/bin/ecadm start -w
-
2.2.2.5 Substituting a Certification Authority's Certificate on the Proxy Controller
The procedure to secure the communication between a Proxy Controller and the agent on each asset is similar to the procedure for the Enterprise Controller. You cannot duplicate a certificate. You must use a different certificate on the Proxy Controller from the certificate used on the Enterprise Controller. You must use a different certificate on each Proxy Controller.
-
After the Proxy Controller has been installed but not configured, stop the Proxy Controller's internal communication using the following command:
-
Oracle Solaris OS:
/opt/SUNWxvmoc/bin/proxyadm stop -w -
Linux OS:
/opt/sun/xvmoc/bin/proxyadm stop -w
If the Proxy Controller has been configured, you must unconfigure it and then stop it.
-
-
Verify that the Proxy Controller is off-line:
-
Oracle Solaris OS:
/opt/SUNWxvmoc/bin/proxyadm status -
Linux OS:
/opt/sun/xvmoc/bin/proxyadm status
-
-
Verify that the Proxy Controller has no connections to the Enterprise Controller:
sc-console list-connections
No Connections found.
-
Create the keystore:
-
Oracle Solaris OS:
/usr/sbin/cacaoadm create-keys -i scn-proxy -
Linux OS:
/opt/sun/cacao2/bin/cacaoadm create-keys -i scn-proxy
-
-
Navigate to the keystore:
-
Oracle Solaris OS:
cd /etc/cacao/instances/scn-proxy/security/jsse -
Linux OS:
cd /etc/opt/sun/cacao2/instances/scn-proxy/security/jsse/
-
-
Perform the procedure in Substituting a Certification Authority's Certificate for the Enterprise Controller from Step 4 through Step 20, replacing the location of the keystore password with the location for the Proxy Controller's keystore password:
/etc/cacao/instances/scn-proxy/security/password. -
Restart the Proxy Controller:
-
Oracle Solaris OS:
/opt/SUNWxvmoc/bin/proxyadm start -w -
Linux OS:
/opt/sun/xvmoc/bin/proxyadm start -w
-
2.2.2.6 Substituting Certificates for the Glassfish Web Container
Oracle Enterprise Manager Ops Center has self-signed certificates that it uses for authentication for its Glassfish web container. The benefit of substituting the self-signed certificates with certificates from a Certificate Authority is that users do not see a warning from the browser about attempting an untrusted connection and do not have to add a security exception to use the product.
If you have performed the procedure in Substituting a Certification Authority's Certificate for the Enterprise Controller and Substituting a Certification Authority's Certificate on the Proxy Controller, the certificates have been substituted already. To replace the self-signed certificate on a system that has been running Oracle Enterprise Manager Ops Center, use the following procedure:
-
Stop the Enterprise Controller's internal communication using the following command:
-
Oracle Solaris OS:
/opt/SUNWxvmoc/bin/ecadm stop -w -
Linux OS:
/opt/sun/xvmoc/bin/ecadm stop -w
-
-
Navigate to the keystore:
cd /var/opt/sun/xvm/bui/conf
-
Delete the keystore. The keystore is re-created automatically when you create a new private key later in this procedure.
rm keystore
-
Delete the Oracle Glassfish Server truststore used by the product's web server. The truststore is re-created automatically when the Enterprise Controller is restarted.
rm keystore_truststore_gf
-
Create a new private key, according to your site's security policy. Use the
keytool -genkeycommand, according to its documentation and your site's security policy. Do not include the-keypassoption so that a prompt for the password will be displayed. The following is an example of the command for creating the private key:keytool -genkey -alias `uname -n` -keyalg RSA -sigalg SHA1withRSA -keysize 2048 -validity 7300 -keystore keystore -storepass trustpass -dname CN=bui-`uname -n`
where
-keyalgspecifies the algorithm to be used to generate the key pair.-sigalgspecifies the algorithm used to sign the self-signed certificate. This algorithm must be compatible with the algorithm specified by the-keyalgoption, as described in thekeytooldocumentation.-dnamespecifies the X.500 Distinguished Name to be associated with alias, and is used as the issuer and subject fields in the self-signed certificate. If you do not include the distinguished name in the command, the user is prompted for one.-validityspecifies the number of days that the certificate remains valid. -
At the prompt for the key password, press the Enter key to set the key password to match the keystore password.
-
Create a signing request:
keytool -certreq -keyalg RSA -sigalg SHA256withRSA -alias `uname -n` -file bui.crq -keystore keystore -storepass trustpass
-
If you have verified the certificate you received from the Certificate Authority, as described in Step 4 of the procedure in Obtaining a Certificate Authority's Certificate, you are ready to import it.
-
Import the certificate that the CA sent to you into the keystore. The certificate is in the file
root.cert.keytool -importcert -alias your_ca -keystore keystore -file root.cert -storepass trustpass -
At the prompt to confirm the certificate, enter
Yes. -
Import the signed certificate into the keystore. The certificate is in the file
bui.cert.keytool -importcert -v -alias `uname -n` -file bui.cert -keystore keystore -storepass trustpass
-
Remove the Certificate Authority's root certificate,
your_cafrom the keystore:keytool -delete -alias your_ca -keystore keystore -storepass trustpass -
Restart the Enterprise Controller:
-
Oracle Solaris OS:
/opt/SUNWxvmoc/bin/ecadm start -w -
Linux OS:
/opt/sun/xvmoc/bin/ecadm start -w
-
2.2.2.7 Substituting Certificates for the Apache UCE Container
To replace the self-signed certificate with certificates from a Certificate Authority, use the procedure in this section for both the Enterprise Controller and the Proxy Controllers before any agents are deployed. As an alternative, you can create a script based on the sample script in Example 2-1 to perform Steps 3 through 9.
Systems running Oracle Solaris 11 require an additional step: the Certificate Authority's certificate must be edited to point the CN (Common Name) field to the following custom string. This step is included in the sample script.
oracle-oem-oc-mgmt-<hostname>
where <hostname> is the name of the system running the Enterprise Controller or Proxy Controller.
-
Stop the Enterprise Controller and Proxy Controllers using the following commands:
-
Oracle Solaris OS:
/opt/SUNWxvmoc/bin/ecadm stop -w/opt/SUNWxvmoc/bin/proxyadm stop -w -
Linux OS:
/opt/sun/xvmoc/bin/ecadm stop -w/opt/sun/xvmoc/bin/proxyadm stop -w
-
-
Copy your local Certificate Authority key and certificate files to a secure location on your server. This is a temporary location.
-
Rename the Certificate Authority certificate file to
server.crt -
Rename the Certificate Authority key file to
server.key -
Navigate to the location of the self-signed certificate and key files for the Apache web container:
-
Oracle Solaris OS:
cd /var/opt/sun/xvm/uce/etc.opt/server/uce_server/ssl.crt -
Linux OS:
cd /var/opt/sun/xvm/uce/etc/uce_server/ssl.crt
-
-
Move the current
server.crtfile andserver.keyfile from thessl.crtdirectory to an alternate, secure location. -
Copy your local Certificate Authority files from the secure temporary location to the
ssl.crtdirectory. -
Verify the permissions for the
server.keyfile are set to allow only the service user to read the file:chown uce-sds:uce-sds server.key chmod 400 server.key
The files now have these permissions:
-r--------  1 uce-sds  uce-sds  1751 Jun 13 13:05 server.key
-rw-r--r--  1 uce-sds  uce-sds  1220 Jun 13 13:05 server.crt
-
If the
server.keyfile is encrypted and requires a password, edit the following file to make it echo the password:-
Oracle Solaris OS:
/var/opt/sun/xvm/uce/etc.opt/server/uce_server/.sslphrase -
Linux OS:
/var/opt/sun/xvm/uce/etc/uce_server/.sslphrase
-
-
To prepare to update the clients of the Apache service to use the new certificates, define the following variables on the command line or add them to the script.
SMSF_STORE=/var/opt/sun/xvm/security/jsse/smsfacade/jssecacerts
SMSF_PASS=`awk -F= '/^engine.installcert.passphrase/{print $2}' /var/opt/sun/xvm/persistence/scn-satellite/satellite.properties`
In addition, define these OS-specific variables:
-
Oracle Solaris OS:
SERVER_SSL_CRT=/var/opt/sun/xvm/uce/etc.opt/server/uce_server/ssl.crt/server.crt TRUST_STORE=/etc/cacao/instances/oem-ec/security/jsse/truststore TRUST_PASS=`awk -F= '/^com.sun.cacao.ssl.truststore.password/{print $2}' /etc/cacao/instances/oem-ec/private/cacao.properties` -
Linux OS:
SERVER_SSL_CRT=/var/opt/sun/xvm/uce/etc/uce_server/ssl.crt/server.crt
TRUST_STORE=/etc/opt/sun/cacao2/instances/oem-ec/security/jsse/truststore
TRUST_PASS=`awk -F= '/^com.sun.cacao.ssl.truststore.password/{print $2}' /etc/opt/sun/cacao2/instances/oem-ec/private/cacao.properties`
-
-
Remove the old alias from the
cacaoandsmsfacadetruststores and import the new certificates:keytool -delete -alias sds -keystore $TRUST_STORE -storepass $TRUST_PASS -noprompt keytool -importcert -file $SERVER_SSL_CRT -alias -keystore $TRUST_STORE -storepass $TRUST_PASS -noprompt keytool -delete -alias 127.0.0.1-1 -keystore $SMSF_STORE -storepass $SMSF_PASS -noprompt keytool -importcert -file $SERVER_SSL_CRT -alias 127.0.0.1-1 -keystore $SMSF_STORE -storepass $SMSF_PASS -noprompt
-
Start the Enterprise Controller and Proxy Controllers.
-
Oracle Solaris OS:
/opt/SUNWxvmoc/bin/ecadm start -w/opt/SUNWxvmoc/bin/proxyadm start -w -
Linux OS:
/opt/sun/xvmoc/bin/ecadm start -w/opt/sun/xvmoc/bin/proxyadm start -w
-
Example 2-1 shows a script that performs the certificate substitution. It includes the required command for Oracle Solaris 11 systems to point the Common Name field to Oracle Enterprise Manager Ops Center's custom string, CN_NAME=oracle-oem-oc-mgmt-$HOST_NAME
Example 2-1 Sample Script for Substituting Certificates
#!/bin/sh
#Define and uncomment the variable below
#TMPDIR=??
#OSNAME=??

SERVER_PATH=/var/opt/sun/xvm/uce/opt/server
SSL_CONF_DIR=/var/opt/sun/xvm/uce/etc.opt/server/uce_server/
if [ "$OSNAME" = "Linux" ] ; then
  SERVER_PATH=/var/opt/sun/xvm/uce/usr.local/server
  SSL_CONF_DIR=/var/opt/sun/xvm/uce/etc/uce_server/
fi
SERVER_SSL_KEY=$SSL_CONF_DIR/ssl.crt/server.key
SERVER_SSL_CRT=$SSL_CONF_DIR/ssl.crt/server.crt
SERVER_BIN=$SERVER_PATH/bin/
HOST_NAME=`uname -a | cut -d\  -f2`
CN_NAME=oracle-oem-oc-mgmt-$HOST_NAME
cat  $SERVER_BIN/openssl.cnf | sed -e "s|CNHOSTNAME|$CN_NAME|" > $TMPDIR/work_openssl.cnf
SSL_PASS=`$SERVER_BIN/openssl rand -base64 10`
$SERVER_BIN/openssl genrsa -des3  -out $TMPDIR/server.key -passout pass:$SSL_PASS 2048 > $TMPDIR/create_ssl_tmp_file 2>&1
$SERVER_BIN/openssl req -new -sha256 -config $TMPDIR/work_openssl.cnf -passin pass:$SSL_PASS -key $TMPDIR/server.key -out $TMPDIR/server.csr -batch > $TMPDIR/create_ssl_tmp_file 2>&1
$SERVER_BIN/openssl x509 -req  -sha256 -days 3652 -in $TMPDIR/server.csr -signkey $TMPDIR/server.key -passin pass:$SSL_PASS -out $TMPDIR/server.crt > $TMPDIR/create_ssl_tmp_file 2>&1

echo "Certificated generated!"
chmod 400 $TMPDIR/server.key
/bin/cp -f $TMPDIR/server.key $SERVER_SSL_KEY
/bin/cp -f $TMPDIR/server.crt $SERVER_SSL_CRT


echo "#!/bin/sh" > $SSL_CONF_DIR/.sslphrase
echo "echo \"$SSL_PASS\"" >> $SSL_CONF_DIR/.sslphrase
chmod 100 $SSL_CONF_DIR/.sslphrase
result=$?
if [ "$result" -ne 0 ] ; then
    echo "Failed to generate .sslphrase!"
    exit 1
fi
2.2.3 Install a Remote Proxy Controller
When installing a Proxy Controller that is not co-located with the Enterprise Controller, do not use the Proxy Controller Deploy action from the browser interface. Instead, copy the Proxy Controller bundle to the target system and then log in as root to install the software. This method removes the need to provide root credentials to the Proxy Controller's system and eliminates the need to enable ssh access from the Enterprise Controller's system to the Proxy Controller's system.
2.3 Configuring Oracle Enterprise Manager Ops Center
A privileged user must be enabled for the Oracle Enterprise Manager Ops Center software. Log in as the privileged user to configure the software.
2.3.1 Set the Connection Mode
Connection modes provide a way to keep the product software and all of the asset software current. However, Connected mode requires Internet access and if this access cannot be made secure or if a site's policy does not enable Internet access, the alternative is to run Oracle Enterprise Manager Ops Center in Disconnected mode. Although Disconnected mode might seem to provide the most secure environment, its use relies on manual procedures that can are error-prone without rigorous compliance to procedures and policies. Table 2-1 shows how operations are affected by the connection mode.
Table 2-1 Comparison of Functions in Different Connection Modes
| Operation | Connected Mode | Disconnected Mode |
|---|---|---|
|
Use the Oracle Ops Center Downloads action to create a job that obtains the latest version. |
|
|
|
Upgrade the product software |
Use the Upgrade Enterprise Controller action. For each Proxy Controller, use the Update to Latest Available Version action. |
For the Enterprise Controller and each Proxy Controller:
|
|
Provision an OS and update an existing OS, using the latest image. |
Download the operating system software from |
Obtain the image. Use a CD or DVD to load the operating system software. Log in to an Internet-facing system and download the operating system software from Then use the Upload ISO Images action and the Import Images action to update the contents of the Enterprise Controller's software library. |
|
Provision firmware and update existing firmware, using the latest image. |
Download firmware from |
Use a CD or DVD to load the software. Then use the Upload ISO Images action, the Upload Firmware action, and the Import Images actions to update the contents of the Enterprise Controller's software library. |
|
Use Automatic Service Requests (ASR) |
After you register the assets in the My Oracle Support database and register a user account as the My Oracle Support user, you have the option to create a service request whenever an incident is reported. In an Automated Service Request, the following information is sent from the Enterprise Controller to My Oracle Support: serial number FRU data site location hardware SNMP trap |
Contact My Oracle Support to request service. |
|
Create a Services Request |
After you register the assets in the My Oracle Support database and register a user account as the My Oracle Support user, select the Open Service Request action. |
Contact My Oracle Support to request service. The Open Service Request action is disabled. |
|
Verify warranties |
After you register the assets in the My Oracle Support database and register a user account as the My Oracle Support user, view the warranty of a specific asset or all assets. |
Contact My Oracle Support to coordinate warranty records with your own records. |
2.3.2 Disable Multiple Logins
The default behavior is to allow a user to log in multiple times. This convenience can be a security risk. You can disable simultaneous sessions for an individual user account or for a role, to affect all user accounts that have the role.
-
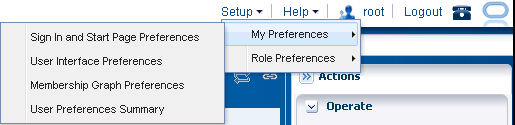
Click Setup in the title bar as shown in Figure 2-3.
-
Click My Preferences to change your account or click Role Preferences to change the role, which affects all user accounts that have that role.
-
Click User Interface Preferences.
-
In the Display Preferences section, select the Disable Multiple Sessions checkbox.
-
Log out and log in again to make the change take effect.
2.3.3 Secure the Log Files
All installation and upgrade log files remain in place to assist in diagnosing any problems with the installation or upgrade. Because their content can be considered sensitive, archive them securely and remove the files after a successful installation or upgrade.
The product installs a diagnostic program,OCDoctor, that gathers logged data, analyzes an installation for common errors, and responds to inquiries. To remove the program at any time, delete its files and directories.
The installation logs are found in the following locations:
-
Log of the most recent installation or uninstallation:
/var/tmp/opscenter/installer.log.latest -
Log of previous installation or uninstallation operations:
/var/tmp/opscenter/installer.log.xxxx -
Log of a specific installation:
/var/opt/sun/xvm/oracle/app/oraInventory/logs/silentInstall<yyyy-mm-dd-hh-mm-sspm>.log -
Log of an agent installation:
/var/scn/install/log
The log of upgrade actions for the Enterprise Controller and its co-located Proxy Controller is in the file: /var/opt/sun/xvm/update-saved-state/update_satellite_bundle_12.1.n.xxxx/updatelog.txt
The log of upgrade actions for a Proxy Controller that is not co-located is in the file: /var/opt/sun/xvn/update-saved-state/update_proxy_bundle_12.1.n.xxxx/updatelog.txt
2.3.4 Secure the Databases
Database passwords are encrypted in /var/opt/sun/xvm/dbpw.properties, using AES 128-bit encryption. The Advanced Encryption Standard (AES) specification defines one key for both encrypting and decrypting electronic data.
2.3.4.1 Securing a Local Database
Access to the local database is restricted to processes on the Enterprise Controller. To allow an external host to get access to the database, you must modify the Oracle*Net Listener configuration, as described in Getting Access to the Database Data.
-
You must protect the properties file for the database,
/var/opt/sun/xvm/db.properties, because it contains schema names and passwords. Use the most restrictive permission: read-only by file owner. -
You must protect the compressed file created when you use the
ecadm backupcommand, as described in Backing Up and Restoring the Enterprise Controller. This tar file contains the dump of the local database. You must also ensure that the backup file is moved to an alternate location.
2.3.4.2 Securing a Remote Database
-
You must remove the
remoteDBCreds.txtfile after installation. The file contains unencrypted credentials for the schema on the customer-managed database, used to configure the connection between the Enterprise Controller and the remote database. The file is located on the system that hosts the Enterprise Controller in a directory chosen by the administrator who installed the software. -
If you are upgrading from product version 12c Release 1 (12.1.0.0.0) to a later version and use a remote database, you must also execute the
refactorOCPrivs_12.1.x.0.sqlscript as described in the following section to further tighten security for the schema owner on the remote database. -
You must protect the properties file for the database,
var/opt/sun/xvm/db.properties, because it contains schema names and passwords. Use the most restrictive permission: read-only by file owner. -
You must ensure that a remote database is included in your site's routine backup plan so that the Oracle Enterprise Manager Ops Center data can always be recovered.
Using the refactorOCPrivs_12.1.x.0.sql Script
Use a database administrator account for this procedure.
To obtain the schema names for the remote database, view the /opt/sun/xvm/db.properties file and search for the mgmtdb.appuser and mgmtdb.roappuser values.
-
Copy the
refactorOCPrivs_12.1.x.0.sqlscript from the Enterprise Controller's system to the Oracle account on the server where the customer-managed database instance is installed. The script is located in the following location of the Enterprise Controller's system:-
Oracle Solaris OS:
/opt/ORCLsysman-db/sql/update/delta-update1/oracle/refactorOCPrivs_12.1.x.0.sql -
Linux OS:
/opt/orcl-sysman-db/sql/update/delta-update1/oracle/refactorOCPrivs_12.1.x.0.sql
-
-
Log in as the database administrator and execute the SQL script, using the following command:
sqlplus / as sysdba @refactorOCPrivs_12.1.1.0.sql
-
At the prompts for Ops Center database login and Read-Only Ops Center database login, enter the schema names created when the remote database was created.
-
Verify the new roles and privileges by running the following SQL statement in a privileged database administrator account:
set pages 0
Select
   lpad(' ', 2*level) ||
   Granted_Role "User, his roles and privileges"
From
  (
-- THE USERS
    Select
       null  Grantee,
       UserName Granted_Role
    From
       Dba_Users
   Where
      UserName Like Upper('&_OC_SYSTEM_SCHEMA%')
-- ROLES TO ROLES RELATIONS
Union
    Select
       Grantee,
       Granted_Role
    From
       Dba_Role_Privs
-- THE ROLES TO PRIVILEGE RELATIONS
 Union
    Select
       Grantee,
       Privilege
    From
        Dba_Sys_Privs
  )
Start With
   Grantee is null
Connect By
   Grantee = Prior Granted_Role
/

Enter the value for the OC System Database Login (i.e the value for mgmtdb.appuser) at the prompt:
    Enter value for _oc_system_schema: OC <cr>
The following are the new roles and privileges, in addition to those granted when the original schema was created such as CREATE DATABASE LINK.
CREATE TABLE
    CREATE VIEW
    OC_SYSTEM_ROLE
      CREATE CLUSTER
      CREATE INDEXTYPE
      CREATE OPERATOR
      CREATE PROCEDURE
      CREATE SEQUENCE
      CREATE SESSION
      CREATE TRIGGER
      CREATE TYPE
The following are the Read Only roles and permissions.
    CREATE SESSION
    CREATE SYNONYM
2.3.4.3 Changing the Database Credentials for the Ops Center User
You can change the database password for the Oracle Enterprise Manager Ops Center user on an embedded or customer-managed database. The Enterprise Controller's services must be restarted to use the new password.
Use this procedure to change the credentials:
-
Create a temporary file containing the new password and secure it with 600 permissions.
For example:
# touch /tmp/password
# chmod 600 /tmp/password
# vi /tmp/password
newpassword
-
Use the
ecadmcommand with thechange-db-passwordsubcommand and the-p <password file>option to change the database password. When prompted, confirm the Enterprise Controller restart.For example:
# ./ecadm change-db-password -p /tmp/password
The Enterprise Controller will be restarted after the database password is changed. Continue? (y/n)
y
ecadm:    --- Changed database password, restarting.
ecadm: shutting down Enterprise Controller using SMF...
ecadm: Enterprise Controller services have stopped
ecadm: Starting Enterprise Controller with SMF...
ecadm: Enterprise Controller services have started
#
-
If you have a high availability configuration, the
ecadmcommand copies the new database properties to each remote cluster node. Enter the root password for each remote cluster node.For example:
ecadm:    --- Changed database password, restarting.
The DB configuration file must now be copied to each remote cluster node.
You will be prompted for the root password for each node to perform the copy.
Copying to node OC-secondary
Password: password
<output omitted>
ecadm:    --- Enterprise Controller successfully started HA
#
-
Remove the temporary file containing the new password.
For example:
# rm /tmp/password
2.3.4.4 Changing the Database Credentials for the Read-Only User
You can change the database password for the read-only user on an embedded or customer-managed database. The Enterprise Controller's services must be restarted to use the new password.
Use this procedure to change the credentials:
-
Create a temporary file containing the new password.
For example:
# vi /tmp/password
newpassword
-
Use the
ecadmcommand with thechange-db-passwordsubcommand and the-p <password file>and-roptions to change the database password. When prompted, confirm the Enterprise Controller restart.For example:
# ecadm change-db-password -r -p /tmp/password
The Enterprise Controller will be restarted after the database password is changed. Continue? (y/n)
y
ecadm:    --- Changed database password, restarting.
ecadm: shutting down Enterprise Controller using SMF...
ecadm: Enterprise Controller services have stopped
ecadm: Starting Enterprise Controller with SMF...
ecadm: Enterprise Controller services have started
#
-
If you have a high availability configuration, the
ecadmcommand copies the new database properties to each remote cluster node. Enter the root password for each remote cluster node.For example:
ecadm:    --- Changed database password, restarting.
The DB configuration file must now be copied to each remote cluster node.
You will be prompted for the root password for each node to perform the copy.
Copying to node OC-secondary
Password: password
<output omitted>
ecadm:    --- Enterprise Controller successfully started HA
#
-
Remove the temporary file containing the new password.
For example:
# rm /tmp/password
2.3.5 Disable the Domain Model Navigator
Oracle Enterprise Manager Ops Center provides a Domain Model Navigator to allow Oracle support personnel to gather detailed information about the state of the system. This diagnostic interface is enabled by default and requires user authentication for access. However, because the Domain Model Navigator displays an internal view of the product software, disable the interface on the Enterprise Controller and Proxy Controllers using the following procedure. The agents for assets are not part of the Domain Model Navigator.
-
Log in to the Enterprise Controller as the
rootuser. -
Click Administration in the Navigation pane.
-
Click Enterprise Controller.
-
Click Configuration in the center pane.
-
In the Subsystem field, click Domain Model Navigator. The
allowToRunproperty's default value istrue, as shown in Figure 2-4.Figure 2-4 Property of Domain Model Navigator
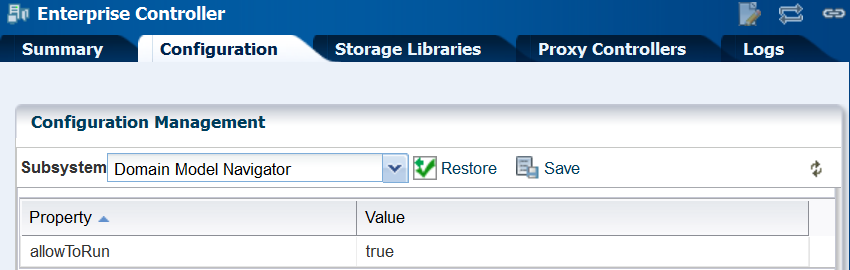
Description of "Figure 2-4 Property of Domain Model Navigator"
-
Click in the Value field to edit it. Change the value to
false. -
Click the Save Properties icon.
-
Perform the following procedure on each Proxy Controller:
-
Edit the file
/opt/sun/n1gc/lib/XVM_PROXY.properties -
Add the following line to the file:
domain.model.navigator.allow=false
-
Stop and restart the Proxy Controller:
/opt/SUNWxvmoc/bin/proxadm stop
/opt/SUNWxvmoc/bin/proxadm start
-
-
Stop and restart the Enterprise Controller:
/opt/SUNWxvmoc/bin/satadm stop
/opt/SUNWxvmoc/bin/satadm start
To investigate an issue with an asset, My Oracle Support might instruct you to view the Domain Model Navigator. To re-enable the Domain Model Navigator, use the same procedure to set the property values to true.
2.3.5.1 Enable the Domain Model Navigator on the Enterprise Controller
To enable the Domain Model Navigator:
-
Log in to the Enterprise Controller as the
rootuser. -
Click Administration in the Navigation pane.
-
Click Enterprise Controller.
-
Click Configuration in the center pane.
-
Click the Restore Properties icon.
-
Repeat the following procedure on each Proxy Controller:
-
Edit the file
/opt/sun/n1gc/lib/XVM_PROXY.properties -
Add the following line to the file:
domain.model.navigator.allow=true
-
Stop and restart the Proxy Controller:
/opt/SUNWxvmoc/bin/proxadm stop
/opt/SUNWxvmoc/bin/proxadm start
-
-
Stop and restart the Enterprise Controller:
/opt/SUNWxvmoc/bin/satadm stop
/opt/SUNWxvmoc/bin/satadm start
2.3.6 Using the Domain Model Navigator
The Domain Model represents Domain Model MBeans, Gear Model MBeans, and Service MBeans and their current states.
To diagnose or correct a problem, you might be directed by My Oracle Support to search for or change information in the domain model. Use the following information to complete this task:
2.3.6.1 Logging Into the Domain Model
In the web browser, navigate to the following:
On the Enterprise Controller's system: https://<hostname>/xvm/
On the Proxy Controller's system: https://<hostname>:21165/xvm/
Log in as the root user of the host system.
2.3.6.2 Searching the Domain Model
The Domain Model Navigator has two tabs: Domain Model/Gear Model page and the JMX Navigator page. Each page contains the definition of assets and some statistics. To locate a specific asset, use the following search tactics:
-
Match JMX patterns in the name. For example, to search for all cache managers, search for: *:type=*Cach*,*
-
Use a JMX query:
-
PowerOff, which invokes the
PoweredOn = falsequery -
Status Not OK, which invokes the
not Status = 'OK'query -
Unreachable, which invokes the
Reachable = false query
-
-
Create a JMX query. These queries are case-sensitive.
2.3.6.3 Changing the Domain Model
You can perform the following operations. You must provide the root password.
-
Refresh
-
Set
WARNING:
An additional operation, Unregister, is available to Oracle Support engineers. Do not attempt to perform this operation unless you are directed by My Oracle Support.
These operations are recorded in the audit log located at /var/cacao/instances/oem-ec/logs/audit-logs.0
2.3.7 Secure the Agents
To encrypt the credentials used to get access to the Agent Controller of an asset:
-
Check the status of the agent:
/var/opt/sun/xvm/OCDoctor/OCDoctor.sh --update
/var/opt/sun/xvm/OCDoctor/OCDoctor.sh --troubleshoot
-
Check the prerequisites for encryption and then encrypt the agent password:
/var/opt/sun/xvm/OCDoctor/OCDoctor.sh --troubleshoot --fix
2.3.8 Secure the Web Browsers
To implement transactions securely, Oracle Enterprise Manager Ops Center supports specific communications and security standards and methods such as HTTP, TLS, x.509 certificates, and Java. Most browsers support several of these features but users must configure their browsers properly to take advantage of security capabilities.
Note:
Oracle Enterprise Manager Ops Center does not use any version of SSL. All transactions with the web browser are in TLS. To verify that SSL is not used, use the following command:
openssl s_client -connect IPaddress:port -ssl3
The response includes the status:
SSL routines:SSL3_WRITE_BYTES:ssl handshake failure
Information sent to and from a browser is transmitted in the clear so any intermediate site can read the data and potentially alter it in transit. Oracle Enterprise Manager Ops Center's browsers and servers address this problem in part by using the Secure Sockets Layer to encrypt HTTP transmissions (referred to as HTTP/SSL or HTTPS). This ensures the security of data transmitted from the client to the server. However, because browsers do not ship with client certificates, most HTTPS transmissions are authenticated in only one direction, from server to client. The client does not authenticate itself to the server.
The browser interface uses JavaScript extensively. Take care to protect against JavaScript-based attacks.
2.3.9 Use Strong Cipher Encryption
By default, Oracle Enterprise Manager Ops Center encrypts its transactions with assets using AES-128 encryption. If an asset's sshd daemon uses a AES-192 or AES-256 encryption, you must also configure the Proxy Controller's system to manage the asset.
Note:
Some locales do not allow the use of strong ciphers. It is the user's responsibility to verify that this level of encryption is allowed under local regulations.To determine the type of encryption used with an asset, view the asset's /etc/ssh/sshd_config file and look for content such as the following in the Ciphers section:
Ciphers aes256-cbc
Use the following procedure to download the Java Cryptography Extension (JCE) Unlimited Strength Jurisdiction Policy Files and move them to the systems running a Proxy Controller.
Configuring Proxy Controllers to Use a Strong Cipher Suite
-
On an Internet-facing system, navigate to http://www.oracle.com/technetwork/java/javase/downloads/jce-7-download-432124.html.
-
Click Accept License Agreement.
-
Click the
UnlimitedJCEPolicyJDK7.ziplink and download the file. -
Unzip the
UnlimitedJCEPolicyJDK7.zipfile. -
Move the
local_policy.jarandUS_export_policy.jarfiles to the/usr/jdk/jdk<latest version>/jre/lib/security/directory on the Proxy Controller. -
Restart the system.
2.4 Viewing the Enterprise Controller's Configuration
To view the Enterprise Controller's configuration, select the Enterprise Controller in the Administration section of the Navigation pane, then click the Configuration tab. Select one of the following subsystems to display its settings.
-
Agent Provisioning – Manages the provisioning of Agent Controllers.
-
Automated Service Requests – Manages the Automated Service Request (ASR) settings.
-
Database – Manages the database used by Oracle Enterprise Manager Ops Center.
-
EC Manager – Manages the Enterprise Controller.
-
Firmware – Manages firmware downloads.
-
Job Manager – Manages the way that jobs are run.
-
My Oracle Support (MOS) – Manages Oracle Enterprise Manager Ops Center's communications with MOS.
-
Network/Fabric Manager – Manages networks and fabrics.
-
OCDoctor – Manages the OCDoctor location and updates.
-
OS Provisioning – Manages network and fabric settings.
-
Permission Cache – Manages cache sizes.
-
Power – Manages energy cost settings.
-
Proxy Manager – Manages the interactions between the parts of the infrastructure.
-
Quartz Scheduler – Manages the quartz scheduler.
-
Role Preferences – Manages role settings.
-
Update – Manages the location of update libraries.
-
Zone Controller – Manages the zone management settings.
2.5 Editing the Configuration
Use roles to control access to the Enterprise Controller's configuration after installation. The Ops Center Admin role is the only role that can modify the configuration properties. Use care in assigning this role to a user.
Note:
Editing configuration properties can have an adverse affect on the stability and performance of the product and is done only if directed by My Oracle Support.2.6 Getting Access to the Database Data
The information in this section is also in Oracle Enterprise Manager Ops Center Accessing the Product Database Guide in the How To library.
This section describes how to view the core product data stored in the Oracle Enterprise Manager Ops Center database using Oracle SQL Developer or SQL*Plus. Use this information to integrate this product with other applications such as Oracle Enterprise Manager Cloud Control, or to pull data from the Oracle Enterprise Manager Ops Center datastore for analytical applications. To use Oracle SQL Developer, you need the following information:
-
Database host name – The name of the database host is listed in the
mgmt.dburlproperty of the/var/opt/sun/xvm/db.propertiesfile on the Enterprise Controller system. The format for this property is:jdbc:oracle:thin:@<databasehostname>:<listenerPort>/<OracleServiceName> -
Read-Only User Name – The Read-Only User name is a schema on the Oracle Enterprise Manager Ops Center Repository that is configured to access Oracle Enterprise Manager Ops Center data using read-only views. When the Enterprise Controller uses an embedded database, the username is
OC_RO. When the Enterprise Controller uses a customer-managed database, the schema name is included in themgmtdb.roappuserproperty of the/var/opt/sun/xvm/db.propertiesfile. -
Read-Only Password – When your Enterprise Controller is configured with the embedded database, the password is randomized at installation. If you do not know the embedded database password, see Changing the Database Credentials for the Read-Only User for information about changing the password. If you are using a customer-managed database and you do not know the password, ask your database administrator for assistance.
-
Listener Port – The listener port number for the database is listed in the
mgmt.dburlproperty of the/var/opt/sun/xvm/db.propertiesfile on the Enterprise Controller system. The format for this property is:jdbc:oracle:thin:@<databasehostname>:<listenerPort>/<OracleServiceName. -
Oracle Service Name – For embedded databases, the service name is
OCDB.us.example.comwhere example is the stringoracle. For customer-managed databases, the service name is listed in themgmt.dburlproperty of the/var/opt/sun/xvm/db.propertiesfile on the Enterprise Controller system. The format for this property is:jdbc:oracle:thin:@<databasehostname>:<listenerPort>/<OracleServiceName.
2.6.1 Viewing Core Product Data Using Oracle SQL Developer
Using Oracle SQL Developer, you can connect to the database using a read-only account and view the schema structures and data.
2.6.1.1 Modifying Oracle*Net Listener
To allow an external host to get access to the database, you must modify the Oracle*Net Listener configuration on the Enterprise Controller:
-
Change to Oracle Enterprise Manager Ops Center's user environment:
$ su - oracleoc
-
Edit the
sqlnet.orafile:vi $ORACLE_HOME/network/admin/sqlnet.ora
-
Disable valid node checking by commenting the following lines:
#tcp.validnode_checking = yes
#tcp.invited_nodes = (localhost,x4150-brm-04)
-
Save the file and exit.
-
To use the new version of the file, either restart all services on the Enterprise Controller, or reload the Oracle*Net Listener configuration from the
oracleocuser environment./opt/SUNWxvmoc/bin/satadm stop -w /opt/SUNWxvmoc/bin/satadm start -w
OR
$ lsnrctl reload OCLISTENER
2.6.1.2 Opening Oracle*Net to External Access
If you are using the embedded database, you must open Oracle*Net to enable external access before you can connect to the database.
-
Log in to the Enterprise Controller system.
-
Change to the user that owns the Oracle software. For example:
$ su - oracleoc
-
Modify the
sqlnet.orafile to comment out the two lines beginning withtcp.validnode_checkingandtcp.invited_nodes. For example:$ vi $ORACLE_HOME/network/admin/sqlnet.ora #tcp.validnode_checking = yes #tcp.invited_nodes = (localhost,<EnterpriseControllerHostname>)
-
Use the
lsnrctl reloadcommand to reload the listener configuration without stopping the Enterprise Controller services. For example:$ lsnrctl reload OCLISTENER
2.6.1.3 Creating the Connection to the Database
You must create a connection to the Oracle Enterprise Manager Ops Center database in Oracle SQL Developer.
-
In Oracle SQL Developer, click the New Connection icon in the Connections tab.

Description of the illustration sqldev_addconnecticon.jpg
-
Enter the connection information, then click Save:
-
Connection Name – Enter a name. This name is only used in Oracle SQL Developer.
-
Username – Enter the schema name for the read-only user.
-
Password – Enter the password for the read-only user.
-
Host name – Enter the name of the database host.
-
Port – Enter the Oracle*Net Listener port number.
-
Service Name – Select the service name option and enter the service name. For embedded databases, the service name is shown in the following figure. For customer-managed databases, the service name is included in the
mgmtdb.dburlproperty in the/var/opt/sun/xvm/db.propertiesfile.

Description of the illustration sqldev_newconnectwizard.jpg
-
2.6.1.4 Viewing Data From the Database Using Oracle SQL Developer
After you create the connection, view product data:
-
Select the connection you created in the previous procedure. The contents of the target database are displayed.
Description of the illustration sqldev_selectconnect.jpg
-
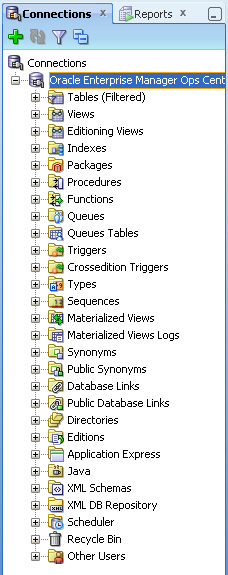
Within the database hierarchy, expand the Other Users section, then select the application user and expand the Views section. If you are using an embedded database, the application user is OC. If you are using a customer-managed database, the application user is included in the
mgmtdb.appuserproperty of the/var/opt/sun/xvm/db.propertiesfile.The database columns visible to the application user are displayed.
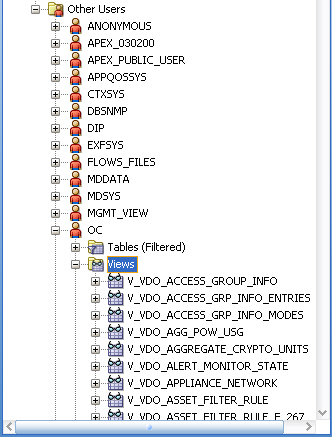
Description of the illustration sqldev_views.jpg
-
View the comment column to find the location of the Javadoc for each column, which explains the usage of the column.
Note:
TheSUNWxvmoc-sdk.pkgpackage, which is included with the product installation media, installs Javadoc. If this package is not installed on your system, use thepkgaddcommand to install it for Oracle Solaris systems, or therpmcommand to install it for Linux systems.
After you get access to the product data, you can integrate the data with other applications, run analytics on the product data, or take other actions that require the data.
2.6.2 Viewing Core Product Data Using SQL*Plus
If you have access to the Enterprise Controller system, you can access the database from the command line.
-
Log in to the Enterprise Controller system.
-
Run the
ecadm sqlpluscommand. Use the-roption to access the database in read-only mode.You are connected to the database using the SQL*Plus interface.
-
Invoke commands using the SQL*Plus syntax.
-
To see a list of views:
select view_name from user_views where (view_name like 'V_VMB%' or view_name like 'V_VDO%')
-
To see comments on a specific view:
select comments from user_tab_comments where table_name='<view name from the above list>'
-
To see comments on all columns of a specific view:
select column_name, comments from user_col_comments where table_name='<view name from the above list>'
-