Oracle® Enterprise Manager Ops Center
Installing and Updating Local Software Packages
12c Release 2 (12.2.0.0.0)
E48186-01
January 2014
This guide provides an end-to-end example for how to use Oracle Enterprise Manager Ops Center.
Introduction
In Oracle Enterprise Manager Ops Center, you can install and update local software packages for an operating system. After an operating system is installed, you can download and provision additional software packages and use patches to update existing components.
The software packages are stored in software libraries provisioned by Oracle Enterprise Manager Ops Center. You can install a component that is part of a software library in a discovered and managed operating system. Before you install a local software package, verify that the version of the software is adequate for the operating system and the type of server where you intend to install it.
This example describes how to install the Apache Ant 1.7.1 version software package for Oracle Solaris 10, running in an Oracle VM Server for SPARC. The example then describes how to update the Apache Ant software to the 1.8.2 version.
In this example, the local software package is installed by using an update profile and a deployment plan, and it is updated by modifying a system catalog.
For Oracle Solaris 11, the View/Modify Catalog action is not supported.
See Related Articles and Resources for links to related information and articles.
What You Will Need
You will need the following to install and update the local software package:
-
Enterprise Controller installed and configured in connected mode.
-
A user with the Storage Admin role to import software packages, and Update Admin role to update the Oracle Solaris 10 operating system.
-
An Oracle VM Server for SPARC with Oracle Solaris 10 OS provisioned.
-
A Linux and Oracle Solaris 8-10 Software Update Library to store the software package.
-
Download and save the Apache Ant 1.7.1 and 1.8.2 versions for Oracle Solaris 10 (SPARC) software in pkg format in the
/var/tmpdirectory on the Enterprise Controller system. You can download theant.1.7.1.SPARC.64bit.Solaris.10.pkgandant.1.8.2.SPARC.64bit.Solaris.10.pkgfiles fromhttp://www.ibiblio.org/pub/packages/solaris/sparc/.
Installing Local Software Packages
The following are the tasks to install and update a local software package for Oracle Solaris 10 OS:
Uploading a Local Software Package
In Oracle Enterprise Manager Ops Center, software packages are stored in software libraries. For Oracle Solaris 10, 9, and 8 and for Oracle Linux, a dedicated software library called Linux, Solaris 8-10 Software Update Library contains the packages, updates, and site-specific scripts and configuration files for these operating systems.
In this example, the ant.1.7.1.SPARC.64bit.Solaris.10.pkg and ant.1.8.2.SPARC.64bit.Solaris.10.pkg packages that are saved locally in the system where Enterprise Controller is installed, are uploaded to the Linux, Solaris 8-10 Software Update Library. The ant.1.7.1.SPARC.64bit.Solaris.10.pkg file is used to install the Apache Ant 1.7.1 version and the ant.1.8.2.SPARC.64bit.Solaris.10.pkg file is used later to update the software to the 1.8.2 version.
The following procedure details the steps required to upload the software package:
-
Expand Libraries in the Navigation pane, select Software Libraries and then select Linux, Solaris 8-10 Software Update Library.
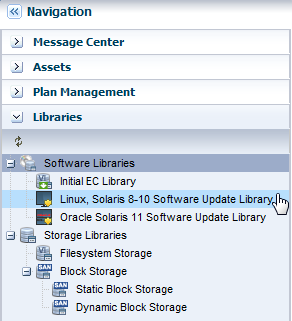
Description of the illustration swlibraries.png
-
Click Upload Local Software Packages in the Actions pane.
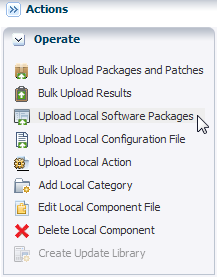
Description of the illustration actionspane.png
-
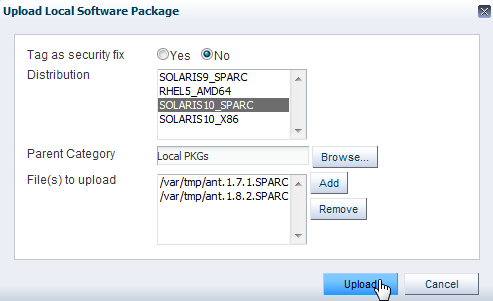
In the Tag as security fix option select No.
-
Select SOLARIS10_SPARC from the Distribution list.
-
In the Parent Category section, click Browse to locate a category.
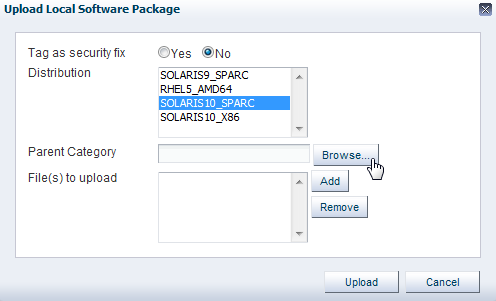
Description of the illustration uploadswpkg1.png
-
Select SOLARIS10_SPARC from the Distribution list, and select the Local PKGs option. Click OK to confirm the parent category.
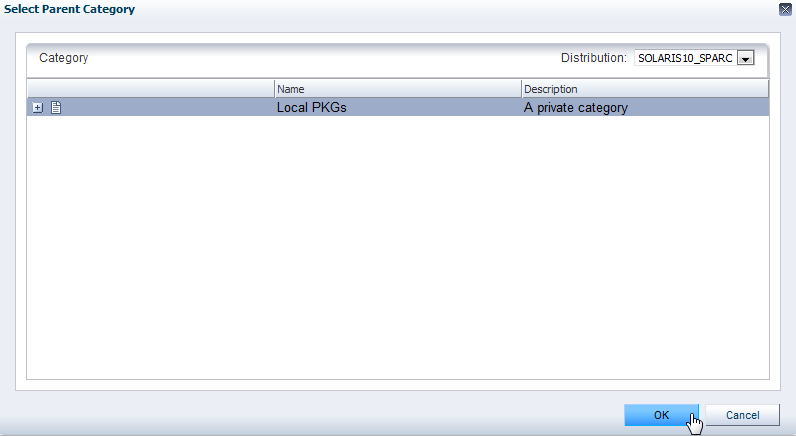
Description of the illustration parentcategory.png
-
In the Files section, click Add to see the list of files. Locate the
ant.1.7.1.SPARC.64bit.Solaris.10.pkgfile in your system. In this example the file is located in/var/tmp. Select the file and click OK.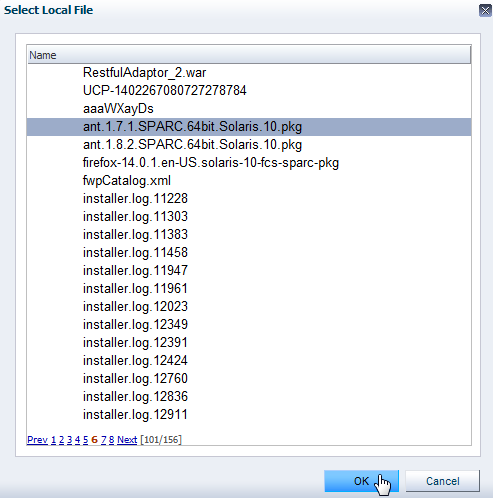
Description of the illustration select_localfile.png
-
Click Add and locate the
ant.1.8.2.SPARC.64bit.Solaris.10.pkgfile. Select the file and click OK.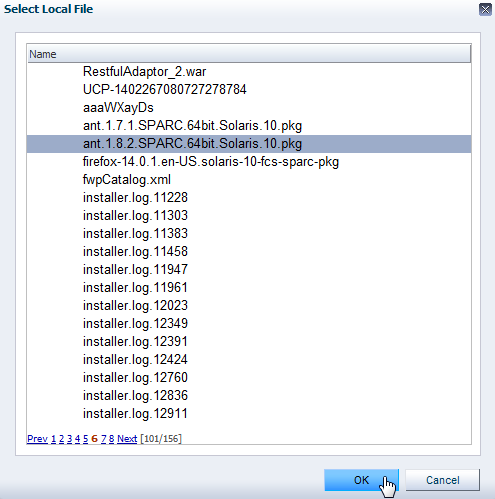
Description of the illustration select_localfile2.png
-
Click Upload. The file is uploaded to the Linux, Solaris 8-10 Software Update Library in the category you specified.
Description of the illustration uploadswpkg3.png
After you upload the software package, the ant-1.7.1-0 [02/17/2011] and ant-1.8.2-0 [02/17/2011] components are added to the list of components for the SOLARIS10_SPARC distribution:
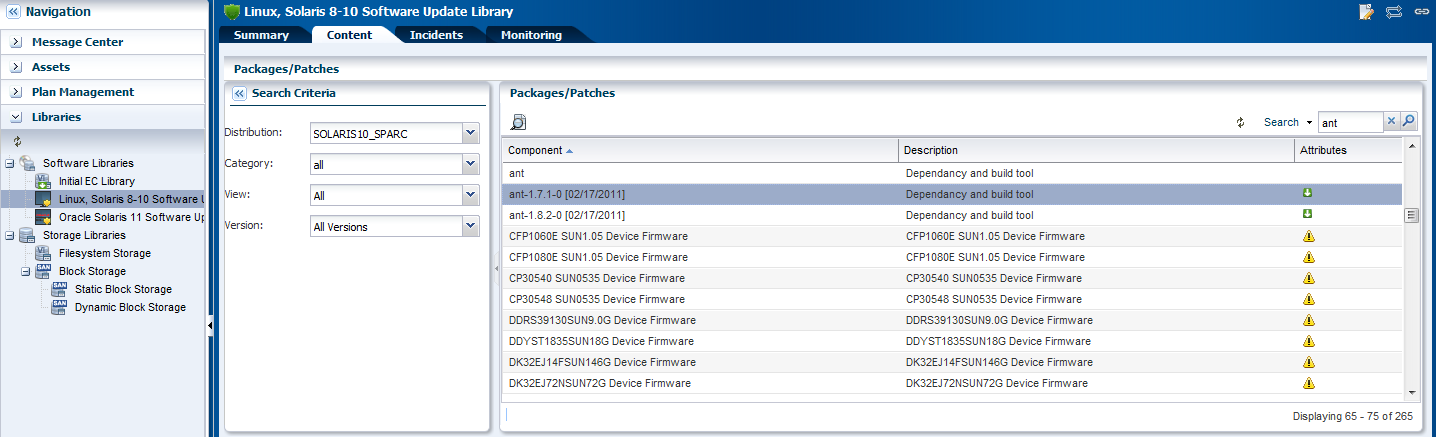
Description of the illustration swpkg_apant.png
Creating an Update Profile
Oracle Enterprise Manager Ops Center provides the option to create Update Profiles that help define which components must be installed or updated.
In this example an update profile is created and the ant-1.7.1-0 [02/17/2011] component is selected to be installed.
The following procedure details the steps required to create the update profile:
-
Expand Plan Management in the Navigation pane and select Profiles and Policies.
-
Click Update Profiles.
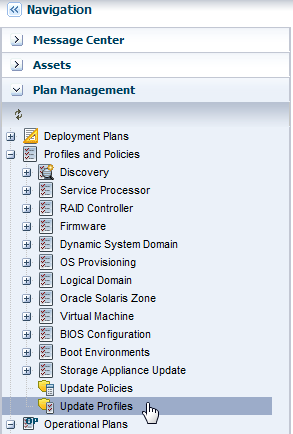
Description of the illustration updateprofiles.png
-
Click New Profile in the Actions pane.
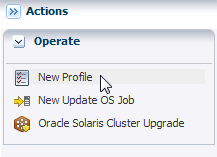
Description of the illustration newprofile.png
-
Enter the following information:
-
Name – Enter the name of the profile
-
Type – Enter the type as Install
-
Description – Enter the description of the profile
-
-
In the Search Criteria menu, select SOLARIS10_SPARC from the Distribution list, all from the Category list, and All Versions from the Version list
-
Type ant in the Search field and click the Search icon.
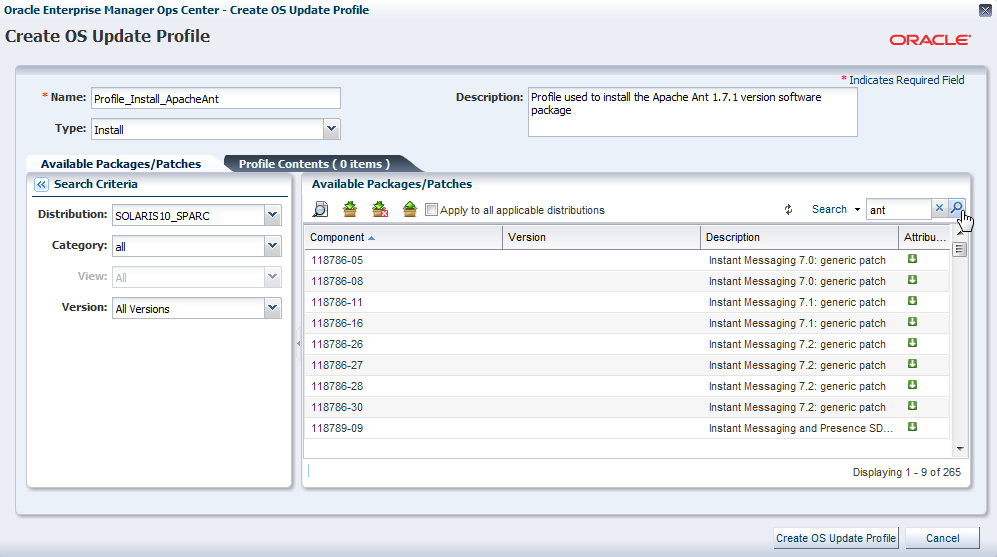
Description of the illustration profilesearch.png
-
Locate and select the
ant-1.7.1-0 [02/17/2011]component from the Component tree and click the Install icon to add the selected component in the Profile Contents.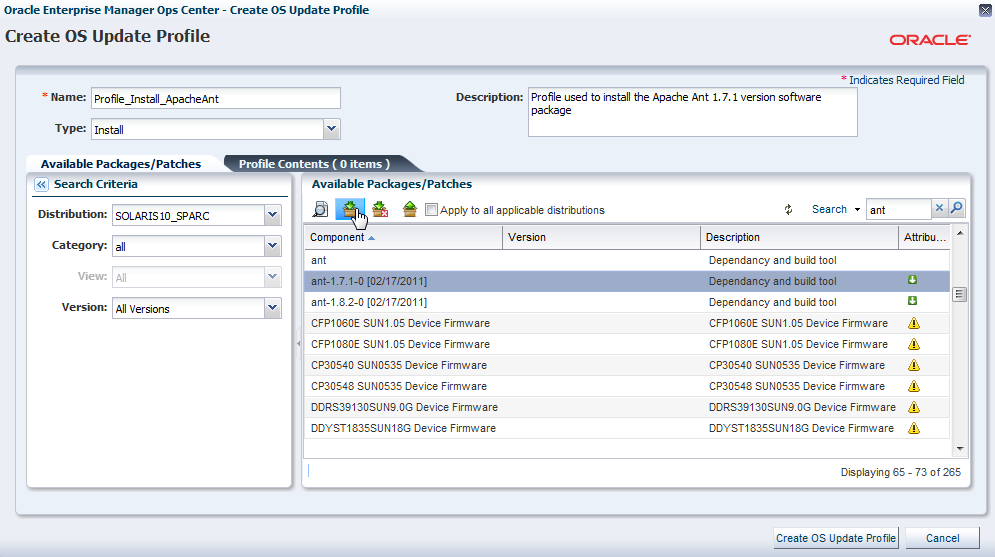
Description of the illustration profileinstall.png
-
Click Create OS Update Profile to create the profile.
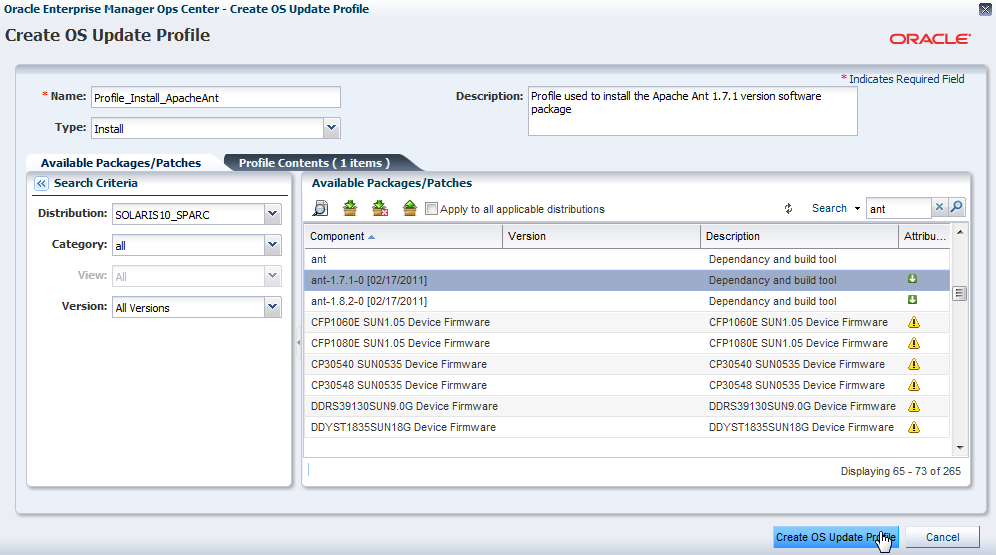
Description of the illustration profilecreate.png
After the profile is created, you can view the profile in the center pane.
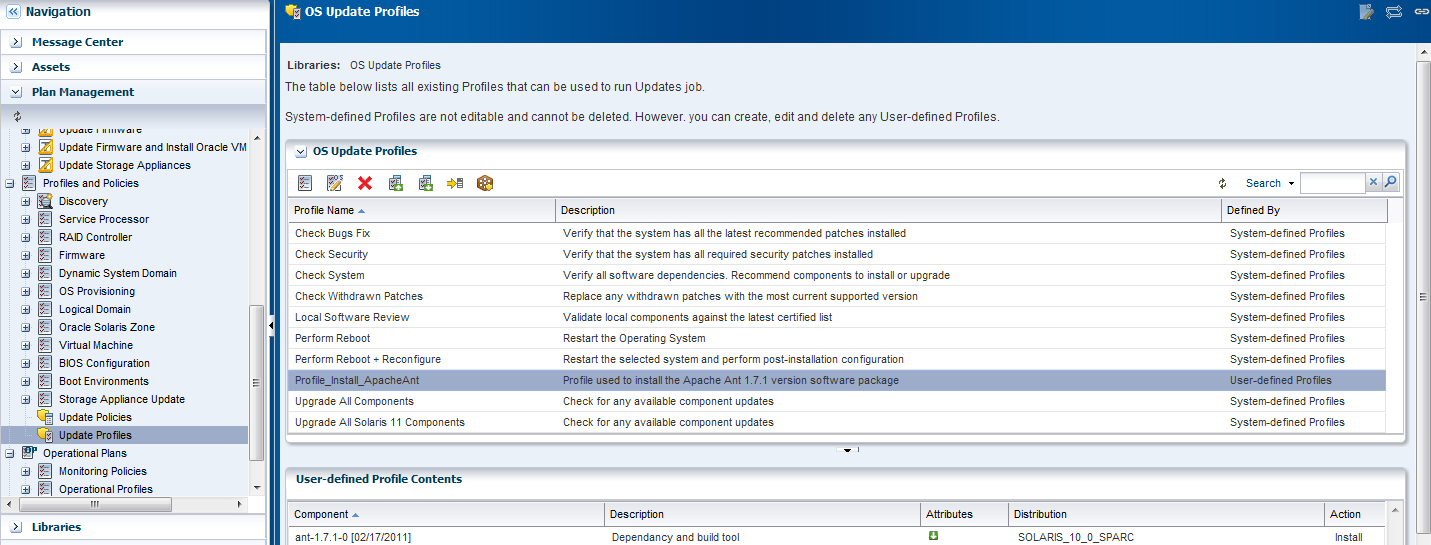
Description of the illustration listprofile.png
Creating a Deployment Plan
Deployment plans enable you to automate a variety of detailed workflows into a single plan. The deployment plan used to install or update a local software package for Solaris 10 is the Software Deployment / Update deployment plan.
The following procedure details the steps required to create a deployment plan:
-
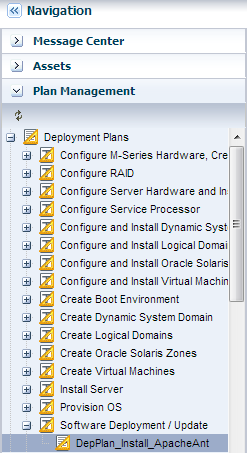
Expand Plan Management in the Navigation pane and the select Software Deployment / Update.
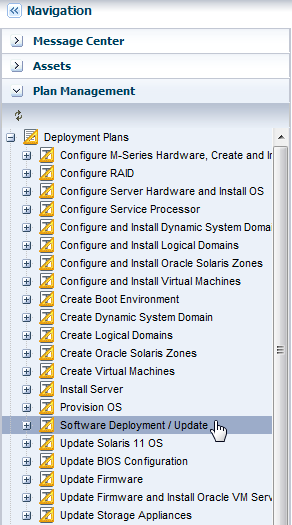
Description of the illustration swdep_plan.png
-
Click Create Plan from Template in the Actions pane.
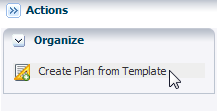
Description of the illustration create_depplan.png
-
Enter a plan name and the plan description. Select the Failure Policy as Complete as much as possible.
-
Select Install Software from the Deployment Plan Steps table. In the Associated Profile/Deployment Profile column, select the update profile that you created in the previous procedure. Click Save to create the deployment plan.

Description of the illustration save_depplan.png
-
After the plan is created, you can view the plan in the center pane.
Description of the illustration depplan_final.png
Applying the Deployment Plan
After you create a deployment plan, select the target asset for the deployment plan to install the local software package.
The following procedure details the steps to apply the deployment plan:
-
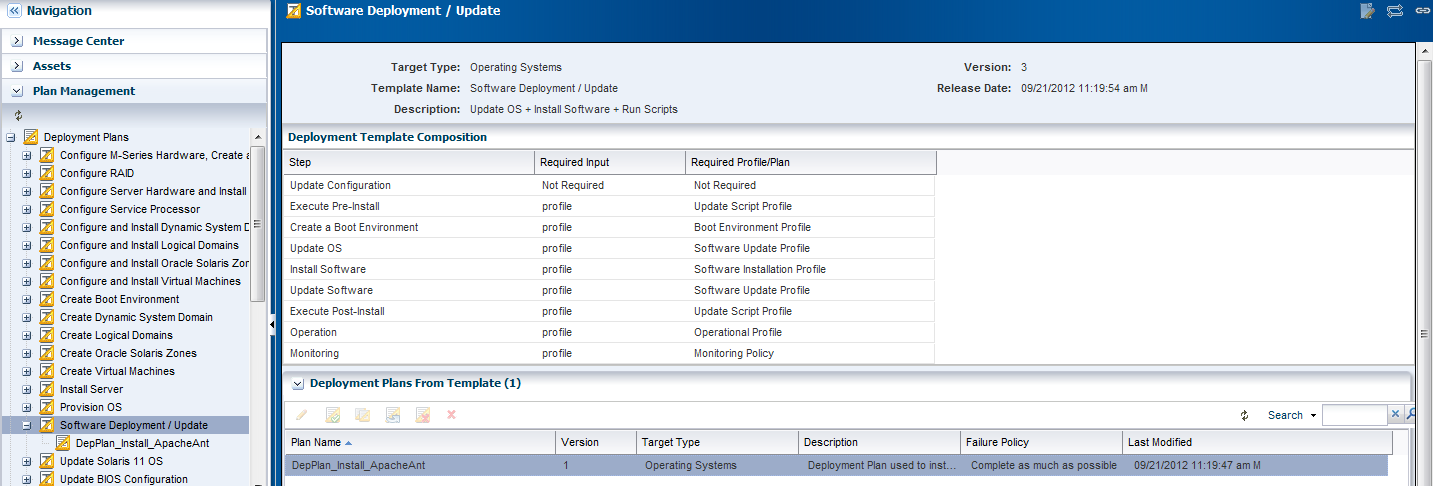
Expand Plan Management in the Navigation pane and select Software Deployment / Update. Select the deployment plan that you created in the previous procedure.
Description of the illustration select_depplan.png
-
Click Apply Deployment Plan in the Actions pane.
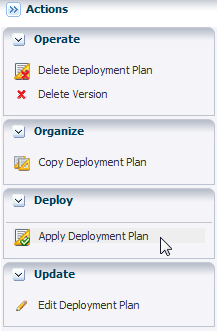
Description of the illustration apply_devpplan.png
-
Select the Oracle Solaris 10 OS asset and click Add to Target List. Select Apply the plan with minimal interaction. Click Next to review the values of the deployment steps.
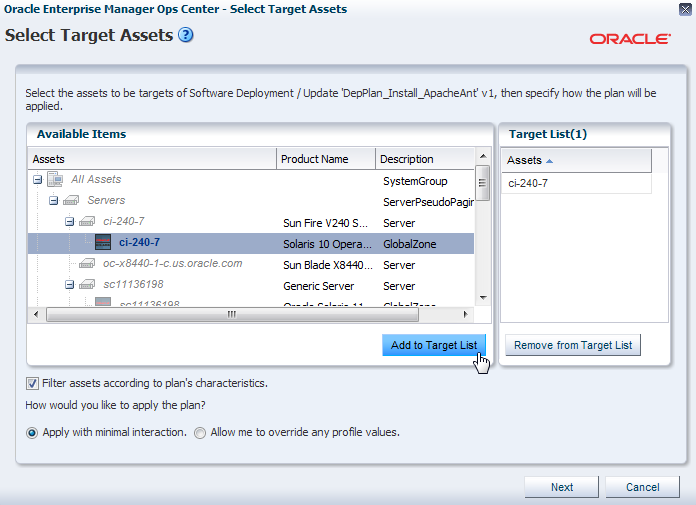
Description of the illustration apply_addtarget.png
-
Select the Do not review steps that are not included in the plan option and click Next.
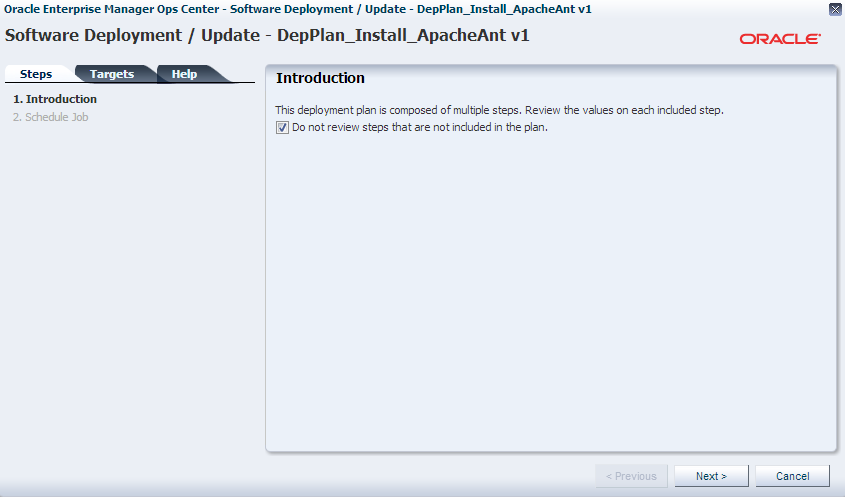
Description of the illustration apply_donotreviewsteps.png
-
For the Global Update Settings window, select the Execution Mode as Perform Update, then click Next.
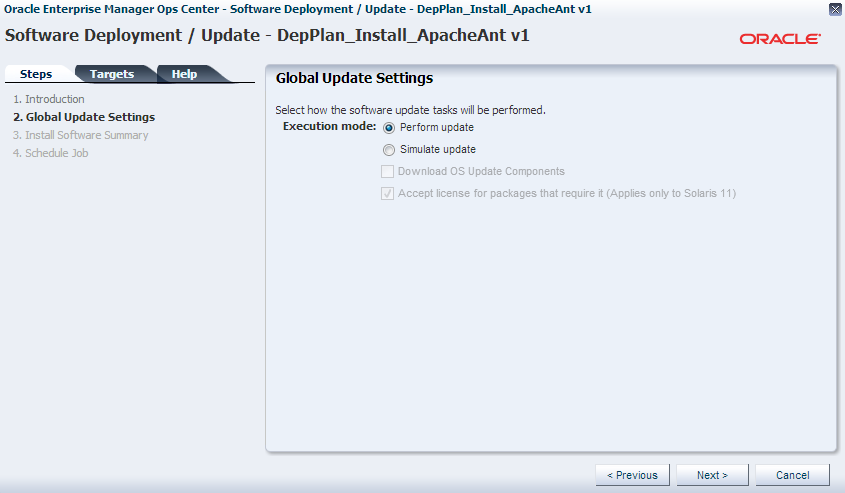
Description of the illustration apply_performupdate.png
-
You can review the profile to be applied. Click Next.

Description of the illustration apply_summary.png
-
Select Now to execute the deployment plan on the selected targets and click Apply to submit the job and execute the deployment plan.
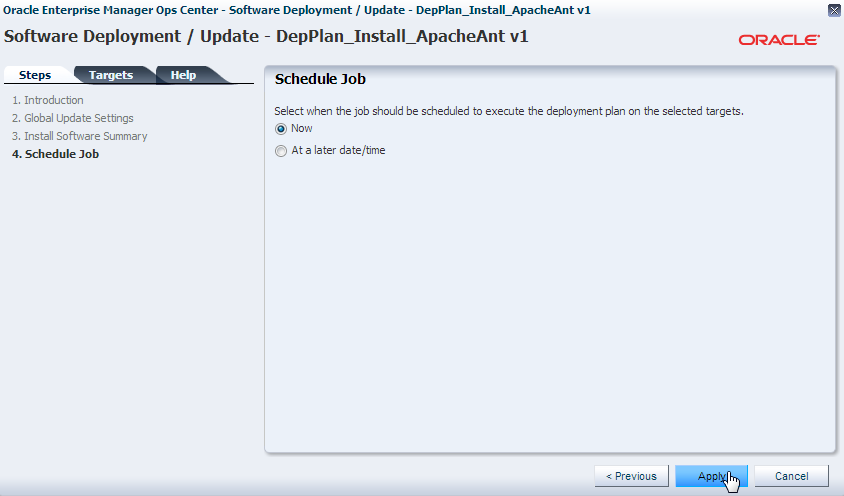
Description of the illustration apply_final.png
After the job is complete, you can open a terminal window and verify that Apache Ant 1.7.1 version is installed.

Description of the illustration ant_171.png
Updating the Local Software Package
You can update a software package that is already installed in an operating system. The patches or update packages necessary to update the software must be downloaded and saved locally in the machine where the Enterprise Controller is installed.
In this example, the Apache Ant software is updated from the 1.7.1 version to the 1.8.2 version. The update package was uploaded to the library as part of the Uploading a Local Software Package task.
In this example, the Apache Ant software package is updated by modifying a system catalog of the software system where the software is installed. A system catalog is a list of operating system software components that are installed on a managed system.
The following procedure details the steps required to update a local software package by modifying a system catalog:
-
Select the target operating system from the Assets section in the Navigation pane.
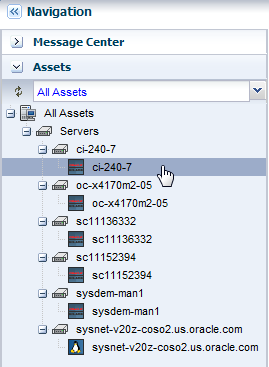
Description of the illustration selecttargetos.png
-
Click View/Modify Catalog in the Actions pane.
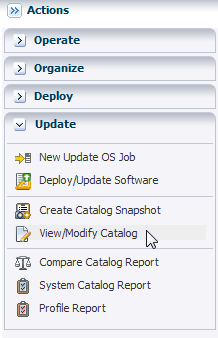
Description of the illustration actionspane2.png
-
In the Search Criteria menu, select Current Inventory from the Catalog list, SOLARIS10_SPARC from the Distribution list, all from the Category list, All from the View list, All Versions from the Version list, and All from the State list.
-
Type ant in the Search field and click the Search icon.
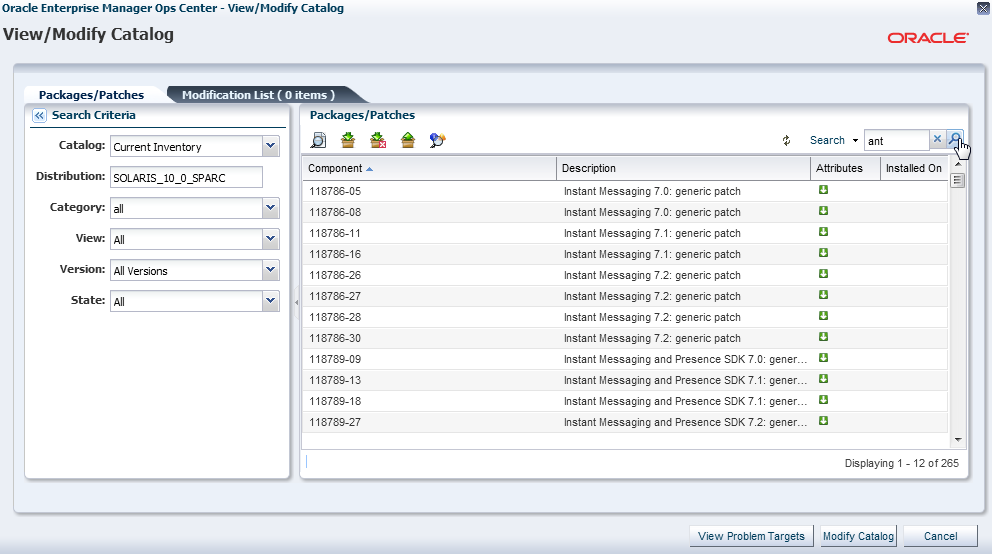
Description of the illustration modifycatalog_search.png
-
Locate and select the
ant-1.7.1-0 [02/17/2011]component from the Component tree and click the Upgrade icon to add the selected component in the Modification List. Theant-1.7.1-0 [02/17/2011]component is updated to theant-1.8.2-0 [02/17/2011]that is also displayed in the list of components.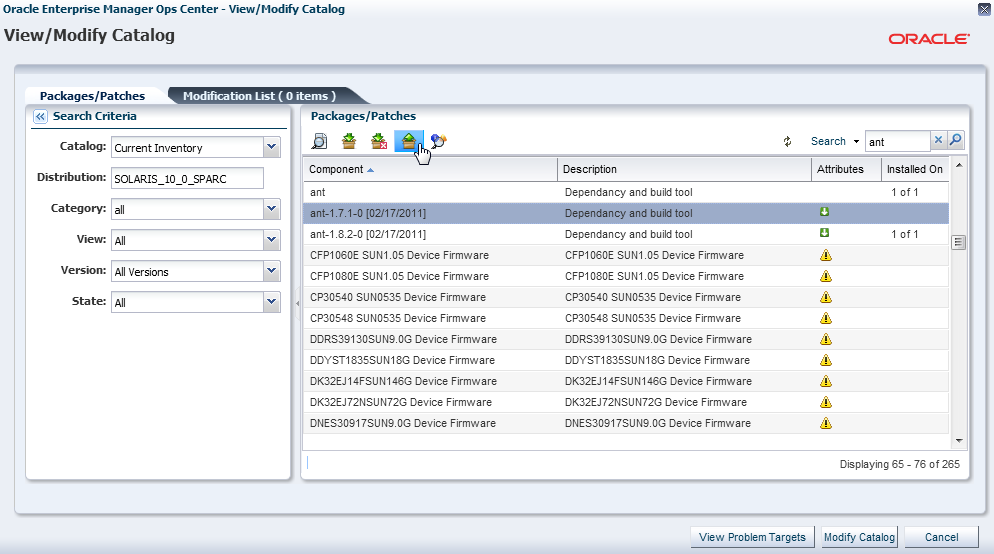
Description of the illustration modifycatalog_upgrade.png
-
Click Modify Catalog. The New Update OS Job wizard is displayed.
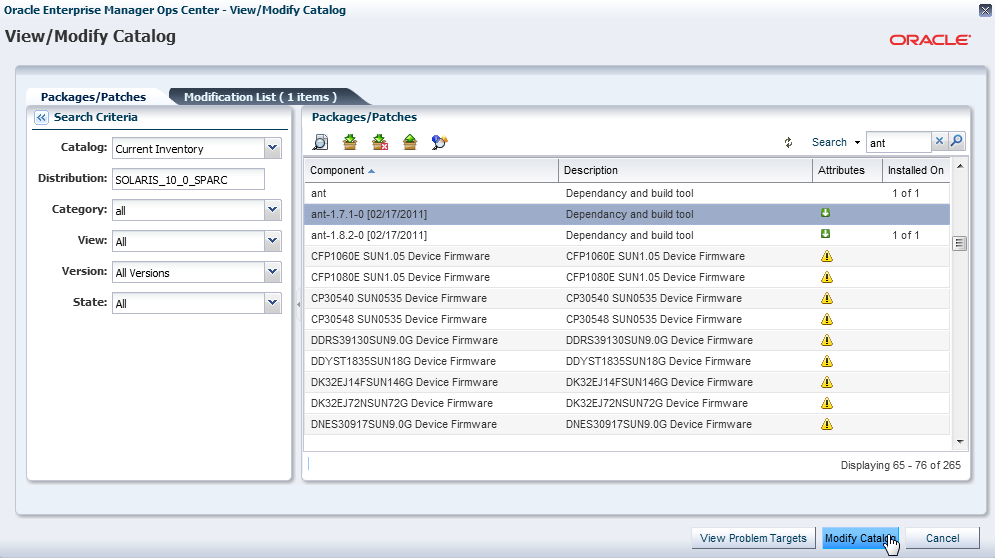
Description of the illustration modifycatalog_modify.png
-
Enter a Job Name. Select Use the same Targets for all tasks in the job as the Target Setting, Actual Run as the Run Type, Complete as much of the job as possible as the Task Failure Policy, Sequential as the Task Execution Order. Click Run Now to start the job immediately.
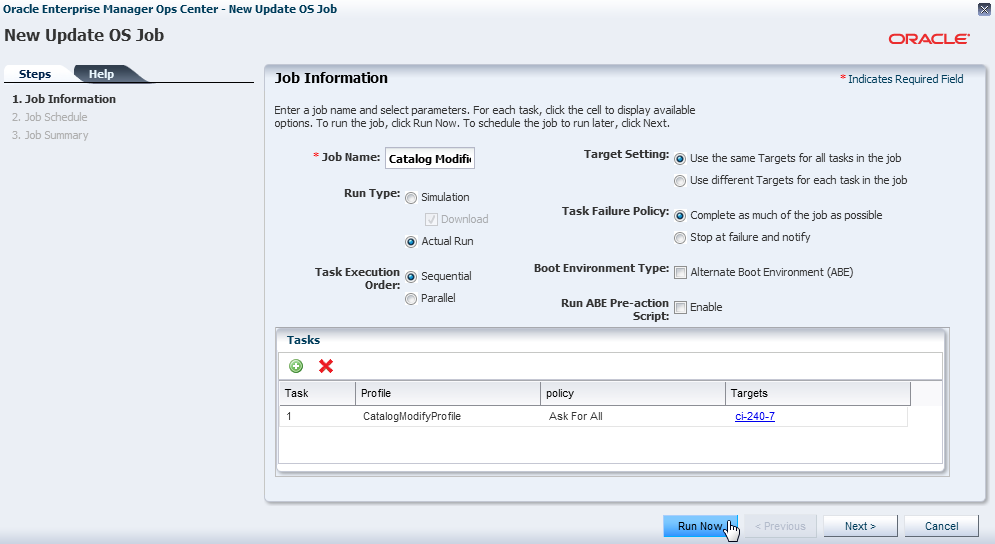
Description of the illustration modifycatalog_apply.png
The job is launched to apply the update of the software package.
When the job is complete, you can open a terminal window and verify that Apache Ant 1.8.2 version is installed.
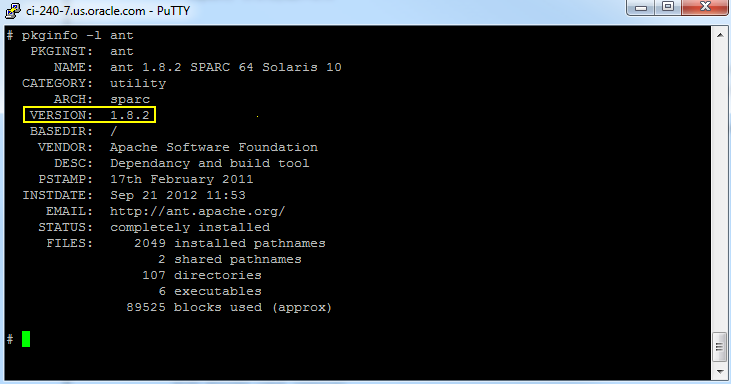
Description of the illustration ant_182.png
What's Next?
After installing the local software package you can use the software in the machine where you installed it to build Java applications. You can also install newer versions of the software or install other software packages.
Related Articles and Resources
The following chapters in the Oracle Enterprise Manager Ops Center Feature Reference Guide contain more information:
-
Plans and Profiles
-
Software Libraries
-
Operating System Updates
Documentation Accessibility
For information about Oracle's commitment to accessibility, visit the Oracle Accessibility Program website at http://www.oracle.com/pls/topic/lookup?ctx=acc&id=docacc.
Oracle customers have access to electronic support through My Oracle Support. For information, visit http://www.oracle.com/pls/topic/lookup?ctx=acc&id=info or visit http://www.oracle.com/pls/topic/lookup?ctx=acc&id=trs if you are hearing impaired.
Oracle Enterprise Manager Ops Center Installing and Updating Local Software Packages, 12c Release 2 (12.2.0.0.0)
E48186-01
Copyright © 2007, 2014, Oracle and/or its affiliates. All rights reserved.
This software and related documentation are provided under a license agreement containing restrictions on use and disclosure and are protected by intellectual property laws. Except as expressly permitted in your license agreement or allowed by law, you may not use, copy, reproduce, translate, broadcast, modify, license, transmit, distribute, exhibit, perform, publish, or display any part, in any form, or by any means. Reverse engineering, disassembly, or decompilation of this software, unless required by law for interoperability, is prohibited.
The information contained herein is subject to change without notice and is not warranted to be error-free. If you find any errors, please report them to us in writing.
If this is software or related documentation that is delivered to the U.S. Government or anyone licensing it on behalf of the U.S. Government, the following notice is applicable:
U.S. GOVERNMENT END USERS: Oracle programs, including any operating system, integrated software, any programs installed on the hardware, and/or documentation, delivered to U.S. Government end users are "commercial computer software" pursuant to the applicable Federal Acquisition Regulation and agency-specific supplemental regulations. As such, use, duplication, disclosure, modification, and adaptation of the programs, including any operating system, integrated software, any programs installed on the hardware, and/or documentation, shall be subject to license terms and license restrictions applicable to the programs. No other rights are granted to the U.S. Government.
This software or hardware is developed for general use in a variety of information management applications. It is not developed or intended for use in any inherently dangerous applications, including applications that may create a risk of personal injury. If you use this software or hardware in dangerous applications, then you shall be responsible to take all appropriate fail-safe, backup, redundancy, and other measures to ensure its safe use. Oracle Corporation and its affiliates disclaim any liability for any damages caused by use of this software or hardware in dangerous applications.
Oracle and Java are registered trademarks of Oracle and/or its affiliates. Other names may be trademarks of their respective owners.
Intel and Intel Xeon are trademarks or registered trademarks of Intel Corporation. All SPARC trademarks are used under license and are trademarks or registered trademarks of SPARC International, Inc. AMD, Opteron, the AMD logo, and the AMD Opteron logo are trademarks or registered trademarks of Advanced Micro Devices. UNIX is a registered trademark of The Open Group.
This software or hardware and documentation may provide access to or information on content, products, and services from third parties. Oracle Corporation and its affiliates are not responsible for and expressly disclaim all warranties of any kind with respect to third-party content, products, and services. Oracle Corporation and its affiliates will not be responsible for any loss, costs, or damages incurred due to your access to or use of third-party content, products, or services.