5 Upgrading a Single EC Environment Using the Command Line
This chapter explains how to upgrade an environment with a single Enterprise Controller through the command line.
Upgrade your systems in the following order:
-
Download the upgrade bundle for your environment.
-
Upgrade the Enterprise Controller. This also upgrades the co-located Proxy Controller.
-
Upgrade the separate Proxy Controllers.
-
Upgrade the Agent Controllers through the UI or manually.
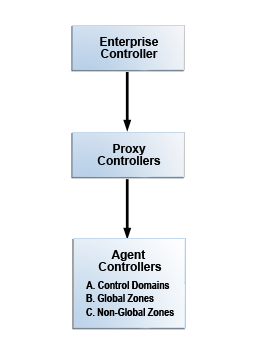
Description of the illustration graphic_singleec_nostage.png
Some of the procedures described in this guide use the ecadm, proxyadm, and agentadm commands. See the Oracle Enterprise Manager Ops Center Administration Guide for more information about these commands.
-
On Oracle Solaris systems, these commands are in the
/opt/SUNWxvmoc/bin/directory. -
On Linux systems, these commands are in the
/opt/sun/xvmoc/bin/directory.
Note:
The upgrade process creates a backup file for the Enterprise Controller. If the upgrade fails, the Enterprise Controller is uninstalled, the initial version of the Enterprise Controller is reinstalled, and the system is automatically restored from the backup file.Once you have begun the upgrade, complete it as soon as possible. Do not allow the Enterprise Controller or Proxy Controllers to be restarted before all systems have been upgraded.
5.1 Downloading Upgrades
You can download the upgrade bundle for Oracle Enterprise Manager Ops Center. This includes upgrades for the Enterprise Controller, Proxy Controllers, and Agent Controllers. Downloading an upgrade does not install it on managed assets.
You can download the upgrade bundles through the user interface, from the Oracle Technology Network, or from the Oracle Software Delivery Cloud.
5.1.1 Downloading Upgrades From the User Interface
You can download upgrades for Oracle Enterprise Manager Ops Center through the user interface.
Upgrades are downloaded to these directories:
-
Enterprise Controller upgrades:
/var/opt/sun/xvm/images/productUpdate -
Proxy Controller upgrades:
/var/opt/sun/xvm/images/productUpdate -
Agent Controller upgrades:
/var/opt/sun/xvm/images/agent
Note:
The Enterprise Controller upgrade includes the Proxy Controller and Agent Controller upgrades, but the Proxy Controller and Agent Controller upgrades are not saved to these directories until the Enterprise Controller upgrade is applied.-
Click the Enterprise Controller in the Administration section of the Navigation pane.
-
Click Ops Center Downloads.
The Ops Center Downloads Wizard is displayed.
-
(Optional) Hover over the details icon for a download to view more information about it.
-
Select one or more downloads and click Next.
The View License page is displayed.
-
Read the license and click Accept.
The Download Status page is displayed.
-
Check I wish to download the remaining upgrades in the background, or wait for the downloads to complete.
-
Click Next.
The Summary page is displayed.
-
Click Finish.
5.1.2 Downloading Upgrades From the Oracle Technology Network
You can download upgrade bundles for the Enterprise Controller and Proxy Controller from the Oracle Technology Network.
-
Log in to the Oracle Technology Network Oracle Enterprise Manager Ops Center page at http://www.oracle.com/technetwork/oem/ops-center/index.html.
-
Click Enterprise Manager Ops Center in the Enterprise Manager Downloads sidebar.
-
Select Accept License Agreement.
-
Click the Enterprise Controller bundle with the correct operating system and architecture to download the full bundle. This bundle contains the Enterprise Controller for the selected architecture, and Proxy Controller and Agent Controller files for every supported operating system and architecture.
-
Copy the Enterprise Controller bundle to the
/var/opt/sun/xvm/images/productUpdate/directory on the Enterprise Controller system.
5.1.3 Downloading Upgrades From the Oracle Software Delivery Cloud
You can download upgrade bundles for the Enterprise Controller and Proxy Controller from the Oracle Software Delivery Cloud.
To Download Upgrades From the Oracle Software Delivery Cloud
-
Log in to the Oracle Software Delivery Cloud at http://edelivery.oracle.com.
-
Read and accept the Software License Agreement and Export Restrictions, then click Continue.
-
Select the Oracle Enterprise Manager product pack and the correct platform for your environment, then click Go.
The list of download packs is displayed.
-
Select the Media Pack for the target version and click Continue.
The list of available bundles is displayed.
-
Click download next to the Enterprise Controller bundle with the correct operating system and architecture to download the full bundle, then save the downloaded bundle locally. This bundle contains the Enterprise Controller files for the selected architecture and operating system, and Proxy Controller and Agent Controller files for every supported operating system and architecture.
-
Copy the Enterprise Controller bundle to the
/var/opt/sun/xvm/images/productUpdate/directory on the Enterprise Controller system.
5.2 Upgrading a Single Enterprise Controller from the Command Line
The following procedures describe how to upgrade the Enterprise Controller, with either an embedded database or a customer-managed database. If you are running Oracle Enterprise Manager Ops Center in Disconnected Mode, you must upgrade from the command line. The co-located Proxy Controller is upgraded as well, even if it is not enabled.
The Enterprise Controller upgrade log is saved locally as /var/opt/sun/xvm/update-saved-state/update_satellite_bundle_<version number>/updatelog.txt.
The upgrade log file is stored in the /var/opt/sun/xvm/update-saved-state directory on the Enterprise Controller.
If an error occurs during this process, the system is restored to the prior version.
Note:
The upgrade disables the Oracle Solaris 11 update manager service,svc:/application/pkg/update:default, if it is enabled.Perform the following tasks before you upgrade the Enterprise Controller:
-
Verify that the Enterprise Controller has at least five (5) GB of free space for the upgrade bundle.
-
Acquire the upgrade bundle from Oracle and transfer it to the Enterprise Controller system.
-
Review pending and scheduled jobs before updating the Enterprise Controller. The upgrade shuts down the Enterprise Controller, which causes running jobs to fail. Scheduled jobs cannot be launched while the upgrade is being applied.
-
Use the OCDoctor to verify that there are no outstanding issues on the Enterprise Controller system. Run the OCDoctor with the
--updateoption, then run the OCDoctor script with the--troubleshootoption. See the Oracle Enterprise Manager Ops Center Administration Guide for more information about the OCDoctor. -
When you are using an embedded database, verify that the required Oracle Database 11g Enterprise Edition installation files are present in the
/var/tmp/downloadsdirectory on the Enterprise Controller system.-
If you are currently using Oracle Enterprise Manager Ops Center version 12.2.1 or earlier, the Oracle Database 11g Enterprise Edition 11.2.0.3 installation files must be present.
-
If you are upgrading to Oracle Enterprise Manager Ops Center 12.2.2, and you are currently using Oracle Enterprise Manager Ops Center version 12.2.0 or version 12.2.1, the Oracle Database 11g Enterprise Edition 11.2.0.4 installation files must be present.
Follow this procedure to download the required installation files if they are not present:
Note:
The download procedure requires a valid My Oracle Support (MOS) account, which must be associated with a Customer Service Identifier (CSI) with a software contract.-
Create a
/var/tmp/downloadsdirectory on the Enterprise Controller system. -
Navigate to http://support.oracle.com, click Sign In, and sign in with your My Oracle Support (MOS) credentials.
-
Click the Patches & Updates tab.
-
Enter the patch number for your version in the field next to Patch Name or Number.
For Oracle Database 11g Enterprise Edition version 11.2.0.3, enter 10404530.
For Oracle Database 11g Enterprise Edition version 11.2.0.4, enter 13390677.
-
Click the Add Filter icon, then select your Enterprise Controller system's operating system and architecture in the drop-down menu next to Platform.
-
Click Search.
The Oracle Database 11g Enterprise Edition patch set of the appropriate version is displayed.
-
Click Download.
The file download popup is displayed.
-
Download the first two files. For Oracle Solaris x86, these files end with
_1of6.zipand_2of6.zip. For Oracle Solaris SPARC and Linux, these files end with_1of7.zipand_2of7.zip -
Copy or move the downloaded installation bundles to the
/var/tmp/downloadsdirectory on the Enterprise Controller system.
-
Upgrading the Enterprise Controller From the Command Line
This procedure describes how to upgrade an Enterprise Controller with an embedded database.
-
Disable the Auto Service Request (ASR) feature if it is enabled.
-
Click Administration in the Navigation pane, then select the Enterprise Controller.
-
Click Disable ASR in the Actions pane.
-
-
As root, log in to the Enterprise Controller.
-
Verify that the Enterprise Controller is online using
ecadmcommand. If necessary, use theecadm startcommand to start the Enterprise Controller. For example:# /opt/SUNWxvmoc/bin/ecadm status online
-
Create a temporary directory within the directory where you installed Oracle Enterprise Manager Ops Center, then copy or move the upgrade bundle to the new directory. For example:
# mkdir /var/tmp/OC/update
# cp enterprise-controller.Solaris.sparc.12.2.2.904.tar.zip /var/tmp/OC/update
-
Change to the directory containing the upgrade bundle.
# cd /var/tmp/OC/update
-
Unzip and un-tar the bundle.
-
If your upgrade bundle has the
.tar.zipextension, use theunzipandtarcommands to uncompress and un-tar the bundle, then list the contents of the temporary directory. The following command example retains the original compressed bundle file. For example:# unzip enterprise-controller.Solaris.i386.12.2.2.904.tar.zip | tar xf - # ls enterprise-controller.Solaris.i386.12.2.2.904.tar.zip xvmoc_full_bundle #
-
If your upgrade bundle has the
.zipextension, use theunzipcommand to uncompress the bundle. For example:# unzip enterprise-controller.Solaris.i386.12.2.2.904.zip # ls enterprise-controller.Solaris.i386.12.2.2.904.zip xvmoc_full_bundle #
-
-
Change to the
xvmoc_full_bundledirectory and run the install script.# cd xvmoc_full_bundle # ./install
The following option can be used with the install script:
--verbose or -v: Increases verbosity of output from upgrade program. Without this option, non-verbose output is given.
When the upgrade is complete, the install script indicates that all Oracle Enterprise Manager Ops Center components have been upgraded to the latest version.
-
Clear your browser cache and refresh your browser before you log in to the newly upgraded Enterprise Controller.
-
Back up your Oracle Enterprise Manager Ops Center data using the
ecadmcommand and thebackupsubcommand. -
(Optional) Once the upgrade has completed successfully, remove the version 12.1 installer to reclaim disk space.
# rm -rf /var/opt/sun/xvm/EnterpriseController_installer_12.1.*
-
Enable the Auto Service Request (ASR) feature if you disabled it at the beginning of the upgrade.
-
Click Administration in the Navigation pane, then select the Enterprise Controller.
-
Click Enable ASR in the Actions pane.
-
Note:
If an error message is displayed indicating that the database must be migrated manually, see Appendix A, "Manually Upgrading Database Tables" for this procedure.5.3 Upgrading a Proxy Controller from the Command Line
You can manually update Proxy Controllers to the latest available version to gain access to new and updated features.
The Proxy Controller upgrade log is saved locally as /var/opt/sun/xvm/update-saved-state/update_proxy_bundle_<version number>/updatelog.txt.
If an error occurs during this process, the system is restored to the prior version.
Note:
During the upgrade process, the Proxy Controller is shut down. However, the Proxy Controller must be online at the beginning of the process.Note:
The upgrade disables the Oracle Solaris 11 update manager service,svc:/application/pkg/update:default, if it is enabled.Upgrade the Enterprise Controllers before you upgrade the Proxy Controllers.
-
As root, log in to the Proxy Controller system.
-
Back up the contents of the following directory:
-
/etc/opt/sun/cacao2/instances/scn-proxy/security/on a Linux Proxy Controller -
/etc/cacao/instances/scn-proxy/security/on an Oracle Solaris Proxy Controller
-
-
Run the
proxyadmcommand with thestatussubcommand to verify that the Proxy Controller is online. If the Proxy Controller is offline, start it using theproxyadmcommand with thestartsubcommand.For example:
# ./proxyadm status
online
-
Create a temporary directory on the Proxy Controller system, then copy or move the Proxy Controller upgrade bundle from the
/var/opt/sun/xvm/images/productUpdatedirectory on the Enterprise Controller system to the new directory on the Proxy Controller system. -
Uncompress and un-tar the upgrade bundle, then list the contents of the temporary directory.
-
For example, on a Linux Proxy Controller:
# unzip proxy-controller.Linux.i686.12.2.2.904.tar.zip
# tar xf proxy-controller.Linux.i686.12.2.2.904.tar
# ls
xvmoc_full_bundle
proxy-controller.Linux.i686.12.2.2.904.tar
#
-
On an Oracle Solaris Proxy Controller:
# gzcat proxy-controller.Solaris.i386.12.2.2.904.tar.zip | tar xf -
# ls
xvmoc_full_bundle
proxy-controller.Solaris.i386.12.2.2.904.tar.zip
-
-
Change to the
xvmoc_full_bundledirectory. -
Run the install script.
# ./install
The following option may be used with the install script:
--install <install bundle path> or -i <install bundle path>: If the Oracle Enterprise Manager Ops Center install bundle cannot be found in the
/var/opt/sun/xvm/directory, you must use this option to specify the location of the Oracle Enterprise Manager Ops Center install bundle.The upgrade is installed on the Proxy Controller. When the upgrade is complete, the install script indicates that all components have been upgraded.
5.4 Upgrading Agent Controllers from the Command Line
You can upgrade Agent Controllers manually. Before you upgrade an Agent Controller, you must upgrade the Proxy Controller that manages it.
If you are upgrading Agent Controllers running in non-global zones, upgrade the Agent Controller in the global zone before upgrading all of the non-global zones. If you are upgrading Agent Controllers running in zones within a Logical Domain, upgrade the Agent Controller in the Control Domain before upgrading the Agent Controllers on the zones.
Caution:
If you upgrade Agent Controllers on virtualized systems in an order other than that specified here, the assets do not display correctly in the user interface. To cause the assets to display correctly, unconfigure the Agent Controllers, then reconfigure or reinstall them in the specified order.Note:
Virtualization Agent Controllers require 1024 MB of memory after the upgrade to version 12.2.1.0.0.Note:
The upgrade disables the Oracle Solaris 11 update manager service,svc:/application/pkg/update:default, if it is enabled.This procedure requires root access.
-
Copy the new Agent Controller bundle from the Enterprise Controller to the client, remove the existing Agent Controller directory, and extract the new Agent Controller bundle.
For example, on Oracle Solaris 8, 9, or 10 Agent Controllers:
# scp <IP of Enterprise Controller>:/var/opt/sun/xvm/images/agent/OpsCenterAgent.Solaris.`uname -p`.12.2.2.904.zip /var/tmp
# cd /var/tmp
# rm -r OpsCenterAgent
# unzip OpsCenterAgent.Solaris.`uname -p`.12.2.2.904.zip
On Oracle Solaris 11 Agent Controllers:
# scp <IP of Enterprise Controller>:/var/opt/sun/xvm/images/agent/OpsCenterAgent.SolarisIPS.all.12.2.2.904.zip /var/tmp
# cd /var/tmp
# rm -r OpsCenterAgent
# unzip OpsCenterAgent.SolarisIPS.all.12.2.2.904.zip
On Linux Agent Controllers:
# scp -p <IP of Enterprise Controller>:/var/opt/sun/xvm/images/agent/OpsCenterAgent.`uname -s`.i686.12.2.2.904.zip /var/tmp
# cd /var/tmp
# rm -r OpsCenterAgent
# unzip OpsCenterAgent.`uname -s`.i686.12.2.2.904.zip
-
Use the
agentadmcommand with thestopsubcommand to stop the Agent Controller.-
On Oracle Solaris systems, this command is in the
/opt/SUNWxvmoc/bin/directory. -
On Linux systems, this command is in the
/opt/sun/xvmoc/bin/directory.
For example:
./agentadm stop
-
-
Install the Agent Controller upgrade.
# cd /var/tmp/OpsCenterAgent
# ./install
-
Use the
agentadmcommand with theconfiguresubcommand and the--keep-connectionoption to configure the new Agent Controller.For example:
# ./agentadm configure --keep-connection
This step also starts the Agent Controller.
Note:
The following errors may safely be ignored. These refer to the addition of two sysidcfg scripts, which are already present from a prioragentadm configurestep, such as from the original Agent Controller installation and configuration. The correct sysidcfg scripts are called properly by sysidcfg.Failed to add the zone configuration automation. Failed to add the service tags recreate script.
-
Verify the connection.
# sc-console list-connections
scn-agent https://172.25.14.21:21165 urn:scn:clregid:1234567-aaaa-bbbb-cccc-123456789abc:YYYYMMDDHHMMSSsss