| Oracle® Fusion Middleware Enterprise Single Sign-On Suite Installation Guide 11g Release 2 (11.1.2.2) Part Number E37691-05 |
|
|
PDF · Mobi · ePub |
| Oracle® Fusion Middleware Enterprise Single Sign-On Suite Installation Guide 11g Release 2 (11.1.2.2) Part Number E37691-05 |
|
|
PDF · Mobi · ePub |
The most convenient way to mass-deploy Oracle Enterprise Single Sign-On Suite is to create a customized MSI package and distribute it to end-user machines using a deployment tool of your choice.
An end-user machine that has been configured and tested for production acts as a configuration "master" from which the target Agent configuration will be derived for inclusion in the package. Below is a high-level overview of the required steps. The steps are described in detail later in this guide.
For information on the installable components, see MSI Package Components.
Obtain the latest installer for the Oracle Enterprise Single Sign-On Suite component(s) you want to deploy.
Obtain the latest versions of this, as well as the following documents:
Deploying Logon Manager with a Directory-Based Repository
Oracle Enterprise Single Sign-On Suite Administrator's Guide
If performing an unattended ("silent") installation, complete the steps in Pre-Requisites for Unattended ("Silent") Installations.
Install the Logon Manager Agent and the Oracle Enterprise Single Sign-On Administrative Console on the "master" machine.
Configure Logon Manager settings using the Console. Make sure you have thoroughly read and understood the Logon Manager Best Practices guides listed above before you begin.
Generate the custom MSI package using the Oracle Enterprise Single Sign-On Administrative Console:
Select the Logon Manager components that you want installed on the end-user machines. (For example, if your environment calls for a single primary logon method, you may want to exclude all but the desired authenticator.)
Select the customized set of global Logon Manager settings you have configured in step 4.
Generate the final MSI package. This package will contain the components selected in step 6a and configuration settings from step 4.
Test the package by deploying it on a pilot group of machines. Identify and correct any issues that may arise. Document the solutions as necessary.
Once the pilot deployment is successful, deploy the MSI package enterprise-wide using a third-party tool of your choice.
Place the base Logon Manager Agent MSI package in a working directory on the "master" machine.
Start the Oracle Enterprise Single Sign-On Administrative Console.
Create and configure the desired set of Global Agent settings:
In the tree in the left-hand pane, right-click the Global Agent Settings node and select Import --> From Live HKLM.
When the "Live" settings set appears in the tree, right-click it, select Rename from the context menu, give the set a descriptive name, and hit Enter.
Configure Logon Manager as desired. For detailed information on each setting, see the Oracle Enterprise Single Sign-On Suite Administrator's Guide.
Create the customized MSI package for deployment to end-user machines:
From the Tools menu, select Generate Customized MSI.
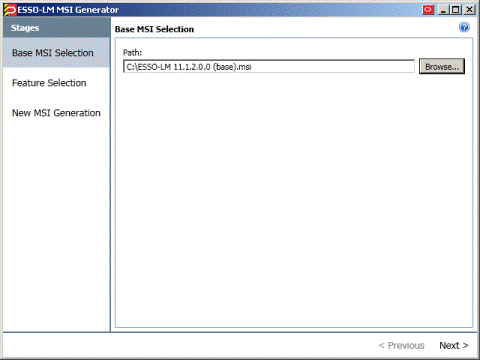
In the "Logon Manager MSI Generator" wizard that appears, click Browse and navigate to the Logon Manager Agent base MSI package, then click Next. 
In the "Feature Selection" screen, select the Logon Manager components that you want to include in the package. Expand each category node to find the desired component(s), then select the check box next to each desired component. When you have finished, click Next.

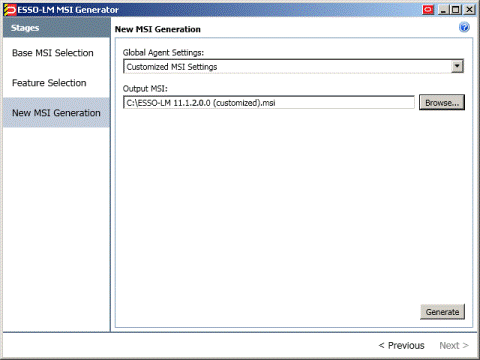
In the "New MSI Generation" screen, select the set of global Agent settings you have created in step 3 from the "Global Agent Settings" drop-down list.
Click Browse and provide the target path and file name for the customized MSI package.
Click Generate.

Close the "Logon Manager MSI Generator" wizard.
Save the package settings to an XML file for future reference. From the File menu, select Save, enter a descriptive file name, and click Save.
Once you have generated your custom MSI package, test it by installing it on one or more pilot machines. Always install the package on a clean machine - that is, one that does not contain any
Logon Manager-related files or registry entries. If you are using the same machine to test multiple packages, you must sanitize it before installing a new package so that old settings and files do not remain; if the installer detects existing data, it will perform an upgrade instead of a normal installation, resulting in false problems and false positives during testing.
To sanitize your pilot machine:
Delete the Logon Manager installation directory and its contents:
On 32-bit systems: \Program Files\Passlogix
On 64-bit systems: \Program Files (x86)\Passlogix
Delete the Logon Manager user data directory:
On Windows XP: \Documents and Settings\<user>\Application Data\Passlogix
On Windows 7: \Users\<user>\AppData\Roaming\Passlogix
32-bit systems only: delete the following registry keys and their children:
HKEY_CURRENT_USER\Software\Passlogix
HKEY_LOCAL_MACHINE\Software\Passlogix
64-bit systems only: delete the following registry keys and their children:
HKEY_CURRENT_USER\Software\Passlogix
HKEY_LOCAL_MACHINE\Software\Wow6432Node\Passlogix
When testing the package, look for any deployment and configuration problems; Oracle highly recommends that you set up a dedicated test environment so that you can perform a full range of staging tests, including the chosen global Agent settings, administrative overrides, synchronization with your central repository, and response to applications. The last item will require that you create a set of pilot templates and test them against a selected set of applications. This will let you spot and correct any application response issues that would have otherwise arisen (and been much more costly to resolve) in production.
When the package has been fully tested and verified, use a deployment tool (such as Microsoft Systems Management Server) to deploy Logon Manager enterprise-wide.