8 Post Installation Tasks
This chapter explains tasks that you must perform once the database, the application servers, and the first client installation have been completed.
See MetaSolv Solution System Administrator's Guide for more information on ongoing administration and maintenance tasks.
Verifying the Database
To verify the database, you must have Oracle Communications MetaSolv Solution (MSS) Utilities installed.
Run the Database (DB) Health Utility to make sure that all database objects required by MetaSolv Solution are valid, make response times quicker, and eliminate problems in processing information. While DB Health is required only after an installation, maintenance release or patch, you may use it at any time.
You can use the DB Health Utility to repair database errors.
Note:
The DB Health Utility cannot correct errors in invalid objects, the DBA must correct these errors. The DB Health Utility will attempt to grant privileges, create public synonyms and enable disabled objects.The DB Health Utility can also generate a DB Status Report, which provides statistics vital to the health of the database.
See the discussion on using the DB Health Utility in the MetaSolv Solution System Administrator's Guide for detailed instructions.
Loading New and Updated Graphics to the Database
A utility named TBS Load Graphic Images loads new and updated graphics to the MSS database. You must run this utility one time, from any client workstation that has MSS Utilities installed, to update the database.
To load graphics to the database:
-
Open the MetaSolv Solution directory on a client workstation and double-click TBSLoadGraphic.exe.
-
The TBS Load Graphics Images utility appears minimized on the status bar. Click the icon on the status bar to display the utility. The TBS Load Graphics Images window appears.
-
Enter your user ID and password.
-
Enter the name of the database to which graphics are being loaded.
-
Click Start.
Once you run this file, subsequent attempts to run it have no effect on the database.
Loading Preferences to the Database
To ensure that all preferences have a value in the database after a first time installation, you must open the Preferences window. This causes any preferences that are not currently in the database to be added with the MSS default value.
To load preferences to the database:
-
On the MetaSolv Solution Navigation Bar, click Application Setup, then click Preferences.
The Preferences window appears.
-
Click Close.
Any preferences in this window not already defined in the database are included with default values.
If a preference is added through an upgrade or a patch, you must open the Preferences window, locate the preference, and configure it with the appropriate value for the feature to which it applies.
Modifying the Oracle-Provided Startup Scripts
When you perform a full installation of MSS, startup scripts are included in the MSS files downloaded to the administration server. The startup scripts are for the following server types:
-
Clustered administration server
-
startAdminServer.sh (UNIX/Linux)
-
startAdminServer.cmd (Windows)
-
startAdminServer_wli.sh (UNIX/Linux)
-
startAdminServer_wli.cmd (Windows)
-
-
Software proxy server
-
startProxyServer.sh (UNIX/Linux)
-
startProxyServer.cmd (Windows)
-
The files are copied to the following location on the administration server:
/MSLV_Home/DOMAIN_NAME
To modify a startup script:
-
Locate and open the startup script in a text editor.
-
Change the following variables in the script to match the server environment:
SERVER_Name=[Admin_servername]or
SERVER_Name=[Proxy_servername]
BEA_Home=[BEA_home]

ADMIN_LOG=[Metasolv_home]
-
To bypass the startup prompt, provide your username and password in the script.
USER=[userid]
PW=[password]
-
Save your changes.
To start the server using the modified script:
-
Navigate to the directory where the startup file is located.
-
At the prompt, enter the script name.
For example:
For Unix/Linux:
./startAdminServer.shFor Windows:
./startAdminServer.cmd
Compiling Invalid Objects for Oracle Database
Run the DBHealth utility, from a client machine, to ensure that there are no invalid objects in the Oracle Database.
-
Navigate to the MSLV_Home directory and double-click tbs_util.exe.
This starts MetaSolv Solution Utilities.
-
When the logon window appears, log on as ASAP.
-
In MetaSolv Solution Utilities, click DBHealth on the toolbar, then click the Compile Invalid Objects tab and click Execute.
This recompiles any invalid procedures. If invalid procedures remain, click Execute again.
-
Select any of the tabs in the following list that have a value greater than zero and click the Execute button.
-
Grant Privileges
-
Create Public Synonyms
-
Enable Disabled Objects
Note:
It is not necessary to recompile the Analyze Statistics tab at this time.
-
-
Exit DBHealth.
Setting Up to View Reports in PDF Format
To ensure you can view MSS reports that appear in Adobe Acrobat's PDF format, complete the following actions.
-
Make sure you have Adobe Acrobat Reader 8.1.2 or higher installed. If you have an older version, uninstall it. Then download and install Acrobat Reader 8.1.2 or higher from the Adobe Web site at:
http://www.adobe.com -
Make Acrobat Reader a helper application to Microsoft Internet Explorer.
To make Adobe Acrobat Reader a helper application:
-
Open Adobe Acrobat Reader.
-
On the menu bar, select Edit, then select Preferences.
The Preferences window appears.

-
In the selection pane on the left, select Internet.
-
Deselect the Display PDF in Browser check box.
-
Click OK.
Note:
Make sure that you view the PDF with the zoom option set at 100 percent. Viewing a design report at a size below 100 percent can cause the text and grid lines on the report to touch, reducing readability.
Enabling Equipment Visualization
To use the equipment visualization feature, you must install Adobe Flash Player 10.0 or higher on the Citrix server or client machines, depending on your network configuration. To ensure you can view equipment graphically, complete one of the following actions:
-
Install Flash Player on the Citrix server by downloading it from the Adobe Web site at:
-
Install Flash Player on each client machine that will access the equipment visualization feature by downloading it from the Adobe Web site at:
-
If you do not use a Citrix server and did not install Flash Player on a client machine, a message is displayed that prompts you to install it when you attempt to access a graphical view of your equipment for the first time. Click Install to proceed with the installation.
User Authentication
User authentication is the process that allows a user to log on and use MSS. For user authentication, MSS uses an external security provider to validate the user ID and password. MSS can support a variety of security providers. MSS system administrators must decide which security provider to use to validate users. The options available include authentication by:
-
Oracle Database
-
Oracle WebLogic Server
-
A third-party software solution
Oracle Database Authentication
Oracle software provides the default user authentication.When Oracle database is used for user authentication, the user ID and password are validated using a standard SQL connect. The database performs the lookup to determine if the user ID is valid and returns the result to MSS. If the lookup is successful, the user is allowed to enter the system. If the lookup is not successful, the user receives an error message.
No changes are required to the default installation of MSS or Oracle WebLogic Server to use Oracle database authentication.
Oracle WebLogic Authentication
Oracle WebLogic Server provides an internal LDAP server and the ability to connect to other external providers such as Microsoft's Active Directory or another LDAP server. This authentication method has the advantage of being able to provide a common user ID and password for MSS as well as other applications.
The Oracle WebLogic Server authentication option requires an authentication provider. The default choice is the internal Oracle LDAP database. However, Oracle WebLogic Server also supports Microsoft Active Directory, Open LDAP providers, IPlanet, and Novell. Refer to the Oracle WebLogic Server security documentation for a description of capabilities for each of these providers. Oracle WebLogic Server documentation can be found on the following Web site:
http://docs.oracle.com/cd/E12840_01/wls/docs103/sitemap.html
To enable Oracle WebLogic Server authentication, configuration changes must be made to the base MSS installation. MSS uses the JEE JAAS authentication standard to connect to Oracle WebLogic. The changes that are outlined here enable the Java VM to load the correct classes. After you complete the changes, restart the server for the changes to take effect.
To enable Oracle WebLogic Server authentication:
-
Locate the JRE Security folder included in the JAVA_Home directory.
Default paths:
ForUNIX/Linux: JAVA_Home/jre/lib/security
For Windows: JAVA_Home\jre\lib\security
-
Using any text editor, edit the text file called mss_jaas.config in the Security directory.
This file creates a pointer to the class that accesses Oracle WebLogic Server for security functions. The file needs to have the exact contents defined below and it must appear with the text between the braces on one line.
MSS { weblogic.security.auth.login.UsernamePasswordLoginModule required debug=false; }; -
Edit the java.security file to enable the external security call. Uncomment the following line:
login.config.url.1=file:${java.home}/lib/security/mss_jaas.config. -
Configure the Oracle WebLogic Server security realm.
During this step, you must choose the Oracle WebLogic Server authentication mechanism. You have the choice of several providers distributed with the Oracle WebLogic Server software, or you can define a custom application and integrate it into the Oracle WebLogic Server installation. Refer to the Oracle WebLogic Server documentation for steps on how to accomplish this configuration.
-
Restart the server.
After the restart is completed, the MSS logon will use the Oracle WebLogic Server security configuration defined in step 4. There are several considerations for using this type of security:
-
Creating a user is a two-step process.
First, users must be added to the external security system so that authentication can be performed during the logon procedure. Refer to the Oracle WebLogic Server documentation on how to add users to the system.
Next, users must be added to the MSS security tables. This step enables the permission functionality so that portions of the application, even individual screens, can be secured internally if necessary. See MetaSolv Solution System Administrator's Guide for more information.
-
Oracle WebLogic Server security system users cannot be created from the MSS security window. This window only creates MSS users; it does not enable user logon.
-
User IDs are limited to eight characters.
-
Passwords are limited to 30 characters.
-
The applications that connect to the database directly and do not use the application server cannot use this authentication method. These applications, which must continue to use the Oracle database authentication method, include the Location and Routing Gateway, MetaSolv Solution Utilities, and the NPA Split Utility.
-
Group functionality is different in MSS and the external provider software, and groups are not kept in sync by the software. This task must be completed manually.
Third-party Authentication
The final alternative for user authentication is to use a third-party authentication software package. This option lets you use an enterprise security package and bypass the Oracle WebLogic Server for authentication. One reason for bypassing the Oracle WebLogic Server is that it does not directly support a security provider and you may not prefer to extend Oracle WebLogic Server to add an additional security package.
MSS allows this option because it has enabled JAAS. This is the same architecture used to enable Oracle WebLogic Server authentication. The only requirement to enable a third-party authentication provider is that the provider must have a JAAS logon module (that conforms to the Java 1.6 specification), or you must develop one. If the provider has a JAAS logon module, skip to the configuration section.
Developing a JAAS Logon Module
This section provides an overview of the steps required to develop a JAAS logon module. It is not a comprehensive guide. You will need to review Oracle's information about JAAS that can be accessed from java.sun.com, and you will have to review your security provider's documentation on how to provide for authentication.
The only class that needs to be developed is a logon module class. This class gets called from MSS on logon. The class must implement the LoginModule. Inside the class you develop several methods. The key method is the logon method. This method gets called on each logon. Inside this method you get the userid and password from the callback object, verify the information, and return a success or failure message. The following is a code fragment from the logon method of a sample JAAS logon module. It simply gets the userid and password and compares it to a static string of TESTUSER/TESTPASS. If it matches, it returns true.
NameCallback name = new NameCallback("name");
PasswordCallback pwd = new PasswordCallback("Password",false);
Callback[] calls = new Callback[2];
calls[0] = name;
calls[1] = pwd;
try {
callbackHandler.handle(calls);
} catch (Exception e) {
System.out.print(e);
}
boolean isSuccess = false;
String userId, password;
userId = name.getName();
password = String.valueOf(pwd.getPassword());

// verify the username/password

if (userId.equals("TESTUSER"))
 isSuccess = true;
if (isSuccess  &&
 password.equals("TESTPASS"))
{
// authentication succeeded!!!
isSuccess = true;
} else
   isSuccess = false;

      return isSuccess;
Configuring a JAAS Logon Module
If you are using a third-party JAAS logon module or a logon module you developed, you must configure the application server to use that module.
To configure a JAAS logon module:
-
Edit the startMSLVServer script file located in the domain directory.
To do this, copy one of the POST_CLASSPATH lines and add your jar file to the line.
Note:
This file gets overlayed with each service pack. Therefore, this change needs to be re-applied to the startMSLVServer script after each service pack. -
Navigate to the JAVA_Home directory and locate the jre/security directory.
Default paths:
For UNIX/Linux: JAVA_Home/jre/lib/security
For Windows: JAVA_Home\jre\lib\security
-
Using any text editor, edit the text file called mss_jaas.config in the security folder.
This file creates a pointer to the class that accesses the third-party security software. The file needs to have the package name of the third-party security class, and it must appear with the text between the braces on one line. Here is an example:
MSS { Sample.module.SampleJAASLoginModule required debug=false; }; -
Edit the java.security file, located in the jre/lib/security folder, using any text editor and uncomment the following line:
login.config.url.1=file:${java.home}/lib/security/mss_jaas.config.This allows the Java runtime to find mss_jaas.config.
-
Configure the third-party security software.
Refer to the security software documentation for steps on how to accomplish this configuration.
-
Restart the server.
After the restart is completed, the MSS logon authentication uses the third-party security software. See the following considerations for using a third-party solution:
-
Creating the user is a two-step process.
First, users must be added to the external security system so that authentication can be performed during the logon procedure. Refer to your third-party security system documentation on how to add users to the system.
Next, users must be added to the MSS security tables. This step enables permission functionality so that portions of the application, even individual screens, can be secured internally if necessary. See MetaSolv Solution System Administrator's Guide for more information.
-
Third-party security system users cannot be created from the MSS security window. This window creates only MSS users; it does not enable user logon.
-
User IDs are limited to eight characters.
-
Passwords are limited to 30 characters.
-
The applications that connect to the database directly and do not use the application server cannot use this authentication method. These applications, which must continue to use the Oracle authentication method, include: the Location and Routing Gateway, MetaSolv Solution Utilities, and the NPA Split Utility.
-
Group functionality is different in MSS and the external provider software, and groups are not kept in sync by the software. This task must be completed manually.
Encrypting Network Traffic
MSS uses HTTPS to encrypt network traffic between the client and the application server; however, by default, MSS uses HTTP for client-to-server communication. To enable HTTPS for network encryption, you must change the standard installation.
The following steps apply only to applications that use the application server for its services. The applications that connect directly to the database can not use HTTPS.
To encrypt network traffic:
-
Obtain an SSL certificate.
Typically you get this from a provider like Verisign. The provider requires a CSR to be generated from the application server. To generate the CSR, navigate to the URL:
https://<hostname:sslport>/certificateSee the Oracle WebLogic Server documentation for more information about the certificate application.
-
Configure the application server to enable HTTPS.
Use the management console to complete the configuration. Refer to the Oracle WebLogic Server documentation and documentation from the certificate provider for details on how to complete this step. After the configuration is complete, restart the server.
-
Test the configuration by navigating to the MSS start page.
The URL for the page is:
https://<hostname:sslport>/mainThe page should render without any warning dialog boxes from Internet Explorer. These warnings prevent the application from working with HTTPS.
-
To start or stop the administration server and managed servers (in a cluster environment) using the SSL port, you must add an s after http in the ADMIN_URL argument in the startup/stop server scripts for the administration server and for each managed server. For example:
https://host_name:admin_sslport
-
Change the gateway.ini file for the application and distribute the changes to each client using ZAC or another distribution method.
Under the JNDI heading, edit the URL parameter by changing:
-
HTTP to HTTPS
-
The port number to the SSL port number you configured
-
-
Configure the browser on the client workstation to allow mixed content to be displayed.
-
Start Microsoft Internet Explorer.
-
On the Tools menu, click Internet Options.
The Internet Options window appears.
-
On the Security tab, click Custom Level.
-
For the Display mixed content option, click Enable.
If this option is disabled, the application does not work. If you set the option to Prompt, the user will be prompted with each page.
-
Adding Your Company Logo to the MSS My Desktop and Forms
You can add your company logo to the MSS interface as shown in Figure 8-1.
Figure 8-1 Location of Customized Company Logo in the MSS Interface
Description of "Figure 8-1 Location of Customized Company Logo in the MSS Interface"
The logo has the following requirements:
-
Size: Width = 100 pixels Height = 25 pixels
-
File name: imgCompanyLogo.jpg
To add your logo to My Desktop:
-
Locate a directory named images in the MSLV_Home/DOMAIN_NAME/logo directory.
-
Copy the company logo file with the required name (imgCompanyLogo.jpg) into the directory.
The image stored in this directory under the file name given appears in the Company Logo field on the My Desktop page and on the Start page for MSS users.
The following option is available if you installed MSS as a full installation. If you used the upgrade option, rather than a full installation, this option is not available.
To add your logo to MSS forms:
-
On the Navigation Bar, select Application Setup, and then Preferences.
The Preferences window appears.
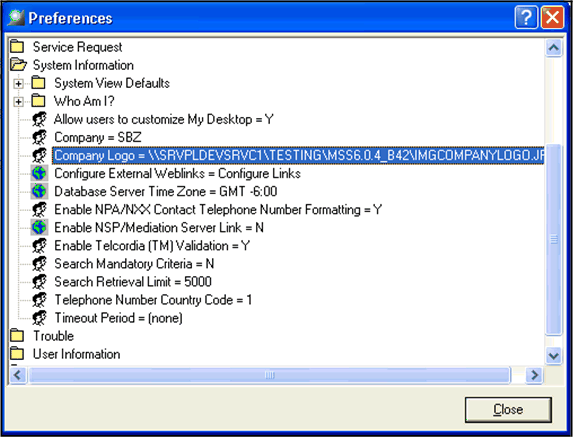
-
Expand the System Information folder.
-
Double-click Company Logo and type the path for the bitmap logo into the Company Logo field of the window that appears.
The default is None. If you leave the default, your company logo does not appear on forms such as orders or DLRs.
-
Click OK.
-
Click Close to close the Preferences window.
What to Do Next to Secure MSS
You must implement MSS security for individual users and groups of users. You can secure portions of the user interface to specific users to prevent unintended changes. This is especially useful if users only work in a portion of the application like ordering or connection design. See MetaSolv Solution System Administrator's Guide for complete information on setting up security for MSS.