| Oracle® Fusion Middleware Portlet Development Guide for Oracle WebLogic Portal 10g Release 3 (10.3.6) Part Number E14244-06 |
|
|
View PDF |
| Oracle® Fusion Middleware Portlet Development Guide for Oracle WebLogic Portal 10g Release 3 (10.3.6) Part Number E14244-06 |
|
|
View PDF |
This chapter describes the most common ways to create portlets, including the Portlet Wizard and the use of out-of-the-box portlets. This chapter also contains instructions for building each type of portlet that is supported by WebLogic Portal.
Before you begin, be sure you are familiar with the concepts associated with creating portlets, as described in Chapter 4, "Understanding Portlet Development."
This chapter contains the following sections:
The following portlet types are supported by WebLogic Portal:
Java Server Faces (JSF) Portlets – JSF portlets produced using WebLogic Portal conform to the JSR 127 specification.
Java Server Page (JSP) and HTML Portlets – JSP portlets and HTML portlets point to JSP or HTML files for their content.
Java Portlets (JSR 286) – Java portlets produced using WebLogic Portal can be used universally by any vendor's application server container that supports JSR 286.
Browser (URL) Portlets – Browser portlets display HTML content from an external URL; no development tasks are required to implement them.
Clipper Portlets – A clipper portlet is a portlet that renders content from another web site. A clipper portlet can include all or a subset of another web site's content using a process called "web clipping." Clipper portlets are discussed in Chapter 7, "Creating Clipper Portlets."
Remote Portlets – WebLogic Portal's remote portlets conform to the WSRP standard; they can be hosted within a producer application, and surfaced in a consumer application.
Java Page Flow Portlets – Java page flow portlets use Apache Beehive page flows to retrieve their content. Page Flows are a feature of Apache Beehive, which is an optional framework that you can integrate with WLP. See "Apache Beehive and Apache Struts Supported Configurations" in the Oracle Fusion Middleware Portal Development Guide for Oracle WebLogic Portal.
Struts Portlets – Struts portlets are based on the Struts framework, which is an implementation of the Model-View-Controller (MVC) architecture. Apache Struts is an optional framework that you can integrate with WLP. See "Apache Beehive and Apache Struts Supported Configurations" in the Oracle Fusion Middleware Portal Development Guide for Oracle WebLogic Portal.
For a detailed discussion of each portlet type, refer to Chapter 3, "Portlet Types."
Note:
WLP supports Apache Portals Bridges. For more information, see Section 4.6, "Support for Apache Portals Bridges."
You can copy portlets or other resources from a J2EE Shared Library into your portal application and modify them as needed. A portlet existing in your project will supersede a portlet of the same name in a J2EE Shared Library. To see a list of available portlets, you can use the Merged Projects View of the workbench; resources contained in J2EE Shared Libraries are shown in italic print. You can expand the tree to see the resources that are stored in the various modules. For a reference list of all the J2EE Libraries and their locations on your file system, you can select Window > Preferences > WebLogic > J2EE Libraries.
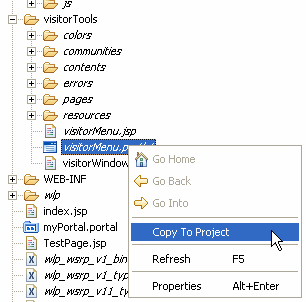
After you locate a portlet that you want to use, you can right-click the portlet in the Merged Projects View and select the Copy to Project option. Figure 5-1 shows an example of a J2EE Shared Library portlet in the Merged Projects view with the Copy to Project option selected.
Caution:
Copying and modifying resources from installed J2EE Shared Libraries can present a problem if you upgrade WLP or install a patch in the future. For example, you might have to perform manual steps to incorporate product changes that affect those resources. For future upgrades and patch installations, WLP cannot fully support configurations where J2EE library resources have been copied to the project and modified.
Figure 5-1 Portlet Being Copied to a Project from Merged Projects View
For more information about J2EE Shared Libraries, refer to the Oracle Fusion Middleware Portal Development Guide for Oracle WebLogic Portal.
An important tool that you can use to create portlets from scratch is the WebLogic Portal Portlet Wizard. The following sections describe the Portlet Wizard in detail:
In general, you choose the portlet type on the first dialog of the wizard; when generating a portlet based on an existing resource, the Portlet Wizard automatically detects the portlet type whenever possible.
This section provides an overview of the two methods you can use to begin creating a portlet—creating the portlet resource information/file first or creating the portlet itself first.
You might already have a JSP file, for example, that you want to use as the basis for a portlet. (In addition to JSP files, you can drag other resources onto the portal (such as content selectors) to automatically start the portlet wizard.)
If you have an existing resource that you want to use as the basis of a portlet, follow these steps:
Create or open a portal's .portal file in Oracle Enterprise Pack for Eclipse.
Drag the resource, such as a JSP file, into one of the portal's placeholder areas in the design view in the editor.
Oracle Enterprise Pack for Eclipse prompts you with a dialog similar to the example in Figure 5-2.
Figure 5-2 Portlet Wizard Prompt Following Drag and Drop of a Resource

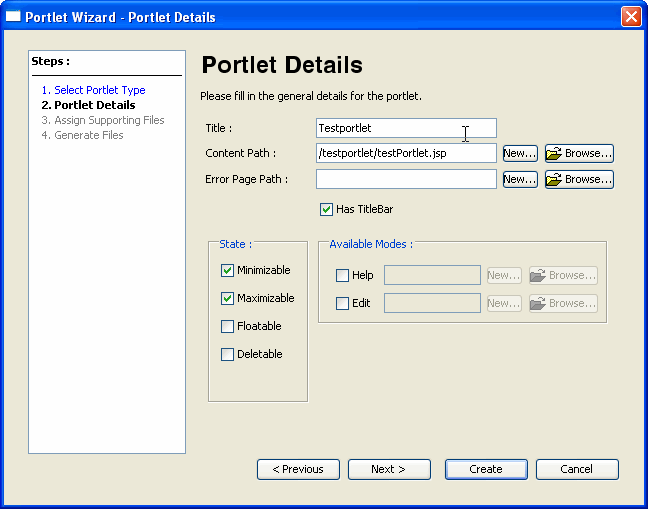
If you click Yes, the Portlet Wizard uses information from the resource file to begin the process of creating a portlet, and displays the Portlet Details dialog. Figure 5-3 shows an example:
Figure 5-3 Example Portlet Wizard Details Dialog Following Drag and Drop of a Resource
If you do not have an existing source file to start with, you can create the portlet using the New Portlet dialog and the Portlet Wizard. To do so, right-click a folder in your portal web project and select New > Portlet. Figure 5-4 shows an example of the New Portlet dialog.
Figure 5-4 Portlet Wizard New File Dialog
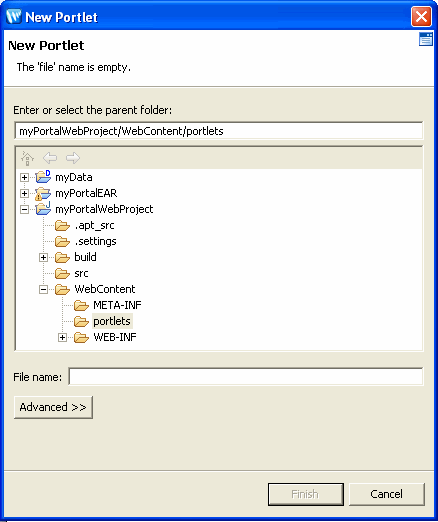
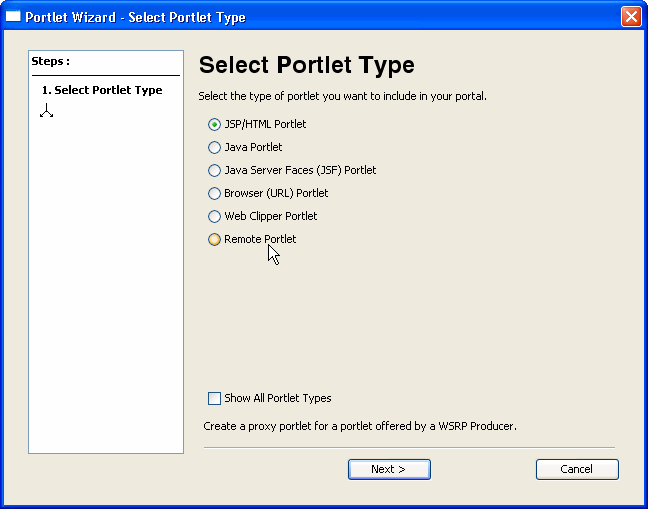
After you confirm or change the parent folder, name the portlet, and click Finish, the Portlet Wizard begins and displays the Select Portlet Type dialog. Figure 5-5 shows an example dialog.
Detailed instructions for creating each type of portlet are contained in Section 5.4, "How to Build Each Type of Portlet."
Figure 5-5 Portlet Wizard - Select Portlet Type Dialog
Oracle Enterprise Pack for Eclipse invokes the Portlet Wizard any time you perform one of these operations:
Select File > New > Portlet from Oracle Enterprise Pack for Eclipse's top-level menu, or right-click a folder in your web application, and select New > Portlet. After you name the portlet and click Next, the Portlet Wizard starts.
Drag and drop a resource such as a JSP from the Package Explorer view onto a placeholder area of an open portal (in other words, a portal_name.portal file is open in the editor view of the workbench.) Oracle Enterprise Pack for Eclipse prompts you with a dialog similar to the example in Figure 5-6.
Figure 5-6 Portlet Wizard Prompt Following Drag and Drop of a Resource

If you click Yes, the Portlet Wizard uses information from the resource file to begin the process of creating a portlet.
Right-click an existing resource such as a JSP file, a portal placeholder, or a portal content selector; then select Generate Portlet from the context menu. The Portlet Wizard displays the Portlet Details dialog. Figure 5-7 shows an example of a dialog after right-clicking a JSP file.
Figure 5-7 Portlet Wizard - Portlet Details Example for JSP Resource

When you use File > New > Portlet to create a new portlet, a New Portlet dialog displays before the Portlet Wizard begins. Figure 5-4 shows an example of the New Portlet dialog.
The parent folder defaults to the location from which you selected to add the portlet.
This dialog requires that you select a project and directory for the new portlet, and provide a portlet file name. (The file name appears in the Package Explorer view after you create the portlet.) The Next button is initially disabled; the button enables when you select a valid project/directory and portlet name. If you select an invalid portal project in the folder tree on this dialog, an error message appears in the status area near the top of the dialog explaining that the project is not a valid portal project. You cannot continue until you have selected a valid project (if one is available).
Note:
With WebLogic Portal Version 9.2 and later versions, the option to convert a non-portal project to a portal project is not offered. For information on how to integrate portal J2EE Shared Libraries into an already existing project, see the Oracle Fusion Middleware Portal Development Guide for Oracle WebLogic Portal.
When the Portlet Wizard starts, it determines the valid portlet types to offer on the Select Portlet Type dialog, based on the type of project that you are working in.
For example, if you are working within a Portal Web Project that has only the WSRP-Producer and Portal Framework Struts facets installed, it does not have the full set of portal libraries. In this case, only the Struts portlet type is available a valid selection; the other portlet types are not included in the Select Portlet Type dialog. If you were to install the optional Apache Beehive facets, then the Java Page Flow portlet option would appear.
If no valid portlet types exist based on the project type, an informational message displays.
Figure 5-8 shows the default configuration of the Select Portlet Type dialog (assuming the default WebLogic Portal facets are installed in the web project).
Figure 5-8 Portlet Wizard - Select Portlet Type Dialog

The Show All Portlet Types option forces all portlet types to appear in the Select Portlet Type dialog even if their modules were not installed. For information on installing the optional Page Flow and/or Struts support, see "Apache Beehive and Apache Struts Supported Configurations" in the Oracle Fusion Middleware Portal Development Guide for Oracle WebLogic Portal.
Caution:
If you create and publish portlets that require modules that have not been properly installed, unexpected behavior and server runtime errors can occur.
The Portlet Details dialogs that display after you select a portlet type vary according to the type of portlet you are creating. The portlet-building tasks that are described in Section 5.4, "How to Build Each Type of Portlet" contain detailed information about each data entry field of the portlet details dialogs.
The following sections describe how to create each type of portlet supported by WebLogic Portal:
JSP portlets are very similar to simple JSP files. In most cases you can use existing JSP files to build portlets from them. JSP portlets are recommended when the portlet is simple and doesn't require the implementation of complex business logic. Also, JSP portlets are ideally suited for single page portlets.
There are several ways to invoke the Portlet Wizard, as explained in the section Section 5.3.2, "Starting the Portlet Wizard." This description assumes that you create a portlet based on an existing JSP file.
To create a JSP portlet, follow these steps:
Right-click a JSP file and select Generate Portlet from the menu.
The Portlet Wizard displays the Portlet Details dialog; Figure 5-9 shows an example.
Figure 5-9 Portlet Wizard - JSP Portlet Details Dialog

Specify the values you want for this portlet, following the guidelines shown in Table 5-1.
Table 5-1 Portlet Wizard - JSP Portlet Data Entry Fields
| Field | Description |
|---|---|
|
Title |
The value for the Title might already be filled in.You can change the value if you wish. |
|
Content Path |
The value for the Content URI (location of the JSP) is probably already filled in. You can change this value if you wish either by entering the path to a JSP or browsing to it. You can also create a new JSP on the fly either by entering a name in the field or by choosing the New button. |
|
Error Page Path |
To designate a default error page to appear in case of an error, indicate the path to the desired URI. You can also create a new error JSP on the fly either by entering a name in the field or by choosing the New button. |
|
Has Titlebar |
If you want your portlet to have a title bar, check this box. The displayed title matches the value in the Title field. In order for a portlet to have changeable states or modes, the portlet must have a title bar. See also Section 9.5, "Portlet Appearance and Features." |
|
State |
Select the desired check boxes to allow the user to minimize, maximize, float, or delete the portlet. For a more detailed description of portlet states, refer to Section 9.5.5, "Portlet States." |
|
Available Modes |
The basic modes are Help and Edit. You can enable access to Help from the portlet or you can allow the user to edit the portlet. To enable an option, select the desired check box and provide the path to the JSP page that will provide the appropriate function. You can either browse to an existing file or click New to create a new JSP. For a more detailed description of portlet modes, refer to Section 9.5.2, "Portlet Modes." |
Click Create to create the portlet, or click Next to assign supporting files. For more information on assigning supporting files see Section 5.5, "Assigning Supporting Files."
The Oracle Enterprise Pack for Eclipse window updates, adding the Portlet_Name.portlet file to the display tree; by default, Oracle Enterprise Pack for Eclipse places the portlet file in the same directory as the content file.
As a portlet developer, it is important to know which version of JSF your web application is configured to use: JSF 1.2 (the default for WLP 10.3.6) or JSF 1.1. The JSF version determines the underlying technology used for the JSF portlet, and it also affects how you develop your portlet.
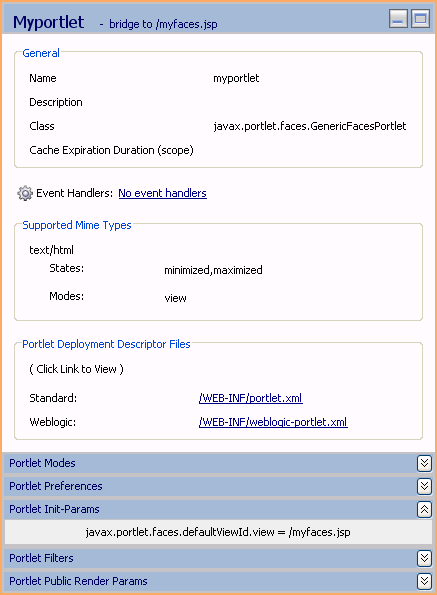
By default, WLP web applications are configured to use Java Server Faces (JSF) 1.2. In this case, the IDE uses the Java 2.0 Portlet (JSR-286) with the JSR-329 Faces Portlet Bridge. This bridge allows the JSF portlet to operate within a JSR-286 compliant portlet container. The resulting portlet is a standard Java 2.0 portlet (JSR-286). The portlet includes all of the JSR-286 portlet features and properties. The Faces front page is referenced by the portlet <init-param> property. This Java portlet also uses the GenericFacesPortlet class, which is the standard Java base class for Faces portlets. The portlet editor indicates that this JSR- 286 portlet is a JSF portlet by placing bridge to <faces home page JSP> in the title bar. For an in-depth discussion, see Chapter 8, "Working With JSF-Java Portlets." For more information on Java portlets and their capabilities, see Chapter 6, "Building Java Portlets."
If your portal web application is configured to use JSF 1.1, the non-standard or native WLP bridge for JSF portlets is used instead. If the facelet facet is installed, the default behavior changes to always use the native WLP bridge for JSF portlets without regard to what version of JSF (1.1 or 1.2) is selected. The IDE uses the native WLP JSF portlet bridge and constructs a JSP-backed portlet with a <facesContent> element. This non-standard bridge is the same bridge used in previous versions of WLP. For an in-depth discussion on these types of portlets, Chapter 8, "Working With JSF-Java Portlets.".
For an in-depth discussion of JSF portlet development including best practices, see Chapter 8, "Working With JSF-Java Portlets." For more information on Java portlets and their capabilities, see Chapter 6, "Building Java Portlets."
To create a JSF portlet, follow these steps:
Note:
The portlet creation wizard differs somewhat depending on whether you are using JSF 1.2 or 1.1. In describing the wizard in this section, these differences are highlighted.
Right-click in the Package Explorer view, within the web content directory, and select New > Portlet from the menu.
The New Portlet dialog displays. Figure 5-10 shows an example of the New Portlet dialog.
Figure 5-10 Portlet Wizard - New Portlet Dialog
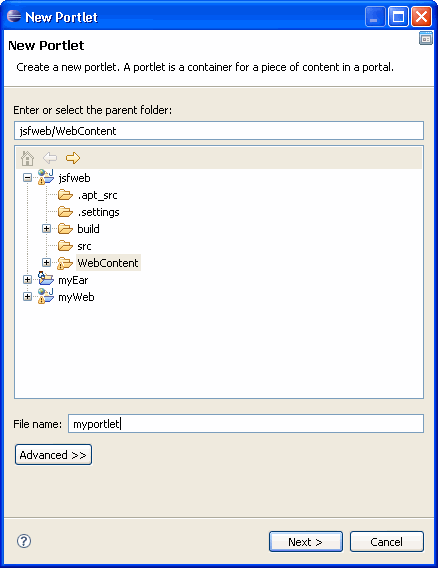
The parent folder defaults to the location from which you selected to add the portlet.
Edit the parent folder field if needed to indicate the project and directory for the new portlet.
The Next button is initially disabled; the button enables when you select a valid parent folder and portlet name. If you select an invalid portal project in the folder tree on this dialog, an error message appears in the status area near the top of the dialog explaining that the project is not a valid portal project.
Type a file name for the new portlet.
Click Next to continue.
The Portlet Wizard displays the Select Portlet Type dialog.
Select the JSF portlet option. If your web application is configured with JSF 1.2 (the default), select the Java Server Faces (JSF) Portlet option. If the web application uses JSF 1.1 or facelets, select the Java Server Faces (JSF) Content option. The wizard automatically displays the correct option depending on your JSF configuration.
The Portlet Wizard displays the Portlet Details dialog; Figure 5-11 shows an example.
Figure 5-11 Portlet Wizard - JSF Portlet Details Dialog for JSF 1.2 Configuration
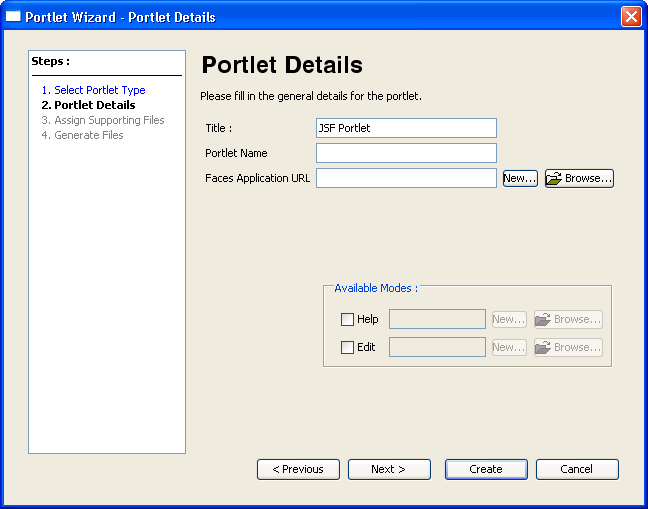
Specify the values you want for this portlet. If your web application is configured to use JSF 1.2, follow the guidelines in Table 5-2. If your web application uses JSF 1.1, follow the guidelines in Table 5-3.
Table 5-2 Portlet Wizard - JSF Portlet Data Entry Fields for a JSF 1.2 Configuration
| Field | Description |
|---|---|
|
Title |
The value for the portlet title, which displays in the title bar if enabled. |
|
Portlet Name |
A unique name for the portlet. |
|
Faces Application URL |
Enter or browse to the inital URL of the Faces Application to be portletized. This sets the javax.portlet.faces.defaultViewId.view |
|
Available Modes |
The basic modes are Help and Edit. You can enable access to Help from the portlet or you can allow the user to edit the portlet. To enable an option, select the desired check box and provide the path to the JSP page that will provide the appropriate function. You can either browse to an existing file or click New to create a new JSP. For a more detailed description of portlet modes, refer to Section 9.5.2, "Portlet Modes." |
Table 5-3 Portlet Wizard - JSF Portlet Data Entry Fields for a JSF 1.1 Configuration
| Field | Description |
|---|---|
|
Title |
The value for the portlet title, which displays in the title bar if enabled. |
|
Content Path |
Enter or browse to the front page JSP file or facelet (.xhtml) file of your Faces application. Click New to create a new Faces JSP or facelet. This file must be placed within the same web project that contains the JSF portlet. If your web application uses JSF 1.1 or the Facelet facet, follow the guidelines in Table 5-3. |
|
Error Page Path |
Note: Error pages are not supported with JSF portlets. |
|
Has Titlebar |
If you want your portlet to have a title bar, check this box. The displayed title matches the value in the Title field. In order for a portlet to have changeable states or modes, the portlet must have a title bar. |
|
State |
Select the desired check boxes to allow the user to minimize, maximize, float, or delete the portlet. For a more detailed description of portlet states, refer to Section 9.5.5, "Portlet States." |
|
Available Modes |
You can enable access to Help from the portlet or you can allow the user to edit the portlet. To enable an option, select the desired check box and provide the path to the file that will provide the appropriate function. For a more detailed description of portlet modes, refer to Section 9.5.2, "Portlet Modes." |
Click Create, or click Next to assign supporting files. For more information on assigning supporting files Section 5.5, "Assigning Supporting Files."
The Oracle Enterprise Pack for Eclipse window updates, adding the Portlet_Name.portlet file to the display tree. The portlet automatically opens in the portlet editor. Figure 5-12 shows the portlet editor for a portlet that is configured for JSF 1.2. The portlet shown is a Java 2.0 portlet that uses the JSF 329 bridge.
Figure 5-12 Portlet Editor for a JSF 1.2 Configuration Portlet
Java portlets are based on the JSR 286 specification that establishes rules for portlet portability. Java portlets are intended for software companies and other enterprises that are concerned with portability across multiple portlet containers.
For detailed information on creating and configuring Java portlets for WLP, see Chapter 6, "Building Java Portlets."
Browser portlets, also called Content URI portlets, are basically HTML portlets that use URLs to retrieve their content. Unlike other portlet types that are limited to displaying data contained within the portal project, browser portlets can display URL content that is outside from the portal project.
Tip:
A clipper portlet also lets you include remote web content in a portal page. For information on clipper portlets and how they differ from browser portlets, see Chapter 7, "Creating Clipper Portlets."
There are several ways to invoke the Portlet Wizard, as explained in the section Section 5.3.2, "Starting the Portlet Wizard." This description assumes that you right-click in the Package Explorer view tree within a portal project and select New > Portlet from the menu.
To create a browser portlet, follow these steps:
Right-click in the Navigation tree within a portal project and select New > Portlet from the menu.
The New Portlet dialog displays. Figure 5-13 shows an example of the New Portlet dialog.
Figure 5-13 Portlet Wizard - New Portlet Dialog

The parent folder defaults to the location from which you selected to add the portlet.
Edit the parent folder field if needed to indicate the project and directory for the new portlet.
The Finish button is initially disabled; the button enables when you select a valid parent folder and portlet name. If you select an invalid portal project in the folder tree on this dialog, an error message appears in the status area near the top of the dialog explaining that the project is not a valid portal project.
Type a file name for the new portlet.
Click Finish to continue.
The Portlet Wizard displays the Select Portlet Type dialog.
Click Browser (URL) Portlet and then click Next.
The Portlet Wizard displays the Portlet Details dialog; Figure 5-14 shows an example.
Figure 5-14 Portlet Wizard - Browser Portlet Details Dialog
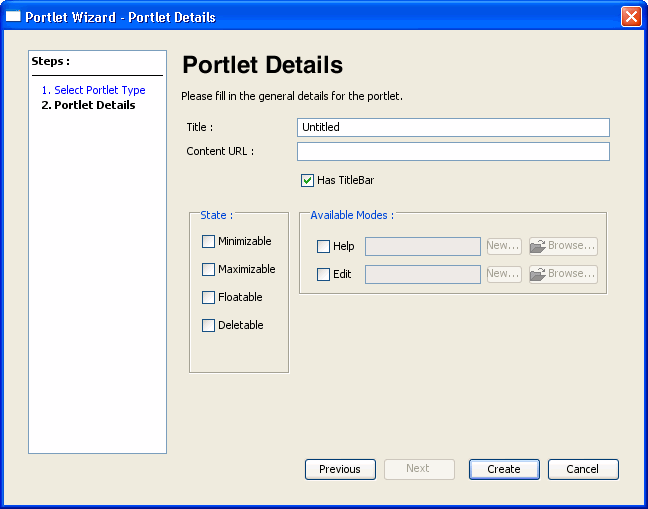
Specify the values you want for this portlet, following the guidelines shown in Table 5-4.
Table 5-4 Portlet Wizard - Browser Portlet Data Entry Fields
| Field | Description |
|---|---|
|
Title |
The title for the portlet. This value appears in the title bar of the portlet in the editor view of the Oracle Enterprise Pack for Eclipse workbench. |
|
Content URL |
The value for the Content URL (external URL) that the portlet should use to retrieve its information. A validator checks the format of the URL that you enter, and a message notifies you if the URL is not properly formatted. You can either change the URL or ignore the warning and continue with the URL as is. |
|
Has Titlebar |
If you want your portlet to have a title bar, check this box. The displayed title matches the value in the Title field. In order for a portlet to have changeable states or modes, the portlet must have a title bar. |
|
State |
Select the desired check boxes to allow the user to minimize, maximize, float, or delete the portlet. For a more detailed description of portlet states, refer to Section 9.5.5, "Portlet States." |
|
Available Modes |
The basic modes are Help and Edit. You can enable access to Help from the portlet or you can allow the user to edit the portlet. To enable an option, select the desired check box and provide the path to the JSP page that will provide the appropriate function. You can either browse to an existing file or click New to create a new JSP. For a more detailed description of portlet modes, refer to Section 9.5.2, "Portlet Modes." |
Click Create.
The Oracle Enterprise Pack for Eclipse window updates, adding the Portlet_Name.portlet file to the display tree; by default, Oracle Enterprise Pack for Eclipse places the portlet file in the same directory as the content file.
Note:
The internal implementation of Browser portlets depends on asynchronous portlet content rendering; because of this, the portlet attribute Async Content that is displayed in the Properties view is set to none and is read-only. For more information about asynchronous content rendering, refer to Section 10.5, "Asynchronous Portlet Content Rendering."
A clipper portlet is a portlet that renders content from another web site. A clipper portlet can include all or a subset of another web site's content using a process called "web clipping." Clipper portlets are discussed in Chapter 7, "Creating Clipper Portlets."
Note:
Apache Struts is an optional framework that you can integrate with WLP. See "Apache Beehive and Apache Struts Supported Configurations" in the Oracle Fusion Middleware Portal Development Guide for Oracle WebLogic Portal.
Use the Portlet Wizard to generate a portlet based on a Struts module, as explained in this section.
Before you can create a Struts portlet, you must first integrate your existing Struts application into your portal web application. For detailed information on integrating Struts applications into WebLogic Portal, see "Integrating Existing Web Applications into WebLogic Portal" in the Oracle Fusion Middleware Portal Development Guide for Oracle WebLogic Portal.
Tip:
It is highly recommended that you fully develop and test a Struts application before attempting to host it within a portal. This helps to separate the complexities of developing a working Struts application from the additional issues involved in putting the Struts application into a portlet.
To create a Struts portlet, follow these steps:
Right-click the Struts application module's XML configuration file located in the WEB-INF directory of the portal web application.
Select Generate Portlet from the menu. The wizard automatically collects and displays the module path and configuration file name(s) in the Struts Config File dialog. An example is shown in Figure 5-15. Use the Browse and Add buttons to locate and add additional configuration files, if applicable.
Click Next.
In the Struts Actions dialog, specify an action for the Struts portlet. The actions that appear in the drop-down menu are based on entries in the configuration file(s) that were added previously.
Click Create.
The Oracle Enterprise Pack for Eclipse window updates, adding the Portlet_Name.portlet file to the display tree; by default, Oracle Enterprise Pack for Eclipse places the portlet file in the directory that you specified in the Struts Module Path dialog of the wizard.
Configuring Multi-Part Form Data Support for a Struts Portlet
You can configure your Struts portlet to handle a multi-part struts action form after a server request has been posted.
Before you can create a Struts portlet, you must first integrate your existing Struts application into your portal web application. For detailed information about integrating Struts applications into WebLogic Portal, see "Integrating Existing Web Applications into WebLogic Portal" in the Oracle Fusion Middleware Portal Development Guide for Oracle WebLogic Portal.
To add the multi-part form data support to a struts portlet:
In Oracle Enterprise Pack for Eclipse, in your portal web application, create a module for the Struts portlet, as described earlier in this section.
In your portal web application, create a JSP page that contains an action form with the attribute enctype= "multipart/form-data".
Open the Strut module's XML configuration file, struts-auto-config.xml, located in the WEB-INF directory of your portal web application.
Configure your struts module to point to the newly created JSP page, and save struts-auto-config.xml.
In struts-auto-config-upload.xml, add the following entries:
<controller inputForward="true" processorClass="com.bea.struts.adapter.action.AdapterRequestProcessor" multipartClass=" com.bea.struts.adapter.action.ScopedMultipartRequestHandler"/>
Save struts-auto-config-upload.xml.
To access the struts application directly, open the browser and use the following URL: http://localhost:port/struts_webapp/module.do.
Where, localhost:port are the host name and port number where WebLogic Portal is deployed, struts_webapp is the name of your portal web application containing the struts module, and module.do is the module in which you want to implement the multi-part form data support.
For example: http://localhost:7001/StrutsUploadWeb13/upload.do
Note:
If you want to run the struts portlet through WebLogic Portal, make sure your portlet points to the WebLogic Portal tag library, which is specified in the import statements at the beginning of a JSP file. If you do not use WebLogic Portal's HTML tab library, the page gets redirected outside of the portal page. As a result, the strut portlet's JSP page takes over the entire page.
Because remote portlet development is a fundamental task in a federated portlet environment, the task of creating remote portlets is described in detail within the Oracle Fusion Middleware Federated Portals Guide for Oracle WebLogic Portal.
The following types of portlets can be exposed with WSRP inside a WebLogic portal:
JavaServer Faces (JSF) portlets
JavaServer Pages (JSP) portlets
Struts portlets
Java portlets (JSR286; supported only for complex producers)
Page Flow portlets
Note:
Page Flows are a feature of Apache Beehive, which is an optional framework that you can integrate with WLP. Apache Struts is also an optional framework that you can integrate with WLP. See "Apache Beehive and Apache Struts Supported Configurations" in the Oracle Fusion Middleware Portal Development Guide for Oracle WebLogic Portal.
Note:
Page Flows are a feature of Apache Beehive, which is an optional framework that you can integrate with WLP. See "Apache Beehive and Apache Struts Supported Configurations" in the Oracle Fusion Middleware Portal Development Guide for Oracle WebLogic Portal.
Note:
Oracle recommends you choose an alternative supported Portlet type, such as JSF, over Java Page Flow / Apache Beehive technology. WLP will continue to support Page Flows and Apache Beehive, however the technology will be deprecated over time and will not see significant new enhancements.
You can edit the tag attributes manually in the JSP editor's Source tab or in the Properties view.
For information about the Apache Beehive Netui documentation, see http://beehive.apache.org/docs/1.0.2/.
For information about the Netui tags, see http://beehive.apache.org/docs/1.0.2/netui/tags/index.html.
You can use the Portlet Wizard to built a portlet that uses Apache Beehive Page Flows to retrieve its content.
To create a page flow portlet, follow these steps:
Right-click the folder where you want to store the page flow portlet. (The folder must be within the WebContent directory.)
Select New > Portlet.
The New Portlet dialog displays.
Enter a name for the portlet and click Next.
The Portlet Wizard displays the Select Portlet Type dialog.
In the Select Portlet Type page, select the Show All Portlet Types checkbox.
Select the Java Page Flow Portlet radio button and click Next.
The Portlet Wizard displays the Portlet Details dialog; Figure 5-17 shows an example.
Figure 5-17 Portlet Wizard - JPF Portlet Details Dialog
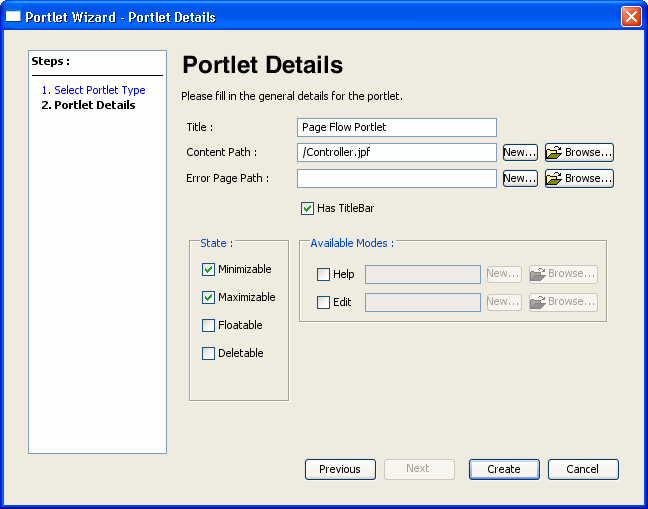
Specify the values you want for this portlet, following the guidelines shown in Table 5-5.
Table 5-5 Portlet Wizard - JPF Portlet Data Entry Fields
| Field | Description |
|---|---|
|
Title |
The title for this portlet, which displays in the title bar if you select to include one. |
|
Content Path |
The Page Flow Request URI. You can type a value here, or click the Browse button to open a class picker and select the appropriate class. If you use the class picker to choose a page flow class, this fully-qualified class name is converted to a URI path of a JPF. The JPF is referred to by the If you enter or navigate to a |
|
Error Page Path |
To designate a default error page to appear in case of an error, check the box and indicate the path to the desired URI. |
|
Has Titlebar |
If you want your portlet to have a title bar, check this box. The displayed title matches the value in the Title field. In order for a portlet to have changeable states or modes, the portlet must have a title bar. |
|
State |
Select the desired check boxes to allow the user to minimize, maximize, float, or delete the portlet. For a more detailed description of portlet states, refer to Section 9.5.5, "Portlet States." |
|
Available Modes |
The basic modes are Help and Edit. You can enable access to Help from the portlet or you can allow the user to edit the portlet. To enable an option, select the desired check box and provide the path to the JSP page that will provide the appropriate function. You can either browse to an existing file or click New to create a new JSP. For a more detailed description of portlet modes, refer to Section 9.5.2, "Portlet Modes." |
Click Create.
The Oracle Enterprise Pack for Eclipse window updates, adding the Portlet_Name.portlet file to the display tree; by default, Oracle Enterprise Pack for Eclipse places the portlet file in the same directory as the content file.
In order to fully understand the process of creating a page flow portlet, you should be familiar with the concept of Page Flows. For more information on using page flows with WebLogic Portal, refer to the Oracle Fusion Middleware Portal Development Guide for Oracle WebLogic Portal.
Some portlet types allow you to attach supporting files to the portlet. For these portlets, the Portlet Wizard provides an optional Assign Supporting Files step, shown in Figure 5-18. This step lets you add a backing file and/or a render dependencies file to your portlet.
Render dependencies allow you to specify resources, such as CSS or JavaScript, that are required for rendering a portlet in the portal page. For details on render dependencies (also called portlet dependencies), see Section 9.5.1, "Portlet Dependencies."
The Assign Supporting Files part of the Portlet Wizard lets you create a new dependency file or choose an existing one to associate with the portlet. Click New to bring up the New Dependencies File dialog, and specify a name and location for the file. Click Browse to locate an existing dependency file.
The most common means of influencing portlet behavior within the control life cycle is to use a portlet backing file. Backing files are a way for you to provide Java code that will run at different points during the portlet lifecycle. A backing file is a Java class that implements com.bea.netuix.servlets.controls.content.backing.JspBacking. For details on backing files, see Section 9.4, "Backing Files."
The Assign Supporting Files part of the Portlet Wizard lets you create a new backing file or choose an existing one to associate with the portlet. Click New to bring up the New Backing File Class dialog, and specify a source folder, package, and name for the file. Click Browse to locate an existing backing file.
In the development phase of the portal life cycle, you add portlets to a portal using the Oracle Enterprise Pack for Eclipse workbench.
Note:
A page must have a layout before you can add a portlet to it. The vertical or horizontal placement of portlets in a placeholder is determined by the selected layout for the page.
Follow these steps:
In the Package Explorer view, double-click the portal (.portal file) to which you want to add the portlet.
The portal displays in the editor.
If your portal has multiple pages, click the desired page to select it.
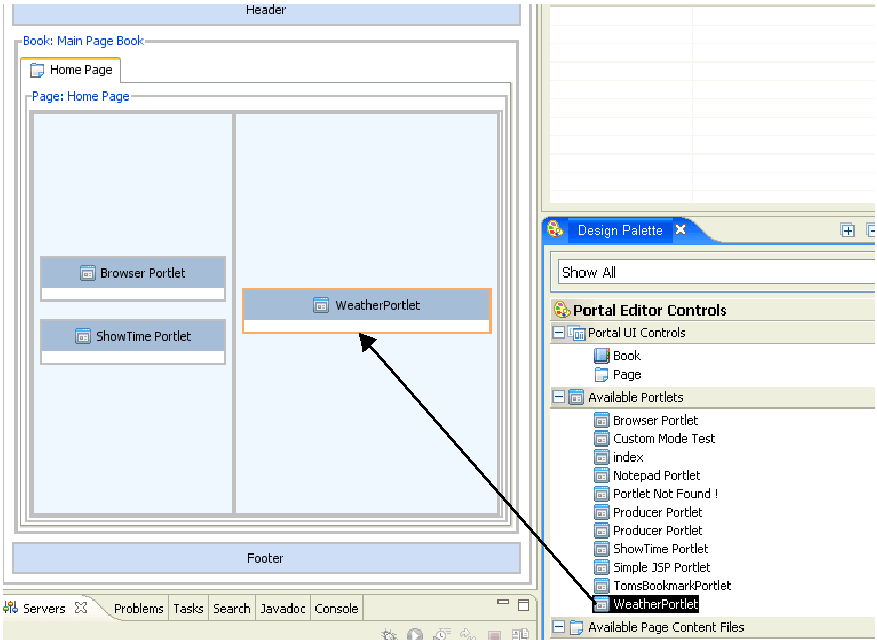
From the Design Palette view, drag the portlet (the .portlet file) onto the portal page at the desired location.
Figure 5-19 shows an example of this step.
Figure 5-19 Dragging a Portlet from the Palette onto a Portal Page in Editor View
With the portlet selected, you can use the Properties view to customize desired portlet properties.
For detailed information about portlet properties, refer to Section 9.1, "Portlet Properties."
When you add a portlet to a page in the workbench editor, a reference to that portlet is added to the .portal file. You can use the .portal file as a template for creating desktops in the WebLogic Portal Administration Console. When a portal administrator creates a desktop based on that template, the portlet is added to the portal resource library where it can be added to pages in streaming desktops. For an overview of file-based portals compared with streaming portals, refer to the Oracle Fusion Middleware Portal Development Guide for Oracle WebLogic Portal.
In the Staging phase of the portal life cycle, you use the WebLogic Portal Administration Console to configure portlets on desktops. A single portlet definition can be associated with one or more portals (desktops) by creating instances of the portlet. Each of these portlet instances can have its own "personality" and behavior as specified by a variety of different configuration options.
For details in adding a portlet to a portal desktop in the WebLogic Portal Administration Console, refer to Section 17.2.5, "Managing Portlets on Pages."
To remove a portlet from a portal without deleting the portlet from your portal web project, right-click the portlet in the Oracle Enterprise Pack for Eclipse workbench editor and click Delete.
To delete a portlet from your portal web project, right-click the portlet in the Package Explorer view and choose Delete.
To remove a portlet after you have assembled portlet instances into portal desktops using the Administration Console, refer to Section 17.2.4, "Deleting a Portlet."