Creating a Base Pay Structure Scenario
This section provides an overview of the Base Pay Structure module and discusses how to:
Assign job codes to job classes.
Create a base pay structure definition.
Build the salary grades and ranges for your base pay structure.
Build steps within a pay grade.
Assign a pay grade to each job code.
Pages Used to Create a Base Pay Structure Scenario
|
Page Name |
Definition Name |
Navigation |
Usage |
|---|---|---|---|
|
Job Class |
WA_JOBCLS_TBL |
|
Create a grouping of job codes known as a job class, which provides the basis for a pay structure. |
|
Base Pay Structure - Definition |
WA_PAYSTR1_TBL |
|
Create a base pay structure ID, associate it with a job class, and select the method to use to develop the base pay structure. |
|
Base Pay Structure - Grades |
WA_GRADE_TBL |
|
Build the grades and ranges for your base pay structure using the specified parameters. |
|
Base Pay Structure - Steps |
WA_STEP_TBL |
|
Build, view, and revise salary steps for each pay grade within the base pay structure. |
|
Grade Assignment |
WA_JOBGRADE_TBL |
|
Assign a grade to each job code within a pay structure. |
Understanding How to Create a Base Pay Structure Scenario
In the Base Pay Structure module you create base pay structures using online pages, and PeopleCode performs all of the calculations and system processing. In this module, you don't create scenarios in the same manner as you do in the other Workforce Rewards modules. There are no model or scenario definition pages to complete, and there are no Application Engine processes or jobstreams to run.
You use the Base Pay Structure tools to develop base pay structures that fit your organization's pay strategy, according to your target market rates. The basic process for creating base pay structure scenarios involves these steps:
Assign groups of job codes to a job class, by associating the job class with a node on the JOBCODE tree.
Create a pay structure definition for the job class. Use the market rates for benchmark jobs developed with the Market Compensation module, or create new ones.
Build salary grades and ranges.
Build steps within pay grades, if applicable.
For each job class, review the pay grades the system automatically assigns to benchmark jobs, and assign pay grades to the non-benchmark jobs.
Synchronizing Tables in the Base Pay Structure Module
The table behind the grid on the Job Class Definition page is WA_JOBCLS_SEQ. The table behind the grids on the Job Code / Grade Assignment, Structure Fit to Market, and Pay Structure Finalization pages is WA_JOBCLS_PAY. The data between the two tables is synchronized whenever one of the following events occurs:
You change and save data on the Job Class Definition page.
You change the effective date or job class on the Base Pay Structure Definition component.
This synchronization process works in the background, and affects the way you work with job classes in the Base Pay Structure module. Normally, if you create a job class on the Job Class Definition page and save the data, the system synchronizes the WA_JOBCLS_SEQ and WA_JOBCLS_PAY tables.
If you do not create job classes on the Job Class Definition page (and instead move the Job Class data in with Data Mover or ETL), however, you will not see any job codes on the grids based on the WA_JOBCLS_PAY table. This is because no event occurred to trigger the automatic synchronization of the two tables. That is, no job codes appear in the grids based on the WA_JOBCLS_PAY table until you open the job class on the Job Class Definition page, change something about the job class, and save the changes. This triggers the PeopleCode synchronization process.
For example, open the Job Class Definition page, change one of the job codes in the grid by selecting a value from the list of available options, change it back to what it was before, and click Save. While you have made no net changes to the job class, the page changes can still be saved, and the PeopleCode synchronization process is triggered.
Reviewing Base Pay Structures
You use the Base Pay Structure Definition component to develop, revise, and evaluate base pay structures. In the process you define the base pay structure parameters, and build the grades and steps.
Note: Base pay structures apply to regular base compensation. This is direct, fixed compensation. Variable compensation types (such as bonuses), and other compensation types (such as benefits), are addressed in the Manage Compensation module. You use the functionality in that module to adjust current pay strategies that include variable compensation or other forms of compensation.
|
Question |
Answer |
|---|---|
|
What is the difference between a salary administration plan, as used in HRMS, and a Base Pay Structure in Workforce Rewards? |
A salary administration plan consists of a plan identification code, salary grades, and steps. A Base Pay Structure includes a job class (a grouping of job codes), a salary plan ID, and salary grades and steps. |
You begin building a pay structure by creating a Pay Structure ID, associating it with a Job Class ID, and specifying pay structure parameters (such as the number of grades, high and low midpoints, and midpoint progression). Then PeopleCode processing builds the pay grades and steps, with their associated range values. The market rate midpoint values for the selected group of job codes are used as a starting point for the system calculations.
Here are some examples of how to use the Base Pay Structure Definition component to modify and test pay structures:
Provide across the board pay rate increases or cost-of-living adjustments (COLA).
Adjust pay rates for hourly or salaried workers, to better align them with your new targets.
Create special pay structures for employees working in jobs requiring key technological or management skills.
Create new pay structures for new job codes within your organization.
Job Class Page
Use the Job Class page (WA_JOBCLS_TBL) to create a grouping of job codes known as a job class, which provides the basis for a pay structure.
Image: Job Class page
This example illustrates the fields and controls on the Job Class page. You can find definitions for the fields and controls later on this page.
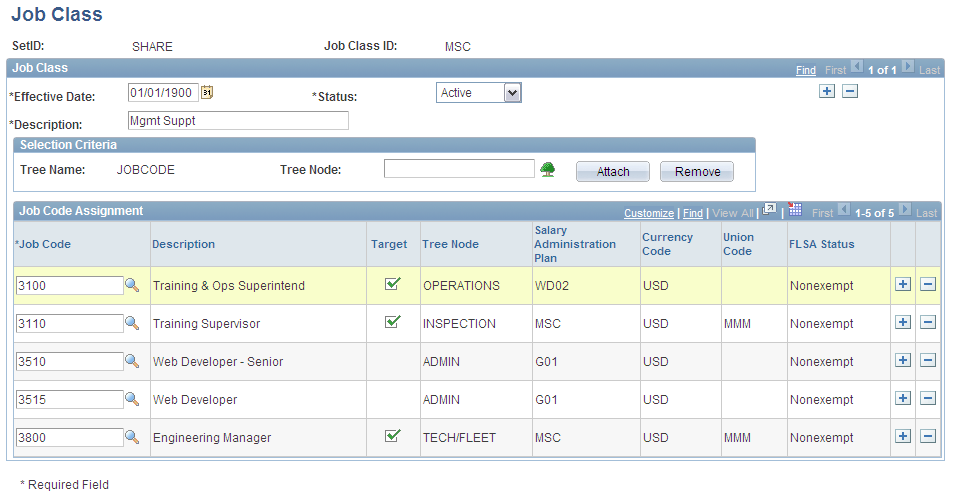
Using the Selection Criteria Group Box
| Tree Node |
Select from the prompt list to indicate which node on the JOBCODE tree you want to associate with the job class |
Using the Grid
| Attach to List |
Click this button once the grid is populated. |
| Job Code |
This field becomes editable when you click the Attach to List button. Note: The remaining fields are display-only. |
You may edit the list by:
Inserting additional rows of data (job codes).
Adding groups of job codes to the list using the Selection Criteria group box.
Removing rows of data (job codes) from the list.
In the grid the following fields display:
Base Pay Structure - Definition Page
Use the Base Pay Structure - Definition page (WA_PAYSTR1_TBL) to create a base pay structure ID, associate it with a job class, and select the method to use to develop the base pay structure.
Image: Base Pay Structure - Definition page
This example illustrates the fields and controls on the Base Pay Structure - Definition page. You can find definitions for the fields and controls later on this page.
Base Pay Structure Type
When you select any of the four options in the Base Pay Structure Type group box, you activate different combinations of fields on the Base Pay Structure - Definition page.
The following table provides a summary of the options, the fields activated on the Definition page when you select the option, and the purpose for selecting the option.
|
Base Pay Structure Type |
Fields Activated |
Purpose |
|---|---|---|
|
Use Current Pay Structure |
Salary Plan ID Rate Type Pay Months/Year Pay Hours/Year Currency Code |
This is the most frequently used option. Choose this option if you believe the pay structure currently in use is close to what you visualize for the new one, with a few changes. This enables you to copy the pay structure definition for an existing salary administration plan, and change or modify it as needed. It also enables you to use the existing grades and steps. The system calculates the minimum, midpoint, and maximum rates, the range width percentage, and the midpoint progression percentage for each grade. |
|
Define Ranges-Number of Grades |
Rate Type Pay Months/Year Pay Hours/Year Number of Grades Use Benchmarks For Range? Midpoint of Lowest Grade Midpoint of Highest Grade Midpoint Progression Type Change in Midpoint Progression (%) Range Width (%) Range Width Progression Type Change In Range Width (%) |
Choose this option if there is market data available for the job codes involved, and you know how many grades you want in the pay structure. This option enables you to input the number of grades, the midpoint of the lowest and highest grades, the range width, the midpoint progression type, and the range width type. On the Base Pay Grades page, the system calculates the minimum, midpoint, and maximum rates, the range width percentage, and the midpoint progression percentage for each grade. |
|
Define Midpoint Progression |
Rate Type Pay Months/Year Pay Hours/Year Use Benchmarks For Range? Midpoint of Lowest Grade Midpoint of Highest Grade Midpoint Progression (%) Midpoint Progression Type Change in Midpoint Progression (%) Range Width (%) Range Width Progression Type Change In Range Width (%) |
Choose this option if you know the percentage difference you would like to see between two successive grade midpoints. This option enables you to input the midpoint of the lowest and highest grades, the midpoint progression percentage and type, and the range width percentage and type. On the Base Pay Grades page, the system calculates the minimum, midpoint, and maximum rates, the range width percentage, and the midpoint progression percentage for each grade. |
|
Define Single Rate Grades |
Rate Type Pay Months/Year Pay Hours/Year Number of Grades Use Benchmarks For Range? Midpoint of Lowest Grade Midpoint of Highest Grade Midpoint Progression Type Change in Midpoint Progression (%) |
Choose this option to create pay structures that are comprised of grades with no width. That is, there is no difference between the minimum rate, midpoint rate, and maximum rate for a particular grade. There can also be only one step in each grade. This option enables you to input the number of grades, the midpoint for the lowest and highest grades, and the midpoint progression type. On the Base Pay Grades page, the system calculates a single rate and the midpoint progression percentage for each grade. |
Grade Range
Progression
Base Pay Structure - Grades Page
Use the Base Pay Structure - Grades page (WA_GRADE_TBL) to build the grades and ranges for your base pay structure using the specified parameters.
Image: Base Pay Structure - Grades page
This example illustrates the fields and controls on the Base Pay Structure - Grades page. You can find definitions for the fields and controls later on this page.
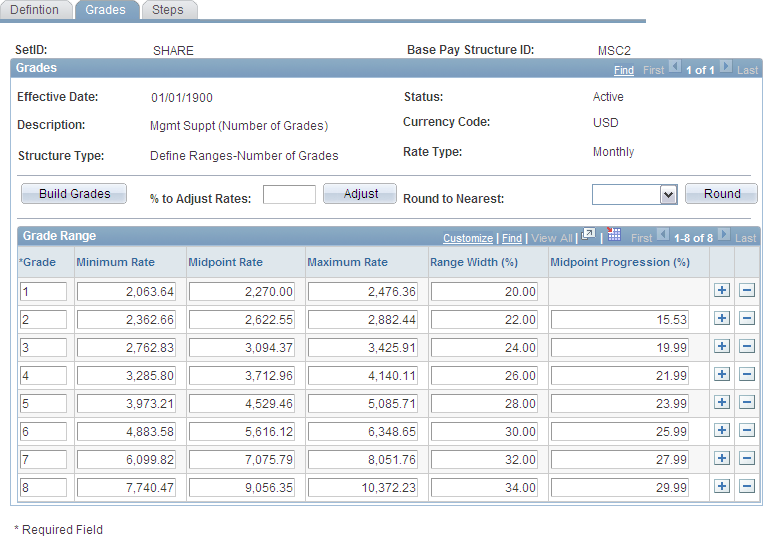
Use this page to review the effect of changes to the structure on the base pay grades, focus on the distance between midpoints of successive grades (midpoint progression), and evaluate the relative width of the ranges within grades. You can have the system calculate and enter the grade range and midpoint values, view the values calculated by the system, manually enter the values yourself, and manually revise specific values as needed.
Steps for Using This Page
To use this page:
Click the Build Grades button to generate the salary grades for this pay structure.
Change the values directly in the grid as necessary (optional).
Choose a power of ten for rounding the salaries (optional) and click the Apply Rounding button. The system rounds the salaries accordingly. The system recalculates the Range Width and Midpoint Progression columns to reflect the new values.
Enter a percentage for adjusting the salaries (optional) and click the Adjust Grades and Steps button. The system adjusts the salaries accordingly.
Using the Build Grades Button
Using the Grade Range Grid to View and Edit Salary Rate Data
Once you have built your base pay grades, with their associated rates, range width, and midpoint progression values, use the grid to view and edit the data as needed. The system helps you by recalculating values when you make changes. Here are some examples of how this works:
When you input new or changed grades, the system leaves the remaining columns unchanged.
When you change the Range Width (%) or Midpoint Progression (%) values, the system automatically recalculates the Minimum, Midpoint, and Maximum Rate values.
When you input changes to the Midpoint Rate, the system recalculates the Minimum and Maximum Rate values. The value of the range width for that grade remains unchanged.
When you change the Minimum Rate value, the system recalculates the Maximum Rate and Range Width (%).
When you change the Maximum Rate, the system recalculates the Minimum Rate and Range Width (%).
Using the Adjust Grade and Step Rates Button

Using the Apply Rounding Button
 |
Click the Apply Rounding icon. The system rounds the salary rates accordingly. The system also recalculates the Range Width (%) and Midpoint Progression (%) columns to reflect the new numbers. |
The output table that stores the data displayed in the grid is the WA_GRADE_TBL table.
Once you're satisfied with the salary grade structure you have created on this page, you have the option of moving to the Base Pay Structure - Steps page to create salary steps for your grades.
Base Pay Structure - Steps Page
Use the Base Pay Structure - Steps page (WA_STEP_TBL) to build, view, and revise salary steps for each pay grade within the base pay structure.
Image: Base Pay Structure - Steps page
This example illustrates the fields and controls on the Base Pay Structure - Steps page. You can find definitions for the fields and controls later on this page.

Entering the Number of Steps for the Grade
If you have selected a Structure Type of Use Current Pay Structure and the current pay structure has steps for this grade, then PeopleCode populates the steps and associated data in the Step Range grid at the bottom of the page. You can change these values as needed.
You can also build the steps manually.
To build steps manually:
Enter the number of Steps/Grade.
Select whether to build for the Current Grade Only, or for the Current and Following Grades by selecting the appropriate check box.
By selecting Current Grade Only, you can enter a different number of steps for each grade, or for any individual grade.
You can also enter the same number of steps for each grade by selecting Current and Following. Just navigate to the grade you want to use as the current grade. For example, if you want all the grades to have the same number of steps, select the first grade in the list as the current grade. Select the Current and Following Grades check box and click the Build Steps button. The system creates the same number of steps for the first grade and all grades below it in the list on the Grades page.
Click the Build Steps button. PeopleCode creates the steps in the Step Range grid at the bottom of the page.
Using the Step Range Grid
The output table that stores the data displayed in the grid is the WA_STEP_TBL table, whether the data is created by PeopleCode or input manually.
Once you have defined your base pay structure, the final step in the process is to assign a grade to each job code within a pay structure, using the Grade Assignment page.
Grade Assignment Page
Use the Grade Assignment page (WA_JOBGRADE_TBL) to assign a grade to each job code within a pay structure.
Image: Grade Assignment page
This example illustrates the fields and controls on the Grade Assignment page. You can find definitions for the fields and controls later on this page.
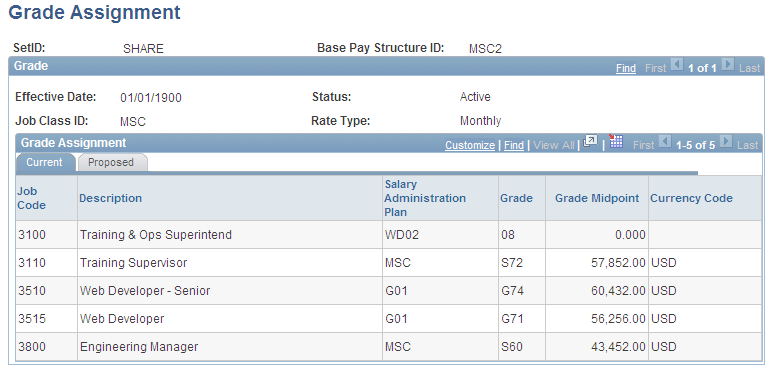
Using the Grade Assignment Grid
Viewing the Current Tab
On the Current tab you can view but not edit or change the following fields:
Using the Proposed Tab
On the Proposed tab, edit the Grade and Step fields to perform your grade assignments. You can view the remainder of the fields.