| Oracle® Health Sciences Omics Data Bank Secure File Store Guide Release 2.5 E27538-04 |
|
| PDF · Mobi · ePub |
| Oracle® Health Sciences Omics Data Bank Secure File Store Guide Release 2.5 E27538-04 |
|
| PDF · Mobi · ePub |
Secure File Store Guide
Release 2.5
E27538-04
June 2013
This guide contains the following sections:
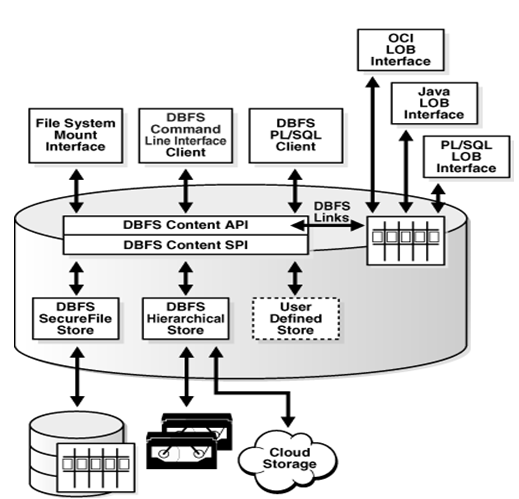
Oracle Database File System (DBFS) provides file system interface to files stored in the database tables. DBFS enables existing file based tools to access database files through familiar pathnames, directories, and links. Files in DBFS are either kept in a dedicated file store, or shared database files system in database tables within Oracle.DBFS provides unified data and file backup, disaster recovery, and management of both relational data and files. DBFS also adds advanced features of compression, deduplication, and encryption to files.The DBFS Content Store lets each database user to create one or more file systems that can be mounted by clients. Each file system has its own dedicated tables that hold the file system content. The DBFS Content Application Programming Interface (API) is a PL/SQL interface in the Oracle Relational Database Management System (RDBMS).
Note:
The secure file is optional for users who want to retain their legacy file systems. Oracle recommends that you migrate to DBFS for easy file management and backup consistency.The following prerequisites apply for installing DBFS:
Install the core Linux server and standard configurations. To view the instructions, visit the website at http://download.oracle.com/docs/cd/E11882_01/install.112/e16763/pre_install.htm.
Purchase an Oracle Advanced Compression database license.
It is assumed that there is a single administrator who owns the SecureFiles system. The administrator create, mount the files system, and load the necessary files.
After installation and configuration of the Linux OS you should ensure that the following prerequisites are set to use DBFS:
32-bit and 64-bit Linux
Installation of kernel -devel development package for command-line requirements
Installation of FUSE package for mounting requirements
Installation of Oracle client libraries for integration of Oracle database with OS requirements
Automatic Segment Space Management (ASM) for the full capability of SecureFiles system requirements.
Linux FUSE is a file system user software environment, and is not related to the Oracle database. However, it is required to mount the DBFS.
Note:
It is not required to install FUSE, if you are not mounting DBFS or using a Non-Linux platform.FUSE version 2.7.x is selected to install the kernel-devel package and prevent compatibility problems. The OEL installation CD contains the kernel-devel package with the FUSE functionality. The FUSE functionality should not be installed if already present in you system. To install the kernel, perform the following steps:
Verify that the kernel-devel package is installed by executing the following command at the shell prompt.
# rpm -q kernel-devel
The expected output is:
kernel-devel-2.6.18-128.el5
Determine the kernel directory.
# echo /usr/src/kernels/`uname -r`-`uname -p`
The expected output is:
/usr/src/kernels/2.6.18-128.el5-x86_64
If the kernel-devel development package was not installed in step 1, then install it now. There are three methods to install the kernel:
You have to configure the Linux server to point to Oracle's public YUM repository. The instructions for this are available at http://public-yum.oracle.com/.
After configuring the YUM, execute the following shell command:
# yum install kernel-devel
If the kernel is already installed, then a Nothing to do message: STOP message is displayed.
If YUM was not used to automatically download and install the kernel then follow these instructions to install the kernel:
On OEL 4 Update 6 or a newer version, execute the following commands as root to download and copy the appropriate YUM configuration file to the ETC/YUM.REPOS.D directory:
# cd /etc/yum.repos.d
# mv Oracle-Base.repo Oracle-Base.repo.disabled
# wget http://public-yum.oracle.com/public-yum-el4.repo.
From the/ETC/YUM.REPOS.D directory, execute the following YUM installation command:
# yum install kernel-devel
If you are unable to download the kernel from the Oracle Public YUM Server or if you prefer to install it from the OEL installation media, execute the following command at the shell prompt:
# cd /media/cdrom/Server
# rpm -Uvh kernel-devel*
The FUSE software can be installed through:
Oracle's Public YUM Server. This is the fastest way of installing FUSE. Oracle recommends to use this server to install FUSE. By assuming that you have configured YUM to point to the Oracle Public YUM Server, and the library is still available on the website http://public-yum.oracle.com
You have to execute the following command to install the FUSE software:
# yum install fuse fuse-libs
Oracle 11g R2 (11.2.0.2.0) should be installed for completion of the installation process. If Oracle 11g R2 (11.2.0.2.0) is not installed, refer to Installing Oracle 11g R2 (11.2.0.2.0) Database to install this Oracle database. Once installed, perform the following steps to complete the FUSE installation:
Login as the Oracle user, execute the following commands to complete the FUSE installation.
Note:
Ensure that you substitute your kernel directory into the prefix=" " in the following command.# cd fuse-2.7.3
# ./configure --prefix=/usr --with-kernel=/usr/src/kernels/`uname -r`-`uname -p`
Note:
If this fails, use the next line, replacing 2.6.18-128.el5-x86_64 with your specific kernel.<# ./configure --prefix=/usr --with-kernel=/usr/src/kernels/2.6.18-128.el5-x86_64>
# make
# sudo su
$ make install
$ /sbin/depmod
$ /sbin/modprobe fuse
$ chmod 666 /dev/fuse
$ echo "/sbin/modprobe fuse" >> /etc/rc.modules
$ chmod 700 /etc/rc.modules
Download the FUSE software from the website http://fuse.sourceforge.net/ into a temporary directory on your local computer and follow the installation procedure. In this example, the FUSE 2.7.3 package file, fuse-2.7.3.tar.gz, is used.
Query your kernel type by using the following command:
uname -a
You may need to know your kernel type to successfully perform the next step.
Unzip the downloaded fuse-2.7.3.tar.gz by executing the following command:
# tar -xzvf fuse-2.7.x.tar.gz
Login as the Oracle user, execute the following commands to complete the FUSE installation.
Note:
Ensure that you substitute your kernel directory into the prefix=" " in the following command.# cd fuse-2.7.3
# ./configure --prefix=/usr --with-kernel=/usr/src/kernels/`uname -r`-`uname -p`
Note:
If this fails, use the next line, replacing 2.6.18-128.el5-x86_64 with your specific kernel.<# ./configure --prefix=/usr --with-kernel=/usr/src/kernels/2.6.18-128.el5-x86_64>
# make
# sudo su
$ make install
$ /sbin/depmod
$ /sbin/modprobe fuse
$ chmod 666 /dev/fuse
$ echo "/sbin/modprobe fuse" >> /etc/rc.modules
$ chmod 700 /etc/rc.modules
Using your OEL installation media. Execute the following commands:
Change to the directory /media/cdrom/Server by executing:
cd /media/cdrom/Server
Execute the following command:
# rpm -Uvh fuse-2* fuse-libs-2*
Login as the Oracle user, execute the following commands to complete the FUSE installation.
Note:
Ensure that you substitute your kernel directory into the prefix=" " in the following command.# cd fuse-2.7.3
# ./configure --prefix=/usr --with-kernel=/usr/src/kernels/`uname -r`-`uname -p`
Note:
If this fails, use the next line, replacing 2.6.18-128.el5-x86_64 with your specific kernel.<# ./configure --prefix=/usr --with-kernel=/usr/src/kernels/2.6.18-128.el5-x86_64>
# make
# sudo su
$ make install
$ /sbin/depmod
$ /sbin/modprobe fuse
$ chmod 666 /dev/fuse
$ echo "/sbin/modprobe fuse" >> /etc/rc.modules
$ chmod 700 /etc/rc.modules
This installation is performed only if the Oracle database is not installed in your system. If you already have a user name and password as Oracle user for your system then use the sudo command with your Oracle user account to perform the following tasks. If the sudo command is disabled, then contact your administrator to perform the steps in Oracle Account Configuration .
Ensure that you have added the Oracle user into /etc/sudoers to enable this account to execute sudo. By doing this, you are enabling the Oracle account to act as a root user.
Create your connection string for the Oracle account to connect to the database. For more information, refer to Configuring TNS.
Check to ensure the entire dependency library is present by executing the following command. If the library is missing install it before you proceed:
ldd $ORACLE_HOME/bin/dbfs_client
This lists the entire dependency library. This assumes that Oracle 11g R2 (11.2.0.2.0) is installed on your computer and configured appropriately. The output after execution indicates if a library is missing or present.
You must soft link the library file to the directory. To soft link the library to the directory, execute the following commands:
# export ORACLE_HOME=/u01/app/oracle/product/11.2.0/dbhome_1
# cd /usr/local/lib
# ln -s $ORACLE_HOME/lib/libclntsh.so.11.1
# ln -s $ORACLE_HOME/lib/libnnz11.so
# ln -s /usr/lib/libfuse.so
Create a run-time dynamic link library by executing the following:
# ldconfig
If you do not perform the above steps, the following dbfs_client error is displayed:
dbfs_client: error while loading shared libraries: libclntsh.so.11.1: cannot open shared object file: No such file or directory
It indicates there are two libraries and libclntsh.so.11.1 is missing. It is located in $ORACLE_HOME/lib. You can adjust the library search path in the following ways:
Modifying /etc/ld.so.conf to include $ORACLE_HOME/lib.
Exporting LD_LIBRARY_PATH=$ORACLE_HOME/lib.
Now, DBFS is already functioning. You can access the files system by using DBFS_CLIENT directory utilities, without mounting the DBFS to the operating system directory.
You must now create the database files system. Oracle recommends that you create:
a separate tablespace to host the file system
a temporary tablespace to host the temp files associated with files system
an Undo tablespace to host the undo data
a database schema user who owns the files system
To create the database file system, perform the following steps:
Login to the Oracle database as a privileged user and execute the following commands. For a list of your privileged user names, contact your database administrator.
# sqlplus system/xxxxx@app58x1 as sysdba
where xxxxx is the password and app58x1 is the server name.
SQL>
You must create a tablespace to hold the file system. Create a tablespace name of your choice. Oracle recommends a bigfile tablespace. The tablespace must be the ASM to use the SecureFiles.
CREATE BIGFILE TABLESPACE <tablespace name>
DATAFILE '/u01/oradata/multimedia/<filename.dbf>' SIZE 2000M REUSE
AUTOEXTEND ON NEXT 1000M MAXSIZE unlimited
Extent management local
SEGMENT SPACE MANAGEMENT AUTO;
To create temporary tablespace name of your choice for the schema, execute the following:
CREATE TEMPORARY TABLESPACE <tablespace name>
TEMPFILE '/u01/oradata/app58x1/ <filename.dbf>' SIZE 32m
AUTOEXTEND ON next 32m maxsize UNLIMITED
Extent management local;
To create an undo tablespace name of your choice for the schema, execute the following:
CREATE UNDO TABLESPACE <tablespace name>
DATAFILE '/u01/oradata/multimedia/<filename.dbf>'
SIZE 2000M AUTOEXTEND ON
RETENTION GUARANTEE;
To create the schema user to own the file system, execute the following:
SQL>
CREATE USER trcdemo IDENTIFIED BY trcdemo
DEFAULT TABLESPACE PROSTRAT_SECUREFILE_TS
TEMPORARY TABLESPACE prostratsecurefile_temp
QUOTA UNLIMITED ON PROSTRAT_SECUREFILE_TS;
Assign the necessary role and privileges to the user. The minimum required role and privileges are: dbfs_role, create session, resource, and create view. Based on your security policy, you can add more roles and privileges as required.
SQL> GRANT CONNECT, CREATE SESSION, RESOURCE, CREATE TABLE, CREATE PROCEDURE, DBFS_ROLE TO trcdemo;
If the procedure listed below is not followed, you will get a basic file system with portion file system created in multiple physical segments in the database and files distributed randomly in them. If the files being loaded are large and make up a large percentage of the total file system, you could get an error ENOSPC even if the file system is not full. To create the SecureFiles system and tables in the database, perform the following steps.
Navigate to the $ORACLE_HOME/RDBMS/ADMIN directory.
Connect to the database with the user details you created earlier.
# sqlplus <>/<password>
Execute the following command. It is a single line with six parameters separated by space.
Note:
Execute the following command with the parameters in the exact order given below.SQL> @$ORACLE_HOME/rdbms/admin/dbfs_create_filesystem.sql ProStrat_Securefile_ts trc_compress_sfs compress-high deduplicate noencrypt non-partition
The available parameters are as follows:
Rem compress-high
Rem compress-medium
Rem deduplicate
Rem encrypt
Rem nocompress
Rem nodeduplicate
Rem noencrypt
Rem non-partition
Note:
If you enterednocompress, nodeduplicate, noencrypt in the above command, the file system created is a Basic Files system.
In the above example, the table and files system is created under an advanced SecureFiles system.
You can view the table structure by executing the following command:
SQL> Describe <username>.<base directory name>;
The following table contains the description of fields included in the database table:
Table 1 Description of Fields in Table
| Attributes | Definition |
|---|---|
|
std_access_time |
The time of last access of the contents of a path name. |
|
std_acl |
The Access Control List (ACL) (in standard ACL syntax) associated with the path name. |
|
std_canonical_path |
The canonical store specific path name of an item, that is cleaned up (leading/, trailing / collapsed, trimmed, and so on). |
|
std_change_time |
The time of last change to the metadata of a path name. |
|
std_children |
The number of child directories or folders in a directory or folder path. This property should be available in providers that support feature_folders. |
|
std_content_type |
The client-supplied mime-type or types (in standard RFC syntax) describing the (typically type_file) path name. The content type is not necessarily interpreted by the store. |
|
std_creation_time |
The time at which the item was created in the database table. Once set, this value never changes for the lifetime of the path name. |
|
std_deleted |
Set to a non-zero number if the path name has been soft-deleted (for more information, refer to above for this feature), but not yet purged. |
|
std_guid |
A store specific unique identifier for a path name. Clients must not depend on the GUID being unique across different stores, but a given (store-name, store-specific-pathname) has a stable and unique GUID for its lifetime. |
|
std_length |
The length of the content (BLOB) of a type_file or type_reference path, or the length of the referent of a type_link symbolic link. Directories do not have a well defined length and stores are free to set this property to zero, null, or any other value they choose. |
|
std_modification_time |
The time of last change to the data associated with a path name. Change to the content of a type_file or type_reference path, the referent of the type_link path, and addition or deletion of immediate children in a type_directory path, all constitute data changes. |
|
std_owner |
A client-supplied (or implicit) owner name for the path name. The owner name may be used along with the current principal for access checks by stores that support ACLs or locking. |
|
std_parent_guid |
A store-specific unique identifier for the parent of a path name. Clients must not depend on the GUID being unique across different stores, but a given (store-name, store-specific-pathname) has a stable and unique GUID for its lifetime.
|
|
std_referent |
The content of the symbolic link of a type_link path; null otherwise. As mentioned before, the std_referent can be an arbitrary string and must not necessarily be interpreted as path name by clients. This type of interpretation should be done in a careful manner. |
|
opt_hash_type |
The type of hash provided in the opt_hash_value property; for more information, refer to dbms_crypto for possible options. |
|
opt_hash_value |
The hash value of type opt_hash_type describing the content of the path name. |
|
opt_lock_count |
The number of (compatible) locks placed on a path name. If different principals are enabled to place compatible (read) locks on a path, the opt_locker must specify all lockers (with repeats so that lock counts can be correctly maintained). |
|
opt_lock_data |
The client supplied user data associated with a user lock, not interpreted by the store. |
|
opt_locker |
The implicit or client-specified principal or principals that applied a user lock on a path name. |
|
opt_lock_status |
One of the values (lock_read_only, lock_write_only, lock_read_write) describing the type of lock currently applied on a path name. |
|
opt_version |
A sequence number for linear versioning of a path name. |
|
opt_version_path |
A version path name for hierarchical versioning of a path name. |
You can access the SecureFile system in any one of the following four ways:
You can use the dbfs_client to bypass the Linux OS interface call. This method takes advantage of all the Oracle database security that are granted or revoked from a database user. An authorized user can perform limited OS operations, such as ls, cp, mkdir, and so on.
Mounting the secure files to a mount point utilizing the FUSE system.
Utilizing SQL scripts to query the SecureFiles system through dbfs_content API.
Mounting the SecureFile in the background securely to enable user access through Oracle Wallet.
The dbfs_client can be executed from any system that meets the requirements mentioned in step 1 of Installing the Kernel-Devel Package.
{client}$ dbfs_client trcdemo@app58x1 --command mkdir dbfs:/ <base directory name>/<new directory name>
Password: xxxxx
For example,
[oracle@olsapp58 ~]$ dbfs_client trcdemo/xxxxx@app58x1.world --command mkdir dbfs:/trc_compress_sfs/fastq
Password: xxxxx
The new directory is created.
After creating a new directory, you can copy a file in it using the following command:
$ dbfs_client xxxxx@app58x1 --command cp /tmp/<new directoryfiles>
dbfs:/<base directory>/<new directory>
Password: xxxxx
/tmp/<new directory files> -> dbfs:/<base directory>/<new directory>/new directory files>
To list the non system directories, use the following command:
[oracle@olsapp58 ~]$ dbfs_client <username>/xxxxxx@app58x1.world --command ls -l dbfs:/<base directory>
Password:<your password>
It is often necessary to connect to the database through shell scripts in the file system. This can be a chief security issue if these scripts contain the database connection details. A solution for this issue is to use the operating system authentication. However, if you want to access a DBFS Files System by the command line, the operating system authentication will nullify the SecureFiles purpose. Oracle 11g R2 database provides the option of using a secure external password storage where the Oracle login credentials are stored in a client-side Oracle Wallet. This enables scripts to contain connections using the /@db_wallet syntax and lets you mount the secure file directory to a Linux operating system mount point securely. This is the recommended and most secure way of deploying DBFS in the enterprise. The users can create stable mount points.
Security in the DBFS is primarily managed by the database, not by the operating system security model. Access to a database file system requires login as a database user with privileges assigned to access the tables underlying the file system. Access to the file system can be granted to other users by the database administrator. This implies that different database users may have different read-only or update privileges to the file system as determined by database administrator. The database administrator has access to all the files stored in the DBFS.
On the client machine, access to a DBFS mount point is limited to the operating system user mounting the file system. However, the number of users who can access DBFS is not limited. Many users can separately mount the same DBFS file system.
When the DBFS is mounted as a file system, the operating system file level permissions are checked by Linux. The DBFS does not check for permissions when using the command interface or when you are directly using the PL/SQL interface. When using the command interface or the PL/SQL interface directly the database privileges are authenticated.
The dbms_client program is used to mount the DBFS store.
dbfs_client <db_user>@<db_server> [options] <mount point>
where,
db_user - Name of Database user that owns DBFS content store file system or file systems
db_server - A valid connection string to Oracle database server
mount point - Path to mount Database File System or Systems. All the file systems owned by the database user is seen at the mount point.
For example, hrdb_host:1521/hrservice.
o direct_io - Bypasses the Linux page cache. This provides much better performance for large files. Programs in the file system cannot be executed with this option. Oracle recommends this option when DBFS is used as an ETL staging area.
-o wallet - Run dbfs_client in background. Wallet must be configured to get credentials.
-o failover - DBFS Client fails over to surviving database instance with no data loss. Some performance cost on writes, especially for small files.
-o allow_root - Enables root access to the file system. This option requires setting the user_allow_other parameter in /etc/fuse.conf.
-o allow_other - Enables other users access to the file system. This option requires setting user_allow_other parameter in /etc/fuse.conf.
-o rw - Mount the file system read-write. This option exists by default.
-o ro - Mount the file system read-only. Files cannot be modified.
-o trace_level=N
Trace Level:
1->DEBUG,
2->INFO,
3->WARNING,
4->ERROR, (default)
5->CRITICAL
-o trace_file <file> | 'syslog'
-h help
-v version
The user mounting the file system enables root access to the file system by specifying the allow_root option. This option requires a user_allow_other field to be present in /etc/fuse.conf. For example:
# Allow users to specify the allow_root mount option.
user_allow_other
The user mounting the file system can let other users access the file system by specifying the allow_other option. Oracle does not recommend DBFS to be run as a root user.
The use of wallet ensures a safe solution if secure file mounting activities are performed by an administrator.
Based on user interaction with the dbfs_client, it is observed that creating a strong wallet encrypted authentication based on X.509 certificates and using AES256 encryption solves many security issues. However, access to the location of the wallet must be restricted.
To mount DBFS through fstab, follow the below steps:
Login as root user.
Change the user and group of dbfs_client to be user root and group fuse.
# chown root.fuse $ORACLE_HOME/bin/dbfs_client
Set the setuid bit on dbfs_client, and restrict execute privileges to the user and group only.
# chmod u+rwxs,g+rx-w,o-rwx dbfs_client
Create a symbolic link to dbfs_client in /sbin as mount.dbfs.
$ ln -s $ORACLE_HOME/bin/dbfs_client /sbin/mount.dbfs
Create a new Linux group called fuse.
Add the Linux user that is running the DBFS Client to the fuse group.
Add the following line to /etc/fstab:
/sbin/mount.dbfs#db_user@db_server mount_point fuse rw,user,noauto 0 0
For example:
/sbin/mount.dbfs#/@trcdemo /mnt/dbfs fuse rw,user,noauto 0 0
The Linux user can mount the DBFS file system using the standard Linux mount command. For example:
$ mount /mnt/dbfs
Note:
FUSE does not currently support automount.A stringent security practice must be executed for any wallets used for secure file or for other applications. This is applicable for stored wallet locations and users having access to these wallets. In cases, where users access wallets to run processing by CRON or other system scheduler, it should be ensured that permissions on the wallet and the wallet directory are given least privilege after careful consideration. By locking down the wallets and only running batch-type, CRON driven processing from trusted clients, this feature protects credentials required for lights-out processing.
An alternate, less secure option has been provided for those who prefer prompt for user credentials. To implement this, login as the Oracle user or a sudo privileged user and perform the following steps:
# su - oracle
Create a directory for mounting your dbfs file system as read write:
# mkdir /u01/app/upload/trc_mount
# chown oracle:dba /u01/app/upload/trc_mount
# chmod <665> /u01/app/upload/trc_mount -- The 665 is your own choice
# dbfs_client trcdemo@app58x1 -o rw,user,direct_io /u01/app/upload/trc_mount
Or,
Create another directory for mounting your dbfs file system as read- only:
# mkdir /u01/app/upload/trc01simple_mount
# chown oracle:dba /u01/app/upload/trc01simple_mount
# chmod <665> /u01/app/upload/trc01simple_mount
Mount file system trc_compress_sfs as a read-only:
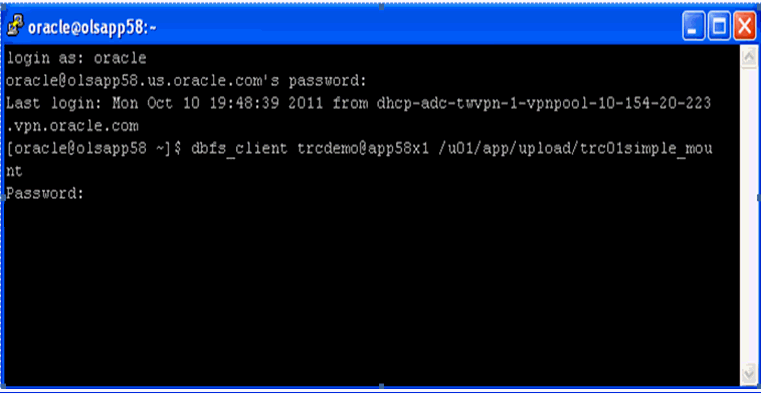
# dbfs_client trcdemo@app58x1 -o ro,user,direct_io /u01/app/upload/trc01simple_mount
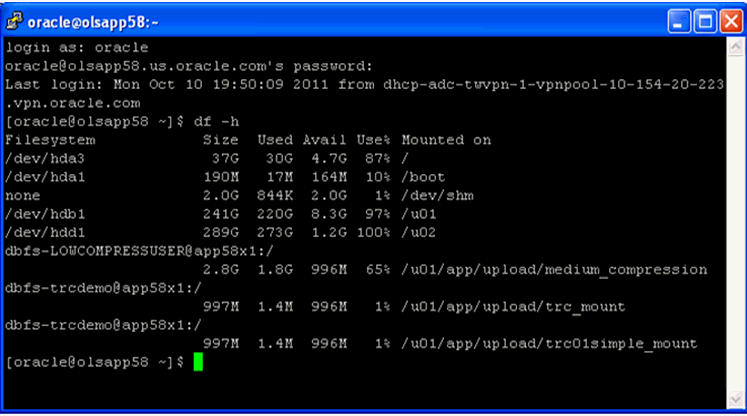
To refer to all your mounted files system, you can use the following:
[oracle@olsapp58 admin]$ df -h
Note:
This option does not let you run the mount process in the background.When you execute the above command, the end result is that the files system is mounted but the shell command prompt does not return unless you dismount the file system. The state does not return to the command line, and this is normal. This is displayed in the following figure.
If you end this session without dismounting the file system, all mount point users gets the following error:
………………..Transport endpoint is not connected
To verify that the file system is mounted at the designated mount point, open a new session and use the command df -h . The output is shown in the following figure:
The TNS configuration for a non wallet entry is as follows:
(<App58x1>=
(DESCRIPTION =
(ADDRESS =
(PROTOCOL = tcp)
(HOST = <hostname>)
(PORT = <port>)
)
(CONNECT_DATA =
(SID = <App58x1>)
)
)
The TNS configuration for a wallet entry is as follows:
Oracle Wallet must be set up with the credentials used to connect to the schema where secure file system is installed.
To set up Oracle Wallet perform the following steps:
Add the following code to tnsnames.ora under $ORACLE_HOME/NETWORK/ADMIN
DB_WALLET =
(DESCRIPTION =
(ADDRESS_LIST =
(ADDRESS = (PROTOCOL = TCP)(HOST = 10.178.187.186)(PORT = 1521))
)
(CONNECT_DATA =
(SERVICE_NAME = db001)
)
)
Set the SERVICE_NAME and HOST values above to point to your database installation.
Oracle Wallet can be created on the client or the middle tier system. Open a command prompt terminal and execute the following:
>mkdir wallets
>cd /wallets
>mkstore -wrl
=/u01/app/oracle/product/11.2.0/client_1/network/admin/wallets -create -nologo
Enter password: < type a 8 alphanumeric-character password >
Enter password again: < retype above password >
Note:
By running mkstore -create command two files should be created: cwallet.sso and ewallet.p12Add your database credentials to your wallet.
>mkstore -wrl =/u01/app/oracle/product/11.2.0/client_1/network/admin/wallets -createCredential db_wallet trcdemo
Your secret/Password is missing in the command line
Enter your secret/Password: < enter password for trcdemo user >
Re-enter your secret/Password:< re-enter password >
Enter wallet password:< enter the 8 digit password given while creating wallet >
Note:
For every user credential added to the wallet, you must create a new dataset name in tnsnames.ora. The system assumes user name as trcdemo in this configuration.Configure SQLNET to look for wallet.
Add the following lines of code to sqlnet.ora under $ORACLE_HOME\NETWORK\ADMIN:
WALLET_LOCATION =
(SOURCE=(METHOD=FILE)(METHOD_DATA=(DIRECTORY=/u01/app/oracle/product/11.2.0/client_1/network/admin/wallets)))
Test connectivity by sqlplus command. On any command prompt terminal enter the following:
>sqlplus /@db_wallet
You get the following result:
SQL*Plus: Release 11.2.0.1.0 Production on Fri Nov 25 15:54:35 2011
Copyright (c) 1982, 2010, Oracle. All rights reserved.
Connected to:
Oracle Database 11g Enterprise Edition Release 11.2.0.1.0 - 64bit Production
With the Partitioning, OLAP, Data Mining and Real Application Testing options.
Using the SQPLUS or SQLDEVELOPER, you can:
view the structure of the file system table created:
DESCRIBE "TRCDEMO"."T_TRC_COMPRESS_SFS"
verify SecureFiles Store tables and file systems:
select * from table(dbms_dbfs_sfs.listTables);
select * from table(dbms_dbfs_sfs.listFilesystems);
verify ContentAPI Stores and mounts:
select * from table(dbms_dbfs_content.listStores);
select * from table(dbms_dbfs_content.listMounts);
verify SecureFiles Store features:
var fs1f number;
exec :fs1f := dbms_dbfs_content.getFeaturesByName('FS_TRC_COMPRESS_SFS');
select * from table(dbms_dbfs_content.decodeFeatures(:fs1f));
verify resource and property views:
select * from dbfs_content;
select * from dbfs_content_properties;
show the file system paths for this user by column selection:
select pathname, pathtype, utl_raw.cast_to_varchar2(filedata) as contents
from dbfs_content
order by std_creation_time;
Select PATHNAME, OPT_CONTENT_ID, PATHTYPE, OPT_VERSION, STD_OWNER FROM dbfs_content
Where pathtype = 'file';
create a new directory and create a new file in it:
declare
ret integer;
b blob;
str varchar2(1000) := '' || chr(10) ||
'#include <stdio.h>' || chr(10) ||
'' || chr(10) ||
'int main(int argc, char** argv)' || chr(10) ||
'{' || chr(10) ||
' (void) printf(<your message>);' || chr(10) ||
' return 0;' || chr(10) ||
'}' || chr(10) ||
'';
begin
ret := dbms_fuse.fs_mkdir('/trc_compress_sfs/src');
ret := dbms_fuse.fs_creat('/trc_compress_sfs/src/hello.c', content => b);
dbms_lob.writeappend(b, length(str), utl_raw.cast_to_raw(str));
commit;
end;
/
show errors;
create another new directory and create a new file in it:
declare
ret integer;
b blob;
str varchar2(1000) := <you can write some genomic data into a file by inserting it here>';
begin
ret := dbms_fuse.fs_mkdir('/trc_compress_sfs/some_genomic_files');
ret := dbms_fuse.fs_creat('/trc_compress_sfs/some_genomic_files/sanjoy.sam', content => b);
dbms_lob.writeappend(b, length(str), utl_raw.cast_to_raw(str));
commit;
end;
/
show errors;
verify newly created directory and file:
select pathname, pathtype, length(filedata),
utl_raw.cast_to_varchar2(filedata)
from dbfs_content
where pathname like '/trc_compress_sfs/src%' or pathname like '/trc_compress_sfs/some_genomic_files%'
order by pathname;
Using a Graphical Interface to Access the Mounted Secure Directories
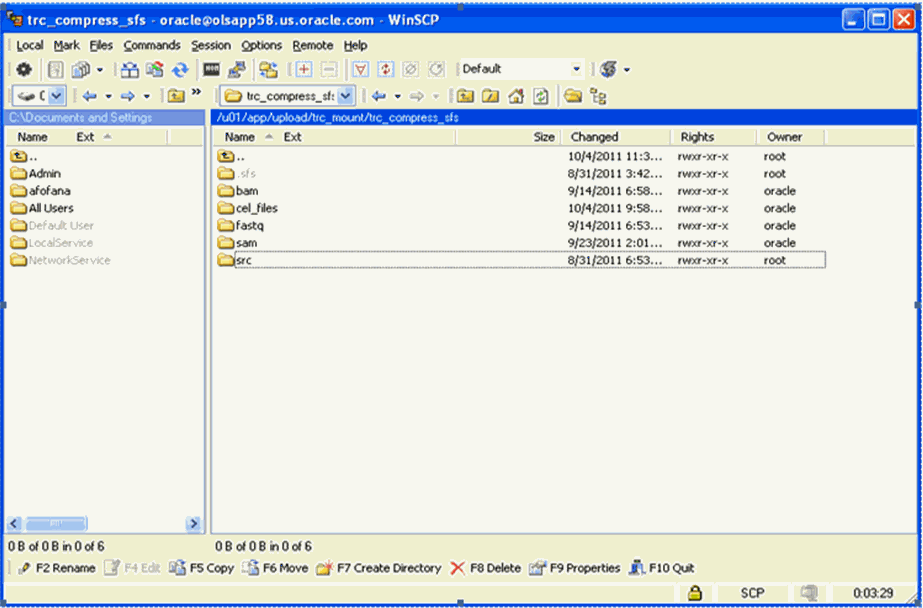
You can also use any third party user interface to access the Secure Directory giving the appropriate permissions as you perform in an operating system based files system. The following example utilizes WinScp to access the mounted secure mount point (/u01/app/upload/trc_mount/trc_compress_sfs) and its content directories as shown below:
Figure 4 Graphical Interface to Access Directories
You can drag and drop your selected files into the target directory. All relational database capabilities and file management features are automatically applied with no action required by you.
Oracle makes no express or implied warranty, including but not limited to warranties regarding the accuracy, completeness, merchantability, or fitness for a particular purpose, with respect to third party data loaded into this application or the results of any functions of the application using such data. It may be used for information purposes only, and no medical, clinical or other health related decisions may be based upon such results. You are solely responsible for your use of the third party data, including your right to use the data for your purposes.
For information about Oracle's commitment to accessibility, visit the Oracle Accessibility Program website at http://www.oracle.com/pls/topic/lookup?ctx=acc&id=docacc.
Oracle customers have access to electronic support through My Oracle Support. For information, visit http://www.oracle.com/pls/topic/lookup?ctx=acc&id=info or visit http://www.oracle.com/pls/topic/lookup?ctx=acc&id=trs if you are hearing impaired.
Oracle Health Sciences Omics Data Bank Secure File Store Guide, Release 2.5
E27538-04
Copyright © 2012, 2013 Oracle and/or its affiliates. All rights reserved.
This software and related documentation are provided under a license agreement containing restrictions on use and disclosure and are protected by intellectual property laws. Except as expressly permitted in your license agreement or allowed by law, you may not use, copy, reproduce, translate, broadcast, modify, license, transmit, distribute, exhibit, perform, publish, or display any part, in any form, or by any means. Reverse engineering, disassembly, or decompilation of this software, unless required by law for interoperability, is prohibited.
The information contained herein is subject to change without notice and is not warranted to be error-free. If you find any errors, please report them to us in writing.
If this is software or related documentation that is delivered to the U.S. Government or anyone licensing it on behalf of the U.S. Government, the following notice is applicable:
U.S. GOVERNMENT RIGHTS Programs, software, databases, and related documentation and technical data delivered to U.S. Government customers are "commercial computer software" or "commercial technical data" pursuant to the applicable Federal Acquisition Regulation and agency-specific supplemental regulations. As such, the use, duplication, disclosure, modification, and adaptation shall be subject to the restrictions and license terms set forth in the applicable Government contract, and, to the extent applicable by the terms of the Government contract, the additional rights set forth in FAR 52.227-19, Commercial Computer Software License (December 2007). Oracle USA, Inc., 500 Oracle Parkway, Redwood City, CA 94065.
This software or hardware is developed for general use in a variety of information management applications. It is not developed or intended for use in any inherently dangerous applications, including applications that may create a risk of personal injury. If you use this software or hardware in dangerous applications, then you shall be responsible to take all appropriate fail-safe, backup, redundancy, and other measures to ensure its safe use. Oracle Corporation and its affiliates disclaim any liability for any damages caused by use of this software or hardware in dangerous applications..
Oracle is a registered trademark of Oracle Corporation and/or its affiliates. Other names may be trademarks of their respective owners.
This software and documentation may provide access to or information on content, products, and services from third parties. Oracle Corporation and its affiliates are not responsible for and expressly disclaim all warranties of any kind with respect to third-party content, products, and services. Oracle Corporation and its affiliates will not be responsible for any loss, costs, or damages incurred due to your access to or use of third-party content, products, or services.
Copyright © 2012, 2013, Oracle and/or its affiliates. All rights reserved. Legal Notices |
|