| Oracle® Enterprise Manager Ops Center Provisioning Oracle Solaris 11 Operating System 12c Release 1 (12.1.1.0.0) Part Number E27333-01 |
|
| PDF · Mobi · ePub |
| Oracle® Enterprise Manager Ops Center Provisioning Oracle Solaris 11 Operating System 12c Release 1 (12.1.1.0.0) Part Number E27333-01 |
|
| PDF · Mobi · ePub |
Provisioning Oracle Solaris 11 Operating System
12c Release 1 (12.1.1.0.0)
E27333-01
August 2012
This guide provides an end-to-end example for how to use Oracle Enterprise Manager Ops Center.
Oracle Enterprise Manager Ops Center streamlines the process of installing an operating system, or OS, on hardware. You can install the OS on a bare metal system or on a configured system.
Profiles and plans simplify and standardize the procedures between different operating systems and platforms. The profile takes care of many of the configuration requirements for you and the plan enables you to apply the profile to target systems.
This examples shows how you can create and use a provisioning profile in Oracle Enterprise Manager Ops Center to install an Oracle Solaris 11 operating system on SPARC hardware using WAN Boot. You can reuse the same profile to quickly provision other systems when new hardware is acquired or provision existing hardware.
The platform determines the connection options for provisioning Oracle Solaris 11:
x86 – Uses a DHCP connection.
SPARC – Uses WAN Boot or DHCP connection. Oracle Enterprise Manager Ops Center automatically configures and uses WAN Boot. You can configure the software to use a DHCP connection on SPARC platforms. When you configure the software to use DHCP, that connection is used for all profiles and plans executed for Oracle Solaris 11 operating systems on SPARC.
Oracle Solaris 11 uses group packages to install, or provision, the OS. The following options are available:
Oracle Solaris Large Server – Installs the group/system/solaris-large-server packages, which provide an Oracle Solaris large server environment.
Oracle Solaris Small Server – Installs the group/system/solaris-small-server packages, which provide a useful command-line Oracle Solaris environment.
Oracle Solaris Desktop – Installs the group/system/solaris-desktop packages, which provide an Oracle Solaris desktop environment.
Oracle Enterprise Manager Ops Center leverages the Oracle Solaris 11 Automated Installer (AI) feature and simplifies it. For example, you do not need to bootstrap a system, create an Automated Installer server, or configure WAN Boot to provision a system with an Oracle Solaris 11 OS. Each Proxy Controller that is installed on an Oracle Solaris 11 operating system is designed to act as an Automated Installer server without any configuration on your part. On an eligible SPARC system, the software configures WAN Boot and selects it as the default connection.
When you install the Oracle Enterprise Manager Ops Center software, you have the option to create an Oracle Solaris 11 Software Library. The library contains the packages needed for provisioning and patching You can configure the library to sync with the latest information on oracle.com on a set schedule, or you can use the Add Content option to update the library whenever you need to get the latest information.
You can use the default profiles that are associated with the different Oracle Solaris packages, create new profiles, or copy existing profiles. This example describes how to copy a default OS provisioning profile for a larger server environment and customize the copy to create a new OS provisioning profile and plan. The profile and plan are configured to install Oracle Solaris 11 on a SPARC system with a WAN Boot connection for a lab named Delta Lab. The profile is configured to use the time zone, root password, user account, and network that is used in the Delta Lab. Other labs have their own customized profiles.
See Related Articles and Resources for links to related information and articles.
You need the following to provision an Oracle Solaris 11 OS:
Oracle Enterprise Manager Ops Center Enterprise Controller and Proxy Controller installed on an Oracle Solaris 11 OS.
Oracle Solaris 11 Software Library.
Unless you opt out of the task, the Oracle Solaris 11 library is created when you install and configure Oracle Enterprise Manager Ops Center on an Oracle Solaris 11 system.
Configured hardware to provision.
SPARC-based platform with at least OpenBoot PROM (OBP) version 4.17 installed.
Updated firmware.
Configured service processor.
Credentials and IP address for the service processor. You either need the actual IP address, or the IP address that is on the same subnet as the server to be discovered.
A new password for root and for the user account that you want to use for your new operating systems.
Note:
Oracle Solaris 11 recommends adding a non-root user, such as admin, during installation. When you create the profile, you will define the root password and non-root user name and password. These are added to the OS during provisioning.Network port and MAC address combination. These are used to connect to the server once it is available on the network.
These are the steps to provision an Oracle Solaris 11 OS on hardware:
The Declare Server option lets you declare one or more bare metal systems in preparation for OS provisioning. You can declare servers individually, or you can create a discovery file that contains the information to declare several servers at the same time. This example shows how to declare a single server.
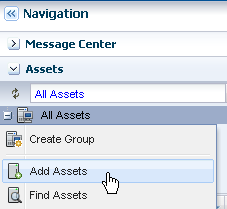
Expand Assets in the Navigation pane, right-click on All Assets, then click Add Assets.
Select Manually Declare a Server to be a Target of OS provisioning, then click Next.

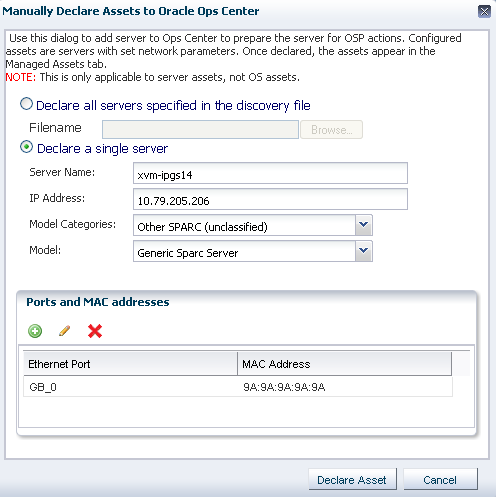
Select Declare a Single Server, enter the following server information, then click Declare Asset:
Server Name – This is the name that appears in the user interface.
IP Address – Specify an IP address to route the discovery to the correct Proxy Controller. You do not need to use a server's actual IP address. You can use an IP address that is on the same subnet as the server to be discovered.
Model Category – Select the category in which the asset model appears.
Model – Select the hardware model.
MAC Address and Port combination – Click the Add or Edit icons to add or edit a MAC Address/Port combination, then select the combination.
Enter a logical port name for each network interface. One of these logical port names must be GB_0. Available logical port names are GB_0 through GB_11. You can also use mgmt as a management port. These logical port names will be mapped to network interfaces after the asset is provisioned, according to the MAC addresses that you specify. If the server has only one network interface, use GB_0.
Enter the MAC addresses of the network interfaces in the server that you want to declare.
A job is launched to discover the asset. When the job completes successfully, expand Servers in Assets to see the hardware.
An Oracle Solaris 11 OS provisioning profile defines the OS package, platform, and configuration details. When you create the Oracle Solaris 11 Software Library, a default profile and plan are created for each type of group package and platform. You can copy a default profile to create a new profile and plan. This example copies a large server package and customizes it for the Delta lab.'s configuration requirements.
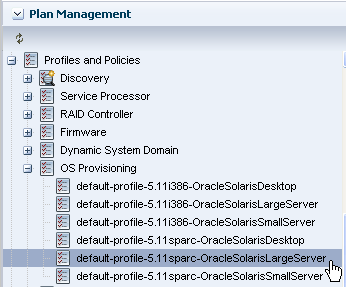
Click Plan Management, scroll down to Profiles and Policies, then expand OS Provisioning. Select default-profile-5.11sparc-Oracle SolarisLargeServer to display the profile in the center pane.
Click Copy Profile in the Actions pane.
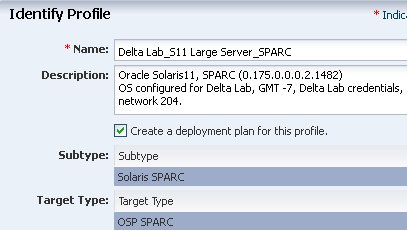
Edit the name and description for the profile, then click Next.
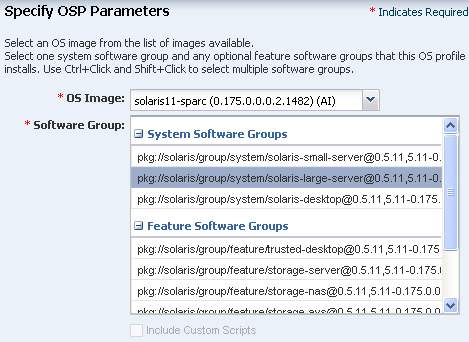
The correct OS Image and package are preselected. The image and package for an Oracle Solaris large server is selected in this example. Optionally, you can add other Feature software groups. Click Next.
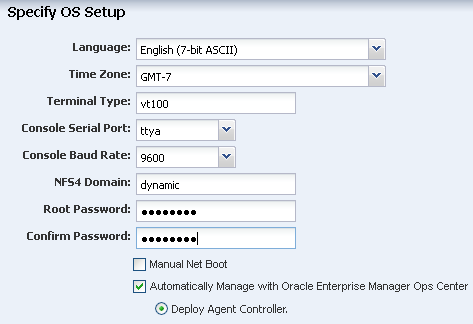
Edit the language, time zone, terminal-type, and root password for the operating system, and for all operating systems that you create with this profile. Click Next.
When a naming service is not configured in the environment, accept the default value, dynamic, for the NFSv4 Domain Name.
The default root password is admin123. Enter the root password for your organization. This is the root password for each operating system provisioned with this profile.
Select the option to automatically manage with Oracle Enterprise Manager Ops Center and Deploy Agent Controller. This option provides the highest level of functionality.
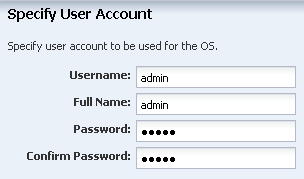
You can change the user name and full name, or leave it admin. In this example, admin is used as the user name for the account. Change the password from admin123 to something unique. Click Next.
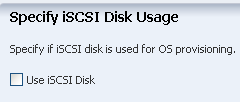
An iSCSI disk is not required and not used in this example. Click Next.
The default swap and ZFS file systems are defined. Click number in the size field to change the default swap size. In this example, the number is 5000. Click Next.

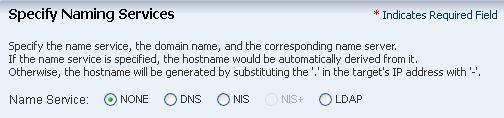
Click Next to skip the Naming Service.
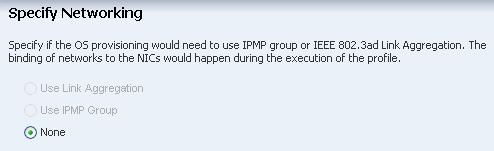
If not already selected, select None in the Specify Networking page, then click Next.
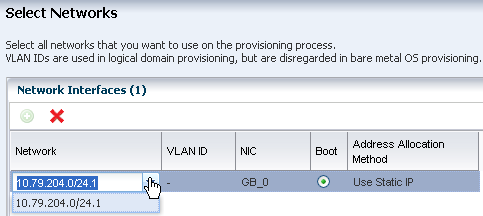
Select a network for the OS from the list of available networks. When you apply the profile and plan, you will provide the specific IP address for each target system.
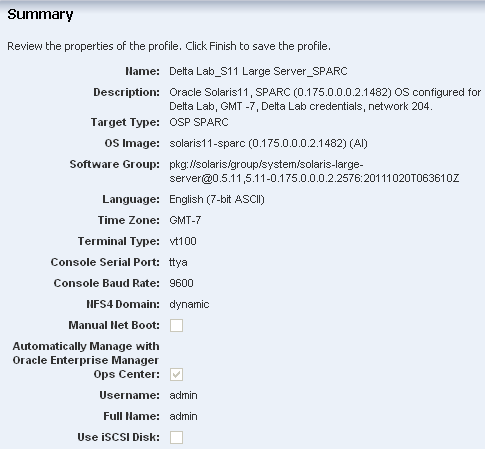
On the Summary page, review the configuration properties, then click Finish to create the profile and deployment plan.
Your new profile appears in Plan Management. Click OS Provisioning to view all OS Provisioning Profiles in the center pane.
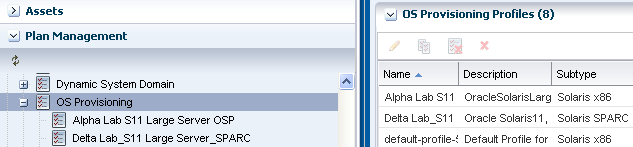
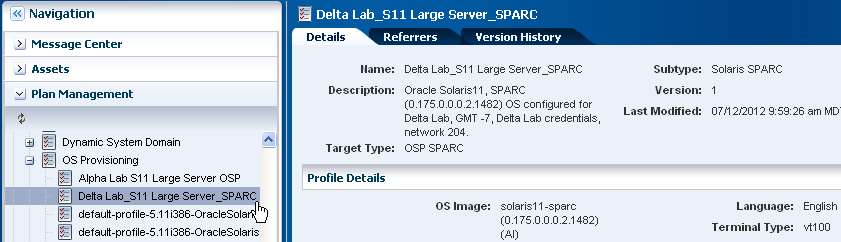
Click the profile to view the details in the center pane.
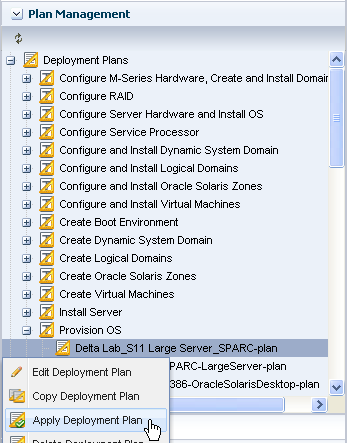
When you create the profile, you also create a default Provision OS plan. Apply the deployment plan to provision the OS on the hardware.
Click Plan Management, scroll down to Deployment plans, expand Provision OS, then right-click the plan that you created in the previous section. Click Apply Deployment Plan.
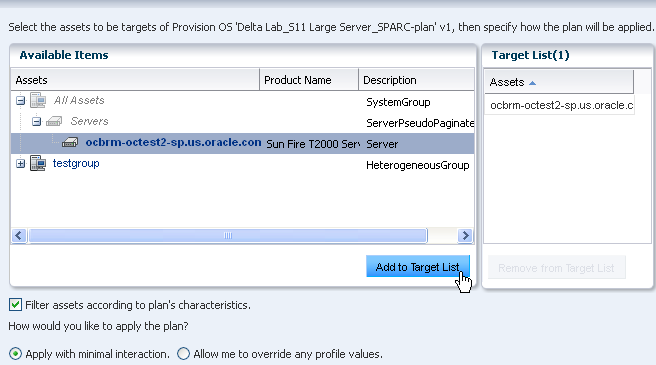
Select a server target from the list of Available Items. Click Add to Target List to add the server to the Target List. Use the default setting for applying the plan with minimal interaction. Click Next.
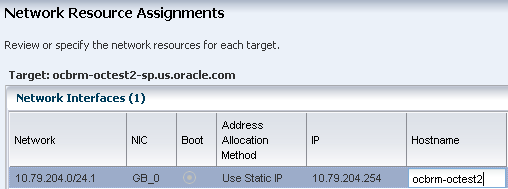
The Network Resource Assignments page shows the target and network. In the IP field, enter the IP address for the operating system. In the Hostname field, enter the host name.
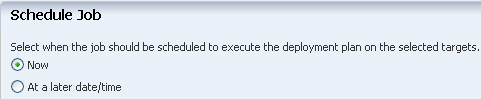
Schedule the job to run Now.
Review the Summary, then click Apply.
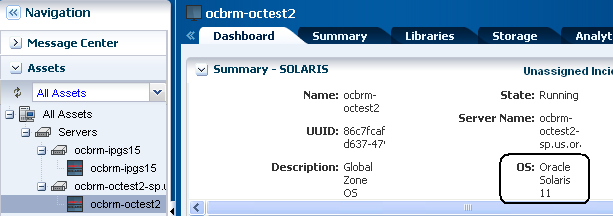
The provisioning job will take time to complete. You can view the progress and status of the provisioning job from the Jobs pane. When the job is completed, go to Assets and expand Servers to see your OS. Click the OS in the Navigation pane to display the details in the center pane.
You can use the OS Provision profile to consistently and quickly provision operating systems. You can also use the OS provisioning profile and the deployment plan as building blocks in larger multi-step or complex plans. For example, depending on the plan, you can either use the OS Provision profile or the Provision OS plan as steps in the following plans:
Install Server – This multi-step plan contains steps that use profiles, including the OS Provision profile. With this plan you can provision the OS, update the BIOS, update the OS, install software, execute pre and post-install scripts, add operational profiles, monitoring profiles, and create guests.
Configure and Install Dynamic System Domain – This multi-step plan contains steps that use a profile to create a Dynamic System Domain and the Install Server plan to install and update the OS.
Configure M-Series Hardware, Create and Install Domain – This complex plan contains steps that use profiles to configure a service processor, update firmware, and create a Dynamic System Domain. You can add a step to use the Install Server plan to install and update the OS on an M-series system.
Configure Server Hardware and Install OS – This complex plan contains steps that use profiles to configure the service processor, configure the RAID Controller, and update firmware. You can add a step to use the Install Server plan to install and update the OS.
When you create a multi-step or complex plan from the template, you often have the choice to add or skip steps. For example, when you create the Install Server plan, the only required step is OS provisioning. You can choose to skip the other steps, such as updating the BIOS.
The following chapters in the Oracle Enterprise Manager Ops Center Feature Reference Guide contain more information:
See Asset Management for more information on discovery, declaring servers, and an example discovery file.
See Plans and Profiles for information about plans and profiles, including using complex plans
See Operating Systems for more information about OS provisioning.
For more examples, see the How To library.
For in-depth information about Oracle Solaris 11, see the Oracle Solaris 11 documentation at http://docs.oracle.com/cd/E23824_01/html/821-1460/index.html.
For information about Oracle's commitment to accessibility, visit the Oracle Accessibility Program website at http://www.oracle.com/pls/topic/lookup?ctx=acc&id=docacc.
Oracle customers have access to electronic support through My Oracle Support. For information, visit http://www.oracle.com/pls/topic/lookup?ctx=acc&id=info or visit http://www.oracle.com/pls/topic/lookup?ctx=acc&id=trs if you are hearing impaired.
Oracle Enterprise Manager Ops Center Provisioning Oracle Solaris 11 Operating Systems, 12c Release 1 (12.1.1.0.0)
E27333-01
Copyright © 2007, 2012, Oracle and/or its affiliates. All rights reserved.
This software and related documentation are provided under a license agreement containing restrictions on use and disclosure and are protected by intellectual property laws. Except as expressly permitted in your license agreement or allowed by law, you may not use, copy, reproduce, translate, broadcast, modify, license, transmit, distribute, exhibit, perform, publish, or display any part, in any form, or by any means. Reverse engineering, disassembly, or decompilation of this software, unless required by law for interoperability, is prohibited.
The information contained herein is subject to change without notice and is not warranted to be error-free. If you find any errors, please report them to us in writing.
If this is software or related documentation that is delivered to the U.S. Government or anyone licensing it on behalf of the U.S. Government, the following notice is applicable:
U.S. GOVERNMENT END USERS: Oracle programs, including any operating system, integrated software, any programs installed on the hardware, and/or documentation, delivered to U.S. Government end users are "commercial computer software" pursuant to the applicable Federal Acquisition Regulation and agency-specific supplemental regulations. As such, use, duplication, disclosure, modification, and adaptation of the programs, including any operating system, integrated software, any programs installed on the hardware, and/or documentation, shall be subject to license terms and license restrictions applicable to the programs. No other rights are granted to the U.S. Government.
This software or hardware is developed for general use in a variety of information management applications. It is not developed or intended for use in any inherently dangerous applications, including applications that may create a risk of personal injury. If you use this software or hardware in dangerous applications, then you shall be responsible to take all appropriate fail-safe, backup, redundancy, and other measures to ensure its safe use. Oracle Corporation and its affiliates disclaim any liability for any damages caused by use of this software or hardware in dangerous applications.
Oracle and Java are registered trademarks of Oracle and/or its affiliates. Other names may be trademarks of their respective owners.
Intel and Intel Xeon are trademarks or registered trademarks of Intel Corporation. All SPARC trademarks are used under license and are trademarks or registered trademarks of SPARC International, Inc. AMD, Opteron, the AMD logo, and the AMD Opteron logo are trademarks or registered trademarks of Advanced Micro Devices. UNIX is a registered trademark of The Open Group.
This software or hardware and documentation may provide access to or information on content, products, and services from third parties. Oracle Corporation and its affiliates are not responsible for and expressly disclaim all warranties of any kind with respect to third-party content, products, and services. Oracle Corporation and its affiliates will not be responsible for any loss, costs, or damages incurred due to your access to or use of third-party content, products, or services.
Copyright © 2007, 2012, Oracle and/or its affiliates. All rights reserved. Legal Notices |
|