3 Tracing and Logging
You can enable tracing for the mobile server. In addition, you can view the log files from the underlying application server. For the mobile server, there are two main sections for tracing: the general tracing for mobile server components and specific tracing for data synchronization components. How to enable tracing for each part of the mobile server is described in the following sections:
3.1 General Tracing for the Mobile Server
To set general tracing for the mobile server, perform the following steps.
-
From the mobile server page, select Administration.
-
Select Trace Setting. This brings up the Trace Settings page, as shown in Figure 3-1, where you can choose to generate trace output, specify the trace output destination to the local console, file, or remote console (viewed by
WSH).. The Trace Settings page provides system filters to generate trace output to the required system level. -
Configure the type of tracing you want and click Apply.
Figure 3-1 General Trace Settings for Mobile Server
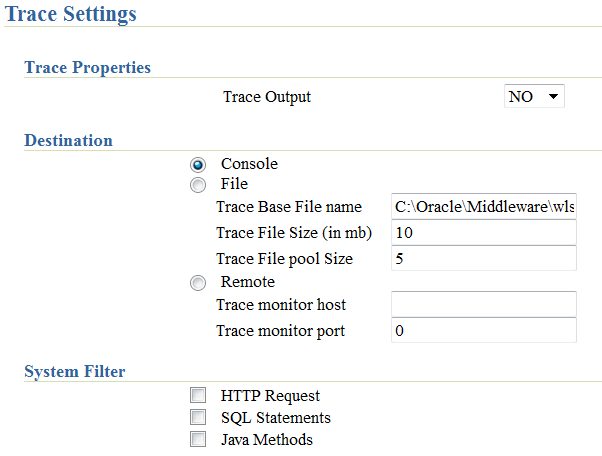
Description of "Figure 3-1 General Trace Settings for Mobile Server"
Table 3-1 Trace Settings Page Description
| Field | Description |
|---|---|
|
Trace Output |
To generate trace output, select Yes. |
|
Console |
You can print the messages to a console. If you are in a WebLogic environment, select File or Remote. |
|
File |
You can direct all messages to a local file. If you selected a file for trace output, then enter the name (including path), the maximum size of the file in MB, and the number of files allowed (pool size). For example, if you set the pool size to 10, then when a trace file hits the maximum size in MB, then a new file is opened and the trace output is written to the new file. This continues until all 10 files of the maximum size exist. At this point, the first file is deleted and a new file is started to contain the trace output. This enables you to manage the amount of disk space that the trace files can use. To create a trace file for every user, select Yes for the Create Trace File for Every User box. |
|
System Filter |
|
3.2 Data Synchronization Tracing
The administrator can turn on tracing for components involved in the synchronization phase, including MGP functions.
-
From either the home page or the Administration page for the mobile server, select Data Synchronization in the Components section, as shown in Figure 3-2.
Figure 3-2 Mobile Server Job Scheduler and Data Synchronization Components

Description of "Figure 3-2 Mobile Server Job Scheduler and Data Synchronization Components"
-
Select Administration off of the Data Synchronization home page.
-
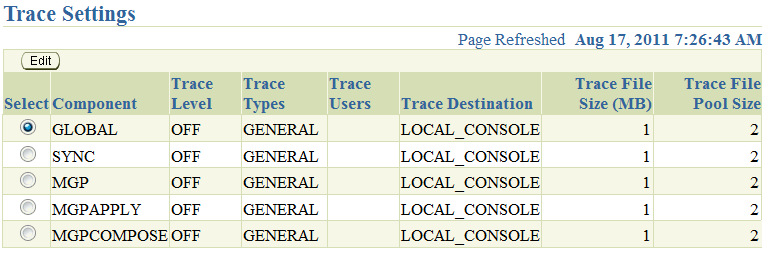
Select Trace Settings, which displays all five components for which you can enable tracing, as shown in Figure 3-3. For a description of each component, see Section 3.2.1, "Description of the Five Data Synchronization Components".
Figure 3-3 The Trace Components for the Data Synchronization
Description of "Figure 3-3 The Trace Components for the Data Synchronization"
-
Select the component for which you want to enable tracing, which brings up the trace configuration screen, as shown in Figure 3-4.
Figure 3-4 Data Synchronization Component Trace Configuration
Description of "Figure 3-4 Data Synchronization Component Trace Configuration"
-
In the Filter section, select the required Level and Type. To specify a trace filter for users, enter comma separated user names in the Users field.
Table 3-2 Data Synchronization Component Trace Level and Type
Filter Description trace level, where each level includes the previous levels as well.
OFF: no tracing enabled.MANDATORY: Mandatory messages only, such as program exceptions.WARNING: Warning messages.NORMAL: Normal messages of which the user must be informed.INFO: Informational messages, such as synchronization timing, MGP apply, MGP compose, and MGP status.CONFIG: Configuration messages, such as JDBC driver version.FINEST: Developer level of tracing.ALL: Logs messages for all trace levels.trace type
SQL: SQL-related messages only, such as SQL statements.TIMING: Timing data only. Note: This option is trace level sensitive. For MGP Cycle time and Synchronization time, use the Trace Level INFO option with the TIMING option on the MGP and SYNC components respectively.DATA: Data only.RESUME: Logs messages with Reliable Transport.FUNCTION: Displays the program flow by logging methods such as Entry, Exit or Invoke. For Long methods, this option logs the method entry or exit; which is a simple invoke log.GENERAL: Logs messages that do not belong to any of the above listed trace types. Note: This type is trace level sensitive.ALL: This option generates logs of all trace types.Note:
You can set these parameters within themobile.orafile in theCONSOLIDATORsection. See Section A.1.5, "[CONSOLIDATOR]" in the Oracle Database Mobile Server Administration and Deployment Guide for more details on these parameters. -
In the Destination section, select Local Console to receive the trace file to the same console as the General tracing is using. If the console is not open, then these messages are sent to the same place that the General tracing is directed. See what the Destination is configured to in Figure 3-1 to determine where these messages are directed.
To send trace information to a file, select the File option. The file name is generated based upon the session id. You can configure the file size in MB and the files allowed (pool number). For example, if you set the pool size to 10, then when a trace file hits the maximum size in MB, then a new file is opened and the trace output is written to the new file. This continues until all 10 files of the maximum size exist. At this point, the first file is deleted and a new file is started to contain the trace output. This enables you to manage the amount of disk space that the trace files can use.
-
-
To implement the modified values, click OK. To retain existing values, click Cancel.
To view trace files, navigate to the Data Synchronization page. Select Administration. Select Trace Files and the Trace Files screen appears, as shown in Figure 3-5.
Figure 3-5 Viewing Data Synchronization Trace Files

Description of "Figure 3-5 Viewing Data Synchronization Trace Files"
-
To view a trace file, select the trace file name or click the Select button next to the trace file name and click View.
Note:
When you view the trace file online, it truncates the file to 10,000 lines. To view the whole trace file, download the file and view it using any text editor. -
To download or delete a trace file, click the Select button next to the trace file name and click either Download or Delete.
-
If there are too many files to view on a page, you can search by entering the name of the trace file in the Search field and clicking Go.
3.2.1 Description of the Five Data Synchronization Components
There are five components that you can turn on to describe what is happening in the synchronization process, as described in the following sections:
3.2.1.1 MGP
You can trace the MGP process. However, if an MGP Cycle ID is not yet available, then tracing is enabled by the configuration of the GLOBAL component. If the trace destination is to be written to a file, then all of the generated logs are recorded in a log file named MGP_<cycle_id>.log.
3.2.1.2 MGPAPPLY
This refers to the APPLY phase in the MGP process. However, between the beginning of the APPLY phase till the availability of the MGP Client ID, tracing is enabled by the configuration of the component MGP. If tracing is sent to a file, then all messages are written to a file named MGPAPPLY_<client_id>_<cycle_id>.log.
3.2.1.3 MGPCOMPOSE
This refers to the COMPOSE phase in the MGP process. Similar to the MGPAPPLY phase where the Client ID is not yet available, tracing is enabled by the configuration of the component MGP. If tracing is sent to a file, then all messages are written to a file named MGPCOMPOSE_<client_id>_<cycle_id>.log.
3.2.1.4 SYNC
This refers to the server-side synchronization process. When a Sync session ID is not yet available, tracing is enabled by the configuration of the GLOBAL component. If the trace destination is set to file, then the messages are written to a file named SYNC_<cycle_id>.log. When the Client ID becomes available, the file is renamed to SYNC_<client_id>_<cycle_id>.log.
3.2.1.5 GLOBAL
This component logs tracing messages that are not specific to any of the above listed components. This component also includes logs that are generated during the execution of the ConsolidatorManager APIs. If the trace destination is set to file, then the messages are written to a file named GLOBAL_<file_number>.log.