9 Using Forms Services with Oracle Single Sign-On
This chapter contains the following sections:
-
Section 9.3, "Forms Services Features with Authentication Server Protection"
-
Section 9.4, "Protecting Forms applications with Single Sign-On"
9.1 Overview
In addition to working with Oracle Single Sign-On Server 10g (OSSO), Oracle Forms Services applications can now run in a Single Sign-on environment using Oracle Access Manager 11g (OAM) and Oracle Internet Directory (OID) to eliminate the need for additional or different logins to access many applications during the same user session.
Oracle Forms Services applications in Oracle FMW 11g Release 2 can be protected by one of the following authentication servers:
-
Oracle Access Manager (OAM) 11g
-
Oracle Single Sign-On Server (OSSO) 10g
During the installation of Forms and Reports 11g Release 2, users can choose to authenticate their Forms Applications using one of these authentication servers. It is required that these authentication servers are configured to use Oracle Internet directory as the backend Identity Store. Authentication servers are designed to work in Web environments where multiple Web-based applications are accessible from a browser. Without an authentication server, each user must maintain a separate identity and password for each application they access. Maintaining multiple accounts and passwords for each user is unsecure and expensive.
Oracle Access Manager 11g is a Java Platform, Enterprise Edition (Java EE)-based enterprise-level security application that provides restricted access to confidential information and centralized authentication and authorization services. Oracle Access Manager 11g, a component of Oracle Fusion Middleware 11g, is a Single Sign-On solution for authentication and authorization.
Authentication servers enable an application to authenticate users by means of a shared authentication token or authentication authority. That means that a user authenticated for one application is automatically authenticated for all other applications within the same authentication domain.
Forms applications use a single sign-on solution only for obtaining database connection information from Oracle Internet Directory. Once the database information is obtained, interaction with the authentication server no longer occurs. Exiting a Forms application does not perform a single sign-on logout. Conversely, logging out of a single sign-on session does not terminate an active Forms session. The database session exists until the Forms Runtime (for example, frmweb.exe) on the server terminates, usually by explicitly exiting the form.
Authentication servers can be used to authenticate other applications that are not Oracle products, for example, custom-built Java EE applications.
Oracle Forms Services provides out-of-the box support for single sign-on for as many Forms applications as run by the server instance with no additional coding required in the Forms application.
Note:
Refer to the Section 3.4.2, "Forms Single Sign-On on Mozilla Firefox" for more information on browser support for Forms and single sign-on.Note:
Oracle Forms Services applications runs in a single sign-on environment using the following OID and authentication server combinations:-
Oracle Internet Directory 10g (10.1.2.3) with Oracle Single Sign-On 10g (10.1.2.3)
-
Oracle Internet Directory 10g (10.1.4.3) with Oracle Single Sign-On 10g (10.1.4.3)
-
Oracle Internet Directory 11g (11.1.1) with Oracle Single Sign-On 10g (10.1.4.3)
-
Oracle Internet Directory 11g (11.1.1) with Oracle Access Manager 11g (11.1.1.5)
-
Oracle Internet Directory 11g (11.1.1) with Oracle Access Manager 11g (11.1.1.7)
-
Oracle Internet Directory 11g (11.1.1) with Oracle Access Manager 11g (11.1.2.0)
-
Oracle Internet Directory 11g (11.1.1) with Oracle Access Manager 11g (11.1.2.1)
For more information about single sign-on, see Oracle Application Server Single Sign-On Administrator's Guide.
For more information about Oracle Access Manager, see Oracle Fusion Middleware Administrator's Guide for Oracle Access Management
For more information about Oracle Internet Directory, see Oracle Fusion Middleware Enterprise Deployment Guide for Oracle Identity Management.
9.1.1 Single Sign-On Components used by Oracle Forms
There are various Single Sign-On components in Oracle Fusion Middleware that are involved when running Forms applications in single sign-on mode with an authentication server. Figure 9-1 describes the high level overview of the various components involved in the single sign-on deployment setup of Forms Services.
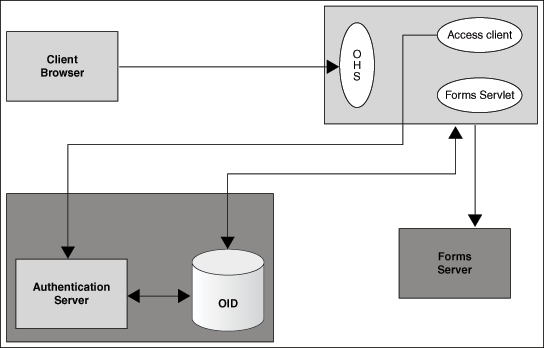
Following is the description of the components mentioned in the above figure:
-
Authentication Server
-
Oracle Access Manager (OAM Server) - It is an Oracle FMW 11g authentication server that provides a full range of security functions that include Web single sign-on, authentication and authorization. When running Forms Services, it uses Oracle Internet Directory as the Identity Store. Oracle Access Manager can use either
mod_ossoorwebgateas the access client configured with Oracle HTTP Server. -
Oracle Single Sign-On Server (OSSO Server) - It is an OracleAS 10g authentication server. It uses Oracle Internet Directory as the Identity Store. Oracle Single Sign-On Server uses
mod_ossoas the access client configured with Oracle HTTP Server.
-
-
Access Client
-
webgate- WebGate provides single sign-on support. It intercepts incoming HTTP requests and forwards them to the Access Server for authentication. Oracle Forms Services and Oracle Reports Services can usewebgateas an access client with OAM server. -
mod_osso- The HTTP modulemod_ossosimplifies the authentication process by serving as a partner application to the OAM server, rendering authentication transparent for applications. Oracle Forms Services and Oracle Reports Services can usemod_ossoto register as partner applications with the OAM Server.mod_ossois also used as an access client with Oracle Single Sign-On server (OSSO).
-
-
Identity Store
-
Oracle Internet Directory (OID) is an LDAP server that is used as the Identity store by the authentication server and the Forms applications. An LDAP server is a special database that is optimized for read access.
-
-
Forms Servlet - The Oracle Forms Services component that accepts the initial user request to start a Forms application. The Forms servlet detects if an application requires authentication, directs the request to the authentication server and accesses the Oracle Internet Directory to obtain the database connect information.
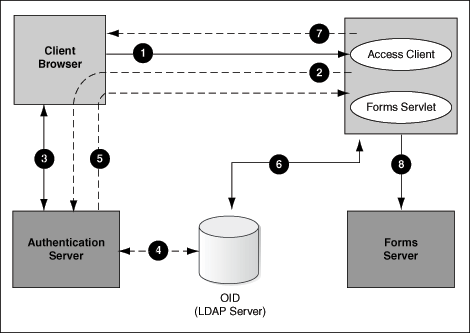
9.1.2 Authentication Flow
Figure 9-2 describes the authentication flow of authentication server support in Oracle Forms the first time the user requests an application URL that is protected by authentication server:
-
The user requests a Forms URL similar to
http(s)://<hostname>:<port>/forms/frmservlet?config= <application>&...Note:
Use the HTTP or Web Cache port number in the Forms URL for Forms applications that use single sign-on. The Forms URL is similar tohttp://<host name>:<http port>/forms/frmservlet?config=ssoappwhere ssoapp is the name of the section in forms configuration file with single sign-on (ssoMode) enabled. -
The Forms servlet redirects the user to the authentication server login page.
-
The user provides user name and password through the login form.
-
The password is verified through Oracle Internet Directory (LDAP Server).
-
The user is redirected to the URL with
sso_useridinformation. -
The Forms servlet retrieves the database credentials from Oracle Internet Directory.
-
The Forms servlet sets the
sso_useridparameter in the Runform session and permits the applet to connect to the Forms listener servlet. -
The Forms servlet starts the Forms server.
Figure 9-3 describes the authentication flow of single sign-on support in Oracle Forms Services when a user, authenticated through another partner application, requests an application that is protected by authentication server.
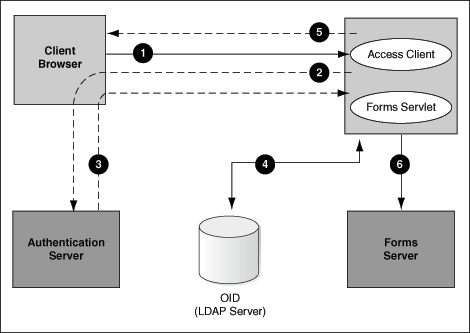
-
The user requests the Forms URL.
-
The Forms servlet redirects the user to the authentication server and its login page.
-
The user is redirected to the URL with the
sso_useridinformation. -
The Forms servlet retrieves the database credentials from Oracle Internet Directory.
-
The Forms servlet sets the
sso_useridparameter in the Runform session and the applet connects to the Forms listener servlet. -
The Forms servlet starts the Forms server.
9.2 Setup Process
The user can enable Single Sign-On for Forms application either during installation or postinstallation. This section discusses the following scenarios:
-
Enabling Single Sign-On for Forms Application during Installation
-
Enabling Single Sign-On for Forms Application Postinstallation
9.2.1 Enabling Single Sign-On for Forms Application during Installation
If the user selects Application Identity Store and an authentication server during the installation of Oracle Forms and Reports 11gR2, then the Forms applications will be configured to be authenticated by Oracle AS Authentication Server. The flowchart in Figure 9-4 describes the steps to enable SSO authentication for Forms applications.
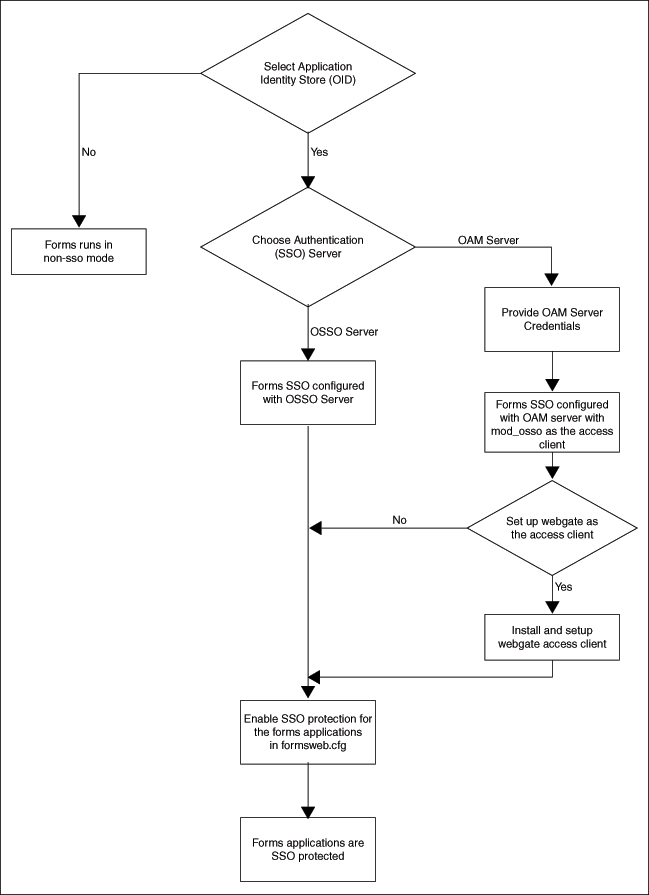
The steps depicted in the flowchart are described in details in Table 9-1:
Table 9-1 Tasks to Enable Single Sign-On for Forms Application during installation
| Tasks | Options | Description | Comments |
|---|---|---|---|
|
Task 1: Select an Application Identity Store (OID) |
No |
User chooses not to configure Forms with Single Sign-On authentication |
|
|
Yes |
User chooses to configure Forms with Single Sign-On authentication. User has to provide the OID access details in the install screen. In the subsequent install screen, the user will be asked to choose the SSO server |
For detailed steps for selecting an Application Identity Store, see Flowchart of Oracle Forms and Reports Installation and Configuration Screens in Oracle Fusion Middleware Installation Guide for Oracle Forms and Reports. |
|
|
Task2: Select an Authentication (SSO) server |
Oracle Single Sign-On Server (OSSO) |
User selects Oracle AS 10g Oracle Single Sign On Server (OSSO) as the authentication/SSO server. No additional credentials required here |
For detailed steps for Selecting an Authentication server, see Flowchart of Oracle Forms and Reports Installation and Configuration Screens in Oracle Fusion Middleware Installation Guide for Oracle Forms and Reports. |
|
OAM Server |
User selects Oracle Access Manager (OAM Server) as the authentication/SSO server. User needs to provide OAM server Administrator Credentials |
For detailed steps for Selecting an Authentication server, see Flowchart of Oracle Forms and Reports Installation and Configuration Screens in Oracle Fusion Middleware Installation Guide for Oracle Forms and Reports. |
|
|
Task3: Setup Webgate Access Client |
No |
User chooses to configure Forms application with OAM authentication server in the out of the box setup. |
|
|
Yes |
User chooses to configure Forms application with OAM authentication server with webgate as the access client. The user must install and configure Webgate manually. |
For detailed steps for setting up Webgate Access Client, see Section 9.7.4, "Installing and Configuring Webgate with OAM". |
|
|
Task4: Enable SSO for Forms applications in formsweb.cfg |
This task is mandatory. |
After having registered the access client with the authentication server, the user must enable SSO for Forms applications. |
For detailed steps for enabling SSO for Forms applications in formsweb.cfg, see Section 9.4, "Protecting Forms applications with Single Sign-On". |
Note:
For more information about enabling Single Sign-On for Forms application during installation, see Oracle Fusion Middleware Installation Guide for Oracle Forms and Reports.9.2.2 Enabling Single Sign-On for Forms Application Postinstallation
If the user does not select Application Identity store during the installation of Oracle Forms and Reports 11gR2, then the Forms application does not get authenticated by the authentication server. However, the user has the choice to enable single sign-on authentication for Forms application postinstallation. The flowchart in Figure 9-5 describes the steps to enable SSO for Forms application postinstallation.
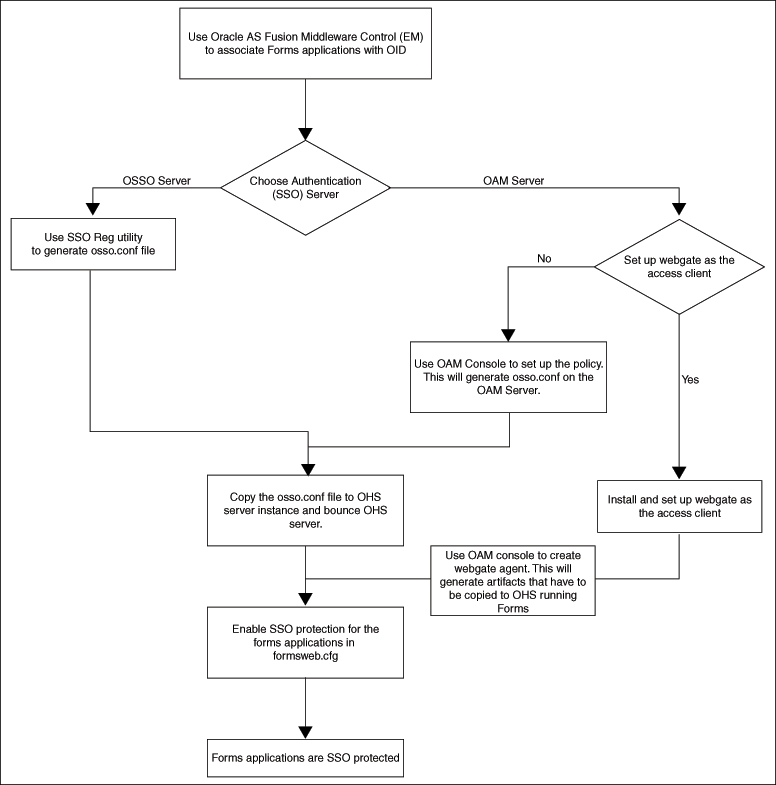
The steps depicted in the flowchart are described in details in Table 9-2:
Table 9-2 Tasks to Enable Single Sign-On for Forms Application Postinstallation
| Tasks | Options | Description | Comments |
|---|---|---|---|
|
Task 1: Use Fusion Middleware Control (EM) to associate Forms applications with OID |
User chooses to associate Forms application with Oracle Internet Directory. |
For detailed steps for selecting an Application Identity Store, see Section 9.7.1, "Configuring Forms J2EE application with Oracle Internet Directory". |
|
|
Task2: Select an Authentication (SSO) server |
Oracle Single Sign-On Server (OSSO) |
User has selected Oracle AS 10g Oracle Single Sign On Server (OSSO) as the authentication server. |
If you already have an Oracle Single Sign-On (OSSO) 10g server installed and running, you can use that. If not, you can installed Oracle Access Manager 11g.For detailed steps for installing OAM 11g, see Oracle Fusion Middleware Installation Guide for Oracle Forms and Reports. |
|
OAM Server |
User has selected Oracle Access Manager (OAM Server) as the authentication server. |
For detailed steps for installing OAM 11g, see Oracle Fusion Middleware Installation Guide for Oracle Forms and Reports. |
|
|
Task 3: Generate and apply the osso.conf file |
Oracle Single Sign-On Server (OSSO) |
User has selected Oracle AS 10g Oracle Single Sign-On Server (OSSO) as the authentication server. User must generate the |
For detailed steps for generating the |
|
OAM Server |
User has selected Oracle Access Manager (OAM Server) as the authentication server. User must generate the |
||
|
Task 4: Set up Webgate Access Client |
No |
In this case, no additional steps are required. mod_osso is set up as the access client. |
|
|
Yes |
The user chose to configure Forms application with OAM authentication server with webgate as the access client. The user must install and configure Webgate manually. |
For detailed steps for setting up webgate access client, see Section 9.7.4, "Installing and Configuring Webgate with OAM". |
|
|
Task 5: Enable SSO for Forms applications in formsweb.cfg |
This task is mandatory. |
After having registered the Access client with the authentication server, the user must enable SSO for Forms applications. |
For detailed steps for enabling SSO for Forms applications in formsweb.cfg, see Section 9.4, "Protecting Forms applications with Single Sign-On". |
9.3 Forms Services Features with Authentication Server Protection
The following features and enhancements are available with this release of Oracle Forms Services:
9.3.1 Dynamic Resource Creation
In single-sign on mode, when a user tries to connect to a Forms application, the user is authenticated by mod_osso or webgate in combination with an authentication server and Oracle Internet Directory. Once the user is authenticated, the user is directed to the Forms servlet which takes the user's request information containing the single sign-on user name. The user name and the application name build a unique pair that identifies the user's resource information for this application in Oracle Internet Directory.
When an authorized Forms user has neither the resource for a particular application that is being requested nor a default resource in Oracle Internet Directory, then the user is redirected to DAS or the Forms RAD Servlet for the creation of the Resource Access Descriptor. After creating the resource, the user is redirected to the original Forms request URL.
The way Forms Services handles the missing resource information can be customized by the application or Forms Services administrator. The following options are available:
-
Allow dynamic resource creation (default)
-
Redirect the user to a pre-defined URL as specified by the ssoErrorUrl parameter
-
Display the Forms error message
The redirection URL is provided by the system administrator in the Forms configuration files and should be either absolute or relative.
9.3.2 Support for Dynamic Directives
Enforcing single sign-on in Forms is done within the formsweb.cfg file. The single sign-on parameter, ssoMode, when set to a valid value other than FALSE, indicates that the application requires authentication by authentication server.
This parameter allows a Forms Services instance to handle both application types, those that rely or do not rely on single sign-on for retrieving the database password. Because single sign-on is configured in the formsweb.cfg file, Enterprise Manager Fusion Middleware Control can be used to manage this aspect of authentication.
9.3.3 Support for Database Password Expiration
In previous releases of Oracle Forms, changing a database password would be successful, but the changes (including expirations) would not propagate to Oracle Internet Directory.
In Oracle Forms Services 11g, if the database password has expired and the Forms Services application, running in single sign-on mode, is used to renew it, the new password entered by the user is used to update the Resource Access Descriptor (RAD) in Oracle Internet Directory for this application. This feature ensures that authenticating a Forms user via authentication server with Forms continues to work even when the user's database password has changed. However, if password changes are made in SQL*Plus, and not in Oracle Forms, the database connect string is not updated in Oracle Internet Directory.
9.4 Protecting Forms applications with Single Sign-On
Oracle Forms applications are configured using a central configuration file, the formsweb.cfg file in the $DOMAIN_HOME/config/fmwconfig/servers/WLS_FORMS/applications/formsapp_11.1.2/config directory. The recommended method of managing formsweb.cfg file is using Fusion Middleware Control.
The following parameters defined in Oracle Forms Services configuration file formsweb.cfg should be used by the users to enable Single Sign-On in individual or collective Forms applications. It is recommended that this file should be managed using the Fusion Middleware Control.
Table 9-3 Parameters used to enable single Sign-On
| Parameter Name | Valid values | Default Value |
|---|---|---|
|
ssoMode |
mod_osso true webgate false |
false |
|
ssoProxyConnect |
yes no |
yes |
|
ssoDynamicResourceCreate |
true false |
true |
|
ssoErrorUrl |
String URL |
|
|
ssoCancelUrl |
String URL |
Note:
A detailed description of these parameters along with their possible values are discussed below.These Oracle Forms parameters in the formsweb.cfg file are set in the User Parameter section, which define the behavior for all Forms applications run by the server. These parameters can also be set in a Named Configuration, which define the settings for a particular application only. A single sign-on parameter set in a Named Configuration section overrides the same parameter set in the User Parameter section.
To enable single sign-on for an application:
-
Start Fusion Middleware Control.
-
Select Web Configuration from the Forms menu.
-
Select the row that lists the configuration section for your application.
-
In the Section region, select sso in the Show drop down list.
-
In the Section region, select the row containing
ssoMode. -
In the Value field, enter
mod_ossoorwebgateorTRUE. -
Click Apply to update the
formsweb.cfgfile.Single sign-on is now enabled for the selected application.
To disable single sign-on for an application:
-
Select Web Configuration from the Forms menu.
-
Select the row that lists the configuration section for your application.
-
In the Section region, select sso in the Show drop down list.
-
In the Section region, select the row containing
ssoMode. -
In the Value column, enter
FALSE. -
Click Apply.
Single sign-on is now disabled for the selected application.
9.4.1 ssoMode
The ssoMode parameter enables a Forms Services application to connect to an authentication server. Following are the values that the single sign-on parameter, ssoMode can assume:
-
ssoMode, when set toTRUEormod_ossoindicates that the application requires authentication by OAM Server or OracleAS Single Sign-On Server. -
ssoMode, when set towebgateindicates that the application requires authentication by OAM server using webgate as the access client. Webgate must be manually installed and configured. -
ssoMode, when set toFALSEindicates that the application does not require authentication with an authentication server.
By default, Oracle Forms applications are not configured to run in single sign-on mode. The ssoMode parameter can be set in two places in the formsweb.cfg file:
-
By setting
ssoModein the default section offormsweb.cfgwith a value oftrueormod_ossoorwebgatewhich allows all applications to run in single sign-on mode by this Forms Services instance -
By setting the
ssoModeparameter in a named configuration of an Oracle Forms application which enables or disables single sign-on only for this particular application, for example:[myApp] form=myFmx ssoMode=true
9.4.2 ssoProxyConnect
The ssoProxyConnect parameter enables a user to control when Oracle Forms should use a proxy connection to the database and when it should not. The ssoProxyConnect parameter can be set in two ways:
-
By setting
ssoProxyConnectin the default section offormsweb.cfgwith a value ofyeswhich allows all applications to run in single sign-on mode by this Forms Services instance -
By passing the
ssoProxyConnectparameter in the URL at runtime, for examplehttp://<host>:<port>/?config=myapp&……&ssoProxyConnect=yes
9.4.3 ssoDynamicResourceCreate
The ssoDynamicResourceCreate parameter is set to true by default which allows the user to create a Resource Access Descriptor (RAD) entry in Oracle Internet Directory to run the application if this resource entry does not exist.
Allowing dynamic resource creation simplifies Oracle Internet Directory administration because there is no longer the need for an administrator to create user RAD information in advance. The ssoDynamicResourceCreate parameter can be set as a system parameter in the formsweb.cfg file or as a parameter of a named configuration. Because the default is set to true, this parameter may be used in a named configuration for a specific application to handle a missing RAD entry differently from the default.
Note that enabling an application for single sign-on with the value of the ssoDynamicResourceCreate parameter set to false, while not specifying a value for the ssoErrorURL, causes Oracle Forms to show an error message if no RAD resource exists for the authenticated user and this application.
Since not all administrators want their users to create resources for themselves (and potentially raising issues with Oracle Internet Directory), these parameters allow administrators to control Oracle Internet Directory resource creation. Although the default behavior is to direct users to an HTML form that allows them to create the resource, the administrator can change the setting and redirect the user to a custom URL.
For the configuration section for the Forms application, you need to set these parameters:
[myApp] form=myFmx ssoMode=true ssoDynamicResourceCreate=false
For information about setting these parameters through Enterprise Manager Fusion Middleware Control, see Section 4.2.4, "Managing Parameters".
9.4.4 ssoErrorURL
The ssoErrorURL parameter allows an administrator to specify a redirection URL that handles the case where a user RAD entry is missing for a particular application. This parameter has effect only if the ssoDynamicResourceCreate parameter is set to false, which disables the dynamic resource creation behavior. The ssoErrorURL parameter can be defined in the default section and as a parameter in a named configuration section. The URL can be of any kind of application, a static HTML file, or a custom Servlet (JSP) application handling the RAD creation, as in the example below.
[myApp] form=myFmx ssoMode=true ssoDynamicResourceCreate=false ssoErrorURL=http://example.com:7779/servlet/handleCustomRADcreation.jsp …
9.4.5 ssoCancelUrl
The ssoCancelURL parameter is used in combination with the dynamic RAD creation feature (ssoDynamicResourceCreate= true) and defines the URL that a user is redirected to if the user presses the cancel button in the HTML form that is used to dynamically create the RAD entry for the requested application.
9.4.6 Accessing Single Sign-on Information From Forms
Optionally, if you need to work with authentication server to authenticate information in a Forms application, the GET_APPLICATION_PROPERTY() Built-in can be used to retrieve the following login information: single sign-on user ID, the user distinguished name (dn), and the subscriber distinguished name (subscriber dn)
authenticated_username := get_application_property(SSO_USERID);
userDistinguishedName := get_application_property(SSO_USRDN);
subscriberName := get_application_property(SSO_SUBDN);
config := get_application_property(CONFIG).
The Forms application developer can obtain the SSO information such as single sign-on user ID, subscriber distinguished name (subscriber dn), and user distinguished name (dn) in SSO mode with either OracleAS Single Sign-On server or Oracle Access Manager when using mod_osso or webgate as the access client.
Note:
config can be obtained even in non-SSO mode.9.5 Integrating Oracle Forms and Reports
Oracle Reports is installed with authentication server enabled.
The best practice for Oracle Forms applications calling integrated Oracle Reports is to use the Oracle Forms Built-in, RUN_REPORT_OBJECT.
When requesting a report from an SSO-enabled Oracle Forms application, the authenticated user's SSO identity is implicitly passed to the Reports Server with each call to RUN_REPORT_OBJECT built-in. The SSO identity is used to authenticate the user to the Reports Server for further authorization checking, if required.
A Forms application running in non-SSO mode can run a report on a SSO-secured Reports Server, but fails if the Reports Server requires authorization. Also, users must provide their SSO credentials when retrieving the Reports output on the Web.
For more information on enabling single sign-on in Forms, see Section 9.4, "Protecting Forms applications with Single Sign-On".
For more information on configuring single sign-on in Reports, refer to Oracle Fusion Middleware Publishing Reports to the Web with Oracle Reports Services.
For more information about integrating Oracle Forms and Oracle Reports, see the white paper Integrating Oracle Forms 11g and Oracle Reports 11g at http://www.oracle.com/technetwork/developer-tools/forms/overview/index.html.
9.5.1 Forms and Reports Integration in non-SSO mode
Prior to 11g Release 1 (11.1.1), Oracle Reports generated sequential job IDs, making it easy to predict the job ID. This meant that unauthorized or malicious users could potentially view the job output using GETJOBID through rwservlet to obtain job output that belongs to another user. In 11g, Oracle Reports can generate random and non-sequential job IDs to make it impossible to predict the job ID for a particular job. This feature must be enabled postinstallation. Only the user who runs a report from Oracle Forms Services is able to see its output. Other users should not be able to see the report output as job IDs are random non-sequential numbers.
For more information about generating random and non-sequential job IDs, see Oracle Fusion Middleware Publishing Reports to the Web with Oracle Reports Services.
For a non-secure Reports Server, the user ID and password for administrators can be set in the identifier element of the Reports Server configuration file.
For more information about configuring the access levels for the users, refer to Oracle Fusion Middleware Publishing Reports to the Web with Oracle Reports Services.
9.5.2 Using Multiple Reports Server Clusters in Oracle Forms Services
If your Oracle Forms application from a prior release uses multiple Reports Server cluster names, you can map each of those cluster names to a different Reports Server. In Oracle Reports 11g Release 1 (11.1.1), Reports Server clustering was deprecated. An Oracle Forms application from prior releases that includes a Reports Server cluster name will fail to bind to the Reports Server cluster it references.
To resolve this issue, the reports_servermap element maps a cluster name to a Reports Server name. This avoids the necessity to change the cluster name in all Oracle Forms applications.
An Oracle Forms application can call Oracle Reports in the following ways:
-
Using
RUN_REPORT_OBJECT: If the call specifies a Reports Server cluster name instead of a Reports Server name, thereports_servermapenvironment variable must be set in the Oracle Forms Servicesdefault.envfile. If your Oracle Forms application uses multiple Reports Server cluster names, you can map each of those cluster names to a different Reports Server usingreports_servermapinrwservlet.properties, as follows:<reports_servermap>cluster1:repserver1;cluster2:repserver2;cluster3:repserver3</reports_servermap>For example, if your Oracle Forms application includes 3 clusters with names
dev_cluster,prd_cluster, andqa_clusterin 10.1.2, you can map these cluster names to respective server names in later releases, as follows:<reports_servermap>dev_cluster:dev_server;prd_cluster:prd_server;qa_cluster:qa_server</reports_servermap> -
Using
WEB.SHOW_DOCUMENT: In this case, the request is submitted to rwservlet. If the call specifies a Reports Server cluster name instead of a Reports Server name, thereports_servermapelement must be set in therwservlet.propertiesfile. For example:<reports_servermap>cluster:repserver</reports_servermap>
For more information, see Oracle Fusion Middleware Publishing Reports to the Web with Oracle Reports Services.
9.5.3 Integrating Forms and Reports Installed in Different Instances
In 11g, Forms and Reports can be configured separately in different instances. If you chose to install Forms and Reports in different Oracle instances, and later require Forms and Reports integration, you need to manually configure files required to establish communication with Reports Servers. For more information, see Oracle Fusion Middleware Publishing Reports to the Web with Oracle Reports Services.
9.6 Enabling and Configuring Proxy Users
This section contains the following:
9.6.1 Proxy User Overview
Many large applications, including Oracle's own E-Business Suite, use a single username for all connections. This makes it possible to manage users in a way that often suits large companies better but it creates a problem with auditing. All inserts, updates and removals of records appear, from the database's perspective, to have been done by a single user. To restore auditing, the application developers must write and implement customized auditing code in the database that requires a user name to be passed to the database from the application. This step not only takes development time, but also duplicates functionality that is already implemented in the Oracle Database.The second issue is security. If that single user access is ever compromised, the compromised user will have access to the entire application schema.To address these two issues, Oracle Database supports proxy user authentication, which allows a client user to connect to the database through an application server, as a proxy user.
Figure 9-6 describes the authentication of a Forms proxy user.
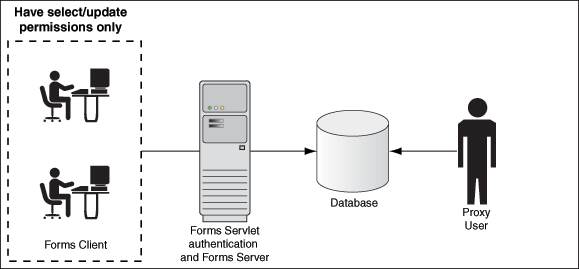
-
Oracle Forms authenticates the user through Oracle Internet Directory or LDAP, as shown in the center of the image.
-
Forms then connects as the proxy user with or without a password, passing in the real username from the Oracle Internet Directory repository.
-
Typically, the proxy user is configured with least set of privileges. In the following procedure, the proxy user has "connect" and "create session" privileges.
-
The database accepts the
createsession action for the proxy user and uses the real username in audits and access control. -
The Oracle Internet Directory user cannot connect to the database independently without configuration of the proxy user account.
-
The proxy user account isolates the client from direct SQL*Plus connections.
9.6.2 Enabling Proxy User Connections
To use a proxy support in Forms, you first need to create a proxy user. In this example, the proxy user is called midtier:
-
Create a proxy user in the database.
SQL> CREATE USER midtier IDENTIFIED BY midtierPW;
-
Assign connect and create session privileges to midtier:
SQL> GRANT CONNECT,CREATE SESSION TO midtier;
At this point, this proxy user has connect and create session privileges and has no grants on any of the user schemas.
-
Create a database user which has one-to-one mapping with a SSO username (that is, if
appuseris the SSO username create database userappuser).SQL> CREATE USER appuser IDENTIFIED BY appuserPW;
-
Assign create session privileges to appuser.
SQL> GRANT CREATE SESSION TO appuser;
-
To make it possible to connect through the midtier user you need to alter the database user:
SQL> ALTER USER appuser GRANT CONNECT THROUGH midtier;
The user
appusercan now connect through the midtier account.Alternatively, you can define the roles that the proxy user can connect to the database as
SQL> ALTER USER appuser GRANT CONNECT THROUGH midtier WITH ROLE <role_name>;
Repeat Step 3 and 4 for all database users who need to use the proxy user account.
It is also possible to set up the database users in Oracle Internet Directory with the help of the database functionality called Enterprise User Security. If you choose this method, the proxy user is the only user defined in the database and the additional benefit of easy administration is gained. For more information on using Enterprise User Security, refer to the Oracle Fusion Middleware Administrator's Guide for Oracle Internet Directory 11g Release 1 (11.1.1).
The application user's password is not presented to the database; only the user name and the proxy user's user name and password. Forms, with the help of OCI calls, issues the equivalent of:
SQL> connect midtier[appuser]/midtierPW@databaseTnsName
For example, suppose your application always connects to the database using midtier. This midtier now informs the database that the actual user is appuser. Without using proxy users, the SQL command select USER from DUAL would return midtier, but, using proxy users, this query returns appuser. This essentially tells the database to trust that the user is authenticated elsewhere and to let the user connect without a password and to grant the connect role.
Note:
-
In the Step 3 of the above procedure, the database users are typically configured to have a subset of permissions granted to a schema. For example, appuser is granted
CREATEpermissions to the schemaapp_schemawith the SQL command:SQL> GRANT CREATE ON SCHEMA app_schema TO appuser
Thus, the appuser is restricted to perform only a set of actions in proxy user mode.
-
When the database user (for example, appuser) is connected in proxy mode, user actions of the database users are audited rather than that of the proxy user. For more information on user action auditing, refer to the Oracle Database documentation at
http://www.oracle.com/technetwork/indexes/documentation/index.html.
9.6.3 Enabling SSO for Proxy Users
Create a configuration section in formweb.cfg for single sign-on (for example, ssoapp) and set SSOProxyConnect to yes and ssoMode to true or mod_osso or webgate.
The username and password that is used for the proxy connection is defined in the RAD entry in Oracle Internet Directory for the user that is logging on. If ssoProxyConnect=yes, the connect string equivalent issued by Forms is in effect:
SQL> connect RADUsername[appuserName]/RADPassword@databaseTnsName
9.6.4 Accessing the Forms Application
After enabling proxy user connections and single sign-on, perform the following steps to access the forms applications:
-
Run the forms application with the URL
http://<host name>:<http port>/forms/frmservlet?config=ssoappwheressoappis the name of the configuration section with single sign-on (ssoMode) is enabled. -
Use the single sign-on user name and password to log in (in this example given in Section 9.6.2, "Enabling Proxy User Connections", the single sign-on username is
appuserand password isappuserPW).
9.6.5 Changes in Forms Built-ins
The Built-in get_application_property now takes a new parameter called IS_PROXY_CONNECTION (a Boolean). When this parameter is supplied, the call returns true if the form is running in proxy user mode, false otherwise.
9.6.6 Reports Integration with Proxy Users
The integration with Reports is maintained when a proxy user is used in Forms. The Oracle Reports administrator has to set up a proxy user. Ensure that the following configuration has been completed in the Reports configuration files.
In rwserver.conf, enter the Forms configuration section name (frm_config_name) and database SID name that is configured for proxy user support (dbname).
<dbProxyConnKeys>
<dbProxyKey name="frm_config_name" database="dbname"/>
</dbProxyConnKeys>
In rwservlet.properties, ensure that Proxy mode is enabled.
<enabledbproxy>yes</enabledbproxy>
For more information about Reports configuration files, see Oracle Fusion Middleware Publishing Reports to the Web with Oracle Reports Services.
9.7 Postinstallation Configuration
This section describes some postinstallation steps. These steps are optional and the user may be required to perform these steps depending on the choices that the user has made in Section 9.2, "Setup Process". This section includes the following topics:
9.7.1 Configuring Forms J2EE application with Oracle Internet Directory
The users connecting through a Forms application as proxy users must also be defined in authentication server and Oracle Internet Directory. Oracle Forms authenticates the user via authentication server (using authentication server with Forms is a requirement when employing a proxy user). Oracle Forms then connects to the database as the proxy user with a username and password that is in the RAD for the Oracle Internet Directory entry for the application user.
For more information on Oracle Forms and Identity Management integration, see Section 11.1.4, "Leveraging Oracle Identity Management Infrastructure"
Note:
When you change the Oracle Web Cache port using Enterprise Manager, regenerate theosso.conf and copy the generated osso.conf file to $ORACLE_INSTANCE/config/OHS/<OHS_INSTANCE>/moduleconf directory. Restart the Oracle HTTP Server and Oracle Web Cache for the changes to take effect.To access the Associate/Disassociate OID page:
-
Start Enterprise Manager.
-
Navigate to the Forms Home page.
-
From the Forms menu, select Associate/Disassociate OID.
The Associate/Disassociate OID page is displayed.
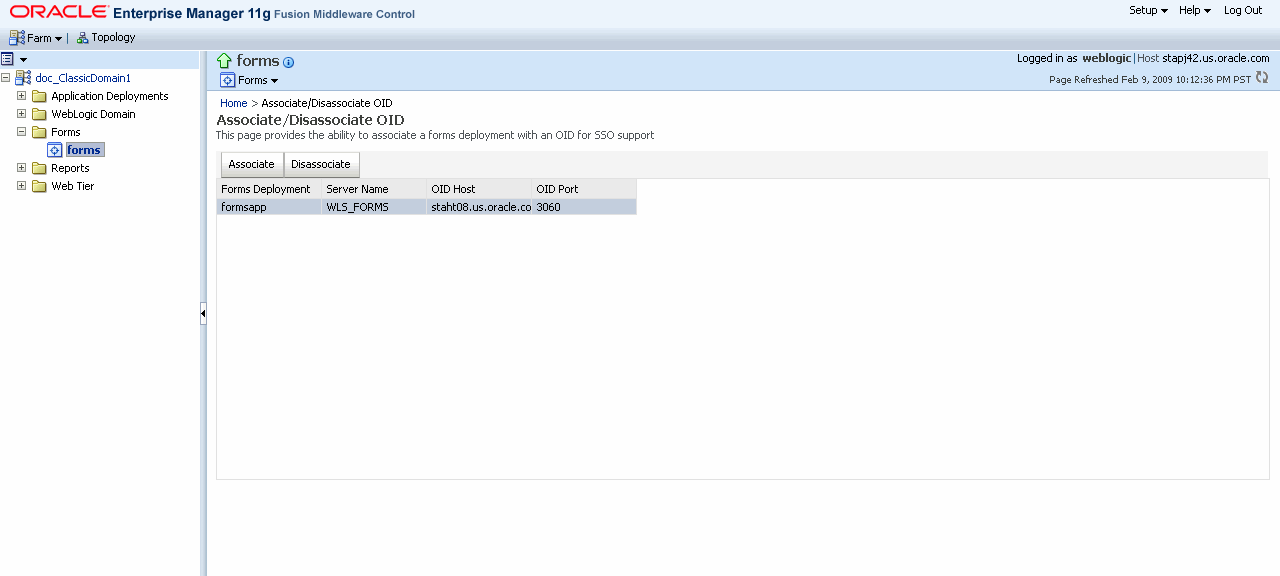
To Associate OID Host with a Forms Application
-
To associate an Oracle Internet Directory host with a Forms application for the first time, from the Associate/Disassociate OID page, select the Forms application. Click Associate.
The Associate dialog appears.
-
Enter the Oracle Internet Directory Host details as described in Table 9-4, "Oracle Internet Directory Host Details".
-
Click Associate.
The Associate/Disassociate OID page reappears.
Table 9-4 Oracle Internet Directory Host Details
Parameter Description OID Host
Select the Oracle Internet Directory Host from the list or select New Oracle Internet Directory (OID) host to add new host details.
New OID host
Host name of the Oracle Internet Directory server. This field is enabled if you have selected to add new Oracle Internet Directory (OID) Host.
New OID Port
Port number on which Oracle Internet Directory is listening. This field is enabled if you have selected to add new Oracle Internet Directory Host.
Username
Oracle Internet Directory Administrator username
Password
Oracle Internet Directory Administrator password
Use SSL Port
Select this box if the connection to the Oracle Internet Directory Host should use SSL (in which case the port number provided should be the SSL port).
-
Generate and apply the access client file as described in Section 9.7.2, "Generating the Access Client File".
To Disassociate OID Host from a Forms Application
-
From the Associate/Disassociate OID page, select the Forms application. Click Disassociate.
A confirmation box appears.
-
Click Yes.
The Oracle Internet Directory host is disassociated from the Forms application.
-
Restart the Oracle WebLogic Managed Server and the front-end OHS for the changes to take effect.
To prevent users from being inadvertently disconnected from active forms sessions, ensure you choose to restart Oracle WebLogic Managed Server and the front-end OHS at a convenient time when users are not running any forms sessions.
To re-associate an OID Host with a Forms Application
-
From the Associate/Disassociate OID page, select the Forms application. Click Disassociate.
-
From the Associate/Disassociate OID page, select the Forms application. Click Associate.
Enter the Oracle Internet Directory Host details as described in Table 9-4, "Oracle Internet Directory Host Details".
-
Generate and apply the access client file as described in Section 9.7.2, "Generating the Access Client File".
9.7.2 Generating the Access Client File
The access client file must be generated for the authentication servers. The procedure for generating the access client file are different depending on whether you are using OracleAS Single Sign-On 10g or Oracle Access Manager 11g.
Generating the osso.conf file for the OracleAS Single Sign-On Server 10g
Perform the following steps to generate the osso.conf file for the OSSO Server:
-
Run the
ssoreg.shscript located atORACLE_HOME/sso/binon the authentication server.ORACLE_HOME/sso/bin/ssoreg.sh -oracle_home_path <ORACLE_HOME> -site_name www.example.com -config_mod_osso TRUE -mod_osso_url http://www.oidtierexample.com:7777 -config_file osso.conf -remote_midtierNote:
On Windows, run thessoreg.batfile. -
Copy the generated
osso.conffile toORACLE_INSTANCE/config/OHS/<OHS_INSTANCE>. For more information, see Oracle Application Server Single Sign-On Administrator's Guide. -
Restart Oracle WebLogic Managed Server (WLS_FORMS) and the front-end OHS for the changes to take effect.
To prevent users from being inadvertently disconnected from active forms sessions, ensure you choose to restart Oracle WebLogic Managed Server and the front-end OHS at a convenient time when users are not running any forms sessions.
Generating the osso.conf file for the Oracle Access Manager
Perform the following steps to generate the osso.conf file for the OAM Server using the OAM console:
-
Log in to the OAM console.
-
Navigate to the System Configuration tab. Select Agents and navigate to the OSSO Agents node. Click Create.
-
Provide all the details such as the Base URL. Ensure that the Auto Create Policies check box is checked.
-
Click Apply.
The
osso.conffile is generated for the OAM server. The location of the file is mentioned in the OAM console. -
Copy the generated
osso.conffile toORACLE_INSTANCE/config/OHS/<OHS_INSTANCE>. -
Restart OHS for the changes to take effect.
To prevent users from being inadvertently disconnected from active forms sessions, ensure you choose to restart Oracle WebLogic Managed Server and the front-end OHS at a convenient time when users are not running any forms sessions.
For more information about generating the osso.conf file using the OAM console, see Registering and Managing OSSO Agents Using the Administration Console in Oracle Fusion Middleware Administrator's Guide for Oracle Access Manager.
9.7.3 Enabling mod_osso in the OHS directives configuration
You must perform this task if you have chosen to install and configure Forms in non-SSO mode and want to enable SSO later. To be able to enable SSO later, you must register mod_osso as a partner application in OHS with authentication server. To achieve this, perform the following steps:
-
Follow the steps to generate and copy the
osso.conffile as described in Section 9.7.2, "Generating the Access Client File". -
Create a
mod_osso.conffile in theORACLE_INSTANCE/config/OHS/<OHS_INSTANCE>/moduleconfdirectory. The file looks similar to the following example:LoadModule osso_module ${ORACLE_HOME}/ohs/modules/mod_osso.so <IfModule mod_osso.c> OssoIpCheck off OssoSecureCookies off OssoIdleTimeout off OssoConfigFile osso.conf # # Insert Protected Resources: (see Notes below for # how to protect resources) # #______- # # Notes # #______- # # 1. Here's what you need to add to protect a resource, # e.g. <ApacheServerRoot>/htdocs/private: # <Location /private> require valid-user AuthType Osso </Location> </IfModule> # # If you would like to have short hostnames redirected to # fully qualified hostnames to allow clients that need # authentication via mod_osso to be able to enter short # hostnames into their browsers uncomment out the following # lines # #PerlModule Apache::ShortHostnameRedirect #PerlHeaderParserHandler Apache::ShortHostnameRedirect -
Add the following lines to the beginning of the
forms.conffile:<IfModule !mod_osso.c> LoadModule osso_module ${ORACLE_HOME}/ohs/modules/mod_osso.so </IfModule> <IfModule mod_osso.c> OssoHTTPOnly off </IfModule> -
Associate the OID Host using Enterprise Manager as described in To Associate OID Host with a Forms Application in Section 9.7.1, "Configuring Forms J2EE application with Oracle Internet Directory".
-
Restart the Oracle WebLogic Managed Server (WLS_FORMS) and the front-end OHS for the changes to take effect.
9.7.4 Installing and Configuring Webgate with OAM
For webgate to work with Oracle Access Manager 11g, you must install and configure webgate manually. For information about installing and configuring webgate as the access client, see Installing and Configuring Oracle HTTP Server 11g Webgate for OAM in Oracle Fusion Middleware Installation Guide for Oracle Identity Managment.
Postinstallation, you must register webgate with OAM 11g so that webgate can directly communicate with Oracle Access Manager 11g services. To register webgate with OAM 11g, perform the following steps:
-
Create a webgate 11g agent by using either RREG tool or through OAM console.
While creating the webgate agent, you must add the following URL to the Protected Resource List:
/forms/frmservlet?*oamMode=true*
Add
"/"and"/.../"to the Public Resource List. -
Copy
ObAccessClient.xmlandcwallet.ssoto the webgate instance directory of the relevant OHS as shown in the following example:cp <OAM_DOMAIN_HOME>/output/<Agent_Name>/*.xml <WEBGATE_INSTANCE>/webgate/config
For information about registering webgate as an agent by using either OAM console or RREG tool, see Register the New Webgate Agent in Oracle Fusion Middleware Installation Guide for Oracle Identity Managment
Note:
After installing and configuring webgate access client to work with Oracle Access Manager 11g, when the user accesses Forms application for the first time with webgate as the access client, the user will see a java exception error. As a workaround to this issue, the user must disable the HTTPOnly parameter. To achieve this, perform the following steps:-
Log in to the OAM Administration Console.
-
Select Authentication Schemes and navigate to LDAPScheme.
-
Set the
ssoCookieparameter value to disablehttponly. -
Click Apply.