| Oracle Virtual Operator Panel User's Guide Release 2.1 E48640-01 |
|


 Previous |
 Next |
This chapter describes how to use VOP in a client/server configuration.
VOP consists of two main components:
VOP client
VOP server (SDP2 Service Delivery Platform 2)
The VOP client can be run in standalone mode (directly connected to a specific devices) or can be connected to the VOP server to direct all traffic through the server.
The VOP server serves as a single point of access to all devices, and is designed to reduce the number of device connections. It provides automated ASR functions and allows for additional logs to be collected.
The VOP client is designed to control and update the maintenance for different tape drives. It can be run in standalone mode (directly connected to a specific devices) or can be connected to the VOP server in order to direct all traffic through the server. In the MDVOP application, a configuration file is used to track different configurations.
Figure 5-1 shows a standalone VOP client, which includes a direct connection to each device.
The VOP server serves as a single point of access to all devices, and is designed to reduce the number of device connections. It provides automated ASR functions and allows for additional logs to be collected. Multiple VOP clients can be configured to communicate with the VOP server.
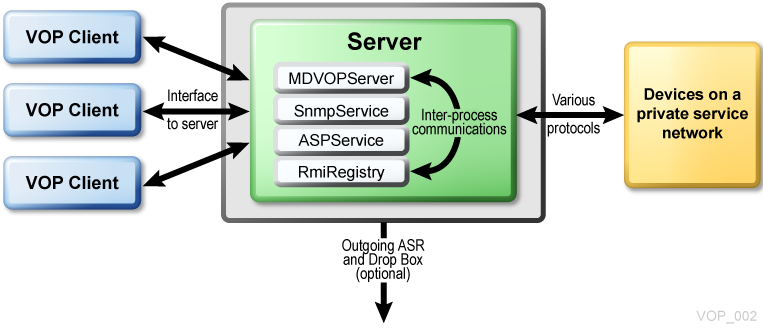
Figure 5-2 shows a VOP Client/Server configuration, which includes multiple VOP clients communicating with the VOP Server to manage devices.
As shown in the Figure 5-2, The VOP server contains multiple applications that run as Linux modules. These applications provide the main communication to each protocol as a central location for different devices and access.
Each module provides a specific function:
MDVOPServer
This module provides the GUI interface to the server and the main control system for the tape drives.
SnmpService - SNMP (simple Network Management Protocol)
This module receives events from different devices and controls all aspects of monitoring and maintaining processing.
ASPService - ASP (ASR Service Plus)
This module controls ASR and VSM related functions. It is responsible for sending alerts.
RmiRegistry - RMI (Remote Method Invocation)
This module provides the default level of communications between the GUI and server and also for inter process communication. This module is the default RMI installed.
Clients connect to the server through the RMI interface. The server handles any interaction through a private service network to the devices. This communication is local only. ASR and the drop box are the only outgoing interfaces that can be enabled or disabled.
The server uses a domain.vop file to control which devices are monitored. This file is only used by the server. To be monitored, the device must be included in this file. Any change to this file (new device, change in IP, etc.) require the services to be restarted.
The VOP client uses a client configuration file. This file is a copy of the domain.vop file, or can be a subset of this file so that it includes only the devices you are interested in. If the domain is changed for selective areas, you must update the client configuration file.
VOP can be used with Automated Service Request (ASR) to manage devices and collect logs by default. The ASR component must be enabled to function.
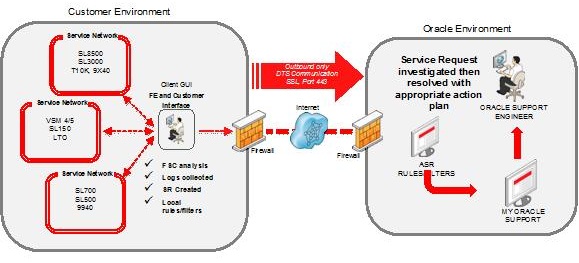
Figure 5-3 shows an example of a configuration using a standalone VOP client. In this customer environment, VOP is directly connected to various devices. This allows for all general VOP functionality. All devices reside on the private service network.
If the ASR component is enabled, then manual case creation can be performed through the DTS protocol to create the case and transfer logs. This protocol is sent through the secure layer.
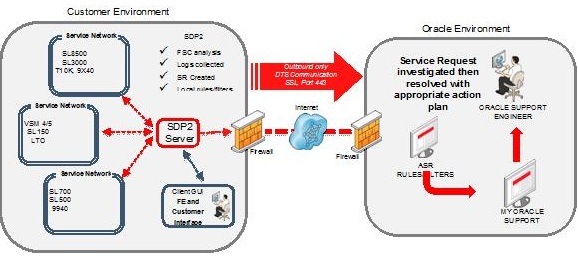
Figure 5-4 shows an example of a configuration using a VOP client communicating with the VOP (SDP2) server. The VOP client communicates with the VOP server while the VOP server communicates with the devices. All VOP functionality is performed through the GUI and redirected to the server.
In this configuration, if the ASR component is enabled, then the VOP server can create alerts after monitoring the devices for problems. The VOP client can still create a manual ASR as needed.
Figure 5-5 shows the different modes you can use to utilize VOP to communicate with Oracle Support.
In each mode shown in Figure 5-5, the primary goal is to use VOP functionality to maintain the supported devices:
This mode is designed for access to devices, and allows for maintenance and support. If an issue must be uploaded, then the user can contact Oracle Support.
This mode includes a manually configured ASR, through either the standalone VOP client or the VOP server. The customer can manually create cases. VOP functionality to the devices is present.
This mode is designed for the creation of automated alerts. VOP functionality to the devices is present. Depending on customer requirements, this may allow Oracle support to remotely collect additional logs.
This section provides VOP server installation instructions and considerations.
The VOP server is installed as an RPM package installed from root. Before installing the VOP server, review the following server notes (assuming Oracle 6.4 Linux):
The application is designed to run as a regular user called sdp2admin.
No special privileges for the account are required.
The account requires a home directory used for collecting logs. Ensure that this directory has an appropriate disk size.
All applications for this user run under this account.
Installation requires a configured account. If the installation system contains NIS, LDAP, or related packages, contact your system administrator and Oracle support as necessary.
ip tables must be considered. Installing the application requires several ports to be open.
SE Linux is modified to allow the local copy of Java to be used by this application.
If root is required to run this application, contact Oracle support for details.
When you install the RPM package, the following actions occur:
The sdp2admin account is created.
The sdp2admin group is created.
ip tables are modified to redirect SNMP to a higher port for the user to access and requests SE Linux to enable the included copy of Java to run.
The application is installed under /opt/Oracle/Mdvopserver.
Entries are placed under init to start the application.
/etc/hosts is checked for an entry.
The Library Complex value is set by the SLConsole for each individual library. The customer or support representative can set or change this value.
Setting or changing this value impacts the VOP Server and StorageTek Tape Analytics (STA). The library complex value defines part of the IP address that is used in the private LAN ports for the library. This can cause the VOP Server (connected through a switch using a VLAN to the private network) to be unable to find the library. STA uses the library complex value to identify a specific library complex. Changing this value can potentially cause loss of records for that library and associated tape drives.
Oracle recommends the following:
Establish a common library complex value when installing the VOP server and StorageTek Tape Analytics.
Once this value is established, do not change this value without careful consideration.
Changing this value is a user defined ability, and therefore cannot be controlled by additional software monitoring the environment.
To install the VOP server:
Edit the /etc/hosts file. To allow RMI to function properly, edit the hosts file with the IP address of the server along with the hostname. Use a fully qualified host name.
If this file is not present, the GUI cannot connect to the server. Currently, only one IP address is supported for the GUI connection.
For example:
[sdp2admin@ttx4200-2 bin]$ cat /etc/hosts
127.0.0.1 localhost localhost.localdomain localhost6 localhost6.localdomain6
10.10.10.102 mdvop_server.us.oracle.com
In this example, the entry 10.10.10.102 mdvop_server.us.oracle.com is added to the /etc/hosts file. The hostname and IP address identify the system for the installation.
Issue the following command to install the rpm package:
rpm --install file_name
where file_name is the VOP server installation package.
The installation displays all steps performed and the completed output displays additional notes to be reviewed.
For example:
[root@dr-sdp2-OEL64-x86-4 ~]# rpm --install
MdvopServer-2.1.1-SNAPSHOT2013101519
1816.i686.rpm
pre 2.1.1
Installing..........
- Checking for Dependencies and creating a list that is needed.
Please Wait....
-(sdp2admin) exists!, No changes to Users Account
Working.....
post 2.1.1
Post Script Running..........
+Installing a local copy of Java into
/opt/Oracle/MdvopServer/jre1.7.0_25!
+Successful with JVM Installation! Deleting Compressed file
+Modify sdp2admin Bash Profile, Please check SDP2_JAVA_HOME
Environment to be set correctly!
+Running MDVOP (SDP2) Server Setup
+Creating sdp2admin cron entry!
-User:sdp2admin Previous Server settings detected. No changes will be made!
+Attempting to run Administration Activities for Mdvop Server
for first time with (root) privileges!
+Configured System for use with Mdvop Server with java
preference (stand alone)
+Attempting to setup Mdvop Server for first time with (sdp2admin_ privileges!
+Configuring system wide init scripts! Selected runlevel will be (3,5)
+Configuring logrotate for Mdvop Server Application Logs!
+Checking network hosts file for IP configuration needed for RMI services
Finished with Package installation
posttran 2.1.1
Perform the following steps to verify and configure the VOP server (SDP2) basic settings:
Login as (sdp2admin) or <su - sdp2admin> as root.
<cd /opt/Oracle/MdvopServer> or alternatively use <cd SDP2_HOME> and then <ls>.
Verify permissions are sdp2admin:sdp2admin on folders.
If a local java was installed, this is the top level directory. Look for a Java folder (i.e. jre1.7.0.25)
<cd bin> and then issue <ls>.
Verify that preinstallation is complete. If the file (jreConfig) is present, then a suitable Java has been found.
Issue the command <./Server.sh config>. If successful, then the file will exist. Otherwise, you must manually configure it.
Alternatively, issue <./detectJava.sh> and review the output to determine whether a JVM was found.
Issue <ls /setup> to verify that there is a directory (bin/setup).
If change (changeSnmpPort) exists, then the firewall was modified.
If change (secureJava) exists, then SE Linux is aware that a local copy of Java is being used.
As an administrator, verify that /etc/hosts file contains the server IP address and correct DNS name.
Issue <./Server.sh start> to start the Mdvop server services. After services start, issue <./Server.sh status> to verify that services are active.
Note the following considerations:
You can run the server from anywhere with the command <mdvop_server start>. Please do not run as root!
General logs of the process are located in /opt/Oracle/MdvopServer/logs.
If you receive a message indicating that a port is in use, verify that other RMI processes are not running.
Local server documents are located in /opt/Oracle/MdvopServer/docs.
Java search order is as follows:
If this installation process was able to detect the correct machine architecture (i686), then a JRE (Java Runtime Environment) was installed under the top level directory.
If you are using an x64 architecture, the JRE was not installed and the installation likely used the native (OS) version detected.
If the installer could not detect an architecture, then you must manually install a compatible version of Java.
After you install Java, point the (/opt/Oracle/MdvopServer/bin/jreConfig) file to the parent directory of the JVM (Java Virtual Machine). For example:
<which java> yields (/usr/bin/java)
</usr/bin/java -version> yields (java version 1.7.0_25)
<echo /usr > /opt/Oracle/MdvopServer/bin/jreConfig>
Note: Use double quotes with echo!
Verify with <cat /opt/Oracle/MdvopServer/bin/jreConfig> yields (/usr)
After installation and setup, the administrator can either restart the server or issue the following commands to start the application:
su - sdp2admin
mdvop_server start
See "Scripts" for details.
To verify whether the VOP server is installed, issue the following command:
rpm -qa | grep -i mdvop
For example:
[root@dr-sdp2-OEL64-x86-4 ~]# rpm -qa | grep -i mdvop
MdvopServer-2.1.1-SNAPSHOT20130919151818.i686
To upgrade to a newer version for this release, you must install and then reinstall the package. The following actions occur:
All running modules are stopped.
The /opt/Oracle/Mdvopserver is removed.
The SNMP port entry in the iptables is removed.
All settings are saved for reuse.
The user account sdp2admin is retained.
To remove the VOP server, issue the following command:
rpm -e MdvopServer
For example:
[root@dr-sdp2-OEL64-x86-4 ~]# rpm -e MdvopServer
preun 2.1.1
Removing........
Stopping MDVOPServer: [ OK ]
Stopping SnmpService: [ OK ]
Stopping ASPService: [ OK ]
Stopping RmiRegistry: [ OK ]
+User:sdp2admin Mdvop Server Settings were archived in
/home/sdp2admin/MdvopServer-20131016084200OURCE-Settings.tar.gz
-User:sdp2admin was not removed from the System
postun 2.1.1
Removed Package, Cleaning up........
FINISHED
Use the mdvop_server script to start and stop the VOP server. This script is included in the path for the account.
Using no arguments displays the available commands. For example:
[sdp2admin@dr-sdp2-OEL64-x86-4 ~]$ mdvop_server
Usage: /usr/local/bin/mdvop_server {start|stop|restart|reload|status}
To start the application, issue the following command:
mdvop_server start
For example:
[sdp2admin@dr-sdp2-OEL64-x86-4 ~]$ mdvop_server start
Starting RmiRegistry: [OK]
Starting ASPService: [OK]
Starting SnmpService: [OK]
Starting MDVOPServer: [OK]
[sdp2admin@dr-sdp2-OEL64-x86-4 ~]$
To stop the application, issue the following command:
mdvop_server stop
For example:
Stopping MDVOPServer: [OK]
Stopping SnmpService: [OK]
Stopping ASPService: [OK]
Stopping RmiRegistry: [OK]
To view the status of the application, issue the following command:
mdvop_server status
For example:
[sdp2admin@dr-sdp2-OEL64-x86-4 ~]$ mdvop_server status
RmiRegistry (pid 3232) is running...
ASPService (pid 3250) is running...
SnmpService (pid 3289) is running...
MDVOPServer (pid 3322) is running...
[sdp2admin@dr-sdp2-OEL64-x86-4 ~]$
|
 Copyright © 2014, Oracle and/or its affiliates. All rights reserved. Legal Notices |
|