4 Installing Software on an Exalytics Machine
This chapter describes how to use the Exalytics Domain Management Utility to install, configure, and manage life cycle functions of an Exalytics domain on an Exalytics Machine (both virtual and non-virtual deployments). The chapter also describes how to use the Exalytics Domain Management Utility to register and manage existing deployments. Finally, the chapter describes how to install and configure Oracle BI Applications on an Exalytics Machine.
Exalytics customers install or upgrade software components based on their specific needs. Typically, customers deploy one of the following applications (single instance or multi-instance) on an Exalytics machine:
-
Custom built Oracle Business Intelligence application (Oracle BI EE) and Oracle TimesTen for Exalytics
-
Prebuilt Oracle BI Applications
-
Oracle Enterprise Performance Management applications
-
Oracle Endeca
This chapter includes the following sections:
-
Section 4.1, "About the Exalytics Domain Management Utility"
-
Section 4.3, "Installing Business Intelligence Software on New Deployments"
-
Section 4.5, "Installing and Configuring Oracle BI Applications 11.1.1.7.1 on an Exalytics Machine"
-
Section 4.6, "Installing Oracle Enterprise Performance Management Applications"
4.1 About the Exalytics Domain Management Utility
The Exalytics Domain Management Utility creates an Exalytics domain on the Exalytics Machine. Each Exalytics domain is defined as the combination of an Oracle Business Intelligence domain and Oracle TimesTen. For each domain, the Exalytics Domain Management Utility automates the installation and configuration of Oracle Business Intelligence, Oracle WebLogic Server, Oracle Essbase, and optionally Oracle TimesTen for Exalytics. Each Exalytics domain has its own middleware home deployed within a specific directory structure and tracked in a central configuration file.
Note:
The Exalytics Domain Management Utility installs full versions of the software (for example, Oracle Business Intelligence 11.1.1.7.0). The Exalytics Domain Management Utility does not install patches. To apply the latest software patches, refer to the respective product Readmes.Figure 4-1 illustrates a directory structure of an Exalytics domain.
Figure 4-1 Directory Structure of an Exalytics Domain
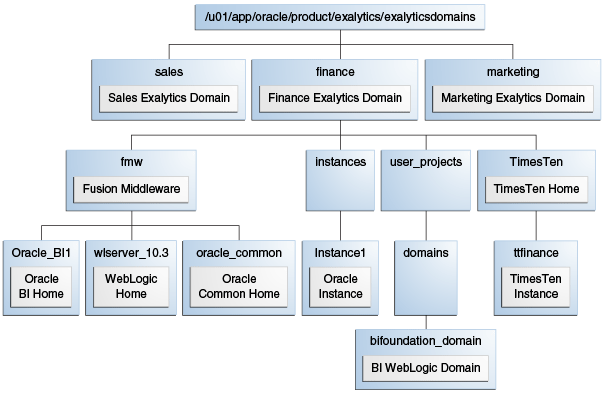
Description of "Figure 4-1 Directory Structure of an Exalytics Domain"
Therefore, by creating multiple domains on a single Exalytics Machine you can manage multiple installations of Oracle Business Intelligence, Oracle WebLogic Server, Oracle Essbase, and Oracle TimesTen for Exalytics.
Note:
Multiple Exalytics domains on a single Exalytics Machine must be created by the same operating system user.In the above example (Figure 4-1), three Exalytics domains (Sales, Finance, and Marketing) are created on an Exalytics Machine. Each domain has its own subdirectories (fmw, instances, user_projects, and TimesTen). Also, as shown for the Finance domain, various components of the domain are located under different subdirectories.
Note:
The ports for each Exalytics domain are allocated in blocks of 100, starting with 12000. For example, the first domain has ports starting from 12000. The second domain has ports starting from 12100, and the third domain has ports starting from 12200, and so on.The Exalytics Domain Management Utility also enables you to start and stop the domain, list the domains, and scaleout the Exalytics Domain software components. See Section 4.3.5, "Managing Exalytics Domains."
Note:
Oracle recommends that you use the Exalytics Domain Management Utility as the primary way to install software on the Exalytics Machine. If you need to install the software by using manual procedures, see Appendix A, "Manual Procedures for Installing and Configuring Software on an Exalytics Machine."4.2 Documents to Review
As you prepare to install Oracle Business Intelligence software on the Exalytics Machine, do the following:
-
Review the Oracle Business Intelligence chapter in the Oracle Fusion Middleware Release Notes, to ensure that you understand the differences between Oracle Business Intelligence and its documented functionality, and any other issues that apply to the current release.
-
Review the Oracle TimesTen In-Memory Database Release Notes to ensure that you understand the differences between Oracle TimesTen and its documented functionality, and any other issues that apply to the current release.
-
Review Chapter 1, "Installation Overview" to ensure that you understand the options and architecture related to installing software on the Exalytics Machine.
4.3 Installing Business Intelligence Software on New Deployments
This section consists of the following topics:
-
Section 4.3.1, "Prerequisites for Installing Software on the Exalytics Machine"
-
Section 4.3.2, "Verifying Configuration of the Exalytics Machine"
-
Section 4.3.3, "Installing the Software by Using the Exalytics Domain Management Utility"
-
Section 4.3.4, "Postinstallation Tasks for Business Intelligence Software"
-
Section 4.3.6, "Troubleshooting the Installation and Configuration Processes"
-
Section 4.3.7, "Deinstalling Business Intelligence Software on the Exalytics Machine"
4.3.1 Prerequisites for Installing Software on the Exalytics Machine
The following prerequisites must be met before installing Oracle Business Intelligence on the Exalytics Machine:
-
The Exalytics Machine has been racked and mounted in a data center.
-
Network configuration is complete and the computer is accessible from the network.
-
The Oracle Exalytics Release 1 Patchset 4 version of the Oracle Exalytics Base Image (1.0.0.6) in running on the Exalytics Machine.
The Exalytics Machine is configured with the base operating system at the factory.
If you need assistance, then Oracle provides Advanced Customer Services for installing software on the Exalytics Machine.
-
A supported database is available (but not on Oracle Exalytics) and accessible from the Exalytics Machine to host the schemas that are required by the Exalytics Domain Management Utility as part of the installation process. Ensure that the database is running during the installation and that the database is not hardened for security purposes. Installing Oracle Business Intelligence against a hardened database is not supported.
For information about hardened databases, see Oracle Database Vault Administrator's Guide.
-
You have access to the internet from a computer (not necessarily the Exalytics Machine) to download required packages.
4.3.2 Verifying Configuration of the Exalytics Machine
Before you install software on the Exalytics Machine, you must run configuration scripts to verify the software and network configurations of the Exalytics Machine.
This section consists of the following topics:
4.3.2.1 Verifying Exalytics Software and Storage Configurations
You run the exalytics_CheckSWProfile script to verify the current Exalytics software and storage configurations.
To verify Exalytics software and storage configurations:
-
Log on to the Exalytics Machine.
-
Navigate to the /opt/exalytics/bin directory.
-
Enter the following command:
./exalytics_CheckSWProfile -
Verify that the output displayed is similar to the following:
[SUCCESS].......Has supported operating system
[SUCCESS]........Has supported processor
[SUCCESS]........Kernel is at the supported version
[SUCCESS]........Has supported kernel architecture
[SUCCESS]........Software is at the supported profile
4.3.2.2 Verifying Exalytics Image Information
You run the exalytics_imageinfo script to verify the current Exalytics image and version details.
To verify the Exalytics image information:
-
Log on the Exalytics Machine as a root user.
-
Navigate to the /opt/exalytics/bin directory.
-
Enter the following command:
./exalytics_imageinfo -
Verify that the output displayed is similar to the following:
Image version      : 1.0.0.6
Creation timestamp : Day Date Month YEAR HOUR:MIN:SEC
Kernel version     :  2.6.32-400.11.1.el5uek

RPM versions:
kernel-uek-2.6.32-400.11.1.el5uek
kernel-2.6.18-308.24.1.0.1.el5
exalytics-container-bm-1.0.0.6-64
exalytics-scripts-1.0.0.6-110
exalytics-flash-1.0.0.6-90
exalytics-domain-configure-1.0.0.6-122
exalytics-deps-exact-1.0.0.6-64
exalytics-deps-minimum-1.0.0.6-64
4.3.3 Installing the Software by Using the Exalytics Domain Management Utility
Installing software on an Exalytics Machine involves running the Exalytics Domain Management Utility. The Exalytics Domain Management Utility provides an automatic way of installing software on the Exalytics Machine by performing the following tasks:
-
Creating the RCU BIPLATFORM and MDS database schemas (if needed)
-
Installing Oracle WebLogic Server
-
Performing a Software Only install of Oracle Business Intelligence
-
Installing Oracle Essbase Suite (if needed)
-
Creating an Oracle Business Intelligence instance
-
Configuring the Oracle Business Intelligence domain
If required, the Exalytics Domain Management Utility also provides an automated way of installing Oracle TimesTen In-Memory Database and configuring communication with a software install of Oracle BI EE.
The steps in the process are:
-
Section 4.3.3.1, "Creating a Password on the Operating System"
-
Section 4.3.3.2, "Optional: Creating the Inventory for Oracle TimesTen"
-
Section 4.3.3.3, "Optional: Setting Resource Limits for Oracle TimesTen"
-
Section 4.3.3.4, "Downloading the Oracle Installation Files into a Staging Directory Structure"
-
Section 4.3.3.6, "Verifying User Permissions to the /u01 Directory"
4.3.3.1 Creating a Password on the Operating System
If you are installing the software on an Exalytics Machine with the Release 1 Patchset 3 Base Image or later, a user named "oracle" and a group named "oinstall" already exists. You next create a password for the user.
To create a password:
-
Log in as the root user.
-
To create a password, enter the following command:
passwd oracle -
Enter the password.
-
Confirm the password when prompted.
Note:
You must use the same operating system user to create multiple Exalytics domains on a single Exalytics Machine.The procedures throughout this section assume a user named "oracle" and a group named "oinstall".
Note:
To add a different user and group, enter the following commands as root user:groupadd <name of the group>
useradd -g <name of the group> <name of the user>
4.3.3.2 Optional: Creating the Inventory for Oracle TimesTen
If you are installing Oracle TimesTen, then create the inventory for Oracle TimesTen after you log in as the root user by entering the following commands:
mkdir /etc/TimesTen
chmod 770 /etc/TimesTen
chgrp oinstall /etc/TimesTen
touch /etc/TimesTen/instance_info
chmod 770 /etc/TimesTen/instance_info
chgrp oinstall /etc/TimesTen/instance_info
Ensure that the group who runs the script has write access to the /etc/TimesTen directory.
4.3.3.3 Optional: Setting Resource Limits for Oracle TimesTen
If you are installing Oracle TimesTen, then set resource limits for Oracle TimesTen by performing the following tasks:
To set the resource limits for Oracle TimesTen:
-
Make the following changes to the /etc/security/limits.conf file:
*       hard nofile 131072
*       soft nofile 131072
*       hard memlock unlimited
*       soft memlock unlimited
*       hard core unlimited
*       soft core unlimited
-
Make the following additions to the /etc/security/limits.conf file:
*    hard nproc  131072
*     soft nproc 131072
-
Depending on the amount of RAM in the Exalytics Machine, make the following shared memory kernel setting in the /etc/sysctl.conf file:
kernel.shmmax = 1099511627776 (For an Exalytics Machine with 1 TB of RAM)
kernel.shmmax = 2199023255552 (For an Exalytics Machine with 2 TB of RAM)
-
Add the following shared memory kernel setting in the /etc/sysctl.conf file:
kernel.shmmni = 4096
-
Add the following setting for semaphores in the /etc/sysctl.conf file:
kernel.sem = 2048 64000 256 128 -
Reboot the machine or run the following command as the root user:
/sbin/sysctl -p
4.3.3.4 Downloading the Oracle Installation Files into a Staging Directory Structure
Before installing the software you must download the required files into an organized Installers directory structure. Please note that the directory structures detailed in Step 3 below are not mandatory, but is just an example. You can choose any structure to organize the files.
For information about which version of the software to download, see the Oracle Exalytics Certification Matrix at the following location:
http://www.oracle.com/technetwork/middleware/ias/downloads/fusion-certification-100350.html
To download the installation files into the directory structure:
-
Log in as the user you created. See, Section 4.3.3.1, "Creating a Password on the Operating System."
-
Download the following required software installers from the Media Pack and patches for Oracle Exalytics under Oracle Business Intelligence software for Linux X86-64 on Oracle Software Delivery Cloud at the following location:
-
Oracle BI Enterprise Edition Release 11g
-
Repository Creation Utility that corresponds with the appropriate Oracle BI EE Release
-
Oracle TimesTen Release 11g
-
Oracle WebLogic Server Release 10g
For information about downloading and applying the latest Oracle Exalytics patch, see Chapter 2, "Applying Oracle Exalytics Release 1 Patchset 4 (1.0.0.4)."
-
-
As the user who owns the installation of the Oracle Exalytics software, create an Installers directory structure such as the following for staging the software installation programs, if the user name is "oracle" and the home directory is /home/oracle:
-
/home/oracle/Installers/rcu
Copy and unzip the Repository Creation Utility (RCU) installation zip file into a directory of your choice.
Enter the following command to copy the contents of the extracted directory into /home/oracle/Installers/rcu:
cp -rf <EXTRACTED RCU DIRECTORY>/rcuHome/* /home/oracle/Installers/rcu -
/home/oracle/Installers/bi
Copy the Oracle BI EE installation zip files into this directory and unzip them using the following command. The -q parameter reduces the number of lines of output that are sent to the console.
unzip -q '*.zip'The unzip process creates a subdirectory called bishiphome that contains subdirectories with names of Disk1 through Disk5.
-
/home/oracle/Installers/timesten
Copy the TimesTen for Exalytics distribution file into this directory and do not unzip it. The file has an extension such as .zip or .tar.gz. The installation scripts work with a file of either extension.
-
/home/oracle/Installers/wls
Navigate to eDelivery and obtain the zip file for Oracle WebLogic Server Oracle 11gR1 (10.3.6) for Exalogic Linux x86-64 (Part number V29852-01) and extract the file with a name such as wls1036_linux64.bin into this directory. If the file is not executable, then use a command such as the following to allow it to be executed:
chmod +x wls1036_linux64.bin
-
Figure 4-2 illustrates the Installers directory structure.
Figure 4-2 Installers Directory Structure
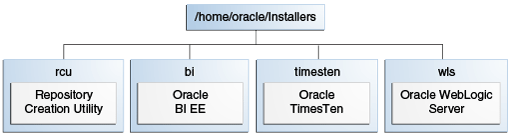
Description of "Figure 4-2 Installers Directory Structure"
4.3.3.5 Creating an Input Properties File
You next create an input properties file. You reference the input properties file when running the command to create an Exalytics domain. The input properties file contains the following parameters:
-
Location of the "Installers" directory. See Step 3 in Section 4.3.3.4, "Downloading the Oracle Installation Files into a Staging Directory Structure."
-
Install group of the user performing the installation. See Section 4.3.3.1, "Creating a Password on the Operating System."
To create an input properties file:
The procedures throughout this section assume the name of the input properties file as "input.properties" and the location of the file at /home/oracle.
-
Open a text editor.
-
Add the following lines in the text editor:
EXALYTICS_INSTALLERS_DIR=<location of your installers directory>
For example: EXALYTICS_INSTALLERS_DIR=/home/oracle/Installers
INST_GROUP=<the install group of the user performing the install>
For example: INST_GROUP=oinstall
The following is an example of an input properties file:
EXALYTICS_INSTALLERS_DIR=/home/oracle/Installers
INST_GROUP=oinstall
-
Save the file in a directory of your choice.
To run the Exalytics Domain Management Utility in silent mode, you must provide additional parameters in the input properties file. An example of the silent mode properties file named noprompts.exalytics.properties is located in the /opt/exalytics/domainconfig/properties directory.
The following is an example of the silent mode input properties file:
Note:
You can optionally exclude passwords from the response file. This prompts users to enter the required passwords when they run the input properties file in silent mode.############################################################################### # This example input properties file allows a "silent" install without any prompts # # EXALYTICS_INSTALLERS_DIR - the repository containing all the shiphome installers # # # Download and Copy the WebLogic Linux X64 installer from Oracle EDelivery to the SHIPHOME_INSTALLERS_DIR/wls directory # Download and Copy the BISHIPHOME zip files from Oracle EDelivery to the SHIPHOME_INSTALLERS_DIR/bi directory and unzip the zips # Download and Copy the RCU zip file from Oracle EDelivery to the SHIPHOME_INSTALLERS_DIR/rcu directory and unzip it # # # INST_GROUP - The group name of the installing user eg. oinstall ################################################################################ EXALYTICS_INSTALLERS_DIR=/home/oracle/EXALYTICS_INSTALLERS INST_GROUP=oinstall ################################################################################ # Admin Credentials ################################################################################ ADMIN_USER_NAME=weblogic ADMIN_PASSWORD=welcome1 ################################################################################ # Schema details: # These are only required for "add_domain" action ################################################################################ # Specify whether you want to create new schemas or use existing schemas # Can be true or false. If you say yes, then the script will create the schemas using RCU DATABASE_CREATE_SCHEMAS=false #Connection string to the database DATABASE_CONNECTION_STRING=host:1521:orcl #Database type DATABASE_TYPE='Oracle Database' #------------------------------------------------------------------------------- # The following properties are only required if DATABASE_CREATE_SCHEMAS=false, ie. use existing schemas #------------------------------------------------------------------------------- DATABASE_SCHEMA_USERNAME_BI=EXAMPLE_BIPLATFORM DATABASE_SCHEMA_PASSWORD_BI=welcome1 DATABASE_SCHEMA_USERNAME_MDS=EXAMPLE_MDS DATABASE_SCHEMA_PASSWORD_MDS=welcome1 #------------------------------------------------------------------------------- # The following properties are only required if DATABASE_CREATE_SCHEMAS=true, ie. create new schemas using RCU #------------------------------------------------------------------------------- DATABASE_SCHEMA_CREATOR_USERNAME=sys DATABASE_SCHEMA_CREATOR_PASSWORD=welcome1 DATABASE_SCHEMA_CREATOR_ROLE=sysdba DATABASE_SCHEMA_PREFIX=EXAMPLE DATABASE_SCHEMA_PASSWORD_BI=welcome1 DATABASE_SCHEMA_PASSWORD_MDS=welcome1 ########################################################################################################## # These are only required for "scaleout_domain" action ########################################################################################################## DOMAIN_HOSTNAME=myhost.example.com DOMAIN_PORT=12000 #Other prompts CONFIGURE_ESSBASE_SUITE=true INSTALL_EXALYTICS_IN_MEMORY_SOFTWARE=true
4.3.3.6 Verifying User Permissions to the /u01 Directory
Before running the configuration script, ensure that the user who is running the script has write permissions to the /u01 directory.
If the user cannot write to the /u01 directory, then, as root user, enter the following commands to change permissions:
chown <name of the user>:<name of the group> /u01
chmod 775 /u01
For example:
chown oracle:oinstall /u01
chmod 775 /u01
4.3.3.7 Creating an Exalytics Domain
You run the Exalytics Domain Management Utility to create an Exalytics domain.
To create an Exalytics domain:
-
Log in to the Exalytics Machine as the user "oracle" or the new user you created. See Section 4.3.3.1, "Creating a Password on the Operating System."
-
To create an Exalytics domain, enter the following command:
/opt/exalytics/bin/exalytics-domain-management.sh --action=add_domain --input=<location and name of the input properties file> --domain=<domain_name>For example:
/opt/exalytics/bin/exalytics-domain-management.sh --action=add_domain --input=/home/oracle/Installers/input.properties --domain=menlo -
When prompted by the Exalytics Domain Management Utility, perform the following tasks:
-
Enter the user name and password you want to use for the Oracle WebLogic Server administrator.
-
Select a database type from the following list:
Oracle Database
Microsoft SQL Server
IBM DB2
-
Choose whether you want to create new schemas or use existing schemas.
-
If you are creating new schemas, enter the following information:
Database connect string (in the host: port: servicename format)
For example: oracle.com:1521:orcl
sys/dba user name and password
sys/dba role
Prefix for the schemas
BIPLATFORM and MDS schema passwords
-
If you are using existing schemas, enter the following information:
Database connect string (in the host:port:servicename format)
For example: oracle.com:1521:orcl
Real Application Clusters Database (RAC DB) connect string in the host1:port1:instance1^host2:port2:instance2@servicename format.
For example:
custdbhost1:1521:custdb1^custdbhost2:1521:custdb2@orcl
BIPLATFORM schema user name and password
MDS schema user name and password
-
Choose whether you want to install and configure Oracle Essbase Suite.
If you choose this option, the Exalytics Domain Management Utility automatically installs and configures Oracle Essbase.
Note:
To install Oracle BI Applications on the Exalytics Machine, you must install and configure Oracle Essbase Suite. See Section 4.5, "Installing and Configuring Oracle BI Applications 11.1.1.7.1 on an Exalytics Machine." -
Choose whether you want to install Oracle Exalytics In-Memory Software.
If you choose to install Oracle Exalytics In-Memory Software, the HardwareAcceleration MBean attribute is enabled.
-
The Exalytics Domain Management Utility performs the following tasks:
-
Creates schemas (if chosen)
-
Installs and configures Oracle BI EE, Oracle WebLogic Server, Oracle Essbase Suite (if needed).
After the installation completes, the status of the domain is displayed as follows:
**************************************************************************
               Status report for the Exalytics Domain: menlo
*                                                                        *
**************************************************************************

==========================================================================
OPMN Managed Processes Status
==========================================================================
OPMN status report as of Thu Nov 07 14:12:33 2013

Processes in Instance: menlo
---------------------------------+--------------------+---------+---------
ias-component                    | process-type       |     pid | status
---------------------------------+--------------------+---------+---------
essbasestudio1                   | EssbaseStudio      |   23985 | Alive
essbaseserver1                   | Essbase            |   15518 | Alive
coreapplication_obiccs1          | OracleBIClusterCo~ |   14823 | Alive
coreapplication_obisch1          | OracleBIScheduler~ |   15418 | Alive
coreapplication_obijh1           | OracleBIJavaHostC~ |   15189 | Alive
coreapplication_obips1           | OracleBIPresentat~ |   14994 | Alive
coreapplication_obis1            | OracleBIServerCom~ |   14866 | Alive


==========================================================================
WebLogic Servers Status
==========================================================================
WebLogic status report as of Thu Nov 07 14:12:33 2013

Servers in this host for WebLogic domain bifoundation_domain:
------------+-------------------------+-----------+-------+---------
Server name | type                    | pid       | port  | status
------------+-------------------------+-----------+-------+---------
AdminServer | WebLogic AdminServer    | 18223     | 12200 | RUNNING
bi_server1  | WebLogic Managed Server | 19585     | 12201 | RUNNING
==========================================================================

The script execution took 40 minutes and 13 seconds. For details, see the log file /u01/app/oracle/product/exalytics/logs/exalytics_domain_menlo_add_domain_2013-11-07_125423.log
4.3.3.8 Installing Oracle TimesTen for Exalytics
If required, you can use the Exalytics Domain Management Utility to install Oracle TimesTen on an existing Exalytics domain.
For information on the Installers directory structure and where to download Oracle TimesTen installers, see Section 4.3.3.4, "Downloading the Oracle Installation Files into a Staging Directory Structure."
To install Oracle TimesTen:
-
Log in to the Exalytics Machine as the user "oracle" or the new user you created. See Section 4.3.3.1, "Creating a Password on the Operating System."
-
Verify the status of the existing domain. The domain should be up and running. See Section 4.3.5.2, "Viewing Status of an Exalytics Domain."
-
To install Oracle TimesTen, enter the following command:
/opt/exalytics/bin/exalytics-domain-management.sh --action=add_timesten --input=<location and name of the input properties file> --domain=<name of existing domain>For example:
/opt/exalytics/bin/exalytics-domain-management.sh --action=add_timesten --input=/home/oracle/Installers/input.properties --domain=menlo
The Exalytics Domain Management Utility performs the following actions:
-
Prompts you to enter the user name and password for the Oracle WebLogic Server administrator.
-
Extracts the Oracle TimesTen installer.
-
Installs and configures Oracle TimesTen.
After the installation is complete, the following message is displayed:
[LOGMSG] [11-12-13 11:11:10] [INFO] [menlo] [add_timesten] TimesTen Installed Successfully
4.3.3.9 Verifying the Installation
To verify that the installation was successful, you run the <list_domain> command of the Exalytics Domain Management Utility. The command displays all existing domains. If the domain is displayed, then the installation succeeded. For instructions on running the <list_domain> command, see Section 4.3.5.3, "Listing Exalytics Domains."
If the installation is successful, the output looks similar to the following:
                 Exalytics Domain: menlo
============================================================
Node type: Primary node
Provisioning status: Completed
Middleware Home: /u01/app/oracle/product/exalytics/exalyticsdomains/menlo/fmw
BI Instance Home: /u01/app/oracle/product/exalytics/exalyticsdomains/menlo/instances/instance1


    | Application URLs |
    -------------------
Oracle Enterprise Manager: http://<server-name>:12000/em
Oracle WebLogic Admin Console: http://<server-name>:12000/console
Oracle Business Intelligence: http://<server-name>:12001/analytics
Oracle BI Publisher : http://<server-name>:12001/xmlpserver

    ------------
    | WebLogic |
    ------------
Domain Home: /u01/app/oracle/product/exalytics/exalyticsdomains/menlo/user_projects/domains/bifoundation_domain
Admin Server Host: <server-name>
Admin Server Port: 12000
BI Managed Server Host: <server-name>
BI Managed Server Port: 12001

    ------------
    | TimesTen |
    ------------
TimesTen enabled: Yes
Timesten Instance Name: ttmenlo
Instance Directory: /u01/app/oracle/product/exalytics/exalyticsdomains/menlo /TimesTen/ttmenlo
Timesten Daemon Port: 12158
Timesten Server Port: 12159

    -----------------
    | Essbase Suite |
    -----------------
Essbase Suite enabled: Yes
Workspace: http://<server-name>:12001/workspace
APS: http://<server-name>:12001/aps
EAS Console: http://<server-name>:12001/easconsole
Essbase Port: 12016

============================================================

Found 1 domain(s) in total
4.3.4 Postinstallation Tasks for Business Intelligence Software
The postinstallation tasks vary depending on whether you are deploying on multiple computers, as described in Chapter 6, "Deploying Oracle Exalytics for High Availability." The tasks include updating files and configuring an ODBC connection.
For a single-node installation, the Exalytics Domain Management Utility performs many of the configuration tasks. For a multiple node system, you must perform the configuration tasks manually. The sections of this chapter indicate on which computers to perform the tasks.
Note:
If you are deploying software on a Exalytics Machine configured for virtualization, postinstallation tasks and various parameters may vary.The chapter includes the following sections:
-
Section 4.3.4.1, "Installing and Deinstalling Oracle Business Intelligence Client Tools"
-
Section 4.3.4.3, "Starting and Stopping Components on an Exalytics Machine"
-
Section 4.3.4.4, "Running the Daemon Configuration Scripts for Oracle TimesTen"
-
Section 4.3.4.5, "Configuring Memory Settings on the Server"
-
Section 4.3.4.6, "Instantiating the Oracle TimesTen In-Memory Database"
-
Section 4.3.4.9, "Installing and Configuring BI Composer for Oracle BI EE"
-
Section 4.3.4.10, "Creating a DSN for IBM DB2 or Microsoft SQL Server"
-
Section 4.3.4.11, "Configuring IBM DB2 to Support Multibyte Data"
-
Section 4.3.4.12, "Configuring Sample Reports for Oracle BI Publisher"
-
Section 4.3.4.13, "Changing the Default Password for SampleAppLite.rpd"
-
Section 4.3.4.14, "Adding the ORACLEHARDWAREACCELERATION TRUE Parameter for Essbase"
-
Section 4.3.4.15, "Enabling Bursting Optimization for BI Publisher"
4.3.4.1 Installing and Deinstalling Oracle Business Intelligence Client Tools
Perform this task one time regardless of the number of computers in the cluster.
You must install the Oracle Business Intelligence Administration Tool, Oracle Business Intelligence Job Manager, and Oracle Business Intelligence Catalog Manager on a Windows computer. See "Installing and Deinstalling Oracle Business Intelligence Client Tools" in Oracle Fusion Middleware Installation Guide for Oracle Business Intelligence.
4.3.4.2 Creating the boot.properties File
Perform the following steps to create a boot.properties file for the Administration Server. This file enables the Administration Server to start without prompting you for the administrator user name and password.
Perform this task on each computer in the cluster.
To create boot.properties file:
-
Go to the following directory:
ORACLE_BASE/admin/domain_name/aserver/domain name/servers/AdminServer/security
-
In this directory, create a file called boot.properties using a text editor and enter the following lines in the file:
username=Admin_Username
password=Admin_Password
-
Save the file and close the editor.
4.3.4.3 Starting and Stopping Components on an Exalytics Machine
After making configuration changes, you stop and start components on the Exalytics Machine to enable those changes to take effect.
4.3.4.3.1 Starting and Stopping Components
You run the Exalytics Domain Management Utility to start and stop the Exalytics domain. When you start a primary or scaled-out Exalytics domain, all components on the domain start. If Oracle TimesTen is installed, the Oracle TimesTen Server starts. Similarly, when you stop a primary or scaled-out Exalytics domain, all components on the domain stop. If Oracle TimesTen is installed, the Oracle TimesTen Server stops. See Section 4.3.5.1, "Starting and Stopping an Exalytics Domain."
4.3.4.4 Running the Daemon Configuration Scripts for Oracle TimesTen
You run the daemon configuration scripts to enable Oracle TimesTen services to start each time you restart the Exalytics Machine.
Perform this task on each computer in the cluster.
Run the daemon configuration scripts for Oracle TimesTen as root, using the following command:
<install_location>/TimesTen/tt1122/bin/setuproot -install
4.3.4.5 Configuring Memory Settings on the Server
Perform this task on each computer in the cluster.
When you configure memory settings, keep the following in mind:
-
If an Oracle TimesTen In-Memory Database larger than 256 GB is required, then you must configure and use large pages.
See "Large pages" in Oracle TimesTen In-Memory Database Installation Guide for additional information on defining the Oracle TimesTen In-Memory Database in the DSN and on editing the limits.conf file for kernel parameters and semaphores.
-
The largest recommended size for a Oracle TimesTen In-Memory Database on a single machine is a total of 800 GB for an X2-4 Exalytics Machine, and 1800 GB for an X3-4 Exalytics Machine, which includes the values for the PermSize and TempSize attributes.
Note:
Increasing large page settings for more memory will result in other applications (Oracle BI EE, Oracle Essbase) unable to allocate memory. Exceeding more than 80% of the physical memory is not recommended. Depending on how much more PermSize memory is required, you can transfer memory from the TempSize.4.3.4.5.1 Configuring Large Pages at the Kernel Level
You can configure and activate the number of large pages by setting the nr_hugepages parameter in the /etc/sysctl.conf file. For example, for an 800 GB Oracle TimesTen In-Memory Database, you must specify greater than 410122 pages to create an 800 GB store based on the following calculation:
(PermSize + TempSize + LogBufMB + 20) / hugepage_size     [All in bytes]
(400*1024*1024*1024) + (400*1024*1024*1024) + (1024*1024*1024) + (20*1024*1024) = 860088172544
 860088172544 / (2 * 1024 * 1024) = 410122
For example, to allow for spare capacity, modify the following setting in the /etc/sysctl.conf file:
vm.nr_hugepages = 410200
then either restart the machine or run the following command as the root user:
/sbin/sysctl –p
Note:
The above calculations are an example for a 800 GB Oracle TimesTen database. Depending on the size of your Oracle TimesTen database deployed and the type of deployment (virtual or non-virtual), you can use different calculations.4.3.4.5.2 Configuring Large Pages for Oracle TimesTen In-Memory Databases
You can configure large pages for the Oracle TimesTen In-Memory Database by editing the following file:
<install_location>/TimesTen/tt1122/info/ttendaemon.options
and adding the following line:
-linuxLargePageAlignment 2
4.3.4.5.3 Increasing PermSize on Existing Oracle TimesTen In-Memory Databases
After configuring large pages for the Oracle TimesTen In-Memory Database, you can increase the PermSize on existing Oracle TimesTen In-Memory Databases.
To increase PermSize on existing Oracle TimesTen In-Memory Databases:
-
Disconnect all applications, including Oracle BI EE, from the Oracle TimesTen In-Memory Database.
-
If needed, change the RAM policy from inUse to Manual.
-
Unload the RAM memory from the Oracle TimesTen In-Memory Database by executing the following command:
ttAdmin -ramunload<Your_TT_DSN>For example:
ttAdmin -ramunload TT_AGGR_STORE
-
Modify the timesten-install-dir/info/sys.odbc.ini file in the Oracle TimesTen In-Memory Database to increase the PermSize.
-
Reload the RAM memory in the Oracle TimesTen In-Memory Database, by executing the following command:
ttAdmin -ramload<Your_TT_DSN>For example:
ttAdmin -ramload TT_AGGR_STORE
-
Reconnect all applications, including Oracle BI EE, to the Oracle TimesTen In-Memory Database.
For more information, see the "Oracle TimesTen In-Memory Database". The link to "Oracle TimesTen In-Memory Database Documentation" is available on the Oracle Exalytics Documentation Library.
4.3.4.6 Instantiating the Oracle TimesTen In-Memory Database
Perform this task on each computer in the cluster. For the first computer, the Exalytics Domain Management Utility updates the sys.odbc.ini file, then you perform the rest of the task manually.
The Oracle TimesTen In-Memory Databases are defined using a DSN that is contained in the sys.odbc.ini file in the following directory:
<install_location>/TimesTen/tt1122/info
The Exalytics Domain Management Utility automatically updates the sys.odbc.ini file for Oracle TimesTen with a default configuration for the in-memory aggregate store for Oracle Exalytics, as shown in the following excerpts from a sample file on an Exalytics Machine:
[ODBC Data Sources]
TT_AGGR_STORE=TimesTen 11.2.2 Driver

[TT_AGGR_STORE]
Driver=/u01/app/oracle/product/TimesTen/tt1122/lib/libtten.so
DataStore=/u01/app/oracle/product/aggregate_store/tt_aggr_store
LogDir=/u01/app/oracle/product/aggregate_store/logs
DatabaseCharacterSet=AL32UTF8
ConnectionCharacterSet=AL32UTF8
LogFileSize=1024
LogBufMB=1024
LogBufParallelism=16
Preallocate=0
PermSize=25000
TempSize=25000
MemoryLock=4
CkptFrequency=30
CkptLogVolume=0
CkptRate=20
PrivateCommands=1
RecoveryThreads=40
This DSN supports an Oracle TimesTen In-Memory Database of 25GB with overall memory consumption of approximately 50GB. To support larger in-memory data stores, increase the settings of the PermSize and TempSize parameters. To support this DSN definition, the semi-automated installation process creates the following directories on the Exalytics Machine:
<install_location>/exalytics/exalyticsdomains/<domainname>/TimesTen/tt<domainname>/aggregate_store/
<install_location>/exalytics/exalyticsdomains/<domainname>/TimesTen/tt<domainname>/aggregate_store/logs
On computers other than the first one in the cluster, manually edit the sys.odbc.ini file for Oracle TimesTen to add the DSN definition. Before instantiating this DSN, remove the comment character (#) that the Exalytics Domain Management Utility included for the lines that define the DataStore and LogDir parameters in the sys.odbc.ini file.
The Oracle TimesTen In-Memory Database is instantiated when the first connection is made to the database. Navigate to the bin directory, run the ttIsql utility, and create a user (with a name such as "exalytics" and password such as "welcome1") as shown in the following sample commands:
cd /u01/app/oracle/product/TimesTen/tt1122/bin
./ttIsql
connect dsn=TT_AGGR_STORE;
create user exalytics identified by welcome1;
grant create session to exalytics;
grant create table to exalytics;
grant select on SYS.OBJ$ to exalytics;
Use the following sample commands to test the connection to the Oracle TimesTen In-Memory Database. There are no tables of data yet configured to return.
connect "DSN=TT_AGGR_STORE;uid=exalytics";
tables;
exit
You can use a tool such as SQL Developer on the client computer, if the Windows TimesTen client drivers that are installed can make a connection to the Oracle TimesTen instance that is used for aggregate storage. This tool can allow you to easily view the contents of the Oracle TimesTen In-Memory Database and to create a dummy table that facilitates the mapping of the Oracle TimesTen schema into the physical layer of the repository for Oracle Business Intelligence.
4.3.4.7 Configuring the ODBC Connection from Oracle Business Intelligence to Oracle TimesTen
Perform this task on each computer in the cluster. The Exalytics Domain Management Utility performs this task on the first computer.
The Client/Server DSN in Oracle TimesTen spans computer boundaries and the remote Oracle TimesTen server can be configured as part of the DSN. You create the DSN for the two Oracle TimesTen instances by modifying the following file:
/EXALYTICS_MWHOME/instances/instance1/bifoundation/OracleBIApplication/coreapplication/setup/odbc.ini
On the second computer in a cluster, the directory name includes the string "instance2" for the second computer instead of "instance1".
The following provides sample modifications to the file:
[ODBC Data Sources]
AnalyticsWeb = Oracle BI Server
Cluster = Oracle BI Server
SSL_Sample = Oracle BI Server
TT_AGGR_STORE = TimesTen 11.2.2 Driver

[TT_AGGR_STORE]
Driver = /u01/app/oracle/product/TimesTen/tt1122/lib/libttclient.so
TTC_SERVER_DSN = TT_AGGR_STORE
TTC_SERVER = <tt_hostname>
TTC_TIMEOUT = 0
Define the DSN Servers for Oracle TimesTen by modifying the following file:
<install_location>/TimesTen/tt1122/info/sys.ttconnect.ini
The following provides sample modifications to the file:
[tt_hostname]
Description=TimesTen Server
Network_Address=example1.com
TCP_PORT=53397
In a multiple node cluster, you achieve high availability of in-memory aggregates by installing a Oracle TimesTen instance on each computer and ensuring that each instance is aware of the Oracle TimesTen instance on the other computer. You edit the odbc.ini file for Oracle Business Intelligence to contain references to both Oracle TimesTen instances. A two-node cluster might contain the following configuration details in the odbc.ini file on each computer:
[ODBC Data Sources]
AnalyticsWeb = Oracle BI Server
Cluster = Oracle BI Server
SSL_Sample = Oracle BI Server
TT_AGGR_STORE1 = TimesTen 11.2.2 Driver
TT_AGGR_STORE2 = TimesTen 11.2.2 Driver

[TT_AGGR_STORE1]
Driver = /u01/app/oracle/product/TimesTen/tt1122/lib/libttclient.so
TTC_SERVER_DSN = TT_AGGR_STORE
TTC_SERVER = <tt_hostname1>
TTC_TIMEOUT = 0

[TT_AGGR_STORE2]
Driver = /u01/app/oracle/product/TimesTen/tt1122/lib/libttclient.so
TTC_SERVER_DSN = TT_AGGR_STORE
TTC_SERVER = <tt_hostname2>
TTC_TIMEOUT = 0
With this configuration, edit the sys.ttconnect.ini in the <install_location>/TimesTen/tt1122/info directory to correspond to the odbc.ini file as shown in the following example:
[tt_hostname1]
Description=TimesTen Server
Network_Address=<fully qualified hostname>
TCP_PORT=53397

[tt_hostname2]
Description=TimesTen Server
Network_Address=<fully qualified hostname>
TCP_PORT=53397
4.3.4.8 Mapping Instances of Oracle TimesTen into the Physical Layer of the Oracle BI Repository
You must map all instances of Oracle TimesTen into the Physical layer of the Oracle BI repository. To map the instances, manually create the necessary database, connection pool, and physical schema objects using the Administration Tool. Then, upload the changed repository using the Repository tab of the Deployment page in Fusion Middleware Control.
When mapping an Oracle TimesTen source into the Physical layer of the Oracle BI repository, ensure that the database type and version are set correctly in the Database field of the General tab of the Database dialog. You must also ensure that the Call interface field in the General tab of the Connection Pool dialog is set correctly. For example, for Oracle TimesTen version 11.2.2., use the ODBC 3.5 call interface.
For more information, see the following:
-
"Setting Up Database Objects and Connection Pools" in Oracle Fusion Middleware Metadata Repository Builder's Guide for Oracle Business Intelligence Enterprise Edition
-
"Configuring Repositories" in Oracle Fusion Middleware System Administrator's Guide for Oracle Business Intelligence Enterprise Edition
4.3.4.9 Installing and Configuring BI Composer for Oracle BI EE
Perform this task on each computer in the cluster.
See "Installing and Configuring BI Composer for Oracle BI EE" in Oracle Fusion Middleware Installation Guide for Oracle Business Intelligence.
4.3.4.10 Creating a DSN for IBM DB2 or Microsoft SQL Server
Perform this task one time regardless of the number of computers in the cluster if you use IBM DB2 or Microsoft SQL Server.
See "Creating a DSN for IBM DB2 or Microsoft SQL Server" in Oracle Fusion Middleware Installation Guide for Oracle Business Intelligence.
4.3.4.11 Configuring IBM DB2 to Support Multibyte Data
Perform this task one time regardless of the number of computers in the cluster if you use IBM DB2.
See "Configuring IBM DB2 to Support Multibyte Data" in Oracle Fusion Middleware Installation Guide for Oracle Business Intelligence.
4.3.4.12 Configuring Sample Reports for Oracle BI Publisher
Perform this task on each computer in the cluster.
See "Configuring Sample Reports for Oracle BI Publisher" in Oracle Fusion Middleware Installation Guide for Oracle Business Intelligence.
4.3.4.13 Changing the Default Password for SampleAppLite.rpd
Perform this task once for the domain.
When you install Oracle Business Intelligence, the Oracle Business Intelligence installer automatically installs the SampleAppLite.rpd file with a default repository password of Admin123. If you intend to use the SampleAppLite.rpd file in a production system, then Oracle recommends that you change the default password for security reasons. For complete information on changing the password, see "Changing the Repository Password" in Oracle Fusion Middleware Metadata Repository Builder's Guide for Oracle Business Intelligence Enterprise Edition.
You can download the Sample Application (full version) from the following location on Oracle Technology Network:
http://www.oracle.com/technetwork/middleware/bi-foundation/obiee-samples-167534.html
4.3.4.14 Adding the ORACLEHARDWAREACCELERATION TRUE Parameter for Essbase
If Essbase is installed, you must add the ORACLEHARDWAREACCELARATION TRUE parameter to the essbase.cfg file.
To add the ORACLEHARDWAREACCELERATION TRUE parameter:
-
Open the essbase.cfg file for editing.
The essbase.cfg file is located in:
ORACLE_INSTANCE/Essbase/essbaseserver1/bin/essbase.cfg
-
Edit the essbase.cfg file by adding the following parameter:
ORACLEHARDWAREACCELERATION TRUE
-
Save the file.
-
Stop and restart the Essbase server by performing the following actions:
-
Log in to Fusion Middleware Control.
For information, see Section 2.2.2, "Logging into Fusion Middleware Control to Manage Oracle Business Intelligence" in Oracle Fusion Middleware System Administrator's Guide for Oracle Business Intelligence Enterprise Edition.
-
Select Business Intelligence then coreapplication.
-
Display the Processes page in the Availability tab.
For example, expand Essbase Agents and select essbaseserver1 in the Processes section.
This enables you to start or stop just the Essbase Server process.
-
Click Stop Selected to stop the selected process.
-
Click Start Selected to start the selected process.
-
4.3.4.15 Enabling Bursting Optimization for BI Publisher
Enabling bursting optimization mode for BI Publisher significantly enhances the performance of bursting jobs run through the BI Publisher scheduler.
To enable bursting optimization:
-
Open the xmlp-server-config.xml file located at:
DOMAIN_HOME/config/bipublisher/repository/Admin/Configuration/xmlp-server-config.xml
-
Add the following property and value setting to the file:
<property name="OPTIMIZE_BURST" value="true" />
-
Save the xmlp-server-config.xml.
-
Restart the BI Publisher application.
To handle high volume jobs (normal scheduled jobs or bursting jobs) configure the system temporary directory and the JMS shared directory in the BI Publisher Administration pages. For best performance configure these temp directories to use RAM disk (for non-clustered environments only) or solid-state drive. For information, see "Setting the System Temporary Directory" and "Configuring the Shared Directory" in the Oracle Fusion Middleware Administrator's Guide for Oracle Business Intelligence Publisher.
4.3.5 Managing Exalytics Domains
You use the Exalytics Domain Management Utility to manage Exalytics domains. You can use the Exalytics Domain Management Utility to start or stop the Exalytics domain, view current status of the domain, list all domains on the Exalytics Machine, and so on.
This section consists of the following topics:
-
Section 4.3.5.1, "Starting and Stopping an Exalytics Domain"
-
Section 4.3.5.4, "Scaling Out an Oracle Business Intelligence Domain."
4.3.5.1 Starting and Stopping an Exalytics Domain
You use the Exalytics Domain Management Utility to start and stop an Exalytics domain. Starting and stopping the Exalytics domain starts and stops all services (WebLogic Administration Server, WebLogic Managed Server, OPMN managed process, and TimesTen) of the installation on the domain.
To start an Exalytics domain:
-
Log in to the Exalytics Machine as the user "oracle" or the new user you created. See Section 4.3.3.1, "Creating a Password on the Operating System."
-
To start an Exalytics domain, enter the following command:
/opt/exalytics/bin/exalytics-domain-management.sh --action=start_domain --input=<location and name of the input file> --domain=<domain_name>For example:
/opt/exalytics/bin/exalytics-domain-management.sh --action=start_domain --input=/home/oracle/Installers/input.properties --domain=menloThe utility performs the following actions:
-
Prompts you to enter the user name and password for the Oracle WebLogic Server administrator.
-
Starts WebLogic Administration Server
-
Starts WebLogic Managed Server
-
Starts OPMN and all managed processes
-
Starts TimesTen (if installed)
All services are started. If the Node Manager was stopped, it restarts.
-
To stop an Exalytics domain:
-
Log in to the Exalytics Machine as the user "oracle" or the new user you created. See Section 4.3.3.1, "Creating a Password on the Operating System."
-
To stop an Exalytics domain, enter the following command:
/opt/exalytics/bin/exalytics-domain-management.sh --action=stop_domain --input=<location and name of the input file> --domain=<domain_name>For example:
/opt/exalytics/bin/exalytics-domain-management.sh --action=stop_domain --input=/home/oracle/Installers/input.properties --domain=menloThe utility performs the following actions:
-
Prompts you to enter the user name and password for the Oracle WebLogic Server administrator.
-
Stops TimesTen (if installed)
-
Stops OPMN and all managed processes
-
Stops WebLogic Managed Server
-
Stops WebLogic Administration Server
All services are stopped. The Node Manager is not stopped.
-
4.3.5.2 Viewing Status of an Exalytics Domain
To view status of an Exalytics domain:
-
Log in to the Exalytics Machine as the user "oracle" or the new user you created. See Section 4.3.3.1, "Creating a Password on the Operating System."
-
To view status of an Exalytics domain, enter the following command:
/opt/exalytics/bin/exalytics-domain-management.sh --action=status --input=<location and name of the input file> --domain=<domain_name>For example:
/opt/exalytics/bin/exalytics-domain-management.sh --action=status --input=/home/oracle/Installers/input.properties --domain=menloThe utility performs the following actions:
-
Prompts you to enter the user name and password for the Oracle WebLogic Server administrator.
-
Displays the TimesTen (if present), OPMN Managed processes, and WebLogic Administration and Manager server statuses for the domain.
The output looks similar to the following:
*******************************************************************
               Status report for the Exalytics Domain: menlo

**************************************************************************
=========================================================================
TimesTen Status
==========================================================================
TimesTen status report as of Wed Nov  6 13:44:26 2013

Daemon pid 11265 port 12158 instance ttmenlo
TimesTen server pid 11274 started on port 12159
------------------------------------------------------------------------
Accessible by group oinstall
End of report

==========================================================================
OPMN Managed Processes Status
==========================================================================
OPMN status report as of Wed Nov 06 13:44:29 2013

Processes in Instance: menlo
---------------------------------+--------------------+---------+---------
ias-component                    | process-type       |     pid | status
---------------------------------+--------------------+---------+---------
essbasestudio1                   | EssbaseStudio      |   14481 | Alive
essbaseserver1                   | Essbase            |   26528 | Alive
coreapplication_obiccs1          | OracleBIClusterCo~ |   26527 | Alive
coreapplication_obisch1          | OracleBIScheduler~ |   26531 | Alive
coreapplication_obijh1           | OracleBIJavaHostC~ |   26525 | Alive
coreapplication_obips1           | OracleBIPresentat~ |   26524 | Alive
coreapplication_obis1            | OracleBIServerCom~ |   26530 | Alive

==========================================================================
WebLogic Servers Status
==========================================================================
WebLogic status report as of Wed Nov 06 13:44:29 2013

Servers in this host for WebLogic domain bifoundation_domain:
------------+-------------------------+-----------+-------+---------
Server name | type                    | pid       | port  | status
------------+-------------------------+-----------+-------+---------
AdminServer | WebLogic AdminServer    | 22224     | 12000 | RUNNING
bi_server1  | WebLogic Managed Server | 22685     | 12001 | RUNNING
==========================================================================
-
4.3.5.3 Listing Exalytics Domains
You use the Exalytics Domain Management Utility to view a listing of all existing Exalytics domains on the Exalytics Machine.
To list Exalytics domains:
-
Log in to the Exalytics Machine as the user "oracle" or the new user you created. See Section 4.3.3.1, "Creating a Password on the Operating System."
-
To list existing Exalytics domains, enter the following command:
/opt/exalytics/bin/exalytics-domain-management.sh --action=list_domains --input=<location and name of the input file>For example:
/opt/exalytics/bin/exalytics-domain-management.sh --action=list_domains --input=/home/oracle/input.propertiesThe utility performs the following actions:
-
Lists all existing domains on the Exalytics Machine and displays the following information for each domain:
Node type
Provisioning status
Location of Middleware Home
Location of BI Instance Home
Application URLs
Host name and port number for WebLogic Administration server
Host name and port number for BI Managed server
Instance name, instance directory, daemon and server port numbers for Oracle TimesTen (if installed)
URLs for Workspace, Analytical Provider Services (APS), Essbase Administration Services (EAS) console, and port number for Oracle Essbase Suite (if installed)
The output looks similar to the following:
Exalytics Domain: menlo ============================================================ Node type: Primary node Provisioning status: Completed Middleware Home: /u01/app/oracle/product/exalytics/exalyticsdomains/menlo/fmw BI Instance Home: /u01/app/oracle/product/exalytics/exalyticsdomains/menlo/instances/instance1 | Application URLs | ------------------- Oracle Enterprise Manager: http://<server-name>:12000/em Oracle WebLogic Admin Console: http://<server-name>:12000/console Oracle Business Intelligence: http://<server-name>:12001/analytics Oracle BI Publisher : http://<server-name>:12001/xmlpserver ------------ | WebLogic | ------------ Domain Home: /u01/app/oracle/product/exalytics/exalyticsdomains/menlo/user_projects/domains/bifoundation_domain Admin Server Host: <server-name> Admin Server Port: 12000 BI Managed Server Host: <server-name> BI Managed Server Port: 12001 ------------ | TimesTen | ------------ TimesTen enabled: Yes Timesten Instance Name: ttmenlo Instance Directory: /u01/app/oracle/product/exalytics/exalyticsdomains/menlo /TimesTen/ttmenlo Timesten Daemon Port: 12158 Timesten Server Port: 12159 ----------------- | Essbase Suite | ----------------- Essbase Suite enabled: Yes Workspace: http://<server-name>:12001/workspace APS: http://<server-name>:12001/aps EAS Console: http://<server-name>:12001/easconsole Essbase Port: 12016 ============================================================ Exalytics Domain: greenwood ============================================================ Node type: Primary node Provisioning status: Completed Middleware Home: /u01/app/oracle/product/exalytics/exalyticsdomains/greenwoo d/fmw BI Instance Home: /u01/app/oracle/product/exalytics/exalyticsdomains/greenwo od/instances/instance1 ------------------- | Application URLs | ------------------- Oracle Enterprise Manager: http://<server-name>:12100/em Oracle WebLogic Admin Console: http://<server-name>:12100/console Oracle Business Intelligence: http://<server-name>:12101/analytics Oracle BI Publisher : http://<server-name>:12101/xmlpserver ------------ | WebLogic | ------------ Domain Home: /u01/app/oracle/product/exalytics/exalyticsdomains/greenwood/us er_projects/domains/bifoundation_domain Admin Server Host: <server-name> Admin Server Port: 12100 BI Managed Server Host: <server-name> BI Managed Server Port: 12101 ------------ | TimesTen | ------------ TimesTen enabled: Yes Timesten Instance Name: ttgreenwood Instance Directory: /u01/app/oracle/product/exalytics/exalyticsdomains/green wood/TimesTen/ttgreenwood Timesten Daemon Port: 12138 Timesten Server Port: 12139 ----------------- | Essbase Suite | ----------------- Essbase Suite enabled: Yes Workspace: http://<server-name>:12101/workspace APS: http://<server-name>:12101/aps EAS Console: http://<server-name>:12101/easconsole Essbase Port: 12116 Found 2 domain(s) in total -
4.3.5.4 Scaling Out an Oracle Business Intelligence Domain
You can scale out an existing Oracle Business Intelligence domain for scalability and performance. For instructions on how to scale out an existing Oracle Business Intelligence domain, see Chapter 6, "Configuring for High Availability."
4.3.5.5 Removing an Exalytics Domain
When you remove the domain on an Exalytics Machine, all components of the domain are automatically removed.
Note:
When removing scaled-out domains, you must first remove all secondary domains before removing the primary node.For instructions on how to remove an Exalytics domain and deinstall software, see Section 4.3.7, "Deinstalling Business Intelligence Software on the Exalytics Machine."
4.3.6 Troubleshooting the Installation and Configuration Processes
This section provides the following information on troubleshooting:
-
Section 4.3.6.3, "Reinstalling Software on the Exalytics Machine"
-
Section 4.3.6.4, "Configuring Exalytics Operating System to Change Capacity On Demand"
4.3.6.1 Resolving Issues with the Installation
If you have any issues installing software on the Exalytics Machine, check the following items:
-
Check the networking configuration of the machine including the /etc/hosts file.
-
If the Exalytics Domain Management Utility fails, then perform the following steps:
-
Check the log files in the /u01/app/oracle/product/exalytics/logs directory. See Section 4.3.6.2, "Viewing Log Files."
-
Review and fix the error. Depending on the type of error, rerun the Exalytics Domain Management Utility.
Note:
If the list_domains command shows the Provisioning Status of the domain as "Failed", then you must first remove the domain by running the remove_domain command.
-
4.3.6.2 Viewing Log Files
After installing the software, you can check log files created by the Exalytics Domain Management Utility. The utility creates a unique log file for each executed action. For example, the Exalytics Domain Management Utility creates a different log file when creating a domain and a different log file when listing domains. The format of the log file for an action is as follows:
exalytics_domain_<domain_name>_<action>_<timesstamp>.log
In addition to the "action" log files, the Exalytics Domain Management Utility also provides information about the location of the log files of the underlying process (such as Oracle BI EE installer log file). For example, there are different log files when installing and configuring Oracle Business Intelligence, and a different log file when installing Oracle TimesTen. The location of the log file for each process is displayed in the specific action log file and is prefixed by the word [LOGFILE]. The format of the log file for an underlying process is as follows:
[LOGFILE] [<process>] <location>
To view log files for each executed action and Oracle WebLogic Server installation:
-
Navigate to the /u01/app/oracle/product/exalytics/logs directory.
The log file for each action is named as follows:
exalytics_domain_<domain_name>_<action>_<timestamp>.log
For example:
exalytics_domain_menlo_list_domain_2013-11-13_005822.log
The log file for Oracle WebLogic Server is named as follows:
weblogic_install_2013-11-21_162945.log
To view log files for software installation and configuration process:
-
Navigate to the /u01/app/oracle/product/exalytics/logs directory.
-
Open the log file that is created for the <add_domain> action.
For example:
exalytics_domain_menlo_add_domain_2013-10-13_005822.log
-
Search for the word [LOGFILE].
Location of the BI Installer and BI Configuration Assistant log files are displayed.
For example:
[LOGFILE] [BI Installer] /u01/app/oracle/product/exalytics/oraInventory/logs/install2013-11-21_11-26-49PM.log
[LOGFILE] [BI Config Assistant] /u01/app/oracle/product/exalytics/oraInventory/logs/install2013-11-21_04-51-20PM.log
To view log files for TimesTen installation:
-
Navigate to the /u01/app/oracle/product/exalytics/logs directory.
-
Open the log file created for the <add_timesten> action for a specific domain.
For example:
exalytics_domain_menlo_add_timesten_2013-10-14_005822.log
-
Search for the word [LOGFILE].
Location of the TimesTen installation log file is displayed.
For example:
[LOGFILE] [TimesTen install] /u01/app/oracle/product/exalytics/exalyticsdomains/menlo/fmw/Oracle_BI1/bifoundation/exalytics/logs/bim-tt-install.log
4.3.6.3 Reinstalling Software on the Exalytics Machine
You might want to reinstall the software. The Exalytics Domain Management Utility does not allow reinstallation of Oracle Business Intelligence in a directory that contains another Oracle Business Intelligence installation on an Exalytics Machine.
To reinstall Oracle Business Intelligence:
-
Remove the domain as described in Section 4.3.7, "Deinstalling Business Intelligence Software on the Exalytics Machine."
-
Create a new Exalytics domain. See Chapter 4, "Creating an Exalytics Domain."
If you created the BISHIPHOME and MDS schemas, then either drop the schemas or use a new prefix to create schemas.
4.3.6.4 Configuring Exalytics Operating System to Change Capacity On Demand
For Oracle Infrastructure as a Service (Oracle IaaS) deployments, you can configure the operating system to change capacity on demand. This enables you to access and pay for peak CPU capacity only when needed.
Each Oracle Exalytics Machine is configured with 4 CPUs, each CPU containing 10 active core processors. This configuration provides 40 active core processors. Of these, 20% are reserved for on-demand use when additional computing processing is needed. For example, you use 32 cores most of the time and enable the other 8 cores only when needed, such as to run reports and queries at quarter end. You can then continue using 80% of the active core processors until the next quarter end.
Note:
When you change the number of active core processors, you do not have to restart the Exalytics Machine.You use the exalytics_resourceControl.sh utility to configure the Oracle Exalytics operating system to change capacity on demand. Table 4-1 shows the parameters for the capacity_on_demand command. The command is part of the exalytics_resourceControl.sh utility.
Table 4-1 Parameters for the capacity_on_demand Command in the exalytics_resourceControl.sh Utility
| Parameter | Description |
|---|---|
|
Display |
Displays number of active core processors currently in use. |
|
Disable |
Disables core processors that are reserved for additional on-demand processing. |
|
Enable |
Enables core processors that are reserved for additional on-demand processing. |
|
Update |
Enables any number of core processors. Can only be used in force mode. |
If you do not specify any parameters, the utility displays all capacity on demand arguments. For example, if you navigate to the /opt/exalytics/bin directory, and enter the following command:
./exalytics_resourceControl.sh
The following output is displayed:
Usage: ./exalytics_resourceControl.sh [-show | -capacity_on_demand args]
 -show: Displays the number of logical cores active
 -capacity_on_demand [display|disable|enable|update -cores <noOfCoresPerSocket>] [-force]
display: displays the number of cores in use.
disable: disables the cores reserved for additional on-demand capacity.
enable: enables the cores reserved for additional on-demand capacity.
update -cores <numCoresPerSocket> -force: can be used in force mode, to enable any number (min 2) of cores on a socket.
To configure the Exalytics operating system to change capacity on demand:
-
Log on the Exalytics Machine as a root user.
-
Navigate to the folder /opt/exalytics/bin directory.
-
View the existing configuration, by entering the following command:
./exalytics_resourceControl.sh -capacity_on_demand displayThe following output is displayed:
[CAPSHOW] Number of cores active per socket: All of 10
-
Disable core processors, by entering the following command:
./exalytics_resourceControl.sh -capacity_on_demand disable2 core processors per CPU are disabled.
The following output is displayed:
[CAPSHOW] Number of cores active per socket: 8 of 10
-
Enable core processors, by entering the following command:
./exalytics_resourceControl.sh -capacity_on_demand enable2 core processors per CPU are enabled.
The following output is displayed:
[CAPSHOW] Number of cores active per socket: All of 10
Note:
After running the Exalytics Domain Management Utility, you can check the log and the trace files in the /var/log/oracleexa/systemconfig.log file and the /var/log/oracleexa/resctl directory respectively.4.3.6.5 For More Information
For additional information, see the following:
4.3.7 Deinstalling Business Intelligence Software on the Exalytics Machine
To deinstall software on the Exalytics Machine, you use the Exalytics Domain Management Utility to remove the Exalytics domain. When you remove the Exalytics domain, all software for the domain is deinstalled.
Note:
To manually deinstall software on the Exalytics Machine, see Appendix A, "Deinstalling Software on the Exalytics Machine."To remove an Exalytics domain:
-
Log in to the Exalytics Machine as the user "oracle". See Section 4.3.3.1, "Creating a Password on the Operating System."
-
To remove an Exalytics domain, enter the following command:
/opt/exalytics/bin/exalytics-domain-management.sh --action=remove_domain --input=<location and name of the input file> --domain=<Domain_name>For example:
/opt/exalytics/bin/exalytics-domain-management.sh --action=remove_domain --input=/home/oracle/Installers/input.properties --domain=menloWhen prompted by the Exalytics Domain Management Utility, perform the following tasks:
-
Confirm whether or not you want to remove the domain by selecting Yes or No.
-
Enter the user name and password for the Oracle WebLogic Server administrator.
The Exalytics Domain Management Utility stops all processes, removes the Oracle Business Intelligence domain, removes Oracle TimesTen (if installed), and deinstalls all software.
-
4.4 Existing Business Intelligence Installations: Registering a Primary Business Intelligence Software Installation on an Exalytics Domain
If you are an existing Exalytics customer and have manually installed the software prior to the availability of the Exalytics Domain Management Utility, you can register any existing software installations by using the Exalytics Domain Management Utility. After you register an existing installation you can use the utility to manage the installation. See Section 4.3.5, "Managing Exalytics Domains."
To register an existing software installation, you must have Release 1 Patchset 4 (Base Image 1.0.0.6) installed on the Exalytics Machine.
Note:
Before you can register an existing installation, ensure that you are running Oracle Business Intelligence 11.1.1.7.x.When you run the Exalytics Domain Management Utility to list the domains on the Exalytics Machine, the registered installation is displayed as "Primary node (Registered Exalytics Domain)".
To register existing software installations on an Exalytics domain:
-
Log in to the Exalytics Machine as the user "oracle" or as the new user you created. See Section 4.3.3.1, "Creating a Password on the Operating System."
-
To register an existing installation, enter the following command:
/opt/exalytics/bin/exalytics-domain-management.sh --action=register_existing_domain --input=<location and name of the input file> --domain=<new_domain_name>For example, to register an existing installation as menlo2, enter the following command:
/opt/exalytics/bin/exalytics-domain-management.sh --action=register_existing_domain --input=/home/oracle/Installers/input.properties --domain=menlo2 -
When prompted by the utility, perform the following actions:
-
Enter the location of the following existing directories:
Middleware Home
For example:
/u01/app/oracle/product/fmw
Oracle BI Home
For example:
/u01/app/oracle/product/fmw/Oracle_BI1
WebLogic Domain
For example:
/u01/app/oracle/product/fmw/user_projects/domains/bifoundation_domain
Oracle BI Instance
For example:
/u01/app/oracle/product/fmw/instances/instance1
-
Is TimesTen installed on the domain? Please enter [1-2].
If you select 1 (Yes), enter the existing TimesTen instance name and the existing TimesTen installation directory location.
-
Enter the user name and password for the Oracle WebLogic Server administrator.
-
Choose whether you want to restart the domain.
If you choose "Yes" to restart the domain, the utility stops and restarts all the processes on the new domain and registers the installation on the new domain.
-
-
To verify that the existing installation is listed as a domain, enter the following command:
/opt/exalytics/bin/exalytics-domain-management.sh --action=list_domains --input=/home/oracle/input.propertiesThe report displays the existing installation as a registered exalytics domain on the Exalytics Machine. The output looks similar to the following:
============================================================
              Exalytics Domain: menlo2
============================================================
Node type: Primary node (Registered Exalytics Domain)
Provisioning status: Completed
Middleware Home: /u01/app/oracle/product/fmw
BI Instance Home: /u01/app/oracle/product/fmw/instances/instance1

    -------------------
    | Application URLs |
    -------------------
Oracle Enterprise Manager: http://<server-name>:7001/em
Oracle WebLogic Admin Console: http://<server-name>:7001/console
Oracle Business Intelligence: http://<server-name>:9704/analytics
Oracle BI Publisher : http://<server-name>:9704/xmlpserver

    ------------
    | WebLogic |
    ------------
Domain Home: /u01/app/oracle/product/fmw/user_projects/domains/bifoundation_ domain
Admin Server Host: <server-name>
Admin Server Port: 7001
BI Managed Server Host: <server-name>
BI Managed Server Port: 9704

    ------------
    | TimesTen |
    ------------
TimesTen enabled: Yes
Timesten Instance Name: tt1122
Instance Directory: /u01/app/oracle/product/TimesTen/tt1122
Timesten Daemon Port: 53396
Timesten Server Port: 53397

Found 1 domain(s) in total
4.5 Installing and Configuring Oracle BI Applications 11.1.1.7.1 on an Exalytics Machine
After performing a Software Only install of Oracle Business Intelligence, you can install Oracle BI Applications 11.1.1.7.1.
To install and configure Oracle BI Applications on an Exalytics Machine:
-
Install Oracle Business Intelligence. See Section 4.3.3, "Installing the Software by Using the Exalytics Domain Management Utility."
Note:
When creating an Exalytics domain, you must choose to install and configure Oracle Essbase suite. See Step 3 (f) in Section 4.3.3.7, "Creating an Exalytics Domain." -
Review the hardware requirements for installing Oracle BI Applications. See "Section 3.1 Hardware Requirements" in Oracle Fusion Middleware Installation Guide for Oracle Business Intelligence Applications.
-
Install Oracle Data Integrator (ODI). See "Section 3.2 Installing Prerequisites for Oracle BI Applications" in Oracle Fusion Middleware Installation Guide for Oracle Business Intelligence Applications.
Note:
You must install ODI into the same inventory directory that you installed Oracle BI EE. To do this, run the ODI installer with the following command:./runInstaller –jreLoc <jdk location> -invPtrLoc u01/app/oracle/product/exalytics/provision/execute/<domain name>/oraInst.locThe other prerequisites, Oracle WebLogic Server 10.3.6, JDK or JRockit, and Oracle BI EE are installed and configured by the Exalytics Domain Management Utility when the utility creates an Exalytics domain.
-
Install and configure BI Applications 11.1.1.7.1. See "Section 3.3 Installing and Configuring Oracle BI Applications" in Oracle Fusion Middleware Installation Guide for Oracle Business Intelligence Applications.
Note:
You must install Oracle BI Applications into the same inventory directory that you installed Oracle BI EE. To do this, run the BI Applications installer with the following command:./runInstaller –jreLoc <jdk location> -invPtrLoc u01/app/oracle/product/exalytics/provision/execute/<domain name>/oraInst.locOne of the tasks you perform when installing and configuring BI Applications, is to apply platform patches. Follow the instructions in "Section 3.3.4 Applying Platform Patches" in Oracle Fusion Middleware Installation Guide for Oracle Business Intelligence Applications, but after downloading and extracting the zip files into a single directory, for example PATCH_HOME/patches, perform the following additional steps:
-
Remove the WebLogic folder and its contents to a location outside the PATCH_HOME/patches directory.
The PATCH_HOME/patches directory should only contain the biappsshiphome, odi, and oracle_common folders.
-
Before applying the platform patches as described in "Section 3.3.4 Applying Platform Patches" in Oracle Fusion Middleware Installation Guide for Oracle Business Intelligence Applications, stop all services by using the Exalytics Domain Management Utility. See Section 4.3.5.1, "Starting and Stopping an Exalytics Domain."
-
After applying the patches, restart all services by using the Exalytics Domain Management Utility. See Section 4.3.5.1, "Starting and Stopping an Exalytics Domain."
Note:
You do not need to perform step "3.3.5 Configuring Oracle Business Intelligence" in Oracle Fusion Middleware Installation Guide for Oracle Business Intelligence Applications because the Oracle Business Intelligence domain is created by the Exalytics Domain Management Utility. -
-
Perform post-installation tasks for installing Oracle BI Applications. See "Section 3.4 Performing Post-Installation System Set Up Tasks" in Oracle Fusion Middleware Installation Guide for Oracle Business Intelligence Applications.
For more information, see "Chapter 3 Installing and Setting Up Oracle BI Applications" in Oracle Fusion Middleware Installation Guide for Oracle Business Intelligence Applications.
4.6 Installing Oracle Enterprise Performance Management Applications
To install Oracle Enterprise Performance Management applications (Oracle Hyperion Planning) refer to the "Oracle Enterprise Performance Management System" documentation, the link to which is available from the Oracle Exalytics Documentation Library.
4.7 Installing Oracle Endeca
To install Oracle Endeca, refer to the "Oracle Endeca Information Discovery" documentation, the link to which is available from the Oracle Exalytics Documentation Library.