| Oracle Argus Safety Installation Guide Release 7.0.3 E40575-02 |
|

 Previous |
 Next |
This chapter provides information for performing other installation and configuration tasks. It includes discussions of the following:
The Argus.xml file is generated during installation on Argus Web / Report Server, but the user can update this file after installation to add, update, or delete database entries. The file resides in the following directory:
<Argus Installation Path>/ArgusWeb/ASP
The Argus.xml file contains two types of xml tags as described in the following table:
| XML Tag | Description |
|---|---|
| <ARGUS_DB> | This tag contains all databases supported by the Argus Web application. Each database is specified as a separate XML tag - <DBNAME> with <ARGUS_DB> as parent tag.
For example, for a database that is recognized as "Testing Database" in Argus Web Login screen and whose alias in the Oracle TNSNAMES.ORA file is "TESTDB", the entry will be <DBNAME id="TESTDB">Testing Database</DBNAME>. |
| <LICENSE_KEY> | This tag contains the License Key value for the Argus application. Do not update this key unless Oracle Customer Support instructs you to do so. |
If you update the Argus.xml file, you must restart the Internet Information Services (IIS) on the server for the changes to take effect.
The Argus.ini file is generated during installation on Argus Web / Report Server and Transactional (AG) Server, but the user can update this file after installation.
With some exceptions, the parameters listed in Table 13-2 are used by Argus Web as well as AG Service. However, some are specific to the Web/Report Server and some are specific to the Transactional (AG) Server
Parameters specific to the Web / Report Server are:
ReportServer
ReportServerUser
ReportServerPassword
MessageCachePath
Upload
Template
ArgusInstallPath
Timeout
DB Connection
Pooling parameters.
Parameters specific to the Transactional (AG) Server are:
PrintRunTime
PrintService
The Argus.ini File Parameters are described in the following table:
| # |
Section | Parameter | Sample Value | Description |
|---|---|---|---|---|
| 1 | Workstation | Cache | c:\ArgusReports\PDFReports\ | This is the path for PDF Reports (Expedited/Periodic/Screen Prints etc.). In case of multiple web / report servers, this is a shared path on the network. |
| 2 | Workstation | MessageCachePath | c:\ArgusReports\MessageCache\ | This is the shared path to save the system level cache such as data for LM tables, CMN Fields, etc. In case of multiple web / report servers, this is a shared path on the network.
For use with Web/Report Server. |
| 3 | Workstation | Upload | c:\ArgusReports\UploadedLetters\ | This is the shared path for uploaded letters. In case of multiple web / report servers, this is a shared path on the network.
For use with Web/Report Server. |
| 4 | Workstation | Template | C:\Program Files\Oracle\E2BViewer\Templates\ | This location stores the template and report files used to display CIOMS and MedWatch views.
For use with Web/Report Server. |
| 5 | Workstation | AcrobatReaderPath | C:\Program Files\Adobe\Acrobat 7.0\Acrobat\Acrobat.exe | This is the path to the Acrobat Reader exe file. |
| 6 | Workstation | HELP | C:\App\Oracle\Documentation\ | This is the base folder where all the files related to various modules of Argus are placed. |
| 7 | Workstation | PrintRunTime | 10 | This is used by the AG Service Print Utility. It specifies how often the Print Utility shall run to print reports to the printer. The unit is in seconds.
For use with Transactional (AG) Server. |
| 8 | Workstation | PrintService | 1 or 0 | This is also used by AG Service Print Utility. When this is set to 0, the AG Service Process Bulk Transmit Print, generates the report and directly prints the report to the printer. If set to 1, the Bulk Transmit Process creates the PDF in the Cache folder with an associated Batch file.
The Print Utility then picks up the Batch File, prints the PDF to the printer and deletes the Batch Job File. For use with Transactional (AG) Server. |
| 9 | Workstation | ArgusInstallPath | C:\Program Files\Oracle\ArgusWeb\ASP\ | This refers to the path of the location where the ASP files are placed.
For use with Web/Report Server. |
| 10 | Workstation | SCANNED_IMAGES | C:\Temp\Scanned_Images | This is the location of files that are used by the "New Case from Image" functionality. |
| 11 | Workstation | ReportServer | http://<ReportServerPath>:8083/ | In case of Report Server, enter the path of the Report Server along with its Port Number. If the Report Server is the same as the Web Server, the value of this parameter should be http://localhost:8083/ |
| 12 | PDFReports | TempFileDeleteInterval | 1 | This key specifies how often the Argus Report Service should run to check for files to delete. By default, this service will delete files from paths specified for "Cache" and "Upload" parameters described above. The unit is in hours. The default value is 1. |
| 13 | PDFReports | HoursBeforeDelete | 24 | This key is used by Argus Report Service. This key specifies in hours, how old the file must be before it gets deleted. By default, this service will delete files from paths specified for "Cache" and "Upload" parameters described above. The default value is 1. |
| 14 | Argus Server | SQLTimes | 1 | This enables the Argus Web application to start creating log files for all the SQLs that are fired. These log files are created in C:\Temp folder and can be used for debugging. |
| 15 | Argus Server | Pool_Initial_Size | 3 | This refers to the DB Connection Pool Initial Size.
For use with Web/Report Server. |
| 16 | Argus Server | Pool_Maximum_Size | 120 | This refers to the DB Connection Pool Maximum Size.
For use with Web/Report Server. |
| 17 | Argus Server | Connection_Time_Out | 120 | This refers to the time out time in seconds. The connection times out if it is idle for the given time.
For use with Web/Report Server. |
| 18 | Argus Server | Connection_Wait_Time | 3 | This refers to the connection wait time in seconds. An exception occurs if the system cannot obtain a DB connection in the given time.
For use with Web/Report Server. |
| 19 | Argus Server | PeriodicRptMaxRunTime | 60000 | This refers to the setting in the Argus.ini file that allows you to override the default Argusvr2a EXE timeout setting to approximately 16 hours (60000). |
Use the following procedure to configure Argus.ini:
Select Start=> Run.
When the Run dialog box opens:
Type argus.ini in the Open field.
Click OK.
When the Argus.ini file opens, set the entries in the file to the required values as described in the previous Table.
Save the file.
Restart the Internet Information Services (IIS) on the server so the changes will take effect.
There can be a problem in running Periodic or System Reports if the Internet Explorer (IE) Setting is set to its default value of 4 (hours) on the Client machine.
Follow the steps listed below to increase the IE Timeout Setting (and thereby run Reports successfully):
Start the Registry Editor on the IE client machine.
Locate the following sub-key: HKEY_CURRENT_USER\SOFTWARE\Microsoft\Windows\CurrentVersion\Internet Settings.
In this sub-key, add the following DWORD entries with 14400000 (4 hours):
KeepAliveTimeout
ReceiveTimeout
ServerInfoTimeout
Restart the computer.
To deploy the portlets to the Oracle Portal Server, navigate to the Portlet Installation folder on the Web Server where the module was installed. Perform the following steps for each Portlet being installed.
Open the .ear file using a Zip utility. The zip program will open with files as seen below.
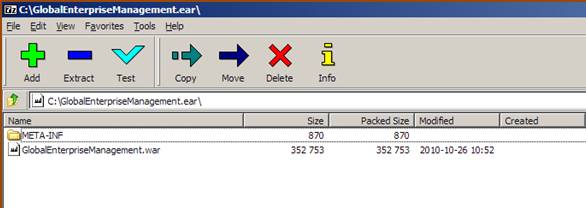
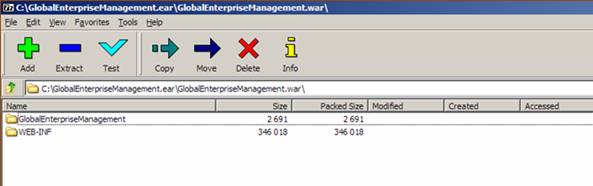
Double click the .war file and you will see the following screen. Double Click the WEB-INF folder.
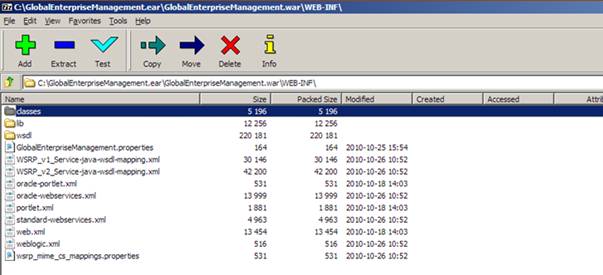
Double click the file portletname.properties where portletname is the name of the portlet ear file under modification.
In the editor find the key named ”ArgusURL” and modify the URL value to the value of your Argus Web Server or Argus Web Load Balancer.
ArgusUrl=http://10.178.91.250:8083. For OAM integration, Oracle recommends that using the FQDN of the machine.

|
Note: Please make sure there is no space between the tokens ”ArgusUrl”, ”=” and the actual URL value. |
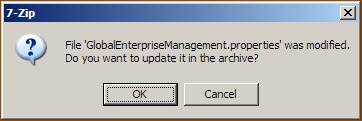
Save the changes to the properties file and close it. Close the 7-zip manager window and press OK to save the changes in the archive. You are now ready to deploy the ear file.
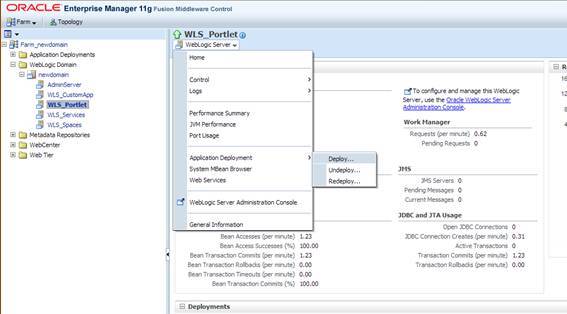
Log in to the Oracle Enterprise Manager Admin Console and navigate to WebLogic Domain>Your Domain>WLS_Portlet. From the top left corner, navigate to Weblogic Server >Application Deployment>Deploy.
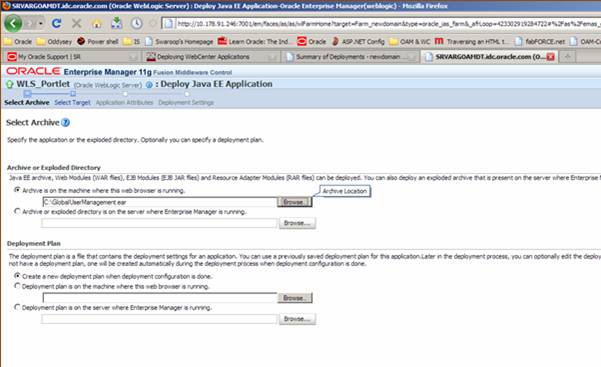
Select Archive is on the machine where this web browser is running and click Browse. Browse to the modified .ear file on your local machine.
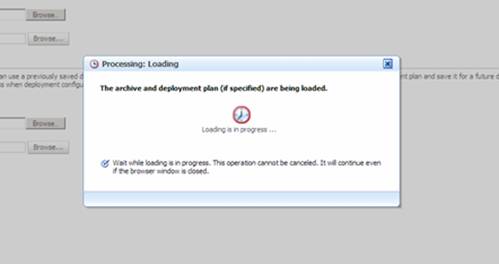
The Portlet will now get uploaded to the server.
Once the Portlet is uploaded, by default WLS_Portlet will be selected. If not then select and click Next.
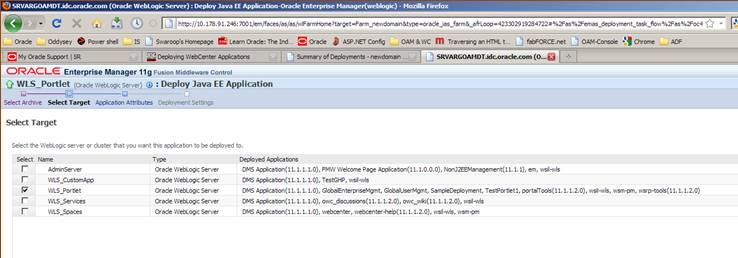
Do not change the default selection. Click Next.
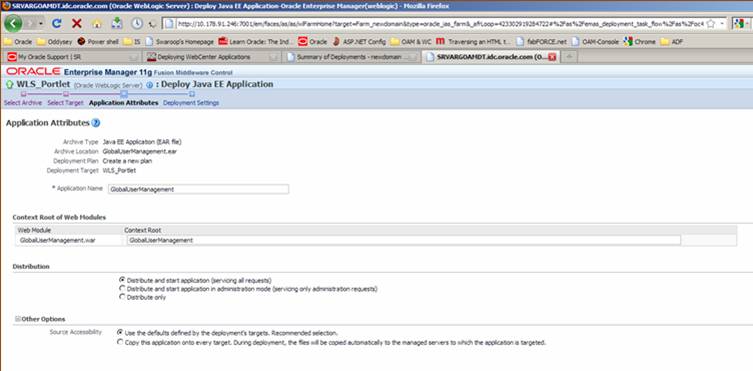
Click Deploy on the last screen to publish the Portlet. Verify that the Portlet was deployed successfully in the Status.
To update the Global Homepage Properties file:
Specify the SSO Header Key
This Key is used to show User Full Name on the Global Homepage.
Specify the Help URL
Update this property with the Argus Web Server or the Argus Web Load Balancer URL. This URL path launches the online Help for the Global Homepage.
Navigate to the Portlet Installation folder on the Safety Web Server where the module was installed.
Open the globalhomePage.ear file using a zip utility.
Open the GlobalHomePage.war file.
Drill down through these folders:
WEB-INF>classes>Oracle>HSGBU>argussafety>ui->util
Open the argussafetyglobalhomeuibundle.properties in a text editor.
Update the SSO Header Key and HELP file path:
HTTPUserNameHeader=
HelpURL=
Save the changes to the properties file and close it.
Close the zip utility and save the changes to the archive.
Navigate to the Portlet Installation folder on the Safety Web Server where the module was installed.
Open the globalhomePage.ear file using a zip utility.
Double-click the GlobalHomePage.war file.
Double-click the Images folder.
Replace logo_small.gif with your logo. Note that the File name should be logo_small.gif.
Close the zip utility and save the changes to the archive.
Now, perform the following steps to deploy the global home application on the Weblogic Server.
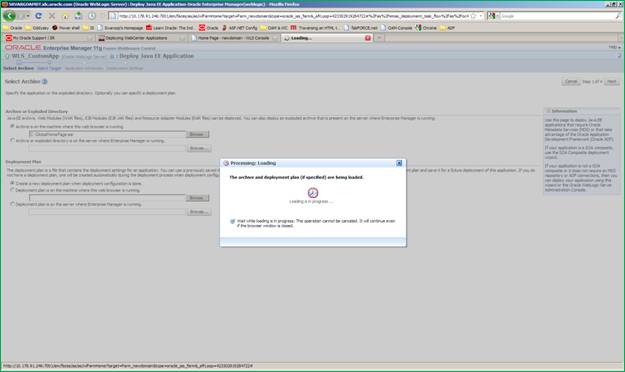
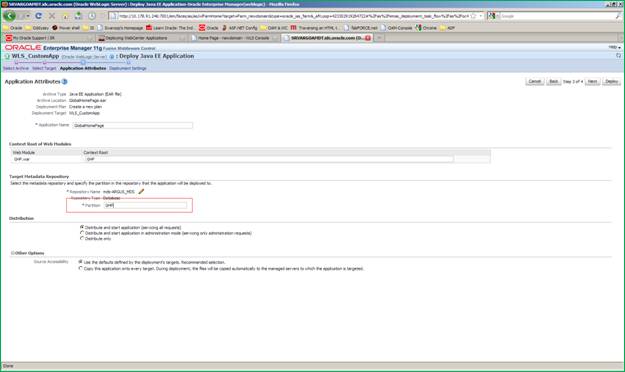
Log in to the Enterprise Manager Admin console. In the left hand tree navigation, select WebLogic Domain>Your Domain>WLS_CustomApp in the left hand tree navigation. The WLS_CustomApp is the name of the server that we have created to deploy Global Home Page. Click the menu just below the name of the server as shown below. Navigate to Application Deployment > Deploy.
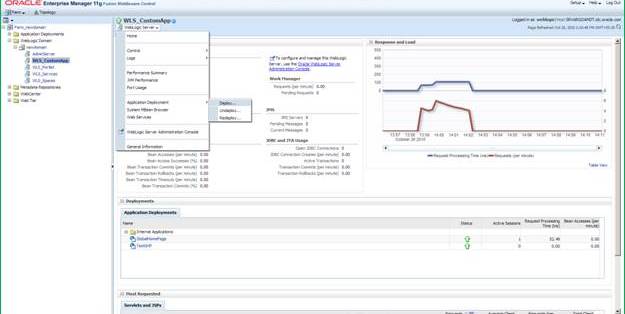
Log in to the Enterprise Manager Admin console. In the left hand tree navigation, select WebLogic Domain>Your Domain>WLS_CustomApp in the left hand tree navigation. The WLS_CustomApp is the name of the server that we have created to deploy Global Home Page. Click the menu just below the name of the server as shown below. Navigate to Application Deployment > Deploy.
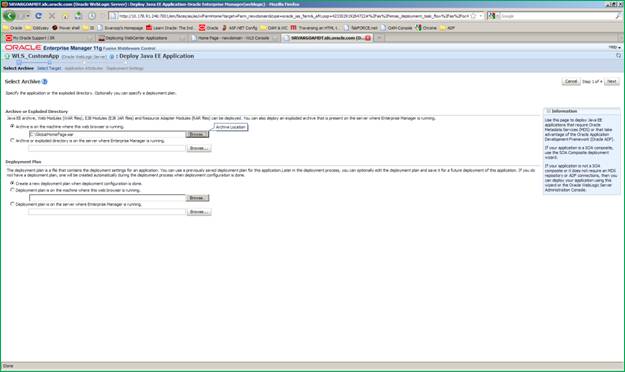
The following screen appears. Browse for the application. ear file and click Next.
Wait for the progressing dialog to finish.
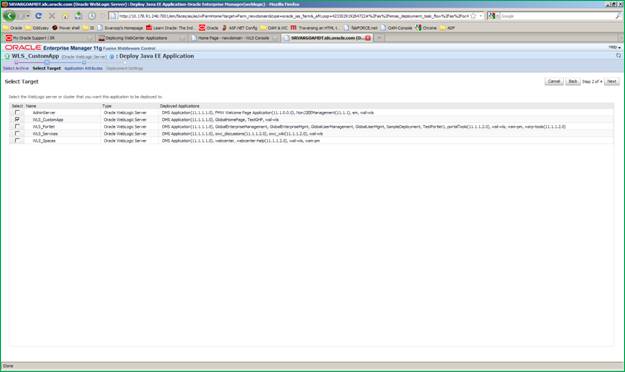
After modal dialogue is completed, you will see a screen for selecting targets. By default WLS_CustomApp will be selected, if not then select and click Next.
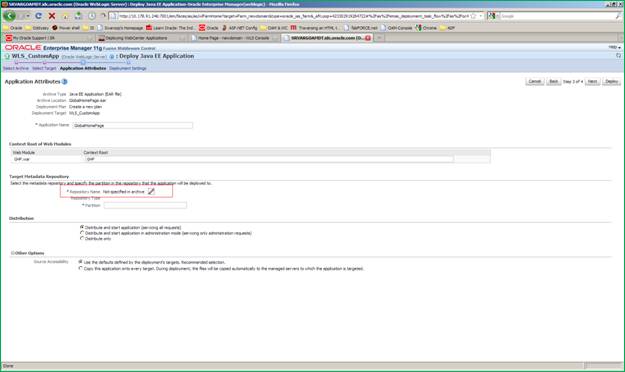
Click the ”pencil” icon in the Target Metadata Repository section.
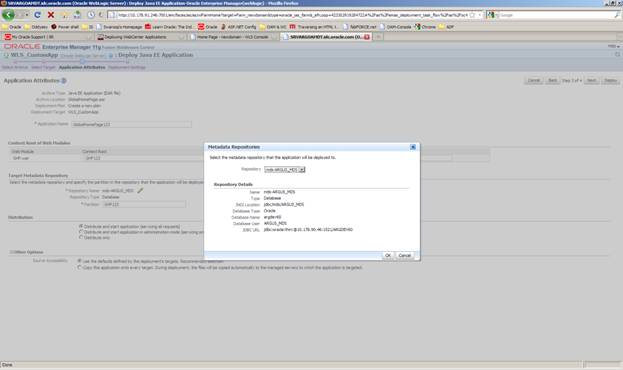
A modal dialog appears that allows you to specify the metadata repository for this application. Choose a metadata repository and click OK.
Specify the ”partition” value. You may choose any value but Oracle recommends using the application name itself as the partition value. Click Next.
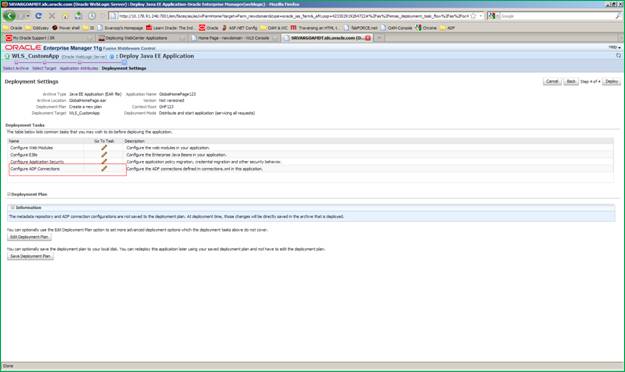
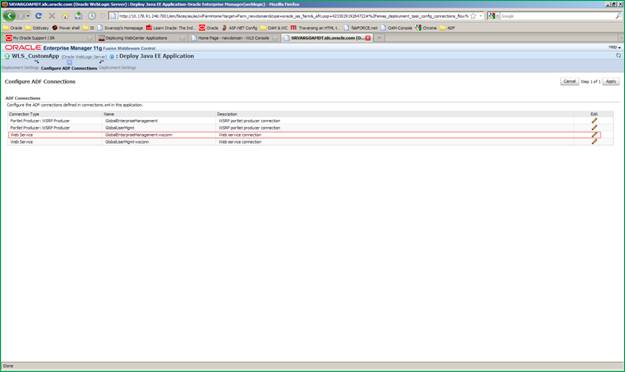
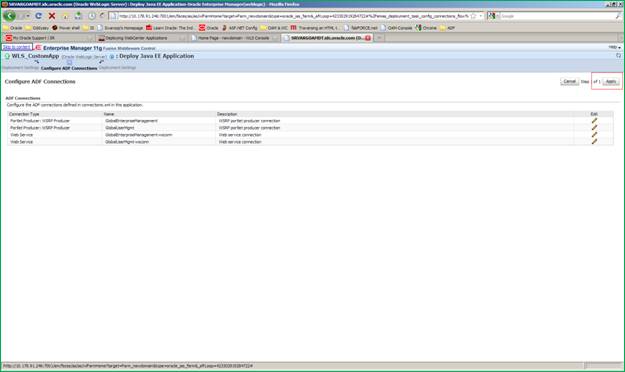
In the ”Configure ADF connections” section, click ”pencil” icon, you will be redirected to the ”Configure ADF connections” screen.
In the Configure ADF connections screen, modify the web service connection. Click the ”pencil” icon to edit the ADF connection settings.
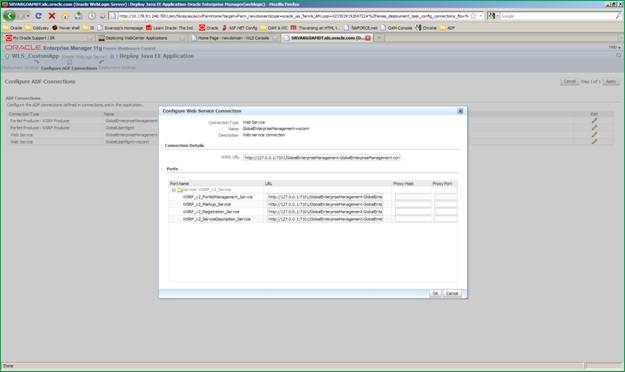
A modal dialog comes where you can change ADF connections. You must modify the URL of the following fields to reflect the settings of your deployed portlets.
WSDL URL
WSRP_v2_PortletManagement_Service
WSRP_v2_Markup_Service
WSRP_v2_Registration_Service
WSRP_v2_ServiceDescription_Service
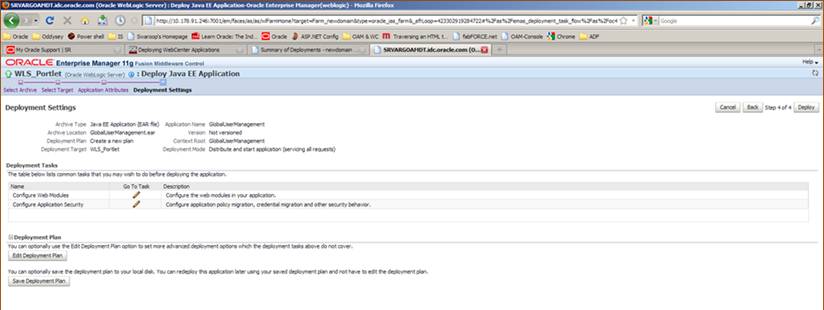
Click OK to close the modal dialogue and you will return to the parent screen. Click Apply in the top right corner. You will return to the deployment wizard screen 4 of 4. Click Deploy. The server will now deploy the ear file and report the success/failure status of the operation.
This section describes how to configure SSO in the Oracle Access Manager (OAM) 10g. Following are the pre-requisites to this task:
The system should have an OAM installation (Identity server, Access server, WebPass, Policy Manager).
User profiles should exist in the LDAP server as well as in Argus with the same credentials.
LDAP should be configured in the Argus console.
The LDAP flag should be set to ON for the users in Argus.
Perform the following steps to install SSO on the OAM:
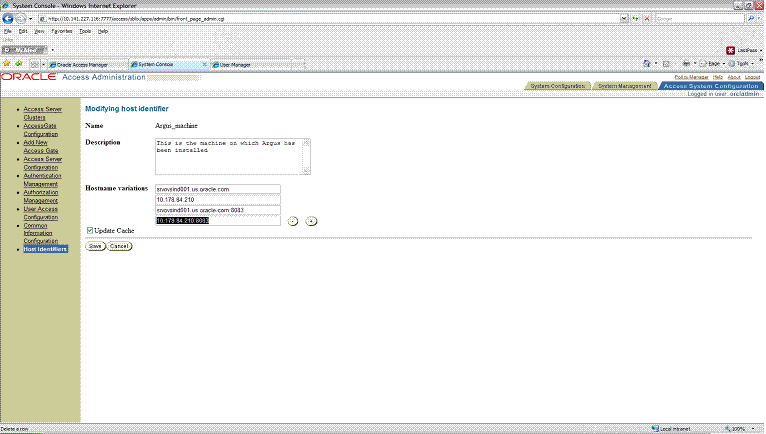
Navigate to the Access System console of OAM and click the Access System Configuration tab. Click Host Identifiers on the left panel. Provide the Fully Qualified Domain Name (FQDN), IP Address and both entries along with port numbers of the Argus Web Server machine. Click Save. For example:
srvovsind001.us.oracle.com
srvovsind001.us.oracle.com:8083
10.178.84.210
10.178.84.210:8083
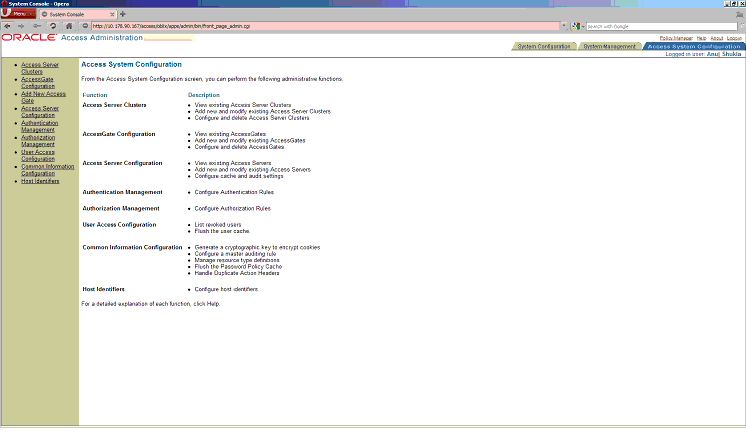
In the Access System console of OAM, click Access System Configuration.
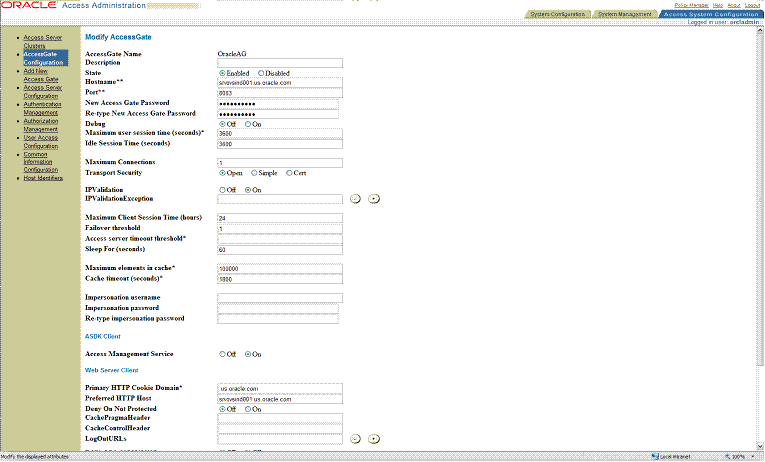
Click Add New Access Gate link on left panel.
Provide details like access gate name, port, and password. Also, enter the following details:
Hostname - provide the FQDN of the Argus Web Server where you will install webgate.
Access Management Service - select On. To enable a smooth installation, it is essential that this option is selected as On.
Primary HTTP Cookie Domain - provide FQDN of the machine where you will install webgate, prefixed by a period. For example, .idc.oracle.com. Note the . before the FQDN.
Preferred HTTP Host - provide the same value as Hostname.
CachePragmaHeader - enter value as private
CacheControlHeader - enter value as private
Once you have entered all the above details, click Save to add the webgate.
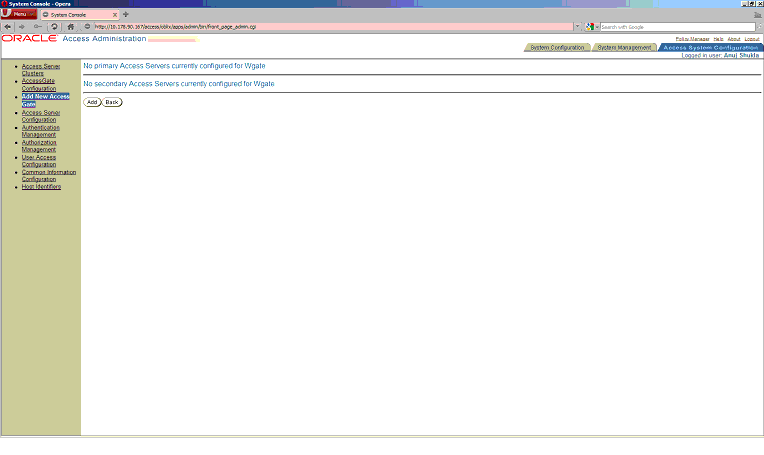
You will see the message "Please associate an Access Server or Access Server Cluster with this AccessGate."
Click List Access Servers. The following screen appears:
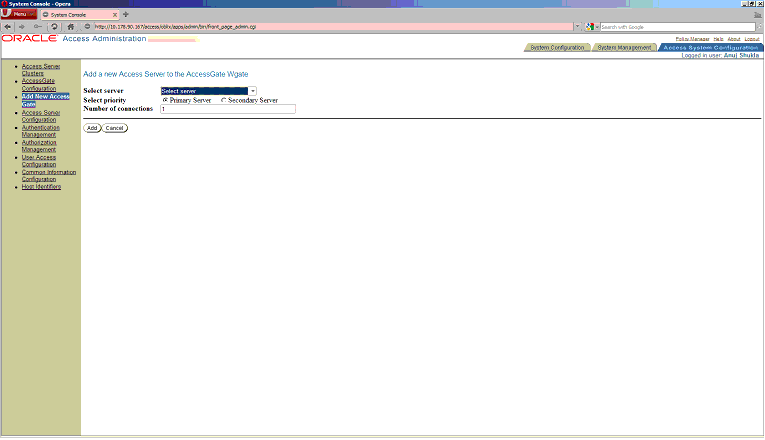
Click Add. Select an access server from the dropdown and click add to associate webgate with access server.
|
Note: The access servers in this list will appear based on the access servers installed in the OAM image or installation that you have. Do not attempt adding Access Servers from OAM Console. |
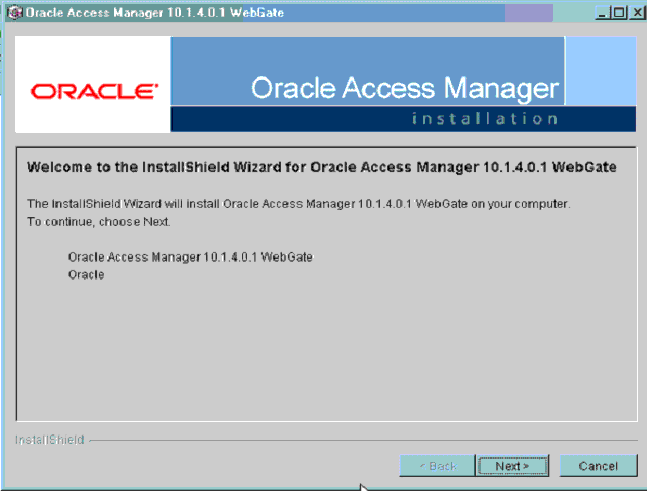
Navigate to the Argus Web Server Machine, that is the machine where you have installed Argus. Run the installer for Webgate.
Following is the procedure to install WebGate:
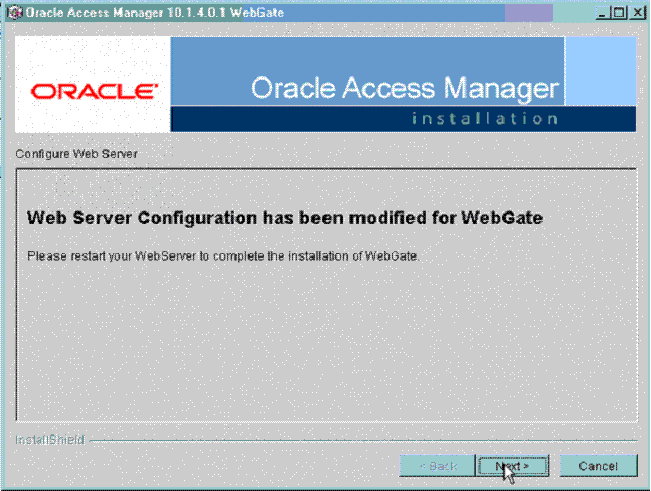
Run the file Oracle_Access_Manager10_1_4_3_0_Win32_ISAPI_WebGate.exe. The following screen appears. Click Next.
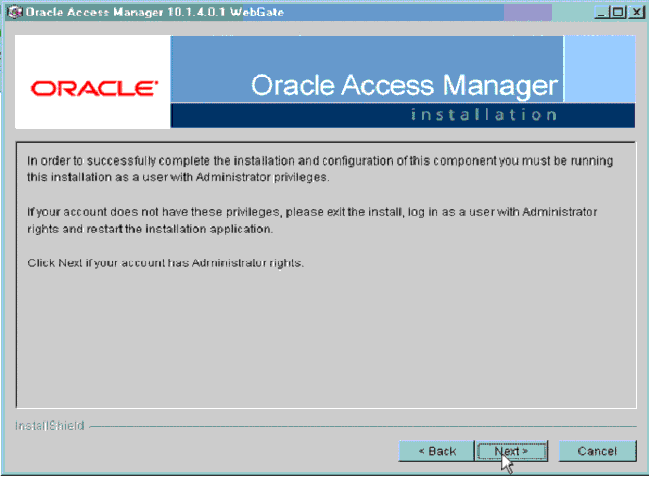
You must have administrative privileges to run the installation. If you are logged in as a different user, you must exit the installation, log in as the Administrator and then restart the installation. When the following screen appears, click Next.
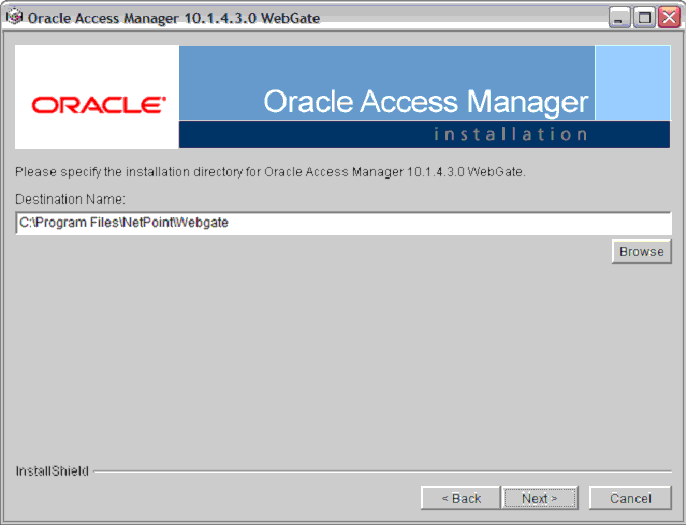
In the Destination Name, set the installation directory and click Next.
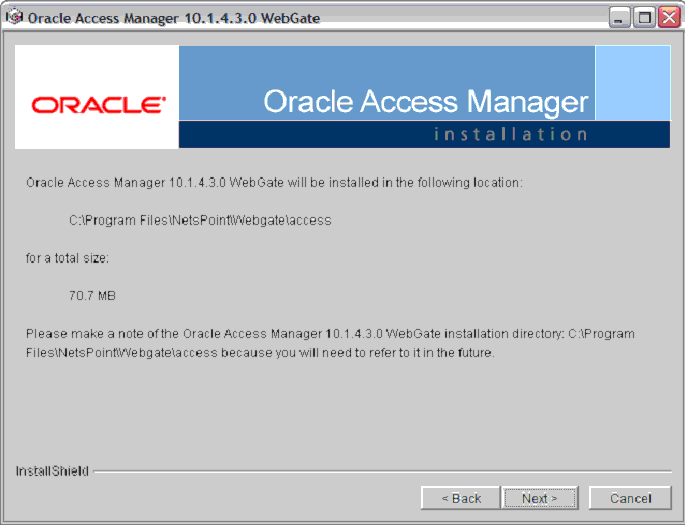
Review the location to which WebGate for IIS is getting installed and the total disk space it will take for the installation. Then click Next.
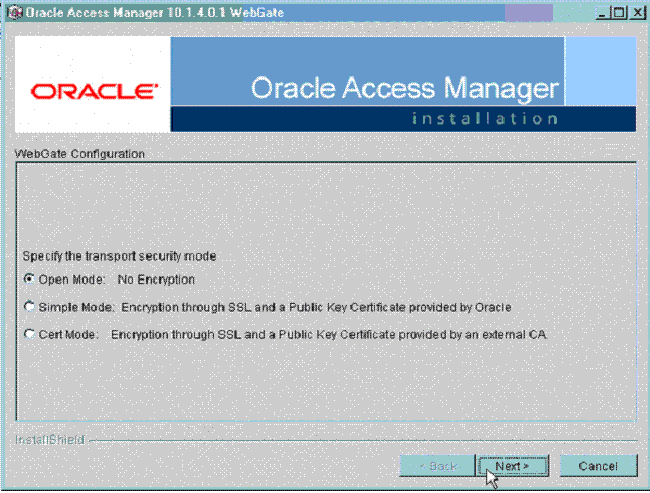
The installer begins copying the WebGate files for IIS. Now select Open Mode: No encryption for the transport security mode and click Next.
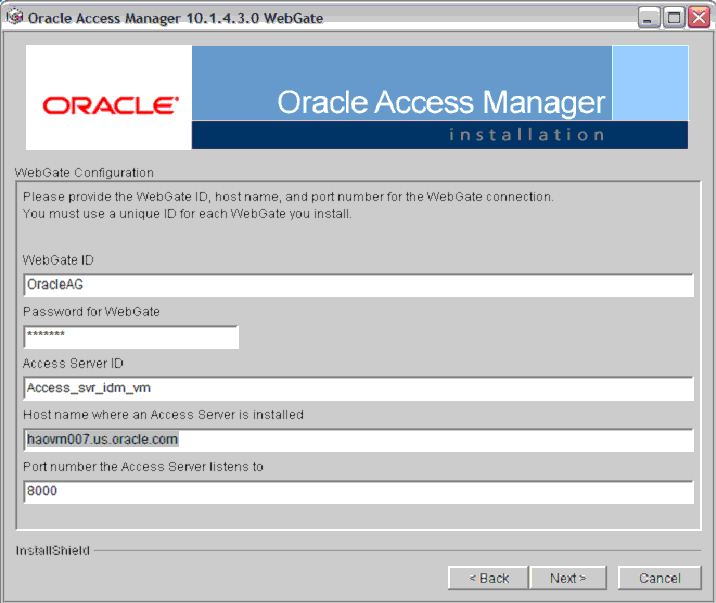
Provide the following details and click Next.
Table 12-1 Values for WebGate configuration
| Parameter | Description |
|---|---|
|
WebGate ID |
Name of the webgate. |
|
Password |
Password for the webgate. |
|
Access Server ID |
Name of the access server that is configured in access server console. |
|
Host name |
FQDN of the machine where the access server is installed. |
|
Port number |
Port of the access server |
The following screen appears:
Review the Readme page and click Next.
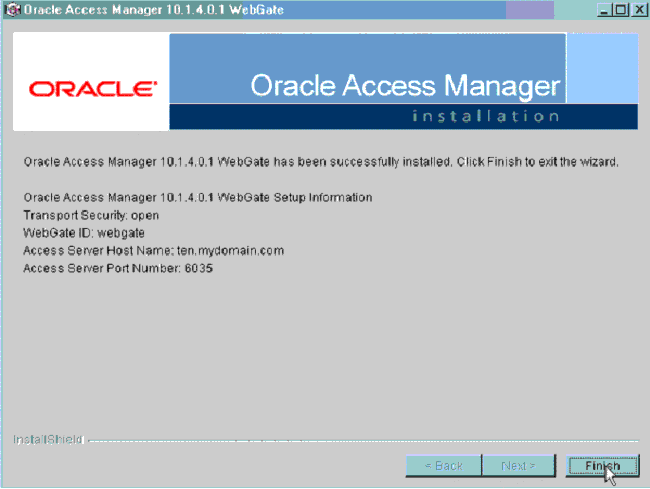
You can review the WebGate for IIS configuration settings and click Finish.
This section describes the procedure to install WebGate on Windows Server 2008. Before following this procedure, ensure that you have already installed webgate on windows 2008 server.
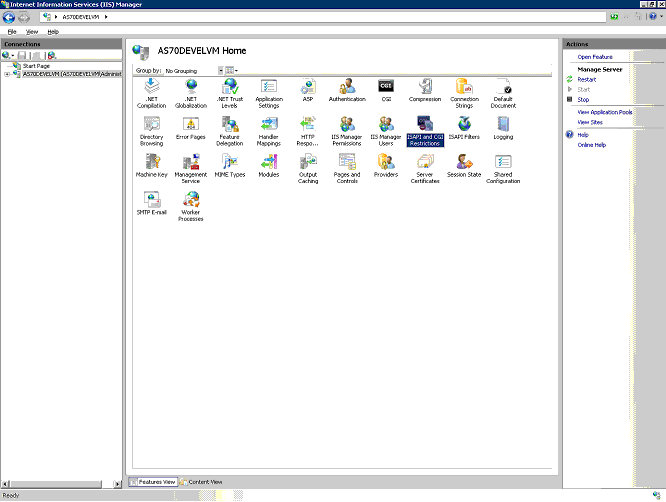
Open IIS manager and navigate to the top level node. On the home page, double click ISAPI and CGI restrictions to open the feature.
The following screen appears:
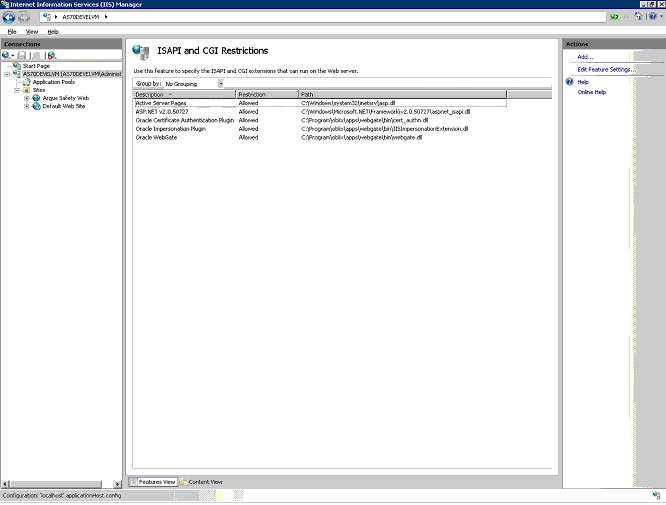
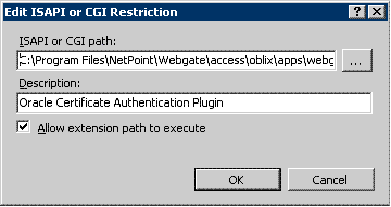
You have to correct the path for the following DLLs to reflect the path where you have installed the WebGate. To do this, double click the DLL entry and you will see the Edit ISAPI or GCI Restrictions dialog box as shown below. In this dialog box, enter the path given in the following table and click OK.
Table 12-2 Default path for DLL
| DLL Name | Default Installation Path |
|---|---|
|
Oracle Certificate Authentication Plugin |
|
|
Oracle Impersonation Plugin |
|
|
Oracle WebGate |
|
|
Note: For Windows 2008 R2, the DLLs must be manually added by clicking on the Add link in the right-most pane. |
Click Edit Feature Settings in the Actions panel in the right. The following dialog box appears:
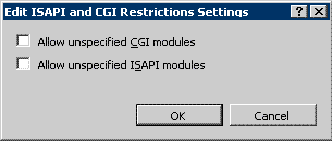
Check both the boxes and click OK.
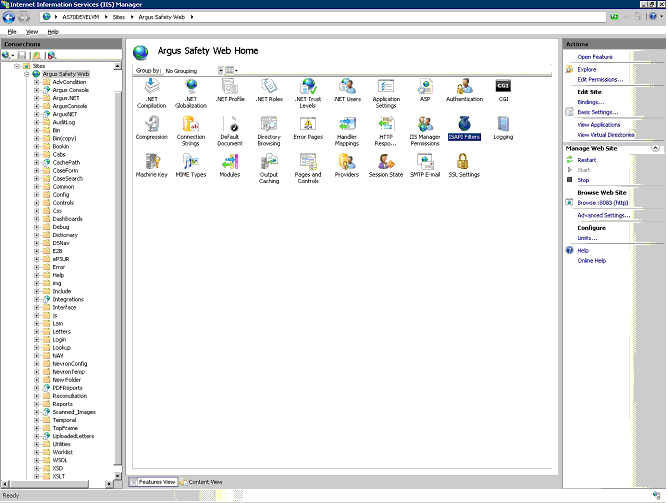
Click Argus Safety Web node, which will open the home page for the application as shown below.
Click ISAPI Filters and the following screen appears:
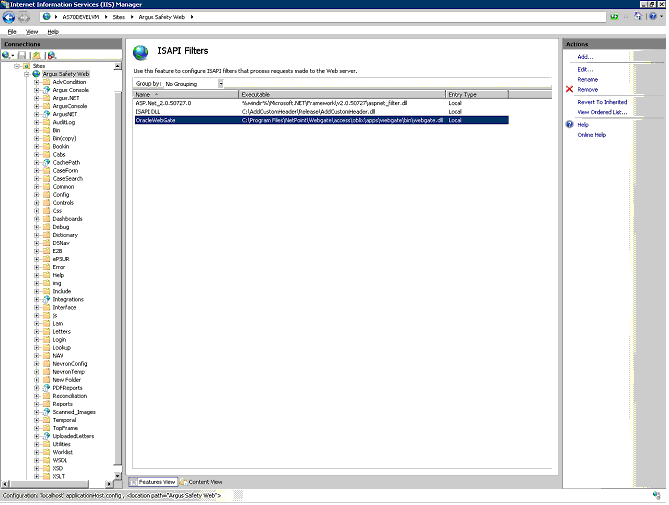
Double click OracleWebGate and enter the path to where you have installed WebGate. The default path is C:\Program Files\NetPoint\Webgate\access\oblix\apps\webgate\bin\webgate.dll
You will now have to remove the <add segment="bin"/> entry from applicationhost.config file. Take a backup of the file before you make the following changes:
Navigate to Windows\System32\inetsrv\config and open the applicationHost.config file.
Search for the <hiddenSegments> module.
Remove the entry <add segment="bin"/> if it is present.
Save the file.
Restart IIS for the changes to take effect.
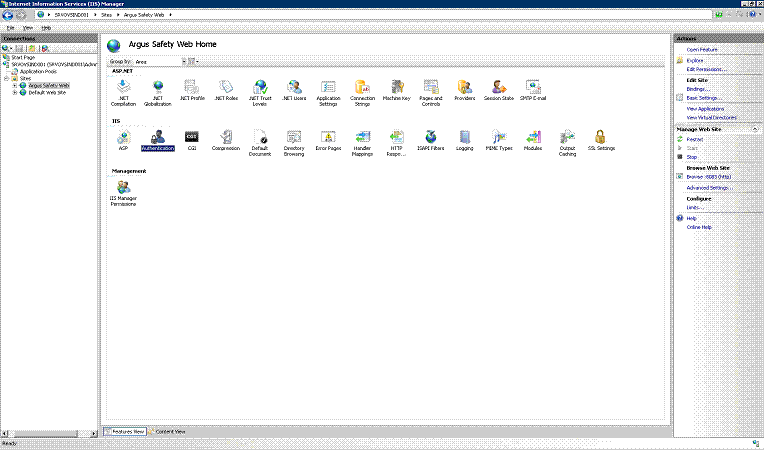
After restarting IIS, open IIS Manager and navigate to Sites > Argus Safety Web > Authentication as per the screenshot below:
Right click on Windows Authentication and check if it is enabled. If yes, then disable it. This completes the WebGate installation on Windows Server 2008.
This section describes the procedure to create a policy to protect files under the Argus directory.
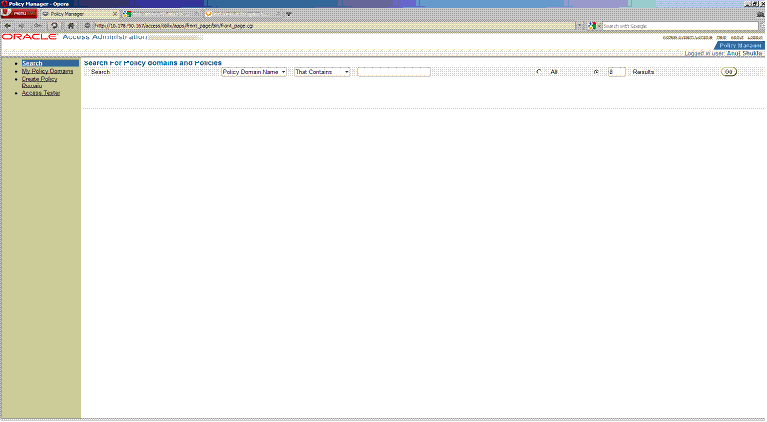
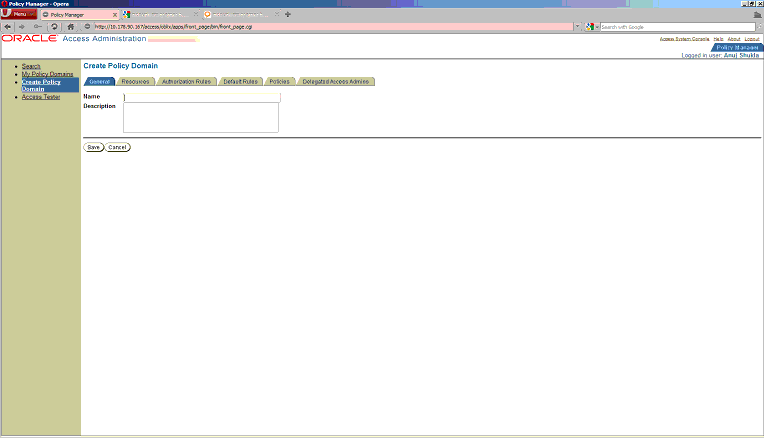
Navigate to the policy manager console and click Create Policy Domain.
Under the General tab provide a name and description and click Save.
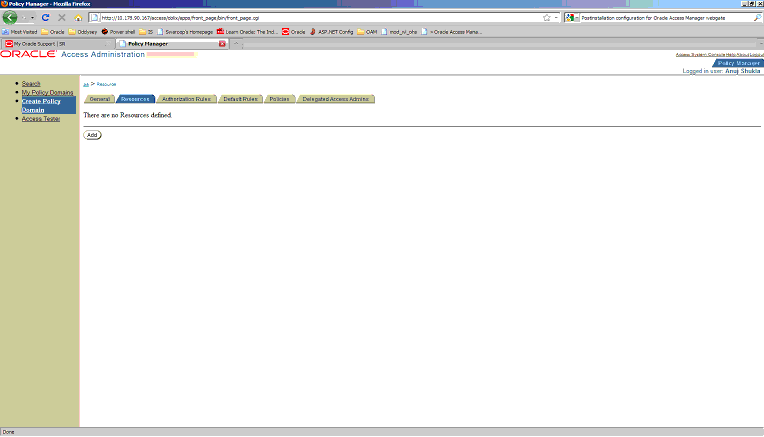
Click the Resource tab and then click Add.
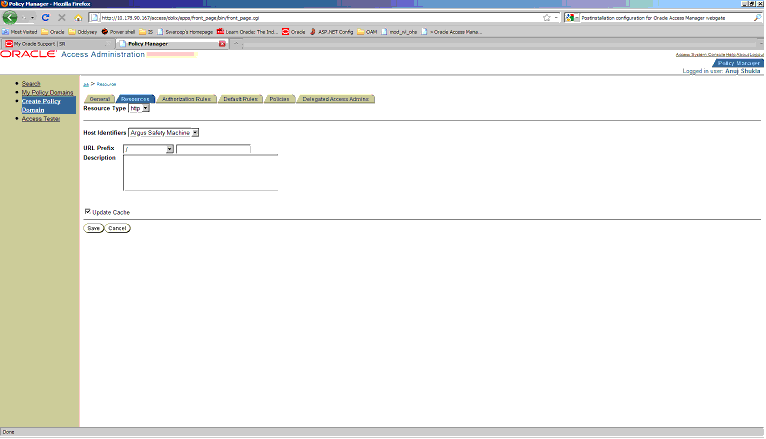
Select Host Identifier from the dropdown list and select URL Prefix as / and provide a description. Click Save.
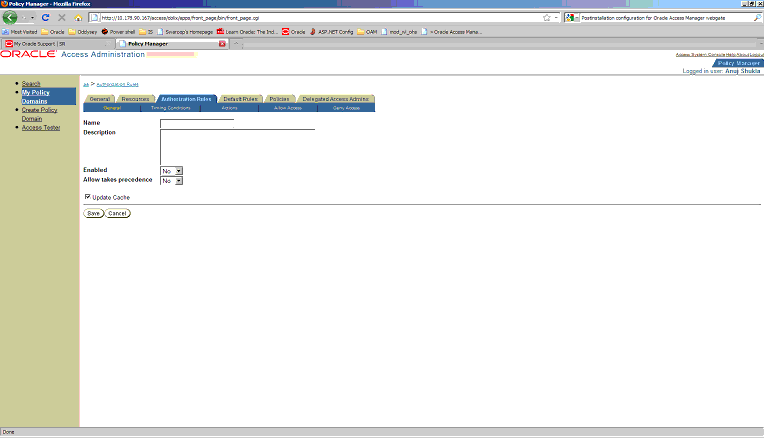
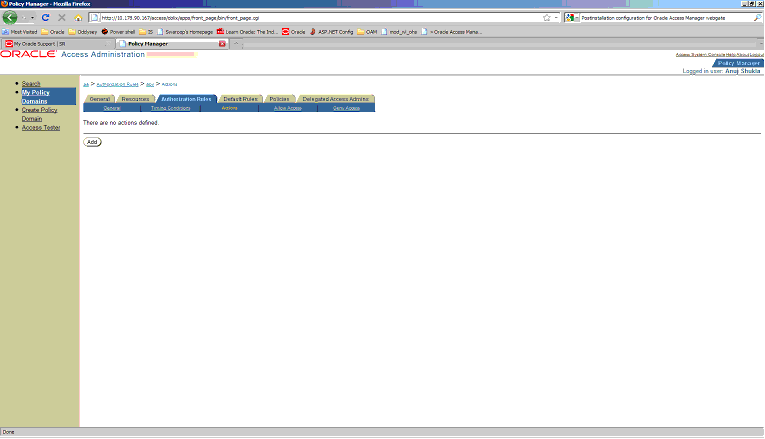
Click the Authorization Rules tab and select the General sub tab.

Enter the following details in this tab and click Save:
Name - Enter an appropriate name for the rule.
Description - Enter a description for the rule.
Enabled - Select Yes from the dropdown list.
Allow takes precedence - Select Yes from the dropdown list.
Now click the Actions sub tab. Click Add.
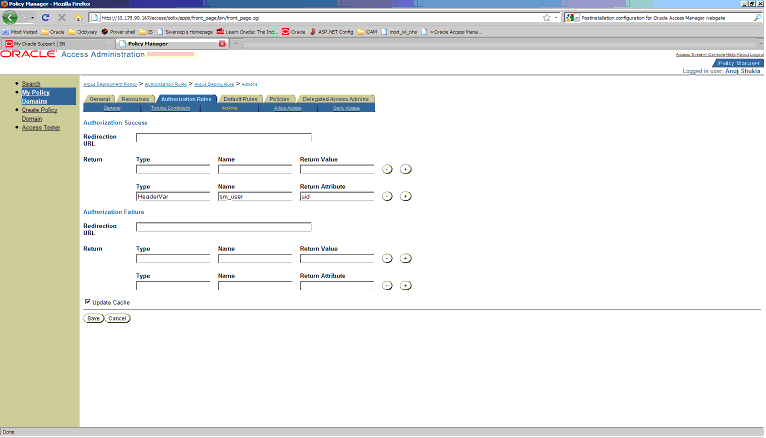
In the Authorization Success section under Return, enter the following values and click Save:
Table 12-3 Values for Return field
| Field name | Value |
|---|---|
|
Type |
HeaderVar |
|
Name |
SM_USER |
|
Return Attribute |
uid |
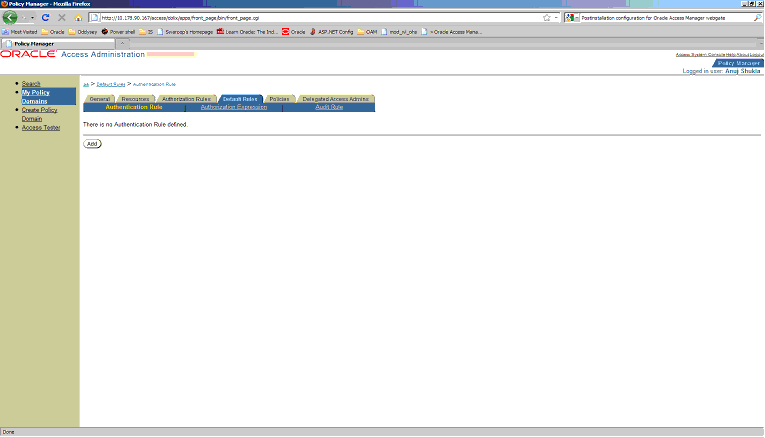
Navigate to Default Rules > Authentication Rule. Click Add.
Enter details for Name and decsription and select Authentication Scheme as Oracle Access and Identity Basic Over LDAP. Click Save.
Click the Authorization Expression sub tab and click Add.
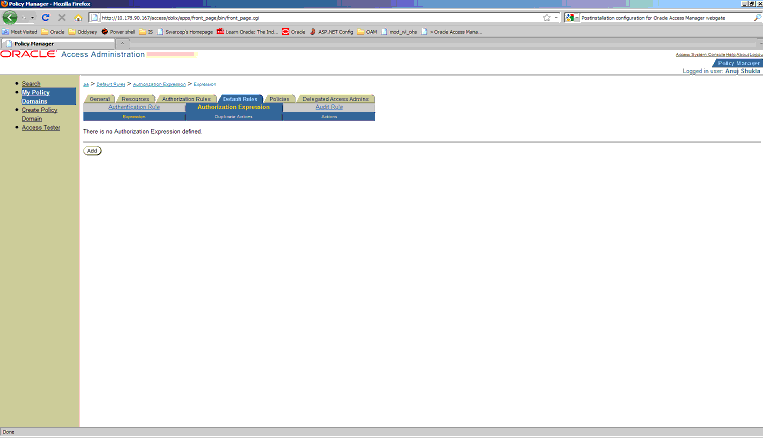
Select Authorization Rule from the dropdown. Click Add and then click Save.
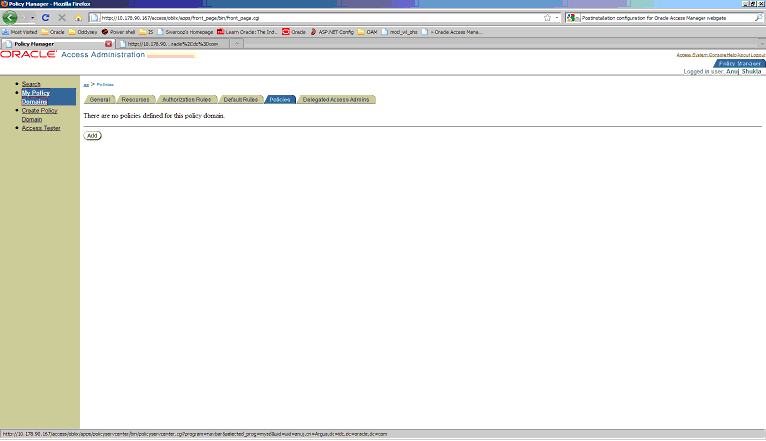
Click Policies and then click Add.
Provide the following details and click Save:
Name - Name of the policy.
Description - Description of the policy.
Resource type - Select as http.
Resource Operation(s) - Select as Get and Post.
Now restart the Identity service and Access service. Also restart the IIS Argus Web Server. This completes the webgate installation and SSO policy configuration.
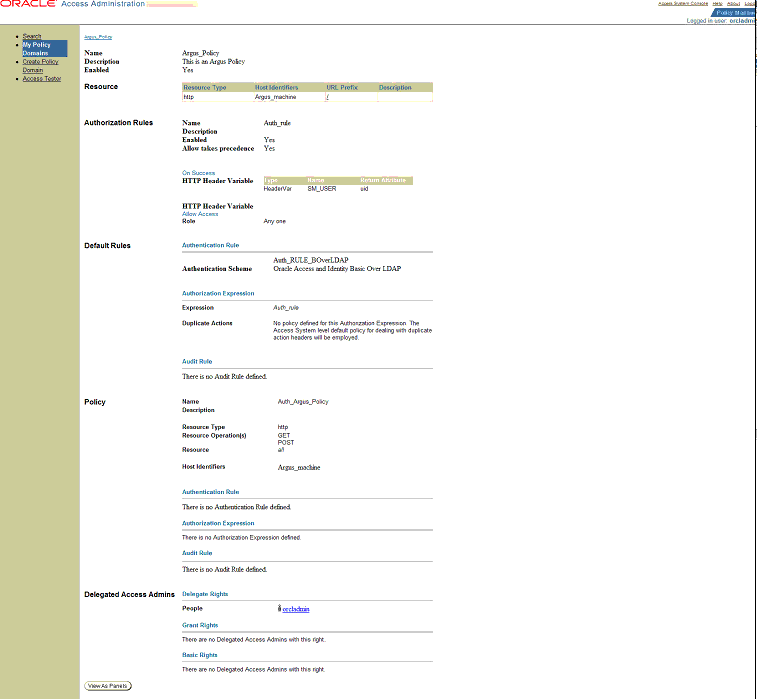
After you have completed the above steps your policy will appear as shown below:
To verify if you have correctly configured the policy check for the following prompt when you open the Argus URL:
This section describes how to configure SSO in the Oracle Access Manager (OAM) 11g. Following are the pre-requisites to this task:
The system should have an OAM installation (Identity server, Access server, WebPass, Policy Manager).
User profiles should exist in the LDAP server as well as in Argus with the same credentials.
LDAP should be configured in the Argus Console.
The LDAP flag should be set to ON for the users in Argus.
Perform the following steps to install SSO on the OAM:
Navigate to the System Configuration tab of OAM and select the New OAM 10g Webgate link.
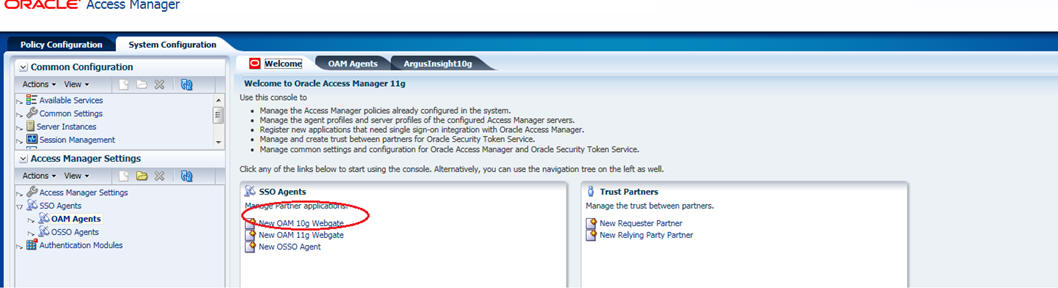
The Create OAM 10g Webgate screen is displayed. Enter the name of the Webgate in the Name field and provide the password for the Webgate in the Access Client Password field. Click Apply.
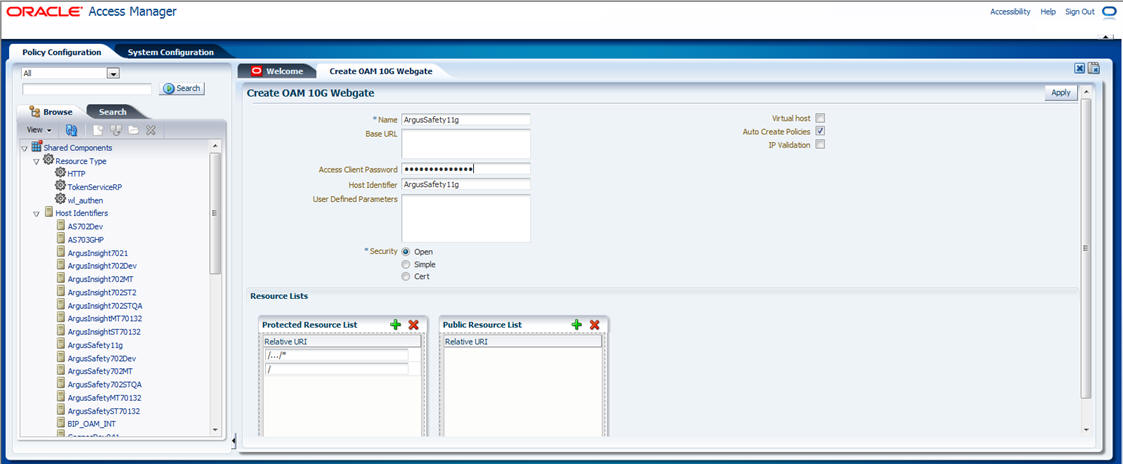
The following screen is displayed:
|
Note: Refresh the Host Identifier list to view the newly created Webgate within the Policy Configuration tab. |
Provide details such as Primary Cookie Domain and Preferred Host, as shown above and click Apply:
Primary Cookie Domain - provide FQDN of the machine where you will install webgate, prefixed by a period. For example, .idc.oracle.com. Note the . before the FQDN.
Preferred Host - provide the IP Address of the Argus Web Server where you will install webgate.
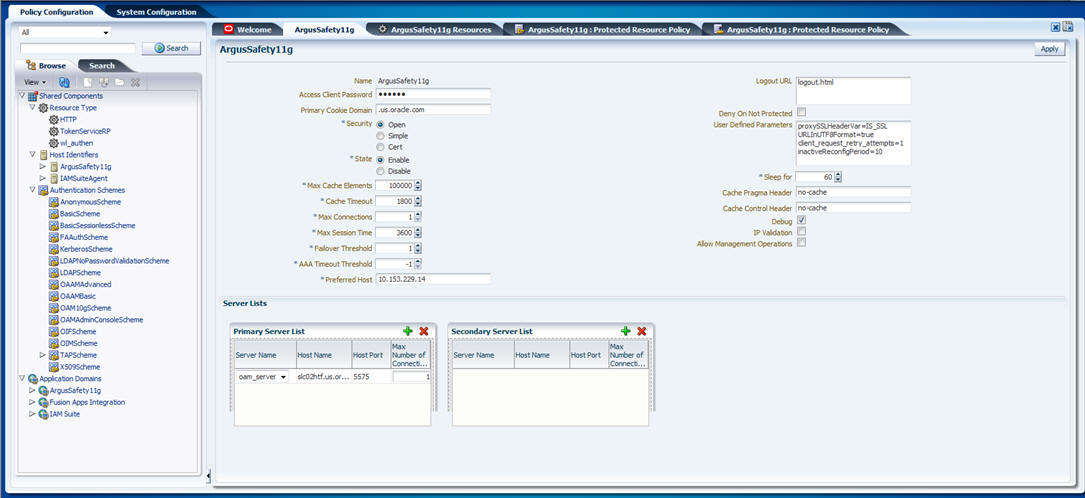
Expand the list of Application Domains and under this, expand the newly created Webgate.
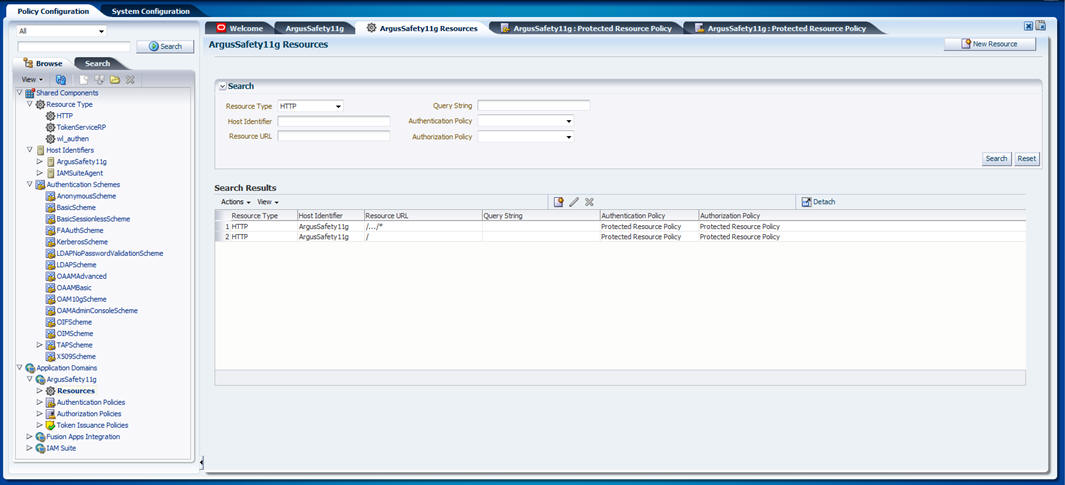
Double-click on Resources. On the Resources screen, click the Create icon (displayed in the Search Results section, with the + symbol in red).
Create the resource type with the correct host identifier, as displayed in the following screen:
Expand the Authentication Policies under the newly created Webgate.
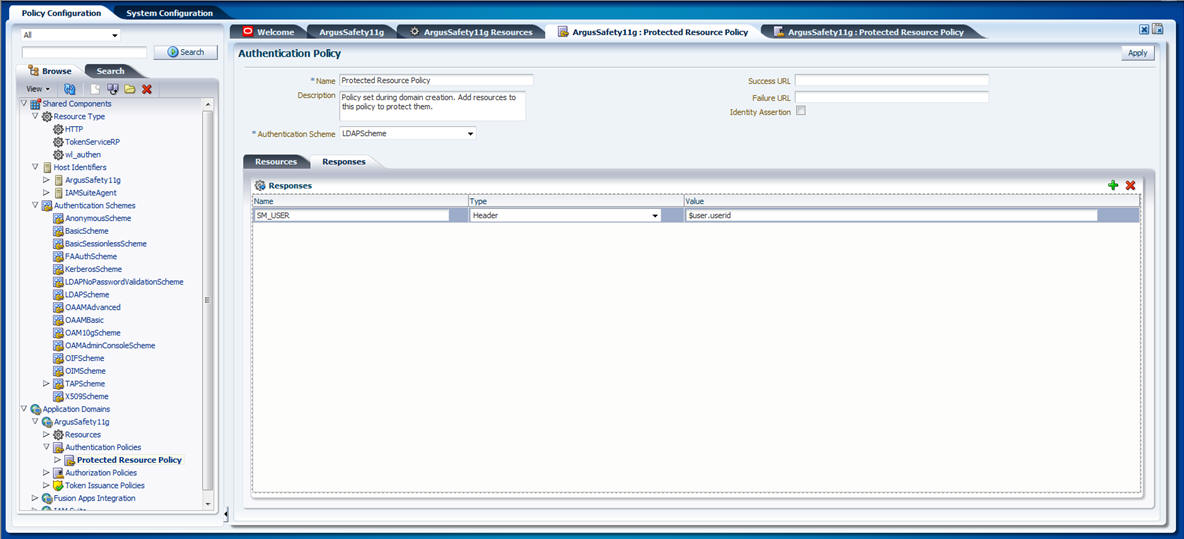
Double-click the Protected Resource Policy. The following screen appears:
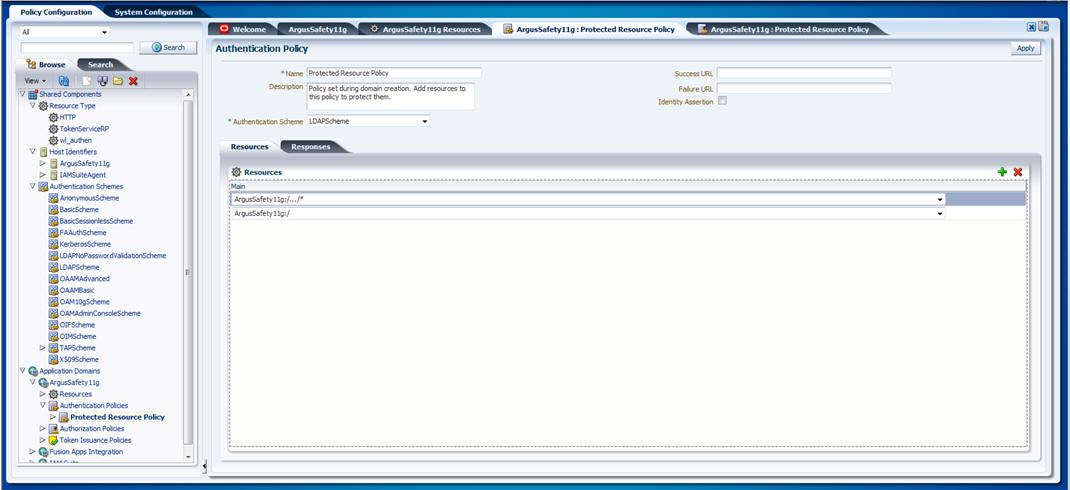
Navigate to the Responses tab and click the + button to add the Name, Type, and Value for the responses, as shown in the following screen:
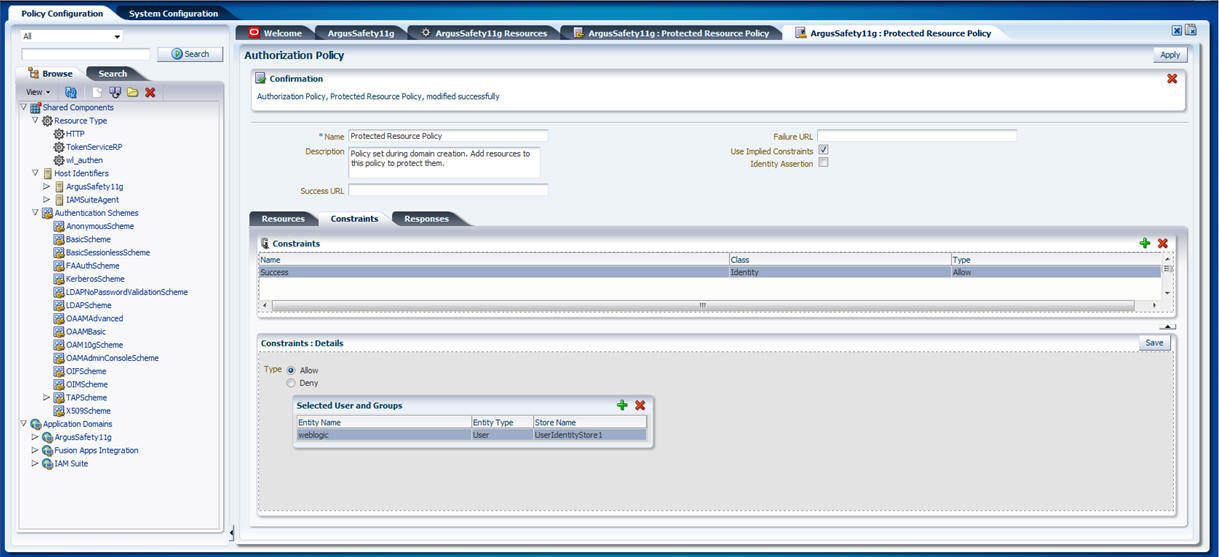
Expand the Authorization Policies under the newly created Webgate and double-click the Protected Resource Policy.
Select the Constraints tab and click the + button to add the Name, Type, and Class for the constraints, as shown in the following screen:
|
Note: All the names under the Constraints tab with Type as Allow can access the Argus Safety Server where Webgate has been installed. Select the Type as Deny if a user should be denied access to the Argus Safety Server where Webgate has been installed.If no constraint is added, all the users configured on the LDAP Server will have access to the Argus Safety Server where Webgate has been installed. |
Following is the procedure to install WebGate:
Run the file Oracle_Access_Manager10_1_4_3_0_Win32_ISAPI_WebGate.exe. The following screen appears. Click Next.
You must have administrative privileges to run the installation. If you are logged in as a different user, you must exit the installation, log in as the Administrator and then restart the installation. When the following screen appears, click Next.
In the Destination Name, set the installation directory and click Next.
Review the location to which WebGate for IIS is getting installed and the total disk space it will take for the installation. Then click Next.
The installer begins copying the WebGate files for IIS. Now select Open Mode: No encryption for the transport security mode and click Next.
Provide the following details and click Next.
Table 12-4 Values for WebGate configuration
| Parameter | Description |
|---|---|
|
WebGate ID |
Name of the webgate. |
|
Password |
Password for the webgate. |
|
Access Server ID |
Name of the access server that is configured in access server console. |
|
Host name |
FQDN of the machine where the access server is installed. |
|
Port number |
Port of the access server |
The following screen appears:
Review the Readme page and click Next.
You can review the WebGate for IIS configuration settings and click Finish.
This section describes the procedure to install WebGate on Windows Server 2008. Before following this procedure, ensure that you have already installed webgate on windows 2008 server.
Open IIS manager and navigate to the top level node. On the home page, double click ISAPI and CGI restrictions to open the feature.
The following screen appears:
You have to correct the path for the following DLLs to reflect the path where you have installed the WebGate. To do this, double click the DLL entry and you will see the Edit ISAPI or GCI Restrictions dialog box as shown below. In this dialog box, enter the path given in the following table and click OK.
Table 12-5 Default path for DLL
| DLL Name | Default Installation Path |
|---|---|
|
Oracle Certificate Authentication Plugin |
|
|
Oracle Impersonation Plugin |
|
|
Oracle WebGate |
|
|
Note: For Windows 2008 R2, the DLLs must be manually added by clicking on the Add link in the right-most pane. |
Click Edit Feature Settings in the Actions panel in the right. The following dialog box appears:
Check both the boxes and click OK.
Click Argus Safety Web node, which will open the home page for the application as shown below.
Click ISAPI Filters and the following screen appears:
Double click OracleWebGate and enter the path to where you have installed WebGate. The default path is C:\Program Files\NetPoint\Webgate\access\oblix\apps\webgate\bin\webgate.dll
You will now have to remove the <add segment="bin"/> entry from applicationhost.config file. Take a backup of the file before you make the following changes:
Navigate to Windows\System32\inetsrv\config and open the applicationHost.config file.
Search for the <hiddenSegments> module.
Remove the entry <add segment="bin"/> if it is present.
Save the file.
Restart IIS for the changes to take effect.
After restarting IIS, open IIS Manager and navigate to Sites > Argus Safety Web > Authentication as per the screenshot below:
Right click on Windows Authentication and check if it is enabled. If yes, then disable it. This completes the WebGate installation on Windows Server 2008.
This section describes the procedure to create a policy to protect files under the Argus directory.
Navigate to the policy manager console and click Create Policy Domain.
Under the General tab provide a name and description and click Save.
Click the Resource tab and then click Add.
Select Host Identifier from the dropdown list and select URL Prefix as / and provide a description. Click Save.
Click the Authorization Rules tab and select the General sub tab.
Enter the following details in this tab and click Save:
Name - Enter an appropriate name for the rule.
Description - Enter a description for the rule.
Enabled - Select Yes from the dropdown list.
Allow takes precedence - Select Yes from the dropdown list.
Now click the Actions sub tab. Click Add.
In the Authorization Success section under Return, enter the following values and click Save:
Table 12-6 Values for Return field
| Field name | Value |
|---|---|
|
Type |
HeaderVar |
|
Name |
SM_USER |
|
Return Attribute |
uid |
Navigate to Default Rules > Authentication Rule. Click Add.
Enter details for Name and decsription and select Authentication Scheme as Oracle Access and Identity Basic Over LDAP. Click Save.
Click the Authorization Expression sub tab and click Add.
Select Authorization Rule from the dropdown. Click Add and then click Save.
Click Policies and then click Add.
Provide the following details and click Save:
Name - Name of the policy.
Description - Description of the policy.
Resource type - Select as http.
Resource Operation(s) - Select as Get and Post.
Now restart the Identity service and Access service. Also restart the IIS Argus Web Server. This completes the webgate installation and SSO policy configuration.
After you have completed the above steps your policy will appear as shown below:
To verify if you have correctly configured the policy check for the following prompt when you open the Argus URL:
The Oracle Web Tier Suite consists of following products:
Oracle Process Manager Notification (OPMN)
Oracle HTTP Server (OHS)
Oracle Web Cache
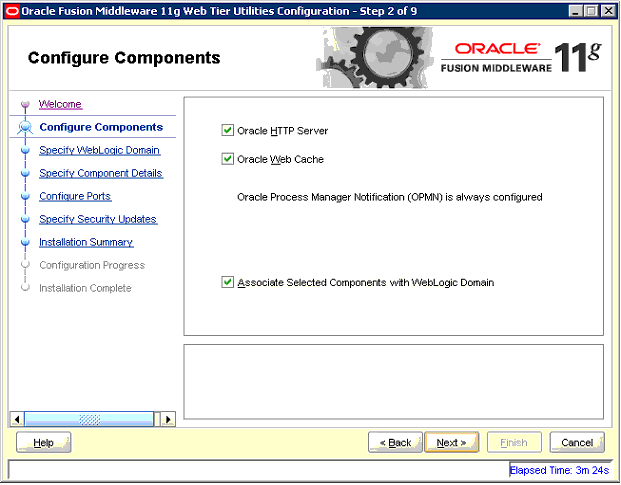
This section describes the procedure to install Oracle Web Tier (OHS). Prior to this installation, ensure that you have a running instance of WebLogic Server.
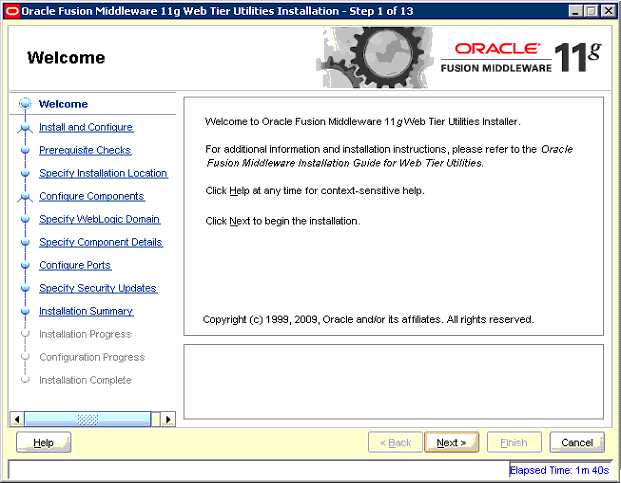
Navigate to folder \ofm_webtier_win_11.1.1.2.0_32_disk1_1of1\Disk1 and double click setup.exe to start the installer. The installer will begin after a check has been made for installer requirements.
Click Next to continue.
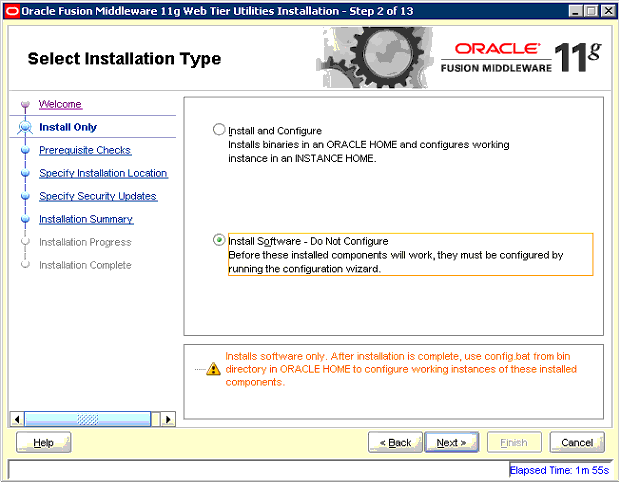
Select Install Software - Do Not Configure and click Next.
In the next screen, the installer performs Prerequisite Checks. Click Next to continue.
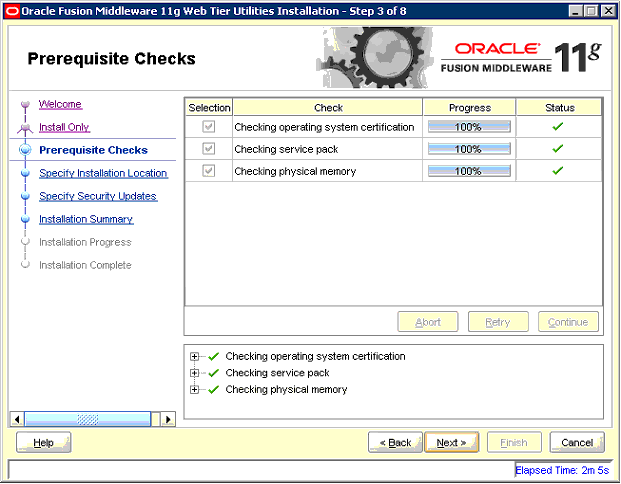
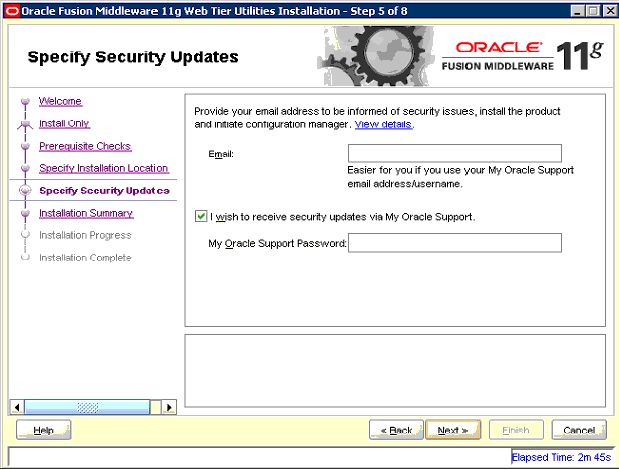
You can skip security updates so uncheck the option to receive security updates via My Oracle Support. The system will give a warning. Click Yes to close the screen and then click Next.
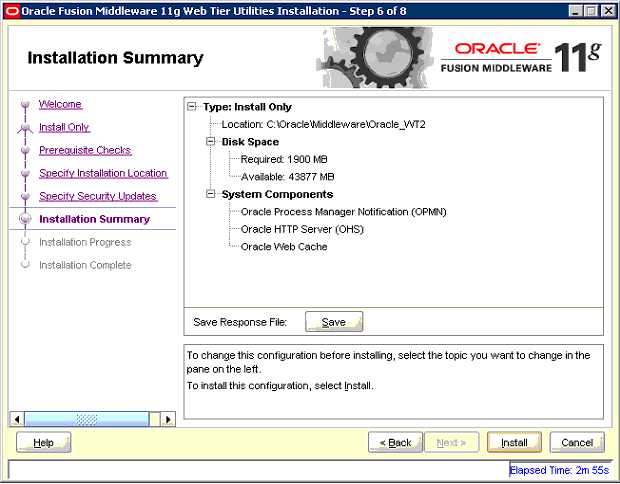
On the installation summary screen, click Install. This will install Oracle Web Tier.
The following section describes the procedure to configure the Oracle Web Tier (OHS).
Navigate to the folder Oracle Middleware_Home\Webtier_Instance\bin. For example, C:\OracleNew\Middleware\Oracle_WT1\bin. Here Oracle_WT1 is the name of the webtier instance created during installation. In the folder, run config.bat to start the configuration wizard.
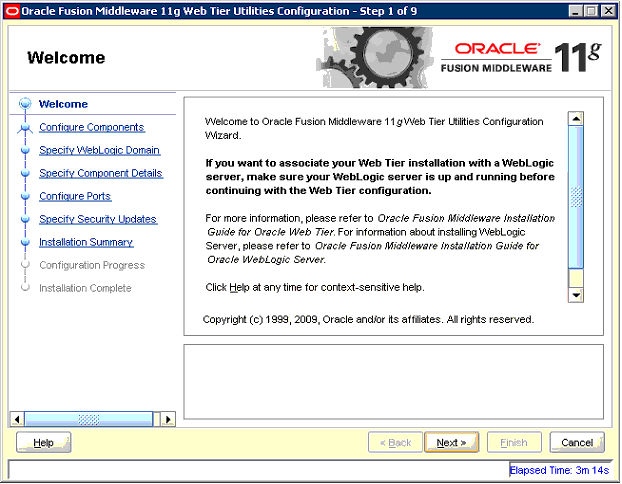
In the next screen, click Next.
Enter details of the weblogic server and click Next.

In the next screen, click Next.
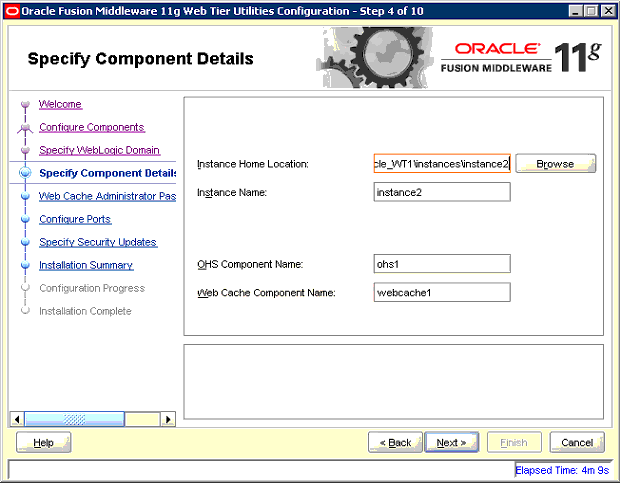
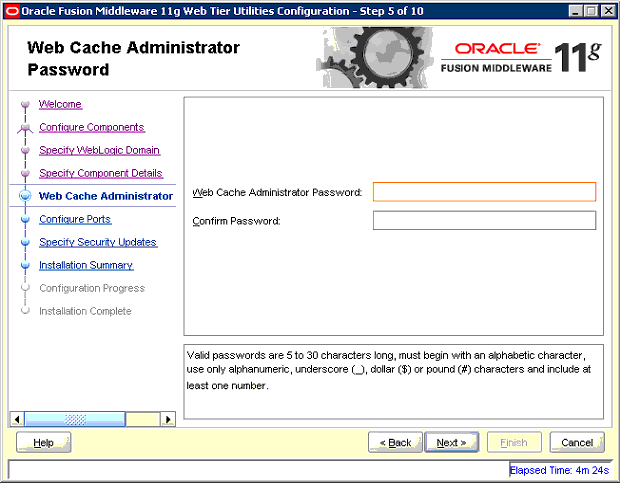
Enter a password for Web Cache and click Next.
Select auto configuration port in the Configure Ports screen. Click Next.
Skip security updates for now and then click Next to continue configuring the Web Tier.
After the configuration, navigate to http://localhost:7001/em. This will open the Enterprise Management console for Fusion Middleware as shown below. Log in using the same credentials as that of the WebLogic server.
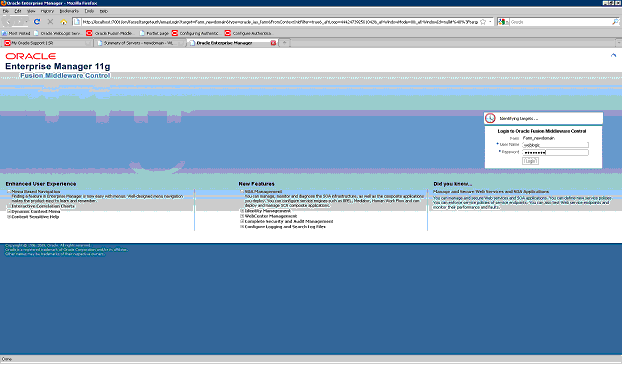
Click the Web Tier node on the left.

Click the name of the OHS instance that you have created during installation. In the following example, the OHS instance is ohs1.
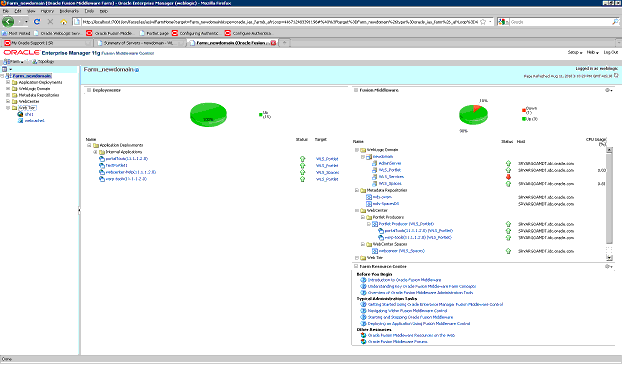
You will see all the details related to Oracle Http server on this console.
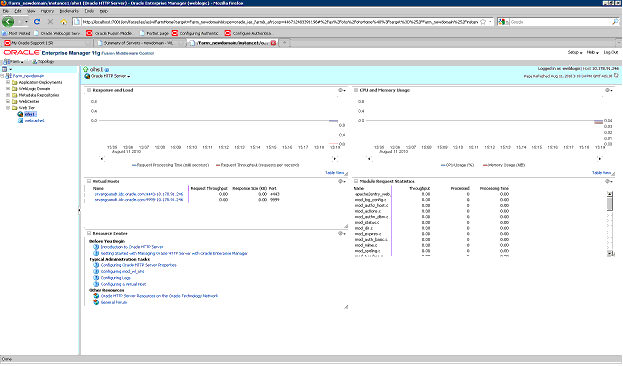
This section describes the procedure to perform administrative tasks on the Oracle Http Server.
Perform steps 8 to 11 from the section Configuring Oracle Web Tier.
Click Oracle Http Server just below instance name at the top of right pane to access a menu.
This menu allows you to perform the following administrative tasks:
Control => Start Up - You can start an OHS instance using this option.
Control => Shut Down - You can stop and OHS instance using this option.
Control => Restart - You can restart an OHS instance using this option.
Logs => View Log Messages - You can view logs of the OHS instance using this option.
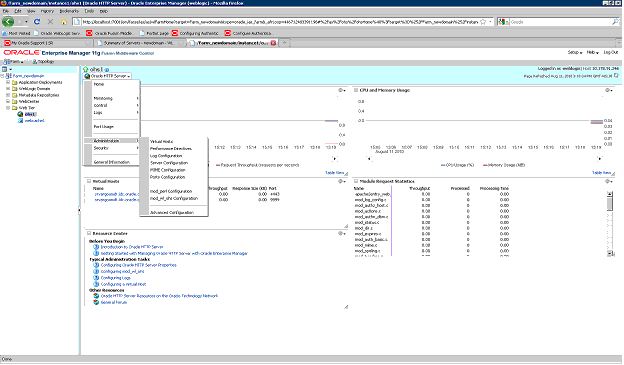
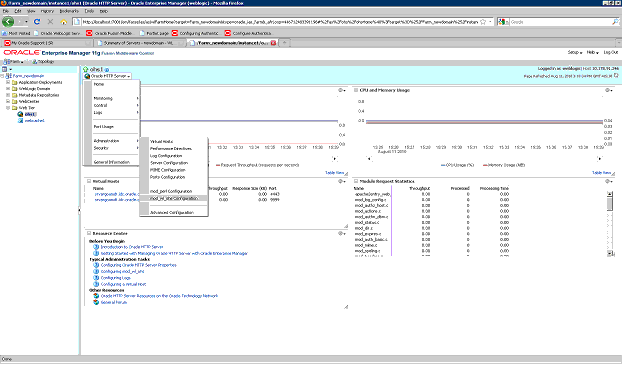
This section describes the procedure to configure the Oracle Http Server to act as a reverse proxy server for the WebLogic Server. Prior to following this procedure, ensure that you have a running instance of WebLogic Server and Oracle Web Tier. Also, you should have Global Home Page URL.
Perform steps 8 to 11 from the section Configuring Oracle Web Tier.
Navigate to Administration => mod_wl_ohs_configuration from the top menu.
The following screen appears:
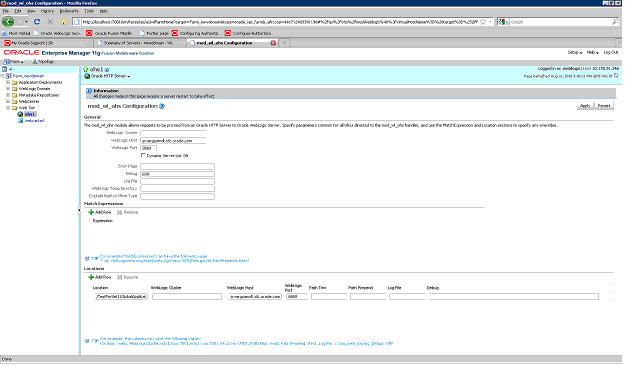
In the General section enter the following information:
Weblogic host: FQDN of the machine where weblogic server and other managed servers are running.
Weblogic port: Port of the WebLogic server.
Debug: Give ERR.
Log File: You can provide a log file here.
In the Locations Section:
Click AddRow and add a new row.
In the WebLogic Host and Port field enter the same values as that in the general section of this page.
Location field: For entering a value in this field consider an example. If the URL for the Global Home Page deployed on custom server is http://srvargoamdt.idc.oracle.com:8001/GlobalHomePage/faces/GlobalHome, then srvargoamdt.idc.oracle.com is the FQDN of the machine where WebLogic server is installed and 8001 is the port at which custom server is listening. Now take the path after port /GlobalHomePage/faces/GlobalHome and enter this as the value in the location field.
Click Apply on the top right corner.
Restart the Oracle http Server using the Restart option of the top level menu.
After restarting, navigate to http://srvargoamdt.idc.oracle.com:7777/ GlobalHomePage/faces/GlobalHome. Here srvargoamdt.idc.oracle.com is the FQDN of the machine where the OHS instance is running and 7777 is the port at which the OHS server is listening.
|
Note: You should see the same page but this time it is being redirected from OHS to the WebLogic Server. |

This section describes how to set the security provider of Web Logic Server to use Oracle Internet Directory which is the OAM identity store.
This section describes the procedure to configure the Oracle Internet Directory Authenticator.
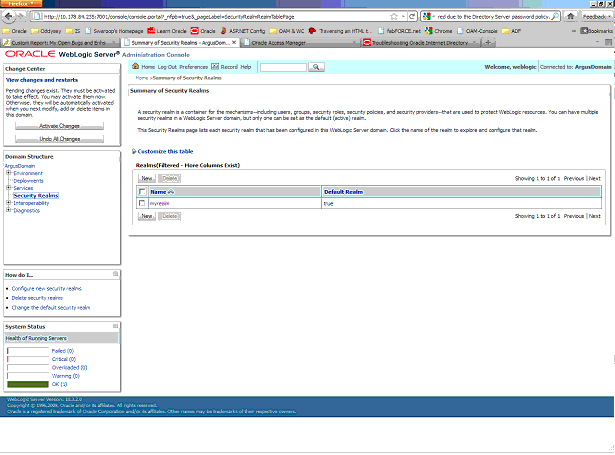
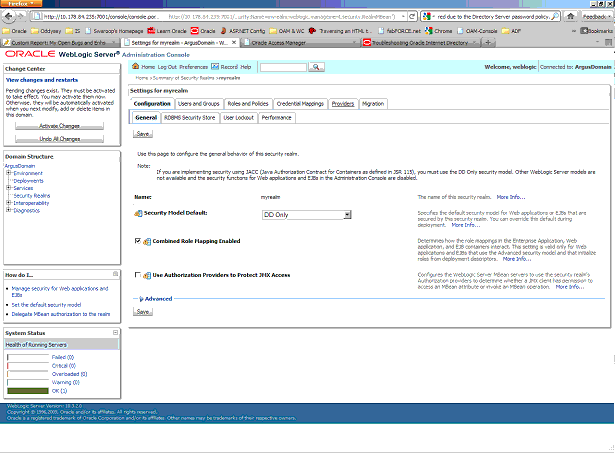
Log in to the WLS Administration Console. From the Domain Structure pane, click Security Realms. Then click myrealm.
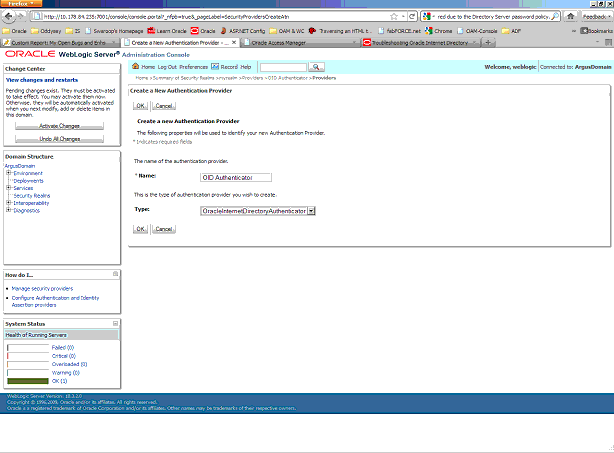
Navigate to Providers => Authentication. Click New to create a new provider.
Enter Name as OID Authenticator and select type from the dropdown as OracleInternetDirectoryAuthenticator. Click OK.
Go back to the Providers tab and click OID Authenticator, which appears as link.
In the Common sub tab modify the Control Flag field to Sufficient and click Save.
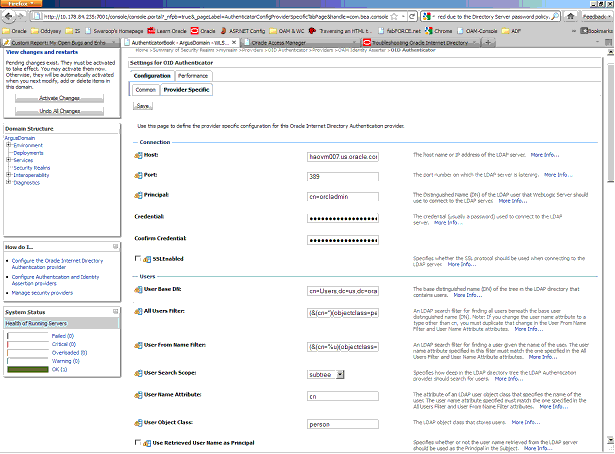
Click the Providers Specific tab and provide values for the fields described in the table below:
Table 12-7 Values for the Providers Specific tab
| Parameter Name | Description | Sample Value |
|---|---|---|
|
Host |
LDAP Hostname |
infra.vm.oracle.com |
|
Port |
LDAP Port |
389 |
|
Principal |
LDAP admin principal |
cn=orcladmin |
|
Credential |
Password for admin principal (password of cn=orcladmin) |
|
|
User Base DN |
User Search Base - This value can be obtained by checking the Users realm DN from OID |
For example, cn=Users,dc=idc,dc=oracle,dc=com |
|
All Users Filter |
Set as |
|
|
User Name Attribute |
Set to "uid" from "cn" |
uid |
|
Group Base DN - Group search base - Same as User Base DN |
Group Search Base - The DN used to search the Group, can be checked by Groups DN in OID |
For example, cn=Groups,dc=idc,dc=oracle,dc=com |
Retain the default values for the remaining attributes. Click Save.
This section describes how to configure the OAM identity asserter in WebLogic server security realm.
Log in to the WLS Administration Console. From the Domain Structure pane, click Security Realms. Then click myrealm.
Click the Providers tab to see list of providers.
Click New. Enter name as OAMIdentity Asserter and select type as OAMIdentityAsserter.
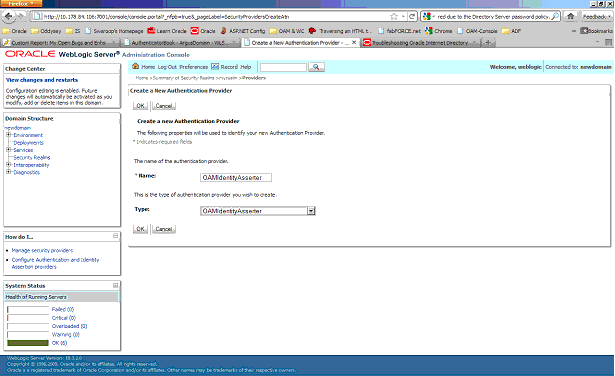
Click OK to save the details. Now click the newly added OAMIdentityAsserter, which appears as link to view its details.
In the Common sub tab select control flag as REQUIRED and click Save.
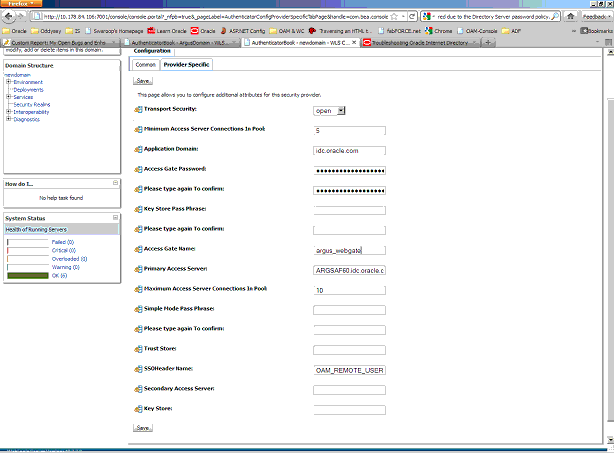
Navigate to the Providers sub tab and provide the details in the table below:
Table 12-8 Values for Provider sub tab
| Parameter Name | Description | Sample Value |
|---|---|---|
|
Transport Security |
Encryption type for Access Gate communication |
Open |
|
Primary Access Server |
Provide OAM server endpoint information in HOST:PORT format |
argsaf60.us.oracle.com:6021 |
|
Access Gate Name |
Copy the Access Gate name from the AG created from Step 3. |
idc.oracle.com_AG |
|
Access Gate Password |
Type the Access Gate Password configured in access system console |
Retain the default values for the remaining attributes.
This section describes how to configure the deafult authenticator and set the prder of the providers.
Navigate to the list Click Default Authenticator from the list of Security Providers in the console, and set Control Flag to SUFFICIENT. Click Save.
Set the Order for providers as follows:
OAMIdentityAsserter - REQUIRED
OracleInternetDirectoryAuthenticator - SUFFICIENT
DefaultAuthenticator - SUFFICIENT
DefaultIdentityAsserter
Log in to the machine where web center has been installed and navigate to user_projects/domains/wc_domain/bin. Now edit the file setDomainEnv.cmd.
|
Note: Ensure that you take a backup of the file setDomainEnv.cmd before making changes. |
Add following code at the end of the file:
Let's say EXTRA_JAVA_PROPERTIES="-Dweblogic.security.SSL.ignoreHostnameVerification=true -Doracle.mds.bypassCustRestrict=true
-Djps.update.subject.dynamic=true -Doracle.webcenter.spaces.osso=true
-noverify ${EXTRA_JAVA_PROPERTIES}"
Export $EXTRA_JAVA_PROPERTIES
Restart the Admin servers, managed servers and HTTP Server.
This section describes maintenance tasks you may need to perform on the installed Argus Safety Solution components. It includes instructions for performing various tasks and tips for using the Web client.
The components can be installed using the following procedure:
Select Start=> Control Panel.
When Windows opens the Control Panel, click Add or Remove Programs / Uninstall or change a program.
When the Add or Remove Programs dialog box opens:
Select Argus Safety.
Select Change.
The Argus Safety InstallShield Wizard opens the Preparing Setup dialog box.
When the wizard opens the Welcome dialog box:.
Select Modify.
Click Next > to continue.
When the wizard opens, select Update installed Argus Components and click Next:
Select Update installed Argus Components.
Click Next > to continue.
When the wizard opens the Customer Information dialog box:
Enter the user name in the User Name field.
Enter the company name in the Company Name field.
Select Next > to continue.
When the wizard opens the Select Features dialog box it contains a list of currently installed components.
Select checkbox for one or more components to install.
Select Next > to continue.
|
Note: Ensure the checkboxes for components that are already installed contain a checkmark. If the checkmark is cleared from the checkbox for an existing component, the component will be uninstalled.Refer to the relevant chapters in this Installation Guide for instructions for installing individual components |
After the installation is complete, the wizard opens the Argus Safety Setup- Maintenance Complete dialog box.
Click Finish. A message box appears.
Use the following procedures if it becomes necessary to uninstall a component:
Select Start=> Control Panel.
When Windows opens the Control Panel, click Add or Remove Programs.
When the Add or Remove Programs dialog box opens:
Select Argus Safety.
Select Change/Remove.
The Argus Safety InstallShield Wizard opens the Preparing Setup dialog box.
When the wizard opens the Welcome dialog box:
Click Next > to continue.
Select Modify.
When the wizard opens the Customer Information dialog box:
Enter the user name in the User Name field.
Enter the company name in the Company Name field.
Select Next > to continue.
When the wizard opens the Select Features dialog box it contains a list of currently installed.
Clear the checkbox for the components to uninstall.
Select Next > to continue.
The Argus Safety Components Installer will uninstall the selected components.
Follow the on-screen instructions to uninstall the components.
|
Note: If a Locked File Detected dialog opens, select "Don't display this message again," and click Reboot. |
If it becomes necessary to remove all the Argus Safety components, use the following procedure to do so:
Select Start=> Control Panel.
When Windows opens the Control Panel, click Add or Remove Programs.
When the Add or Remove Programs dialog box opens:
Select Argus Safety
Select Change/Remove' to "Select Remove/Uninstall"
The Argus Safety InstallShield Wizard opens the Preparing Setup dialog box.
When the wizard opens the Welcome dialog box:
Click Next > to continue after 'Select Remove.'
Select Remove.
When the Confirm Uninstall dialog box opens , Click OK to proceed.
The Argus Safety Components Installer uninstalls the required component(s).
Follow the screen instructions to uninstall the components.
|
Note: If a Locked File Detected dialog appears, select "Don't display this message again," and click Reboot.If a Shared File Detected dialog appears, select "Don't display this message again," and click Yes. If a ReadOnly File Detected dialog appears, select "Don't display this message again," and click Yes. |
This section describes the recommended Internet Explorer configuration for clients that access Argus Safety Web, Affiliate, Dossier, and Interchange Web.
To configure Internet Explorer:
|
Note: Use these steps to configure Internet Explorer v8.0 and v9.0. |
Open Internet Explorer v8.0.
Select Tools=> Internet Options.
When the Internet Options dialog box opens:
Locate Browsing History
Click Settings.
When the Settings dialog box opens:
Locate Check for newer versions of stored pages.
Select Automatically.
Click OK.
Click the Advanced tab of the Internet Options dialog box.,
When the Advanced tab opens:
Locate the Multimedia section.
Clear the following check boxes:
Show image download placeholders
Smart image dithering.
Select the Show Pictures check box.
Clear the Enable Automatic Image Resizing checkbox.
Click OK to close the Internet Options dialog.
|
Note: Make sure cookies are enabled on the client machine.If password encryption is required between Internet Explorer Client and the Web Server, HTTPS must be utilized. Please refer to the section Enabling SSL Support for Windows 2008 in this Installation Guide. When logged into Argus Safety System, having multiple internet browsers open may cause the user to receive a login screen when opening certain parts of the application such as opening E2B Report dialog. It is recommended to shut down all other non Argus Safety Sessions if this problem occurs on an end user machine. Certain requirements within the Argus Safety System open file attachments within a separate internet browser window however based on client machine settings this may not occur. Each application is configured differently as to how it handles files within Internet Explorer. Please refer to the application documentation to correctly configure it. It is not recommended to utilize the IP Address of the web server from the client machines within Internet Explorer. Using the IP Address forces Internet Explorer to use a high security mode which may restrict certain functionality from Argus to run. |
On the Argus Web, Argus Report and Argus Safety Service Servers, Oracle creates many temp files that begin with OIP and do not have an extension. Oracle does not delete these files and they can cause problems with the maximum number of files in a folder. This prevents Argus from creating new temp files. Therefore, these files must be deleted.
Deleting these files does not harm the system. One way of deleting these files is to use Argus Report Service because it cleans up the files at regular intervals. If you do not use Argus Report Service to clean these files, you will have to clean them manually.
Use the following procedure to configure the Argus Report Service to clean up these files.
|
Note: Oracle will first use the TMP Windows Environment Variable Path for Temp Files. If the TMP Variable is not defined, Oracle will use the path as defined in the registry below. |
To configure Argus Report Service to clear Oracle Temp files:
Start the Windows Registry Editor.
Locate the following path: HKEY_LOCAL_MACHINE \ SOFTWARE \ ORACLE.
Locate and open the folder containing the OO4O sub folder.
|
Note: The folder structure under the Key from Step 2 can vary for each installation, based on the installation client and version used. |
Locate and expand the OO4O folder.
Locate the TempFileDirectory folder.
|
Note: Oracle sometimes selects the Temp Folder as the Windows or Windows System Folder. Change this to some other temp folder so the files can be deleted without affecting any other files. For example, you can change the path to C:\Temp\Oracle.After changing the patch, please reboot the machine and continue with the next steps. Once it is set, the Argus Report Service will delete all files within the folder set here. If non-Oracle files exist, they will be deleted. |
Copy the path from the TempFileDirectory key.
Go to the Argus Installation Folder\Common folder.
Open the DeleteUser.bin file in Notepad.
Add a new line at the end of the file with the following syntax:
<Oracle Temp File Folder>;*
Example - C:\Temp;*
This line instructs the Argus Report Service to delete all files from this folder.
This section describes how to set up easyPDF and Microsoft Office and includes the following sections:
The easyPDF component is required for printing PDF reports and for use by Interchange features such as transmitting E2B attachments.
The domain account created during the installation of either Argus Web Server, Argus Report Server, Argus Safety Service or Interchange Service, will be required to continue with the following steps.
Before configuring Windows Service settings, verify the following:
The domain account created is part of the local Administrator Group on the server being setup.
Please verify that the step in the note below is completed before going to the Configure Windows Service Settings section.
|
Note: You must log on to the server being setup with the domain account at least once to initialize the account, including the printer driver setting, or Argus will not be able to function correctly. |
Use the following procedure to configure the Windows service settings:
Log on to the computer as the defined domain account.
Select Start=> Control Panel=> Administrative Tools=> Services.
When the Services dialog box opens:
Locate the BCL easyPDF SDK 6 Loader and double-click.
When the BCL easyPDF SDK 6 Loader Properties dialog box opens:
Click the Log On tab.
Enter the defined domain account name in the This account field.
Enter the defined domain account password in the Password field.
Enter the defined domain account password in the Confirm password field.
Click the General tab.
When the General tab opens:
Select Automatic from the Startup type drop-down list.
Click OK to close the Properties dialog box.
When the system returns to the main Services window, start the BCL easyPDF SDK 6 Loader.
Close the Services window.
This section provides an example procedure to make Microsoft Office applications, such as MS Word and MS Office, ready for server use. The example shows how Microsoft Word can be set up; you can also set up Microsoft Excel in the same manner.
Make sure that pop-up dialog boxes from Office products do not appear during the PDF conversion.
|
Note: Performance Consideration: If you have any third- party Word macros or add-ins, we recommend removing them. They often add extra overhead to Microsoft Word and slow down the entire PDF conversion process. |
Use the following procedure to set up Microsoft Word:
Log in to the computer as the defined domain account.
Start Microsoft Word to force the application to register itself.
Close all pop-ups that appear during Word initialization.
Hide the Office Assistant.
For Microsoft Word, configure the Customer Feedback Options (and also the other service options, as necessary).
Exit Microsoft Word.
If you are working on a Client machine, you must ensure that you enable/check the Display PDF in Browser setting in Adobe Acrobat Reader. If this setting is not enabled, PDF documents will not appear in Argus front-end. This might cause some information status pop-ups to hang on the client machine.
When printing Argus reports with Adobe Acrobat, make sure the Page Scaling option in the Print dialog box (File=> Print) is set to Shrink to Printable Area.
By default, Argus Safety logs files in ”C:\temp” (default temp directory of Argus Safety). You must ensure that the user under which Safety applications are running has access to this directory.
In the situation where the customer has a different ”Temp” directory, the temp directory path needs to be changed in the following files:
Background Processes (AG Server)
<Argus Install Path>/Argus Safety/AGProc.config
<Argus Install Path>/Argus Safety/Service.config
<Argus Install Path>/Argus Safety/RelsysWindowsService.exe.config
Argus Web Server and Report Server:
<Argus Install Path>/ArgusWeb/ASP/Web.config
<Argus Install Path>/ArgusWeb/Bin/Argussvr2.config
<Argus Install Path>/ArgusWeb/ASP/Argus.Net/Web.config
<Argus Install Path>/ArgusWeb/ASP/Argus.Net/Bin/RelsysWindowsService.exe.config
<Argus Install Path>/ArgusWeb/ASP/ Argus.Net/Bin /Service.config
<Argus Install Path>/ArgusWeb/ASP/Integrations/Web.config
|
Note: It is recommended that you use the local server path rather than the network share path. |
Backing up Configuration Files
You must ensure to back up the following configuration files before proceeding with this application upgrade. All system configuration (.config) files will be overwritten by this upgrade and your manual configuration changes will be lost. These files may be stored on multiple servers, depending on components selected at the time of the Argus installation (web server, report server, integration server, transaction server, and so on). The directory structure of the file, however, remains constant. Refer to the following list of commonly modified configuration files:
.\ArgusWeb\ASP\Argus.NET\bin\Intake.config
.\ArgusWeb\ASP\Argus.NET\bin\RelsysWindowsService.exe.config
.\ArgusWeb\ASP\Argus.NET\bin\Service.config
.\ArgusWeb\ASP\Argus.NET\web.config
.\ArgusWeb\ASP\ArgusConsole\web.config
.\ArgusWeb\ASP\Integrations\Service.config
.\ArgusWeb\ASP\Integrations\Web.config
.\ArgusWeb\ASP\web.config
.\ArgusWeb\Bin\Argusvr2.config
.\ArgusWeb\Bin\Argusvr2a.config
.\Argus Safety\AGProc.config
.\Argus Safety\Intake.config
.\Argus Safety\RelsysWindowsService.exe.config
.\ArgusSafety\Service.config
.\DBInstaller\ArgusDBInstall.exe.config
.\ESMMapping\ESMapping.exe.config
|
 Copyright © 2013, 2015, Oracle and/or its affiliates. All rights reserved. Legal Notices |
|