| Oracle Argus Safety English Administrator's Guide Release 7.0.3 E40578-01 |
|

 Previous |
 Next |
This section discusses how to create and use Advanced Conditions. If you not have access to the advanced conditions on certain screens, the system displays only the Advanced Condition Names you can access (instead of displaying a blank) and does not permit you to modify or view the advanced condition details. The system displays a warning message stating that you do not have permissions to update the advanced conditions. The following screens are affected by this change:
Expedited Reporting Rules
Auto Signals
Batch Reports
Letters
Studies
Case Priority
Field Validation
Narrative Templates
Profile Switches | Auto Archiving
This option is available from the Advanced Conditions icon.
Argus Safety provides a powerful search tool that enables complex queries to be built in order to retrieve data from the system. Detailed knowledge of the database schema is not required.
Complex or non-standard queries are constructed by means of the Advanced Conditions dialog, that enable users to define field level search criteria.
Sets of search criteria (advanced conditions) can be saved and retrieved from the Advanced Conditions dialog. These conditions may then be added, edited, or deleted.
Access rights and permissions can be assigned to individual advanced conditions. You can execute and modify rights to one or more groups on a per-advanced condition basis.
By default, the Advanced Conditions drop-down list enables you to view only the New, None and already selected Advanced Conditions.
Select New or None from the drop-down list and click the AC button to create a new advanced condition.
Click the lookup icon to filter for existing advanced conditions.
Execute the steps below to filter for existing Advanced Conditions:
Click Lookup in the Case Search Criteria section. The Advanced Conditions Lookup dialog is displayed.
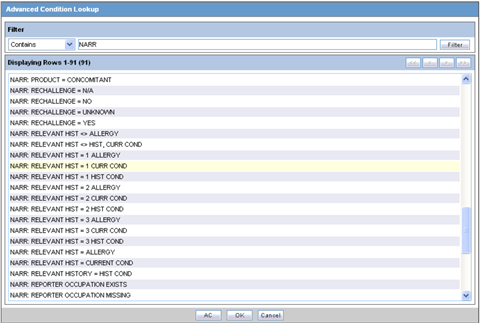
Select one of the following options from the drop-down list under Filter.
Contains - Enables you to filter for advanced conditions that contain the entered criteria.
Starts With - Enables you to filter for all advanced conditions that start with the entered criteria.
Enter the search criteria for the advanced conditions in the text box, as applicable.
Click Filter.
The advanced conditions matching the specified filtering criteria are displayed.
Select an advanced condition from the list, as per your search requirements.
Execute any of the actions below, as applicable:
Click OK. The selected advanced condition is listed in the Advanced Condition drop-down list.
Click AC. The details of the selected advanced condition are displayed in the Advanced Conditions dialog.
Click Cancel. The Advanced Condition Lookup dialog is closed without saving any changes.
Select a previously selected advanced condition from the drop-down list to apply the search criteria for that condition.
Use the following procedure when using advanced conditions.
Click Select lookup to view/edit/create the Advanced Condition in the Advanced Condition dialog.
To use advanced conditions, the following options are available, depending on how the set of criteria is to be used:
To use a set of previously saved criteria, select the appropriate set of criteria from the Advanced Condition list
To add a new condition to a set of criteria, select the set of criteria from the Advanced list and click the adjoining Advanced Condition icon.
To enable the creation of new advanced conditions by associating logical operators (like AND, OR) with items from the Case Form, refer to Creating Advanced Conditions.
To create an advanced condition query set from existing advanced condition search criteria, refer to Creating a Query Set of Advanced Conditions.
Use the following procedure to create advanced conditions.
Select New from the Advanced Conditions drop-down list or click the Advanced Conditions icon
This displays a confirmation dialog.
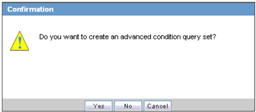
Select whether you wish to create a query set by using previous advanced condition query sets or by creating one through logical operators.
Click Yes to create a new advanced condition query set.
Click No to create a new advanced condition by associating logical operators (like AND, OR) with items from the Case Form.
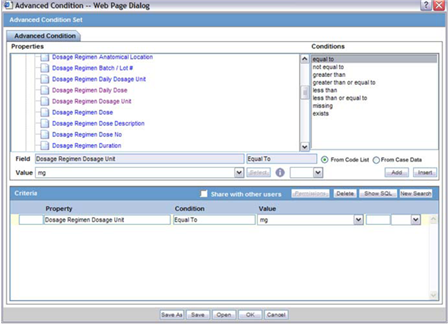
If you select No, an Advanced Condition Set dialog is displayed.
|
Note: The Advanced Condition Set dialog enables you to search for those entities under the Properties tree-list, which are from either the case data or from the code list. For this, the dialog provides two radio buttons - From Code List and From Case Data.
|
Select a property type from the Properties tree list.
The items available under the folders in the Properties list represent those fields on the Case Form that can be used to perform the search in the advanced conditions.
|
Note: When a Property for which terms can be encoded is selected, the Select button is enabled. You can use the MedDRA Browser to select (possibly) multiple terms for the property.An SMQ icon is enabled when the SMQ-related properties are selected from the Properties tree-list. Click this icon to view the SMQ Info dialog. The SMQ Info dialog contains details about the selected SMQ. |
In the Conditions list, select a condition that must apply to the item selected above.
The available conditions are "equal to", "contains", "less than", "greater than", "not equal to", "missing", "greater than or equal to", "less than or equal to", "exists", "does not contain" or "begins with".
Under Value, enter the value which will apply to the property, or select an appropriate value from the list, as applicable.
If the condition created in steps 4 through 6 above is to be linked with another condition, select the appropriate logical operator in the list adjoining Value.
|
Tip: The logical operators that can be used to link the existing condition to a new condition are AND/OR. |
Click Add to add the newly created condition to the advanced condition.
Repeat steps 3 through 7 to add more conditions to the advanced condition.
When each of the required conditions for the advanced condition is entered, click Save.
Enter a name for the advanced condition and click OK.
|
Note: To enable other users to use the advanced condition, the Share with other users check box should be selected. More about sharing advanced conditions
Access Management --> Argus --> Groups> Menus> Utilities (subarea) section |
|
Tip: To enter a customized date range, select Custom Date Range from the list. Enter an appropriate date range in the custom date range dialog and click OK. |
The user can configure the Action Items type to be scheduled based on the Advanced Conditions rules as shown in the following.
| Field/Control Name | Description | Property |
| Query Action | Defines the Action Item as a Query Action used to generate the letter and used as a placeholder. | Checkbox |
| Advanced Conditions | Enables the user to configure an Advanced Conditions Rule for creating the Query Type Action Item in the case. | User Selectable |
| User Group | Enables the user to define a User group (undeleted user groups in Access Management) for the Action Item created in the case. | Type Ahead |
| Letter Placeholder Content | Enables the user to enter Letter Text that prints in the letter using the Open Query placeholder. | Text (1000 characters) |
| Due In (days) | When the action item is created on the Case form, this option enables the user to define the number of days until the Action Item is due.. | - |
Be aware of the following:
The Advanced Conditions, User Group, Letter Placeholder Content, and Due In fields are enabled only if Query Action is checked.
The system tracks any changes made to the profile switch in the audit log.
The Action Type report prints any additional fields.
The system has a profile switch to enable the user to generate open queries when he/she saves the case.
No (Default) - When the user clicks No, the system does not generate open queries in the case when the user saves the case.
Yes - When the user clicks Yes, the system generates all action items with a query action type based on the advanced conditions defined for the Action Taken due in xxx days for User group yyy
where:
xxx is the number of action items defined + the System Date for the defined user group
yyy is the user group
The system tracks changes made to the Profile Switch in the audit log.
Use the following procedure to create a query set of advanced conditions.
Select New from the Advanced Conditions drop-down list or click the Advanced Conditions icon
A dialog that prompts for the creation of an advanced condition query set opens.
Click Yes to create a set of advanced conditions by linking together those advanced conditions that have been defined previously.
The Advanced Condition Set dialog opens.
In this dialog, previously-created advanced conditions can be linked together using set operators like UNION, MINUS, and INTERSECT.
Click Add to add an advanced condition to the query set. A new row opens in the advanced condition selection area. In this row, select an appropriate advanced condition from the Advanced Condition list.
|
Tip: To modify, open, or delete advanced conditions, click Open in the Advanced Conditions dialog. A list of all the advanced conditions will be displayed. In this list, select the appropriate advanced condition and click Open to open or modify it, or Delete to delete it.To view or modify the SQL statement associated with an advanced condition, click Show SQL. Make the required modifications to the SQL statement, if necessary. |
Select an appropriate set operator from the Set Operator list. This set operator will link this advanced condition to the next advanced condition.
To add the next advanced condition to the query set, click Add.
Repeat steps 5 through 7 for each advanced condition that must be entered in the query set.
|
Tip: If the required advanced condition is not already present in the list, it can be created by selecting (New) from the list.
|
When each of the advanced conditions for the query set is entered, click Save.
Enter a name for the advanced condition and click OK.
|
Tip: Tip: To view or modify the SQL statement associated with an advanced condition, click Show SQL. Make the required modifications to the SQL statement, if necessary. |
The Hit List tab in the Advanced Condition Set dialog can be used to search for cases that match the query set criteria.
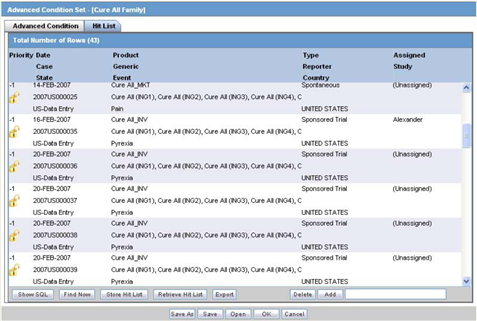
Click Find Now in the Hit List tab of the Advance Conditions dialog.
This runs a search based on the selected query set criteria and displays a list of cases (if any) that satisfy the advanced condition query set.
Perform these operations to do the following:
| To... | Click... |
|---|---|
| Manually add an existing case to the hit list | Add and enter the Case ID |
| Remove a case from the hit list | Remove |
| Save the hit list result for future use | Store Hit List |
| Retrieve results of the saved hit list | Retrieve Hit List |
| Save the hit list as a text file | Export |
| View SQL for Query | Show SQL |
| Run a Query | Find Now |
|
 Copyright © 2013, Oracle and/or its affiliates. All rights reserved. Legal Notices |
|