| Oracle Argus Safety English Administrator's Guide Release 7.0.3 E40578-01 |
|

 Previous |
 Next |
Site, group, and user configuration takes place in the Access Management section of Argus Console. Here you can add, copy or delete users, groups or sites.
Each user must be assigned to at least one group in order to determine their security level. Each group is assigned a specific security level. This security level enables members of the group to view, modify, or restrict access rights to various sections of the Case Form, and so on.
The first set of steps in configuring Argus safety is to create the following exactly in the listed order:
Sites
Groups
Users
|
Note: The configuration must occur in the exact order specified above. |
Addition of Sites is necessary in order to create Users because every user must be assigned to exactly one Site. Site information can also be used in automatic numbering of case IDs.
To configure Sites, use the Access Management --> Argus --> Sites section. The following is an illustration of that section.
The following table lists and describes the fields on the screen.
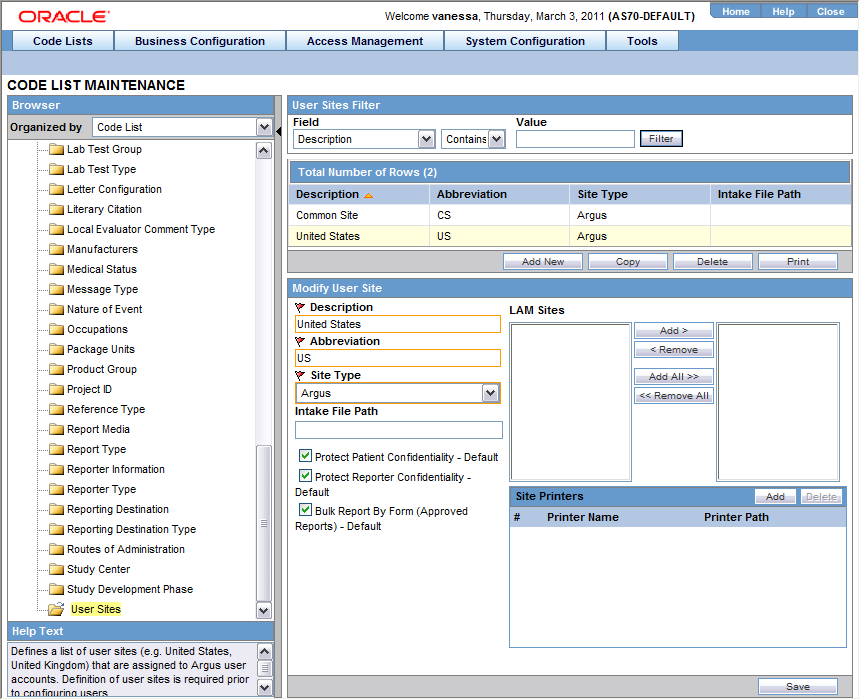
| Field/Control Name | Description |
| Description | Enter a description of the site. |
| Abbreviation | Enter an abbreviation of the site name. A one to four character abbreviation is required for each site. |
| Site Type | Select the Site Type Argus or LAM (Local Affiliate Module). |
| Protect Patient Confidentiality - Default | Protects or reveals Patient Confidentiality for the specific site. |
| Protect Reporter Confidentiality - Default | Protects or reveals Reporter Confidentiality for the specific site. |
| Bulk report By form (Approved reports) - Default | Allows or protects availability of the Bulk Reports by Form for the specific site. |
| LAM Sites | Select and add previously created LAM sites. |
| Site Printers | The Site Printers section is used to configure site printers. |
This screen helps in capturing Site information (such as user site description, abbreviated term, site type and LAM site configuration).
Use the following procedure to add a user site.
Click Access Management->Argus->Sites.
In the left panel, select User Sites. The User Sites are listed in the right panel.
|
Tip: You can alternatively click Modify to modify an existing site.Use Copy to make an editable copy of an existing user site. Use Delete to delete a user site. |
Select a User Site and click Add New.
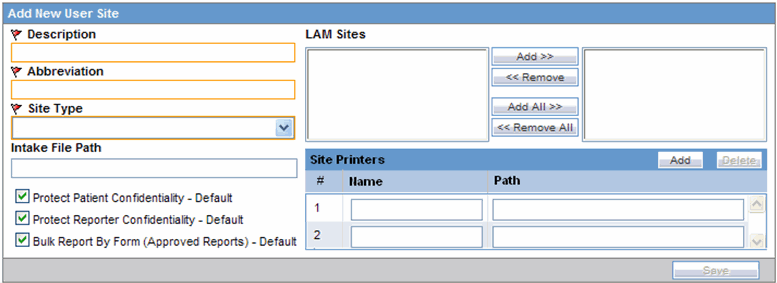
Enter the user site Description.
Enter the user site Abbreviation.
|
Note: A maximum four-character abbreviation is required for each user site. |
Select a Site Type.
|
Note: Each Argus Safety user must be assigned to exactly one user site.You cannot change the site type from LAM to Central if the current central site has an association with a LAM site, the current site is associated with any user, or the current LAM site has any events assigned to it. |
Select the following options as required:
Select the Protect Patient Confidentiality - Default to protect or reveal Patient Confidentiality for this specific user site.
Select the Protect Reporter Confidentiality - Default to protect or reveal Reporter Confidentiality for this specific user site.
Select the Bulk Report by Form (Approved Reports) - Default to enable availability of the Bulk Reports By Form for this specific site.
Add or remove any LAM Sites information.
|
Tip: To add more LAM Sites to the Lam Sites list, use the Add>>/ Add All .options.To delete the LAM Sites from the Lam Sites list, use the Remove>>/Remove All options.. |
In the Site Printers section, click Add to add a site printer.
Enter the Name of the printer that will be displayed in the application when referring to the printer. The name can have up to 20 characters.
To delete a site printer, select the printer and click Delete.
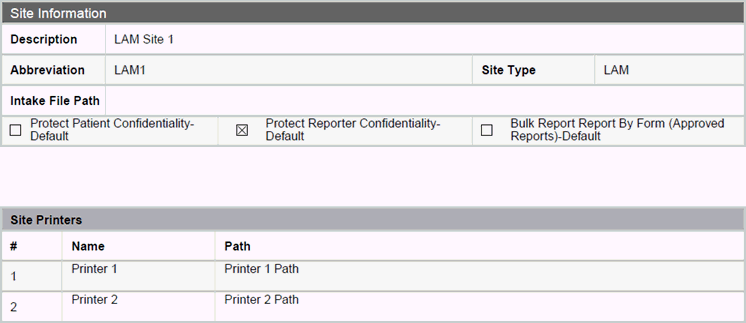
Click Print to print the site information, as shown below:
In the Path textbox, enter the full path of the printer on the network. This path name can have upto 256 characters. The specified path should be accessible from the machine where Argus Safety Service is installed.
Click Save to save the information and return to the Code List Maintenance dialog.
The filtering criterion is essential as it helps you to search for specific items. The Argus Console provides this option for the Access Management section. The filtering browser is displayed as the Code Filter List
Argus Console helps you to filter information further for the Access Management section. Using the Code Filter List you can specify whether your search should contain or start with specific alphabets.
For Example: The following filtering criteria enables the system to search for all User Sites that contain A in the abbreviated term.
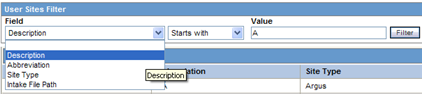
The right panel now displays the list of User Sites based on the filtering criterion.
Each user of Argus Safety can be a member of one or more user groups. The access rights of each user group to the menus in the user interface and specific sections of the Case Form can be configured when the group is created.
Configuration of the user site is done using the Access Management-->Argus --> Groups section.
The following table lists and describes the fields in the Modify Group Information section. 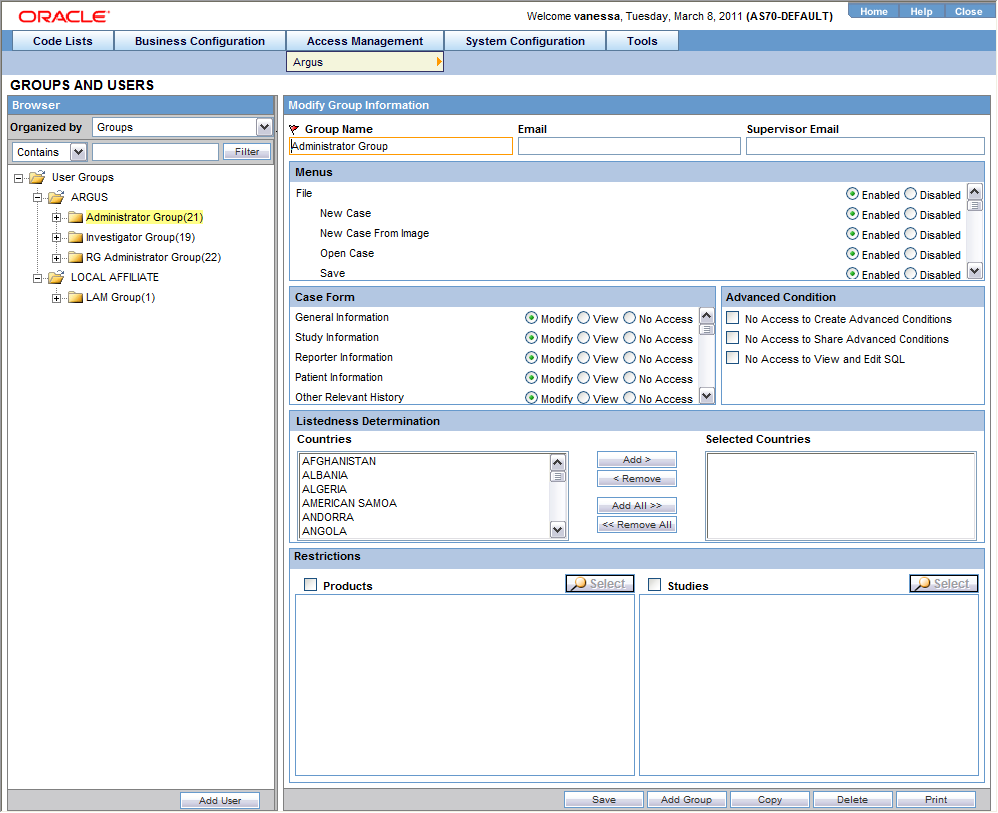
| Field/Control Name | Description |
|---|---|
| Group Name | Enter a unique name for the group. |
| Add the group email, used for case priority notification and workflow routing notification. | |
| Supervisor Email | Add the Group's Supervisor Email as applicable. This e-mail address is used to send notifications when the maximum time of a case for a particular workflow state is exceeded. |
| Menus | Lists the menus and sub menus within a Case Form and allows you to enable or disable each of them. |
| Case Form | Lists the sections and sub sections within a Case Form and enables you to assign the group Modify; View (Read Only); or No Access (not visible) to each area. |
| Listedness Determination - Countries | Assigns Argus users to the group that has rights to change the listedness determination for licenses originating in the selected countries. |
| Restrictions - Products | Limits the number of products that can be viewed in the trade name lookup and non-study cases. |
| Restrictions - Studies | Limits the number of studies available for selection and the study cases that can be viewed.
|
| Default report (LAM only) | Lists the expedited report forms in the drop-down list. |
This section enables the Administrator to configure the security levels for each work group.
Radio buttons enable you to view the group and assign access rights for several specific sections of the case form, menu, case workflow, and report workflow.
If a user belongs to multiple groups, the access rights for the user will be the sum-total of the individual group access rights. Consider the following example:
John Smith is an Argus User and his profile has been added to 2 user groups with different access level permissions for each group.
John has access rights to the Patient Tab in one group and access rights to the General Tab in another group.
In this case, John will be able to access both the Patient and the General tabs of Argus
Use the following procedure to create a user group
Click Access Management->Argus->Groups.
Select the filtering criterion to display the list of Groups or Users in the left panel.
Select a Group and click to view the group details in the right panel.
|
Tip:
|
Enter the Group Name. This should be a unique name associated with this Group.
Enter the Email address, if applicable.
Enter the Supervisor Email address, if applicable.
In the Case Form section, select the desired access right option ("Modify", "View", or "No Access") for the group's access to each of the listed items of Case Form.
|
Note: The following fields are required in order to save a case: Initial Receipt Date, Country of Incidence, Report Type, Suspect Product, and Event Description as Reported. Therefore, the group responsible for initial case entry must have access to these fields in order to save new cases. |
In the Menus section, enable or disable access of the group, to particular items in the Argus Safety menu.
|
Tip: Refer to the Argus Safety User Guide for information about the functions of the Case Form sections and the menu items in the Argus Safety user interface. |
In the Listedness Determination section, select a list of countries. This enables the end user to override the listedness determination in the Event Assessment section of the Case Form for product licenses that match the countries selected in this step.
In the Advanced Conditions section, select No Access to Create Advanced Condition, No Access to Share Advanced Conditions, and/or No Access to View and Edit SQL.
|
Tip:
|
In the Restrictions section, select Products.
Click Add Product, to open the Available Products dialog box.
Select each product you want to add and click OK.

In the Restrictions section, select Study.
Click Add Study, to open the Available Studies dialog box.
Click the appropriate checkboxes to select the required studies and click OK. 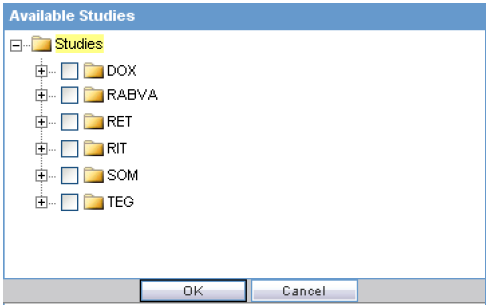
Click OK to save the group.
The following table lists and describes the groups included with the factory data.
| Group | Description |
|---|---|
| Administrator | This group has access rights to all areas and all the functionality of Argus Safety. |
| Investigator | Receives an e-mail alert that can be set up during Clinical Study Configuration. |
The filtering criterion is essential as it helps you to search for specific items. The Argus Console provides this option for the Access Management section.
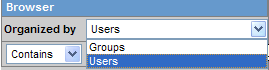
Using Organized by
The system displays the filtering browser in the top-left corner of the left panel. You can filter based on either of the two combination shown in the following illustration.
Consider the following.
If you enable Organized by Groups, the generated output displays in a tree-format in the left panel. The structure is based on the entire categorization of Groups and Users
If you enable the Organized by Users, only the User list is available in the tree view in the left panel.
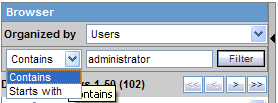
Using contains or starts with enables you to specify whether your search should contain or start with specific alphabetic characters. For example, filtering criterion shown in the following illustration enables the system to for all Groups that contain the word "administrator."
Use the following procedure to print a user group.
Select Access Management->Argus->Groups.
Select the filtering criterion to display the list of Groups or Users (based on the filtering criterion) in the left panel.
Select a Group and click to view the group details in the right panel.
Click Print to display a Print dialog that enables the user to choose to print the entire window or to print only the text covered by the current selection.
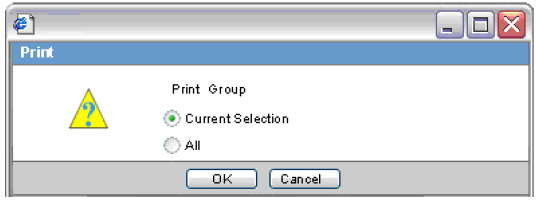
Select the appropriate options and click OK.
The system opens the Print Groups to enable the user select the sections to be printed in the Group Configuration printout.
By default, the Group Information checkbox is selected and disabled so that it always gets printed.
Select the appropriate checkboxes, and click OK 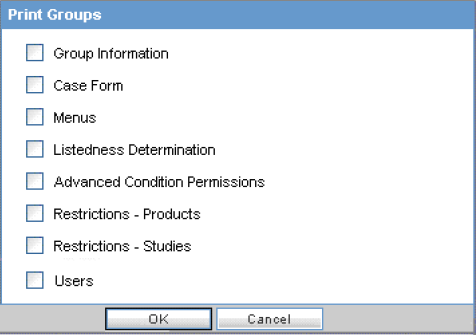
The following is an illustration of the Group Configuration printout.
It lists the users which are configured to the groups.
User are sorted alphabetically by User Full Name in the report section

The filtering criterion is essential as it helps you to search for specific items. The Argus Console provides this option for the Access Management section.
Using Organized by
The system displays the filtering browser in the top-left corner of the left panel. You can filter based on either of the two combinations.
Consider the following.
If you enable Organized by Groups, the generated output displays in a tree-format in the left panel. The structure is based on the entire categorization of Groups and Users
If you enable the Organized by Users, only the User list is available in the tree view in the left panel.
Using contains or starts with enables you to specify whether your search should contain or start with specific alphabetic characters. For example, filtering criterion shown in the following illustration enables the system to for all Groups that contain the word "administrator."
User Maintenance enables you to add, copy, or delete users for the system.
Each user must be assigned to at least one group in order to determine security level.
Each group is assigned a specific security level that defines whether group members can view, modify, or have no access rights to various sections of the case form, etc.
Configuration of the users is done using the Access Management->Argus->Users section. If the Enable LDAP Login checkbox is not checked, you can specify a password when creating or modifying an individual user account. When updating user records, be aware of the following:
If you enter a value in the Password field, the system uses this password to authenticate at login.
The Reset Password field is available only when you select Reset Password. The new password can be up to 30 characters.
If you leave the value blank, the system uses the default password as defined in the Common Profile for the system.
When you save the user configuration, the system saves the default password you enter.
During entry, the system displays the password you type.
The following illustration shows the fields associated with this section.
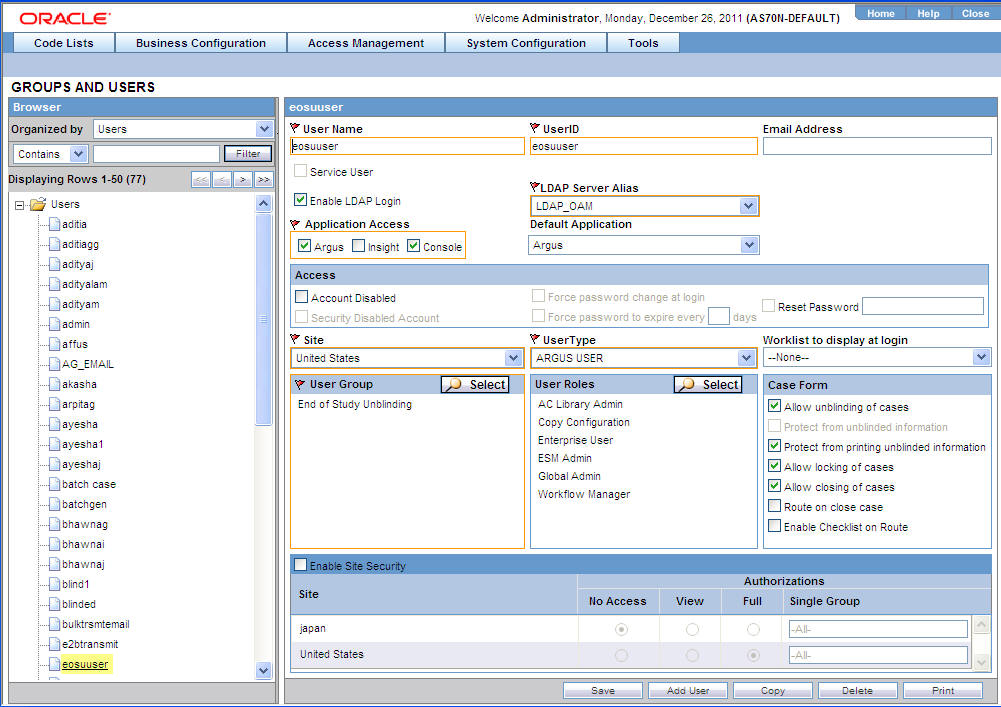
The following table lists and describes the fields in the Administrator section
| Field/Control Name | Description |
|---|---|
| User Name | Enter the full name. |
| User ID | Enter a unique user identification (ID). |
| Reset Password | Reset the password of a user to a default value specified in the common profile section. |
| Email Address | Enter the user's e-mail address. |
| Site | Assigns the user to a site.
The values in this field are populated from the codelist item User Sites. |
| User Group - Select | Attaches the user to pre-configured user groups. |
| User Type | Select the type of user, such as an Argus J user from the drop-down list. |
| User Roles - Select | Attaches the user to pre-configured user roles such as Global Admin. By default, a Global Admin role is granted to only an Administrator, who can grant/revoke this role to other Argus users. Such a user role should be assigned to users who need access to the Argus Global application. Similarly, you can also select from other roles present within User Roles. |
| Application Access | Configure user access settings for Argus Console and Argus Safety.
The default application access for the user can be selected from the list. |
| Worklist to display at login | Configure users to see their worklists immediately upon login. The options are:
|
| Enable site security | If Enable Security is checked, the site-based data security will be enabled for the user.
If the box is not checked, the user will have full access to data from all sites. |
| Enable LDAP Login | Authenticates users against the active directory server.
When Enable LDAP Login is selected, all fields inside the Access section are disabled, excluding the Account Disabled option. |
| Account Disabled | When this option is selected, the user account is temporarily disabled to prevent users from logging in. This option is different from deleting a user as it enables the Administrator to re-activate the account at a later date. |
| Security Disabled Account |
|
| Force password change at login | If this check box is selected, the users must change the password the first time user logs on to the system after the checkbox is checked. |
| Force password to expire every | Enables the Administrator to force the user's password to expire in the specified number of days. |
| Days | Enables the Administrator to enter the number of days after which the password should expire. |
| __ Days remaining | The field displays the number of days remaining for the password change. |
| Allow unblinding of cases | Enables the user to unblind a study case.
For example, a user without unblinding rights will not see the Study Drug field. A user with unblinding rights sees a yellow Unblind tag next to concentration of product field and the Broken by Sponsor option in Blinding Status drop-down list is enabled. User will have to enter password when user selects Broken by Sponsor' option. |
| Protect from unblinded information | When checked, the user cannot view any unblinded information. |
| Protect from printing unblinded information | When checked, the user cannot print any unblinded information. |
| Allow locking of cases | Enables the user, to lock/unlock the cases. |
| Allow closing of cases | Enables the user to close the cases. |
| Route on close case | Opens a routing dialog when the user closes the case. |
| Enable Checklist on Route | By default, this checkbox is selected.
If this checkbox is not selected, the checklist for the Workflow is not displayed to the user while routing the cases, even if the rule that is being used has a checklist. |
Use the following procedure to print users.
Select Access Management > Argus > Users.
Select a User and click to view the user details in the right panel.
Click Print to display the Print User dialog. 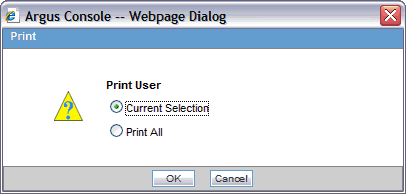
Click OK to display list of Print User options.
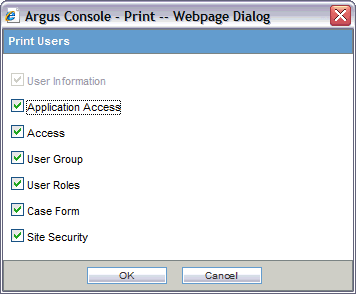
Select the appropriate option(s) and click OK.
|
 Copyright © 2013, Oracle and/or its affiliates. All rights reserved. Legal Notices |
|