Release 1.2
Part Number E36379-01
Contents
Previous
Next
| Oracle Pedigree and Serialization Manager Process Guide Release 1.2 Part Number E36379-01 | Contents | Previous | Next |
This chapter covers the following topics:
Oracle Pedigree and Serialization Manager (OPSM) manages the generation of unique serial numbers. Serials can be generated that are either product or non-product specific serial types. If the serial type is product specific, the product number must be identified for creation of the serial. If the serial type is non-product specific, the product number does not have to be identified. When a serial is created without the product and lot identified, the serial is created at a Reserved status. When the product and lot are identified, the serial status is changed to Commissioned. When commissioning a serial, the product and lot must be identified.
OPSM provides logic for generation of serials for the supported serial types. You can also define a new serial type and customize the logic for generation of the serials. OPSM supports the generation of the following serial types:
SGTIN-96
SGTIN-198
USN-1
To generate serials in OPSM, a serial generation request must be created and processed. Serial generation requests can be created in OPSM in these ways:
Using the Create Serial Generation Request page in OPSM.
Using the Work Order Serialization process (integration between OPSM and an external system).
For more information on the Work Order Serialization process, see Performing Work Oracle Serialization from an External System.
Using a Create Serial Generation Request Web Service in OPSM.
When creating a serial generation request in OPSM you specify whether you want to create a quantity of serial numbers or a range of serial numbers. Depending on this selection, you will then specify either the quantity of serial numbers or the start and end range for the serial numbers you want to create. Then you specify the location that is requesting the serial numbers. After that you can enter product and lot information for the request. The serial type that is used for serial generation is based on either the product details or the location that you enter for the serial generation request. If product information is entered, the serial type from the product detail information will be used. If no product information is entered, the locations non-product specific serial type will be used for serial generation. In addition, when creating the serial generation request you have the option to specify a few other parameters they include:
Ignore Serial Overage Amount (include or do not include)
Saleable Unit (mark serial numbers as saleable units)
Automatically Submit (if enabled, the system will automatically submit the serial generation request for processing when you save the request)
Serial Usage (indicate how the serial will be used. For example, sample)
Created Document Information
Alternate Document Information
During the serial generation processing if quantity has been specified the system generates serials for the quantity entered on the serial generation request. Serial numbers will be determined by the serial range setup if used. When a quantity of serials is requested, the serials can be generated by either the Next Number or Random unique serial generation method as defined on the serial type. If only some of the requested quantity can be generated, due to a depletion of the serial range or the max serial value defined for the serial type, OPSM generates as many serials as it can and generates a warning message stating that all serials requested were not generated.
If during the serial generation processing a serial number range is specified (starting serial number and ending serial number, this should not be confused with the serial range setup) then the system generates serials from the starting serial number through the ending serial number sequentially. The number of serials to be generated is the same as the difference between the starting serial number and the ending serial number. If only the starting serial number is entered but no ending serial number, then the system generates only one serial number and assigns the starting number to it. If any number between the starting serial number and ending serial number has already been used, then the system skips that number and keeps generating serial numbers.
After the serial generation request is created, it must be submitted for processing. If the serial generation request was created using the Create Serial Generation Request page, an option exists to automatically submit the serial generation request. Otherwise, the serial generation request must be submitted from the Maintain Serial Generation Request page. When the serial generation request is submitted, a business event triggers the processing of your request and a background process is executed to generate the serials and create the Serial Generation transaction. The background process uses the system parameter (Serial Commit Size) value you specify to determine the database commit size. For example, let's say the Serial Commit Size is 1,000. Serial generation requests that result in more than 1,000 serials will be processed in groups. A serial generation request for 10,000 serials will be processed in 10 groups assuming the value has not been changed. When the first 1,000 serials are generated, the system will create the Serial Generation transaction and commit those serials to the database. The remaining serials will be created in groups of 1,000 and the Serial Generation transaction will be updated as each group successfully completes.
When the serial generation processing is complete and finishes successfully for the first group of serials, the system will create the Serial Generation transaction that can be viewed using the Maintain Transactions page. If any error or warning conditions are encountered during the serial generation processing the system will issue error or warning messages and those messages can be viewed using the Maintain Serial Generation Requests page. The system will create “Serial Generation” transactions if warning messages are issued.
Following is the basic high-level process flow for serial generation in OPSM:
Create a serial generation request in OPSM using the Create Serial Generation Request page, using Work Order Serialization to process the work order information to create serial generation requests, or using the Create Serial Generation Request Web Service.
For more information on creating serial generation requests, see Creating Serial Generation Requests and Performing Work Oracle Serialization from an External System.
After you create a serial generation request the Generation Status of the request is Generation Requested. If you select the option of automatically submitting the request, the Generation Status will be Generation Submitted or In Progress.
View all serial generation requests available for processing using the Maintain Serial Generation Requests page.
For more information on viewing serial generation requests, see Searching for Serial Generation Requests.
Submit one or more serial generation requests for processing using the Maintain Serial Generation Requests page.
If you selected the option to Automatically Submit the serial generation request when creating the serial generation request then this step is not necessary.
For more information on submitting serial generation requests, see Submitting Serial Generation Requests.
After you submit the serial generation requests the Generation Status of the requests changes from Generation Requested to Generation Submitted to In Progress.
Monitor the processing of the submitted serial generation requests using the Maintain Serial Generation Requests page. Click the Refresh icon or Search button until the processing is complete. You can also view how many serials have been created by looking at the Requested Quantity and Generated Quantity columns.
For more information on submitting serial generation requests, see Submitting Serial Generation Requests.
When the process is complete the Generation Status of the requests changes from In Progress to one of these statuses (Successful Generation, Error(s) Exists, or Warning(s) Exists).
(Optional) View the Error and Warning messages associated with serial generation request using the Maintain Serial Generation Requests page.
For more information on viewing error and warning messages, see Viewing Serial Generation Request Messages.
(Optional) Fix the error conditions and then create another serial generation request to reprocess. Repeat Steps 1-5.
(Optional) View the Serial Generation transactions that are created for serial generation requests that completed successfully or completed with warnings using the Maintain Transactions page.
For more information on viewing transactions, see Searching for Transactions.
(Optional) View the serial numbers that were created from the serial generation processing using the Maintain Serials page or the Maintain Transactions page.
For more information on viewing serial numbers, see Searching for Serials.
For more information on viewing transactions, see Searching for Transactions.
(Optional) Delete the serial generation requests that have finished processing using the Maintain Serial Generation Requests page.
For more information on deleting serial generation requests, see Deleting Serial Generation Requests.
Use the Maintain Serial Generation Requests page in Oracle Pedigree and Serialization Manager (OPSM) to search for existing serial generation requests. You can view the requests in a multitude of ways by using the search criteria fields that include, generation request method, generation status, created document, lot number, location, product code, creation date, and created by.
Use this procedure to search for serial generation requests:
To Search for Serial Generation Requests
Navigate to the Maintain Serial Generation Requests page.
Maintain Serial Generation Requests page
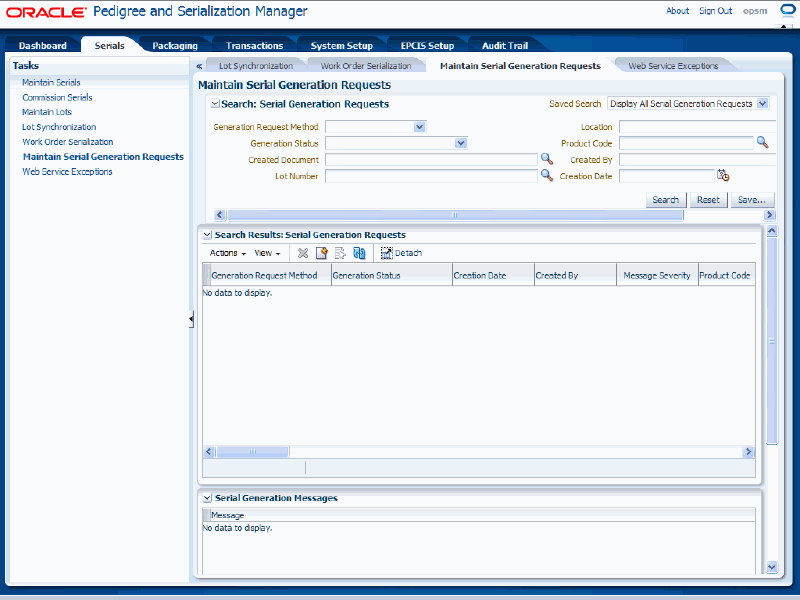
In the Search: Serial Generation Requests region, enter the search criteria for the serial generation requests using one or more of these fields:
| Field Name | Description |
|---|---|
| Generation Request Method | (Optional) Select how the serial generation requests were created by selecting a Generation Request Method. Methods are:
|
| Generation Status | (Optional) Select the status of the serial generation requests by selecting a Generation Status. Statuses are:
|
| Created Document | (Optional) Select the created document associated with the serial generation requests. |
| Lot Number | (Optional) Select the lot number associated with the serial generation requests. If you select the lot number using the Search and Select dialog box, after you select the lot number the Product Code field will appear by default from the lot number selected. |
| Location | (Optional) Select the location associated with the serial generation requests. |
| Product Code | (Optional) Select the product code associated with the serial generation requests. |
| Created By | (Optional) Select the User ID that created the serial generation request. |
| Creation Date | (Optional) Select the date the serial generation request was created. |
Otherwise, you can click the Search button without entering any search criteria and all available serial generation requests will appear.
Click the Search button.
Maintain Serial Generation Requests page
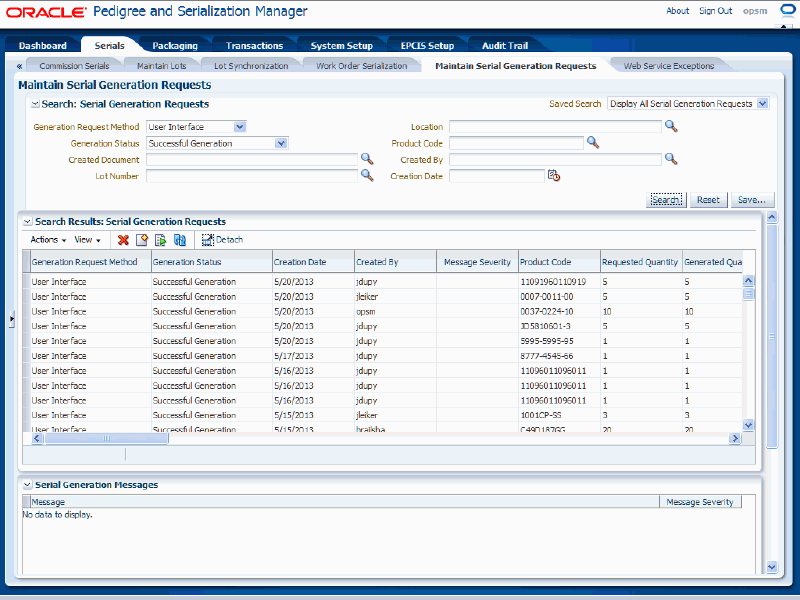
All of the serial generation requests that match the search criteria appear in the Search Results: Serial Generation Requests region in a table format. Depending on the definition for the serial generation request certain information appears in the table. The information that may appear for a serial generation request is:
| Field Name | Description |
|---|---|
| Generation Request Method | Displays how the serial generation request was created. Methods are:
|
| Generation Status | Displays the status of the serial generation request. Statuses are:
|
| Creation Date | Displays the date the serial generation request was created. |
| Created By | Displays the user ID that created the serial generation request. |
| Message Severity | Displays an icon to represent the severity of the messages that were generated for the serial generation request. A red circle with an X indicates the serial generation request was unsuccessful and contains error messages and may also contain warning messages. A yellow triangle with an exclamation point indicates the serial generation request was successful but it contains warning messages. |
| Product Code | Displays the product code associated with the serial generation request. |
| Requested Quantity | Displays the requested quantity for the serial generation request. |
| Generated Quantity | Displays the generated quantity for the serial generation request. Serial Generation Requests that result in more serials than serial commit size specified in System Parameters will be processed in groups. The generated quantity will reflect how many serials the system has currently created. |
| Lot Number | Displays the lot number associated with the serial generation request. |
| Location | Displays the location associated with the serial generation request. |
| Starting Serial Number | Displays the starting serial number associated with the serial generation request. This value only appears if the serial generation request was submitted as a Serial Number Range. |
| Ending Serial Number | Displays the ending serial number associated with the serial generation request. This value only appears if the serial generation request was submitted as a Serial Number Range. |
| Serialized Unit of Measure | Displays the serialized unit of measure associated with the serial generation request. |
| Ignore Serial Overage Amount | Displays a green check mark to indicate that the serial generation request indicated to ignore the serial overage amount that is defined for the product. This field is clear if the serial generation request indicated to include the serial overage amount that is defined for the product. |
| Serial Usage | Displays the serial usage associated with the serial generation request. Serial Usages are user defined using Lookup Type PAS_SERIAL_USAGE. |
| Saleable Unit | Displays a green check mark to indicate that the serial generation request indicated the serial numbers generated were for saleable units. This field is clear if the serial generation request indicated the serial numbers generated where not for saleable units. |
| Item Number | Displays the item number associated with the serial generation request. |
| Item Description | Displays the item description associated with the serial generation request. |
| Source System | Displays the name of the system that requested the serial generation request. Source Systems are user defined using the Lookup Type PAS_SOURCE_SYSTEM. |
| Packaging Unit | Displays the packaging unit associated with the serial generation request. Packaging unit is user defined using the Lookup Type PAS_PACKAGE_UNIT. |
| Parent Lot | Displays the parent lot associated with the serial generation request. |
| Expiration Date | Displays the date the lot associated with the serial generation request expires. |
| Best By Date | Displays the date the lot associated with the serial generation request is best used by. |
| Retest Date | Displays the date the lot associated with the serial generation request is to be retested. |
| Sell By Date | Displays the date the lot associated with the serial generation request is to be sold by. |
| Origination Date | Displays the date the lot associated with the serial generation request originated |
| Created Document Organization | Displays the created document organization associated with the serial generation request. |
| Created Document | Displays the created document associated with the serial generation request. |
| Created Document Type | Displays the created document type associated with the serial generation request. Document Types are user defined using Lookup Type PAS_DOCUMENT_TYPE. |
| Create Document Line Number | Displays the created document line number associated with the serial generation request. |
| Alternate Document Organization | Displays the alternate document organization associated with the serial generation request. |
| Alternate Document | Displays the alternate document associated with the serial generation request. |
| Alternate Document Type | Displays the alternate document type associated with the serial generation request. Document Types are user defined using Lookup Type PAS_DOCUMENT_TYPE. |
| Alternate Document Line Number | Displays the alternate document line number associated with the serial generation request. |
| Generation Request ID | Displays the generation request ID that was created by the system when the serial generation request was created. |
| Batch ID | Displays the Batch ID that was created by the system when the serial generation request was submitted. If multiple requests are submitted at the same time, these requests have the same batch ID. |
Below the Search Results: Serial Generation Requests region appears the Serial Generation Messages region. If a row in the Search Results: Serial Generation Requests table contains a warning or error message severity for a serial generation request the messages for that condition display in this region. If no message severity exists then no information displays in this region. Each text message associated with the serial generation request and the message severity icon (warning or error) for the message displays in this region.
Use the Maintain Serial Generation Requests page in Oracle Pedigree and Serialization Manager (OPSM) to view warning and error messages associated with the processing of serial generation requests.
Use this procedure to view serial generation request messages:
To View Serial Generation Request Messages
Navigate to the Maintain Serial Generation Requests page.
In the Search: Serial Generation Requests region, enter search criteria for the serial generation requests. Select at least a Generation Status of Error(s) Exists or Warning(s) Exist.
Otherwise, you can click the Search button without entering any search criteria and all available serial generation requests will appear.
Click the Search button.
Maintain Serial Generation Requests page
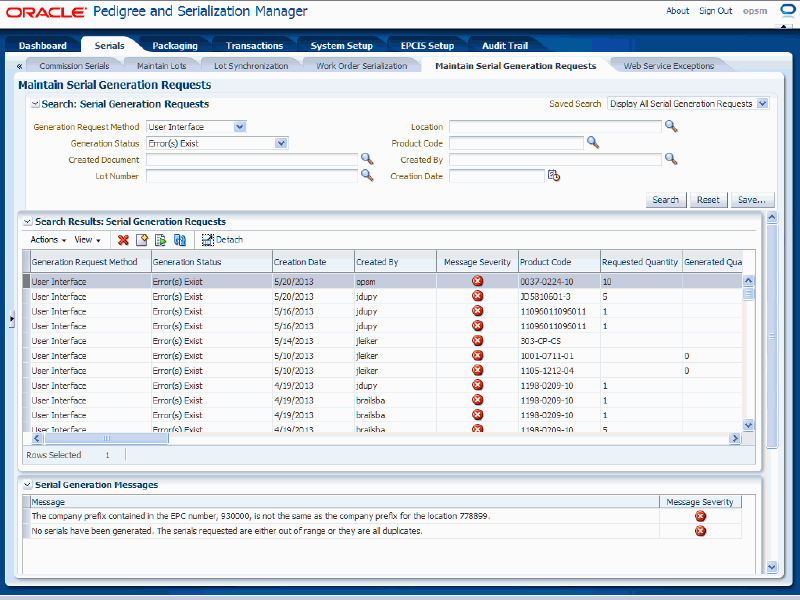
All of the serial generation requests that match the search criteria appear in the Search Results: Serial Generation Requests region in a table format.
In the Message Severity column, a red circle with an X indicates the serial generation request was unsuccessful and contains error messages and may also contain warning messages. A yellow triangle with an exclamation point indicates the serial generation request was successful but it contains warning messages.
Select a row in the Search Results: Serial Generation Requests table that contains warnings or errors or a combination of both. A Message Severity icon appears in the Message Severity column in the table.
Maintain Serial Generation Requests page
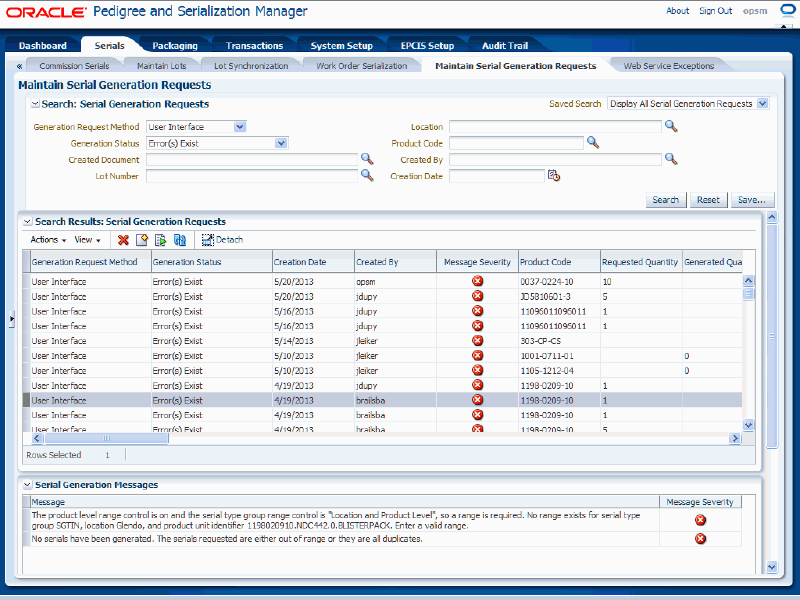
In the Serial Generation Messages region (bottom of the page) the system displays the warning or error messages associated with the processing of the serial generation request along with each messages severity code icon.
Use the Create Serial Generation Request page in Oracle Pedigree and Serialization Manager (OPSM) to create serial generation requests. Serial generation requests are used to specify the parameters and data that will be used during the generate serials process in OPSM.
When creating a serial generation request you specify whether you want to create a quantity of serial numbers or a range of serial numbers through the request and then you define all of the other information (location, product, lot, and document) for the serial numbers.
In addition, during the create process you can specify whether you want the system to automatically submit the serial generation request for processing after it is saved or if you want to manually submit the serial generation request. After you submit (manually or automatically) a serial generation request, a business event triggers the processing of your request and a background process is executed to generate the serial numbers and create the Serial Generation transaction. The Maintain Serial Generation Requests page is used to view the processing.
For more information on manually submitting a serial generation request, see Submitting Serial Generation Requests.
Use this procedure to create serial generation requests:
To Create Serial Generation Requests
Navigate to the Maintain Serial Generation Requests page.
Select Create from the Actions menu or click the Create icon located at the top of the Search Results: Serial Generation Requests region.
Create Serial Generation Request page
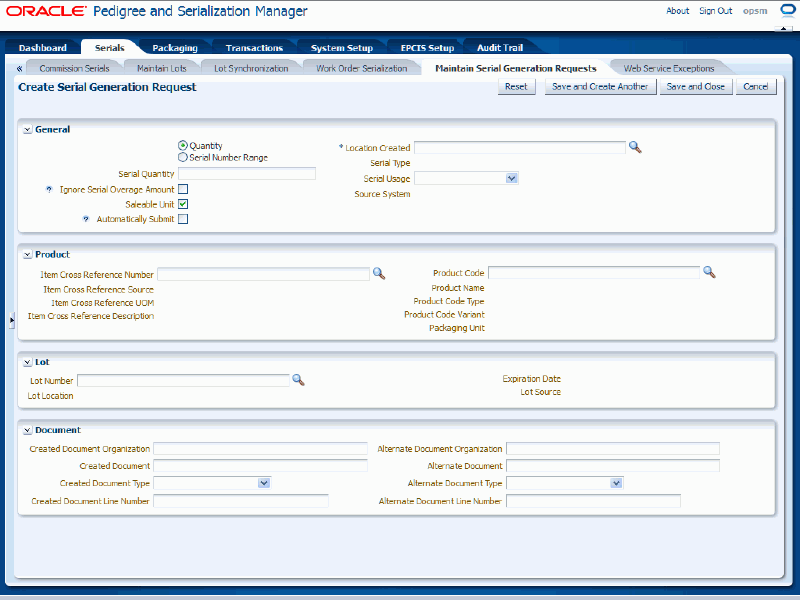
The Create Serial Generation Request page appears displaying four different regions (General, Product, Lot, and Document).
In the General region of the page enter the general information for the request. Enter the following information:
| Field Name | Description |
|---|---|
| Quantity or Serial Number Range radio buttons | Select how you want to create serial numbers by selecting the specific radio button. If you want to create a quantity of serial numbers select the Quantity radio button. The Quantity radio button is selected by default. If you want to create a range of serial numbers select the Serial Number Range radio button. After you select this radio button the Quantity field disappears and the Starting Serial Number and Ending Serial Number fields appear. The system will generate sequential serial numbers based upon the starting and ending serial numbers that you have entered. |
| Serial Quantity | Enter the quantity of serial numbers you want to create. This field is available if you select the Quantity radio button. |
| Starting Serial Number | Enter the starting serial number for the range of serial numbers you want to create. This field is available if you select the Serial Number Range radio button. If you only want to generate one specific serial number, you can enter the starting serial number and leave the ending serial number blank. Note: If the generation method for the serial type is random, you cannot use the starting and ending serial number option (Serial Number Range option). |
| Ending Serial Number | Enter the ending serial number for the range of serial numbers you want to create. This field is available if you select the Serial Number Range radio button. If you only want to generate one specific serial number, you can enter the starting serial number and leave the ending serial number blank. Note: If the generation method for the serial type is random, you cannot use the starting and ending serial number option (Serial Number Range option). |
| Ignore Serial Overage Amount check box | Clear this check box if you want the system to apply the serial overage amount that is setup for the product detail on this request. The check box is clear by default. Select this check box if you do not want the system to apply the serial overage amount that is setup in the product detail on this request. |
| Saleable Unit check box | (Optional) Select this check box if you want the system to mark the serial numbers that are created as saleable units. This check box is selected by default. |
| Automatically Submit check box | (Optional) Select this check box if you want the system to automatically submit the serial generation request for processing when you save the request. This check box is clear by default. Otherwise, you will have to manually submit the serial generation request for processing. For more information on manually submitting a serial generation request, see Submitting Serial Generation Requests. |
| Location Created | Select the location for the serial numbers that are to be created. This is a required field. |
| Serial Type | The serial type associated with the Location Created field value appears in this field. When you enter product code information in the Product region of the page the serial type for the product detail will appear in this field overriding the serial type for the location created. Note: You cannot use the Serial Number Range option if the generation method for the serial type is random. |
| Serial Usage | (Optional) Select the serial usage for the serial numbers that are to be created. Serial Usages are user defined using Lookup Type PAS_SERIAL_USAGE. |
| Source System | The source system associated to the Location Created field value appears in this field. |
(Optional) In the Product region of the page select either the Item Cross Reference Number or the Product Code for the serial numbers that are to be created. You cannot enter both fields at that same time. You can use the Item Cross Reference Number to search for the Product Code you wish to serialize.
If you select an Item Cross Reference Number, the Item Cross Reference Source, Item Cross Reference UOM, and Item Cross Reference Description fields appear by default from the item cross reference number entered. The Product Code, Product Name, Product Code Type, Product Code Variant, and Packaging Unit fields appear by default from the item cross reference number entered. In addition, the serial type for the product code detail will appear in the Serial Type field in the General region overriding the serial type for the location. The Product Code field is unavailable for entry.
If you select a Product Code, the Product Name, Product Code Type, Product Code Variant, and Packaging Unit fields appear by default from the product code. The serial type for the product code detail will appear in the Serial Type field in the General region overriding the serial type for the location. The Item Cross Reference Number field is unavailable for entry.
If you identify the lot number and product on the serial generation request, serials will be generated in a Commissioned status. If the lot number and product are not entered, serials will be generated in a Reserved status.
Note: If you want the item number to appear on the serial generation transaction, the item number must be entered when you create the serial generation request.
(Optional) In the Lot region of the page select the Lot Number for the serial numbers that are to be created.
The Lot Number you enter must be associated to the product code you have entered in the Product region. If you do not know the lot number of the product you are requesting, the search and select popup for lots will display only the lots that are associated with the product. If you identify the lot number and product on the serial generation request, serials will be generated in a Commissioned status. If the lot number and product are not entered, serials will be generated in a Reserved status.
After you select the Lot Number, the Expiration Date, Lot Location, and Lot Source fields appear by default from the selected lot.
(Optional) In the Document region of the page enter the documents for the serial numbers that are to be created. Enter the following information:
| Field Name | Description |
|---|---|
| Created Document Organization | (Optional) Enter the organization that created the document. |
| Created Document | (Optional) Enter the document number you wish to reference for the serials that are created. |
| Created Document Type | (Optional) Select the document type for the document. Document Types are user defined using Lookup Type PAS_DOCUMENT_TYPE. |
| Created Document Line Number | (Optional) Enter the document line number for the document. |
| Alternate Document Organization | (Optional) Enter the organization for the alternate document. |
| Alternate Document | (Optional) Enter the alternate document number you wish to reference for the serials that are created. |
| Alternate Document Type | (Optional) Select the document type for the alternate document. Document Types are user defined using Lookup Type PAS_DOCUMENT_TYPE. |
| Alternate Document Line Number | (Optional) Enter the document line number for the alternate document. |
Create Serial Generation Request page
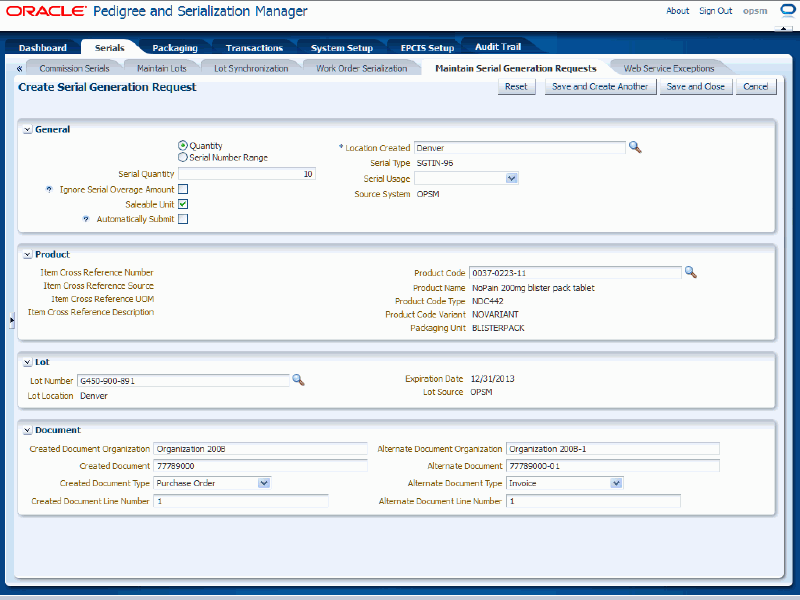
Save your work. Choose one of these options:
Click the Save and Close button to save this serial generation request and return back to the Maintain Serial Generation Requests page.
If the Automatically Submit check box is selected, after you save the request, a business event triggers the processing of your request and a background process is executed to generate the serial numbers and create the Serial Generation transaction. The system assigns a Generation Request ID and a Batch ID to this request and the Generation Status of Generation Submitted which will turn to In Progress. After processing is complete for the request the Generation Status will change to Successful Generation, Error(s) Exist, Warning(s) Exist, or Abnormal Termination.
If the Automatically Submit check box is not selected, after you save the request, the system assigns a Generation Request ID and the Generation Status of Generation Requested to this request. You must then manually submit the serial generation request for processing.
For information on manually submitting a serial generation request, see Submitting Serial Generation Requests.
Click Save and Create Another button to save this serial generation request and to stay on this page so you can create another serial generation request. The system displays a message that the serial generation request was created successfully and it clears all of the values in the fields.
If the Automatically Submit check box is selected, after you save the request, a business event triggers the processing of your request and a background process is executed to generate the serial numbers and create the Serial Generation transaction. The system assigns a Generation Request ID and a Batch ID to this request and the Generation Status of Generation Submitted which will turn to In Progress. After processing is complete for the request the Generation Status will change to Successful Generation, Error(s) Exist, Warning(s) Exist, or Abnormal Termination.
If the Automatically Submit check box is not selected, after you save the request, the system assigns a Generation Request ID and the Generation Status of Generation Requested to this request. You must then manually submit the serial generation request for processing.
For information on manually submitting a serial generation request, see Submitting Serial Generation Requests.
Use the Maintain Serial Generation Requests page in Oracle Pedigree and Serialization Manager (OPSM) to submit serial generation requests that are ready for processing. You can submit for processing one or more serial generation requests at one time.
You can also have the system automatically perform the Submit process by selecting the Automatically Submit check box when creating a serial generation request in OPSM. In this case, the system will automatically submit the request for processing when you save the serial generation request.
For more information on automatically submitting a serial generation request, see Creating Serial Generation Requests.
You can only submit for processing those serial generation requests that have a Generation Status of Generation Requested.
Use this procedure to submit serial generation requests:
To Submit Serial Generation Requests
Navigate to the Maintain Serial Generation Requests page.
In the Search: Serial Generation Requests region, enter search criteria for the serial generation requests that you want to submit for processing. Select at least a Generation Status of Generation Requested.
Otherwise, you can click the Search button without entering any search criteria and all available serial generation requests will appear.
Click the Search button.
All of the serial generation requests that match the search criteria appear in the Search Results: Serial Generation Requests region in a table format.
Select one or more serial generation requests in the Search Results: Serial Generation Requests table that you want to submit.
Use the Ctrl or Shift buttons to select one or more serial generation requests in the table.
Select Submit in the Actions menu or click the Submit Serial Generation Request icon located at the top of the Search Results: Serial Generation Requests region.
A business event triggers the processing of your request and a background process is executed to generate the serial numbers and create the Serial Generation transaction. After you submit the serial generation requests a Batch ID is assigned to the serial generation requests.
The background process uses the system parameters (Serial Commit Size) value you specify when creating a serial generation request to determine the serial numbers to be created. For example, let's say the Serial Commit Size is 1,000. Serial generation requests that result in more than 1,000 serials will be processed in groups. A serial generation request for 10,000 serials will be processed in 10 groups. When the first 1,000 serials are generated, the system will create the Serial Generation transaction and commit those serials to the database. The remaining serials will be created in groups of 1,000 and the Serial Generation transaction will be updated as each group successfully completes. The system changes the Generation Status from Generation Requested to Generation Submitted then to In Progress while it is processing.
After the background process is complete the Generation Status will change from In Progress to one of these statuses depending on whether the process completed successfully. The statuses are:
Successful Generation: Process completed successfully with no problems.
Error(s) Exist: Process completed but was unsuccessful due to the errors.
Warning(s) Exist: Process completed successfully but there were warning messages issued.
Abnormal Termination: Process did not complete successfully due to a catastrophic failure (for example, the system went down during processing).
Select Refresh from the Action menu or click the Refresh icon periodically at the top of the Search Results: Serial Generation Requests region or click the search button to monitor the progress of the process. As the page is refreshed, the Requested Quantity and Generated Quantity fields in the table will be updated.
After processing is complete, if the serial generation request has a Generation Status of Error(s) Exist, Warning(s) Exist, or Abnormal Termination view the messages for the serial generation request in the Serial Generation Messages region of the Maintain Serial Generation Requests page.
Use the Maintain Serial Generation Requests page in Oracle Pedigree and Serialization Manager (OPSM) to delete serial generation requests. You can delete one or more serial generation requests at one time.
You cannot delete serial generation requests that have an In Progress generation status.
Use this procedure to delete serial generation requests:
To Delete Serial Generation Requests
Navigate to the Maintain Serial Generation Requests page.
In the Search: Serial Generation Requests region, enter search criteria for the serial generation requests that you want to delete.
Otherwise, you can click the Search button without entering any search criteria and all available serial generation requests will appear.
Click the Search button.
All of the serial generation requests that match the search criteria appear in the Search Results: Serial Generation Requests region in a table format.
Select one or more serial generation requests in the Search Results: Serial Generation Requests table that you want to delete.
Use the Ctrl or Shift buttons to select one or more serial generation requests in the table.
Note: You cannot delete In Progress serial generation requests.
Select Delete in the Actions menu or click the Delete icon located at the top of the Search Results: Serial Generation Requests region.
The system displays a message asking if you are sure you want to delete the serial generation request as well as its request generation messages.
Click the Yes button.
The serial generation requests are deleted from the system.
Oracle Pedigree and Serialization Manager (OPSM) can be integrated with transactional systems to perform work order serialization. The work order serialization process will create serial generation requests in OPSM based on planned manufacturing yield from work order transactions allowing additional serials for manufacturing overages or scrapped items. In addition to the overage amount from the work order, the overage from the product detail is also applied when calculating the quantity of serials for generation. After you submit the serial generation request in OPSM, the system will create and reserve serial numbers for these work orders. The creation of the serials is loosely coupled to the external transactional system. The serials are stored in the OPSM system and linked to the work order by the order number, product, and lot identification.
Any changes to the work order that increases the output of the work order or identifies a new product will cause OPSM to evaluate the need for additional serials. If the increase to the quantity exceeds the overage amount it results in a request for additional serials to be generated in OPSM. A reduction in the output quantity does not reduce the quantity of serials or change the status of the serials. If the work order is cancelled, the serials are set to Decommissioned status. If the work order is terminated, serials that are at a Reserved status are set to Decommissioned status when the work order is closed. Serials are generated at either a Reserved or Commissioned status. If both the product and the lot are identified on the serial generation request, the serials are created as Commissioned. If either the product or lot is unknown or the lot has not been created in the transactional system and synchronized to OPSM, the serials are generated in a Reserved status.
For more information on the serial generation process, see Understanding Serial Generation.
For more information on integrating Oracle E-Business Suite with OPSM, see the Oracle Serialization and Tracking Integration Pack for Oracle Pedigree and Serialization Manager and Oracle E-Business Suite 3.1 - Implementation Guide.
Use these procedures to:
Extract and process work order serialization from an external system.
Extract work orders from an external system.
Process work order serialization in OPSM.
Prerequisites
A work order extract scenario must be defined in OPSM.
An Oracle Data Integrator (ODI) extract application that conforms to the required specifications must exist and must be configured to communicate with OPSM.
See the Oracle Serialization and Tracking Integration Pack for Oracle Pedigree and Serialization Manager and Oracle E-Business Suite 3.1.
For Process Work Order Serialization:
The Work Order interface table must be populated by the extract system or another method.
To Extract and Process Work Order Serialization from an External System
Navigate to the Work Order Serialization page.
Work Order Serialization page
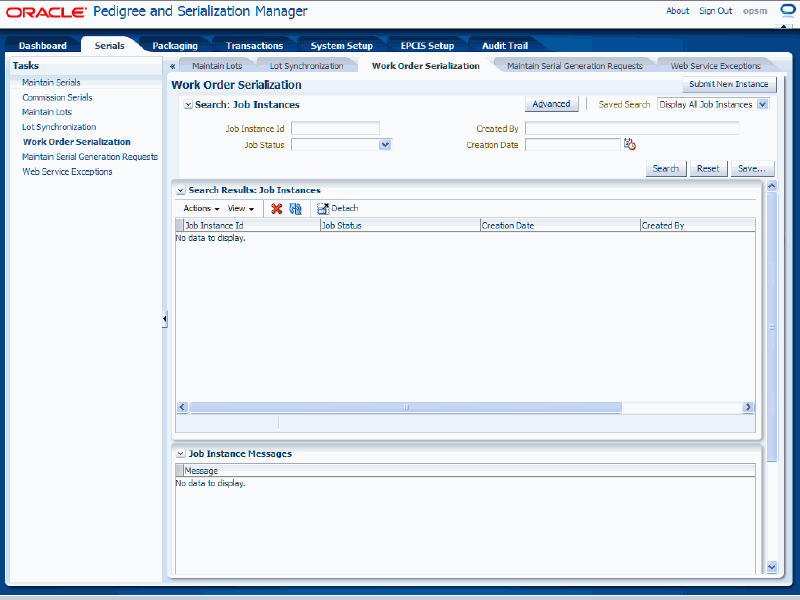
Click the Submit New Instance button in the upper right hand corner of the Work Order Serialization page.
Work Order Serialization dialog box
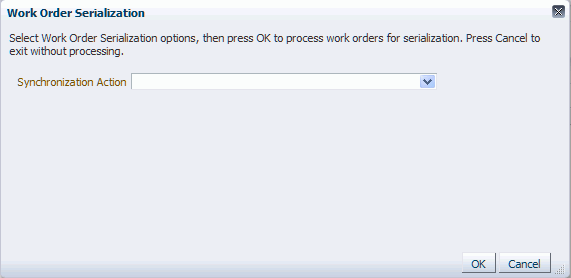
The Work Order Serialization dialog box appears.
Enter the following options for the Work Order Serialization process:
| Field Name | Description |
|---|---|
| Synchronization Action | Select Extract Work Orders and Process Work Order Serialization. After you select the Synchronization Action, the Extract Scenario Name, Source System, and Purge Interface Table fields become available. |
| Extract Scenario Name | Select the extract scenario name. Extract Scenario Names are user defined using Lookup Type PAS_WORK_ORDER_EXTRACT. Oracle delivers four lookup codes for the Work Order Serialization between OPSM and Oracle E-Business Suite for the PAS_WORK_ORDER_EXTRACT lookup type. They are:
|
| Source System | Select the source system where you are going to extract work order information from into OPSM. Source Systems are user defined using the Lookup Type PAS_SOURCE_SYSTEM. |
| Purge Interface Table check box | Select this check box if you want to delete existing records in the interface table for the selected source system. |
Work Order Serialization dialog box
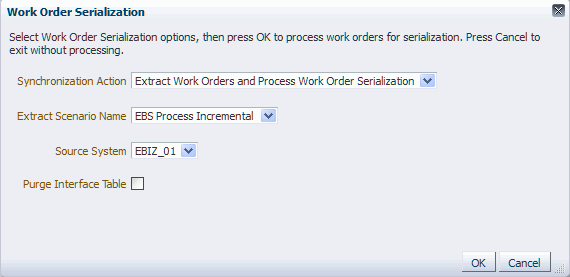
Click the OK button to initiate the Work Order Serialization process.
The Work Order Serialization process runs in the background. The system assigns a job instance Id for that specific run of the process. The Work Order Serialization page reappears.
The Work Order Serialization (Extract Work Orders) background process will invoke an Oracle Data Integrator (ODI) application to extract work order information from an external system. The work order information that is extracted from the source system will be merged into the target OPSM Work Order Interface table (PAS_S_WORK_ORDER_INTERFACE).
The Work Order Serialization (Process Work Order Serialization) background process takes the work order information from the PAS_S_WORK_ORDER_INTERFACE table and validates the data and initiates the process to generate a serial generation request in OPSM.
Enter the following information in the Search: Job Instances region of the page:
| Field Name | Description |
|---|---|
| Job Instance Id | (Optional) Enter a specific job instance Id. |
| Job Status | (Optional) Select the job status for the job instances. Job Statuses are:
|
| Created By | (Optional) Enter the individual that initiated the process. |
| Creation Date | (Optional) Select a creation date for the job instance that is equal to the current date. |
Click the Search button.
Locate the job instance Id for the process and verify that the Job Instance Id completed successfully or completed with warnings.
The Job Status associated with job instance Id is at one of these statuses:
Complete: Job instance completed successfully with no errors or warnings.
Error(s) Exist: Job instance did not complete successfully.
In Progress: Job instance is in progress.
Submitted: Job instance has been submitted but not started.
Abnormal Termination: The job instance did not complete successfully due to a catastrophic failure (for example, the system went down during processing).
Warning(s) Exist: Job completed successfully but there are warning messages.
Scroll to the Job Instance Messages region and view the following:
Informational messages (blue circle with the letter "i"): These messages display the parameters used to initiate the process and the results of the process.
Warning messages (A yellow triangle with an exclamation point): These messages display the warning messages for the process.
For more information on the job instances functionality, see Using Job Instances functionality.
Navigate to the OPSM Maintain Serial Generation Requests page.
Enter the following information and click the Search button:
| Field Name | Description |
|---|---|
| Generation Request Method | Select a generation request method of Work Order Import. |
| Generation Status | Select a generation status of Generation Requested. |
| Created Document | Select the work order number (job or batch). |
For more information on searching for serial generation requests, see Searching for Serial Generation Requests.
Maintain Serial Generation Requests page
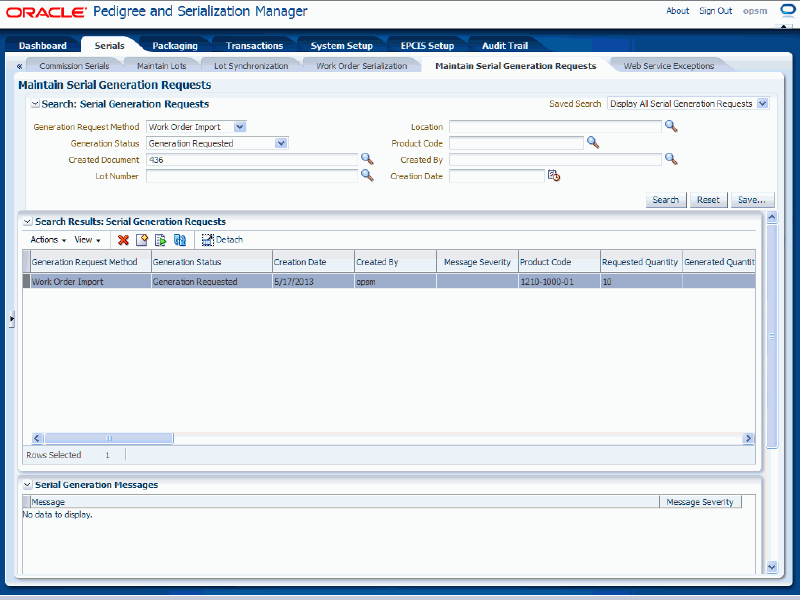
Select the serial generation request and then select Submit from the Actions menu or click the Submit Serial Generation Request icon.
For more information on submitting serial generation requests, see Submitting Serial Generation Requests.
Maintain Serial Generation Requests page
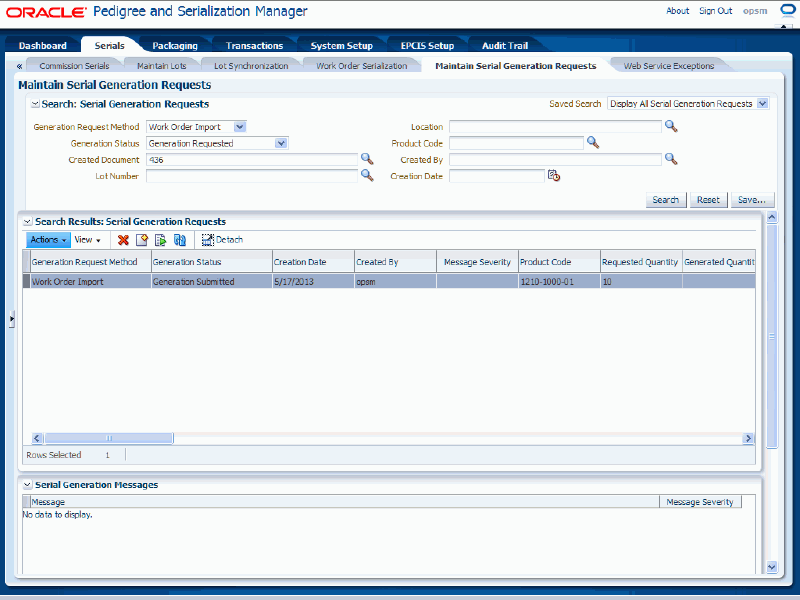
After the serial generation request is processed it creates the serial numbers for the items on the work orders.
Navigate to the OPSM Maintain Serials page and search for the serial numbers that were created for the items on the work orders.
For more information on searching for serials, see Searching for Serials.
Maintain Serials page
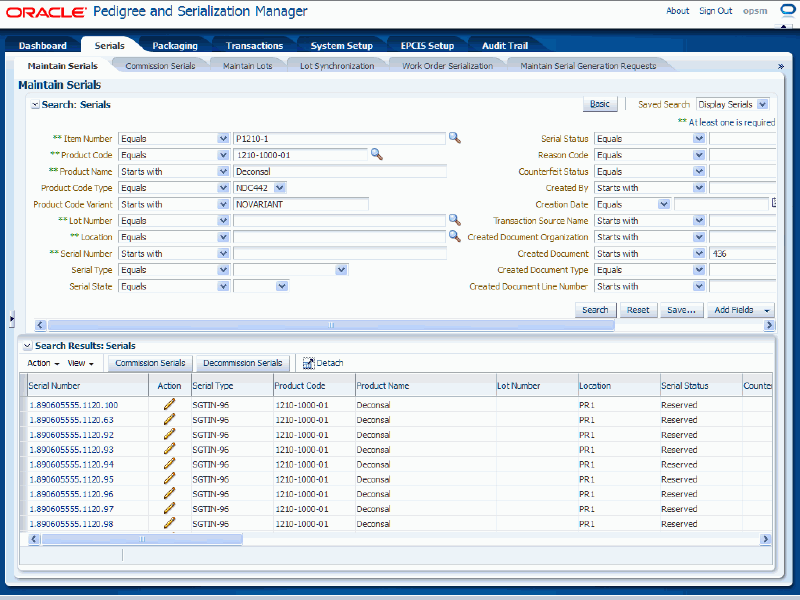
Using the Maintain Serials page you can view all of the serial numbers that were created for the items on the work orders. The serial numbers are created in OPSM in a Reserved status or a Commissioned status if product and lot were identified. If a work order was cancelled, previously generated serials are set to Decommissioned status. If a work order was terminated, serials in a Reserved status when the work order is closed are set to Decommissioned status. Serials at a Commissioned status will remain commissioned.
For information on viewing serials, see Viewing Serial Detail Information.
To Extract Work Orders from an External System
Navigate to the Work Order Serialization page.
Work Order Serialization page

Click the Submit New Instance button in the upper right hand corner of the Work Order Serialization page.
Work Order Serialization dialog box

The Work Order Serialization dialog box appears.
Enter the following options for the Work Order Serialization process:
| Field Name | Description |
|---|---|
| Synchronization Action | Select Extract Work Orders. After you select the Synchronization Action, the Extract Scenario Name, Source System, and Purge Interface Table fields become available. |
| Extract Scenario Name | Select the extract scenario name. Extract Scenario Names are user defined using Lookup Type PAS_WORK_ORDER_EXTRACT. Oracle delivers four lookup codes for the Work Order Serialization between OPSM and Oracle E-Business Suite for the PAS_WORK_ORDER_EXTRACT lookup type. They are:
|
| Source System | Select the source system where you are going to extract work orders from into OPSM. Source Systems are user defined using the Lookup Type PAS_SOURCE_SYSTEM. |
| Purge Interface Table check box | Select this check box if you want to delete existing records in the interface table for the selected source system. |
Work Order Serialization dialog box
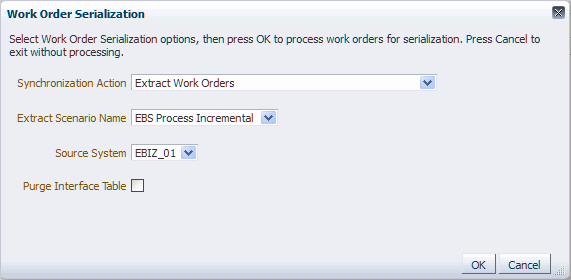
Click the OK button to initiate the Work Order Serialization process.
The Work Order Serialization process runs in the background. The system assigns a job instance Id for that specific run of the process. The Work Order Serialization page reappears.
The Work Order Serialization (Extract Work Orders) background process will invoke an Oracle Data Integrator (ODI) application to extract work order information from an external system. The work order information that is extracted from the source system will be merged into the target OPSM Work Order Interface table (PAS_S_WORK_ORDER_INTERFACE).
Enter the following information in the Search: Job Instances region of the page:
| Field Name | Description |
|---|---|
| Job Instance Id | (Optional) Enter a specific job instance Id. |
| Job Status | (Optional) Select the job status for the job instances. Job Statuses are:
|
| Created By | (Optional) Enter the individual that initiated the process. |
| Creation Date | (Optional) Select a creation date for the job instance that is equal to the current date. |
Click the Search button.
Locate the job instance Id for the process and verify that the Job Instance Id completed successfully or completed with warnings.
The Job Status associated with job instance Id is at one of these statuses:
Complete: Job instance completed successfully with no errors or warnings.
Error(s) Exist: Job instance did not complete successfully.
In Progress: Job instance is in progress.
Submitted: Job instance has been submitted but not started.
Abnormal Termination: The job instance did not complete successfully due to a catastrophic failure (for example, the system went down during processing).
Warning(s) Exist: Job completed successfully but there are warning messages.
Scroll to the Job Instance Messages region and view the following:
Informational messages (blue circle with the letter "i"): These messages display the parameters used to initiate the process and the results of the process.
Warning messages (A yellow triangle with an exclamation point): These messages display the warning messages for the process.
For more information on the job instances functionality, see Using Job Instances functionality.
To Process Work Order Serialization in OPSM
Navigate to the Work Order Serialization page.
Click the Submit New Instance button in the upper right hand corner of the Work Order Serialization page.
The Work Order Serialization dialog box appears.
Enter the following options for the Work Order Serialization process:
| Field Name | Description |
|---|---|
| Synchronization Action | Select Process Work Order Serialization. After you select the Synchronization Action, the Source System, and Purge Interface Table fields become available. |
| Source System | Select the source system for the extracted work orders in which you want to perform the work order serialization process for in OPSM. Source Systems are user defined using the Lookup Type PAS_SOURCE_SYSTEM. |
| Purge Interface Table check box | Select this check box if you want to delete existing records in the interface table for the selected source system. |
Work Order Serialization dialog box
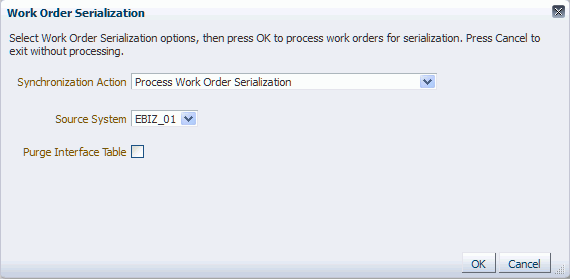
Click the OK button to initiate the Work Order Serialization process.
The Work Order Serialization process runs in the back ground. The system assigns a job instance Id for that specific run of the process. The Work Order Serialization page reappears.
The Work Order Serialization (Process Work Order Serialization) background process takes work order information from the PAS_S_WORK_ORDER_INTERFACE table and initiates the process to generate the serial generation request in OPSM (PAS_S_SERIAL_GEN_REQUESTS table).
Enter the following information in the Search: Job Instances region of the page:
| Field Name | Description |
|---|---|
| Job Instance Id | (Optional) Enter a specific job instance Id. |
| Job Status | (Optional) Select the job status for the job instances. Job Statuses are:
|
| Created By | (Optional) Enter the individual that initiated the process. |
| Creation Date | (Optional) Select a creation date for the job instance that is equal to the current date. |
Click the Search button.
Locate the job instance Id for the process and verify that the Job Instance Id completed successfully or completed with warnings.
The Job Status associated with job instance Id is at one of these statuses:
Complete: Job instance completed successfully with no errors or warnings.
Error(s) Exist: Job instance did not complete successfully.
In Progress: Job instance is in progress.
Submitted: Job instance has been submitted but not started.
Abnormal Termination: The job instance did not complete successfully due to a catastrophic failure (for example, the system went down during processing).
Warning(s) Exist: Job completed successfully but there are warning messages.
Scroll to the Job Instance Messages region and view the following:
Informational messages (blue circle with the letter "i"): These messages display the parameters used to initiate the process and the results of the process.
Warning messages (A yellow triangle with an exclamation point): These messages display the warning messages for the process.
For more information on the job instances functionality, see Using Job Instances functionality.
Navigate to the OPSM Maintain Serial Generation Requests page.
Enter the following information and click the Search button:
| Field Name | Description |
|---|---|
| Generation Request Method | Select a generation request method of Work Order Import. |
| Generation Status | Select a generation status of Generation Requested. |
| Created Document | Select the work order number (job or batch). |
For more information on searching for serial generation requests, see Searching for Serial Generation Requests.
Maintain Serial Generation Requests page

Select the serial generation request and then select Submit from the Actions menu or click the Submit Serial Generation Request icon.
For more information on submitting serial generation requests, see Submitting Serial Generation Requests.
Maintain Serial Generation Requests page

After the serial generation request is processed it creates the serial numbers for the items on the work orders.
Navigate to the OPSM Maintain Serials page and search for the serial numbers that were created for the items on the jobs or batches.
For more information on searching for serials, see Searching for Serials.
Maintain Serials page

Using the Maintain Serials page you can view all of the serial numbers that were created for the items on the work orders. The serial numbers are created in OPSM in a Reserved status or a Commissioned status if product and lot were identified. If a work order was cancelled, previously generated serials are set to Decommissioned status. If a work order was terminated, serials in a Reserved status when the work order is closed are set to Decommissioned status. Serials at a Commissioned status will remain commissioned.
For information on viewing serials, see Viewing Serial Detail Information.
Use the Maintain Serials page in Oracle Pedigree and Serialization Manager (OPSM) to search for existing serials. You can view the serials in a multitude of ways by using the search criteria fields that include item number, product code, product name, lot number, location, serial number, and serial status.
Using the advanced search functionality you can search for a range of serials by using the operator field (equal to, contains, ends with, starts with, and so on) associated with the search criteria fields.
Use these procedures to search for serials:
To Search for Serials (Basic Search)
Navigate to the Maintain Serials page.
Maintain Serials page (Basic Search)
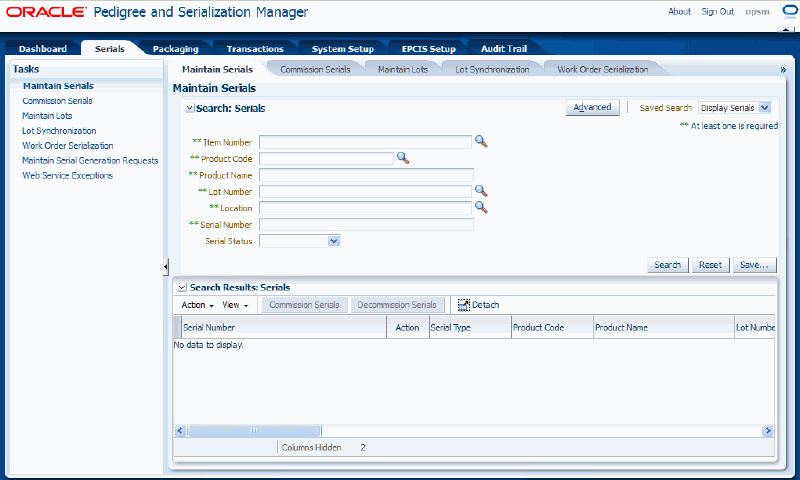
In the Search: Serials region, enter the search criteria for the serials using one or more of these fields:
| Field Name | Description |
|---|---|
| Item Number | Select the item number associated with the serials. This is the transactional systems item number. It is used to find the Product Code to perform the search. Serials are created using product code so the item number search is merely a way for you to search for the correct product code. When you select the Item Number, the Product Code and Product Name fields are automatically populated. If you clear the item number, then the Product Code and Product Name fields get cleared as well. You cannot enter both the Item Number and the product fields (Product Code and Product Name) on the search. |
| Product Code | Select the product code associated with the serials. |
| Product Name | Enter the product name associated with the serials. |
| Lot Number | Select the lot number for the product associated with the serials. If you select the lot number using the Search and Select dialog box, after you select the lot number the Product Code and Product Name fields will appear by default from the lot number selected. |
| Location | Select the location associated with the serial number. |
| Serial Number | Enter the serial number. |
| Serial Status | (Optional) Select the serial status for the serials. Statuses are:
|
Click the Search button.
Maintain Serials page (Basic Search)
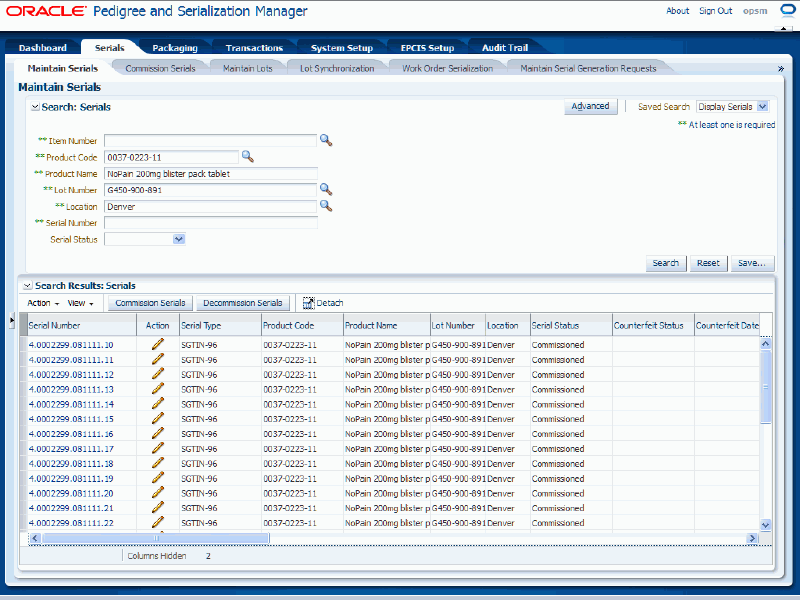
All of the serials that match the search criteria appear in the Search Results: Serials region in a table format. For each serial number the following information displays:
| Field Name | Description |
|---|---|
| Serial Number | Displays the serial number. |
| Action | Displays the Edit icon. |
| Serial Type | Displays the serial type associated with the serial number. |
| Product Code | Displays the product code associated with the serial number. |
| Product Name | Displays the product name for the product. |
| Lot Number | Displays the lot number associated with the product. |
| Location | Displays the location that generated the serial number. |
| Serial Status | Displays the status of the serial number. Values are: Reserved, Commissioned, and Decommissioned. |
| Counterfeit Status | Displays the counterfeit status for the serial number. Values are: Counterfeit, Suspect Counterfeit, or Verified Not Counterfeit. |
| Counterfeit Date | Displays the date the serial number was detected as being counterfeit or suspect counterfeit. |
| Reason Code | Displays the reason code used when decommissioning a serial number. This is required if decommissioning a serial. |
| Serial State | Displays the state of the serial number. Values are: Shipped and Returned. |
| Created Document Organization | Displays the organization for the document that created the serial number. |
| Created Document | Displays the document number that was used to create the serial number. |
| Created Document Type | Displays the document type associated with the document. Document Types are user defined using Lookup Type PAS_DOCUMENT_TYPE. |
| Created Document Line Number | Displays the document line number. |
| Creation Date | Displays the date the serial number was created. |
| Created By | Displays the user that created the serial number. |
| Transaction Source Name | Displays the transactional system where the serial number was created. |
| Commission Document Organization | Displays the organization for the document used for commissioning the serial. |
| Commission Document | Displays the document number that was used to commission the serial. |
| Commission Document Type | Displays the document type associated with the commission document. Document types are user defined using Lookup Type PAS_DOCUMENT_TYPE. |
| Commission Document Line Number | Displays the commission document line number. |
Click the Advanced button to perform an advanced search.
To Search for Serials (Advanced Search)
Use the Advanced Search functionality to perform a more detailed search for specific serial numbers. Field operators associated with the search criteria fields can be used during an Advanced Search so that a range of serial numbers can be easily retrieved.
Navigate to the Maintain Serials page.
Click the Advanced button located at the top of the page.
Note: Clicking the Advanced or Basic button will keep the values in the base criteria fields.
Maintain Serials page (Advanced Search)
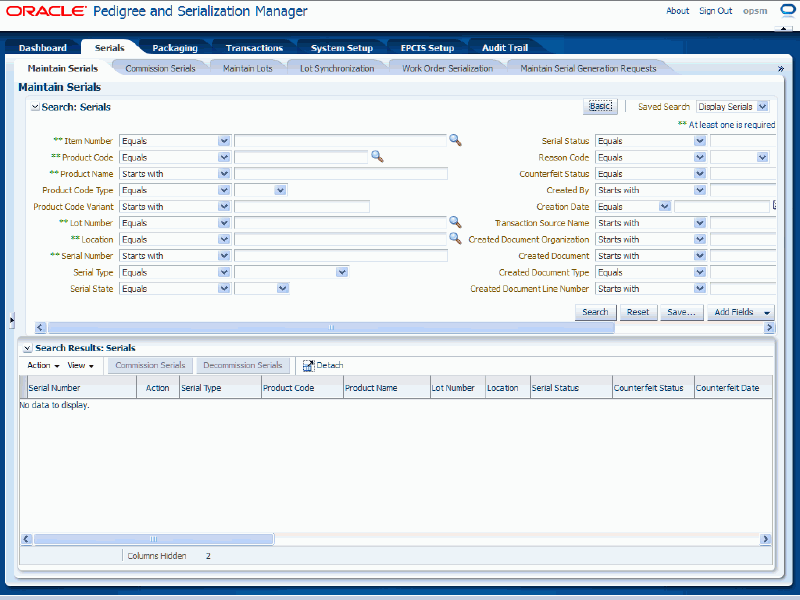
In the Search: Serials region, enter the search criteria for the serials using one or more of these fields:
| Field Name | Description |
|---|---|
| Item Number | Select the field operator and then select the item number for the product. Operators are:
This is the transactional systems item number. It is used to find the Product Code to perform the search. Serials are created using product code so the item number search is merely a way for you to search for the correct product code. When you select the Item Number, the Product Code, Product Name, Product Code Type, and Product Code Variant fields are automatically populated. If you clear the item number, then the Product Code, Product Name, Product Code Type, and Product Code Variant fields get cleared as well. You cannot enter both the item number and the product fields (Product Code, Product Name, Product Code Type, and Product Code Variant) on the search. |
| Product Code | Select the field operator and then select the product code. The field operators are the same as that for the Item Number field. |
| Product Name | Select the field operator and then enter the product name. The field operators are the same as that for the Item Number field. |
| Product Code Type | (Optional) Select the field operator and then select the product code type. For example, NDC442, NDC532, and GTIN. The field operators are the same as that for the Item Number field. |
| Product Code Variant | (Optional) Select the field operator and then enter the product code variant. The field operators are the same as that for the Item Number field. |
| Lot Number | Select the field operator and then select the lot number for the product. The field operators are the same as that for the Item Number field. If you select the lot number using the Search and Select dialog box, after you select the lot number the Product Code and Product Name fields will appear by default from the lot number selected. |
| Location | Select the field operator and then select the location for the serial number. The field operators are the same as that for the Item Number field. |
| Serial Number | Select the field operator and then enter the serial number. The field operators are the same as that for the Item Number field. |
| Serial Type | (Optional) Select the field operator and then select the serial type. For example, SGTIN or USN-1. The field operators are the same as that for the Item Number field. |
| Serial State | (Optional) Select the field operator and then select the serial state. Values are: Shipped and Returned. The field operators are the same as that for the Item Number field. |
| Serial Status | (Optional) Select the field operator and then select the serial status. Values are: Commissioned, Decommissioned, and Reserved. The field operators are the same as that for the Item Number field. |
| Reason Code | (Optional) Select the field operator and then select the reason code that was used when decommissioning the serial number. The field operators are the same as that for the Item Number field. |
| Counterfeit Status | (Optional) Select the field operator and then select the counterfeit status. Values are: Counterfeit, Verified Not Counterfeit, and Suspect Counterfeit. The field operators are the same as that for the Item Number field. |
| Created By | (Optional) Select the field operator and enter the user that created the serial number. The field operators are the same as that for the Item Number field. |
| Creation Date | (Optional) Select the field operator and select the date the serial number was created. Operators are:
|
| Transaction Source Name | (Optional) Select the field operator and then enter where (transactional system) the serial number was created. The field operators are the same as that for the Item Number field. |
| Created Document Organization | (Optional) Select the field operator and then enter the organization for the document that created the serial number. The field operators are the same as that for the Item Number field. |
| Created Document | (Optional) Select the field operator and then enter the document number that was used to create the serial number. The field operators are the same as that for the Item Number field. |
| Created Document Type | (Optional) Select the field operator and then enter the type of document that created the serial number. Document types are user defined using Lookup Type PAS_DOCUMENT_TYPE. The field operators are the same as that for the Item Number field. |
| Created Document Line Number | (Optional) Select the field operator and then enter the document line number that created the serial number. The field operators are the same as that for the Item Number field. |
(Optional) To enter additional search criteria fields, click the Add Fields button and select the field you would like to add to the search criteria.
The selected field appears as a search criteria field.
Note: To remove the additional field, click the Remove icon next to the field. The field will be removed from the search criteria.
(Optional) Enter search criteria for the additional fields you added.
Click the Search button.
Maintain Serials page (Advanced Search)
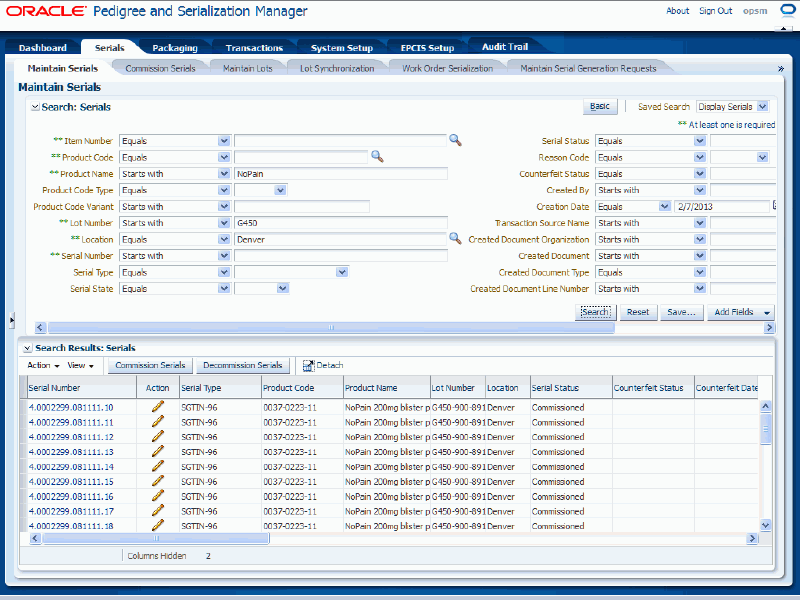
All of the serials that match the search criteria appear in the Search Results: Serials region in a table format.
For information on the fields that appear for each serial number, see Procedure: To Search for Serials (Basic Search).
Click the Basic button to have the page hide the advanced search criteria fields and re-display the basic search criteria fields.
Note: Clicking the Reset button clears the values in all of the search criteria fields.
Use the View Serial page in Oracle Pedigree and Serialization Manager (OPSM) to view all of the different types of information for serial numbers. The types of information you can view for a serial number are:
General
Product
Lot
Packaging
Lot Details
Generated Transaction
Use this procedure to view serial detail information:
To View Serial Detail Information
Navigate to the Maintain Serials page.
Enter search criteria for the serials you want to view and click the Search button.
All of the serials that match the search criteria appear in the Search Results: Serials table.
Select the serial number in the table that you want to view.
Select View in the Actions menu or click the Serial Number link.
View Serial page - Serial Details sub tab
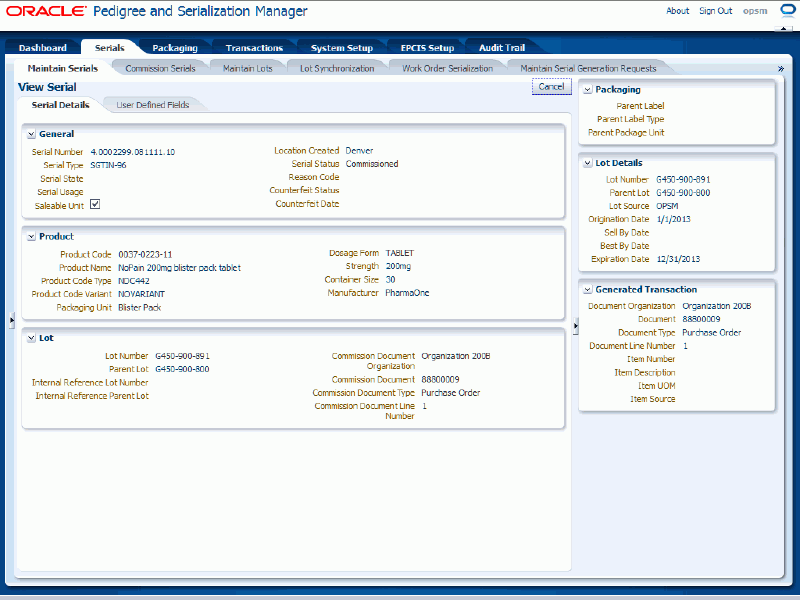
The View Serial page appears. There are two sub tabs (Serial Details and User Defined Fields) along with a contextual area on the right side of the page that can be expanded and collapsed that displays information related to the serial number.
The Serial Details sub tab displays this information:
| Field Name | Description |
|---|---|
| General region | |
| Serial Number | Displays the serial number. |
| Serial Type | Displays the serial type associated with the serial number. For example, SGTIN-96 or USN-1. |
| Serial State | Displays the state of the serial number. Values are: Shipped, Returned, or blank. |
| Serial Usage | Displays the serial usage. Serial Usages are user defined using Lookup Type PAS_SERIAL_USAGE. |
| Saleable Unit check box | If this check box is selected, it indicates this serial number is a saleable unit. |
| Location Created | Displays the location where the serial number was created. |
| Serial Status | Displays the status of the serial number. Values are:
|
| Reason Code | Displays the reason code used when decommissioning a serial number. This is required if the serial is being decommissioned. Reason codes are user defined using Lookup Type PAS_REASON_CODE. |
| Counterfeit Status | Displays the counterfeit status for the serial number. Values are: Counterfeit, Suspect Counterfeit, Verified Not Counterfeit, and blank. |
| Counterfeit Date | Displays the date the serial number was detected as being Counterfeit, Suspect Counterfeit, or Verified Not Counterfeit. |
| Product region | |
| Product Code | Displays the product code associated with the serial number. |
| Product Name | Displays the product name. |
| Product Code Type | Displays the product code type associated with the product code. For example, NDC442, NDC532, and GTIN. |
| Product Code Variant | Displays the product code variant. |
| Packaging Unit | Displays the packaging unit for the product. Packaging unit is user defined using the Lookup Type PAS_PACKAGE_UNIT. |
| Dosage Form | Displays the dosage form for the product. Dosage form is user defined using the Lookup Type PAS_DOSAGE_FORM. |
| Strength | Displays the strength of the product. |
| Container Size | Displays the container size for the product. |
| Manufacturer | Displays the manufacturer for the product. |
| Lot region | |
| Lot Number | Displays the lot number associated with the product. |
| Parent Lot | Displays the parent lot number for the product. |
| Internal Reference Lot Number | Displays the internal reference lot number given upon receipt. |
| Internal Reference Parent Lot | Displays the internal reference parent lot number given upon receipt. |
| Commission Document Organization | Displays the organization for the document used for commissioning the serial. |
| Commission Document | Displays the document number that was used to commission the serial. |
| Commission Document Type | Displays the document type associated with the commission document. Document types are user defined using Lookup Type PAS_DOCUMENT_TYPE. |
| Commission Document Line Number | Displays the commission document line number. |
View Serial page - User Defined Fields sub tab
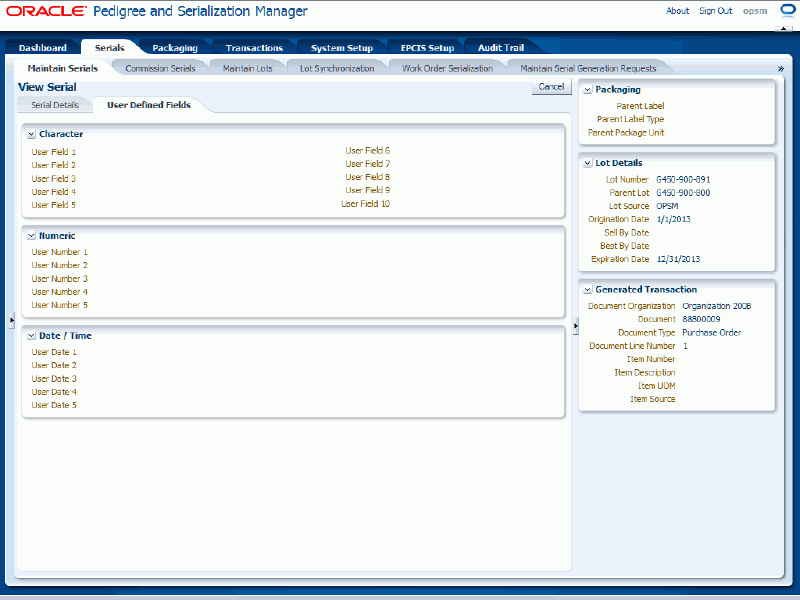
The User Defined Fields sub tab displays this information:
| Field Name | Description |
|---|---|
| Character region | |
| User Field 1-10 | Displays the user defined field information. |
| Numeric region | |
| User Number 1-5 | Displays the user defined number information. |
| Date/Time region | |
| User Date 1-5 | Displays the user defined date and time information. |
On the right side of the page is a contextual area that contains information related to the serial. This contextual area displays this information:
| Field Name | Description |
|---|---|
| Packaging region | |
| Parent Label | Displays the parent label for the package. |
| Parent Label Type | Displays the parent label type for the package. |
| Parent Package Unit | Displays the parent package unit for the serial. This is the package that the serial is contained in. |
| Lot Details region | |
| Lot Number | Displays the lot number for the product. |
| Parent Lot | Displays the parent lot number for the product. |
| Lot Source | Displays the source for the lot. This is the transactional system that created the lot. |
| Origination Date | Displays the date the lot originated. |
| Sell By Date | Displays the sell by date for the lot. |
| Best By Date | Displays the best by date for the lot. |
| Expiration Date | Displays the expiration date for the lot. |
| Generated Transaction region | |
| Document Organization | Displays the organization for the document that generated the serial number. |
| Document | Displays the document number that was used to generate the serial number. |
| Document Type | Displays the document type that was used to generate the serial number. Document Types are user defined using Lookup Type PAS_DOCUMENT_TYPE. |
| Document Line Number | Displays the document line number. |
| Item Number | Displays the transactional system’s item number that was used to create the serial. |
| Item Description | Displays the transactional system’s item description. |
| Item UOM | Displays the transactional system’s item unit of measure. |
| Item Source | Displays the transactional system that the item source is from. |
Select the different sub tabs (Serial Details and User Defined Fields) to the view that particular type of information for the serial number.
Click the Cancel button to return back to the Maintain Serials page.
Use the Edit Serial page in Oracle Pedigree and Serialization Manager (OPSM) to:
Edit the different types of information (general, product, and lot) related to a serial number.
Commission a serial number.
Decommission a serial number.
For more information on commissioning and decommissioning a serial, see Commissioning Serials and Decommissioning Serials.
Use these procedures to edit, commission, or decommission an individual serial number:
Navigate to the Maintain Serials page.
Enter search criteria for the serials you want to edit and click the Search button.
All of the serials that match the search criteria appear in the Search Results: Serials table.
Select the serial number in the table that you want to edit.
Select Edit in the Actions menu or click the Edit icon associated with the serial number in the Action column of the results table.
The Edit Serial page appears displaying all of the existing information for the serial.
For more information on all of the fields on this page, see Viewing Serial Detail Information.
Edit the serial number fields.
Edit Serial page (Serial State of Shipped)
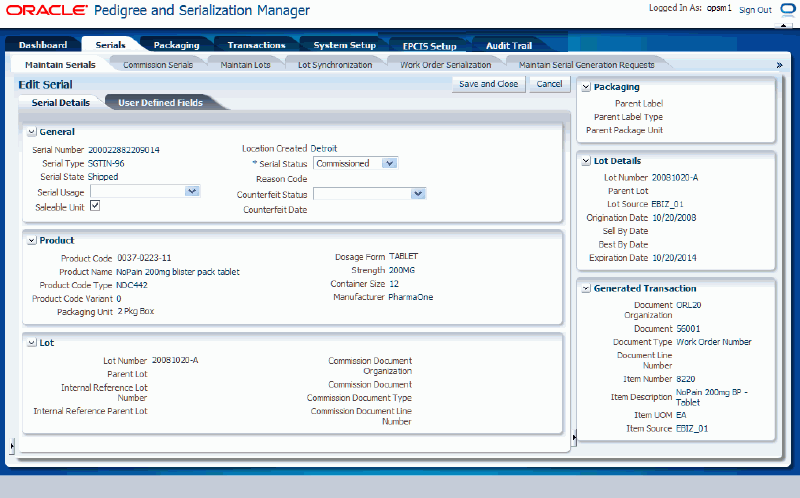
For serial numbers that have a Serial State of Shipped, you can edit these fields pertaining to the serial number:
Serial Usage
Serial Status
Reason Code (if you select a Serial Status of Decommissioned)
Counterfeit Status
Counterfeit Date
User Defined fields
Edit Serial page (Serial State of Returned)
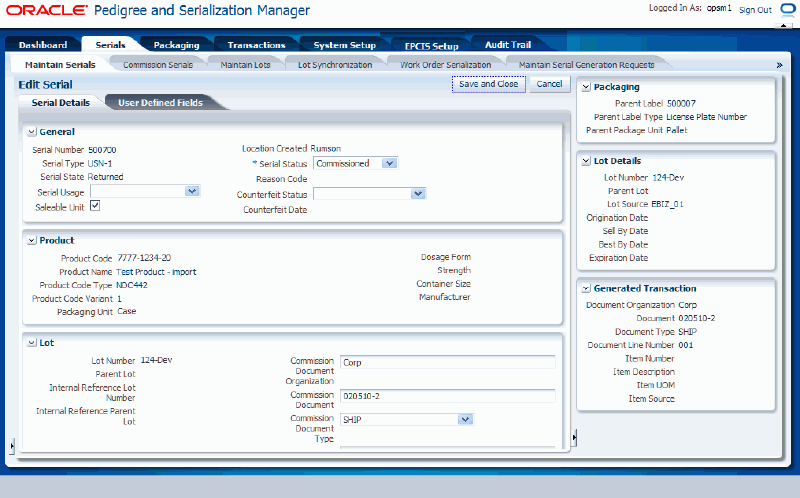
For serial numbers that have a Serial State of Returned, you can edit these fields pertaining to the serial number:
Serial Usage
Serial Status
Reason Code (if you select a Serial Status of Decommissioned)
Counterfeit Status
Counterfeit Date (if you select a Counterfeit Status not equal to blank)
Commission Document Organization (if you select a Serial Status of Commissioned)
Commission Document (if you select a Serial Status of Commissioned)
Commission Document Type (if you select a Serial Status of Commissioned)
Commission Document Line Number (if you select a Serial Status of Commissioned)
User Defined fields
Edit Serial page (Product Specific Serial Type Group (SGTIN))
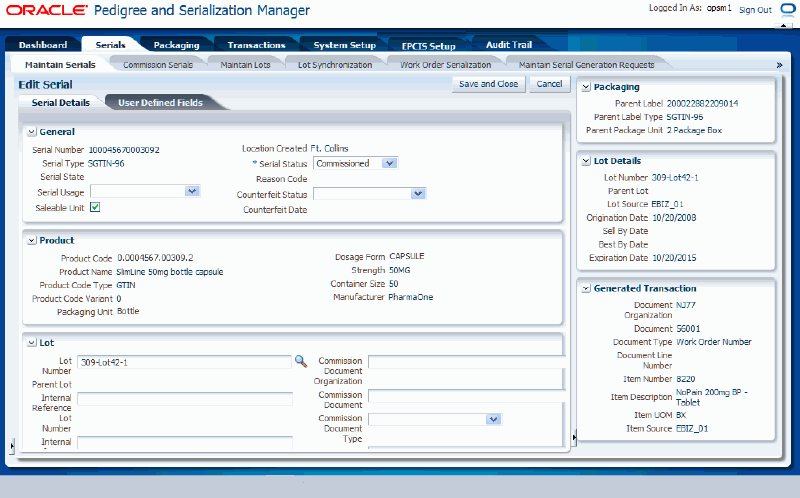
For serial numbers related to an SGTIN serial type group that have no serial state, you can edit these fields pertaining to the serial number:
Serial Usage
Saleable Unit check box
Serial Status
Reason Code (if you select a Serial Status of Decommissioned)
Counterfeit Status
Counterfeit Date (if you select a Counterfeit Status that is not blank)
Lot Number
Parent Lot Internal Reference
Lot Number Internal Reference
Commission Document Organization (if you select a Serial Status of Commissioned)
Commission Document (if you select a Serial Status of Commissioned)
Commission Document Type (if you select a Serial Status of Commissioned)
Commission Document Line Number (if you select a Serial Status of Commissioned)
User Defined fields
Note: You cannot edit the product information because the product is imbedded into the serial number.
Edit Serial page (Non Product Specific Serial Type Group (USN))
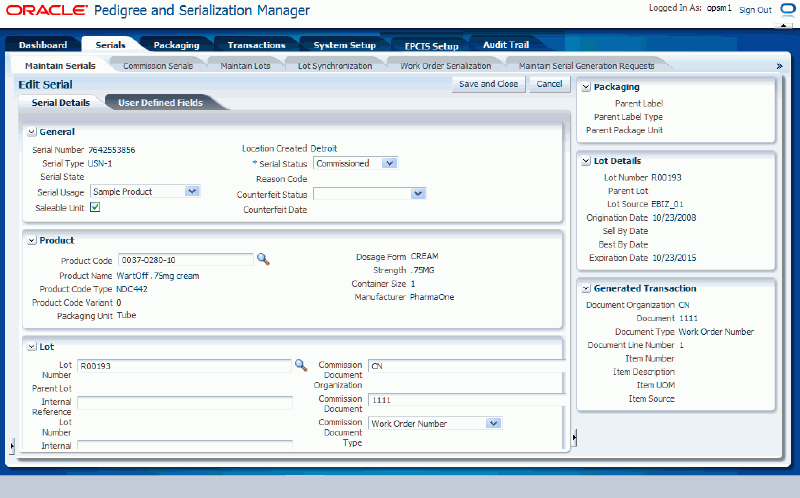
For serial numbers related to a USN serial type group that have no serial state, you can edit these fields pertaining to the serial number:
Serial Usage
Saleable Unit check box
Serial Status
Reason Code (if you select a Serial Status of Decommissioned)
Counterfeit Status
Counterfeit Date (if you select a Counterfeit Status that is not blank)
Product Code
Lot Number
Parent Lot Internal Reference
Lot Number Internal Reference
Commission Document Organization (if you select a Serial Status of Commissioned)
Commission Document (if you select a Serial Status of Commissioned)
Commission Document Type (if you select a Serial Status of Commissioned)
Commission Document Line Number (if you select a Serial Status of Commissioned)
User Defined fields
Click the Save and Close button to save the changes you made to the serial number information and to return back to the Maintain Serials page.
To Commission a Single Serial Number
Navigate to the Maintain Serials page.
Enter search criteria for the serials you want to commission and click the Search button.
All of the serials that match the search criteria appear in the Search Results: Serials table.
Select the serial number in the table that you want to commission.
Select Edit in the Actions menu or click the Edit icon associated with the serial number in the Action column of the results table.
The Edit Serial page appears displaying all of the existing information for the serial.
For more information on all of the fields on this page, see Viewing Serial Detail Information.
Select a Serial Status of Commissioned.
The commission document fields become available for entry in the Lot region of the page for serials related to all serial types.
For non-product specific serials, the Product Code and Lot Number fields are available for entry.
For product specific serials, the Lot Number field is available for entry.
Enter or modify product and lot information.
For a non-product specific serial number, enter Product Code and Lot Number.
For a product specific serial number, enter Lot Number.
(Optional) Enter commission document information (Commission Document Organization, Commission Document, Commission Document Type, and Commission Document Line Number.
Click the Save and Close button to save the changes you made to the serial number information and to return back to the Maintain Serials page.
To Decommission a Single Serial Number
Navigate to the Maintain Serials page.
Enter search criteria for the serials you want to decommission and click the Search button.
All of the serials that match the search criteria appear in the Search Results: Serials table.
Select the serial number in the table that you want to decommission.
Select Edit in the Actions menu or click the Edit icon associated with the serial number in the Action column of the results table.
The Edit Serial page appears displaying all of the existing information for the serial.
For more information on all of the fields on this page, see Viewing Serial Detail Information.
Select a Serial Status of Decommissioned.
The Reason Code field becomes available for entry.
Enter the Reason Code for the serial decommission.
Click the Save and Close button to save the changes you made to the serial number information and to return back to the Maintain Serials page.
Use the Maintain Serials page, Edit Serial page, and the Commission Serials page in Oracle Pedigree and Serialization (OPSM) to commission serials. To commission a serial means to associate a product and lot to the serial. All serials can be commissioned unless they have a Shipped serial state.
OPSM can be integrated with external transactional systems to commission serials based on the lot and item cross reference information passed between the systems. From the external system you can call the Commission Serials page. If you have not previously signed into OPSM, you will be prompted for user authentication. After successful authentication, you can use the Commission Serials page to select serials within OPSM to commission.
For more information on the integration between OPSM and EBS, see the Oracle Serialization and Tracking Integration Pack for Oracle Pedigree and Serialization Manager and Oracle E-Business Suite 3.1 - Implementation Guide.
Using OPSM you can generate serial numbers for product specific and non-product specific serial types. When the system generates serial numbers for a product specific serial type, the serial numbers are generated with the product code as part of the actual serial number. The serial numbers are sequentially or randomly assigned (depending on the configuration of the serial type) by the system. In this case, when commissioning product specific serial numbers you cannot change the product code, as it is part of the actual serial number. During the commissioning process you will assign the lot number and optionally the commission document information to the serial numbers. You can change the lot and commission document information on these types of serial numbers until the serial is shipped (Serial State of Shipped).
When the system generates serial numbers for a non-product specific serial type, the serial numbers are sequentially or randomly assigned (depending on the configuration of the serial type) by the system and do not contain the product code. During the commissioning process of non-product specific serials you can change the product code that was originally assigned and you will assign the lot number and optionally the commission document information to the serial numbers. The product, lot, and commission document information can be changed on these types of serial numbers until the serial is shipped (Serial State of Shipped).
In addition, you can commission the same serial numbers multiple times changing the information as you wish. You can use this program to commission serials numbers to a different document for serials that have been returned (Shipped Status of Returned). The only information you can change for a returned serial number is the commission document information.
Use these procedures to commission serials:
To Commission Serials (Maintain Serials page)
Navigate to the Maintain Serials page.
Enter search criteria for the serials you want to commission and click the Search button.
You cannot commission serials that have a Shipped serial state.
All of the serials that match the search criteria appear in the Search Results: Serials table.
Select one or more serial numbers in the table that you want to commission.
When commissioning multiple serials at one time, select the serials with the same serial type and product code. Also, avoid selecting multiple serials where one or more of them has a Returned serial state.
The system will give you a message and won't allow you to commission multiple serials in these conditions:
Selecting multiple serials numbers with different serial types.
Selecting multiple serials numbers with the same serial types but they have different product codes.
Selecting multiple serials numbers with the same serial type and one or more of the serials numbers has a serial state of Returned and the returned serial number contains a different product code or lot number.
Note: Use Ctrl or Shift buttons on your keyboard to select multiple serial numbers in the table.
Maintain Serials page
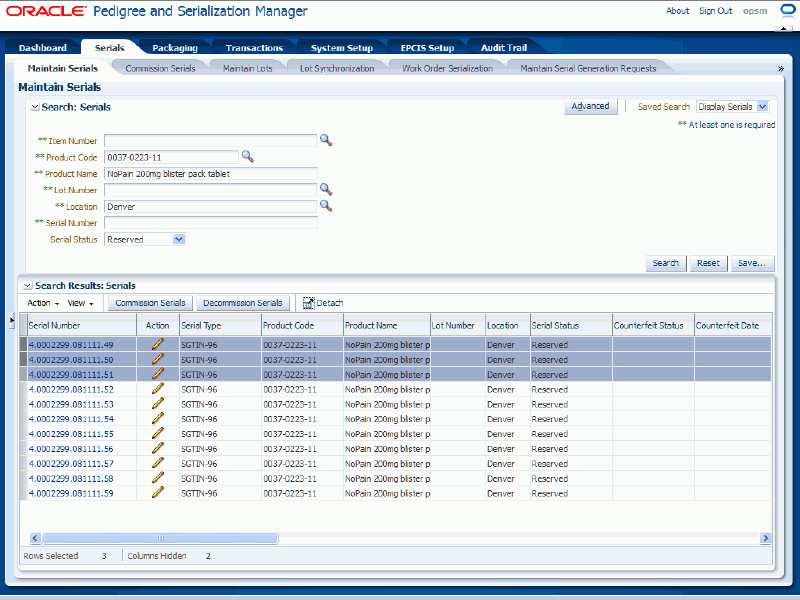
Select Commission Serials in the Action menu or click the Commission Serials button located at the top of the Search Results: Serials region.
Commission Serial(s) page (Product Specific Serial Type (SGTIN))
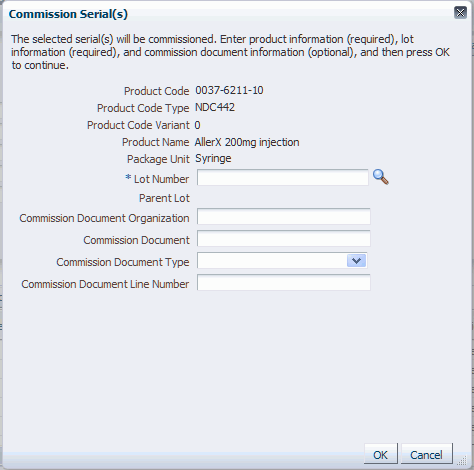
Commission Serial(s) page (Non-Product Specific Serial Type (USN))
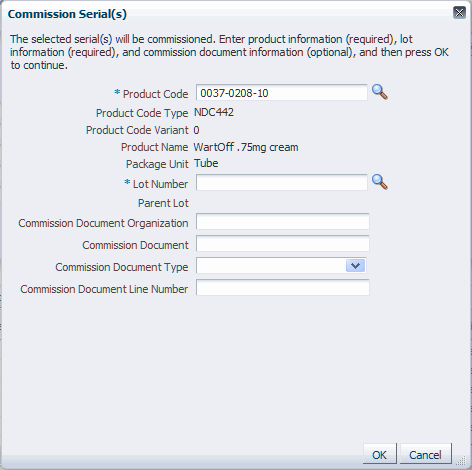
Commission Serial(s) page (Serial State of Returned)
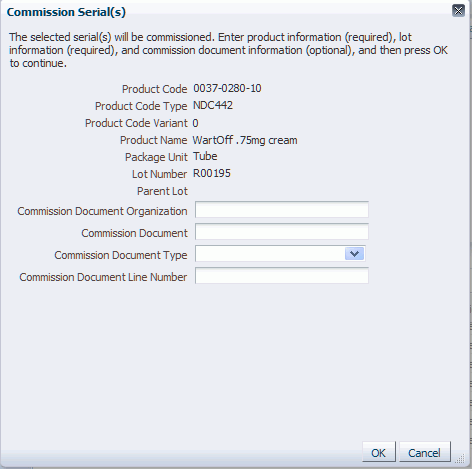
The Commission Serial(s) page appears displaying the product information for the serial numbers you selected.
Depending on the Serial Type for the serials different fields will be available for entry. For product specific serial types (for example, SGTIN-96) you can enter Lot Number and commission document information but you cannot enter Product Code. For non-product specific serial types (for example, USN-1) you can enter Product Code, Lot Number, and commission document information.
For serials with a Returned serial state the Product Code and Lot Number fields are not available for entry.
(Optional) If you are commissioning non-product specific serials, select the Product Code you want to associate with the serials.
The product codes that are available for selection in the Product Code field drop down are related to the serial's serial type.
Note: Product Code is only available for non-product specific serial types.
The Product Code Type, Product Code Variant, Product Name, and Package Unit fields appear by default from the Product Code selected.
Select the Lot Number to associate with the commissioning of the serials.
The lot numbers that are available for selection in the Lot Number field drop down are related to the product code.
For non-product specific serial types, if you enter a Lot Number and then change the Product Code, the system will clear the Lot Number field as the Lot Number may no longer be valid for the Product Code. You would then need to reenter the Lot number.
The Parent Lot field appears by default from the Lot Number selected.
(Optional) Enter the following commission document information:
| Field Name | Description |
|---|---|
| Commission Document Organization | Enter the organization for the commission document. |
| Commission Document | Enter the commission document number. |
| Commission Document Type | Select the type for the commission document. Document Types are user defined using the Lookup Type (PAS_DOCUMENT_TYPE). |
| Commission Document Line Number | Enter the document line number for the commission document. |
Click the OK button.
The Commission Serial(s) Result page appears displaying the number of serials that were successfully commissioned.
Click the OK button.
The serial numbers that were successful are commissioned and are updated with the information entered. The Serial Status for those serial numbers changes to Commissioned.
To Commission Serials (Edit Serial page)
Using the Edit Serial page you can commission individual serial numbers.
For more information on commissioning serials using the Edit Serial page, see Editing Serials.
To Commission Serials (Commission Serials page)
Navigate to the Commission Serials page.
This page can be accessed from the Task menu in OPSM or it can be invoked from an external system.
To Invoke the Commission Serials Page in OPSM from an External System
Call the URL to invoke the Commission Serials page passing the parameter values:
| Parameter Name | Description |
|---|---|
| page | ‘commissionSerials’ |
| lot | The lot number used to commission the serials. |
| key | The item in the external system to be cross referenced to a product in OPSM. |
| unit | The unit of measure of the item to be cross referenced to a product packaging unit in OPSM. |
| loc | The location identifier for the item in the external system. |
| docOrg | The organization from which the work order document originates. |
| doc | The document number that will be associated with the commissioned serials. |
| docType | The document type that will be associated with the commissioned serials. |
| docLine | The document line number that will be associated with the commissioned serials. |
| comQty | The completed quantity from the work order. |
| qty | The transaction quantity from the work order. |
| src | The identifier for the external system that invoked OPSM (for example, EBIZ_01). |
If prompted for user authentication, enter your user ID and password.
Commission Serials page (Invoked from External System)
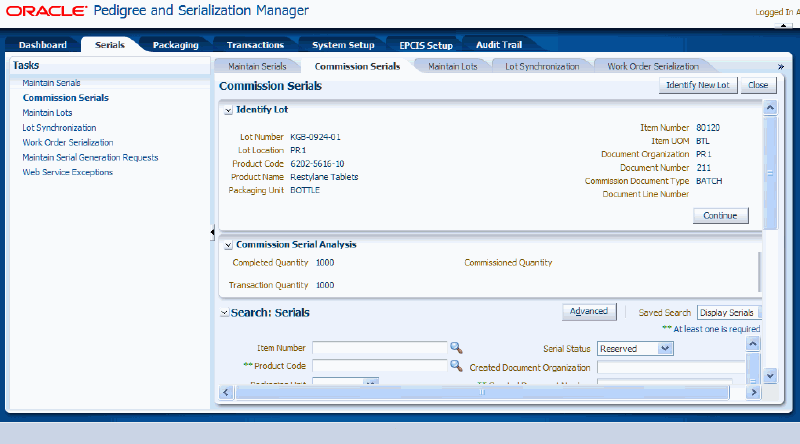
The Commission Serials page appears.
Enter the following information in the Identify Lot region of the page:
| Field Name | Description |
|---|---|
| Lot Number | Select the lot number you want to commission serials to. If you invoke this page from an external system, the lot number from the work order will appear by default. |
| Lot Location | The lot location associated with the lot number selected displays. |
| Product Code | The product code associated with the lot number selected displays. |
| Product Name | The product name associated with the product code displays. |
| Packaging Unit | The packaging unit associated with the product code displays. Packaging unit is user defined using the Lookup Type PAS_PACKAGE_UNIT. |
| Item Number | The item number associated with the lot number and product code selected displays. If you invoke this page from an external system, the item number from the work order will appear by default. This field does not appear if you access this page directly within OPSM. |
| Item UOM | The item UOM associated with the item number displays. If you invoke this page from an external system, the item UOM from the work order will appear by default. This field does not appear if you access this page directly within OPSM. |
| Document Organization | Enter the organization for the document that will be used for the commissioning of the serials. If you invoke this page from an external system, the document organization from the work order will appear by default. |
| Document Number | Enter the document number for the commissioning of the serials. If you invoke this page from an external system, the document number from the work order will appear by default. |
| Document Type | Select the type of document used for the commissioning of the serials. Document types are user defined using Lookup Type PAS_DOCUMENT_TYPE. If you invoke this page from an external system, the document type from the work order will appear by default. |
| Document Line Number | Enter the document line number of the document for the commissioning of serials. If you invoke this page from an external system, the document line number from the work order will appear by default. |
If you invoke this page from an external system, the OPSM Commission Serials page is called asynchronously. The product and lot information is passed to this page. The Completed Quantity and Transaction Quantity fields in the Commission Serial Analysis region of the page will appear by default from the work order. These fields do not appear if you access this page within OPSM directly.
Click the Continue button.
Commission Serials page (1 of 2)
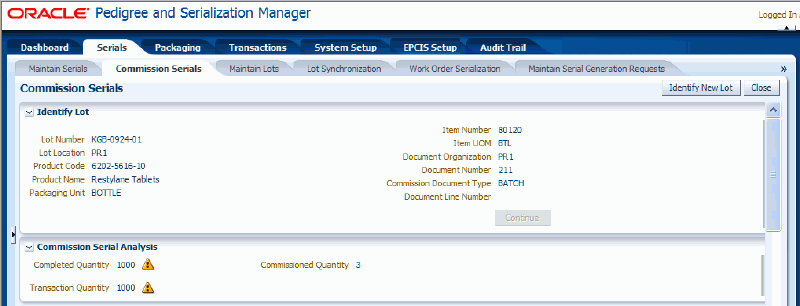
Commission Serials page (2 of 2)
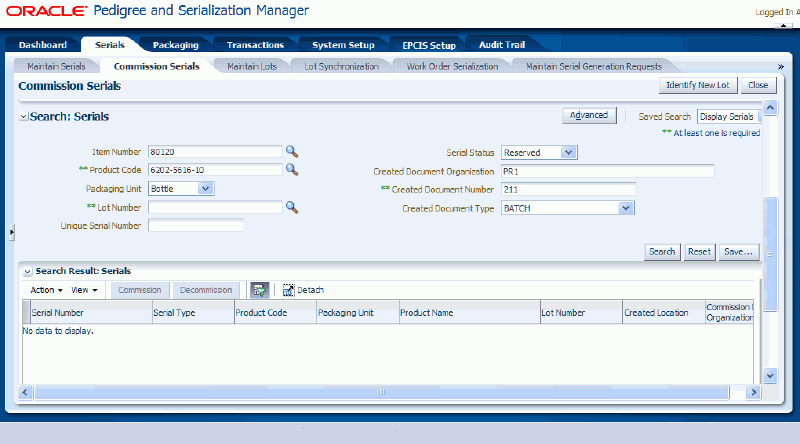
The system displays in the Commission Serial Analysis region the Commissioned Quantity for the lot and product code. It will also display a yellow triangle with an exclamation point (warning) icon next to the Completed Quantity and Transaction Quantity fields if these quantities do not equal the Commissioned Quantity.
In the Search: Serials region of the page the fields are populated with the same field values that you entered in the Identify Lot region of the page. Reserved appears by default in the Serial Status field. These are just default values and they can be overridden.
(Optional) Enter search criteria for the serials you want to commission using one of these methods:
To Search for Serials (Basic Method)
In the Search: Serials region, enter the search criteria for the serials using one or more of these fields:
| Field Name | Description |
|---|---|
| Item Number | (Optional) Select the item number associated with the serials. This is the transactional systems item number. It is used to find the Product Code to perform the search. Serials are created using product code so the item number search is merely a way for you to search for the correct product code. When you select the Item Number, the Product Code field is automatically populated. If you clear the Item Number, then the Product Code field gets cleared as well. |
| Product Code | Select the product code associated with the serials. |
| Packaging Unit | (Optional) Select the packaging unit associated with the serials. Packaging unit is user defined using the Lookup Type PAS_PACKAGE_UNIT. |
| Lot Number | Select the lot number associated with the serials. |
| Unique Serial Number | (Optional) Enter a unique serial number. |
| Serial Status | (Optional) Select the serial status for the serials. Values are: Commissioned, Decommissioned, and Reserved. Reserved appears by default. |
| Created Document Organization | (Optional) Enter the organization for the document that created the serial number. |
| Created Document Number | Enter the document number that was used to create the serial number. |
| Created Document Type | (Optional) Select the type of document that created the serial number. Document types are user defined using Lookup Type PAS_DOCUMENT_TYPE. |
To Search for Serials (Advanced Method)
Click the Advanced button to perform an advanced search.
Use the Advanced Search functionality to perform a more detailed search for specific serial numbers. Field operators associated with the search criteria fields can be used during an Advanced Search so that a range of serial numbers can be easily retrieved.
(Optional) In the Search: Serials region, enter the search criteria for the serials using one or more of these fields:
| Field Name | Description |
|---|---|
| Item Number | Select the field operator and then select the item number for the product. Operators are:
This is the transactional systems item number. It is used to find the Product Code to perform the search. Serials are created using product code so the item number search is merely a way for you to search for the correct product code. When you select the Item Number, the Product Code field is automatically populated. If you clear the Item Number, then the Product Code field gets cleared as well. |
| Product Code | Select the field operator and then select the product code. The field operators are the same as that for the Item Number field. |
| Packaging Unit | (Optional) Select the field operator and then select the packaging unit. Packaging unit is user defined using the Lookup Type PAS_PACKAGE_UNIT. The field operators are the same as that for the Item Number field. |
| Lot Number | Select the field operator and then select the lot number for the product code. The field operators are the same as that for the Item Number field. |
| Unique Serial Number | (Optional) Select the field operator and then enter a unique serial number. Operators are:
|
| Serial Status | (Optional) Select the field operator and then select the serial status. Values are: Commissioned, Decommissioned, and Reserved. Reserved appears by default. The field operators are the same as that for the Item Number field. |
| Created Document Organization | (Optional) Select the field operator and then enter the organization for the document that created the serial number. The field operators are the same as that for the Item Number field. |
| Created Document Number | Select the field operator and then enter the document number that was used to create the serial number. The field operators are the same as that for the Item Number field. |
| Created Document Type | (Optional) Select the field operator and then enter the type of document that created the serial number. Document types are user defined using Lookup Type PAS_DOCUMENT_TYPE. The field operators are the same as that for the Item Number field. |
(Optional) To enter additional search criteria fields, click the Add Fields button and select the field you would like to add to the search criteria.
The selected field appears as a search criteria field.
Note: To remove the additional field, click the Remove icon next to the field. The field will be removed from the search criteria.
(Optional) Enter search criteria for the additional fields.
Click the Search button.
Commission Serials page (1 of 2)
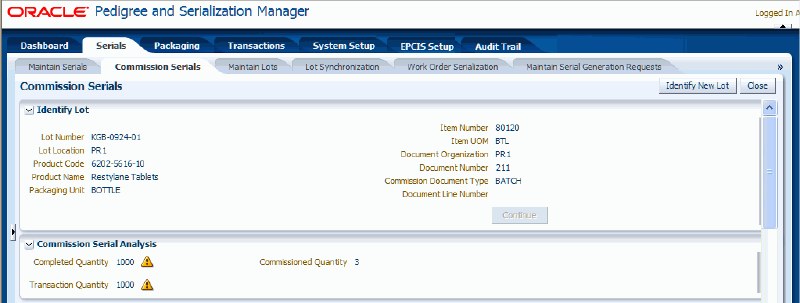
Commission Serials page (2 of 2)
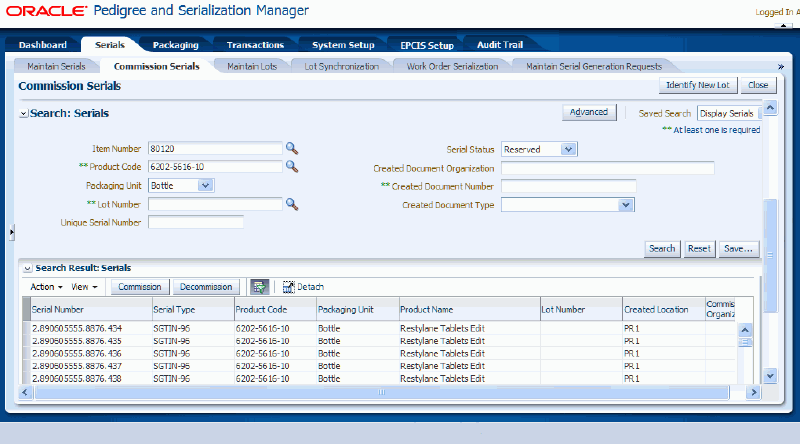
All of the serials that match the search criteria appear in the Search Results: Serials region in a table format. For each serial number the following information displays:
| Field Name | Description |
|---|---|
| Serial Number | Displays the serial number. |
| Serial Type | Displays the serial type associated with the serial number. |
| Product Code | Displays the product code associated with the serial number. |
| Packaging Unit | Displays the packaging unit associated with the serial number. Packaging unit is user defined using the Lookup Type PAS_PACKAGE_UNIT. |
| Product Name | Displays the product name for the product. |
| Lot Number | Displays the lot number associated with the product. |
| Created Location | Displays the location that created the serial number. |
| Commission Document Organization | Displays the organization for the document used for commissioning the serial. |
| Commission Document | Displays the document number that was used to commission the serial. |
| Commission Document Type | Displays the document type associated with the commission document. Document types are user defined using Lookup Type PAS_DOCUMENT_TYPE. |
| Commission Document Line Number | Displays the commission document line number. |
| Serial Status | Displays the status of the serial number. Values are: Reserved, Commissioned, and Decommissioned. |
| Counterfeit Status | Displays the counterfeit status for the serial number. Values are: Counterfeit, Suspect Counterfeit, or Verified Not Counterfeit. |
| Counterfeit Date | Displays the date the serial number was detected as being Counterfeit or Suspect Counterfeit. |
| Reason Code | Displays the reason code used when decommissioning a serial number. This is required if decommissioning a serial. |
| Created Document Number | Displays the document number that was used to create the serial number. |
| Created Document Type | Displays the document type associated with the document. Document Types are user defined using Lookup Type PAS_DOCUMENT_TYPE. |
Select one or more serial numbers in the table that you want to commission.
When commissioning multiple serials at one time, select the serials with the same serial type and product code. Also, avoid selecting multiple serials where one or more of them has a Returned serial state.
The system will give you a message and won't allow you to commission multiple serials in these conditions:
Selecting multiple serials numbers with different serial types.
Selecting multiple serials numbers with the same serial types but they have different product codes.
Selecting multiple serials numbers with the same serial type and one or more of the serials numbers has a serial state of Returned and the returned serial number contains a different product code or lot number.
Note: Use Ctrl or Shift buttons on your keyboard to select multiple serial numbers in the table.
Commission Serials page (1 of 2)
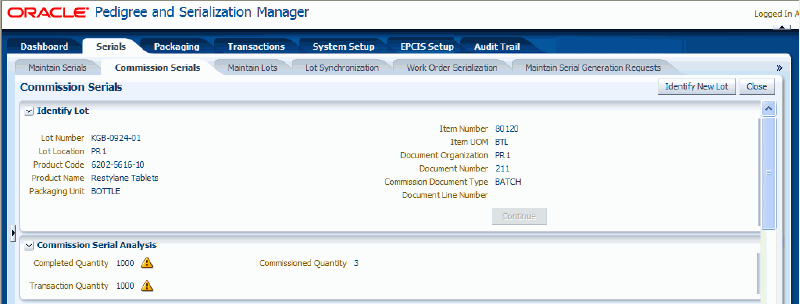
Commission Serials page (2 of 2)
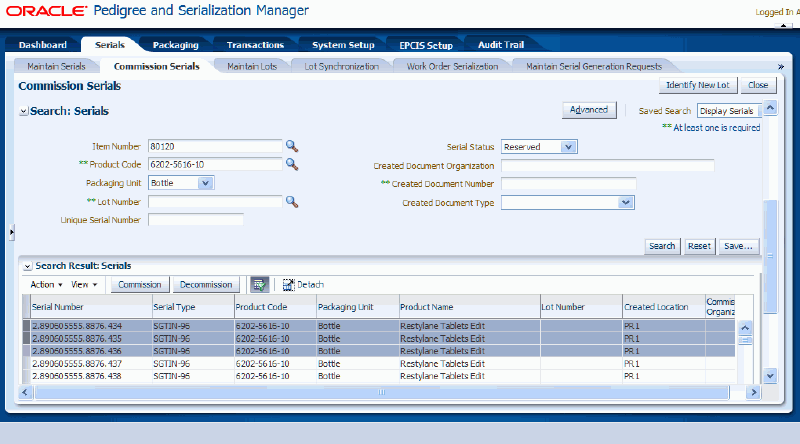
Select Commission in the Action menu or click the Commission button located at the top of the Search Results: Serials region.
Commission Serial(s) page
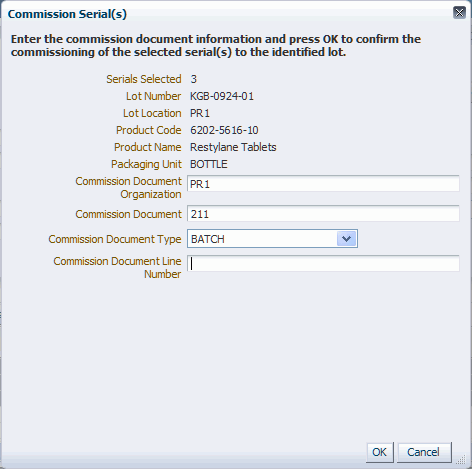
The Commission Serial(s) page appears displaying the number of serials selected, lot information, product information, and packaging unit for the serial numbers you selected. If you invoke this page from an external system, the Commission Document Organization, Commission Document, Commission Document Type, and Commission Document Line Number from the work order will appear by default.
(Optional) Enter the following commission document information:
| Field Name | Description |
|---|---|
| Commission Document Organization | Enter the organization for the commission document. |
| Commission Document | Enter the commission document number. |
| Commission Document Type | Select the type for the commission document. Document Types are user defined using the Lookup Type (PAS_DOCUMENT_TYPE). |
| Commission Document Line Number | Enter the document line number for the commission document. |
Click the OK button.
The Commission Serial(s) Result page appears displaying the number of serials that were successfully commissioned.
Click the OK button.
Commission Serials page (1 of 2)
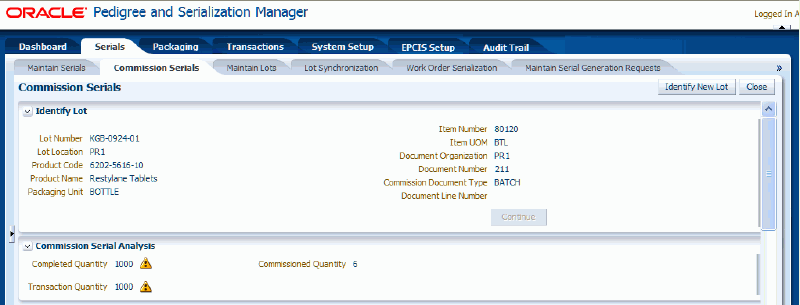
Commission Serials page (2 of 2)
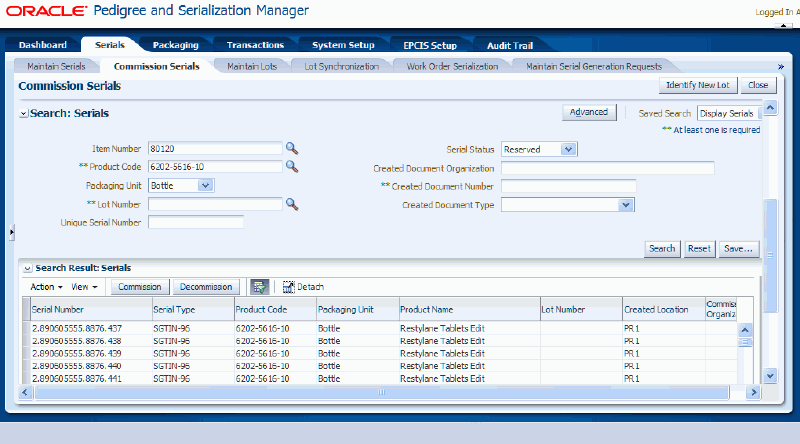
The serial numbers that were successful are commissioned and are updated with the information entered. The Serial Status for those serial numbers changes to Commissioned. and the Commissioned Quantity in the Commission Serial Analysis region is updated with the number of serials successfully commissioned.
(Optional) Click Identify Lot button at the top of the page if you want to commission serials to a different lot.
Repeat steps 2 - 10 for the new lot and product code.
Click the Close button at the top of the page to close the Commission Serials page.
Use the Maintain Serials page, Edit Serial page, and Commission Serials page in Oracle Pedigree and Serialization Manager (OPSM) to decommission serials.
OPSM can be integrated with external transactional systems to decommission serials based on the lot and item cross reference information passed between the systems. From the external system you can call the Commission Serials page. If you have not previously signed into OPSM, you will be prompted for user authentication. After successful authentication, you can use the Commission Serials page to select serials within OPSM to decommission.
Use these procedures to decommission serials:
To Decommission Serials (Maintain Serials page)
Navigate to the Maintain Serials page.
Enter search criteria for the serials you want to decommission and click the Search button.
All of the serials that match the search criteria appear in the Search Results: Serials table.
Select one or more serial numbers in the table that you want to decommission.
Note: Use Ctrl or Shift buttons on your keyboard to select multiple serial numbers in the table.
Select Decommission Serials in the Actions menu or click the Decommission Serials button located at the top of the Search Results: Serials region.
The Decommission Serial(s) page appears displaying a message asking if you are sure you want to decommission these serials numbers and it requests that you select a Reason Code. Reason code is required for decommissioning a serial.
Select a Reason Code for the serial decommission and click the Yes button.
The selected serial numbers are decommissioned. The Serial Status for the serial numbers changes to Decommissioned and a reason code is identified.
To Decommission Serials (Edit Serial page)
Using the Edit Serial page you can decommission individual serial numbers.
For more information on decommissioning serials using the Edit Serial page, see Editing Serials.
To Decommission Serials (Commission Serials page)
Navigate to the Commission Serials page.
This page can be accessed from the Task menu in OPSM or it can be invoked from an external system.
To Invoke the Commission Serials Page in OPSM from an External System
Call the URL to invoke the Commission Serials page passing the parameter values:
| Parameter Name | Description |
|---|---|
| page | ‘commissionSerials’ |
| lot | The lot number used to commission the serials. |
| key | The item in the external system to be cross referenced to a product in OPSM. |
| unit | The unit of measure of the item to be cross referenced to a product packaging unit in OPSM. |
| loc | The location identifier for the item in the external system. |
| docOrg | The organization from which the work order document originates. |
| doc | The document number that will be associated with the commissioned serials. |
| docType | The document type that will be associated with the commissioned serials. |
| docLine | The document line number that will be associated with the commissioned serials. |
| comQty | The completed quantity from the work order. |
| qty | The transaction quantity from the work order. |
| src | The identifier for the external system that invoked OPSM (for example, EBIZ_01). |
If prompted for user authentication, enter your user ID and password.
Commission Serials page (Invoked from an External System)
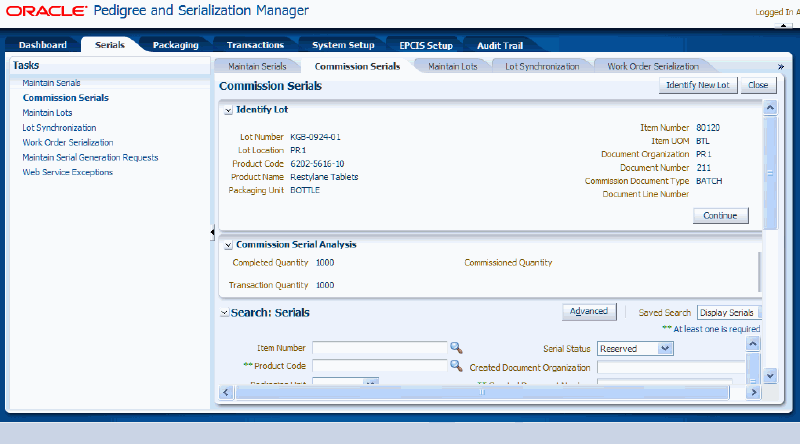
The Commission Serials page appears.
Enter the following information in the Identify Lot region of the page:
| Field Name | Description |
|---|---|
| Lot Number | Select the lot number you want to decommission serials from. If you invoke this page from an external system, the lot number from the work order will appear by default. |
| Lot Location | The lot location associated with the lot number selected displays. |
| Product Code | The product code associated with the lot number selected displays. |
| Product Name | The product name associated with the product code displays. |
| Packaging Unit | The packaging unit associated with the product code displays. Packaging unit is user defined using the Lookup Type PAS_PACKAGE_UNIT. |
| Item Number | The item number associated with the lot number and product code selected displays. If you invoke this page from an external system, the item number from work order will appear by default. This field does not appear if you access this page directly within OPSM. |
| Item UOM | The item UOM associated with the item number displays. If you invoke this page from an external system, the item UOM from the work order will appear by default. This field does not appear if you access this page directly within OPSM. |
| Document Organization | Enter the organization for the document that will be used for the decommissioning of the serials. If you invoke this page from an external system, the document organization from the work order will appear by default. |
| Document Number | Enter the document number for the decommissioning of the serials. If you invoke this page from an external system, the document number from the work order will appear by default. |
| Document Type | Select the type of document used for the decommissioning of the serials. Document types are user defined using Lookup Type PAS_DOCUMENT_TYPE. If you invoke this page from an external system, the document type from the work order will appear by default. |
| Document Line Number | Enter the document line number of the document for the decommissioning of serials. If you invoke this page from an external system, the document line number from the work order will appear by default. |
If you invoke this page from an external system, the OPSM Commission Serials page is called asynchronously. The product and lot information is passed to this page. The Completed Quantity and Transaction Quantity fields in the Commission Serial Analysis region of the page will appear by default from the work order. These fields do not appear if you access this page within OPSM directly.
Click the Continue button.
Commission Serials page (1 of 2)
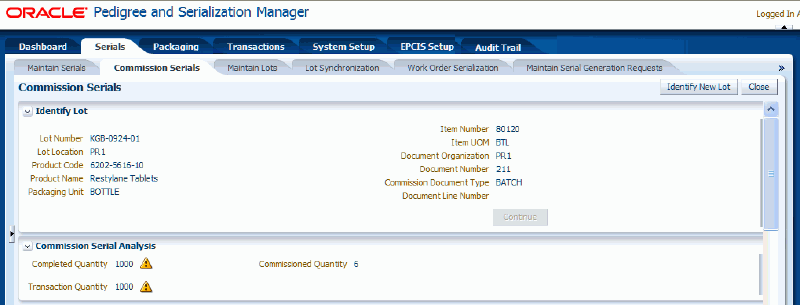
Commission Serials page (2 of 2)
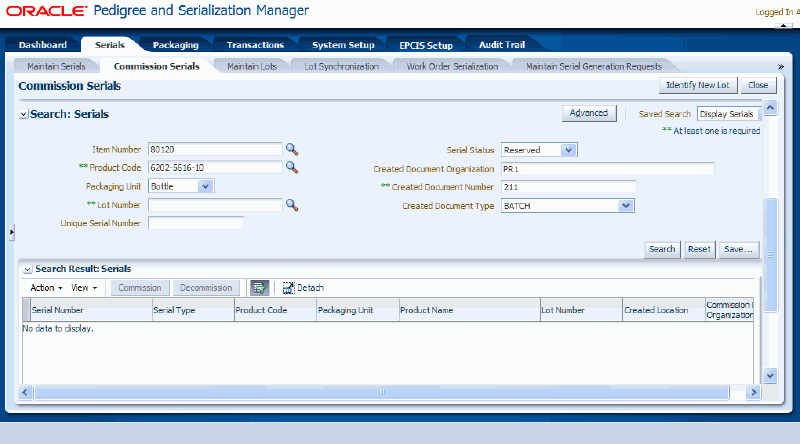
The system displays in the Commission Serial Analysis region the Commissioned Quantity for the lot and product code. It will also display a yellow triangle with an exclamation point (warning) icon next to the Completed Quantity and Transaction Quantity fields if these quantities do not equal the Commissioned Quantity.
In the Search: Serials region of the page the fields are populated with the same field values that you entered in the Identify Lot region of the page. Reserved appears by default in the Serial Status field. These are just default values and they can be overridden.
(Optional) Enter search criteria for the serials you want to decommission using one of these methods:
To Search for Serials (Basic Method)
In the Search: Serials region, enter the search criteria for the serials using one or more of these fields:
| Field Name | Description |
|---|---|
| Item Number | (Optional) Select the item number associated with the serials. This is the transactional systems item number. It is used to find the Product Code to perform the search. Serials are created using product code so the item number search is merely a way for you to search for the correct product code. When you select the Item Number, the Product Code field is automatically populated. If you clear the Item Number, then the Product Code field gets cleared as well. |
| Product Code | Select the product code associated with the serials. |
| Packaging Unit | (Optional) Select the packaging unit associated with the serials. Packaging Unit is user defined using the Lookup Type PAS_PACKAGE_UNIT. |
| Lot Number | Select the lot number associated with the serials. |
| Unique Serial Number | (Optional) Enter a unique serial number. |
| Serial Status | (Optional) Select the serial status for the serials. Values are: Commissioned, Decommissioned, and Reserved. Reserved appears by default. You can only decommission serials that are in a Reserved or Commissioned Serial Status. |
| Created Document Organization | (Optional) Enter the organization for the document that created the serial number. |
| Created Document Number | Enter the document number that was used to create the serial number. |
| Created Document Type | (Optional) Select the type of document that created the serial number. Document types are user defined using Lookup Type PAS_DOCUMENT_TYPE. |
To Search for Serials (Advanced Method)
Click the Advanced button to perform an advanced search.
Use the Advanced Search functionality to perform a more detailed search for specific serial numbers. Field operators associated with the search criteria fields can be used during an Advanced Search so that a range of serial numbers can be easily retrieved.
(Optional) In the Search: Serials region, enter the search criteria for the serials using one or more of these fields:
| Field Name | Description |
|---|---|
| Item Number | Select the field operator and then select the item number for the product. Operators are:
This is the transactional systems item number. It is used to find the Product Code to perform the search. Serials are created using product code so the item number search is merely a way for you to search for the correct product code. When you select the Item Number, the Product Code field is automatically populated. If you clear the Item Number, then the Product Code field gets cleared as well. |
| Product Code | Select the field operator and then select the product code. The field operators are the same as that for the Item Number field. |
| Packaging Unit | (Optional) Select the field operator and then select the packaging unit. Packaging unit is user defined using the Lookup Type PAS_PACKAGE_UNIT. The field operators are the same as that for the Item Number field. |
| Lot Number | Select the field operator and then select the lot number for the product code. The field operators are the same as that for the Item Number field. |
| Unique Serial Number | (Optional) Select the field operator and then enter a unique serial number. Operators are:
|
| Serial Status | (Optional) Select the field operator and then select the serial status. Values are: Commissioned, Decommissioned, and Reserved. Reserved appears by default. You can only decommission serials that are in a Reserved or Commissioned Serial Status. The field operators are the same as that for the Item Number field. |
| Created Document Organization | (Optional) Select the field operator and then enter the organization for the document that created the serial number. The field operators are the same as that for the Item Number field. |
| Created Document Number | Select the field operator and then enter the document number that was used to create the serial number. The field operators are the same as that for the Item Number field. |
| Created Document Type | (Optional) Select the field operator and then enter the type of document that created the serial number. Document types are user defined using Lookup Type PAS_DOCUMENT_TYPE. The field operators are the same as that for the Item Number field. |
(Optional) To enter additional search criteria fields, click the Add Fields button and select the field you would like to add to the search criteria.
The selected field appears as a search criteria field.
Note: To remove the additional field, click the Remove icon next to the field. The field will be removed from the search criteria.
(Optional) Enter search criteria for the additional fields.
Click the Search button.
Commission Serials page (1 of 2)
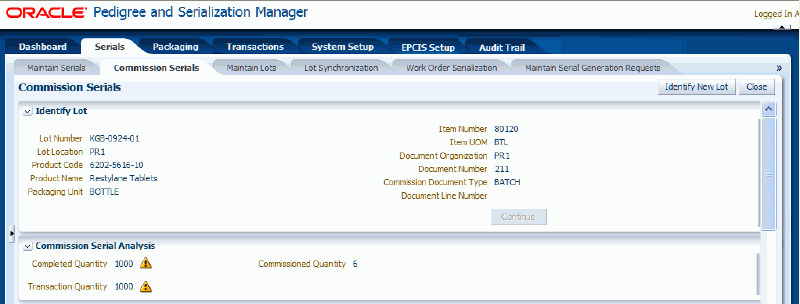
Commission Serials page (2 of 2)
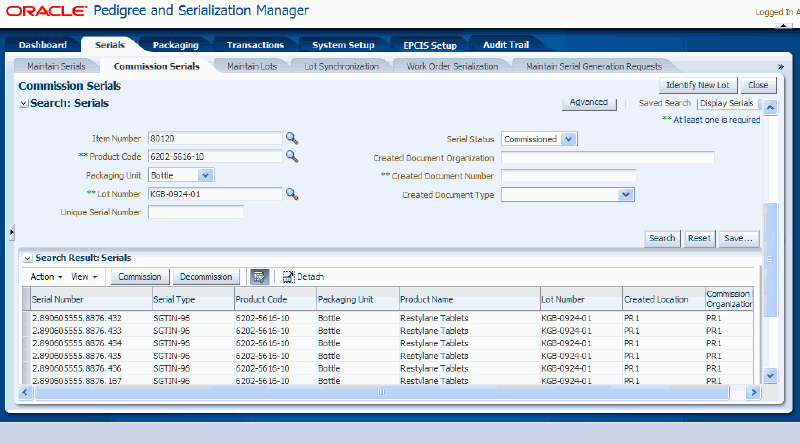
All of the serials that match the search criteria appear in the Search Results: Serials region in a table format. For each serial number the following information displays:
| Field Name | Description |
|---|---|
| Serial Number | Displays the serial number. |
| Serial Type | Displays the serial type associated with the serial number. |
| Product Code | Displays the product code associated with the serial number. |
| Packaging Unit | Displays the packaging unit associated with the serial number. Packaging unit is user defined using the Lookup Type PAS_PACKAGE_UNIT. |
| Product Name | Displays the product name for the product. |
| Lot Number | Displays the lot number associated with the product. |
| Created Location | Displays the location that created the serial number. |
| Commission Document Organization | Displays the organization for the document used for commissioning the serial. |
| Commission Document | Displays the document number that was used to commission the serial. |
| Commission Document Type | Displays the document type associated with the commission document. Document types are user defined using Lookup Type PAS_DOCUMENT_TYPE. |
| Commission Document Line Number | Displays the commission document line number. |
| Serial Status | Displays the status of the serial number. Values are: Reserved, Commissioned, and Decommissioned. |
| Counterfeit Status | Displays the counterfeit status for the serial number. Values are: Counterfeit, Suspect Counterfeit, or Verified Not Counterfeit. |
| Counterfeit Date | Displays the date the serial number was detected as being Counterfeit or Suspect Counterfeit. |
| Reason Code | Displays the reason code used when decommissioning a serial number. This is required if decommissioning a serial. |
| Created Document Number | Displays the document number that was used to create the serial number. |
| Created Document Type | Displays the document type associated with the document. Document Types are user defined using Lookup Type PAS_DOCUMENT_TYPE. |
Select one or more serial numbers in the table that you want to decommission.
Note: Use Ctrl or Shift buttons on your keyboard to select multiple serial numbers in the table.
Commission Serials page (1 of 2)

Commission Serials page (2 of 2)
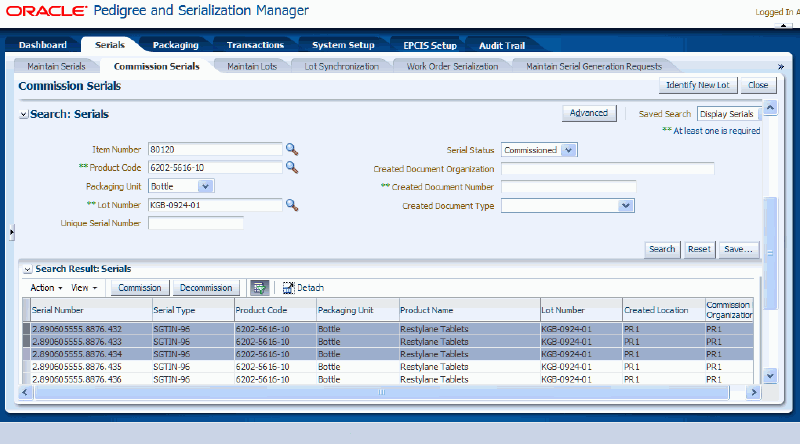
Select Decommission in the Action menu or click the Decommission button located at the top of the Search Results: Serials region.
Decommission Serial(s) page
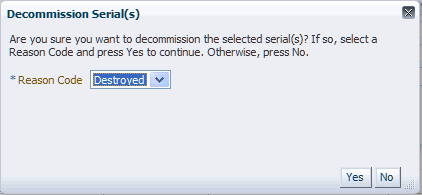
The Decommission Serial(s) page appears displaying a message asking if you are sure you want to decommission these serials numbers and it requests that you select a Reason Code. Reason code is required for decommissioning a serial.
Select a Reason Code for the serial decommission and click the Yes button.
Commission Serials page (1 of 2)
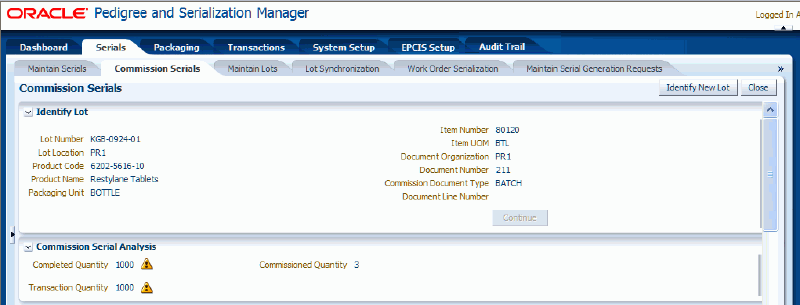
Commission Serials page (2 of 2)
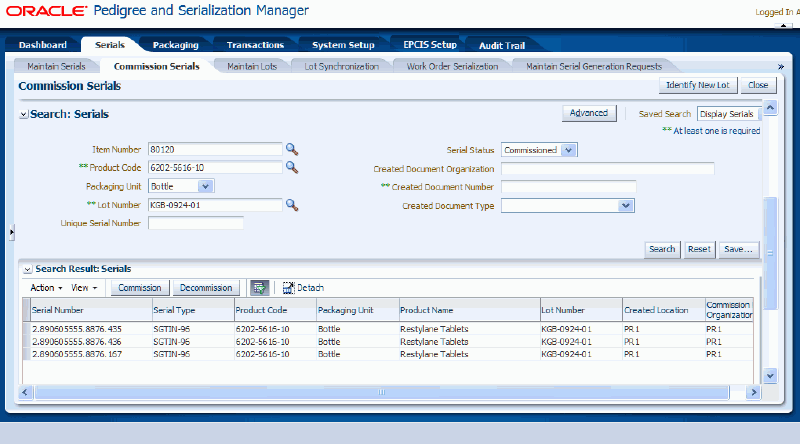
The selected serial numbers are decommissioned. The Serial Status for those serial numbers changes to Decommissioned and a reason code is identified. The Commissioned Quantity in the Commission Serial Analysis region is updated to reflect the number of serials successfully decommissioned.
(Optional) Click Identify Lot button at the top of the page if you want to decommission serials from a different lot.
Repeat steps 2 - 8 for the new lot and product code.
Click the Close button at the top of the page to close the Commission Serials page.
![]()
Copyright © 2013, Oracle and/or its affiliates. All rights reserved.