A Reference for Administrators
This appendix contains information for administrators who set up and maintain Oracle BI Mobile App Designer.
It includes the following topics:
-
Required Permissions to Use Oracle BI Mobile App Designer and Run Apps
-
Enabling Oracle BI EE 10g-Style Initialization Block Security
A.1 About the Apps Library
This section describes the Apps Library. It includes the following sections:
A.1.1 What Is the Apps Library?
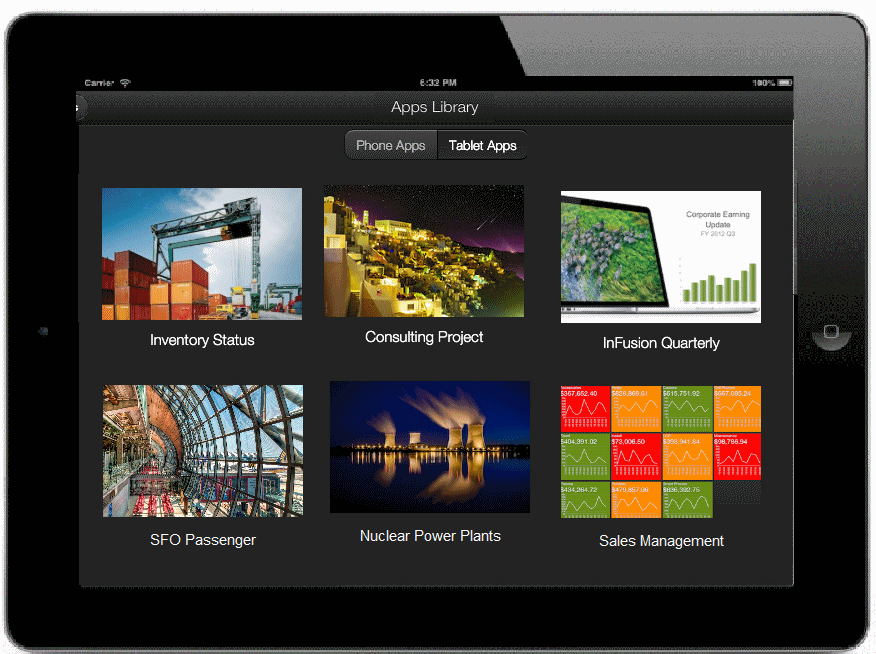
The Apps Library is where users view, manage, and subscribe to published apps from their mobile devices. When users navigate to the Apps Library URL from a browser they can choose to subscribe to the apps they have permission to access.
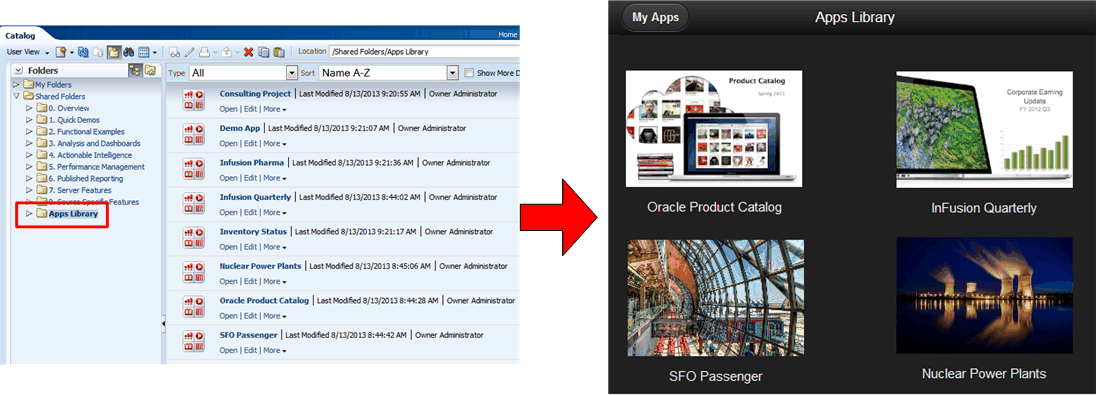
From the administrator's perspective, the Apps Library is a folder in the catalog configured to act as the library. When app designers publish an app it is copied to the Apps Library folder. When consumers open the Apps Library URL in their browsers they can interact with the apps that have been published to the folder.
A.1.2 What Happens When a User Subscribes to an App?
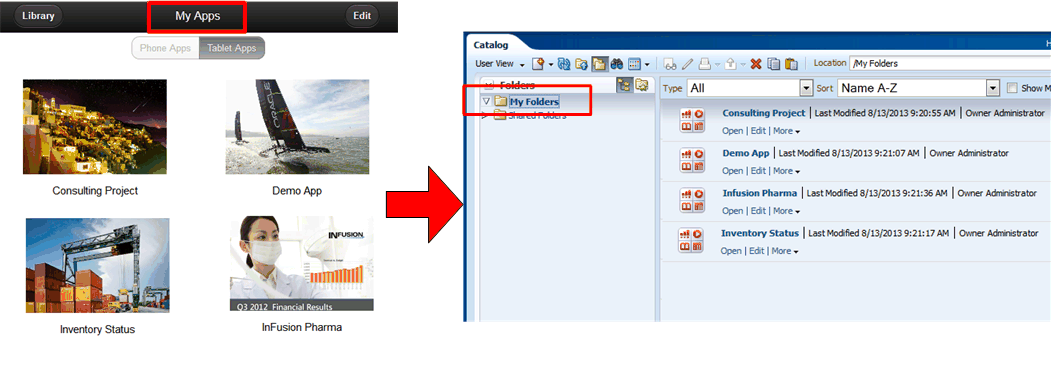
Subscribing to an app copies the app from the Apps Library to the user's My Folders folder in the catalog. This exposes the app in the user's My Apps library.
A.1.3 About Local and Remote Apps Libraries
You can configure a folder on the local instance to be the Apps Library where app designers publish their apps. You can also configure an instance to connect and publish to the Apps Library on another (remote) instance.
For example, suppose you have a development instance and a production instance. Both instances have a local Apps Library defined. The development instance has the production instance configured as a remote library. App designers using the development instance publish their apps to the local (development) instance during design time to test and review. When apps are ready for production you can use the Publish option from the development instance to publish the app to the production instance using the remote Apps Library option.
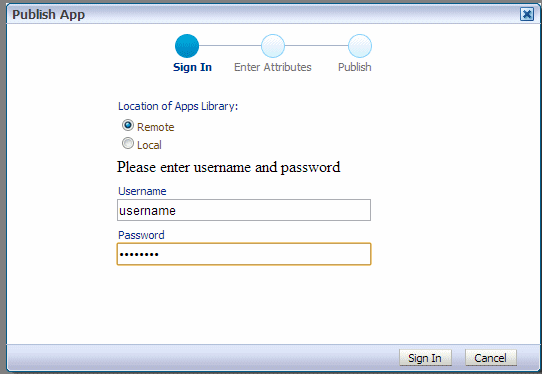
Figure A-4 shows the Remote and Local options available to select the location of the Apps Library that you publish to.
A.2 Setting Up the Apps Library Locations
The following sections describe setting up an Apps Library and enabling connection to publish to a remote server.
A.2.1 Setting Up a Local Apps Library
To set up a local Apps Library to create an Apps Library on the same instance, perform the following:
A.2.1.1 Create the Apps Library Folder in the Catalog
To create a folder in the catalog:
-
On the Catalog page, select Shared Folders.
-
In the catalog toolbar, click New and select Folder.
-
Enter the folder name and click OK, as shown in Figure A-5.
-
Set Permissions on the Apps Library folder. App designers that will be publishing apps to the folder must have Write permissions. App consumers that will be viewing apps in the library must have Read permissions.
A.2.1.2 Set Up the Configuration File
To register the folder in the catalog designated as the Apps Library you add a property entry to the xmlp-server-config.xml configuration file.
To set up the configuration file:
-
Open the
xmlp-server-config.xmlfile. It is located under<DOMAIN_HOME>/config/bipublisher/repository/Admin/Configuration. -
Add the following property to
xmlp-server-config.xml:Property:
APPS_LIBRARY_FOLDER_LOCALDescription: Specifies the folder in the catalog to act as the Apps Library. Enter the path to the folder under Shared Folders that you created in the previous step (do not include "Shared Folders" in the path).
Sample Configuration File Entry:
<property name="APPS_LIBRARY_FOLDER_LOCAL" value="/Apps Library"/>
-
Restart the
bimad(BI Mobile App Designer) application in the WebLogic Server Administration Console.
A.2.2 Enabling Remote Connection to an Apps Library on Another Instance
Set up a remote Apps Library connection when you want to Publish apps that reside on one instance to the Apps Library that resides in the catalog of another instance. To enable connection to a remote Apps Library, register the connection information in the configuration file of the instance from which you want to connect.
To enable connection to a remote Apps Library:
-
Open the
xmlp-server-config.xmlfile. It is located under<DOMAIN_HOME>/config/bipublisher/repository/Admin/Configuration. -
Add the following properties to
xmlp-server-config.xml:Property Description Sample Configuration File Entry APPS_LIBRARY_FOLDER_REMOTESpecifies the Apps Library folder in the catalog on the remote server. <property name="APPS_LIBRARY_FOLDER_REMOTE" value="/Apps Library"/>MOBILE_APP_REMOTE_SERVERSpecifies the remote server where the APPS_LIBRARY_FOLDER_REMOTEresides. Setting this property enables connection to Publish apps to the remote Apps Library.<property name="MOBILE_APP_REMOTE_SERVER" value="http://example.com:7001/mobile/"/>The following sample shows example entries when both a local and remote Apps Library are defined:
<property name="APPS_LIBRARY_FOLDER_REMOTE" value="/Apps Library"/>
<property name="MOBILE_APP_REMOTE_SERVER" value="http://example.com:7001/mobile/"/>
<property name="APPS_LIBRARY_FOLDER_LOCAL" value="/Apps Library Test"/>
-
Restart the
bimad(BI Mobile App Designer) application from the WebLogic Server Administration Console.
A.3 Sharing Access to the Apps Library with App Consumers
The URL for the Apps Library is of the form:
http://<hostname>:<port>/mobile/appstore/
After you configure the Apps Library, you can provide users with this URL to open in the device browser and bookmark for later use.
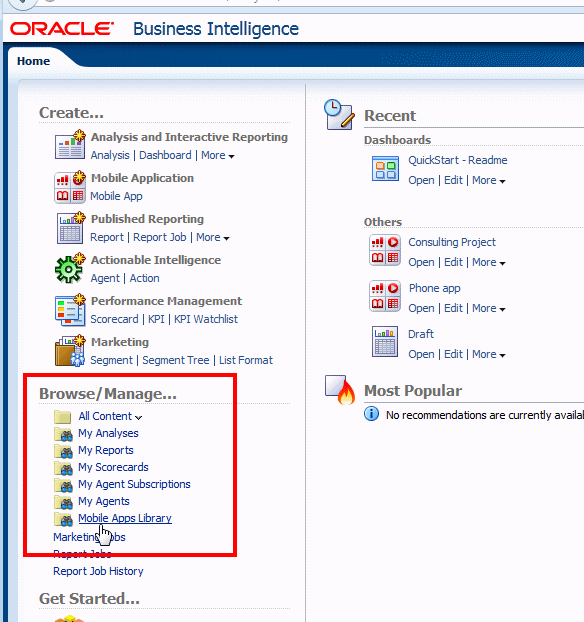
Users can also access the Apps Library URL from the Oracle Business Intelligence home page under the Browse/Manage region.
A.4 Securing Apps in the Apps Library
Typically you configure the Apps Library to be accessible to all users who will be running apps. To ensure that users can only run apps appropriate for their roles, apply permissions specifically to each app. When using the Publish feature to promote apps to the Apps Library, Oracle recommends applying the permissions to the app before Publish. When the app is promoted to the Apps Library it maintains the original permission settings.
For information on setting permissions in the catalog, see "Managing Objects in the Oracle BI Presentation Catalog" in the Oracle Fusion Middleware User's Guide for Oracle Business Intelligence Enterprise Edition.
A.5 Required Permissions to Use Oracle BI Mobile App Designer and Run Apps
The default permissions assigned to the BI Author role enable the use of the Mobile App Designer. To save apps to a specific folder the user's role must also have write permissions on the target folder.
The default permissions assigned to the BI Consumer role enable viewing apps.
If you create custom roles, the following are required:
Table A-1 Required Permissions for Mobile App Designer
| Function | Required Permission | Included In |
|---|---|---|
|
Create apps |
oracle.bi.publisher.developReport |
BI Author |
|
Create apps that use BI Subject Area or Excel spreadsheet as the data source |
oracle.bi.publisher.developLightDataModel |
BI Author |
|
View apps |
oracle.bi.publisher.runReportOnline |
BI Consumer |
App consumers must also have appropriate permissions on the app data sources; for example, if your data source is a BI Publisher data model, the role must be granted access to that data source to view apps that run against the data source.
A.6 Moving Apps Between Environments
To move apps between development, test, and production environments, use the archive and unarchive feature available from the BI Presentation catalog. For more information about this feature, see the Oracle Fusion Middleware User's Guide for Oracle Business Intelligence Enterprise Edition.
Archiving enables you to bundle the entire catalog, specific folders, or multi-component objects as a .catalog file and upload the .catalog file to unarchive the data to another location in the catalog. This process enables you to transfer specific data across environments.
To create an archive file:
-
In the Catalog navigate to the folder or app to archive.
-
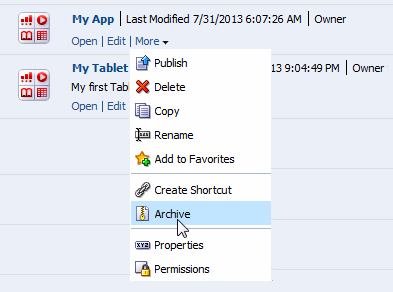
Select More, then Archive.
-
In the Archive dialog, specify to maintain or omit the permissions and timestamps for the folder or object.
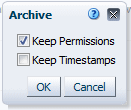
Keep Permissions: Use this option to maintain the object or folder's existing permissions. If you do not select this option, then the archiving process does not include any permissions. Upon unarchiving, the system assigns the parent folder's permissions to all of the objects and folders.
Keep Timestamps: Use this option to maintain the CreationTime, LastModified, and LastAccessed timestamps assigned to the object or folder. Upon unarchiving, the LastModified timestamp is updated to indicate the time at which the object or folder is unarchived. If you select this option, the Old option in the Paste Overview area of the Preferences dialog is available when unarchiving. You use the Old option to overwrite existing catalog items that are older than the catalog items in the archive.
If you do not select this option, then the archiving process does not include timestamp information and the Old option in the Paste Overview area of the Preferences dialog is not available.
-
Click OK to save the archive file.
To unarchive an archive file:
-
In the catalog, select the folder location where you want to upload the archive file.
-
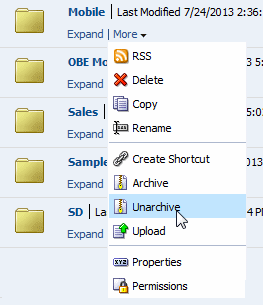
Select More, then Unarchive.
-
In the Unarchive dialog, browse for and select the archive file.
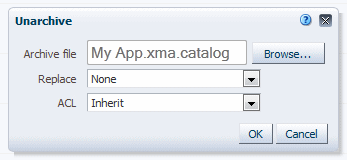
Replace: Use to specify if and how to replace an existing folder or object with the same name. Note the following options:
-
All — Select this option to replace any existing folders or objects with the same names as folders or objects included in the archive file that you are uploading.
-
Old — Select this option to replace folders or objects except those folders or objects that exist, unless they are older than the source.
-
None — Select this option to add any new folders or objects, but preserve any existing folders or objects.
-
Force — Select this option to add and replace all folders or objects.
ACL: Use to specify how the folders or objects are assigned permissions using Access Control Lists (ACLs) when unarchived. Note the following options:
-
Inherit — Inherits the folder or object's permissions (ACL) from its new parent folder.
-
Preserve — Preserves the folder or object's permissions (ACL) as it was in the original, mapping accounts as necessary.
-
Create — Preserves the folder or object's permissions (ACL) as it was in the original, creating and mapping accounts as necessary.
-
-
Click OK.
A.7 Adding Custom Maps
The map component supports custom region definitions. Provide the custom region definitions through a custom geoJSON format file; then update the configuration file to make it available to the Mobile App Designer map component.
-
Define your region definitions in a geoJSON format file. The files must be saved with the
.jsonextension. (See http://geojson.org/">>) -
Copy the geoJSON file to the Map directory in the BI Mobile App Designer repository:
<DOMAIN_HOME>/config/bipublisher/repository/Admin/Map.
-
Update the map-config.xml file to recognize your geoJSON file.
The map-config.xml file is also located in:
<DOMAIN_HOME>/config/bipublisher/repository/Admin/Map.
Sample entries in the map-config file are:
<?xml version="1.0"?>
<map-config>
  <geojson-list>
    <geojson file="world_countries.json" display-name="World Countries" label-column="NAME">
      <matcher type="property" name="NAME" case-sensitive="false"/>
      <matcher type="property" name="ISO2" case-sensitive="true"/>
      <matcher type="property" name="ISO3" case-sensitive="true"/>
    </geojson>
    <geojson file="usa_states.json" display-name="U.S. States" label-column="STATE_ABRV" projection="AlbersUSA">
      <matcher type="id" case-sensitive="false"/>
      <matcher type="property" name="STATE_ABRV" case-sensitive="false"/>
    </geojson>
    <geojson file="usa_counties.json" display-name="U.S. Counties" label-column="DISPLAY_NAME" projection="AlbersUSA" outline-file="usa_states_line.json">
      <matcher type="id" case-sensitive="false"/>
    </geojson>
  </geojson-list>
</map-config>
Add another <geojson> element to the map-config file to define the attributes for your custom geoJSON file. Each <geojson> element in the configuration file must have at least one <matcher> child element. The <matcher> element specifies how data is matched from your data source to the location definition in the geoJSON file.
The <geojson> element takes the following attributes:
Table A-2 Attributes of the <geojson> Element
| Attribute | Description |
|---|---|
|
file |
Required. The custom geojson file name residing in the Admin/Map folder. Example: "world_regions.json" |
|
display-name |
Required. The name for the map that displays in the selection list in the app designer. Example: "World Regions" |
|
label-column |
Optional. Specifies the attribute from the geoJSON file to use as the display label for locations on the map. The display label is shown when the Display Labels property is enabled for the map. Example: "STATE_ABRV" might be entered here to display the state abbreviation for each state on the map. |
|
projection |
Optional. Applies to maps of the USA only. Valid values are "Mercator" and "AlbersUSA". If not specified, maps of the USA use the "Mercator" projection. |
|
outline-file |
Optional. Applies to maps of the USA only. The outline-file provides enhanced border outlines of the US states. |
Following are the attributes for the child <matcher> element. You can have multiple <matcher> elements to provide multiple ways to map data fields to locations defined in the geoJSON file.
Table A-3 Attributes of the Child <matcher> Element
| Attribute | Description |
|---|---|
|
type |
Required. Valid values are "id" and "property". Specifies how to match a data field from the data source to a location defined in the geojson file. When set to "id" the commonly used identifier defined for the geoJSON object is used to match a data field to the location definition. When set to "property" you also must specify "name" attribute to specify the property in the geoJSON file to match to. |
|
name |
Required when type is "property". Not required when type is "id". The name of the property to match the data field value to in the geoJSON file. |
|
case-sensitive |
Values are: "true" or "false". Specifies whether the matcher field is case sensitive. |
For example:
In the World Countries geoJSON file, the commonly used identifier (_id) for each country is a three-letter country code (e.g. USA, JPN, or FRA). Because the map configuration file includes a matcher element of type "id", as long as your data also includes the same three-letter country codes to identify countries, your data will be mapped properly.
If you look more closely at the geoJSON file, you will notice that it includes more options for associating data values with the geographical polygons, specifically: "NAME","ISO2","ISO3","CONTINENT","ALT_REGION".
The map config file also includes three "property" matcher type entries for the World Countries map. The corresponding "name" attributes are "ISO2", "ISO3" and "NAME". These provide additional valid values for mapping your data to the World Countries map. So if your data includes the matching ISO2 code, ISO3 code, or Name to identify each country, your data will still be mapped properly (for example, JP, JPN, or JAPAN).
A.8 Activating Metadata Startup Cache to Improve Performance
BI Subject Area metadata such as dimension and measure names are cached in the server to improve the performance when opening the Designer or running apps. By default this caching occurs for a Subject Area the first time it is used by Mobile App Designer either for designing or running an app. For large subject areas the initial loading time can seem unacceptable to users.
You can avoid this initial load-time experience by activating metadata start-up cache. With the metadata start-up cache activated, all Subject Area metadata (that you specify) are loaded into cache when the Mobile App Designer server initially starts up. Because the cache is loaded before users begin running or designing apps, users do not experience the first-time load slowdown.
A.8.1 Configuring Metadata Cache on Startup
To activate metadata cache on startup, manually update the configuration file, xmlpserver-config.xml.
-
Navigate to the
xmlpserver-config.xmlfile located in:<DOMAIN_HOME>/config/bipublisher/repository/Admin/Configuration/ -
Locate the following three properties and update them as described in Table A-4:
Note:
If you upgraded from the 11.1.1.7 release of Mobile App Designer, you must add these properties toxmlpserver-config.xmlfile.Table A-4 Business View Cache Properties
Property Description BVCACHE_ALLOW_LOADING_AT_STARTUP
Set value="true" to turn on subject area metadata caching. The default is "false".
BVCACHE_LIST_OF_SUBJECT_AREAS
List the Subject Areas to cache at startup. Separate Subject Areas with a comma. For example:
<property name="BVCACHE_LIST_OF_SUBJECT_AREAS" value="Sales,Target Sales,Offices"/>
To cache all Subject Areas, use "*", for example:
<property name="BVCACHE_LIST_OF_SUBJECT_AREAS" value="*"/>
This property is active only when BVCACHE_ALLOW_LOADING_AT_STARTUP is set to true.
BVCACHE_DEFAULT_BIEE_USERNAME
Enter a username to connect to the Oracle BIEE system. This user does not need Administration privileges, but must have read access to the Subject Areas.
This property is active only when BVCACHE_ALLOW_LOADING_AT_STARTUP is set to true.
The following sample shows how the properties display in the xmlpserver-config.xml file:
<!-- Turn on/off the automatic subject area metadata cache loading
at the system startup time. Value can be true or false. The default is false.  ->
<property name="BVCACHE_ALLOW_LOADING_AT_STARTUP" value="true"/>

<!-- List of subject areas to load automatically at the startup time.
Separated by comma, or simply '*' to load all subject areas. ->
<property name="BVCACHE_LIST_OF_SUBJECT_AREAS" value="*"/>

<!-- The default username to connect to BIEE system to load subject areas.
This is mandatory for the automatic subject area business view loading. ->
<property name="BVCACHE_DEFAULT_BIEE_USERNAME" value="username"/>
Consider carefully when deciding the trade-off in slower initial start-up time versus better subsequent performance. If your system has hundreds of Subject Areas, consider defining a list of Subject Areas rather than using '*', otherwise the startup time of the Mobile App Designer application may be unacceptable. Focus on listing those Subject Areas with many tables and measures that cause the biggest hit to performance for end users.
A.8.2 Clearing the Subject Area Metadata Cache
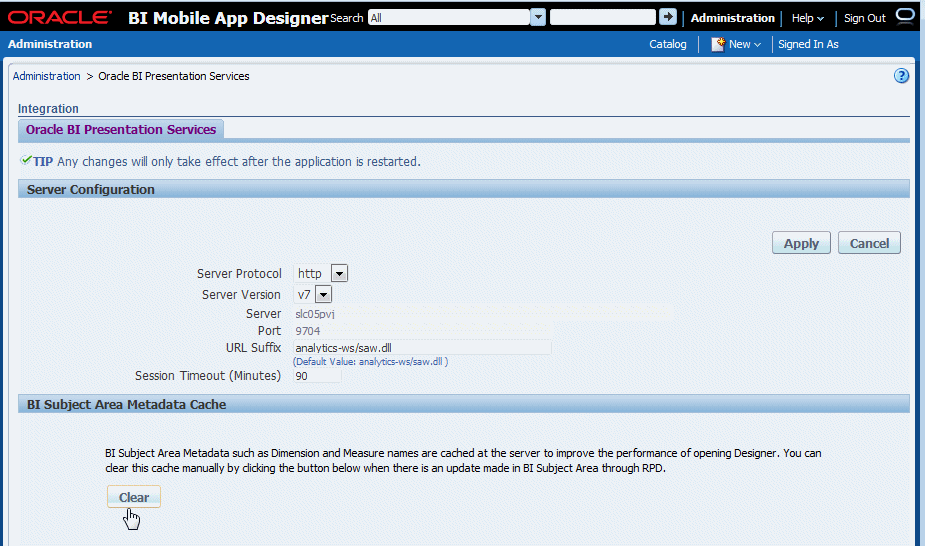
The cached Subject Area metadata remain in cache until you clear it. If you make any changes to your subject areas in the RPD, such as adding or deleting columns, you must follow this procedure for your changes to show up in Mobile App Designer.
Clearing the cache is a two-step process: You must refresh the cache from the Oracle BI Administration page and then also clear the cache from the BI Mobile App Designer Administration page.
To clear the Subject Area metadata cache:
-
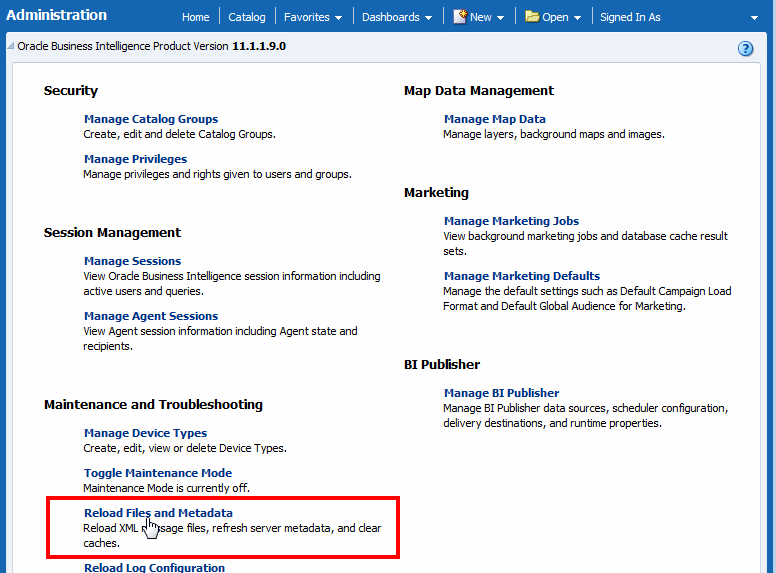
On the Oracle Business Intelligence header, click Administration.

-
On the Administration page, under Maintenance and Troubleshooting, click Reload Files and Metadata.
-
Next, launch the BI Mobile App Designer application directly from its URL:
http://<host>:<port>/mobile/and log in with Administrator credentials.
-
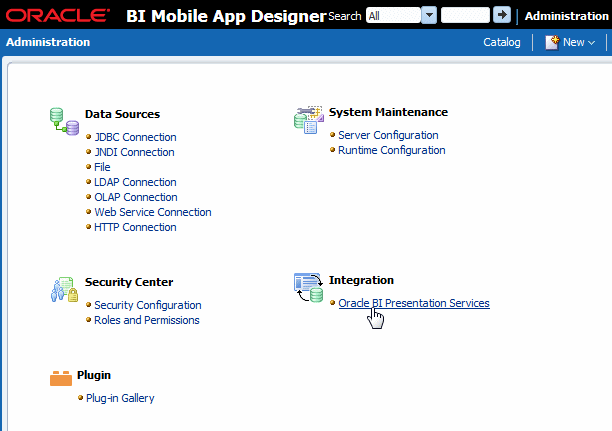
Click Administration.

-
On the Administration page, click Oracle BI Presentation Services.
-
Under BI Subject Area Metadata Cache, click Clear.
A.9 Configuring Single Sign-On
If your Oracle BI Enterprise Edition is configured for single sign-on, you must add BI Mobile App Designer as a protected resource and also unprotect services to allow communication with other BI resources.
See your single sign-on provider documentation for specific requirements for your single sign-on provider. See also the Oracle Fusion Middleware Security Guide for Oracle Business Intelligence Enterprise Edition.
A.9.1 Setup Procedure for Oracle Access Manager
To set up Single Sign-On in Oracle Access Manager:
-
Navigate to the Oracle Access Management Console.
-
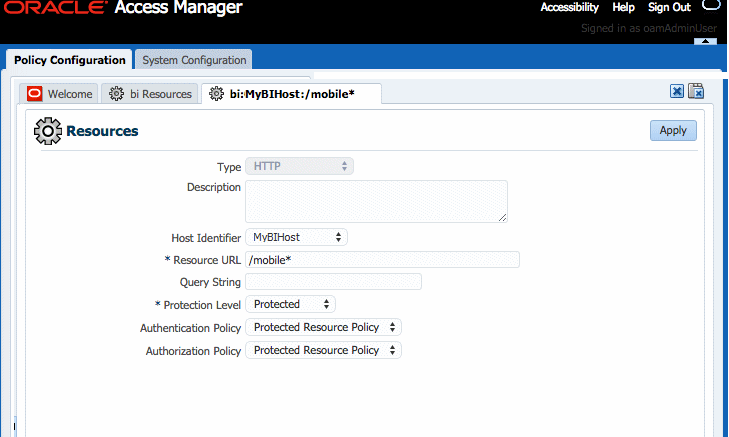
Under the bi domain, add these BI Mobile App Designer URLs and set the Protection Level to "Protected":
/mobile*
/mobile/.../*
-
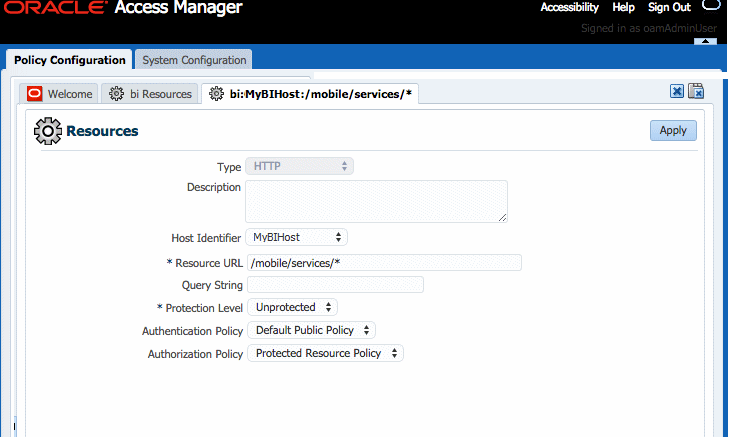
To allow internal communication between Mobile App Designer and other components of the BI suite, add these URLs and set the Protection Level to "Unprotected":
 /mobile/services/*
 /mobile/services/.../*
 /mobile/report_service/*
 /mobile/report_service/.../*
-
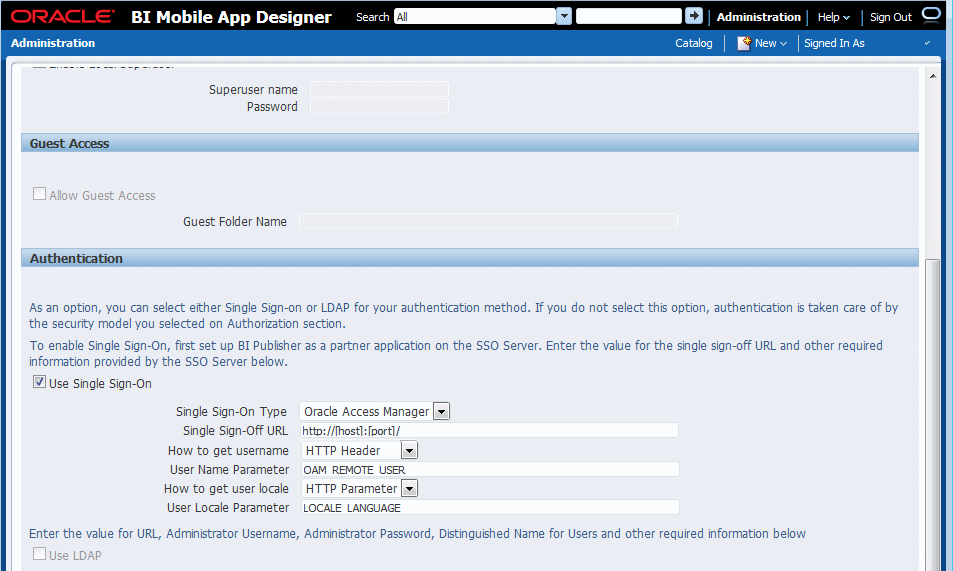
Set up the Single Sign-Off URL on the BI Mobile App Designer Administration Security Configuration page.
Important:
BI Mobile App Designer shares this setting with Oracle BI Publisher. If you have already set up the Single-Sign-Off URL in BI Publisher, you can skip this step.On the Administration page, click Security Configuration. In the Authentication region:
-
Select Use Single Sign-On
-
From the Single Sign-On Type list, select Oracle Access Manager.
-
Enter the Single Sign-Off URL.
A sample Security Configuration page is shown in Figure A-9.
-
-
Click Apply. Restart the application.
A.10 Enabling Oracle BI EE 10g-Style Initialization Block Security
If your authentication and authorization are configured with the Oracle BI EE 10g style Initialization Blocks (Init Blocks) against external database tables, you must manually update the web.xml file inside the bimad.ear as described here.
To update the web.xml file in the bimad.ear:
-
Back up the existing bimad.ear file in your staging directory:
[MW_HOME]/Oracle_BI1/bifoundation/jee/bimad.ear
-
Extract bimad.war from bimad.ear.
-
Update WEB-INF/web.xml in the bimad.war file as follows:
Find SAW_AUTH_INIT_BLOCK_ONLY and change the value from "true" to "false"
<servlet>
<servlet-name>xdo</servlet-name>
<servlet-class>oracle.xdo.servlet.MobileXDOServlet</servlet-class>
<init-param>
<param-name>SAW_AUTH_INIT_BLOCK_ONLY</param-name>
<param-value>false</param-value>
 <!-- <description>True to tell BIEE executing auth init block only. False otherwise </description> -->
</init-param> <load-on-startup>2</load-on-startup>
</servlet>
-
Re-pack bimad.ear with modified bimad.war.
-
From the Oracle WebLogic Server Administration Console, update the bimad.ear deployment with the modified bimad.ear file as follows:
-
Open your Oracle WebLogic Server Administration Console.
-
In the Change Center of the Administration Console, click Lock & Edit.
-
In the left pane of the Console, select Deployments. A table in the right pane displays all deployed Enterprise Applications and Application Modules.
-
In the table, select bimad.
-
Click Update.
-
Click Finish (do not change the source path).
-
In the Change Center of the Administration Console, click Activate Changes.
-
A.11 Protecting Against Out of Memory Errors Using Memory Guard
BI Mobile App Designer provides a set of properties to protect against out-of-memory errors by blocking app requests that generate excessive amounts of data. The properties set limits on data size and free memory availability. When an app exceeds the set limits, processing of the app terminates and the following error message is returned to the user:
The report you are trying to run exceeds the data limit set for this server.
Memory Guard includes default settings that may not be appropriate for your system. It may take trial and error before you find the appropriate setting for your system. When editing the Memory Guard limits keep in mind that setting them too high may impact the overall health of your system.
A.11.1 What are the Memory Guard Settings?
Memory Guard protects your system by setting maximum limits on data set size and by setting minimum limits on available memory:
A.11.1.1 Restricting Maximum Data Sizes for App Processing
By restricting the data size allowed for app processing you can prevent out of memory errors when a query returns more data than the system can handle.
Specify a Maximum Data Size Allowed for Online Processing
Property: Maximum report data size for online reports
Default value: 300 MB
This property limits the data size allowed for online report (or app) viewing. This limit is applied as follows:
-
A user taps (or clicks) an app.
-
The data engine retrieves the data for the app.
-
The size of the data is inspected.
-
If the data generated is larger than the maximum setting, the app processing is ended. The user gets the following message:
The report you are trying to run exceeds the data limit set for this server.
To enable this app to run, you must The user can then either set parameters (if available for the report) to limit the data and resubmit online; or use the BI Publisher scheduler to submit the report.
A.11.1.2 Configuring Free Memory Threshold
This set of properties helps you to protect against out of memory conditions by establishing a minimum available free memory space. This set of properties enables your system to automatically protect free memory availability and intelligently process reports with large data sets based on this availability.
-
Specify Maximum App Data Size Under the Free Memory Threshold
-
Set Maximum Wait Time for Free Memory to Come Back Above the Threshold
Specify A Minimum Free Memory Threshold for App Processing
Property: Free memory threshold
Default value: 500 MB
This property protects a minimum amount of JVM space while evaluating the ability of the to system to run an app based on two factors: current usage and the size of the report data. This feature requires the setting of several properties that work together. You specify the threshold JVM space, the maximum app size that will be allowed when the JVM falls below the threshold, and the maximum wait time to pause the app to wait for more JVM free space to become available.
These limits are applied as follows:
-
A user taps (or clicks) an app.
-
The data engine generates the data for the app.
-
JVM memory is inspected. If the available JVM memory is above the Free memory threshold property value, the app processes as usual and there is no system intervention.
If the available JVM memory is below the threshold value, the size of the app data is inspected and compared to the property setting for Maximum report data size under the free memory threshold. If the app data is below this threshold, then the app continues processing.
If the app data size exceeds the threshold, then the app is paused to wait for free memory to become available. The app will wait for the time specified in the property Maximum Wait Time for Free Memory to Come Back Above Threshold Value. If the free memory does not rise back above the minimum in the wait period specified, the app request is rejected.
Specify Maximum App Data Size Under the Free Memory Threshold
Property: Maximum report data size under the free memory threshold
Default value: (value of Free Memory Threshold)/10
Maximum single app data size allowed when free JVM memory is under the specified threshold value set in Free memory threshold. For example (assuming the default setting), if the data generated for an app exceeds one-tenth of the value set for Free memory threshold, then processing is terminated. Therefore if the Free memory threshold is set to 100 MB and an app data extract exceeds 10 MB, then the report processing is terminated.
This property takes effect only when Free memory threshold is set to be a positive value.
Set Minimum Time Span Between Garbage Collection Runs
Minimum time span in seconds between any two subsequent garbage collection runs. Set this value to avoid overrunning JVM garbage collection. The server enforces the minimum of 120 seconds, which means the value will be reset to 120 seconds if it falls below the minimum.
The default is 300 seconds.
Set Maximum Wait Time for Free Memory to Come Back Above the Threshold
The maximum time in seconds that a run-app request will wait for free JVM memory to come back above the threshold value. This property value takes effect only when a positive value for Free memory threshold is specified.
If the free memory becomes available within the time specified, the request will proceed immediately to generate the app. If free memory is still below the threshold value after the time specified, the request is rejected.
The default for this property is 30 seconds.
A.11.2 Setting Memory Guard Properties
To navigate to the Memory Guard properties:
-
Launch the BI Mobile App Designer application directly from its URL:
http://<host>:<port>/mobile/ -
Click Administration.
-
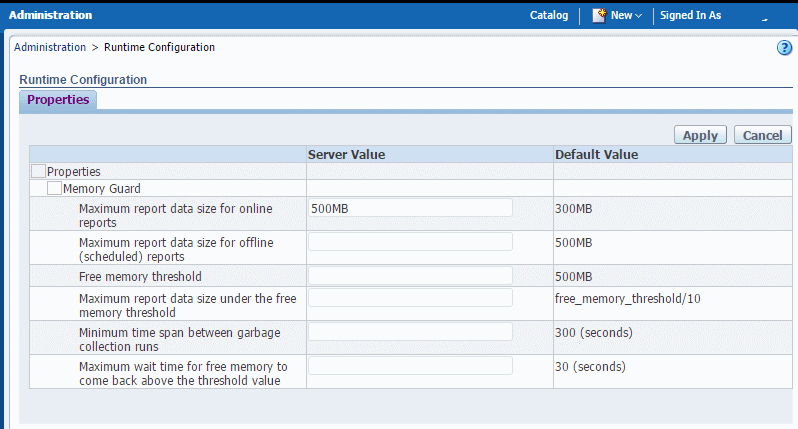
From the Administration page, under System Maintenance, click Runtime Configuration.
-
The default values are shown. To change the value for your server, enter the new value in the Server Value column. See Table A-5 for property details.
IMPORTANT:
These settings are shared with Oracle BI Publisher. Updating the setting here also updates it for BI Publisher.Table A-5 Memory Guard Properties and Descriptions
| Property | Description |
|---|---|
|
Maximum report data size for online reports |
Default value: 300MB Sets the maximum allowed app data size. You can set the value in GB, MB, or KB. For example: 1GB, 200MB, or 1500KB. An app request is rejected immediately when the data size returned from the data model exceeds the value of this property. To turn off this property, enter 0 or a negative number. |
|
Maximum report data size for offline (scheduled) reports |
Not used by BI Mobile App Designer. |
|
Free memory threshold |
Default value: 500MB Threshold value of free JVM memory to trigger possible rejection of app requests. You can set the value in GB, MB, or KB. For example: 1GB, 200MB, or 1500KB. When JVM free memory returned from run time is below the value of this property, the server will check the report data size to decide if a request should be accepted or rejected. This property works together with the three properties:
If this property value is to 0 or a negative number, this condition is ignored. |
|
Maximum report data size under the free memory threshold |
Default value: (value of Free memory threshold/10) Maximum app data size allowed when free JVM memory is under the specified threshold value set in Free memory threshold. A request will be rejected when its data size exceeds the value of this property. This property takes effect only if Free memory threshold is set to be a positive value. You can set the value in GB, MB, or KB. For example: 1GB, 10MB, or 1500KB. If you do not explicitly set the value, the default value is calculated by dividing the value you set for Free memory threshold by 10. So if you set Free memory threshold to 100MB, the default value for this property is 10MB. |
|
Minimum time span between garbage collection runs |
Default value: 300 (seconds) Minimum time span in seconds between any two subsequent garbage collection runs. Set this value to avoid overrunning JVM garbage collection. Note that the server automatically enforces a minimum value of 120 seconds, so if you enter a value less than 120 seconds, the server overrides it. |
|
Maximum wait time for free memory to come back above the threshold value |
Default value: 30 (seconds) The maximum time in seconds that an app request will wait for free JVM memory to come back above the threshold value. This property value takes effect only when a positive value of Free memory threshold is specified. If the free memory comes back in the time less than the value of Maximum wait time for free memory to come back above the threshold value, the request will proceed immediately to generate the app. If free memory is still below the threshold value after the time set for this property, the request is rejected. |
