12 Configuring Your Environment to Work With Mobile Security Manager
This chapter documents configuration steps that may be required to get Mobile Security Manager working in your environment. It is organized into the following sections:
-
Configuring NDES and the Active Directory Certificate Authority
-
Configuring Automatic Certificate Revocation with the Active Directory Certificate Authority
-
Configuring Microsoft Exchange (Secure Mail) to Work With Mobile Security Manager
Note:
See the Oracle Fusion Middleware Integration Guide for Oracle Identity Management Suite to learn how to integrate Oracle Identity Manager Oracle Mobile Security Suite with Oracle Mobile Security Suite.12.1 Tuning Oracle Mobile Security Suite
See "Tuning Oracle Mobile Security Suite" in the Oracle Fusion Middleware Performance and Tuning Guide for information about tuning the heap size, tuning the datasource connection pool settings, and other tuning recommendations.
12.2 Configuring the Identity Store Configuration
To configure the identity store connection, create an Identity Directory Service Profile in the Oracle Access Management console. Then in Mobile Security Manager, set the IDS Profile Name in the Identity Store Settings tab.
-
To learn how to configure the identity store connection, see "Managing User Identity Store Registrations" in Oracle Fusion Middleware Administrator's Guide for Oracle Access Management.
-
To set the IDS Profile Name in the Identity Store settings tab, see Section 11.2.5, "Configuring Identity Store Settings."
12.3 Configuring NDES and the Active Directory Certificate Authority
This section describes how to configure Windows Enterprise 2008 R2 machines so that the Simple Certificate Enrollment Protocol (SCEP) works with the Mobile Security Manager server. This configuration is required for Secure Workspace enrollment.
Before you begin, install the Network Device Enrollment Service (NDES) on either the Windows Enterprise 2012 R2 or Windows Enterprise 2008 R2 machine.
Note:
Ensure that the user password for the user account specified for the NDES configuration never expires.-
Apply the required hotfixes. The following hotfixes must be applied to Windows 2008 R2 machines before you configure NDES:
-
KB 959193
http://support.microsoft.com/kb/959193 -
KB 2633200
http://support.microsoft.com/kb/2633200 -
KB 2483564
http://support.microsoft.com/kb/2483564
-
-
Configure the Network Device Enrollment Services (NDES) on your Active Directory server by completing the Setup instructions found in the Microsoft TechNet article "Network Device Enrollment Service (NDES) in Active Directory Certificate Services (AD CS):
-
Increase the MAX URL limit. Because SCEP requests use the HTTP GET method, the length of the URL can exceed the limit due to the certificate signing request present in the request URL.
%windir%\system32\inetsrv\appcmd set config /section:requestfiltering /requestlimits.maxurl:4096

 %windir%\system32\inetsrv\appcmd set config /section:requestfiltering /requestlimits.maxquerystring:4096
-
Extend the Smart Card Logon Certificate Template to create a new template to be used while issuing certificates.
-
Open Server Manager and right-click the Smartcard Logon template.
Select Duplicate Template.
The Duplicate Template dialog opens.
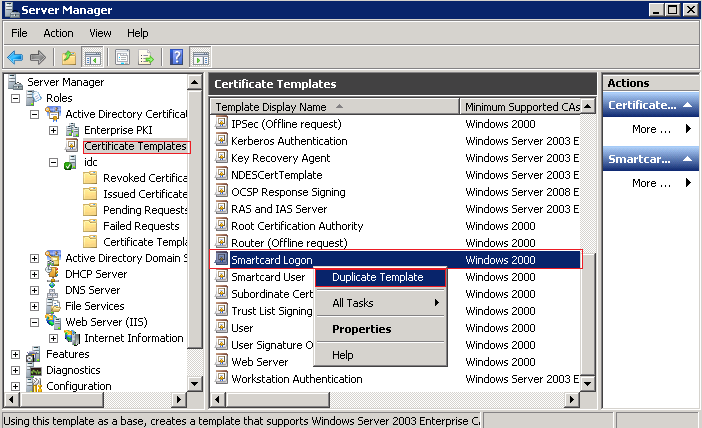
Description of the illustration ''ndes-ca-config1.png''
-
Select Windows Server 2003 Enterprise and click OK.
The Properties of New Template form opens.
-
On the General tab of the Properties of New Template form, type a template name. You will use this name when configuring NDES.
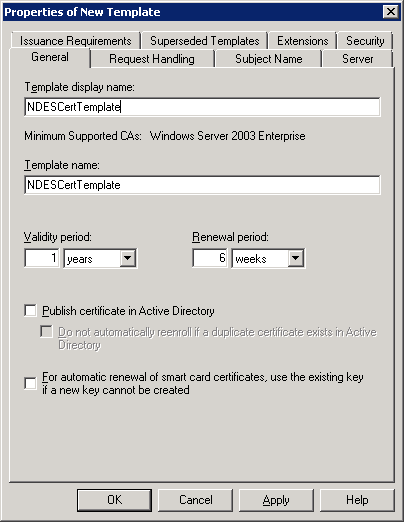
Description of the illustration ''ndes-ca-config3.png''
-
On the Request Handling tab of the Properties of New Template form, select Allow private key to be exported. Do not change the other values.
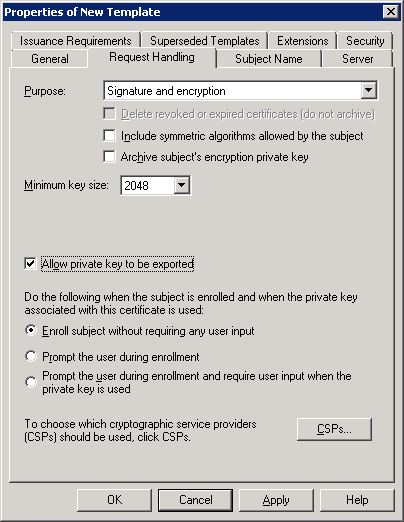
Description of the illustration ''ndes-ca-config4.png''
-
On the Subject Name tab of the Properties of New Template form, select Supply in the request.
A warning message opens.
Click OK to close the warning, then click Apply, and click OK to complete the template creation.
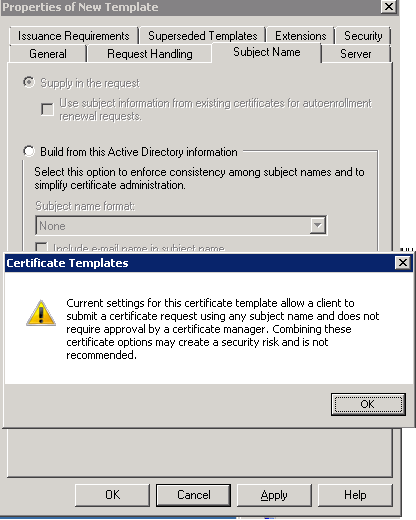
Description of the illustration ''ndes-ca-config5.png''
-
In the Server Manager window, expand the certificate authority node and choose the Certificate Templates entry under it.
Select the recently created certificate.
-
From the menu, choose Action > New > Certificate Template to Issue.
Select the newly created certificate template.
-
-
Set permissions for the certificate template by selecting Allow for Read, Write, Enroll, and Autoenroll.
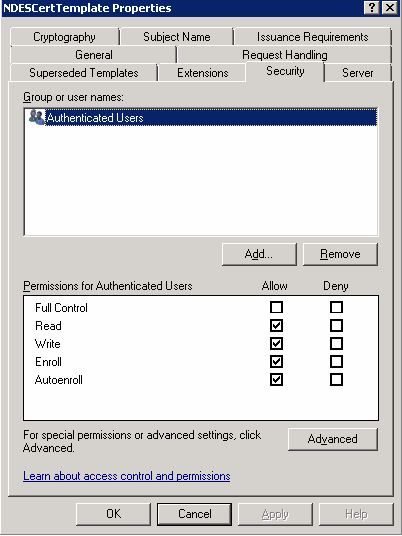
Description of the illustration ''ndes-ca-config6.png''
-
Configure the following values so that Certification Authority includes SAN in the certificate
certutil -setreg policy\EditFlags +EDITF_ATTRIBUTESUBJECTALTNAME2

net stop certsvc
net start certsvc
-
Set the NDES configuration to disable the password policy and to use the Certificate Template for certificate issuance.
Update the registry settings for SCEP as follows:
-
Open the following registry key:
HKEY_LOCAL_MACHINE\SOFTWARE\Microsoft\Cryptography\MSCEP -
Add the new key and value as shown in the screen capture.
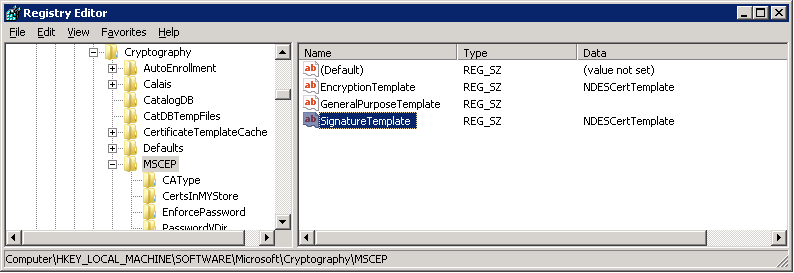
Description of the illustration ''ndes-ca-config7b.png''
-
-
Disable the password policy for NDES.
-
Open the following registry key:
HKEY_LOCAL_MACHINE\SOFTWARE\Microsoft\Cryptography\MSCEP\

EnforcePassword -
Change the value for EnforcePassword to
0x00000000.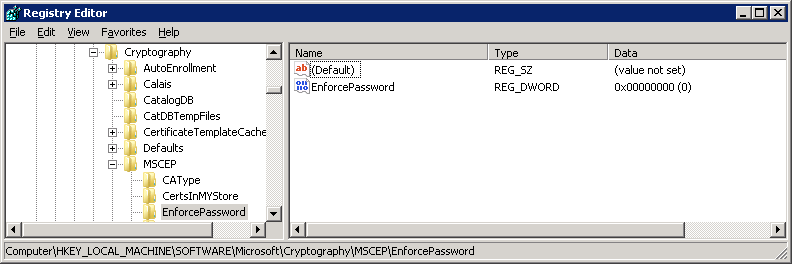
Description of the illustration ''ndes-ca-config8.png''
-
-
Restart the NDES SCEP server or the Internet Information Server (IIS).
12.4 Configuring Automatic Certificate Revocation with the Active Directory Certificate Authority
When the Mobile Security Manager component of the Oracle Mobile Security Suite is configured to provision certificates from a Microsoft CA, by default those certificates will not be automatically revoked when mobile devices and Workspace apps are wiped or deregistered. Mobile Security Manager uses the Network Device Enrollment Service (NDES) for provisioning certificates. NDES, however, does not provide a network interface for certificate revocation.
This section describes how to configure a Certificate Revocation Application in Internet Information Server (IIS) on the NDES server. Mobile Security Manager will invoke this application so that mobile device and user certificates are automatically revoked at the appropriate points in the lifecycle of mobile devices and workspace apps.
The URL that Mobile Security Manager calls to revoke certificates is computed based on the NDES URL provided in the Mobile Security Manager CA Settings tab. The URL for certificate revocation will be constructed like the following:
http(s)://<ca_host>:<ca_port>/CertService/revoke.php
The Mobile Security Manager server sends POST requests to revoke the certificates, indicating ”Cease of Operation” as the reason for the revocation.
This section includes the following topics:
12.4.1 Steps to Configure Certificate Revocation Application
Before you begin: The Certification Revocation Application is a PHP application. It requires that Internet Information Server (IIS) on your NDES server support PHP applications. If it does not, then follow the Steps in Section 12.4.5, "Configuring IIS to run PHP applications."
Configuring the Certificate Revocation Application involves the following steps:
-
Deploy Certificate Revocation Application in IIS – In this step you create and configure the PHP application in IIS.
-
Deploy Certificate Revocation PHP Scripts – In this step you deploy the PHP scripts provided by Oracle to the physical path of the Certificate Revocation Application.
-
Import Mobile Security Manager Certificate – In this step you import the Mobile Security Manager certificate to the physical path of the Certificate Revocation Application so that it can authenticate certificate revocation requests as originating from Mobile Security Manager.
12.4.2 Deploy the Certificate Revocation Application in IIS
This section describes how to deploy the Certificate Revocation Application in IIS.
-
Add an Application Pool
-
Open the IIS Manager application for the NDES IIS instance. Select Application Pools, and in the Actions pane, select Add Application Pool.
The Add Application Pool dialog opens.
-
Complete the form as follows and click OK:
Name – Type CertService.
.NET Framework version – Use the default value.
Managed pipeline mode – Choose Integrated.
Start application pool immediately – Select this option.
Figure 12-1 Complete the Add Application Pool form
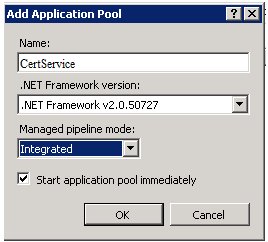
Description of ''Figure 12-1 Complete the Add Application Pool form''
-
Edit the newly created CertService application pool.
In the Actions pane, select Advanced and click ApplicationPoolIdentity to set Identity as a privileged service account.
The Application Pool Identity dialog opens.
Figure 12-2 The Application Pool Identity dialog
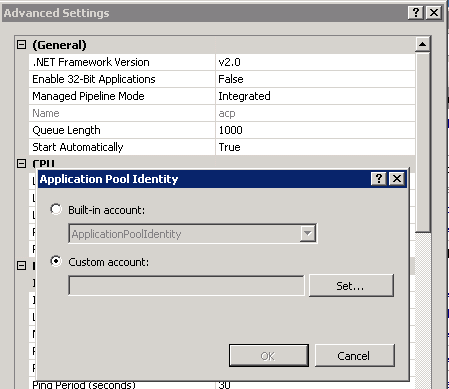
Description of ''Figure 12-2 The Application Pool Identity dialog''
-
Select Custom account and click Set.
The Set Credentials dialog opens.
-
In the User name field, enter the user name of a Windows account that has permission to manage certificates at the Certificate Authority level (assigned on the security properties of the CA).
Enter the password in the Password and Confirm password fields and click OK.
Click OK to close the other open dialogs.
Figure 12-3 Enter CA administrator credentials in the Set Credentials dialog
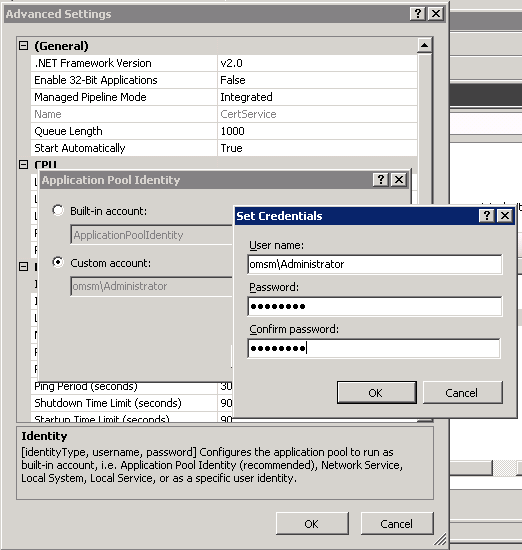
Description of ''Figure 12-3 Enter CA administrator credentials in the Set Credentials dialog''
The service account is shown as the identity for the application pool.
-
-
Right-click the Default Web Site in the IIS NDES instance and select Add New Application.
The Add Application dialog opens.
In the Alias field, enter CertService, then click Select and choose CertService as the Application Pool to use.
In Physical path, click the ... button and select a physical path for the application.
Click OK to finish creating the new Certificate Revocation Application.
-
Update the
php.inifile.Add the following line to the
<PHP_INSTALLATION_HOME>/php.inifile to enable the OpenSSL extension for PHP:extension=php_openssl.dll
12.4.3 Deploy the Certificate Revocation PHP Scripts
This section describes how to deploy two PHP scripts for certificate revocation to the physical path of the Certificate Revocation Application.
-
Create a text file named
revoke.phpand add the contents of the following code snippet.Save the file to the root of the physical path that you selected for the Certificate Revocation Application in step 2 of Section 12.4.2, "Deploy the Certificate Revocation Application in IIS."
Contents of the
revoke.phpfile<?php function checkNull($var){ return (!isset($var) || is_null($var)); } function checkNullOrEmpty($var){ return (!isset($var) || trim($var)===''); } include_once "JWT.php"; $postdata = file_get_contents("php://input"); $result = 1; $reasonCode =""; try{ $ar = json_decode($postdata); if( ! checkNull($ar) ){ if(!(checkNullOrEmpty($ar->serialnumber) || checkNullOrEmpty($ar->authtoken) || checkNullOrEmpty($ar->caauthority) || checkNullOrEmpty($ar->reason))) { $check = $ar->caauthority . ":" . $ar->serialnumber; $res_pubkey = openssl_pkey_get_public(file_get_contents("certs/SignerCertificate.pem")); $payload = JWT::decode($ar->authtoken, $res_pubkey, true); if(strcmp($check, $payload->sub) == 0){ $cmd="certutil -config \"$ar->caauthority\" -revoke $ar->serialnumber $ar->reason" ; exec($cmd); $status = "0"; $message="Certificate Revoked Successfully" ; $result = 0; } else { $status = "337"; $message = "Revoke request does not match with Authentication subject"; $result = 4; } } else { $result = 2; $message = "Missing request parameters"; } } else { $result = 3; $status = "335"; $message = "Http Get is not supported"; } } catch (Exception $ex){ $result = 1; $reasonCode = "Authentication Token verification failed"; } if($result == 1){ $status = "333" ; $message = "Certificate revoke failed. Reason $reasonCode"; } else if($result == 2){ $status = "333"; } $data="{ \"message\": \"$message\", \"code\": \"$status\"}"; header("Content-Type: application/json"); print ($data); ?> -
Create a text file named
JWT.phpand add the contents of the following code snippet.Save the file to the root of the physical path that you selected for the Certificate Revocation Application in step 2 of Section 12.4.2, "Deploy the Certificate Revocation Application in IIS."
Contents of the
JWT.phpfile<?php class JWT { public static function encode($payload, $key, $algo = 'HS256') { $header = array('typ' => 'JWT', 'alg' => $algo); $segments = array( JWT::urlsafeB64Encode(json_encode($header)), JWT::urlsafeB64Encode(json_encode($payload)) ); $signing_input = implode('.', $segments); $signature = JWT::sign($signing_input, $key, $algo); $segments[] = JWT::urlsafeB64Encode($signature); return implode('.', $segments); } public static function decode($jwt, $key = null, $verify = true) { $tks = explode('.', $jwt); if (count($tks) != 3) { throw new Exception('Wrong number of segments'); } list($headb64, $payloadb64, $cryptob64) = $tks; if (null === ($header = json_decode(JWT::urlsafeB64Decode($headb64)))) { throw new Exception('Invalid segment encoding'); } if (null === $payload = json_decode(JWT::urlsafeB64Decode($payloadb64))) { throw new Exception('Invalid segment encoding'); } $sig = JWT::urlsafeB64Decode($cryptob64); if ($verify) { if (empty($header->alg)) { throw new DomainException('Empty algorithm'); } if (!JWT::verifySignature($sig, "$headb64.$payloadb64", $key, $header->alg)) { throw new UnexpectedValueException('Signature verification failed'); } } return $payload; } public static function getSignature($jwt, $key = null, $verify = true) { $tks = explode('.', $jwt); if (count($tks) != 3) { throw new Exception('Wrong number of segments'); } list($headb64, $payloadb64, $cryptob64) = $tks; if (null === ($header = json_decode(JWT::urlsafeB64Decode($headb64)))) { throw new Exception('Invalid segment encoding'); } if (null === $payload = json_decode(JWT::urlsafeB64Decode($payloadb64))) { throw new Exception('Invalid segment encoding'); } $sig = JWT::urlsafeB64Decode($cryptob64); return $sig; } private static function verifySignature($signature, $input, $key, $algo = 'HS256') { switch ($algo) { case'HS256': case'HS384': case'HS512': return JWT::sign($input, $key, $algo) === $signature; case 'RS256': return (boolean) openssl_verify($input, $signature, $key, OPENSSL_ALGO_SHA256); case 'RS384': return (boolean) openssl_verify($input, $signature, $key, OPENSSL_ALGO_SHA384); case 'RS512': return (boolean) openssl_verify($input, $signature, $key, OPENSSL_ALGO_SHA512); default: throw new Exception("Unsupported or invalid signing algorithm."); } } private static function sign($input, $key, $algo = 'HS256') { switch ($algo) { case 'HS256': return hash_hmac('sha256', $input, $key, true); case 'HS384': return hash_hmac('sha384', $input, $key, true); case 'HS512': return hash_hmac('sha512', $input, $key, true); case 'RS256': return JWT::generateRSASignature($input, $key, OPENSSL_ALGO_SHA256); case 'RS384': return JWT::generateRSASignature($input, $key, OPENSSL_ALGO_SHA384); case 'RS512': return JWT::generateRSASignature($input, $key, OPENSSL_ALGO_SHA512); default: throw new Exception("Unsupported or invalid signing algorithm."); } } private static function generateRSASignature($input, $key, $algo) { if (!openssl_sign($input, $signature, $key, $algo)) { throw new Exception("Unable to sign data."); } return $signature; } private static function urlSafeB64Encode($data) { $b64 = base64_encode($data); $b64 = str_replace(array('+', '/', '\r', '\n', '='), array('-', '_'), $b64); return $b64; } private static function urlSafeB64Decode($b64) { $b64 = str_replace(array('-', '_'), array('+', '/'), $b64); return base64_decode($b64); } } ?>
12.4.4 Import the Mobile Security Manager Certificate in IIS
This section describes how to import the Mobile Security Manager certificate to the physical path of the Certificate Revocation Application. This step is necessary so that the Certificate Revocation Application can authenticate certificate revocation requests as originating from Mobile Security Manager.
-
Export the Mobile Security Manager certificate from the Mobile Security Manager server:
-
Go to the Mobile Security Manager installation directory:
<DOMAIN_HOME>/config/fmwconfig -
Export the certificate using the following command:
keytool -alias oraclemsm -exportcert -file oraclemsm.crt -keystore OracleMSMCertificates.p12 -storepass<KeyStorePassword>-storetype pkcs12Tip:
The keystore password can be obtained from CSF using map namemsmand keyserverKeystoreKey.
-
-
On the NDES server, use the following command to convert the resulting DER encoded certificate to PEM format.
openssl x509 -inform der -in oraclemsm.crt -out SignerCertificate.pem -
Copy the
SignerCertificate.pemfile to the/certsdirectory under the physical path of the Certificate Revocation Application.<PHYSICAL_PATH>/certs/SignerCertificate.pem
12.4.5 Configuring IIS to run PHP applications
This section describes how to configure IIS on your NDES server to support PHP applications.
Note:
If your IIS instance is already configured to run PHP applications, then skip the steps in this section. If the CGI Role Service is configured, but PHP is not enabled, then skip step 1.-
Add the CGI Role Service to IIS:
-
Open the Server Manager application.
In the pane on the left, expand Roles, right-click Web Server (IIS), and select Add Role Services.
The Add Role Services dialog opens.
Figure 12-4 The Server Manager application
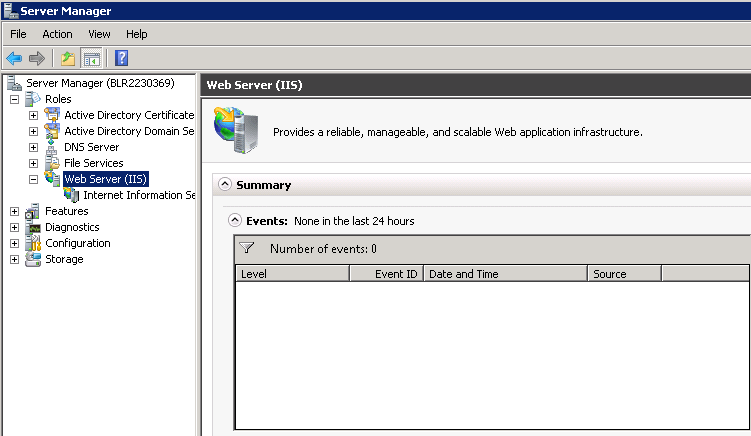
Description of ''Figure 12-4 The Server Manager application''
-
Expand Web Server (Installed), expand Application Development (Installed), and select the CGI check box.
Figure 12-5 The Add Role Services dialog
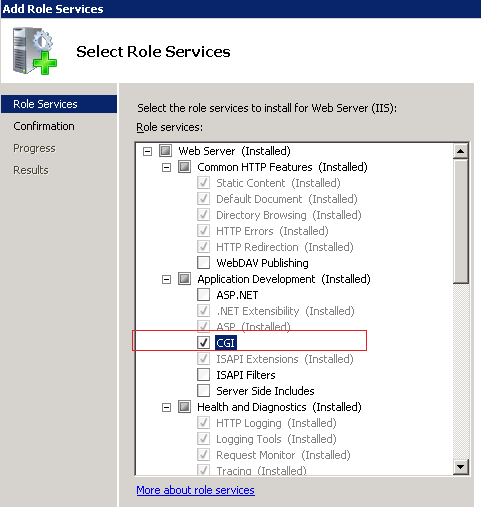
Description of ''Figure 12-5 The Add Role Services dialog''
-
Expand Security and select the Windows Authentication check box.
-
Expand Management Tools and select the IIS 6 Management Compatibility check box, which selects all of the sub-selections under IIS 6 Management Compatibility.
-
Select Next.
-
Select Install.
-
-
Configure IIS to handle PHP requests:
-
Open the Internet Information Services (IIS) Manager application for the NDES IIS instance.
Select the server, and double-click Handler Mappings.
-
In the Actions pane on the right, click Add Module Mapping.
-
Enter *php for Request path.
-
Select FastCGIModule for Module.
-
Enter
<PHP_INSTALLATION_HOME>/php-cgi.exeas the Executable. If you browse, make sure that you select (*.exe) as the file type; otherwise it will be (*.dll) by default. -
Enter a Name of PHP using FASTCGI.
-
Click the OK button.
The Add Module Mapping confirmation dialog opens.
Figure 12-6 The Add Module Mapping confirmation dialog
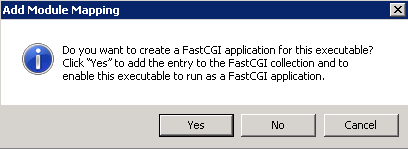
Description of ''Figure 12-6 The Add Module Mapping confirmation dialog''
-
Click Yes to add the FastCGI application for PHP.
-
In the Actions pane, click Edit Feature Permissions....
The Edit Feature Permissions dialog opens.
Under Script, select Execute, then click OK.
-
In the Actions pane, click Edit....
Click Request Restrictions, select the Access tab, and ensure that Execute is selected. Click OK to close the Edit Module Mapping dialog.
-
-
Add the PHP MIME type:
-
Select the NDES server instance in the IIS Manager application and double-click MIME Types.
-
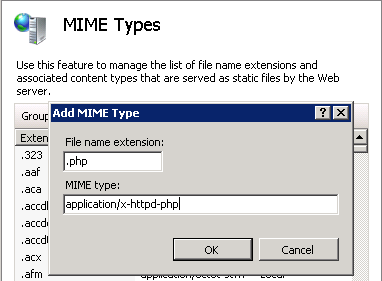
In the Actions pane select Add.
The Add MIME Type dialog opens.
-
Complete the form as follows and press OK:
File name extension -Enter
.phpMIME type - Enter
application/x-httpd-php
-
12.5 Configuring Microsoft Exchange (Secure Mail) to Work With Mobile Security Manager
Use these steps to configure Mobile Security Manager and Microsoft Exchange to work together.
-
Provide Mobile Security Manager with information about your Exchange server.
-
Open the Mobile Security Settings page. To learn how, see Section 11.2.2, "How to Open the Mobile Security Settings Page."
-
Click Exchange Server Settings on the menu bar. (If Exchange Server Settings is not visible, use the arrow buttons to scroll the menu bar to the right. Or, click
 to view additional menu items.)
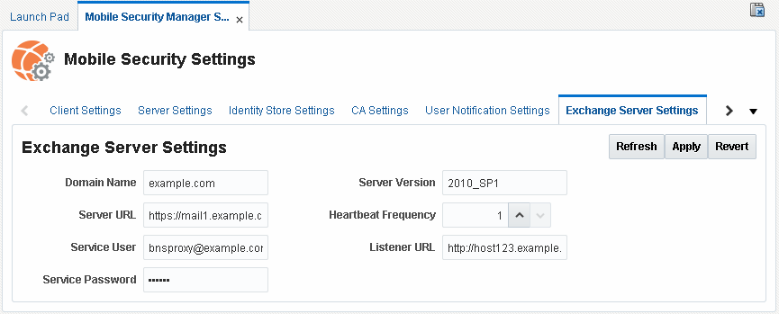
The Exchange Server Settings page opens.
-
Configure the Exchange Server Settings form. Use online help for field descriptions or see the Help Reference for Oracle Mobile Security Suite Consoles.
Figure 12-8 The Exchange Server Settings page
Description of ''Figure 12-8 The Exchange Server Settings page''
-
-
Modify the Workspace tab of the policy (or policies) to allow the end user access to e-mail on the Exchange server.
-
Search for the first policy to update. To learn how, see Section 8.7.1, "How to Search for a Policy Record in Mobile Security Manager."
-
In the search results section expand the policy details by clicking the policy record, then click the Workspace tab to open the Workspace policy.
-
Expand the Workspace/Apps section and select Email so that it is allowed.
-
Expand the Application Settings section and select Allow next to PIM .
In the Email Server URL field, enter the URL for the ActiveSync server, for example:
https://mail1.example.com. -
Click Apply to save your changes, then repeat the steps for the remaining policies (if any) that need to be updated.
Figure 12-9 Policy settings that allow users to access e-mail
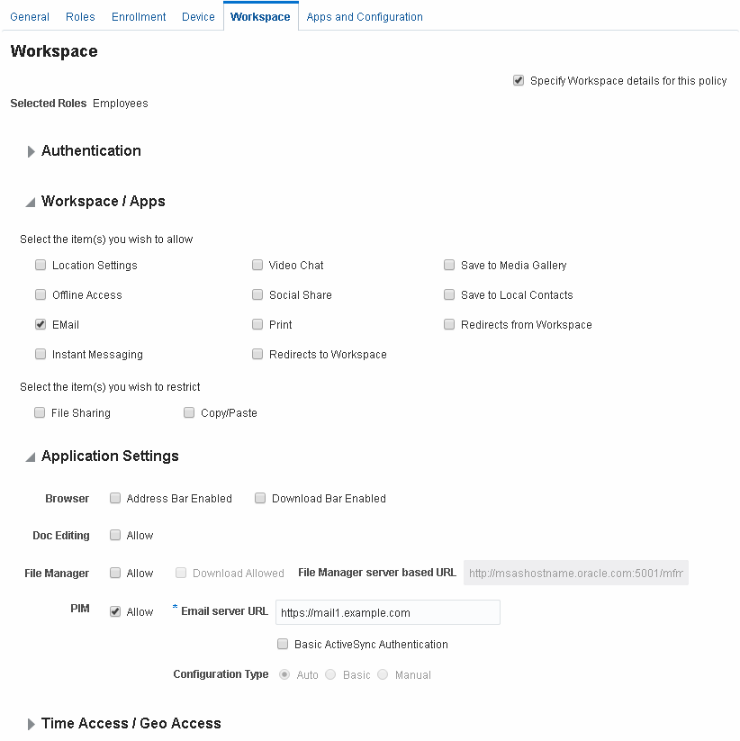
Description of ''Figure 12-9 Policy settings that allow users to access e-mail''
-
-
Import your Exchange Server's security certificate into the MSAS server's trust store.
-
Download the Exchange Server certificate to a temp folder on the Oracle Access Management server, for example:
/tmp/example-exchange.cer. -
Use the following WLST commands to import the certificate to the MSAS server's trust store:
wls:/offline>connect('@ADMIN_USER','@ADMIN_PWD','t3://@MSM_HOST:@MSM_ADMIN_PORT')
wls:/idmdomain/serverConfig>svc = getOpssService(name='KeyStoreService')
wls:/idmdomain/serverConfig>svc.importKeyStoreCertificate(appStripe=
 '@MSAS_INSTANCE_NAME',name='ssltruststore',password='pass1234',
 alias='mailca', keypassword='',type='TrustedCertificate',
 filepath='/tmp/example-exchange.cer')
-
-
Configure Mobile Security Manager's APNS (Apple Push Notification Service) and GCM (Google Cloud Messaging) settings to receive push notifications from the APNS/GCM servers for new mail or calender requests.
To configure APNS (for iOS devices):
-
Open the Mobile Security Settings page. To learn how, see Section 11.2.2, "How to Open the Mobile Security Settings Page."
-
Click Apple Push Notification Service (APNS) Settings on the menu bar. (If this option is not visible, use the arrow buttons to scroll the menu bar to the right. Or, click
to view additional menu items.)The Apple Push Notification Service (APNS) Settings page opens.
-
Click Add to create a new row to the settings table. For Certificate Name, enter the name Secure Mail; for Certificate Password, enter the password; for Certificate File, click Choose File and upload the certificate.
Use online help for field descriptions, or see the Help Reference for Oracle Mobile Security Suite Consoles.
-
Click Apply to save your changes.
To configure GCM (for Android devices):
-
Open the Mobile Security Settings page. To learn how, see Section 11.2.2, "How to Open the Mobile Security Settings Page."
-
Click Google Cloud Messaging (GCM) Settings on the menu bar. (If this option is not visible, use the arrow buttons to scroll the menu bar to the right. Or, click
to view additional menu items.)The Google Cloud Messaging Service (GCM) Settings page opens.
-
Click Add to create a new row to the settings table. For Application ID, enter
com.nitrodesk.honey.nitroid; for Sender ID, enter the Sender ID value; for API Key, enter the server authentication key that is saved on the third-party application server that gives the application server authorized access to Google services.Use online help for field descriptions, or see the Help Reference for Oracle Mobile Security Suite Consoles.
-
Click Apply to save your changes.
-
12.6 Configuring Oracle Mobile Security Suite to use Oracle Access Management 11gR2 PS2 for Authentication and SSO
If Oracle Access Management 11gR2 PS2 is already deployed in your environment, Oracle Mobile Security Suite can use that version for authentication and SSO, provided that OMSS is deployed on Oracle Access Management 11gR2 PS3 in a separate WLS domain. This configuration requires the use of Mobile and Social Services on Oracle Access Management 11gR2 PS3.
Before you Begin - Install Oracle Access Management 11gR2 PS3 on Host 1 and Oracle Access Management 11gR2 PS2 on Host 2.
-
Log on to the Oracle Access Management Console on Host 2 and create a WebGate profile for Mobile and Social Services using the default settings.
The following options should be selected:
-
Allow Management Operations
-
Allow Token Scope Operations
-
Allow Master Token Retrieval
-
Allow Credential Collector Operations
In the Access Client Password field, enter a password.
-
-
Next you will configure the OAM Authentication Token Service Provider on Host 1 (OAM 11.1.2.3) to use the WebGate on Host 2 to connect to OAM 11.1.2.2.
Log on to the Oracle Access Management Console on Host 1 and choose MobileSecurity > Mobile and Social Services.
In the Service Providers section locate OAMAuthentication and click Edit.
The "out-of-the-box" Oracle Access Manager (OAM) Authentication Token Service Provider Configuration form opens.
Modify the form as follows:
-
For the
OAM_VERSIONattribute, keep the default value ofOAM_11G. -
Change the
OAM_SERVER_1attribute value to use the correct OAM host name and port for the Host 2 server, for example:oam-host.example.com:5575 -
Change the
OAM_LOCAL_MODEattribute value tofalse. -
In the WebGate Agent section:
-
Change the WebGate ID value to the name of the WebGate you created using OAM 11gR2 PS2.
-
Replace the Encrypted Password by copying the
accessClientPasswdvalue from theObAccessClient.xmllocation on the OAM R2 PS2 server. For example:(ParamName="accessClientPasswd" Value="<Encrypted password value to copy>")
-
Figure 12-10 The OAM Authentication Token Service Provider Configuration form
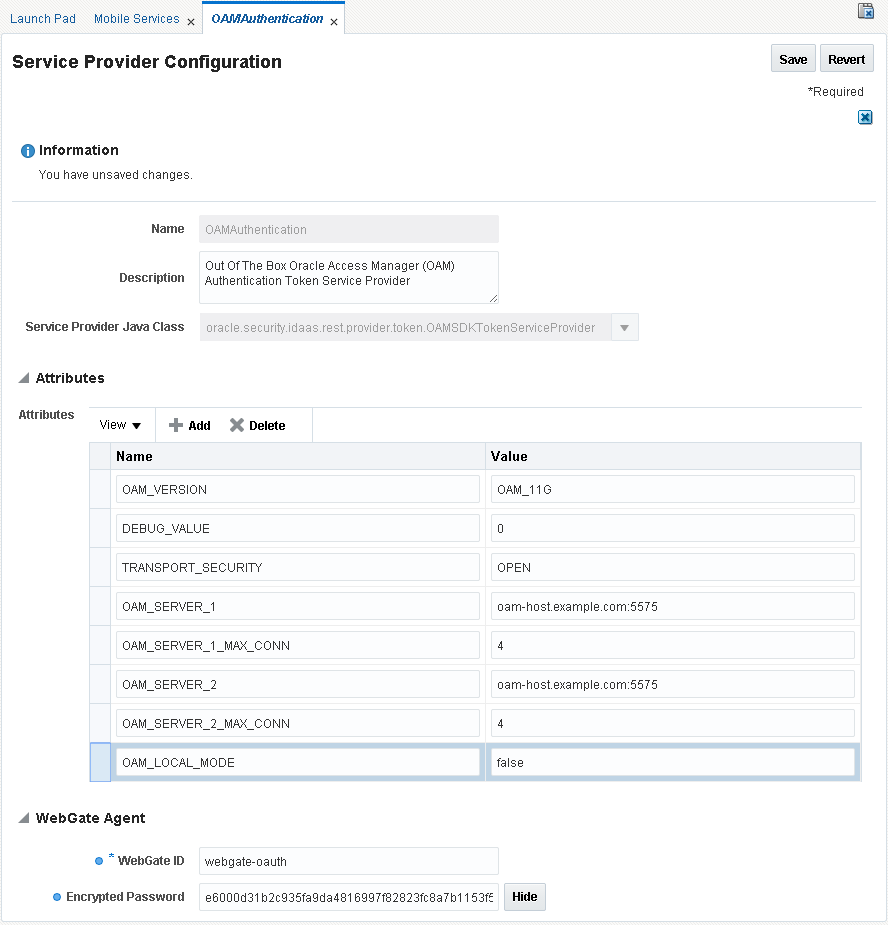
Description of ''Figure 12-10 The OAM Authentication Token Service Provider Configuration form''
-
-
In this step you will modify the OAuth Mobile Service Provider on Host 1 to use Oracle Access Manager on Host 2. This will route Host 1 authentication requests to Host 2.
Using the Oracle Access Management Console on Host 1, choose MobileSecurity > Mobile OAuth Services > YourDomain > ServiceProviders > OAuthServiceProvider.
The Mobile Service Provider Configuration form opens.
Modify the form as follows and click Save:
-
Change the
oam.WEBGATE_IDattribute value to the name of the WebGate you created using OAM 11gR2 PS2. -
Replace the
oam.ENCRYPTED_PASSWORDattribute value by copying theaccessClientPasswdvalue from theObAccessClient.xmllocation on the OAM R2 PS2 server. For example:(ParamName="accessClientPasswd" Value="<Encrypted password value to copy>") -
Change the
oam.OAM_SERVER_1attribute value to use the correct OAM host name and port for the OAM 11gR2 PS2 server, for example:oam-host.example.com:5575 -
Change the
oam.OAM_SERVER_2attribute value to use the same OAM host name and port for the OAM 11gR2 PS2 server (oam-host.example.com:5575). -
Change the
oam.OAM_LOCAL_MODEattribute value to false.
Figure 12-11 The OAuth Mobile Service Provider Configuration form
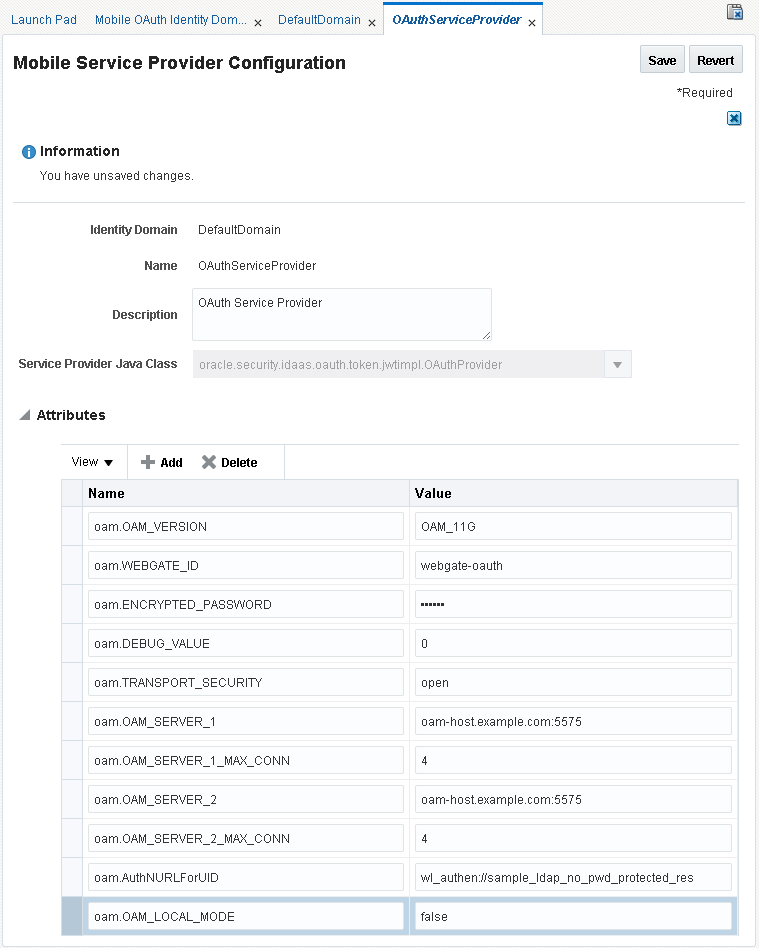
Description of ''Figure 12-11 The OAuth Mobile Service Provider Configuration form''
-
-
On Host 1, you will prepare to merge the credential information from the Host 2
cwalletfile into the Oracle Access Manager database. The Host 2cwalletfile was created when you created the WebGate profile on Host 2.-
Navigate to the
fmwconfiglocation on Host 1.At a command prompt on Host 1 type:
cp jps-config-jse.xml jps-config-db-mig.xml
-
On Host 1, create the
/tmp/oamdirectory, then paste the Host 2cwallet.ssofile into/tmp/oam:At a command prompt on Host 1 type:
# mkdir /tmp/oam # cp <host>/cwallet.sso /tmp/oam -
On Host 1, edit the
cwallet.ssofile, add the following values, and save the file:<serviceInstance location="/tmp/oam" provider="credstoressp" name="credential.file.source"> <property name="location" value="/tmp/oam" /> </serviceInstance> <jpsContext name="FileSourceContext"> <serviceInstanceRef ref="credential.file.source"/> </jpsContext> <jpsContext name="FileDestinationContext"> <serviceInstanceRef ref="credstore.db"/> </jpsContext>
-
-
Migrate the credentials by running this WLST command on Host 1:
migrateSecurityStore(type="credStore",
configFile="fmwconfig/jps-config-db-mig.xml", src="FileSourceContext",dst="FileDestinationContext")
-
Verify that the migration was successful by testing with Enterprise Manager.
-
Open the Enterprise Manager (EM) console and navigate as follows: welogicdomain > Security > Credentials.
-
Expand OAMAgent in the Credential Store.
-
Check that a key was generated that corresponds with the WebGate profile that you created on Host 2 (OAM 11gR2 PS2). For example, if you created a WebGate with WebGate ID "webgate-oauth," you should have a key called "webgate-oauth_Key."
-
-
Restart the OAM server on Host 1.