32 Replicating Directory Data
This chapter provides a general introduction to configuring Oracle Unified Directory replication in the directory server.
Note:
For information about the mechanics of the replication process, see Chapter 7, "Understanding the Oracle Unified Directory Replication Model."This chapter includes the following sections:
-
Section 32.2, "Configuring Data Replication With
dsreplication" -
Section 32.5, "Modifying the Replication Configuration With
dsconfig" -
Section 32.8, "Managing Tombstones in Oracle Unified Directory"
-
Section 32.11, "Detecting and Resolving Replication Inconsistencies"
-
Section 32.13, "Verifying and Fixing a Replication Configuration Using
dsreplication verify"
Note:
For information about the mechanics of the replication process, see Chapter 7, "Understanding the Oracle Unified Directory Replication Model."32.1 Before You Begin Configuring Replication
You must resolve the following issues before attempting to configure replication:
-
Determine whether the default multi-master replication model is right for your deployment.
The multi-master replication model is loosely consistent by default. This means that changes made on one server are replayed asynchronously to the other servers in the topology. The same entries can be modified simultaneously on different servers. When updates are sent between the two servers, any conflicting changes must be resolved. Various attributes of a WAN, such as latency, can increase the chance of replication conflicts. Conflict resolution generally occurs automatically. Several conflict rules determine which change takes precedence. In some cases, conflicts must be resolved manually.
Note:
In certain deployment scenarios, the default loose consistency model might not be adequate. In these situations, you can configure replication to function in assured mode. For more information, see Section 32.5.9, "Configuring Assured Replication." -
SSL must be enabled. Replication always occurs over a secure connection. Both parties of a replication session must authenticate to the other using SSL certificates. No access control or privileges are enforced.
-
You can set up replication automatically using the graphical setup utility when you first install Oracle Unified Directory only if you configure all of the directory servers in the same manner.
-
You cannot use the
setupcommand to configure replication in command-line mode. If you set up your directory servers by using thesetupcommand, you must use thedsreplicationcommand to configure replication between the servers. -
In any topology, you should have two replication servers for availability, in case one replication server fails. Replication servers are responsible for keeping track of all changes in the environment. Each replication server contains a list of all other replication servers in the topology.
Note:
In a replication architecture, each replication server is connected to every other replication server in the topology. -
To use the Dynamic Host Configuration Protocol (DHCP) in a replicated topology, you cannot change the replication servers' host names after the initial configuration.
-
The examples in this section assume that you have already installed two directory servers and populated one with data. The directory servers can be installed on the same host machine, but if they are, they must have different port numbers.
32.2 Configuring Data Replication With dsreplication
The dsreplication command accesses the server configuration over SSL through the administration connector. For more information, see Section 17.4, "Managing Administration Traffic to the Server."
32.2.1 Enabling Replication Between Two Servers
You cannot run more than one instance of the dsreplication enable command to set up replication among multiple directory servers. You must run the dsreplication enable command separately for each directory/replication server pair in the topology.
Figure 32-1 Basic Replication Architecture
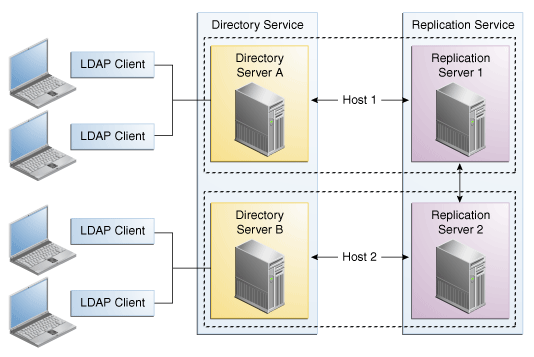
Description of ''Figure 32-1 Basic Replication Architecture''
To enable replication between two directory servers:
Run the dsreplication enable command.
The following configuration example enables replication of the data under "dc=example,dc=com" between two directory servers: Directory Server A on host1 and Directory Server B on host2. Both directory servers use the default administration port (4444). The command creates a replication server instance on host1, port 8989, and a second replication server instance on host2, port 8989.
$ dsreplication enable
  --host1 host1 --port1 4444 --bindDN1 "cn=Directory Manager" \
  --bindPasswordFile1 pwd.txt --replicationPort1 8989 \
  --host2 host2 --port2 4444 --bindDN2 "cn=Directory Manager" \
  --bindPasswordFile2 pwd.txt --replicationPort2 8989 \
  --adminUID admin --adminPasswordFile pwd.txt --baseDN "dc=example,dc=com" -X -n
The --adminUID and --adminPasswordFile options refer to the Global Administrator for the replication domain. For more information, see Section 29.5, "Managing Administrators." The -X option specifies that all server certificates should be trusted and the -n (--no-prompt) option specifies that the command should be run in non-interactive mode. For information about all the global options for the dsreplication command, type dsreplication -help at the command-line.
If a host has several network interfaces configured (not including loopback addresses), then you can specify them when providing the values for --host1 and --host2. Use commas to separate values. For example:
$ dsreplication enable
  --host1 interface1,interface2,interface3 --port1 4444 --bindDN1 \
    "cn=Directory Manager" \
  --bindPasswordFile1 pwd.txt --replicationPort1 8989 \
  --host2 host2 --port2 4444 --bindDN2 "cn=Directory Manager" \
  --bindPasswordFile2 pwd.txt --replicationPort2 8989 \
To add a new directory server to the replication topology, run dsreplication enable providing the connection information of the new server and the information of any of the already replicated servers.
To add replicas to an existing replication topology, for each replica that you want to add, run the following command:
$ dsreplication enable
  --host1 host1 --port1 4444 --bindDN1 "cn=Directory Manager" \
  --bindPasswordFile1 pwd.txt --replicationPort1 8989 \
  --host2 host2 --port2 4444 --bindDN2 "cn=Directory Manager" \
  --bindPasswordFile2 pwd.txt --replicationPort2 8989 \
  --adminUID admin --adminPasswordFile pwd.txt --baseDN "dc=example,dc=com" -X -n
where --[parameter]1 specifies an existing replica that has already been added to the replication topology, and --[parameter]2 specifies the new replica to be added.
32.2.1.1 Controlling Where Replication Servers are Created
Using dsreplication enable between two servers automatically configures a replication server on each host. You might want to configure replication between two directory servers without creating a replication server on each host. Use the --noReplicationServer1 or --noReplicationServer2 options to add a directory server to a topology without creating an additional replication server. Remember that a replicated topology must contain at least two replication servers to avoid a single point of failure.
You can also enable replication between two servers and specify that one of the servers should only contain a replication server (not a directory server). Use the --onlyReplicationServer1 or --onlyReplicationServer2 options to achieve this. Specifying this option will configure a change log and replication port on the server the server will not contain replicated data.
32.2.2 Initializing a Replicated Server
To initialize a replicated server with the data from another replicated server, use the dsreplication initialize command.
The following command initializes the base DN "dc=example,dc=com" on host2 with the data contained on host1:
$ dsreplication initialize --baseDN "dc=example,dc=com" \
  --adminUID admin --adminPasswordFile pwd.txt \
  --hostSource host1 --portSource 4444 \
  --hostDestination host2 --portDestination 4444 -X -n
32.2.3 Initializing an Entire Topology
If there are more than two directory servers in the topology, use the dsreplication intialize-all command to initialize all replicas simultaneously.
This command takes the details of the source host as arguments, and initializes all other servers for which replication is enabled.
The following command initializes all servers on which replication is enabled, from the contents of the base DN "dc=example,dc=com" on host1:
$ dsreplication initialize-all --hostname host1 --port 4444 \
  --baseDN "dc=example,dc=com" --adminUID admin --adminPasswordFile pwd.txt
32.2.4 Testing Replication
The easiest way to test that replication is working is to apply changes on one directory server and to check that those changes have been replicated on another directory server. To test the replication topology set up in the previous procedures, do the following:
-
Use
ldapmodifyto change an entry on host1. -
Use
ldapsearchto verify that the change was propagated to host2.
32.2.5 Obtaining the Status of a Replicated Topology
You can use the connection details of any directory server in the topology to obtain the status of the entire topology.
Use the dsreplication status command to display a list of the directory servers in the topology, along with any missing changes between those servers.
The following command displays the status of the topology set up in the previous procedures:
$ dsreplication status --adminUID admin --adminPasswordFile pwd.txt -X \
  --hostname host1 --port 4444
32.2.6 Merging Two Existing Replicated Topologies
You can merge two replicated topologies by enabling replication between one server of each topology.
Note the following limitations:
-
All of the servers in both topologies must be up and running when you perform the merge.
If a server its offline,
dsreplicationcannot update its configuration. If a server is offline when a merge is done, that server will not include the references to the replication servers in the other topology when it comes back online. -
The merge cannot be performed if there are conflicting domain IDs or replication server IDs between the two topologies.
That is, a server in topology A cannot have the same replication server ID or domain ID as a server in topology B.
If there are conflicting IDs, the ID of the first server (
--host1) is used to resolve the conflict. You must then re-initialize any servers that are out of date, using a server from the same topology as--host1as the source. -
Both replication topologies must have the same global administrators defined.
-
To merge two replicated topologies, use the
dsreplication enablecommand.For example, if you have a replicated topology (for example, topology A) that includes host1, host2 and host3 and a replicated topology (for example, topology B) that includes host4, host5, and host6, the following command effectively merges the two topologies:
$ dsreplication enable \
  --host1 host1 --port1 4444 --bindDN1 "cn=Directory Manager" \
  --bindPasswordFile1 pwd.txt --replicationPort1 8989 \
  --host2 host4 --port2 4444 --bindDN2 "cn=Directory Manager" \
  --bindPasswordFile2 pwd.txt --replicationPort2 8989 \
  --adminUID admin --adminPasswordFile pwd.txt --baseDN "dc=example,dc=com" \
  -X -n
This example assumes that both the hosts (host1 and host4) include a directory server and a replication server. If they do not, a directory server or replication server is automatically configured.
-
To ensure high availability, you must perform the following steps on all servers that were offline or unavailable during a merge:
-
Initialize the contents of the suffix
cn=admin databy usingdsreplication enableYou can initialize the servers individually, using one of the servers that was available during the merge, or you can use
dsreplication initialize-all. -
Use the
dsconfigcommand to update the list of replication servers.
-
32.2.7 Disabling Replication For a Specific Replication Domain
-
To disable replication on a specific domain, use the
dsreplication disablecommand.The following command disables replication of the data under
"dc=example,dc=com".$ dsreplication disable --hostname host1 --port 4444 --adminUID admin \ --adminPasswordFile pwd.txt --baseDN "dc=example,dc=com" -X -n
This command removes the replication configuration from the directory server for that domain. If the domain that is disabled is the only replicated domain on this directory server instance, the command also disables the replication server on that instance. If the replication server is disabled, other directory servers that were connected to that replication server are disconnected and automatically reconnect to another replication server in the topology.
-
To disable the replication server itself (including the change log and the replication port) use the following command:
$ dsreplication disable --hostname host1 --port 4444 -X -n \
  --adminUID admin --adminPasswordFile pwd.txt --baseDN "dc=example,dc=com" \
  --disableReplicationServer
When the replication server is disabled, other directory servers that were connected to that replication server are disconnected and automatically reconnect to another replication server in the topology.
32.2.7.1 Notes About Disabling the Replication Server
Disabling a replication server deletes the replication configuration but does not delete the replication server databases. You can therefore retrieve replication changes in the event that the replication server was disabled in error. If you have no requirement for re-enabling replication on this suffix, remove the replication server databases manually, for example: $rm changelogDB/*.
If replication is disabled, and then reenabled, any changes made on that server in the interim are not replicated. You must therefore either forbid changes on the server on which replication is disabled (for the period that replication is disabled) or resynchronize the rest of the topology from that server in the event that changes have occurred.
32.3 Configuring Data Replication Using ODSM
Most server configuration that can be done by using ODSM is done from the Directory Manager tab. However, you can use either the Directory Manager tab or the Topology Manager tab to manage replication configuration, as follows:
-
To view or configure replication configuration properties that are specific to an individual server or replicated suffix, select the Directory Manager tab.
-
To manage an existing topology or to create a brand new topology using a replication configuration wizard, select the Topology Manager tab.
The topics in this section include:
-
Section 32.3.1, "Viewing or Modifying an Existing Replication Server Configuration"
-
Section 32.3.2, "Viewing or Modifying a Replicated Suffix Configuration"
-
Section 32.3.3, "Launching the Replication Configuration Wizard from the Directory Manager Tab."
-
Section 32.3.4, "Launching the Replication Configuration Wizard from the Topology Manager Tab."
Considerations When Updating ODSM
If you are using multiple instances of ODSM in your replication topology and preparing to update ODSM, you must be aware of the following:
-
If you update one ODSM instance, you must update all ODSM and replicated instances.
-
When updating ODSM, you must also update Oracle Unified Directory to the same version. Updated ODSM versions are not guaranteed to work with older Oracle Unified Directory versions.
Note:
For information about updating Oracle Unified Directory and Oracle Directory Services Manager, see "Updating Oracle Directory Services Manager on Oracle WebLogic Server" in the Installing Oracle Unified Directory.32.3.1 Viewing or Modifying an Existing Replication Server Configuration
To view or modify an existing replication server:
-
Connect to the directory server from ODSM, as described in Section 16.2, "Connecting to the Server Using ODSM."
-
Click the Directory Manager tab.
-
Click the tab of the server your want to configure.
-
Click the Configuration subtab.
-
In the Naming Contexts section, under General Configuration, click Replication Server.
The Replication Server page is displayed.
-
View or modify the Replication Server properties.
For a description of all possible properties, and their values, see the "Replication Server" section in the Configuration Reference for Oracle Unified Directory.
-
Click Apply to save any modifications you may have made.
32.3.2 Viewing or Modifying a Replicated Suffix Configuration
To view or modify a replicated suffix's configuration:
-
Connect to the directory server from ODSM, as described in Section 16.2, "Connecting to the Server Using ODSM."
-
Click the Directory Manager tab.
-
Click the tab of the server your want to configure.
-
In the Naming Contexts section, under General Configuration, expand the Replicated Suffixes node, then select the suffix you want to view or modify.
-
Click the Main subtab.
View or modify the properties on the Main subtab, then click Apply to save any modifications you may have made.
For a description of all possible properties, and their values, see the "Replication Domain" section in the Configuration Reference for Oracle Unified Directory.
-
Click the Assured Replication subtab.
View or modify the properties on the Assured Replication subtab, then click Apply to save any modifications you may have made.
For a description of all possible properties, and their values, see the "Replication Domain" section in the Configuration Reference for Oracle Unified Directory.
-
Click the Fractional Replication subtab.
View or modify the properties on the Fractional Replication subtab, then click Apply to save any modifications you may have made.
For a description of all possible properties, and their values, see the "Replication Domain" section in the Configuration Reference for Oracle Unified Directory.
32.3.3 Launching the Replication Configuration Wizard from the Directory Manager Tab
Launch the replication configuration wizard when you want to create a brand new topology, or to add a server to an existing topology. You can launch a replication configuration wizard from the Directory Manager Tab when either of these conditions are true:
-
No replication topology exists. See Section 32.3.3.1, "Creating a New Topology from Scratch."
-
A replication topology exists, but the current server has not yet been added to it, or the current server is only partially configured for replication. See Section 32.3.3.2, "Adding a Server to an Existing Topology."
32.3.3.1 Creating a New Topology from Scratch
-
Connect to the directory server from ODSM, as described in Section 16.2, "Connecting to the Server Using ODSM."
-
Click the Directory Manager tab.
-
Click the tab of the server your want to configure.
-
In the Naming Context pane, under General Configuration, choose Replication Configuration.
The Replication Configuration page is displayed.
-
To launch the replication configuration wizard, click Configure.
-
In the Replication Options page, choose "Do you want to create a new topology from scratch?"
Click Next.
-
In the Identify Servers page, enter the following information for at least two source servers to be configured:
-
Host. Enter the server name using the fully qualified domain name.
-
Administration Port. Enter the administration port number. The default is 4444.
-
Admin Username. Enter the DN for the administrator who can manage the server.
-
Admin Password. Enter the password for the administrator you specified.
-
-
(Optional) On this page, you can also perform the following:
-
To preview the suffixes configured for a server, click its Preview Suffixes link in the last column.
-
To add another server to be configured, click Add, then repeat step 6 above.
-
To remove a server from the topology, select the server name, then click Remove.
Click Next.
-
-
In the Global Administrators page, the Domain Administrator can manage multiple directory server instances using ODSM. This administrator is the Global Administrator who will manage the new replication topology.
Provide the following information for the Global Administrator:
-
Global Admin User ID. This is the administrator who can view and manage the topology.
-
Global Admin Password. Enter the password for the Global Administrator specified above.
-
Confirm Global Admin Password. Enter the password again to confirm it.
Click Next.
-
-
In the Replication Servers page, in the Configure Replication Servers table, the following information for each replication server is displayed:
-
Host. The replication server host name cannot be modified here.
-
Admin Port. The replication server admin port cannot be modified here.
-
Act as Replication Server. If you want the server to act as a replication server, then click the checkbooks until a check is displayed. If you cannot modify this setting, then the server is already configured as a replication server.
-
Replication Port. If you enabled a server to act as a replication server in the previous field, then enter a replication port number.
Note:
Be sure to enter a replication port number that is not already in use. If you cannot modify this setting, then the server is already configured as a replication server.
-
-
In the Replication Data page, the Configure Replicated Data table displays all the suffixes that are available in at least two servers among all servers. Indicate whether each suffix in the topology will be replicated. The suffixes you enable here will be replicated on all the servers in the replication topology.
-
To enable a domain to act as a replication suffix, in the Configure Replicated section, select a domain from the "Available for Replication" column, then click the right arrow to move it to the "Selected for Replication" column.
-
To enable a server to act as a replication domain, click its Replicate Suffixes checkbox until a checkmark is displayed.
Click Next.
-
-
The summary page displays the replication server and domain information you just entered.
-
If you must modify any of the displayed information, click Back.
-
When you are satisfied that the Summary information is correct, click Create.
-
32.3.3.2 Adding a Server to an Existing Topology
-
Connect to the directory server from ODSM, as described in Section 16.2, "Connecting to the Server Using ODSM."
-
Click the Directory Manager tab.
-
Click the tab of the server your want to configure.
-
In the Naming Context pane, under General Configuration, choose Replication Configuration.
The Replication Configuration page is displayed.
-
To launch the replication configuration wizard, click Configure.
-
If the current server is already partially configured for replication, then it already exists as part of an existing topology. Skip step 6, and proceed to step 7.
-
If the current server is not already part of an existing topology, then the Replication Options page is displayed. Proceed to step 6.
-
-
In the Replication Options page, choose "Is there an existing topology you want to add the server to?"
Click Next.
-
On the Connect/Identity Server page, in the Connect to Server section, the following information about the server you want to connect to in the existing topology is displayed:
-
Host. If the current server host is already part of a topology, then its name cannot be modified here. If the server is not part of a topology, then enter the host name of an existing server in the topology.
-
Administration Port. If the current server is already part of a topology, then its administration port cannot be modified here. If the current server is not part of topology, then enter the administration port for the host specified above.
-
Global Admin User ID. Enter the Global admin User ID. This is the administrator who can view and manage the topology. The user ID was specified when the topology was created.
-
Global Admin Password. Enter the password for the Global Administrator specified above.
Click Connect. The "List of Servers" and "List of Replicated Suffixes" are displayed.
-
-
Review the "List of Servers" and the "List of Replicated Suffixes" to be sure that you are adding the server to the appropriate topology.
When you are satisfied with the information displayed, click Next.
-
In the Replication Servers page, in the Configure Replication Servers table, the following information for each replication server to be configured is displayed:
-
Host. The replication server host name cannot be modified here.
-
Admin Port. The replication server administration port cannot be modified here.
-
Act as Replication Server. If you want the server to act as a replication server, then click the checkbox until a check is displayed. If you cannot modify this setting, then the server is already configured as a replication server.
-
Replication Port. If you enabled a server to act as a replication server in the previous field, then enter its replication port number.
Note:
Be sure to enter a replication port number that is not already in use. If you cannot modify this setting, then the server is already configured as a replication server.Click Next.
-
-
In the Replication Data page, the Configure Replicated Data table displays all servers that contain suffixes already configured for replication in the topology, and that you've chosen to be added to the topology. Indicate whether each server in the topology will have suffixes replicated.
To enable a server to act as a replication domain, click its Replicate Suffixes checkbox until a checkmark is displayed.
Click Next.
-
The summary page displays the replication server and domain information you just entered.
-
If you must modify any of the displayed information, click Back.
-
When you are satisfied that the Summary information is correct, click Apply.
-
32.3.4 Launching the Replication Configuration Wizard from the Topology Manager Tab
Launch the replication configuration wizard when you want to create a brand new topology, or to add a server to an existing replication topology. You can launch a replication configuration wizard from the topology Manager Tab when either of these conditions are true:
-
No replication topology exists. See Section 32.3.4.1, "Creating a New Topology from Scratch."
-
A replication topology exists, but the current server has not been added to the topology. See Section 32.3.4.2, "To Manage an Existing Replication Topology."
32.3.4.1 Creating a New Topology from Scratch
-
To invoke ODSM, enter the following URL into your browser's address field:
http://host:port/odsmwhere host is the name of the host on which ODSM is running, and port is the port number of its administration server. The default administration port number is 7001.
-
Click the Topology Manager tab.
The Topology Connections tab is displayed.
-
In the Create Replication Topology section of the Topology Connection tab, click Create.
The Create Replication Topology tab is displayed.
-
In the Identify Servers page, enter the following information for at least two source servers to be configured:
-
Host. Enter the host name using a fully qualified domain name.
-
Administration Port. Enter the administration port number for the server named above. The default is 4444.
-
Admin Username. Enter the DN for the administrator who can manage the server.
-
Admin Password. Enter the password for the administrator you specified.
-
-
(Optional) On this page, you can also perform the following:
-
To preview the suffixes configured for a server, click its Preview Suffixes link in the last column.
-
To add another server to be configured, click Add, then repeat step 4 above.
-
To remove a server from the topology, select the server name, then click Remove.
-
-
Click Next.
-
In the Global Administrators page, the Domain Administrator can manage multiple directory server instances using ODSM. This administrator is the Global Administrator who will manage the new replication topology.
Provide the following information for the Global Administrator:
-
Global Admin User ID. This is the administrator who can view and manage the topology.
-
Global Admin Password. Enter the password for the Global Administrator specified above.
-
Confirm Global Admin Password. Enter the password again to confirm it.
Click Next.
-
-
In the Replication Servers page, in the Configure Replication Servers table, provide the following information for the replication servers to be configured:
-
Host. You cannot modify the server host name here.
-
Admin Port. You cannot modify the server administration port here.
-
Act as Replication Server. If you want the server to act as a replication server, then click the checkbox until a check is displayed. If you cannot modify this setting, then the server is already configured as a replication server.
-
Replication Port. If you enabled a server to act as a replication server in the previous field, then enter a replication port number.
Note:
Be sure to enter a replication port number that is not already in use. If you cannot modify this setting, then the server is already configured as a replication server.Click Next.
-
-
In the Replication Data page, the Configure Replicated Data table displays all the suffixes that are available in at least two among the servers. Indicate whether each suffix in the topology will be replicated. The suffixes you enable here will be replicated on all the servers in the replication topology.
-
To enable a domain to act as a replication suffix, in the Configure Replicated section, select a domain from the "Available for Replication" column, then click to right arrow to move it to the "Selected for Replication" column.
-
To enable a server to act as a replication domain, click its Replicate Suffixes checkbox until a checkmark is displayed.
Click Next.
-
-
The summary page displays the replication server and domain information you just entered.
-
If you must modify any of the displayed information, click Back.
-
When you are satisfied that the Summary information is correct, click Create.
-
32.3.4.2 To Manage an Existing Replication Topology
-
To invoke ODSM, enter the following URL into your browser's address field:
http://host:port/odsmwhere host is the name of the host on which ODSM is running, and port is the port number of its administration server. The default administration port number is 7001.
-
In the Topology Manager subtab, enter the following information:
-
Host. Enter the host name of any server that is part of the replication topology. Use the fully qualified domain name.
-
Administration Port. Enter the administration port number for the server specified above.
-
Global Admin User ID. Enter the Global admin User ID. This is the administrator who can view and manage the topology. The user ID was specified when the topology was created.
-
Global Admin Password. Enter the password for the Global Administrator specified above.
Click Connect.
-
-
In the Replication topology page, you can view and manage information about the topology, and you can add additional servers to the topology.
-
To add a server to the replication topology, click Add Servers.
-
To automatically refresh the topology information, click the Automatically Refresh Topology Information checkbox until a checkmark is displayed. To manually refresh the topology information, first be sure the automatic refresh feature is disabled, then click Refresh.
-
To edit the value for interval after which the topology is to be automatically refreshed, click Update.
-
To view tasks recently executed in the replication topology, in the Launched Tasks section click the View Launch Task Details link.
-
-
In the Replication Servers and Replicated Data section, you can do to the following:
-
Use the drop-down filter lists to filter search results based on any of the following: replicated suffix, replication host name, host:port information, or replication group name.
-
Change the replication port number.
-
To disable replication, select the replication server or replicated suffix you want to disable. Then, in the Actions menu, choose Disable Replication.
-
-
To assign a replication server to a different replication group, in the Replication Servers section, click the Change Replication Group link.
-
To configure a replicated suffix on a server, in the Replicated Data section, first select the replicated suffix you want to configure, then:
-
To change the Trust/Untrust setting, click Trust/Untrust. For information about trusted and untrusted servers, see Section 32.15, "Using Isolated Replicas."
Note:
The Trust/Untrust button will be disabled if the server used for connecting to the topology is an untrusted server. -
To initialize the server, click Initialize. For information about initialization, see Section 7.2.1, "Replication Initialization."
-
To start pre-external initialization, click Pre-External Initialization. For information abut pre-external initialization, see the
pre-external-initializationoption in Section A.2.6, "dsreplication," and in Section A.2.8, "gicadm." -
To start post-external initialization, click Post-External Initialization. For information about post-external initialization, see the
post-external-initializationoption in Section A.2.6, "dsreplication," and in Section A.2.8, "gicadm." -
To purge historical data, click Purge Historical. For information about purging historical data, see Section 7.3.4, "Purging Historical Information,"and Section 32.14, "Purging Historical Replication Data."
-
To change the data replication group, click Change Replication Group. For information about replication groups, see Section 7.6, "Replication Groups."
-
-
To modify the Global Administrator credentials, click Topology Settings. Provide the following information:
-
Global Admin ID. Enter the username for the administrator who can connect to and manage a topology. This username was created when the topology was created.
-
Global Admin Password. Enter the password for the administrator named above.
-
Confirm Global Admin Password. Enter again the password for the administrator name above.
Click Apply.
-
32.4 Configuring Large Replication Topologies
In particularly large topologies, it is often simpler to configure dedicated replication servers and dedicated directory servers.
-
Dedicated directory servers that do not include a directory server. They contain replicated data, but do not contain a change log with the modifications made to the replicated data. Dedicated directory servers also have no configured replication port.
-
Dedicated replication servers do not include a replication server or replicated data, but they do contain a change log with the modifications made to the replicated data on other servers in the topology. Dedicated replication servers also do have a configured replication port.
Note:
Each topology must have at least two replication servers to avoid a single point of failure.For more information and sample topologies, see Chapter 2, "Example Deployments Using the Directory Server."
The following diagram illustrates a large replication topology with one dedicated replication server (Replication Server 2), four dedicated directory servers, and one server that contains both a replication server and a directory server (Host 1).
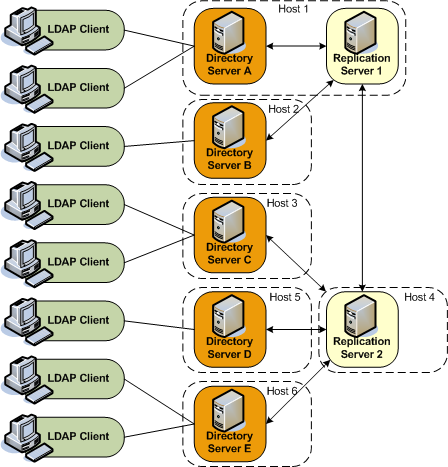
32.4.1 Configuring a Dedicated Replication Server
To configure a dedicated replication server, use the --onlyReplicationServer1 or --onlyReplicationServer2 option when you enable replication between two servers.
The following example configures replication between Directory Server C and Replication Server 2 in the previous illustration.
$ dsreplication enable \
  --host1 host3 --port1 4444 --bindDN1 "cn=Directory Manager" \
  --bindPasswordFile1 pwd.txt --noReplicationServer1 \
  --host2 host4 --port2 4444 --bindDN2 "cn=Directory Manager" \
  --bindPasswordFile2 pwd.txt --onlyReplicationServer2 \
  --replicationPort2 8989 --adminUID admin --adminPasswordFile pwd.txt \
  --baseDN "dc=example,dc=com" -X -n
32.5 Modifying the Replication Configuration With dsconfig
This section describes how to change certain advanced properties of a replication configuration by using the dsconfig command. Advanced properties are usually optional, or have a default value that is acceptable in most cases. For general information about using dsconfig, see Section 17.1, "Managing the Server Configuration Using dsconfig."
You cannot use dsconfig to set up replication between directory servers. Replication can be set up automatically using the GUI install utility, or manually, using the dsreplication command. For more information, see Section 32.3, "Configuring Data Replication Using ODSM."
This section covers the following topics:
32.5.1 Retrieving the Replication Domain Name
The replication domain name is generated by the directory server and includes the base DN and a numeric unique identifier.
To obtain a list of the configured replication domains, use the list-replication-domains subcommand. For example:
$ dsconfig -h host1 -p 4444 -D "cn=directory manager" -j pwd-file -n list-replication-domains \
   --provider-name "Multimaster Synchronization"

Replication Domain : Type    : server-id : replication-server     : base-dn
-------------------:---------:-----------:------------------------:--------------------
cn=admin data      : generic : 13981     : host1:8989, host2:8989 : cn=admin data
cn=schema          : generic : 20284     : host1:8989, host2:8989 : cn=schema
dc=example,dc=com  : generic : 26560     : host1:8989, host2:8989 : "dc=example,dc=com"
32.5.2 Changing the Replication Purge Delay
The replication changes database maintains a record of updates, which might or might not have been replicated. The replication purge delay is a property of the replication server, and specifies the period of time after which internal purge operations are performed on the replication changes database.
32.5.2.1 How Replication Changes Are Purged
Any change that is older than the purge delay is removed from the replication changes database, irrespective of whether that change has been applied. The default purge delay is one day. If the replication changes database is backed up less frequently than the purge delay, changes will be cleared before the changes database has been backed up. Changes can therefore be lost if you use the backup to restore data.
32.5.2.2 Changing the Replication Purge Delay
-
Display the current value of the replication purge delay.
$ dsconfig -h localhost -p 4444 -D "cn=directory manager" -j pwd-file -n \
  get-replication-server-prop \
  --provider-name "Multimaster Synchronization" --advanced \
  --property replication-purge-delay

Property                : Value(s)
------------------------:---------
replication-purge-delay : 1 d
-
Change the purge delay.
The following command changes the purge delay to one week:
$ dsconfig -h localhost -p 4444 -D "cn=directory manager" -j pwd-file -n \
  set-replication-server-prop \
  --provider-name "Multimaster Synchronization" \
  --set replication-purge-delay:1w
32.5.3 Changing the Window Size
The window size is a property of the replication server and specifies the number of change requests that are sent to directory servers, without the replication server having to wait for an acknowledgment from the directory server before continuing.
The window size represents the maximum number of update messages that can be sent without immediate acknowledgment from the directory server. It is more efficient to send many messages in quick succession instead of waiting for an acknowledgment after each one. Using the appropriate window size, you can eliminate the time replication servers spend waiting for acknowledgments to arrive. The default window size is 100. If you notice that some directory servers are lagging behind in terms of replicated changes, increase the window size to a higher value and check replication performance again before making further adjustments.
32.5.3.1 Changing the Window Size
-
Display the current value of the window size:
$ dsconfig -h localhost -p 4444 -D "cn=directory manager" -j pwd-file -X -n \
  get-replication-server-prop --provider-name "Multimaster Synchronization" \
   --advanced --property window-size

Property    : Value(s)
------------:---------
window-size : 100
-
Change the window size.
The following command changes the window size to 200.
$ dsconfig -h localhost -p 4444 -D "cn=directory manager" -j pwd-file -X -n \
  set-replication-server-prop \
  --provider-name "Multimaster Synchronization" --set window-size:200
32.5.4 Changing the Initialization Window Size
During a data import in a replicated topology, it can occur that the importing server is too slow to keep up with the data that is sent by the exporting server. The importing server can therefore block not only the import, but can also stop any other replication changes from being propagated by the exporting server.
An initialization window size enables an exporting server to detect acknowledgments from the slowest importing server and to send data on the replication network only when the slow importer is available to receive them.
The initialization window size is set to 100 by default. If there are no slow servers in your topology, you can increase the initialization window size so that exporting servers send more updates before waiting for an acknowledgment. If your topology includes a particularly slow server, you can decrease the initialization window size to ensure that replication is not blocked by this server.
32.5.4.1 Changing the Initialization Window Size
-
Display the current value of the initialization window size:
$ dsconfig -h localhost -p 4444 -D "cn=directory manager" -j pwd-file -X -n \
  get-replication-domain-prop --provider-name "Multimaster Synchronization" \
  --domain-name dc=example,dc=com --advanced --property initialization-window-size
Property                   : Value(s)
---------------------------:---------
initialization-window-size : 100
-
Change the initialization window size.
The following command changes the initialization window size to 50.
$ dsconfig -h localhost -p 4444 -D "cn=directory manager" -j pwd-file -n \
  set-replication-domain-prop --provider-name "Multimaster Synchronization" \
  --domain-name dc=example,dc=com --set initialization-window-size:50
32.5.5 Changing the Heartbeat Interval
The heartbeat interval is a property of the replication domain and specifies the frequency with which the replication domain communicates with the replication server. The replication domain expects a regular heartbeat at this interval from the replication server. If the heartbeat is not received, the domain closes its connection and connects to another replication server in the topology.
The default heartbeat interval is ten seconds. If replication is running over a WAN or a network with slow response times, you might want to increase the heartbeat interval. In addition, if you observe an error similar to the following in the logs, it is probably necessary to increase the heartbeat interval.
[26/May/2011:16:32:50 +0200] category=SYNC severity=NOTICE msgID=15138913
 msg=Replication Heartbeat Monitor on RS rserver/192.157.197.62:8989 30382 for
 dc=example,dc=com in DS 10879 is closing the session because it could not
 detect a heartbeat
The heartbeat interval is sensitive to the settings of your JVM. If you require a lower heartbeat interval than the default, you must configure your JVM to have a low pause time during garbage collection by setting the -XX:+UseConcMarkSweepGC option. For more information, see "Configuring the JVM, Java Options, and Database Cache" in Installing Oracle Unified Directory.
32.5.5.1 Changing the Heartbeat Interval
-
Display the current value of the heartbeat interval.
$ dsconfig -h localhost -p 4444 -D "cn=directory manager" -j pwd-file -n \
  get-replication-domain-prop \
  --provider-name "Multimaster Synchronization" \
  --domain-name "dc=example,dc=com (domain 15853)" --advanced \
  --property heartbeat-interval
Property           : Value(s)
-------------------:---------
heartbeat-interval : 10 s
-
Change the heartbeat interval.
The following command changes the heartbeat interval to 5 seconds.
$ dsconfig -h localhost -p 4444 -D "cn=directory manager" -j pwd-file -n \
  set-replication-domain-prop \
  --provider-name "Multimaster Synchronization" \
  --domain-name "dc=example,dc=com (domain 15853)" --set heartbeat-interval:5s
32.5.6 Changing the Isolation Policy
The isolation policy is a property of the replication domain and specifies the behavior of the directory server if replication is configured but none of the replication servers are up and running when an update is received. The default behavior of the directory server in this situation is to reject all updates.
32.5.6.1 Changing the Isolation Policy
-
Display the current isolation policy.
$ dsconfig -h localhost -p 4444 -D "cn=directory manager" -j pwd-file \
 get-replication-domain-prop \
  --provider-name "Multimaster Synchronization" \
  --domain-name "dc=example,dc=com (domain 15853)" \
  --advanced --property isolation-policy -n

Property         : Value(s)
-----------------:-------------------
isolation-policy : reject-all-updates
-
Change the isolation policy.
The following command specifies that the directory server should accept all updates in this situation.
$ dsconfig -h localhost -p 4444 -D "cn=directory manager" -j pwd-file \
  set-replication-domain-prop \
  --provider-name "Multimaster Synchronization" \
  --domain-name "dc=example,dc=com (domain 15853)" \
  --set isolation-policy:accept-all-updates -n
32.5.7 Configuring Encrypted Replication
By default, replication traffic is not encrypted. To enable encryption, use the dsconfig command to set the properties of the crypto manager.
The following command specifies that replication traffic should be encrypted.
$ dsconfig -h localhost -p 4444 -D "cn=directory manager" -j pwd-file -X -n \
  set-crypto-manager-prop --set ssl-encryption:true
32.5.8 Configuring Replication Groups
Replication groups are designed to support multi-data center deployments and disaster recovery scenarios. For information about the design and implementation of replication groups in the directory server, see Section 7.6, "Replication Groups."
Note:
Changing the replication group configuration has an impact on assured replication. For more information, see Section 7.7, "Assured Replication."32.5.8.1 Configuring a Replication Group
A replication group is configured on each directory server and replication server that should be part of the same group. On directory servers, a replication group is configured per replicated domain. On replication servers, the group is configured for the entire replication server.
Replication groups are configured by giving each replicated domain and replication server the same group ID. This example configures a replication group (1) for the replicated domain dc=example,dc=com.
-
On each directory server that will be part of this group, set the group ID for the domain
dc=example,dc=com.$ dsconfig -h localhost -p 4444 -D "cn=directory manager" -j pwd-file -n \ set-replication-domain-prop \ --provider-name "Multimaster Synchronization" \ --domain-name "dc=example,dc=com (domain 10233)" --advanced \ --set group-id:1
-
On each replication server that will be part of this group, set the group ID.
$ dsconfig -h localhost -p 4444 -D "cn=directory manager" -j pwd-file -n \
  set-replication-server-prop \
  --provider-name "Multimaster Synchronization" --advanced \
  --set group-id:1
32.5.9 Configuring Assured Replication
In most deployment scenarios, the loosely consistent multi-master replication model is sufficient. However, certain scenarios might require tighter consistency between replicas. In such cases, you can configure assured replication, which provides the following benefits:
-
High availability of data. If a server crashes immediately after a modification is received on that server, there is a risk that the modification will be lost before it is replayed to other servers in the topology. With assured replication, any modification is replayed to another server in the topology before an acknowledgment is sent to the client application., which minimizes the risk of losing data if the server crashes.
-
Immediacy of data availability. Some applications might require modifications to be available on additional servers in the topology immediately after a modification is made.
Assured replication is an extension of the replication protocol and is configured per replicated domain. For more information, see Section 32.5.1, "Retrieving the Replication Domain Name."
Assured replication is different from synchronous replication. That is, changes do not occur simultaneously on all servers in the topology. However, assured replication can mimic the functionality of synchronous replication to an extent, as far as LDAP clients are concerned. This is achieved by delaying acknowledgments to the client application until a modification has been propagated to additional servers in the topology.
Note:
Assured replication relies on replication groups. All replication servers and directory servers that function together in an assured replication configuration must be part of the same replication group.Assured replication can function in two modes:
-
Safe data mode. Any update must be propagated to a defined number of replication servers before the client receives an acknowledgment that the update has been successful.
The number of replication servers that must be reached defines the safe data level. The higher the safe data level, the higher the overall data availability.
-
Safe read mode. Any update must be propagated to all the directory servers in the topology before the client receives an acknowledgment that the update has been successful.
In both safe data mode and safe read mode, you can configure a time-out interval to prevent LDAP client calls from hanging if certain servers in the topology are not available.
-
On each directory server, you can configure a global time-out that comes into effect when the directory server sends an update to its replication server, either safe data mode or safe read mode. If this time-out is reached, the LDAP client call returns immediately and a message is written to the replication log to track the event.
-
On each replication server, you can configure a global time-out that comes into effect when the replication server sends an update to a peer replication server or to another directory server, either in safe data mode or in safe read mode. If this time-out is reached, the acknowledgment message that is returned to the initiating server (either a directory server or a replication server) includes a message that indicates the time-out. The initial directory server then logs a message that the time-out occurred for that update.
Note:
The default time-out of two seconds for a directory server and one second for a replication server should be satisfactory for most deployments. Only change the time-out if you are viewing time-outs in the logs and if you have a complete understanding of the impact of such a change. The value of the time-out should reflect the anticipated time that an update requires to go through its full path to reach its destination.The time-out value on a directory server should always be higher than the value on the replication server. For example: DS1(timeout 2s) -> RS1(timeout 1s) -> RS2(timeout 1s) -> DS2.
For a detailed explanation of the assured replication mechanism and the various configurable options, see Section 7.7, "Assured Replication."
32.5.9.1 Configuring Assured Replication in Safe Data Mode
This procedure configures assured replication in safe data mode for a topology. The procedure assumes that replication has already been configured.
-
On each directory server in the topology:
-
Set the assured replication mode.
$ dsconfig -h localhost -p 4444 -D "cn=directory manager" -j pwd-file -n \
  set-replication-domain-prop \
  --provider-name "Multimaster Synchronization" \
  --domain-name "dc=example,dc=com (domain 10233)" --advanced \
  --set assured-type:safe-data
-
Set the safe data level.
$ dsconfig -h localhost -p 4444 -D "cn=directory manager" -j pwd-file -n \
  set-replication-domain-prop \
  --provider-name "Multimaster Synchronization" \
  --domain-name "dc=example,dc=com (domain 10233)" --advanced \
  --set assured-sd-level:2
If you have configured replication by using
setupordsreplication, your replication servers and directory servers will be on the same virtual machine. In this case, you must set the safe data level to 2 or higher. -
Set the assured replication time-out.
$ dsconfig -h localhost -p 4444 -D "cn=directory manager" -j pwd-file -n \
  set-replication-domain-prop \
  --provider-name "Multimaster Synchronization" \
  --domain-name "dc=example,dc=com (domain 10233)" --advanced\
  --set assured-timeout:5s
Only change the time-out if you are viewing time-outs in the logs and if you have a complete understanding of the impact of such a change.
-
Verify the directory server group ID.
This should be the same for all replication servers and directory servers that form part of this replication group. For instructions on configuring the group ID, see Section 32.5.8, "Configuring Replication Groups."
-
Display the current assured replication configuration.
$ dsconfig -h localhost -p 4444 -D "cn=directory manager" -j pwd-file -n \
  get-replication-domain-prop \
  --provider-name "Multimaster Synchronization" \
  --domain-name "dc=example,dc=com (domain 10233)" --advanced \
  --property assured-type --property assured-sd-level --property assured-timeout

Property         : Value(s)
-----------------:------------
assured-sd-level : 2
assured-timeout  : 5 s
assured-type     : safe-data
-
-
On each replication server in the topology:
-
Display the current assured replication configuration.
$ dsconfig -h localhost -p 4444 -D "cn=directory manager" -j pwd-file -n \
  get-replication-server-prop \
  --provider-name "Multimaster Synchronization" --advanced \
  --property assured-timeout --property group-id

Property                  : Value(s)
--------------------------:---------
assured-timeout           : 1 s
group-id                  : 1
-
Set the assured replication time-out.
$ dsconfig -h localhost -p 4444 -D "cn=directory manager" -j pwd-file -n \
  set-replication-server-prop \
  --provider-name "Multimaster Synchronization" --advanced \
  --set assured-timeout:5s
Only change the time-out if you are viewing time-outs in the logs and if you have a complete understanding of the impact of such a change.
-
Verify the replication server group ID.
This should be the same for all replication servers and directory servers that form part of this replication group. For instructions on configuring the group ID, see 0
-
32.5.9.2 Configuring Assured Replication in Safe Read Mode
Assured replication is configured per replicated domain. This procedure configures assured replication in safe read mode for a topology. The procedure assumes that replication has already been configured.
-
On each directory server in the topology:
-
Set the assured replication mode.
$ dsconfig -h localhost -p 4444 -D "cn=directory manager" -j pwd-file -n \
  set-replication-domain-prop \
  --provider-name "Multimaster Synchronization" \
  --domain-name "dc=example,dc=com (domain 10233)" --advanced \
  --set assured-type:safe-read
-
Set the assured replication time-out.
$ dsconfig -h localhost -p 4444 -D "cn=directory manager" -j pwd-file -n \
  set-replication-domain-prop \
  --provider-name "Multimaster Synchronization" \
  --domain-name "dc=example,dc=com (domain 10233)" --advanced \
  --set assured-timeout:5s
Only change the time-out if you are viewing time-outs in the logs and if you have a complete understanding of the impact of such a change.
-
Verify the directory server group ID.
This should be the same for all replication servers and directory servers that form part of this replication group. For instructions on configuring the group ID, see Section 32.5.8, "Configuring Replication Groups." For more information about groups and assured replication, see Section 7.7, "Assured Replication."
-
Display the current assured replication configuration.
$ dsconfig -h localhost -p 4444 -D "cn=directory manager" -j pwd-file -n \
  get-replication-domain-prop \
  --provider-name "Multimaster Synchronization" \
  --domain-name "dc=example,dc=com (domain 10233)" --advanced \
  --property assured-type --property assured-timeout --property group-id

Property         : Value(s)
-----------------:------------
assured-timeout  : 5 s
assured-type     : safe-read
group-id         : 1
-
-
On each replication server in the topology:
-
Display the current assured replication configuration.
$ dsconfig -h localhost -p 4444 -D "cn=directory manager" -j pwd-file -n \
  get-replication-server-prop \
  --provider-name "Multimaster Synchronization" --advanced \
  --property assured-timeout --property degraded-status-threshold \
  --property group-id

Property                  : Value(s)
--------------------------:---------
assured-timeout           : 1 s
degraded-status-threshold : 5000
group-id                  : 1
-
Set the assured replication time-out.
Only change the time-out if you are viewing time-outs in the logs and if you have a complete understanding of the impact of such a change.
$ dsconfig -h localhost -p 4444 -D "cn=directory manager" -j pwd-file -n \
  set-replication-server-prop \
  --provider-name "Multimaster Synchronization" --advanced \
  --set assured-timeout:5s
-
Set the degraded status threshold.
The degraded status threshold defines the stage at which the server is regarded as "too slow", based on the number of updates queued in the replication server for that directory server. For more information, see Section 7.5.2, "Degraded Status."
Do not adjust this value unless you observe time-outs in the logs.
$ dsconfig -h localhost -p 4444 -D "cn=directory manager" -j pwd-file -n \
  set-replication-server-prop \
  --provider-name "Multimaster Synchronization" --advanced \
  --set degraded-status-threshold:2000
-
Verify the replication server group ID.
This should be the same for all replication servers and directory servers that form part of this replication group. For instructions on configuring the group ID, see Section 32.5.8, "Configuring Replication Groups." For more information about groups and assured replication, see Section 7.7, "Assured Replication."
-
32.5.10 Configuring Fractional Replication
Fractional replication enables you to replicate specific parts of directory data to other replicas in the topology. This feature is particularly useful in the following scenarios:
-
Limited disk space. Restricting the data that is replicated can significantly cut down on the amount of disk space that is required on certain replicas, particularly if you restrict the replication of attributes such as jpeg photos, which represent large data volumes.
-
Security concerns. Certain data, such as user passwords, might be sensitive and not required on certain replicas, especially if there is a risk of inappropriate access on these replicas.
This section describes how to configure fractional replication on one or more servers in a topology. For information about the architecture of the fractional replication mechanism, see Section 7.8, "Fractional Replication."
Fractional replication is configured on the directory server that receives the partial data, and is attribute-based. Consider the following illustration:
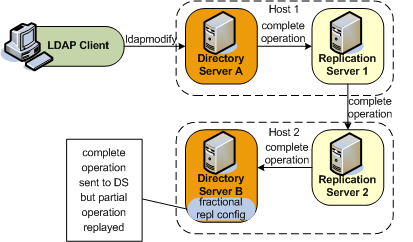
Description of the illustration ''fractional-repl.png''
Fractional replication is configured on Directory Server B. An ldapmodify operation is sent to Directory Server A. The entire operation is forwarded to Replication Server 1, then to Replication Server 2, then to Directory Server B. When the operation is replayed on Directory Server B, certain attributes from the operation are filtered out, based on that server's fractional configuration.
Fractional replicas remain writable directly from client applications. However, if an add or modify operation that includes certain "forbidden attributes" is attempted on a fractional replica, the operation is denied and the server returns an "Unwilling to perform" error.
You can configure fractional replication in one of two modes:
-
Exclusive mode. In this mode, the multi-valued
fractional-excludeattribute is used to filter out the specified attributes from an incoming LDAP add or modify operation.Excluded attributes must be optional attributes of an object class.
-
Inclusive mode. In this mode, the multi-valued
fractional-includeattribute is used to filter in only the specified attributes from an incoming LDAP add or modify operation.All other attributes (except for those that are mandatory in the object class) are removed from the change that is replayed on the server.
The two modes are mutually exclusive, that is, you can include only one of these attributes in a domain configuration.
Fractional replication is configured per replicated domain (see Section 32.5.1, "Retrieving the Replication Domain Name"). A fractional domain implies that certain attributes are entirely absent from the domain. These attributes are filtered out at operation replay time but are also absent from the existing data in the domain.
To ensure coherency of the data across a replicated topology, it is necessary to identify whether a particular data set is fractional. The configuration of a new fractional domain therefore implies specific steps to ensure that the domain is free of forbidden attributes, and recognizable as a fractional domain. For more information, see Section 32.5.10.3, "Configuring and Initialize a Fractional Domain."
Use the dsconfig command to configure fractional replication in a domain, as follows.
32.5.10.1 Configuring Exclusive Fractional Replication
The following example configures a replica to exclude the photo and jpegPhoto attributes from any creation or modification of an entry whose object class is inetOrgPerson.
$ dsconfig -h localhost -p 4444 -D "cn=directory manager" -j pwd-file -X \
  set-replication-domain-prop --provider-name "Multimaster Synchronization" \
  --domain-name "dc=example,dc=com (domain 10233)" \
  --set fractional-exclude:inetOrgPerson:photo,jpegPhoto
Object classes and attributes can be specified by their names, or by their OIDs, so the following example has the same effect as the previous example:
$ dsconfig -h localhost -p 4444 -D "cn=directory manager" -j pwd-file -X \
  set-replication-domain-prop --provider-name "Multimaster Synchronization" \
  --domain-name "dc=example,dc=com (domain 10233)" \
  --set fractional-exclude:2.16.840.1.113730.3.2.2:0.9.2342.19200300.100.1.7, \
  0.9.2342.19200300.100.1.60
If you use object class or attribute names and OIDs, both values are added. For example, the following command adds both the attribute name and its OID to the list of excluded attributes:
$ dsconfig set-replication-domain-prop ...
  --set fractional-exclude:*:jpegPhoto,*:0.9.2342.19200300.100.1.60
If you wanted to remove this attribute from the list, you would need to remove both the attribute name and the OID.
To specify that the photo and jpegPhoto attributes should be removed from any creation or modification of any entry (regardless of its object class), use an asterisk in place of the object class. For example:
$ dsconfig -h localhost -p 4444 -D "cn=directory manager" -j pwd-file -X \
  set-replication-domain-prop --provider-name "Multimaster Synchronization" \
  --domain-name "dc=example,dc=com (domain 10233)" \
  --set fractional-exclude:*:photo,jpegPhoto
32.5.10.2 Configuring Inclusive Fractional Replication
The following example configures a replica to include only the uid and employeeNumber attributes from any creation or modification of an entry whose object class is inetOrgPerson. All other attributes are ignored in the modification, except those that are mandatory for the object class.
$ dsconfig -h localhost -p 4444 -D "cn=directory manager" -j pwd-file -X \
  set-replication-domain-prop --provider-name "Multimaster Synchronization" \
  --domain-name "dc=example,dc=com (domain 10233)" \
  --set fractional-include:inetOrgPerson:uid,employeeNumber
Object classes and attributes can be specified by their names, or by their OIDs, so the following example has the same effect as the previous example:
$ dsconfig -h localhost -p 4444 -D "cn=directory manager" -j pwd-file -X \
  set-replication-domain-prop --provider-name "Multimaster Synchronization" \
  --domain-name "dc=example,dc=com (domain 10233)" \
  --set fractional-include:2.16.840.1.113730.3.2.2:0.9.2342.19200300.100.1.1, \
  2.16.840.1.113730.3.1.3
If you use object class or attribute names and OIDs, both values are added. For example, the following command adds both the attribute name and its OID to the list of included attributes:
$ dsconfig set-replication-domain-prop ...
  --set fractional-include:*:jpegPhoto,*:0.9.2342.19200300.100.1.60
If you wanted to remove this attribute from the list, you would need to remove both the attribute name and the OID.
To specify that a particular attribute should be included in the creation or modification of any entry (regardless of its object class), use an asterisk in place of the object class. The following example includes only the description attribute in a creation or modification operation on any entry.
$ dsconfig -h localhost -p 4444 -D "cn=directory manager" -j pwd-file -X \
  set-replication-domain-prop --provider-name "Multimaster Synchronization" \
  --domain-name "dc=example,dc=com (domain 10233)" \
  --set fractional-include:*:description
32.5.10.3 Configuring and Initialize a Fractional Domain
The following steps are required when you initialize a new fractional domain:
-
Configure exclusive or inclusive fractional replication, as described in the previous two sections.
At this point, the domain obtains a bad generation ID status. For more information, see Section 7.5, "Replication Status."
This means that all modifications on the domain are blocked until the data is synchronized with the rest of the topology.
-
Import a new data set from one of the other servers in the topology.
The new data set can be imported online, by using
dsreplication initializeor by usingimport-ldifin online or offline mode. The server from which you import the data must either be an entire replica (that is, not a fractional replica) or must have the same fractional configuration as the server to which you are importing the data. During the import, all entries will be filtered with the fractional configuration set up in the previous step.For information about how to import a data set, see Section 32.6.1, "Initializing a Single Replicated Server" and Section 18.1, "Importing and Exporting Data."
-
After the data import, the domain returns to normal status.
For more information, see Section 7.5, "Replication Status."
The domain is now able to accept new entries from local LDAP operations, or synchronization operations with other servers in the topology. The data in the domain is free of any "forbidden" attributes.
32.5.11 Configuring Replication Status
Each replicated domain in a replicated topology has a certain replication status, depending on its connections within the topology, and on how up to date it is regarding the changes that have occurred throughout the topology. For more information, see Section 7.5, "Replication Status."
Replication status is generated automatically, based on how up-to-date a server is within the replicated topology. The only configurable parameter is the degraded status threshold, which defines the maximum number of changes allowed in the replication server's queue for all domains of the directory servers that are connected to this replication server. When this number is reached for a specific directory server, that server is assigned a degraded status. The degraded status remains until the number of changes drops below this value.
Note:
The default value of the degraded status threshold should be adequate for most deployments. Only modify this value if you observe several time-out messages in the logs when assured replication is configured.32.5.11.1 Configuring the Degraded Status Threshold
The default number of changes defined by this threshold is 5000. This example sets the threshold to 6000, to account for a network with more latency.
On the replication server, use dsconfig to set the degraded status threshold.
$ dsconfig -h localhost -p 4444 -D "cn=directory manager" -j pwd-file -X -n \
  set-replication-server-prop --provider-name "Multimaster Synchronization" \
  --set degraded-status-threshold:6000
32.5.12 Configuring the Replication Server Weight
In large topologies with several directory servers and several replication servers, it is more efficient to spread the directory servers out across the replication servers in a predefined manner. You can specify how many directory servers should connect to each replication server in a topology according to the relative capacity of the machine on which the replication server is running. For more information, see Section 7.2.3.2, "Replication Server Load Balancing."
To configure the replication server weight, run the dsconfig command as follows:
$ dsconfig -h localhost -p 4444 -D "cn=directory manager" -j pwd-file -X -n \
  set-replication-server-prop \
  --provider-name "Multimaster Synchronization" --set weight:2
By default, the weight of each replication server in the topology is 1.
32.6 Initializing a Replicated Server With Data
This section describes how to initialize a replicated server with data by using the dsreplication command, which accesses the server configuration over SSL through the administration connector.
Note:
For more information, see Section 17.4, "Managing Administration Traffic to the Server."In addition, because this section references information provided in Section 18.1.1, "Populating a Stand-Alone Directory Server With Data," be sure to read that section before you proceed.
32.6.1 Initializing a Single Replicated Server
The easiest way to initialize a single directory server in a replicated topology is to use the dsreplication command to copy the data over from another directory server in the topology. This command requires replication to have been enabled between the source server and the destination server. The command replaces all data under the specified base DN on the destination server with the data from the source server.
For example, the following command initializes the base DN "dc=example,dc=com" on host2 with the data on host1.
$ dsreplication initialize --baseDN "dc=example,dc=com" \
  --adminUID admin --adminPasswordFile pwd.txt \
  --hostSource host1 --portSource 4444 \
  --hostDestination host2 --portDestination 4444 --trustAll
32.6.2 Initializing a New Replicated Topology
To initialize all directory servers in a new replicated topology, use one of the following options:
-
Initialize all directory servers individually with the same data, using one of the methods described in Section 18.1.1, "Populating a Stand-Alone Directory Server With Data." When you have initialized all directory servers with data, enable replication between the servers.
-
Initialize a single directory server using one of the methods described in Section 18.1.1, "Populating a Stand-Alone Directory Server With Data." Enable replication for all directory servers, then use the
dsreplication intialize-allcommand to initialize all the remaining servers simultaneously. This command takes the details of the source server as arguments, and initializes all other servers for which replication is enabled.For example, the following command initializes all directory servers from the contents on
host1.$ dsreplication initialize-all --hostname localhost --port 4444 --trustAll \ --baseDN "dc=example,dc=com" --adminUID admin --adminPasswordFile pwd.txt
32.6.3 Adding a Directory Server to an Existing Replicated Topology
When you add a directory server to an existing replicated topology, the new server must be populated with the same generation of data as the existing directory servers in the topology. The data generation is an ID stored within the root entry of the replication domain. When the data generation does not exist, it is computed by the replication mechanism and stored. To ensure that the new directory server has the same data generation as the other servers in the topology, use one of the following methods to populate the directory server with data:
-
Use the same original LDIF file, backup file, or binary copy that was used to populate the other directory servers.
-
Use the result of an export, backup, or binary copy from another directory server in the topology.
If you install the new directory server using the GUI install and specify that it will be part of the replicated topology, the server is initialized with the correct data generation automatically.
If you do not install the directory server using the GUI install, and you use the dsreplication command to enable replication, you must initialize the server manually using one of the methods described in the previous section.
If a directory server in the topology does not contain the same data generation as the rest of the topology, data cannot be replicated to or from the server. However, the directory server remains connected to the topology, enabling it to be initialized using the replication protocol. Replication on this directory server is said to be downgraded.
When a directory server with the correct data generation is added to an existing topology, the replication mechanism automatically replays any changes that occurred since the first directory server in the topology was initialized with data. This action ensures that the new directory server is synchronized with the rest of the topology.
32.6.4 Changing the Data Set in an Existing Replicated Topology
Changing the data set implies importing an entirely new set of data to every directory server in the topology. When the data set is changed, two tasks are performed:
-
The new data is applied to each directory server in the topology.
-
The replication servers are cleared of any changes they might contain. This task includes resetting the data generation on the directory servers so that the new data generation is used.
If you change the data set using the dsreplication initialize command, both of these tasks are performed automatically. However, if you use the import-ldif command or the binary copy method to change the data set, you must perform these tasks manually, as described in the following section.
32.6.4.1 Changing the Data Set With import-ldif or Binary Copy
-
Clear the generation ID from the directory servers by running the
dsreplication pre-external-initializationcommand.It is sufficient to run this command from any directory server in the topology. All directory servers in the topology will be updated. For example, the following command prepares all servers in the topology for initialization by using
import-ldifor binary copy:$ dsreplication pre-external-initialization -h host1 -p 4444 -X \ -b dc=example,dc=com -I admin -j pwd-file Establishing connections ..... Done. pre-external-initialization should only be used if you are going to initialize all the replicated servers. If it is not the case (for instance you are going to recover only a server or you are in the process of adding a new server to the replication topology), the subcommand must not be executed. Do you want to continue? (yes / no) [yes]:
-
Use
import-ldifor binary copy to initialize all directory servers in the topology with data. -
Reset the generation ID by running the
dsreplication post-external-initializationcommand.It is sufficient to run this command from any directory server in the topology. All other directory servers are updated. For example, the following command resets the generation ID for all directory servers in the topology after initialization using
import-ldifor binary copy:$ dsreplication post-external-initialization -h localhost \ -p 4444 -b dc=example,dc=com -I admin -j pwd-file -X Updating replication information on base DN dc=example,dc=com ..... Done. Post initialization procedure completed successfully.
32.6.5 Appending Data in an Existing Replicated Topology
The easiest way to import a large number of entries to an existing replicated topology that already contains a large number of entries is to use the import-ldif command with the -a or --append option.
When you import data by using the import-ldif command, the imported data is not replicated automatically. You must therefore run import-ldif --append on every directory server in the topology. This strategy enables you to import the data with no downtime in the directory service.
You can also use the dsreplication initialize-all command after you have imported the data to a single directory server in the topology. However, this strategy will result in the directory service being unavailable for a certain period of time.
32.7 Using the External Change Log
The External Change Log (ECL) publicizes all changes that have occurred in a directory server database and is particularly useful for synchronizing the LDAP directory with other subsystems.
The ECL is built online from the replication change log and does not use an additional database for its storage. It is not a regular JEB back end, therefore no index must be configured.
This section describes how to enable the ECL in your directory service and how to configure client applications so that they can access the ECL. The section covers the following topics:
-
Section 32.7.3, "How a Client Application Uses the External Change Log in Cookie Mode"
-
Section 32.7.5, "Specifying the Attributes to be Included in the External Change Log"
-
Section 32.7.6, "Specifying the Attributes to be Excluded in the External Change Log"
-
Section 32.7.7, "Initializing Client Applications to Use the External Change Log"
-
Section 32.7.8, "Controlling Access to the External Change Log"
-
Section 32.7.10, "Disabling the External Change Log on a Server"
-
Section 32.7.11, "Disabling the External Change Log for a Specific Domain"
-
Section 32.7.13, "Porting Applications That Rely on Other Change Logs"
32.7.1 Enabling the External Change Log
The ECL is available by default on any server instance that includes both a directory server and a replication server. The ECL is not available by default on a server instance that is configured as either a dedicated directory server or a dedicated replication server (as described in Section 32.4, "Configuring Large Replication Topologies").
The ECL is enabled when replication is configured in one of the following ways:
-
By configuring a directory server as part of a replicated topology during installation. For more information, see "Setting Up Replication During Installation" in Installing Oracle Unified Directory.
-
By configuring replication after installation, by using the
dsreplicationcommand. For more information, see Section 32.3, "Configuring Data Replication Using ODSM."Note:
The ECL is not available if you configured replication with the--onlyReplicationServeror--noReplicationServeroptions.
Although the ECL functionality is based on the replication mechanism, some client applications might require access to the ECL content on a local server, outside of a replicated topology. You can enable the ECL on a local server, for a specific base DN, by running the following command:
$ dsreplication enable-changelog -h localhost -p 4444 -D "cn=directory manager" \
  -j pwd-file -r 8989 -b dc=example,dc=com -X -n
The replication port (-r) is required to configure the ECL, even on a standalone server, because the ECL relies on the replication mechanism. You need only specify the replication port if the change log (or replication) was not previously configured on the server. The default value of the replication port is 8989.
To verify that the ECL is configured on a directory server instance, run the following search command:
$ ldapsearch -h localhost -p 1389 -D "cn=directory manager" -j pwd-file \
  -s base -b "" "objectclass=*" namingContexts
dn:
namingContexts: cn=changelog
namingContexts: dc=Europe,dc=com
namingContexts: dc=us,dc=com
32.7.2 External Change Log APIs
The ECL supports two APIs, which enable two distinct modes of operation:
-
Cookie mode. This is the recommended API that you should use to access the ECL.
In cookie mode, the client application provides an ECL exchange control in its request to the server. In this mode, the DIT and schema provided in the entries that are returned by the server are not compatible with the LDAP change log draft (
http://tools.ietf.org/html/draft-good-ldap-changelog-04). -
Draft-compatible mode. This mode should be used only by existing applications that rely on the LDAP change log draft.
In this mode, the DIT and schema provided in the entries that are returned by the server are compatible with the LDAP change log draft.
For improved performance and for simplicity, you should port client applications to use the cookie mode. For more information, see Section 32.7.13, "Porting Applications That Rely on Other Change Logs."
32.7.3 How a Client Application Uses the External Change Log in Cookie Mode
Each entry in the ECL has an associated cookie. When a client application sends a SEARCH request, the application provides either the cookie of the last message that was read from the ECL (in a previous SEARCH), or an empty value. The server returns the ECL entries associated with that cookie.
Each entry is returned with its associated cookie. When the application disconnects, it stores the last cookie that it received, and provides this cookie to the server with its next SEARCH request.
This transmission of ECL cookies is illustrated in the following diagram.
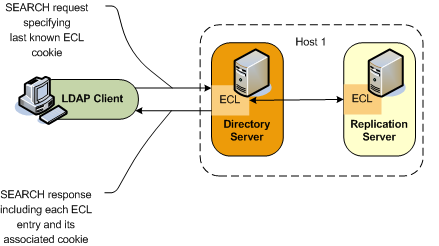
Description of the illustration ''external-changelog.png''
The content of the cookie is not a public interface for the client application. The client application sends the cookie as a request control and the server sends the cookie as a response control.
The External Changelog Cookie Control has an OID of 1.3.6.1.4.1.26027.1.5.4. If the server identifies that the cookie provided by the application is corrupted, the request is rejected. The request is also rejected if the server identifies that the configuration of the ECL has changed since the server sent this cookie to the application, or that the ECL has been purged and the oldest change stored is newer than the cookie value. In this case, additional information is returned, indicating that a full re synchronization of the external application is recommended.
Note:
If a server is disconnected from the replication topology and processes changes from clients that are connected to it, convergence cannot be guaranteed.The following request and response examples indicate how the client application searches using the external change log and how the ECL responds.
- Request One
-
To start reading the ECL, the client sends the first SEARCH request on
cn=changelog, specifying an empty value in the External Changelog Cookie Control.$ ldapsearch -h localhost -p 1389 -D "cn=directory manager" -j pwd-file \ --control "1.3.6.1.4.1.26027.1.5.4:false:;" -b "cn=changelog" \ "(objectclass=*)" "*" +
- Response One
-
The server sends each change to the client in a
SearchResultEntry. The cookie attribute specifies the new cookie value. This value is also sent in a External Changelog Cookie Control, along with the entry.# Public changelog exchange control(1.3.6.1.4.1.26027.1.5.4): dc=europe,dc=com:0000012187eae081456200000001;o=example:; dn: replicationcsn=0000012187eae081456200000001,dc=europe,dc=com,cn=changelog objectClass: top objectClass: changeLogEntry replicationCSN: 0000012187eae081456200000001 replicaIdentifier: 17762 targetDN: cn=chek-piao chea,ou=unit1,o=people,dc=europe,dc=com changeTime: 20090528155105Z changes:: cmVwbGFjZTogc2VlQWxzbwpzZWVBbHNvOiBjbj1tY29uZmlnCi0KcmVwbGFjZTogbW9kaW ZpZXJzTmFtZQptb2RpZmllcnNOYW1lOiBjbj1EaXJlY3RvcnkgTWFuYWdlcixjbj1Sb290IEROcyxjb j1jb25maWcKLQpyZXBsYWNlOiBtb2RpZnlUaW1lc3RhbXAKbW9kaWZ5VGltZXN0YW1wOiAyMDA5MDUy ODE1NTEwNVoKLQo= changeType: modify changeLogCookie: dc=europe,dc=com:0000012187eae081456200000001; targetEntryUUID: 08d1830c-02f1-34a6-9cf4-8d1270ec1db0 changeNumber: 0
- Request Two
-
To read the ECL from the last returned entry, the client sends the SEARCH request on
cn=changelog, specifying the last cookie value that it received in the External Changelog Cookie Control.$ ldapsearch -h localhost -p 1389 -D "cn=directory manager" -j pwd-file --control "1.3.6.1.4.1.26027.1.5.4:false:dc=europe,dc=com:0000012187eae081456200000001;" -b "cn=changelog" "(objectclass=*)"
Note:
The contents of the external change log are base 64 encoded. For information about decoding the content, see Section A.3.2, "base64."32.7.4 Format of External Change Log Entries
The DN for entries that are returned in the ECL is of the form:
replicationcsn=replicationCSN,replication-domain-DN,cn=changelog
For example:
dn: replicationcsn=0000012187eae081456200000001,dc=europe,dc=com,cn=changelog
The following attributes are returned for ECL entries:
targetDN / MUST
changeType / MUST
changeTime / MUST
changeNumber / MUST // used only for compatibility mode

changes / MAY, MUST for add, mod
newRDN / MAY, MUST for modrdn
deleteOldRDN / MAY, MUST for modrdn
newSuperior / MAY, MUST for modrdn

replicaIdentifier / MAY, OPERATIONAL / specific OUD value
replicationCSN / MAY, OPERATIONAL / specific OUD value
targetEntryuuid / MAY, OPERATIONAL / specific OUD value
changelogcookie / MAY, OPERATIONAL
32.7.5 Specifying the Attributes to be Included in the External Change Log
By default, attributes are included in the ECL only if they are affected by a change operation. So, for example, if the sn attribute of an entry is modified, only that attribute will appear in the ECL. You can, however, specify a list of attributes that will be included in the ECL regardless of whether they are affected by a change operation. In addition, you can also determine if this list of attributes is included for all types of operations or for delete operations only.
You can configure the attributes using the following properties:
-
ecl-include -
ecl-include-del-only
Using the ecl-include Property
You can use the ecl-include property to configure attributes to be included in the ECL if an entry is modified.
Use the dsconfig command to set the value of the ecl-include property. For example, to specify that the cn, and sn attributes always be included in the ECL if an entry is modified, run the following command:
dsconfig -h localhost -p 4444 -D "cn=directory manager" -j pwd-file -Q -n -X \
set-external-changelog-domain-prop --provider-name "Multimaster Synchronization" \
--domain-name dc=example,dc=com \
--add ecl-include:cn --add ecl-include:sn
In the ECL entry that is returned by the server, the attribute name is prefixed with target. For example, in the previous example, the ECL entries for changes on dc=example,dc=com will always contain the attributes targetcn and targetsn. The values of these attributes will be the values of the cn and sn attributes of the entry before it was modified or moved.
Using the ecl-include-del-only Property
In combination with the ecl-include property, you can use the ecl-include-del-only property to retrieve extra attributes for delete operations only.
Use the dsconfig command to set the value of the ecl-include-del-only property.
dsconfig -h localhost -p 4444 -D "cn=directory manager" -j pwd-file -Q -n -X \
set-external-changelog-domain-prop --provider-name "Multimaster Synchronization" \
--domain-name dc=example,dc=com \
--add ecl-include:cn --add ecl-include:sn --set ecl-include-del-only:true
32.7.6 Specifying the Attributes to be Excluded in the External Change Log
Client applications that use ECL are not always interested in all the LDAP operations executed on the server. Therefore, to avoid processing of irrelevant information you can filter a list of attributes.
You can use the ecl-blacklist property to configure attributes to be excluded from the ECL. It only skips MODIFY operations sent to the client application when all the modifications apply to blacklisted attributes.
Note:
The blacklist mechanism requires the use of the cookie mode. When you configure the blacklist property, then it prevents access tocn=changelog without the cookie mode.Use the dsconfig command to set the value of the ecl-blacklist property. For example, to specify that the modify operations concerning attributes email and telephonenumber should be excluded from ECL, run the following command:
dsconfig -h localhost -p 4444 -D "cn=directory manager" -j pwd-file -Q -n -X \
set-external-changelog-domain-prop --provider-name "Multimaster Synchronization" \
--domain-name dc=example,dc=com --add ecl-blacklist:email \
--add ecl-blacklist:telephonenumber
32.7.7 Initializing Client Applications to Use the External Change Log
No specific server configuration is required for clients to use the ECL. However, any client application that needs to use the ECL must be initialized, as described in the following sections.
-
Section 32.7.7.1, "Initializing a Client Application to Use the External Change Log"
-
Section 32.7.7.2, "Reinitializing a Client Application When a Domain is Added"
-
Section 32.7.7.3, "Reinitializing a Client Application When a Domain is Removed or Disabled"
32.7.7.1 Initializing a Client Application to Use the External Change Log
The following example describes a scenario in which host 2 is initialised from host 1. Host 1 is not frozen during the initialization operation, so continues to receive changes. This procedure guarantees that host 2 does not lose any of the changes that were received on host 1.
-
Save the current state of host 1 by reading the last ECL cookie value on host 1.
This is the value of the
lastExternalChangelogCookieattribute of the root DSE. For example:$ ldapsearch -h localhost -p 1389 -D "cn=directory manager" -j pwd-file \ -s base -b "" "objectclass=*" lastExternalChangelogCookie dn: objectClass: top objectClass: ds-root-dse lastExternalChangelogCookie: dc=europe:00000121cea5221c04b100000005 \ 00000121cea5319e04b400000009;Notice that host 1 is not frozen and continues to receive changes.
-
To initialize host 2, export the Oracle Unified Directory database from host 1 and import it to host2.
-
Initialize the application from the exported database.
Restart replication on host 2, using the current state saved in Step1. The application can now start reading the ECL by providing the last cookie value as the value of the search control. For example:
$ ldapsearch -h localhost -p 1389 -D "cn=directory manager" -j pwd-file
  --control "1.3.6.1.4.1.26027.1.5.4:false:dc=europe:00000121cea5221c04b100000005 \
    00000121cea5319e04b400000009" -b "cn=changelog" "(objectclass=*)"
32.7.7.2 Reinitializing a Client Application When a Domain is Added
When a new replication domain is added to a topology, the ECL is enabled on that domain by default. Client applications that use the ECL must be reinitialized for the new domain.
The server enforces this requirement by rejecting SEARCH operations if the cookie that is provided does not refer to the new domain. The operation result code is UNWILLING TO PERFORM. The server provides a detailed message that includes a list of the domains that are missing and a cookie value for a possible partial initialization.
The client application must be reinitialized using one of the following methods:
-
Full reinitialization. The application is reinitialized for all domains.
-
Read the value of the
lastExternalChangelogCookieattribute. This value refers to all domains in the topology, including the new domain. -
Export the database for all domains, including the new domain.
-
Initialize the application for all domains from the export output. For more information, see Section 32.7.7.1, "Initializing a Client Application to Use the External Change Log."
-
The application can now search the ECL using the
last_cookie_from_dse_root.
-
-
Partial reinitialization. The application is reinitialized only for the new domain.
-
Export the database for the new domain only.
-
Initialize the application from the export output, which contains only the entries in the new domain. For more information, see Section 32.7.7.1, "Initializing a Client Application to Use the External Change Log."
-
The application can now search the ECL, using the cookie value for a possible partial initialization that was returned by the server in its
UNWILLING TO PERFORMerror.Note:
This might result in some updates that have already been processed being replayed, because the cookie value represents the initial state of the database.
-
Note:
In draft compatibility mode, the draft API does not allow the server to enforce the application to be properly initialized. Therefore, in draft compatibility mode, any changes on the new domain are published in the ECL as soon as the new domain is added.To prevent the server from publishing changes for the new domain, follow the instructions in Section 32.7.11, "Disabling the External Change Log for a Specific Domain." To ensure that an application is notified of changes to a particular domain only, specify this domain either in the base DN (in cookie mode only) or as a search filter on the targetDN attribute.
32.7.7.3 Reinitializing a Client Application When a Domain is Removed or Disabled
When a replication domain is removed from a topology (or when the ECL is disabled for a specific domain), client applications must be alerted to the fact that no more changes will occur on that domain.
The server enforces this requirement by rejecting SEARCH operations if the cookie that is provided refers to the removed domain. The operation result code is UNWILLING TO PERFORM. The server provides a detailed message, that includes a list of the domains that are present in the cookie but have been removed (or for which the ECL has been disabled), and a cookie value for a possible continuation.
The client application can use one of the following methods to handle the removed domain:
-
Smooth continuation. In this case, the application applies its own policy of what to do when a domain is removed. To assist with the formulation of this policy, the application can search the ECL by providing the cookie value for a possible continuation that is returned by the server in the error message.
-
Full reinitialization. The application is reinitialized for all domains.
-
Read the value of the
lastExternalChangelogCookieattribute. This value refers to all domains in the topology, excluding the removed domain. -
Export the database for all domains.
-
Initialize the application for all domains from the export output. For more information, see Section 32.7.7.1, "Initializing a Client Application to Use the External Change Log."
-
The application can now search the ECL using the
lastExternalChangelogCookie.
-
32.7.8 Controlling Access to the External Change Log
Access to the ECL is ruled by global ACIs, which you can configure on the server. By default, only the root user can access the ECL.
For information about configuring global ACIs, see Section 28.1, "Managing Global ACIs Using dsconfig."
32.7.9 Purging the External Change Log
The ECL is purged simultaneously with the replication change log. For information about changing the interval at which the replication change log is purged, see Section 32.5.2, "Changing the Replication Purge Delay."
Sometimes, an application might submit a search request on the ECL, providing a cookie value that is older than the oldest change stored on the server (because a purge has occurred since the last request from that application). In this case, the server rejects the requests and indicates that the cookie is too old and that a full resync is required.
32.7.10 Disabling the External Change Log on a Server
To disable the ECL on a server, for a specific base DN, use the dsreplication disable-changelog command, as follows:
$ dsreplication disable-changelog -h localhost -p 4444 -D "cn=directory manager" \
  -j pwd-file -b dc=example,dc=com -X -n
32.7.11 Disabling the External Change Log for a Specific Domain
In certain situations, you might want to exclude changes on a specific domain from the external change log. You can disable the ECL for a specific replication domain, which prevents changes to this domain from being published in the ECL.
-
Obtain the domain name, as described in Section 32.5.1, "Retrieving the Replication Domain Name."
-
Set the external changelog domain properties for that domain.
For example, to prevent changes to the schema from being published in the ECL, run the following
dsconfigcommand:$ dsconfig -h localhost -p 4444 -D "cn=directory manager" -j pwd-file -n \ set-external-changelog-domain-prop \ --provider-name "Multimaster Synchronization" --domain-name cn=schema \ --set enabled:false
32.7.12 Retrieving the last Change Number
To get the lastchangenumber attribute on the server, run the following command:
Note:
Ensure that the external change log is enabled, as described in Section 32.7.1, "Enabling the External Change Log."./ldapsearch -h <hostname> -p <portnumber> -D "cn=Directory Manager" -w <password> -s base -b "" objectclass=* lastchangenumber
Example
$ ldapsearch -h localhost -p 1389 -D "cn=directory manager" -w <password>
  -s base -b "" "objectclass=*" lastchangenumber
32.7.13 Porting Applications That Rely on Other Change Logs
The ECL is based on the LDAP change log draft (http://tools.ietf.org/html/draft-good-ldap-changelog-04) but does not strictly support this change log. The LDAP change log draft uses an integer as the key to browse the change log whereas the ECL uses a cookie.
On the client side, the cookie mechanism has the following advantages:
-
Ability to fail-over from one ECL instance to another
-
Ability to load balance request over several ECL instances
On the server side, the cookie mechanism has the following advantages:
-
Easier implementation in a multi-master environment
-
Cheaper in terms of resources required on the server
-
Smaller performance impact for other applications that generate changes
Note:
The Oracle Directory Server Enterprise Edition (ODSEE) Retro Change Log (RCL) supports the LDAP change log draft, with some specific additions.32.7.13.1 Differences Between the ECL and the LDAP Change Log Draft
The following sections describe the differences between the two change logs, which will assist you in porting client applications.
32.7.13.1.1 Index Differences
The LDAP change log draft specifies the change log index as an integer (changenumber attribute). This works well when the change log is served by a single server (which was the case at the time that the LDAP change log draft specification was written.) When the change log service supports more than one server and when failover is supported from one server to another, the integer format is not appropriate.
Note:
You should index thereplicationCSN attribute on cn=changelog for compatibility with Oracle Directory Server Enterprise Edition. If you index the replicationCSN attribute on parameters other than cn=changelog, the index might have a performance impact.32.7.13.1.2 DIT and Schema Differences
The LDAP change log draft specifies the DN for entries in the change log as changenumber=changenumber,cn=changelog. The ECL uses the following DN for entries in the change log:
replicationcsn=replicationCSN,replication-domain-DN,cn=changelog
The ECL schema is based on the LDAP change log draft schema, however, Oracle Unified Directory manages an index in the ECL through a cookie that is opaque to the application, rather than through the changenumber attribute. The schema differ as follows:
| Origin | MUST | MAY |
|---|---|---|
| LDAP Change Log Draft | changenumber
|
changes
|
| ODSEE RCL | changenumber
|
changes
|
| Oracle Unified Directory ECL | changenumber
|
changes
|
32.7.13.2 Additional Differences Between the ECL and the Oracle Directory Server Enterprise Edition Retro Change Log
- Schema and implementation-based values
-
The Oracle Directory Server Enterprise Edition RCL specifies that the target entry unique ID is stored in the
targetuniqueidattribute. The format of this attribute value is specific to Oracle Directory Server Enterprise Edition. Thereplicationcsnattribute also has a value that is specific to Oracle Directory Server Enterprise Edition. - First and last ECL index
-
The Oracle Directory Server Enterprise Edition RCL supports the following attributes in the root DSE entry:
-
The
firstchangenumberattribute, which contains the first (oldest) change log index as an integer change number.This value is updated when the change log is purged. Before connecting to the change log server, an application reads the first change log index and compares it with the change log index that it stored. If the first change log index is more recent than the last change log index stored by the application, the application knows that the changes from the application index to the first change log index will never be returned by the server. They can only be obtained by reading the entries (full resync).
With the Oracle Unified Directory ECL, this procedure is not required of the application. Instead the Oracle Unified Directory server does the check and rejects the request when the cookie is too old. For more information, see Section 32.7, "Using the External Change Log."
-
The
lastchangenumberattribute, which contains the latest (newest) change log index as an integer change number.The Oracle Unified Directory ECL supports the equivalent feature with the
lastExternalChangelogCookieattribute. For more information, see Section 32.7, "Using the External Change Log."
-
- Purge delay
-
In the Oracle Directory Server Enterprise Edition RCL, the external change log and the regular replication change log are different databases. In Oracle Unified Directory, the two change logs are in the same database. This design decision has several advantages. An additional consequence of this design decision is that Oracle Directory Server Enterprise Edition can have two different trim policies (purge delays), while in Oracle Unified Directory the trim policy is the same.
32.7.13.3 API for Compatibility With the LDAP Change Log Draft and the Oracle Directory Server Enterprise Edition Retro Change Log
Oracle Unified Directory provides an additional API that is compatible with the LDAP draft change log and supports most of the additional features of the Oracle Directory Server Enterprise Edition Retro Change Log. The use of this API has a performance impact in terms of CPU and database (disk) space on the server side, and some computation for the application that fails over from one ECL server to another one.
The use of this compatible API (compatible mode) is configured when the server receives a request on the ECL with no change log cookie. The server returns entries with a changenumber attribute, the value of which is an incremental integer.
The client can search the ECL by providing a filter on the changenumber. The target entry unique ID is stored in an attribute called targetuniqueid with a format compatible with the Oracle Directory Server Enterprise Edition Retro Change Log. The first and last changenumber are present as attributes of the root DSE entry.
32.7.13.3.1 Limitations of the Compatibility API
Because Oracle Unified Directory does not store the ECL in a dedicated database, it does not support all the features supported by a JEB back end, such as specific indexes.
In addition, to support the changenumber-based ordering that is specified by the LDAP change log draft, Oracle Unified Directory must store a mapping from the changenumber to the replication state. When the server processes a request, it must try to retrieve the replication state from the changenumber that is provided in the request filter. If this cannot be achieved, the request is rejected.
32.8 Managing Tombstones in Oracle Unified Directory
Oracle Unified Directory supports the tombstone feature to maintain those directory entries that are deleted on one replica until they are no longer needed for replication.
This section contains the following topics:
32.8.1 About Tombstone Support
When an entry is a target of an LDAP delete operation, Oracle Unified Directory normally deletes this entry from the directory database. However, when the tombstone creation is enabled, that delete operation is a logical delete, which means the directory does not physically remove that entry from the database. Instead, the directory converts the entry into a tombstone entry with a specific object class. Tombstone entries use their nsUniqueID as RDN.
Tombstones provide administrators with the ability to resurrect one or more deleted entries that were accidentally deleted to the original entries, if required.
Tombstone support helps the Oracle Unified Directory replication solves some deletion conflicts. During replication, a server may crash due to a connection failure between the Directory Server and the Replication Server. After the crash, it is possible that some operations were committed in the database of the Directory Server but not yet transmitted to a Replication Server. In such cases, Replication Servers use tombstone entries internally to resolve conflicts.
Note:
Problems may arise if a replica (say A) with the tombstones may be offline beyond the purge interval. When this replication is connected to the replication ring, it may generate conflicts with other servers where these tombstone entries may have been purged. It is best to initialize A with the chosen master from the replication topology.32.8.2 About Tombstone Entries
A tombstone is a read-only entry and is stored with a different DN. However, from a client point of view, the tombstone keeps the same DN as the deleted entry.
Tombstone entries have special object class values; either tombstone or nstombstone. The tombstone entry can contain all the attributes of the original deleted entry or only a part of them.
           dn: cn=u2,cn=users,dc=example,dc=com
    objectClass: person
    objectClass: inetOrgPerson
    objectClass: organizationalPerson
    objectClass: orclIDXPerson
    objectClass: nstombstone
    objectClass: top
    objectClass: tombstone
    objectClass: person
    objectClass: organizationalPerson
    objectClass: inetOrgPerson
    objectClass: orclIDXPerson
    objectClass: top
    objectClass: tombstone
    objectClass: nstombstone
    givenName: useri
    description: bidule
    cn: usersSuffix
    cn: u2
    sn: u2
    userPassword: {SSHA}zL22oCGjlG80cmbvh9jnzXAIyUfDSO+y4gRi+w==
    l: London
    orclGUID: 859b759ea60746a0bb271e4a46007f24
    pwdPolicySubentry: cn=Default Password Policy,cn=Password Policies,cn=config
    deleteTimestamp: 20110922084753Z
    subschemaSubentry: cn=schema
    proximity: -1
    createTimestamp: 20110922084752Z
    pwdChangedTime: 20110922084752.126Z
    structuralObjectClass: orclIDXPerson
    entryDN: cn=u2,cn=users,dc=example,dc=com
    entryUUID: 859b759e-a607-46a0-bb27-1e4a46007f24
    creatorsName: cn=Internal Client,cn=Root DNs,cn=config
    modifyTimestamp: 20110922084753Z
    nscpEntryDN: cn=u2,cn=users,dc=example,dc=com
    modifiersName: cn=Internal Client,cn=Root DNs,cn=config
     1316681273304
32.8.3 Enabling or Disabling Tombstone Support
The tombstone support is enabled by default in Oracle Unified Directory. You can disable or enable tombstones using the tombstone-creation-enabled advanced property of the DB Local Backend Workflow Element.
To disable tombstone for the userRoot backend:
dsconfig set-workflow-element-prop \
          --element-name userRoot \
          --set tombstone-creation-enabled:false \
          --hostname localhost \
          --port 1444 \
          --trustAll \
          --bindDN cn=directory\ manager \
          --bindPasswordFile /local/tests/password \
          --no-prompt
For the parameter description of the tombstone-creation-enabled advanced property, see DB Local Backend Workflow Element in Configuration Reference for Oracle Unified Directory.
32.8.4 Searching for Tombstone Entries
Tombstone entries do not show up in regular search operations, unless you add objectclass=tombstone or objectclass=nstombstone in your search filter in the search request.
The following ldapsearch command returns tombstone entries under dc=example,dc=com:
$ ldapsearch -h localhost -p 5444 -D "cn=Directory Manager" -j pwd-file.txt -b dc=example,dc=com "(objectclass=nsTombstone)"
dn: uid=user.3,ou=people,dc=com
postalAddress: Aaron Atrc$59748 Willow Street$Green Bay, TN 66239
postalCode: 66239
description: This is the description for Aaron Atrc.
uid: user.3
userPassword: {SSHA512}li0gmRHdPtL326Pc2B2tIfGe/RdITcQXzZshsR96nKl25FaTYFXvp9nq1
rNzafjKKFkgRrhGEwDggn6KaMsjym0Ggzm36oAh
employeeNumber: 3
initials: AKA
givenName: Aaron
objectClass: person
objectClass: organizationalperson
objectClass: inetorgperson
objectClass: nstombstone
objectClass: top
objectClass: tombstone
pager: +1 197 025 3730
mobile: +1 890 430 9077
cn: Aaron Atrc
telephoneNumber: +1 094 100 7524
sn: Atrc
street: 59748 Willow Street
homePhone: +1 332 432 4295
mail: user.3@maildomain.net
l: Green Bay
st: TN
orclGUID: 8264e7f807f438879b9833ca1d0ed04a
pwdPolicySubentry: cn=Default Password Policy,cn=Password Policies,cn=config
deleteTimestamp: 20150227113328Z
subschemaSubentry: cn=schema
changelog: cn=changelog
structuralObjectClass: inetOrgPerson
dssynchist:
dn:0000014bcad0132714a000000003:del
nsUniqueId: 8264e7f807f438879b9833ca1d0ed04a
entryDN: uid=user.3,ou=people,dc=com
entryuuid: 8264e7f807f438879b9833ca1d0ed04a
nscpEntryDN: uid=user.3,ou=people,dc=com
modifyTimestamp: 20150227113328Z
modifiersName: cn=directory manager
32.8.5 Purging Tombstone Entries Automatically
Tombstone entries consume resources (index, database storage) and hence are not stored indefinitely. The purge thread is invoked periodically at a specified interval as per the configuration parameter tombstone-purge-interval.
The tombstone purge thread deletes tombstone entries that are older than the time specified in the tombstone-lifetime configuration parameter. Tombstone entries have a lifetime of one week set by default. After this delay, the server automatically cleans these entries.
Note:
Ensure that the time interval of thetombstone-lifetime parameter is not too low. An aggressive tombstone lifetime interval may make the server not responsive, if you have a lot of tombstones to purge.To change the tombstone lifetime to a particular interval:
dsconfig set-workflow-element-prop \
          --element-name userRoot \
          --set tombstone-lifetime:1440\ m \
          --hostname localhost \
          --port 1444 \
          --trustAll \
          --bindDN cn=directory\ manager \
          --bindPasswordFile /local/tests/password \
          --no-prompt
To change the tombstone purge interval:
dsconfig set-workflow-element-prop \
          --element-name userRoot \
          --set tombstone-purge-interval:6\ m \
          --hostname localhost \
          --port 1444 \
          --trustAll \
          --bindDN cn=directory\ manager \
          --bindPasswordFile /local/tests/password \
          --no-prompt
For the parameter description of the tombstone-lifetime and tombstone-purge-interval properties, see DB Local Backend Workflow Element in Configuration Reference for Oracle Unified Directory.
32.8.6 Removing Tombstone Entries
You can also remove tombstone entries without waiting for an automatic purge.
To remove tombstones entries:
-
Export a data set from one server, excluding tombstone entries from the export with a search filter:
/export-ldif -n userRoot -l /tmp/export_no_tombstones.ldif –excludeFilter "objectclass=tombstone"
This filter excludes every entry having the
objectclass=tombstonefrom the LDIF file. -
Stop the directory server where you need to import the file including the one where you performed the
export-ldif. -
Import the LDIF file:
/import-ldif -n userRoot -l /tmp/export_no_tombstones.ldif
-
Start the server again.
You can perform these steps for each and every directory server in the topology to remove the tombstone entries. The dsreplication status command shows no difference among the back-end entry counts.
32.9 Configuring Schema Replication
Schema replication is enabled by default. When you configure replication as part of the server setup, the schema of the new server is automatically initialized with the schema of the existing server in the topology.
32.9.1 Specifying the Schema Source
When you configure replication with the dsreplication enable command, you can specify that the schema of the second directory server be used to initialize the schema of the first server. If you do not specify an option, the schema of the first directory server is used by default.
In the following example, the data of host1 is used to initialize host2 but the schema of host2 is used to initialize the schema on host1:
$ dsreplication enable --host1 host1 --port1 4444 \
  --bindDN1 "cn=Directory Manager" --bindPasswordFile1 pwd.txt \
  --replicationPort1 8989 --host2 host2 --port2 4444 \
  --bindDN2 "cn=Directory Manager" --bindPasswordFile2 pwd.txt \
  --replicationPort2 8989 --adminUID admin --adminPasswordFile pwd.txt \
  --baseDN "dc=example,dc=com" --useSecondServerAsSchemaSource -X
32.9.2 Disabling Schema Replication
In certain circumstances, you might not want the schema to be replicated. The schema is replicated under a separate base DN, "cn=schema".
32.9.2.1 Specifying That Schema Should Not Be Replicated
When you configure replication with the dsreplication enable command, you can specify that the schema should not be replicated, using the --noSchemaReplication option.
Note:
If you use QuickSetup to enable replication, you cannot specify that the schema should not be replicated.32.9.2.2 Disabling Schema Replication
In an existing topology in which the schema are being replicated, you can disable this functionality by disabling replication of the schema base DN. The following example disables schema replication from the directory server running on the local host on port 1389:
$ dsreplication disable -h localhost -p 1389 -D "cn=directory manager" \
  -j pwd-file -b "cn=schema" -X
Note:
The previous example does not disable schema replication for the entire topology. To disable schema replication for the entire topology, you must run the equivalent command for each directory server in the topology.32.10 Replicating to a Read-Only Server
The Oracle Unified Directory replication model is a multi-master model, that is, all the replication servers in the topology can process both read and write operations. However, you can configure a directory server to be read-only, in which case add, modify, and delete operations from LDAP clients are rejected on this server.
Note:
A read-only directory server functions like a consumer replica does in the Oracle Directory Server Enterprise Edition replication model.32.10.1 Configuring a Replica as Read-Only
This example assumes a replication configuration with replication servers on two hosts, host1 and host2. The example makes the directory server on host2 a read-only replica. The example uses the dsconfig command, which accesses the server configuration through the administration connector. For more information, see Section 17.4, "Managing Administration Traffic to the Server."
Use the dsconfig command to set the writability-mode of host2.
$ dsconfig -h host2 -p 4444 -D "cn=Directory Manager" -j pwd-file -X -n \
  set-global-configuration-prop --set writability-mode:internal-only
A writability mode of internal-only means that replication operations are processed on the server, but the server is not writeable directly by LDAP client applications.
32.11 Detecting and Resolving Replication Inconsistencies
Directory server replication has been designed to ensure that replicated databases remain consistent, even for hardware faults, directory server restarts, or network failures. However, despite these efforts, possible hardware failures (disk errors, memory errors) or software errors (causing memory corruption) might lead to inconsistent databases.
These topics explain how to detect replication inconsistencies, and how to resolve them when they are identified.
32.11.1 Types of Replication Inconsistencies
When inconsistencies occur, they might remain hidden for some time or they might trigger replication or application errors. Examples of inconsistencies include the following:
-
An entry is present on all but one directory server in the replication topology.
-
An entry has a DN on one directory server that is different to its DN on all other directory servers.
-
An entry has different attributes on one directory server than on other directory servers in the replication topology.
32.11.2 Detecting Inconsistencies
Use the following methods to check for replication inconsistencies:
-
Check for information in the replication log file. The replication log file is configured by default and lists inconsistencies that are detected by the replication mechanism. Imagine, for example, that a modify operation is performed on an entry that is missing from one directory server in the topology. When replication attempts to replay this operation to that server, it will detect the problem and produce an error in the
logs/replicationerror log. This kind of error will not stop replication, but the operation will not be replayed and the administrator will need to repair the inconsistency. -
Pay attention to errors reported by client applications or users. Client applications or users might experience errors when accessing the directory server that might be due to replication inconsistencies.
-
Make regular checks for database consistency. With the current directory server release, these checks must be performed manually, using searches or database exports.
32.11.3 Resolving Inconsistencies
If a replication inconsistency is found on a single directory server in the topology, it is not possible to fix this inconsistency using regular LDAP operations. This is because the LDAP operation itself would be replicated to the other directory servers in the topology and might cause damage on those servers. In addition, the fix might involve modifying attributes that are generated by the directory server, such as the entryuid or modifyTimestamp attributes. Regular LDAP operations cannot modify such attributes.
Replication repair operations must therefore be done using LDAP operations that specify the Replication Repair Control (OID: 1.3.6.1.4.1.26027.1.5.2).
Caution:
Because the replication repair control allows you to skip several controls usually done by the directory server, it should be used with great care and only when consistency problems have been detected and asserted.The repair control alters the regular processing of an operation as follows:
-
The operation can modify attributes that might not normally be modified or added (
NO-USER-MODIFICATION), such asentryuuidandds-sync-hist. -
No replication change number is associated with the operation.
-
The operation is not published to the replication server and is therefore a local-only operation.
-
Replication does not try to resolve conflicts or to generate historical information for this operation.
-
Most of the schema checks are not performed for this operation.
For example, the following ldapmodify operation repairs an entry on host1 only, with the changes contained in the file changes.ldif:
$ ldapmodify -J 1.3.6.1.4.1.26027.1.5.2 -h localhost -p 1389 \
  -D "cn=Directory Manager" -j pwd-file -f changes.ldif
When you repair an entry, you must repair all of its regular attributes as well as the attributes generated by the directory server, such as modifyTimestamp, modifiersName, createTimestamp, creatorsName, and ds-sync-hist. The values of these attributes should be read from a directory server that contains the correct values, and recreated on the server with faulty values.
The ds-sync-hist attribute contains historical information that replication uses to solve modify conflicts. This attribute can only be viewed by an administrator.
32.11.4 Solving Naming Conflicts
Entries with identical DNs can be created on separate directory servers if they are created before the servers replicate the changes to each other. When the remote operation is replicated to the local server, a naming conflict occurs. The naming conflict results in the creation of a conflict entry on the local server.
Conflict entries have a specific DN, of the form entryuuid=entryUid+oldRDN. Every conflict entry includes a ds-sync-conflict attribute, whose value is the DN of the conflicting regular entry.
For example, imagine that the entry cn=bjensen,ou=People,dc=example,dc=com is created simultaneously on two directory servers. The entry on server 1 is given a unique ID of uid1 and the entry on server 2 is given a unique ID of uid2. Both directory servers will have the following two entries after replication:
cn=bjensen,dc=example,dc=com
...
entryuuid=uid2+cn=bjensen,dc=example,dc=com
  ds-sync-conflict:cn=bjensen,dc=example,dc=com
When you have identified the conflicting entry, you can rename it so that it has a unique DN.
If the naming attribute in a conflicting entry is multi-valued, you can rename the conflicting entry as follows:
-
Rename the entry while keeping the old RDN value, for example:
$ ldapmodify -h localhost -p 1389 -D "cn=Directory Manager" -j pwd-file
dn: entryuuid=uid2+cn=bjensen,dc=example,dc=com
changetype: modrdn
newrdn: cn=bljensen
deleteoldrdn: 0
^D
You cannot delete the old RDN value in this step because it also contains the
entryuuidoperational attribute, which cannot be deleted. -
Remove the old RDN value of the naming attribute and the conflict marker attribute, for example:
$ ldapmodify -h localhost -p 1389 -D "cn=Directory Manager" -j pwd-file
dn: cn=bljensen,dc=example,dc=com
changetype: modify
delete: cn
cn: bjensen
delete: ds-sync-conflict
^D
If the naming attribute in a conflicting entry is single-valued, for example dc (domain component), you cannot simply rename the entry to another value of the same attribute. Instead, you must give the entry a temporary name, as follows:
-
Rename the entry by using a different naming attribute, and keep the old RDN, for example:
$ ldapmodify -h localhost -p 1389 -D "cn=Directory Manager" -j pwd-file
dn: entryuuid=uid2+dc=HR,dc=example,dc=com
changetype: modrdn
newrdn: o=TempHR
deleteoldrdn: 0
^D
You cannot delete the old RDN value in this step because it also contains the
entryuuidoperational attribute, which cannot be deleted. -
Change the desired naming attribute to a unique value and remove the conflict marker attribute, for example:
$ ldapmodify -h localhost -p 1389 -D "cn=Directory Manager" -j pwd-file
dn: o=TempHR,dc=example,dc=com
changetype: modify
replace: dc
dc: NewHR
delete: ds-sync-conflict
^D
-
Rename the entry back to the intended naming attribute and delete the temporary RDN, for example:
$ ldapmodify -h localhost -p 1389 -D "cn=Directory Manager" -j pwd-file
dn: dc=NewHR,dc=example,dc=com
changetype: modrdn
newrdn: dc=NewHR
deleteoldrdn: 1
^D
32.12 Managing Certificates Using dsreplication
The replicated Oracle Unified Directory servers use certificates to perform authentication and to encrypt the replication communication. You can manage these certificates using the following dsreplication subcommands:
-
Section 32.12.1, "Listing Certificates Using
dsreplication list-certs" -
Section 32.12.2, "Regenerating Certificates Using
dsreplication regenerate-cert" -
Section 32.12.3, "Providing Certificates Using
dsreplication set-cert" -
Section 32.12.4, "Verifying and Fixing Certificates Using
dsreplication verify"
Note:
The certificates described in this section are used in the internal replication communication process and are different from certificates used by the server to communicate with LDAP clients.For more information about the dsreplication subcommands, including the syntax, see Section A.2.6, "dsreplication."
32.12.1 Listing Certificates Using dsreplication list-certs
The list-certs subcommand displays the certificates used by the replicated servers in a deployment.
For example, to display all certificates in a replication deployment:
$ dsreplication list-certs -j /tmp/password.txt -X -n
Establishing connections ..... Done.

Reading Certificates ..... Done.

host1.example.com:4444
==============
User DN:   CN=host1.example.com, O=Oracle Unified Directory Certificate
Validity:  From November 7, 2013 1:48:55 PM CET to November 2, 2033 1:48:55 PM CET
Issuer:    CN=host1.example.com, O=Oracle Unified Directory Certificate

host1.example.com:5444
==============
User DN:   CN=host1.example.com, O=Oracle Unified Directory Certificate
Validity:  From November 7, 2013 1:48:55 PM CET to November 2, 2033 1:48:55 PM CET
Issuer:    CN=host1.example.com, O=Oracle Unified Directory Certificate
32.12.2 Regenerating Certificates Using dsreplication regenerate-cert
The regenerate-cert subcommand regenerates the certificate used by the specified server, or for all servers, in the replication topology.
By default, the Oracle Unified Directory server automatically generates some certificates for replication. This command allows you to regenerate these certificates if needed (for example, because they are about to expire).
Note:
If you provided your own certificates (for example, using thedsreplication set-cert subcommand), Oracle does not recommend that you use this command because it will try to remove those certificates.For example, to regenerate the certificate of the host1.example.com server using port 4444:
$ dsreplication regenerate-cert -h host1.example.com -p 4444 -X -j /tmp/password.txt -n --adminUID admin
Establishing connections ..... Done.

After the generation of the new certificate for server host1.example.com:4444,
the references to the old certificate will be removed.

Regenerating the Certificate of Server host1.example.com:4444 ..... Done.
Propagating certificate public keys ..... Done.
Reestablishing replication connections on server host1.example.com:4444 .... Done.
Checking registration information ..... Done.
To regenerate the certificates of all the servers that are replicated, include the --all option.
32.12.3 Providing Certificates Using dsreplication set-cert
The set-cert subcommand allows you to provide the certificate that the replication system should use. You also provide the keystore containing the public key to be used to communicate with the other replicated servers.
For example, after you generate a self-signed certificate named my-ads-keystore using a utility such as keytool, invoke the set-cert subcommand, as follows:
$ dsreplication set-cert -X

>>>> Specify Oracle Unified Directory LDAP connection parameters
Directory server hostname or IP address [host1.example.com]:
Directory server administration port number [4444]:
Global Administrator User ID [admin]:
Password for user 'admin':

Establishing connections ..... Done.

Choose the type of the key store.
    1)  JKS
    2)  JCEKS
    3)  PKCS12
    4)  PKCS11
    5)  Other (File Based)
    6)  Other (Hardware Based)
    q)  quit

Enter choice [1]:

You must provide the path of the key store containing the certificate to be
used by the replication.  The server must have read access rights to thispath.

Key store path: /users/admin/my-ads-truststore

You must provide the path of the file containing the password (PIN) in clear
of the key store.  The server must have read access rights to this file.

Key store password (PIN) file: /tmp/password.txt

The server allows to encrypt the key store password file '/tmp/password.txt'.
Note that the server must have write access rights on the file to do so.
Do you want to encrypt the key store password file? (yes / no) [no]:

Choose the Nickname of the Certificate:
    1)  my-ads-truststore

    q)  quit
Enter choice [my-ads-truststore]:
Updating the certificate configuration of server host1.example.com:4444 ..... Done.
Propagating certificate public keys ..... Done.
Reestablishing replication connections on server host1.example.com:4444 ........................... Done.
Checking registration information ..... Done.
See /tmp/oud-replication-356794289708010450.log
for a detailed log of this operation.
32.12.4 Verifying and Fixing Certificates Using dsreplication verify
The verify subcommand allows you to verify the configuration of the replicated servers and then (in interactive mode) to fix any problems related to the certificates used by the replication system, if needed.
To verify and correct certificates used by the replication system, run the verify subcommand in interactive mode. For example:
$ dsreplication -X

What do you want to do?

    1)   Enable Replication
    2)   Disable Replication
    3)   Initialize Replication on one Server
    4)   Initialize All Servers
    5)   Pre External Initialization
    6)   Post External Initialization
    7)   Display Replication Status
    8)   Purge Historical
    9)   Set the Trust Flag of a Directory Server
    10)  Enable External Changelog
    11)  Disable External Changelog
    12)  Verify Server Configuration
    13)  >>>> Replication Certificate Management

    q)   quit

Enter choice: 12

>>>> Specify Oracle Unified Directory LDAP connection parameters

Directory server host name or IP address [host1.example.com]:

Directory server administration port number [4444]:

Global Administrator User ID [admin]:

Password for user 'admin':

Establishing connections ..... Done.

No errors were found with the configured host names.  The following host names
have been found in the registration information to identify the different
replicated servers:
host1.example.com
host2.example.com
host3.example.com

Do you want to update the host names for the servers? (yes / no) [no]: no

The replication servers are consistently referenced in the configuration.
The replication server values in the configuration are:
- host1.example.com:8989
- host2.example.com:8989
- host3.example.com:9989

What do you want do?

    1)  Provide directly the replication server values to be used
    2)  Do not update the configuration

Enter choice [2]:

Checking certificates ..... Done.

The following certificates are missing in the trust store of server host1.example.com:4444:
- Certificate of Server host2.example.com:4444

Do you want to repair the issues with the certificates? (yes / no) [yes]: yes
Fixing certificates ..... Done.
Reestablishing replication connections on server host1.example.com:4444 .......... Done.
Reestablishing replication connections on server host2.example.com:4444 .......... Done.
Reestablishing replication connections on server host3.example.com:4444 .......... Done.
Checking registration information ..... Done.

See /tmp/oud-replication-356794289708010450.log
for a detailed log of this operation.
32.13 Verifying and Fixing a Replication Configuration Using dsreplication verify
The verify subcommand allows you to verify the replication configuration of the replicated servers and then (in interactive mode) fix any inconsistencies, if needed.
Oracle recommends that you run the verify subcommand in interactive mode (that is, without the --no-prompt option). If any inconsistencies are found in the replication configuration, they will be displayed and you can fix them interactively.
Use the verify subcommand to:
-
Remove references to servers that are no longer reachable (for example, because they crashed and are not recoverable or they were not properly uninstalled).
-
Fix configuration problems related to the certificates used by the replication system.
-
Update the host names used by the replication configuration.
To verify and fix a replication configuration, run the verify subcommand in interactive mode. For example:
$ dsreplication -X
What do you want to do?

    1)   Enable Replication
    2)   Disable Replication
    3)   Initialize Replication on one Server
    4)   Initialize All Servers
    5)   Pre External Initialization
    6)   Post External Initialization
    7)   Display Replication Status
    8)   Purge Historical
    9)   Set the Trust Flag of a Directory Server
    10)  Enable External Changelog
    11)  Disable External Changelog
    12)  Verify Server Configuration
    13)  >>>> Replication Certificate Management

    q)   quit

Enter choice: 12


>>>> Specify Oracle Unified Directory LDAP connection parameters

Directory server host name or IP address [host1.example.com]:

Directory server administration port number [4444]:

Global Administrator User ID [admin]:

Password for user 'admin':

Establishing connections ..... Done.

No errors were found with the configured host names.  The following host names
have been found in the registration information to identify the different
replicated servers:
host1.example.com
host2.example.com
host3.example.com

Do you want to update the host names for the servers? (yes / no) [no]:

The following replication servers do not have the complete list of replication
server values in their configuration:
- host2.example.com:8989
The replication servers must have the complete list of replication server
values.

The following replication domains do not have the complete list of replication
server values in their configuration:
- host2.example.com:4444(cn=admin data)
- host2.example.com:4444(cn=schema)
- host2.example.com:4444(dc=example,dc=com)
If they have not been configured this way intentionally, the configuration of
the replication domains should be updated.

The replication server values in the configuration are:
- host1.example.com:8989
- host2.example.com:8989
- host3.example.com:8989

What do you want do?

    1)  Use the interactive assistant
    2)  Provide directly the replication server values to be used
    3)  Do not update the configuration

Enter choice [1]:

The replication server values proposed after running the assistant are:
- host1.example.com:8989
- host2.example.com:8989
- host3.example.com:8989

What do you want to do?

    1)  Use the values above
    2)  Use the values above but do not update the replication domains
    3)  Provide the values again
    4)  Do not update the configuration

    q)  quit

Enter choice [1]:

Checking certificates ..... Done.
No problems were found with the certificates used by the replication.

Updating replication server references ..... Done.

See /tmp/oud-replication-6260669521027550543.log
for a detailed log of this operation.
32.14 Purging Historical Replication Data
Oracle Unified Directory maintains a history of all changes that have been made on the server as a result of replication operations. This historical replication data is stored in an attribute of each user entry, and can eventually take up a large amount of space on your disk. Historical information is therefore purged when an entry is modified, or when you specifically run a command to purge the data.
By default, information that is older than one day is purged. You can specify the age of data that should be purged by setting the value of the conflicts-historical-purge-delay property of the replication domain. The following example specifies that data older than five days should be purged. The property value is expressed in minutes.
$ dsconfig -h localhost -p 4444 -D "cn=directory manager" -j pwd-file -X -n \
  set-replication-domain-prop --provider-name "Multimaster Synchronization" \
  --domain-name dc=example,dc=com --set conflicts-historical-purge-delay:7200m
You can also purge historical data immediately, or schedule a task to purge the data at a specific time. Imagine, for example, that you initialize a server with a large number of entries, then perform a significant number of changes on these entries. The resulting replication historical data will increase the size of the database quite substantially. If your server is then used mainly for read operations, the large database size remains, because no modifications are made to trigger a purge of the historical data. In this case, you can launch a once off purge task to remove the historical data that was generated by the initial modifications, and return the database to a more accurate size.
Because the purge process can take some time, you are required to specify the maximum duration of the purge (in seconds). To purge historical data immediately, run the following command:
$ dsreplication -h localhost -p 4444 --adminUID admin --adminPasswordFile pwd.txt \
  purge-historical --maximumDuration 3600 --baseDN dc=example,dc=com -X -n
For information about scheduling commands as tasks, see Section 17.5, "Configuring Commands As Tasks."
32.15 Using Isolated Replicas
An isolated replica is a directory server that can accept changes from other replicas for replay but cannot send changes to the replication server to which it is connected. An isolated replica cannot be the source of data updates to the topology. You can use isolated replicas to separate a directory server from the rest of the replication topology.
Every directory server in the topology has a trusted configuration property that is set to true by default. Isolated replicas are identified as such by configuring them as untrusted servers in the topology, that is, by setting the trusted configuration property to false. Data that comes from an untrusted directory server is discarded by a replication server. This ensures that an isolated replica cannot be the source of data updates in the replication topology.
Only directory servers are configured as trusted or untrusted. Replication servers do not have the trusted configuration flag.
To configure a directory server as untrusted, use the dsreplication set-trust command, as follows:
$ dsreplication --adminUID admin --adminPasswordFile pwd.txt -X \
  set-trust --trustedHost host1 --trustedPort 4444 \
  --modifiedHost host2 --modifiedPort 5444 --trustValue untrusted
The dsreplication set-trust command is supported in both interactive and non-interactive modes.
The configuration of trusted and untrusted servers is subject to the following restrictions:
-
You can only configure the trust flag of a directory server from another trusted server in the topology. You cannot configure the trust flag from that server itself. The
-trustedHostand--modifiedHostoptions can therefore not refer to the same directory server. -
When you modify a directory server from
untrustedtotrusted, the host that is being modified must be running, otherwise the command will fail. -
When you modify a directory server from
untrustedtotrusted, the host that is being modified must not contain any untrusted changes. An untrusted change is a change that has been made on an untrusted directory server and has therefore not been propagated to the rest of the topology. If the host that is being modified contains untrusted changes, the affected suffixes should be re-initialized with an appropriate data set from one of the trusted servers in the topology before the host is modified to trusted. -
If you modify the schema on an untrusted server, that server cannot be reconfigured as a trusted server. In this case, the server instance must be deleted and recreated.
Use the dsreplication status command to determine whether a directory server is trusted or untrusted. For example:
$ dsreplication status --adminUID admin --adminPasswordFile pwd.txt -X \
  --hostname host1 --port 4444
32.15.1 Deployment Scenarios for Isolated Replicas
There are two main scenarios for using isolated replicas in a replication topology:
-
Providing additional security in a demilitarized zone (DMZ)
-
Testing client applications in a staging area
32.15.1.1 Using Isolated Replicas in a DMZ
A demilitarized zone (DMZ) is the area in an enterprise network that is exposed to an untrusted network, such as the Internet. A DMZ provides a layer of protection because it stands between a trusted and untrusted network. Direct access from the outside is limited to the equipment located inside the DMZ. The following figure shows how isolated replicas can be used in a DMZ.
Figure 32-3 Isolated Replicas in a Demilitarized Zone
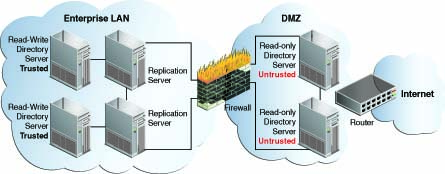
Description of ''Figure 32-3 Isolated Replicas in a Demilitarized Zone''
By placing read-only directory servers in the DMZ, you can prevent compromised data from being transmitted to the replication servers in the private area of your network. When you deploy a replica in a DMZ, the replica is not protected by the enterprise firewall and might therefore at risk of being compromised. In such case, an unauthorized user might obtain access to the configuration of the replica and change it into a writable replica. Such a replica is therefore tagged as untrusted by the replication servers that are protected by the firewall.
Configuring the servers in the DMZ as untrusted safeguards against malicious data being accepted from them. The servers inside the private area are configured to have read and write access. This configuration ensures that data changes are propagated throughout the replication topology, only by the directory servers in the private area. The read-only directory servers in the DMZ obtain data changes from the replication servers located inside the private network. If an outside attacker attempts to compromise data, the direct access point is a read-only server inside the DMZ. Malicious data cannot be transmitted because directory servers in the DMZ are untrusted. The integrity of the server data inside the private enterprise LAN is therefore protected.
This scenario has the following configuration requirements:
-
Each directory server in the DMZ is configured as untrusted and as read-only.
-
Each replication server in the topology is located inside the private enterprise LAN.
-
Each directory server in the private enterprise LAN is configured as a trusted server with read/write access.
Each trusted directory server in this topology has the following access rights:
-
Can send changes to the replication server to which it is connected. Those changes will be propagated to all other directory servers in the topology.
-
Can replay changes sent by the replication server to which it is connected.
-
Can be the source of an online full update operation to initialize other servers with its data.
Each untrusted directory server in this topology has the following access limitations:
-
Is not authorized to send changes to the replication server to which it is connected. If an untrusted directory server sends changes, the changes are evaluated as compromised data, and the replication server discards the changes.
-
Can replay changes sent by the replication server to which it is connected.
-
Cannot be the source of an online full update operation to initialize other servers with its data.
32.15.1.2 Using Isolated Replicas for Testing
Isolated replicas can be useful to test an application against live data in a staging area. This can be accomplished by configuring the isolated replicas to be untrusted, but with read and write access. The application's access point is the isolated replica and data is written only to the isolated replicas in the staging area.
The following figure shows how isolated replicas can be used in a staging area.
Figure 32-4 Isolated Replicas in a Staging Area
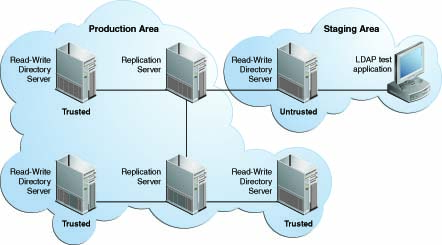
Description of ''Figure 32-4 Isolated Replicas in a Staging Area''
32.16 Replicating Between Oracle Directory Server Enterprise Edition and Oracle Unified Directory
Oracle Unified Directory provides a mechanism to replicate data between Oracle Directory Server Enterprise Edition and Oracle Unified Directory. The main purpose of this replication gateway is to enable migration from Oracle Directory Server Enterprise Edition to Oracle Unified Directory.
Setting up replication between these two disparate topologies involves three steps:
-
Migrating the Oracle Directory Server Enterprise Edition schema and configuration to the Oracle Unified Directory server.
-
Configuring replication between the Oracle Directory Server Enterprise Edition server and the Oracle Unified Directory server.
-
Initializing the Oracle Unified Directory server with the data from the Oracle Directory Server Enterprise Edition server.
The following procedures describe each step. These procedures assume that you have the following:
-
An installed and running Oracle Directory Server Enterprise Edition server.
The Oracle Unified Directory replication gateway supports the DS6-mode password policy only. If your Oracle Directory Server Enterprise Edition instance is using a DS5-mode password policy, you must update it.
-
An installed and running Oracle Unified Directory directory server.
The Oracle Unified Directory server must be configured without any suffixes, because that server is initialized with the data from the Oracle Directory Server Enterprise Edition server.
If you have an existing, replicated Oracle Unified Directory topology, create an additional Oracle Unified Directory server instance, with no suffixes, and attach that server to the replication gateway. All
ds2oudcommands should be run on that empty Oracle Unified Directory server. When replication is working between the Oracle Directory Server Enterprise Edition server and the Oracle Unified Directory server, you can add the Oracle Unified Directory server to the existing replicated Oracle Unified Directory topology.For example, assuming an existing Oracle Unified Directory topology, your server layout prior to migration would be as follows:
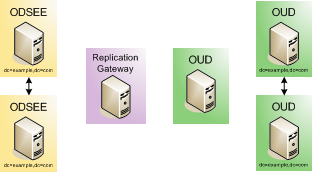
After migration, your server layout would be as follows:
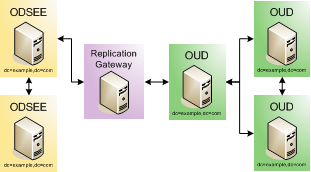
32.16.1 Migrating the Oracle Directory Server Enterprise Edition Schema and Configuration
Oracle Unified Directory allows migration of the configuration and the schema of Sun ONE Directory Server 5.2, Sun Java System Directory Server Enterprise Edition 6.3.1, Sun Directory Server Enterprise Edition 7.0, and Oracle Directory Server Enterprise Edition 11g Release 1 (11.1.1) including all patchsets. The migration of this types of instances can be done using the ds2oud command tool. The support of these versions of directory is only available for the tool ds2oud, but it does not apply to the use of the replication gateway which still requires at least an Oracle Directory Server Enterprise Edition 11g Release 1 (11.1.1).
In other words, depending on the instance version you migrate, the resulting Oracle Unified Directory instance requires supplementary manual steps to be fully functional, including modifying the data with respect to objectclasses and password policies, and converting metadata. However, if you run at least Oracle Directory Server Enterprise Edition 11g Release 1 (11.1.1), then it automatically takes care of data conversions while exporting the user data as described in Step 2a in this section.
The procedure in this section describes various options of the ds2oud command. You can run the ds2oud command completely interactively by typing ds2oud on the command line. In interactive mode, the command prompts you for the required responses. For more information, see Section A.2.3, "ds2oud."
-
On the Oracle Unified Directory directory server, run the
ds2oud --diagnosecommand, providing the connection details of the Oracle Directory Server Enterprise Edition server. Theds2oudcommand is located ininstance_dir/OUD/binfor Linux andinstance_dir\OUD\batfor Windows.This command assesses the Oracle Directory Server Enterprise Edition server instance and informs you whether any of the server configuration must be migrated to the Oracle Unified Directory server.
$ ds2oud --diagnose -h host1.example.com -p 1389 \
  -D "cn=directory manager" -j pwdfile
The
--diagnosesubcommand identifies the following elements of an Oracle Directory Server Enterprise Edition configuration:-
any enabled user plug-ins
-
enabled subtree entry counter plug-ins (subtree entry counter plug-ins are not supported in Oracle Unified Directory)
-
extensions to the default schema
-
any CoS or role definitions
-
macro ACIs
-
ACI syntax validity
-
the type of password policy (only DS6-mode is supported)
-
conflicting entries in the data
-
encrypted attributes (attribute encryption is not supported in Oracle Unified Directory)
-
-
To verify data compliance regarding the Oracle Unified Directory schema:
-
Export the Oracle Directory Server Enterprise Edition data to LDIF.
On the Oracle Directory Server Enterprise Edition server, run the
dsconf exportcommand as shown in the following example:$ dsconf export -f opends-export -h host1.example.com -p 1389 \ dc=example,dc=com odsee-data.ldif
Note:
The option-f opends-exportin the preceding command is only applicable for Oracle Directory Server Enterprise Edition 11g Release 1 (11.1.1). -
When you have exported the data to LDIF, run the
ds2oudcommand on the Oracle Unified Directory. For example:$ ds2oud --ldifDBFile odsee-data.ldif --userSchemaFile 99user.ldif
where
odsee-data.ldifis the Oracle Directory Server Enterprise Edition data exported to LDIF and99user.ldifis the customized Oracle Directory Server Enterprise Edition schema file, if you have customised the Oracle Directory Server Enterprise Edition schema.This command highlights any schema inconsistencies between the Oracle Directory Server Enterprise Edition data and the Oracle Unified Directory schema. Any schema extensions required by the Oracle Directory Server Enterprise Edition data must be added to the Oracle Unified Directory schema before you migrate the data.
-
-
Run the
ds2oudcommand with one or more of the migration options to migrate the schema, the server configuration, or both.You must migrate the schema before you migrate the configuration, so that Oracle Unified Directory can validate the data.
-
Running
ds2oud --migrateUserSchemaadds the Oracle Directory Server Enterprise Edition user schema (usually located in the file99user.ldif) to the Oracle Unified Directory schema.If you plan to replicate collective attributes or password policy features in Oracle Unified Directory, you must prepare the Oracle Directory Server Enterprise Edition schema for these features. Oracle Unified Directory provides a customer schema file (
99OudSchemaExtract.ldif) located in:
install-dir/OracleUnifiedDirectory/config/ds2oud
that enables you to add Oracle Unified Directory-specific schema elements to an Oracle Directory Server Enterprise Edition instance.For information about adding this schema file to the Oracle Directory Server Enterprise Edition schema, see "Extending Schema With a Custom Schema File" in Oracle Directory Server Enterprise Edition Administration Guide.
-
Running
ds2oud --migrateConfigurationdoes the following:-
Creates the naming contexts based on the existing Oracle Directory Server Enterprise Edition suffixes. You can specify whether the naming contexts are created in a single shared workflow element (
userRoot) or in a workflow element per suffix. If the configuration includes sub-suffixes, one workflow element per suffix is imposed. -
Migrates certain global configuration parameters that apply to Oracle Unified Directory, including
size-limit,lookthrough-limit,idle-time-limit,max-psearches, andbind-with-dn-requires-password. -
Migrates the global and back-end
allidsthresholdparameters to the Oracle Unified Directoryindex-entry-limitback-end property. -
Adds any configured indexes, and migrates specific
allidsthresholdparameters on the index or index type to the new indexes. -
Translates the DSE ACI into
ds-cfg-global-aci, and checks the validity of ACIs by using Oracle Unified Directory syntax validation. -
Migrates the plug-in configuration if possible for the following plug-ins: 7-bit check, UID uniqueness, Referential Integrity, Strong password policy check.
-
Sets up a password policy and configures the default password policy to be equivalent to the default Oracle Directory Server Enterprise Edition password policy.
Note:
Migration is possible only for Oracle Directory Server Enterprise Edition servers that are using a DS6-mode password policy.
-
-
To migrate the schema and the configuration parameters, run the following command:
$ ds2oud --migrateAll -D "cn=directory manager" -j pwdfile \
  -h host1.example.com -p 1389 \
  --oudBindDN "cn=directory manager" --oudBindPasswordFile pwdfile \
  --oudHostname localhost --oudAdminPort 4444 --oudPort 1389
where
-D,-j-hand-pspecify the connection parameters of the Oracle Directory Server Enterprise Edition instance.Most ACIs are stored in the entries themselves, and are therefore migrated when you export the data from the Oracle Directory Server Enterprise Edition instance and import it to the Oracle Unified Directory instance. The
--migrateAllsubcommand migrates only global ACIs that are stored in the configuration.You are prompted for additional information relating to the Oracle Unified Directory configuration. This command creates a compatible configuration on the Oracle Unified Directory directory server.
-
32.16.2 Configuring Replication Between Oracle Directory Server Enterprise Edition and Oracle Unified Directory
Install and configure the replication gateway, as described in "Setting Up the Replication Gateway" section in Installing Oracle Unified Directory.
At this point you must configure a global administrator on the Oracle Unified Directory server, for replication. If you intend to connect this server to an existing replicated Oracle Unified Directory topology at a later stage, use the same global administrator credentials that you have defined on the other Oracle Unified Directory servers.
32.16.3 Initializing the Oracle Unified Directory with Oracle Directory Server Enterprise Edition Data
-
Prepare the Oracle Unified Directory server to be initialized. For example:
$ dsreplication pre-external-initialization -h localhost -p 4444 \
  --adminUID admin --adminPasswordFile pwd.txt --baseDN dc=example,dc=com \
  -X -n --noPropertiesFile
-
On the Oracle Directory Server Enterprise Edition server, run the following command to export the data set:
$ dsadm export -f opends-export dsee-instance-path baseDN exportedLDIFPath
where exportedLDIFPath is the path of the resulting LDIF file that contains the replicated data.
If the Oracle Directory Server Enterprise Edition data includes encrypted attributes, decrypt them with the
--decrypt-attroption.Note:
dsadm exportcreates a file in LDIF format.dsadm backupcreates a binary copy of the database files of the Oracle Directory Server Enterprise Edition server. Because the database implementations of Oracle Directory Server Enterprise Edition and Oracle Unified Directory are very different, you cannot use the binary copy to export data from one server type to another. -
Copy the LDIF file that was generated in step 2 to a directory that is accessible by the Oracle Unified Directory server. Ensure that the file permissions on the LDIF file allow read access by the server.
-
On the Oracle Unified Directory server, import the LDIF data, as follows:
$ import-ldif -h localhost -p 4444 -D "cn=directory manager" -j pwd-file \
  --includeBranch dc=example,dc=com --ldifFile path/to/exportedLDIFFile \
  --clearBackend --trustAll --noPropertiesFile
Note:
If you use a relative path to the LDIF file, the root for the relative path is the instance root, rather than the current working directory. So, for example, a path ofimports/odsee-data.ldifhere refers toinstance-root/imports/odsee-data.ldif.When you use the
opends-exportoption during migration, DSEE-specific attributes might exist in some entries, preventing these entries from being imported. For instance,nds5replconflictmight exist in the Oracle Directory Server Enterprise Edition data.Therefore, it is imperative to filter this attribute during import to Oracle Unified Directory using the following import option:--excludeAttribute "nsds5replconflict"
-
Run the post-initialization script on the Oracle Unified Directory server, for example:
$ dsreplication post-external-initialization -h localhost -p 4444 \
  --adminUID admin --adminPasswordFile pwd.txt --baseDN dc=example,dc=com \
  -X -n --noPropertiesFile
-
To test that replication is working correctly, modify at least one entry on each Oracle Directory Server Enterprise Edition server and check the modification on the Oracle Unified Directory server.