
 Part 2: Building the View Project
The application to build reflects the Model-View-Controller architecture. The model is provided by EJB Components, while the view and controller are provided by JavaServer Faces.You use the ADF Faces set of JSF-compatible components to build a richer web interface.
This tutorial requires to have JDeveloper 12.1.3. installed and to have access to an Oracle database 10g and onward with access to the HR schema.
| Purpose | Duration | Application |
|---|---|---|
In this tutorial, you use Oracle JDeveloper 12c Version 12.1.3.0.0 to build a web application. To build the data model, you use the EJB diagrammer, EJB 3.0 and Java Persistence API (JPA). For the web client side, JavaServer Faces (JSF) is used. A main master-detail page is created with query and edit functionalities in the user interface. A task flow, with a search functionality, is also added as a region to the page. |
90 minutes |  |
-
Start JDeveloper by selecting Start > Programs > <JDEVELOPER_HOME> > OracleHome > Oracle JDeveloper Studio > Oracle JDeveloper Studio
If a dialog box opens asking if you would like to import preferences from a previous JDeveloper installation, click NO.
-
If prompted for a Role, select Studio Developer (All Features) and click OK.

Close the Tip of the Day window.
Once loaded, the JDeveloper IDE appears. The very first time you open JDeveloper, the Start Page displays. You can re-invoke the Start Page later by choosing Help > Start Page.

Notice the various options available to help you learn about JDeveloper. After exploring these options, click the X on the Start Page tab to close it. (the X appears when you mouse over the tab).
-
Click the Application tab to go back to the Applications window. Click the New Application icon.

-
In the New Gallery, select the Fusion Web Application (ADF) option.

Click OK.
-
In the Name your application dialog box, enter the Application Name HR_EJB_JPA. Notice that as you enter the application name, the directory name changes automatically. Enter oracle as the Application Package Prefix.
 Selecting the Fusion Web Application option creates 2 projects.
Clicking Next on each page of the wizard and leaving the default values shows you the project names and package names that are going to be used. It also allows you to select specific features for the Model and ViewController projects.
The default name for the first project is Model as the project name and oracle.model as the package name.
The default name for the second project is ViewController as the project name and oracle.view as the package name.. -
Click Finish. Wait for JDeveloper to create your application environment.
-
The Applications window displays the two projects created. On the right pane, notice the application overview allowing you to keep track of the steps as you complete them.

There are now 2 projects in your application. The Model project is empty and will be populated with EJB JPA components after the creation of a database connection.
The ViewController project contains the basic components for building the UI.
The Overview pane guides you through your application development. You can use it and follow the step-by-step instructions to build your applications.
-
In the Applications window, right-click the Model node and select New > From Gallery from the context menu.

-
In the New Gallery select the All Features tab, then select Business Tier > EJB as the category and double-click the Entities from Tables item.

Click OK.
-
In the Create Entities from Tables wizard, select JPA 2.0 Entities (Java EE6), then click Next.

-
Click Next to skip the persistence unit definition.
-
In the Type of Connection page select the Online Database Connection option. Then click Next.

-
In the Database Connection Details page, click the Create button
 to create a new connection.
-
Provide the following values to create the database connection to the hr schema. Note that the values provided here as examples may need to be modified to work with your environment.
Option Value Connection Name HR Username/Password hr / <your hr password> Save Password Checkbox checked Driver Thin Host Name The machine where the schema is installed (e.g. localhost) SID The database where the HR schema is installed (XE, orcl...)
Click Test Connection to confirm that you can connect.

Click OK if the connection was successful.
If the connection fails, check that the parameters entered are correct and that the Oracle database and listener services are running.
The connection should also appear in the Initialize Business Components Project page.-
Back in the Database Connection Details page, click Next.

-
In the Select Tables page, click Query to retrieve the available objects for the HR schema. Then select DEPARTMENTS and EMPLOYEES and shuttle the selection into the Selected pane using the right arrow button
 .
. 
Click Next.
-
In this step, make sure the package name is oracle.model.

-
Click Next, then Finish.
-
Click the Save All
 icon to save your work.
In the Applications window one java class file is created for Departments and one for Employees.

An EJB diagram is a way to create and visualize entities, java beans and relationships between these components. To create an EJB diagram perform the following steps:
-
Right click the Model node in the Applications window and select New > From Gallery.

-
In the New Gallery select Business Tier > EJB as the category and double click EJB Diagram (JPA/EPA 3.x).

-
Click OK.
-
In the Create EJB Diagram dialog, change the default name for the diagram (EJB Diagram1) to HR EJB Diagram.The default Package name should be oracle.model.

-
Click OK.
-
On the Associate Diagram With Persistence Unit dialog, click OK to accept the proposed Persistence Unit (Model.jpr).

-
A new empty diagram opens in the diagram editor.
 b
Modeling EJB/JPA components on a diagram can be useful for the developer.
b
Modeling EJB/JPA components on a diagram can be useful for the developer. Read more...
Enterprise JavaBeans (EJBs) modeling helps you visualize your EJB entity relationships and architecture, and to quickly create a set of beans to populate with properties and methods, and to create a graphical representation of those beans and the relationships and references between them. Whenever a bean is modeled, the underlying implementation files are also created.
Read more...
Enterprise JavaBeans (EJBs) modeling helps you visualize your EJB entity relationships and architecture, and to quickly create a set of beans to populate with properties and methods, and to create a graphical representation of those beans and the relationships and references between them. Whenever a bean is modeled, the underlying implementation files are also created. -
Select the Departments and Employees entities from the Applications window and then drag them onto the diagram.

-
Click the Save All
icon to save your work.
The diagram displays the EJB components that you just created from the Departments and Employees tables. Zoom in if necessary and reorganize the layout of the diagram to have both entities horizontally aligned. You can tidy the diagram by selecting relationships and using the Straighten lines option from the context menu.
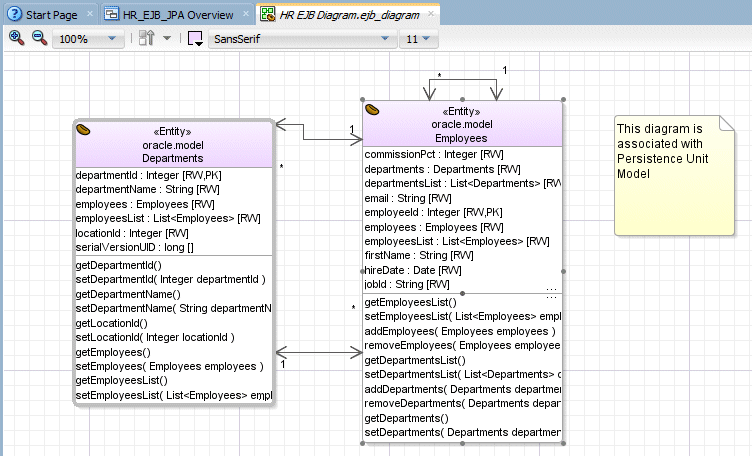
A session facade presents client objects with a unified interface to the underlying EJBs (Enterprise JavaBeans). The client interacts only with the facade, which resides on the server and invokes the appropriate EJB methods. As a result, dependencies and communication between clients and EJBs are reduced. If you are performing remote access without a session facade, numerous remote calls are needed for the clients to access EJB 3.x entities directly over the network. This results in a large amount of network traffic that negatively affects performance. In addition, without a facade the client depends directly on the implementation of the business objects, so that if the interface of an EJB changes, client objects have to be changed as well.
In this step, you create a session bean that implements a method to find employees and departments records.
-
In the Components window, select the EJB Components library and open the EJB Nodes.

-
Select the Session Bean
 component and then drag and drop it onto the diagram.
The Create Session Bean Wizard opens. (If necessary, click Next on the Welcome step.)
-
In the EJB Name and Options step, set the EJB Name to HRFacade and make sure that the following values are properly set:
Property Value EJB Name HRFacade Session Type Stateless Transaction Type Container Generate Session Facade Method (Checked) Entity Implementation JPA Entities Persistence Unit Model

-
Click Next.
There are two types of session bean, Stateful and Stateless.
Read more...
A stateful session bean maintains conversational state on behalf of the client. A conversational state is defined as the session bean field values plus all objects reachable from the session bean fields. Stateful session beans do not directly represent data in a persistent data store, but they access and update data on behalf of the client. The lifetime of a stateful session bean is typically that of its client.
Stateless session beans are designed strictly to provide server-side behavior. They are anonymous because they contain no user-specific data. The EJB architecture provides ways for a single stateless session bean to serve the needs of many clients. All stateless session bean instances are equivalent when they are not involved in serving a client-invoked method. The term stateless means that it does not have any state information for a specific client. However, stateless session beans can have non-client specific state, for example, an open database connection.
Use Container for a transaction being handled by the session facade and bean for managing user transaction explicitly through a programmatic process. -
In the Session Facade - Select JPA Entity Method step, any entities in this project appear as a node in the tree control. You can select the checkbox to include all entity methods this entity exposes, or expand the nodes and select a subset of methods.
Expand the Employees and Departments nodes and select all methods for each entity.
-
Click Next.
-
In the Class Definition step, make sure that the full name for Bean Class is oracle.model.HRFacadeBean, and then click Next.

The diagram should now look like the following:

-
The Applications window should look like this:

The session bean is made up of three files: HRFacadeBean - contains the session bean code. HRFacade - describes the capabilities of the bean for remote clients and HRFacadeLocal describes the capabilities for the local client.
Click the Save All
icon to save your work.
In the following step, ensure that both Remote and Local interface implementations are selected. The remote interface is used for client applications that run in a separate virtual machine, such as Java clients, whereas a local interface is used for client applications that run in the same virtual machine, such as Web clients.
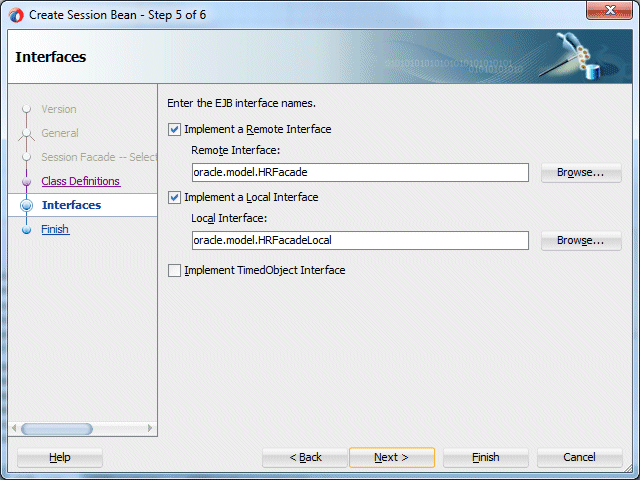
Click Next to review the summary of the created classes and then Finish.
You now expose the EJB as a data control for the Oracle ADF framework. This simplifies the way that you bind user interfaces to the EJB. To learn more about the ADF Framework visit:
http://oracle.com/technology/products/adf
To create ADF data controls from EJB Session Beans, perform the following steps:
-
Right-click the HRFacadeBean.java node in the Applications window and select Create Data Control from the context menu.

-
In the first step of the wizard, click Next to accept the default name (HRFacadeBean)
-
In the Session EJB Business Interface page, select Local, and click Finish..

Click the Save All icon
to save your work. -
The Applications window should now look like this, with a DataControl.dcx file part of the Model project:

A number of things happen in your project when you create a data control. When you create a data control based on an EJB session bean, JDeveloper creates the data control definition file (DataControls.dcx), opens the file in the overview editor, and displays the file's hierarchy in the Data Controls panel. This file enables the data control to work directly with the service and the bindings.
-
Expand the Data Controls accordion to review the components that have been created and are now available for the UI.

-
Notice the Data Control Registry displaying the available data controls.

-
Expand the HRFacadeLocal node. Selecting the departmentsFindAll node provides details in the right hand side about the data control.

The overview editor for the DataControls.dcx file provides a view of the master-detail hierarchies of your data model as well as methods from the session facade.
When you select a node, you can view the bean properties for the corresponding entity class in the Attributes tab. In the Accessors tab, you can view all bean properties for the corresponding entity class that return a collection. In the Operations tab, you can view other methods from the session facade that operate on the entities. -
You can collapse the Model project node and right-click any of the tabs to close all open tabs.

The ADF Model provides a declarative way of adding validation and consistent UI control to your application. Once you create a data control, you have access to a fine level of control over display and validation characteristics of that data control.
In the next few steps, you will set the label of several attributes and and a validation rule to the Employees data control.
-
In the Data Controls panel, right-click departmentsFindAll and select edit definition.

-
Select the Attributes node.

-
Select departmentId in the attributes list and click the UI Hints tab.

-
Enter Department Id in the Label property for the departmentId attribute.

-
Repeat the previous step for departmentName and locationId. Set the departmentName Label to Department Name and the locationId Label to Location ID.
-
In the Data Controls panel, right-click employeesFindAll and select Edit Definition.

-
Select salary in the attributes list and click the Validation Rules tab.

-
Click the green plus sign
on the right side of the Validation Rules pane. 
-
In the Add Validation Rule for: salary dialog, enter the following values:
Option Value Description Salary between 100 and 15000 Type Range Operator Between Minimum Value 100 Maximum Value 15000 
-
Click the Failure Handling tab and enter "Salary amount must be between 100 and 15000." as the Message Text and click OK to create the validation rule.

-
Save your work.
Next, we'll add some validation to the Employees data control.
The Employees data control definition should now look like the following:

You have now completed the model including added UI Hints and validation rules. The UI Hints will be used on any new page uses the departments data control The salary validation rule will be enforced on any page that uses salary.