Table of Contents Previous Next PDF


Oracle Tuxedo Application Rehosting Workbench Users Guide

Oracle Tuxedo Application Rehosting Workbench Users Guide
This chapter contains the following topics:
Introduction
What is Rehosting?
Rehosting is a way to preserve the expensive investments in business logic and business data trapped in proprietary hardware and software, while opening paths to future modernization by moving to an open and more extensible architecture.
Product Overview
Refine for Z/OS Replatforming package provides automated migration tools to enable customers to replatform COBOL, JCL, DB2, VSAM files and related assets from an IBM DB2 mainframe environment to a UNIX environment with an Oracle Tuxedo transaction processor and an Oracle database.
The objectives of the plug-in are to help address these areas of complexity by providing the following:
Oracle Tuxedo Application Rehosting Workbench
Refine for Z/OS Replatforming and Oracle Tuxedo Application Runtime for CICS and Batch are used within the context of a rehosting project. The process guide gives a global view of rehosting and the use of the conversion and runtime tools in this process. A rehosting project requires the creation of specific test, integration and production environments. The different functions of a rehosting project are typically:
These functions may be performed iteratively, typically a project consists of the following phases:
Each of these phases is made up of different steps, the results of these steps may be tested and the steps reiterated as necessary.
Rehosting Lifecycle Overview
Rehosting is performed within a project organized into phases and steps. Each step produces one or more deliverables. In parallel to the different steps of the rehosting project are a parallel series of test steps that validate the different phases of the project.
A project concerns different people who have different roles and responsibilities within the project. A project is carried out within an environment and it is impossible to describe the different phases and steps of a project without first describing the environment in which they need to be performed.
Project Environment
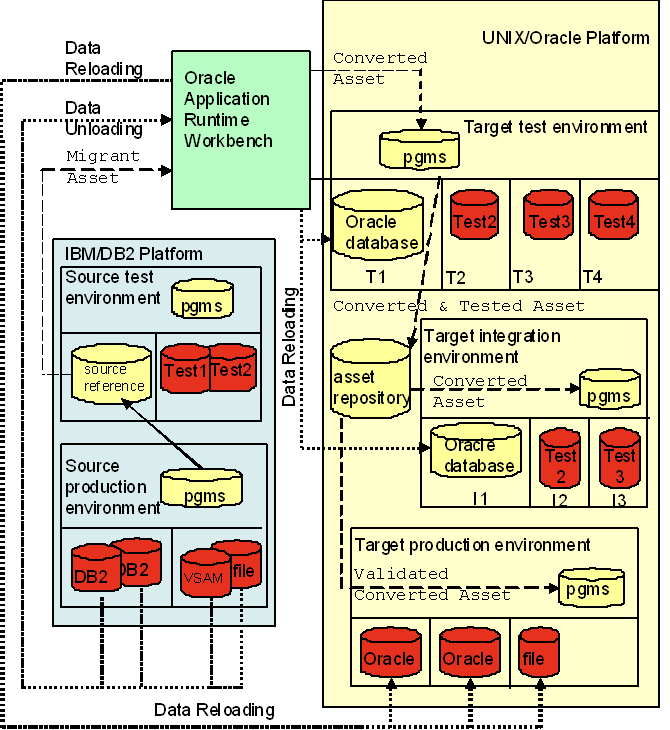
There are five clearly distinct environments necessary to carry-out a rehosting project. These include two source (pre-migration) environments and three target (post-migration) environments as described below:
1.
A current production source environment for the assets to be converted.
2.
A test source environment for storing and isolating the operations extracted from the production environment and for creating a test database.
3.
A test target environment for running, tuning and testing the converted assets.
4.
An integration target environment, which is used to host all activities such as integration, operations migration or pre switch-over processing.
5.
A production target environment for the converted and tested assets.
 
Depending on your needs, there may be several occurrences of the same platform to allow teams to work in parallel within the same project.
Project Phase Overview
A project is divided into different phases of work, producing clear deliverables that are validated before proceeding to the next phase of the project. These phases are as follows
 
Table 1‑2 Project Phases
Graphically, the different phases may be grouped as shown below:
Figure 1‑1 Project Phases and Processes
Overview of Using the Product in a Project
Refine for Z/OS Replatforming is used for converting and integrating program components and data. The following diagram shows the use of the program components, and how they are used to prepare source files for migrating to different environments.
Figure 1‑2 Language Migration
Refine for Z/OS Replatforming components are used to convert assets, enabling them after post-conversion adjustments to be moved from the from the source test environment to the target test environment.
Oracle Tuxedo Application Runtime for CICS and Batch components are used to integrate the converted assets after testing and integration preparation on the target test environment. The COBOL programs, JCL and associated components are integrated with the UNIX, Oracle database and Tuxedo transaction environments. These components are tested to work with the batch and CICS components produced during the conversion process.
Figure 1‑3 Data Migration
The assets to be migrated are generated and moved to the source test machine. The migrated assets are then converted and moved to a target test machine containing an Oracle database. After testing, the data is moved to an integration environment where rehosting tools are integrated with the programs to test their quality and performance using the converted data. When switchover occurs the latest data is converted directly from the source production environment to the target production environment.
Figure 1‑4 Migration Architecture
Prerequisites
Platform
Linux32/Linux64
Software Environment
JRE 1.6.0 or higher
Eclipse IDE for Java Developers Galileo (3.5) or higher
Perl version 5.8.8 or higher
Skills
The following skills are required.
You must understand the processes, concepts and terminology used by the Rehosting Workbench Cataloger (i.e., know the inputs, outputs and configuration expected by the Cataloger and how it analyzes all the components separately and together to determine whether the asset is consistent and can be migrated).
Eclipse skills are required to perform certain actions accompanying the migration process. You must know:
Run Eclipse using the "-clean" option.
Installing the Plug-in
To install the plug-in you must copy the com.oracle.tuxedo.wbplugin_x.x.x.x.jar file (located in utils/eclipse_plugin sub-directory under the Tuxedo ART Workbench installation directory) to the $ECLIPSE_HOME/plugins directory and then restart Eclipse.
Note:
However, when you update version, the new plug-in may not take affect after restarting Eclipse. Use the -clean option as command line arguments when starting Eclipse to force Eclipse to reinitialize these caches.
Component and Layout
The plug-in has an Tuxedo ART Workbench Perspective which organizes Tuxedo ART Workbench views, menus and toolbars around the eclipse. It also has a navigator made for Tuxedo ART Workbench projects.
The plug-in has Cataloger Report View and Process Monitor View to help you analyze the migration process.
Tuxedo ART Workbench Perspective
In the Eclipse Platform a Perspective determines the visible actions and views within a window.
The Tuxedo ART Workbench Perspective is made up of the following views:
From the Tuxedo ART Workbench Perspective, Tuxedo ART Workbench specific actions/commands are also shown as menu items and toolbar buttons.
Tuxedo ART Workbench Navigator
The Tuxedo ART Workbench Navigator is very similar to the internal Eclipse General Navigator. The difference is that Tuxedo ART Workbench Navigator only displays ART Projects.
Cataloger Report View
The cataloger output reports are shown in the report view (as shown in Figure 1‑5), with tabs for each report. The view is integrated with ART perspective. Click the Close button to close it or re-open it from main menu.
Figure 1‑5 Report View Example
The report view has following features:
The report contents are organized in a table. You can sort by clicking on the table heading.
The anomaly level of each report is colored by level.
 
Table 1‑3 Color Warning
The content of report refreshes automatically after the convert operation or create new project operation.
You can also refresh the content by clicking the Refresh button on the menu bar of report view.
Progress Monitor View
The progress monitor view allows you to see which source file or schema is being processed. A source tree is initially displayed to show the structure of sources or schemas in the current project organized by source types as shown in Figure 1‑6.
Along with the Cataloging, JCL conversion and COBOL conversion processes, the current processing source file is highlighted in the source tree.
For DB conversion and File conversion, the current processing db schema or file schema is highlighted in the schema list.
Figure 1‑6 Sample of Progress Monitor View
Migration Process Cheat Sheet
The Plug-in has a Migration Process Cheat Sheet to guide you though the conversion tasks step-by-step. To open the cheat sheet click “Help->Cheat Sheets” on main menu, and then select the cheat sheet Create ART migration project for STDB2ORA sample under ART group.
This cheat sheet demonstrates how to perform Mainframe artifacts migration by using the Tuxedo ART Workbench Eclipse Plug-in. After ART project creation, all Tuxedo ART Workbench functions (including cataloging, converting VSAM files, converting DB2 schemas, converting COBOL and JCL sources), can be done in Eclipse.
Eclipse Preferences
Some Tuxedo ART Workbench global options are set in the Eclipse Preference page. Include following:
Workbench Installation Directory
This global preference will take effect to all ART projects by default.
Menu Items and Tasks
The section provides a general overview of menu items and their associated tasks.
For a more detailed menu item example, see Appendix B: Appendix C: Oracle Tuxedo Application Rehosting Workbench Logs
Figure 1‑7 provides an Tuxedo ART Workbench high-level workflow illustration.
Figure 1‑7 Tuxedo ART Workbench High-Level Workflow
Import
The process of copying assets into a ART project. User can specify which sub-directory to be imported by using import wizard. These raw files are unchanged in the whole process of the migration.
Prepare
Preparation requires the migration assets are collected and pre-processed for further conversion. It includes the process of updating the format of the original assets, such as file trancoding, remove unrecognized character and file renaming.
Preparation tasks are listed in Table 1‑4.
 
Table 1‑4 Preparation Tasks
Analyze
Populate the source assets and generate analyze reports.
Analysis tasks are listed in Table 1‑5.
 
Table 1‑5 Analysis Tasks
Convert
Convert phase supports incremental conversion for COBOL conversion and JCL conversion, the incremental conversion is based on the timestamp of a POB file and the corresponding target file, conversion for a POB file is only done when its timestamp is newer than corresponding target file. However, Convert phase doesn't support incremental conversion for RDBMS and FILE conversion because of the difference of underlying mechanism between them.
Conversions tasks are listed in Table 1‑6.
 
Table 1‑6 Conversation Tasks
Note:
Configure
In this step, the default build scripts, tuxedo configure file, CICS and Batch runtime environment configure file are generated. It can be customized with user specified option through wizards under configure menu.
Configuration tasks are listed in Table 1‑7.
 
Note:
Build
In this step, database schema will be created; application components, data reloading programs, data access programs, tuxedo configuration file will be compiled.
Build tasks are listed in Table 1‑8.
 
Table 1‑8 Tasks
Deploy
The process of packing the converted asset and un-pack on the target platform if it is the local machine.
Deployment tasks are listed in Table 1‑9.
 
Table 1‑9 Deployment Tasks
Run
The process of running the converted application on the target platform for testing. Missing "Run tasks are listed in Table 1‑10.
 
Table 1‑10 Run Tasks
Reset
Roll back the specified steps. Reset tasks are listed in Table 1‑11.
 
Table 1‑11 Reset Tasks
 
 
Detailed Rehosting Methodology
Creating an ART Project
Configuring Project Properties
Creating an ART Project
You must create a new ART Project though New Project Wizard. Do the following:
1.
Figure 1‑8 Select a Wizard
2.
Figure 1‑9 Project Name
3.
Figure 1‑10 Select the Workbench install Directory.
4.
Figure 1‑11 Specify Root Directory Source Files
5.
Figure 1‑12 Choose Database and Compiler
 
 
Configuring Project Properties
After creating a new ART project, you must configure the project properties in the project properties page as shown in Figure 1‑13.
Figure 1‑13 Project Properties Page
Most of the configurable options in Tuxedo ART Workbench can be configured in the project properties pages. It provides an easy way for to view and modify Tuxedo ART Workbench configuration options. Those options are organized by type. For more information, see "Description of Configuration Files" in the Tuxedo ART Workbench Reference Guide.
Import
This section provides information how to use the Eclipse plug-in import wizard.
All the sub-directories of the directory which you specified while creating project will be showed in first column of table; you can click second column to import or not import related sub-directory; the last column is the status of importing, it will display "Yes" if this sub-directory has be imported before, otherwise it display "No".
If users have done the analyze and/or convert phases for imported source files, and then re-run the import wizard to import new source files or new sub-directories containing source files, only the later imported source files will be processed in analyze phase, that is incremental processing, unless users have to clean the output of analyze phase.
Prepare
This section provides information and instructions regarding how to use the Eclipse plug-in preparation wizard.
Execute Custom Script Before Prepare Steps
A custom script is automatically executed by the interpreter before the preparation process; it is called using the directory path as an argument.
If multiple directories are selected, the custom script is executed multiple times, using the directory path as the argument each time.
The standard output and standard custom script execution errors are dumped to the logfile.
MBCS Code Page Conversion.
EBCDIC-based encoding is used on IBM mainframes. ASCII-based encoding is used on open systems.
You can use this utility to convert the multiple-byte characters in EBCDIC encoding (e.g., IBM-1390) to multiple-byte characters on open system (e.g., Shift-JIS). The encoding names used in ICU are the same as the ones used by iconv, which is a common utility in UNIX/Linux, so you can retrieve encoding names easily by reading iconv online help.
Tip:
Type command "uconv -l" in the shell lists encoding names.
dos2unix Conversion
The newline marker is different between DOS systems (using 0x0D0A) and UNIX/Linux systems (using 0x0A).
You can use this utility to convert text files in DOS format to UNIX/Linux format.
Rename Source File Name to UPPER CASE
It provides a function to change file name (exclude extension) to upper case.
Execute Custom Script after prepare steps
It does the task similar with "Execute Custom Script before prepare steps". The script in here applies on source files which have already been processed by preparation tasks.
Analyze
This section aims to:
This guide includes information about the following:
Note:
The Tuxedo ART Workbench Cataloger is described in the following sections:
Skills
Migration Process and Concepts
You should understand the processes, concepts and terminology used by Tuxedo ART Workbench Cataloger; know the inputs, outputs and configuration expected by the Cataloger and how it analyzes all the components separately and together to determine whether the asset is consistent and can be migrated.
The Tuxedo ART Workbench Reference Guide describes precisely all features of the Cataloger. Read at least the three first sections of the Cataloger chapter for an introduction to the concepts, terminology, inputs and outputs, and configuration.
UNIX/Linux Skills
UNIX/Linux skills are required to work correctly on the migration platform environment and perform certain actions accompanying the cataloguing process. You need to know:
z/OS Skills
You should be able to identify and understand z/OS components and programming languages. General skills in z/OS environment (COBOL, files, DB2, CICS, JCL, utilities) are sufficient.
Requirements & Prerequisites
Preparing the Migration Platform
The migration platform is the platform on which the Tuxedo ART Workbench migration tools execute, including the Cataloger. This platform is based on Linux running on an Intel-compatible hardware platform.
Before performing any action, Tuxedo ART Workbench should be installed and configured according to specifications and requirements detailed in the Oracle Tuxedo Application Rehosting Workbench Installation Guide.
Configure Scope
This section describes the usage of configure scope wizard. All the imported sub-directories will be showed in first column of the table.Plug-in can detect source types automatically in some case, the rules are as follow.
1.
*.cpy - COPYBOOK
*.cbl - COBOL Source Program, including CICS, Batch and Sub
*.jcl - JCL Script
*.bms, *.map - BMS Map
*.sql, *.ddl, *.db2 - SQL Scripts
*.sysin - SYSIN files
*.rdo - RDO files
*.proc, *incl - JCL libraries
2.
 
 
Whenever a known suffix is found, the analyze wizard stops searching and determines the source type of the sub-directory as the type corresponding to the found suffix.
3.
Whenever a known suffix is found, the analyze wizard stops searching and determines the source type of the sub-directory as the type corresponding to the found suffix.
4.
5.
6.
7.
User can enable or disable processing of each sub-directory by clicking the last column of the table.
There are many options appeared while clicking "Advanced settings for sub-directory". To make the clear meaning of each option, refer to "Cataloger" section in the Oracle Tuxedo Application Rehosting Workbench Reference Guide
Overview of the Cataloger in the Replatforming Process
This section describes the inputs and outputs of the Cataloging step and dependencies with other migration steps in the replatforming process.
Simple Sample Application
In order to illustrate all of the migration activities performed and how to use Tuxedo ART Workbench Cataloger to determine whether the asset is consistent and can be migrated to the target platform, the Simple Application STFILEORA will be used. STFILEORA is provided with Tuxedo ART Workbench set of tools.
Cataloging Migration Steps
Description of the cataloging operations shown in the graphic:
1.
2.
3.
4.
5.
The operations described above are explained in more detail in the next sections.
Cataloging Steps
Building-up an Asset
This step is a pre-requisite for the Cataloger and, as mentioned in the Oracle Tuxedo Application Process Guide that gives an overview of the whole migration process, it is up to the user of Tuxedo ART Workbench to gather these source files on the source platform, transfer them to the migration platform, install them in an appropriate file structure and prepare them for migration.
Building up the asset consists of several steps from getting sources to organizing them to be available as a valid input to the Cataloger tool:
1.
2.
3.
Organize components by type: put all CICS programs in one directory that could contain sub-directories, the same applies for COBOL includes, Batch programs, Jobs, etc.
4.
Initialization and Configuring the Working Environment
As Tuxedo ART Workbench Cataloger is the first tool of the Oracle Tuxedo Application Workbench suite used in the migration process, a general configuration step for the whole project to be performed is explained here.
Configuration Objectives
Recommended File Structure
The more organized and standardized the working space, the more migration tasks will be easier and automated.
In the following sample we illustrate a typical organization and we recommend working with the same structure.
Listing 1‑1 Sample Application Hierarchy
SampleApp
|-- Logs
|-- param
| `-- system.desc
|-- source
| `-- makefile
|-- trf
|-- tools
|-- tmp
 
The contents of each directory are:
Contains all sources to be migrated and prepared as input for Tuxedo ART Workbench tools.
Workspace where all Tuxedo ART Workbench processes can find the source code.
Contains all configuration files (parameters and hints for use by Tuxedo ART Workbench tools).
Working directory where all Tuxedo ART Workbench tools are launched, all log files are generated
Directory to place specific tools developed by the user during the migration process.
Directory where conversion results are generated.
Directory where temporary and intermediate files generated during conversion operations are placed.
Setting Environment and Working Variables
It is recommended that each time you work on a project using Tuxedo ART Workbench to set certain environment variables that will be useful later. The only environment variable that is mandatory is REFINEDISTRIB; others can be used for simplification reasons.
Table 1‑12 explains the usage of proposed variables.
 
Variable used by Tuxedo ART Workbench
In the Simple Application example project, we use a setting file named $PROJECT/.project that contains all initializations using an export Linux command. This file is to be executed each time a new Linux session is opened to work in the project
Listing 1‑2 Extract from Simple Application .project File:
echo "Welcome to SampleApp"
export GROUP=refine
export PROJECT=${HOME}/SampleApp
export LOGS=${PROJECT}/Logs
export SOURCE=${PROJECT}/source
export PARAM=${PROJECT}/param
export REFINEDIR=/product/art_wb11gR1/refine
export PHOENIX=${REFINEDIR}
export TMPPROJECT=${PROJECT}/tmp
export REFINEDISTRIB=Linux64
 
Project Initialization Summary
To initialize a new project, proceed as follow:
1.
2.
3.
4.
Create a file .project under $PROJECT and initialize it with variables listed in Setting Environment and Working Variables. Variables in the file are to be exported each time you work on the project.
5.
6.
Configuration
You need to set at least two configuration files, additional configuration files are described in the advanced usage section.
The two configuration files needed by the Cataloger are:
System Description File
The system description file is the main configuration file for Tuxedo ART Workbench tools.
For the Simple Application example:
global-options catalog = "../param/options-catalog.desc".
Listing 1‑3 System Description for Simple Application
system SampleApp root "../source"
global-options
catalog="../param/options-catalog.desc",
no-END-Xxx.
DBMS-VERSION="8".
% Copies
directory "COPY" type COBOL-Library files "*.cpy".
% DDL
directory "DDL" type SQL-SCRIPT files "*.ddl".
% Batch
directory "BATCH" type COBOL-Batch files "*.cbl" libraries "COPY". %, "INCLUDE".
% Cics COBOL Tp
%
directory "CICS" type COBOL-TPR files "*.cbl" libraries "COPY". %, "INCLUDE".
 
 
Global Options
The purpose of the Cataloger options file is to give the Cataloger additional information that will influence its behavior.
In the Simple Application example we use only three options, of course other options can be used; see the Tuxedo ART Workbench Reference Guide for a full list of options.
Listing 1‑4 Global Options File for the Simple Application
%% Options for cataloging the system
job-card-optional.
 
Executing the Cataloger
One Operation
You can launch the Cataloging with one command; all operations are performed sequentially.
The example command line syntax is:
${REFINEDIR}/refine r4z-catalog -s $PARAM/system.desc
Where:
${REFINEDIR} is the directory where Tuxedo ART Workbench tools are installed.
$(CATALOG) is the version of the Cataloger to be used
$(SYSTEM) is the path of the system description file.
In our sample the command will be:
From directory $LOGS/catalog execute the command:
${REFINEDIR}/refine r4z-catalog -s $PARAM/system.desc
The execution log is printed on the screen and at the same is redirected in log file under the directory from which you lunched the command.
Step by Step
Parsing
Running this step is useful when you want to check specific programs without waiting for the whole cataloging to see the results.
Listing 1‑5 Parsing Examples
# parse only one program
${REFINEDIR}/refine r4z-preparse-files -s $PARAM/system.desc CICS/PGMM000.cbl
 
# parse a list of programs
# build a list that contains programs with path from source (CICS/PGMM000.cbl)
${REFINEDIR}/refine r4z-preparse-files -s $PARAM/system.desc -f list-of-file
 
Analysis
The result of this step is the binary file named symtab-SampleApp.pob that represents inter-component information.
Listing 1‑6 Analysis Example
cd $LOGDIR/catalog
${REFINEDIR}/refine r4z-analyze -s $PARAM/system.desc
 
Print Reports
In this step information stored in binary files is collected and printed in CSV format reports.
Listing 1‑7 Print Reports Example
cd $LOGDIR/catalog
$REFINEDIR/refine r4z-fast-final -v M2_L3_3 -s $PARAM/system.desc
 
In the Simple Application reports are generated in $PROJECT/source/Reports-SampleApp:
The different reports are described in the Oracle Tuxedo Application Rehosting Workbench Reference guide.
Result Analysis and Validation
Using the cataloging reports, you can perform different actions in order to create the exact asset set to be migrated and launch Tuxedo ART Workbench steps: COBOL conversion, JCL translation and Data conversion.
Note:
Inventory
After cataloging each Program, Copy, Job, Include is given a status depending on its use.
 
Table 1‑13 Inventory Status
Anomaly Analysis
All the errors reported in the Anomalies Report must be analyzed:
The asset should be free from severe errors before proceeding to conversion.
Completion Criteria
Cataloging can be considered complete once all expected outputs are generated (pob files and cataloging reports).
As a process, it depends on the context of the project, but generally cataloguing is considered as completed when:
Using the Make Utility
make is a UNIX utility intended to automate and optimize the construction of targets (files or actions).
We highly recommend using make to perform the different operations that compose the migration process because this enables you to:
You should have a descriptor file named makefile in the source directory in which all operations are implemented (a makefile is prepared in the source directory during the initialization of a project).
The following two sections describe the make configuration and how to use the Cataloger functions through make.
Make Configuration
Version.mk
The version.mk configuration file in $PARAM is used to set the variables and parameters required by the make utility.
In this file specify where each type of component is installed and their extensions, and the versions of the different tools to be used. This file also describes how the log files are organized.
Listing 1‑8 Extract From version.mk for Simple Application
Root = ${PROJECT}
#
# Define directory Project
#
Find_Jcl = JCL
Find_Prg = BATCH
Find_Tpr = CICS
Find_Spg =
Find_Map = MAP
SCHEMAS = AV
#Logs organisation
#
LOGDIR := $(LOGS)
CATALDIR := $(LOGS)/catalog
PARSEDIR := $(LOGS)/parse
TRADJCLDIR := $(LOGS)/trans-jcl
TRADDIR := $(LOGS)/trans-cbl
DATADIR := $(LOGS)/data
 
MakeFile
The contents of the makefile summarize the tasks to be performed:
The makefile provided with the Simple Application is auto-documented.
Parsing
Parsing All Programs
From the $SOURCE directory execute the command:
> make pob
The log file is generated in $LOGS/parse
Check Need to Be Parsed
> make pob VERIF=TRUE
Check: Parse of BATCH/PGMMB02.cbl Need Process.. To obtain BATCH/pob/PGMMB02.cbl.pob
Parsing of One Program
Sample: parsing the program BATCH/PGMMB02.cbl
> make BATCH/pob/PGMMB02.cbl.pob
The log file is generated in $LOGS/parse
Cataloging
To launch cataloging use:
make catalog
The log file is generated in $LOGS/catalog
Advanced Usage of Make
To Add or Update a Target
You can update the makefile to add some targets or to update existing ones.
For example, if you developed you own script (report.sh) to generate a customized report based on basic cataloguing reports, place your script in $TOOLS directory.
The makefile can be modified as follow:
Reporting:
@${TOOLS}/report.sh
catalog:
@$(REAL_CMD) ${REFINEDIR}/refine r4z-catalog -v $(CATALOG) -s $(SYSTEM) $(LOG_FILE_FLAGS_CAT)
@make reporting
Your customized report will be updated automatically after each catalog execution.
Debugging the Make Target
Sometimes a command through make cannot work properly because of a lack of configuration.
Proceed as follow:
1.
2.
catalog:
@$(COMMENT) ${REFINEDIR}/refine r4z-catalog -v $(CATALOG) -s $(SYSTEM) $(LOG_FILE_FLAGS_CAT)
Using the Command with Option VERIF=TRUE
> make catalog VERIF=TRUE -f makefile.debug
The command to be executed is printed = after replacement of all variables.
Clean POB Repository
Convert
File-to-File Migration Process
Migrating data files is described in the following sections:
File Organization
When migrating from a z/OS source platform to a target platform, the first question to ask, when VSAM is concerned, is whether to keep a file or migrate the data to an Oracle table.
The Tuxedo ART Workbench File-to-File converter is used for those files that keep their source platform format (sequential, relative or indexed files) on the target platform. On the target platform, these files use a target COBOL (Micro Focus COBOL/COBOL-IT) file organization equivalent to the one on the source platform.
Table 1‑14 lists the file organizations handled by z/OS and indicates the organization proposed on the target platform:
 
Note:
PDS File Organization
Files that are part of a PDS are identified as such by their physical file name, for example: METAW00.NIV1.ESSAI(FIC).
An unloading JCL adapted to PDS is generated in this case. The source and target file organizations as indicated in the above table are applied.
GDG File Organization
Generation Data Group (GDG) files are handled specially by the unloading and reloading components in order to maintain their specificity (number of GDG archives to unload and reload). They are subsequently managed as generation files by Oracle Tuxedo Application Runtime Batch (for more information, see the Oracle Tuxedo Application Runtime Batch Reference Guide). On the target platform these files have a LINE SEQUENTIAL organization.
Migration Process Steps
The principle steps in the File-to-File migration process, explained in detail in the rest of this chapter, are:
1.
2.
3.
4.
5.
6.
7.
8.
9.
10.
Initializing the Process
This section describes the steps to be performed before starting the file migration.
Requirements
The migration of z/OS files to UNIX/Linux is dependant on the results of the Tuxedo ART Workbench Cataloger (for more information, see Analyze). It does not have any impact on the conversion of COBOL components or the translation of JCL components.
Listing the Files to Be Migrated
The first task is to list all of the files to be migrated, for example, the permanent files input to processing units that do not come from an Oracle table.
File Descriptions and Managing Files With the Same Structure
For each candidate file for migration, its structure should be described in COBOL format. This description is used in a COBOL copy by the Tuxedo ART Workbench COBOL converter, subject to the limitations described in COBOL Description.
Once built, the list of files to migrate can be purged of files with the same structure in order to save work when migrating the files by limiting the number of programs required to transcode and reload data.
Using the purged list of files, a last task consists of building the files:
Note:
The populate.sh utility (located in REFINEDIR/scripts/file/populate.sh), can be used to help generate these two configuration files automatically. For more information, see REFINEDIR/scripts/file/README.txt.
COBOL Description
A COBOL description is related to each file and considered as the representative COBOL description used within the application programs. This description can be a complex COBOL structure using all COBOL data types, including the OCCURS and REDEFINES notions.
This COBOL description will often be more developed than the COBOL file description (FD). For example, an FD field can be described as a PIC X(364) but really contain a three times defined area including, in one case a COMP-3 based numerals table, and in another case a complex description of several characters/digits fields etc.
It is this developed COBOL description which describes the application reality and therefore is used as a base to migrate a specific physical file.
The quality of the file processing execution depends on the quality of this COBOL description. From this point, the COBOL description is not separable from the file and when referring to the file concerned, we mean both the file and its representative COBOL description. The description must be provided in COBOL format, in a file with the following name:
<COPY name>.cpy
Note:
COBOL Description Format
The format of the COBOL description must conform to the following rules:
Example
 
COBOL Description and Related Discrimination Rules
Within a COBOL description there are several different ways to describe the same memory field, which means to store objects with different structures and descriptions at the same place.
As the same memory field can contain objects with different descriptions, to be able to read the file, we need a mechanism to determine the description to use in order to interpret correctly this data area.
We need a rule which, according to some criteria, generally the content of one or more fields of the record, will enable us to determine (discriminate) the description to use for reading the re-defined area.
In Tuxedo ART Workbench this rule is called a discrimination rule.
Any redefinition inside a COBOL description lacking discrimination rules presents a major risk during the file transcoding. Therefore, any non-equivalent redefined field requests a discrimination rule. On the other hand, any equivalent redefinition (called technical redefinition) must be subject to a cleansing within the COBOL description (see the example below).
The discrimination rules must be presented per file and highlight the differences and discriminated areas. Regarding the files, it is impossible to reference a field external to the file description.
The following description is a sample of a COPY as expected by Tuxedo ART Workbench :
Listing 1‑9 COBOL COPY Sample
01 FV14.
05 FV14-X1 PIC X.
05 FV14-X2 PIC XXX.
05 FV14-X3.
10 FV14-MTMGFA PIC 9(2).
10 FV14-NMASMG PIC X(2).
10 FV14-FILLER PIC X(12).
10 FV14-COINFA PIC 9(6)V99.
05 FV14-X4 REDEFINES FV14-X3.
10 FV14-MTMGFA PIC 9(6)V99.
10 FV14-FILLER PIC X(4).
10 FV14-IRETCA PIC X(01).
10 FV14-FILLER PIC X(2).
10 FV14-ZNCERT.
15 FV14-ZNALEA COMP-2.
15 FV14-NOSCP1 COMP-2.
15 FV14-NOSEC2 COMP-2.
15 FV14-NOCERT PIC 9(4) COMP-3.
15 FV14-FILLER PIC X(16).
05 FV14-X5 REDEFINES FV14-X3.
10 FV14-FIL1 PIC X(16).
10 FV14-MNT1 PIC S9(6)V99.
05 FV14-X6 REDEFINES FV14-X3.
10 FV14-FIL3 PIC X(16).
10 FV14-MNT3 PIC S9(6).
10 FV14-FIL4 PIC X(2).
 
The discrimination rules are written in the following format:
Listing 1‑10 COBOL COPY Discrimination Rules
Field FV14-X3
Rule if FV14-X1 = “A” then FV14-X3
elseif FV14-X1 = “B” then FV14-X4
elseif FV14-X1 = “C” then FV14-X5
else FV14-X6
 
Note:
The copy name of the COBOL description is: <COPY name>.cpy
Redefinition Examples
Non-Equivalent Redefinition
Listing 1‑11 Non-equivalent Redefinition Example
01 FV15.
05 FV15-MTMGFA PIC 9(2).
05 FV15-ZNPCP3.
10 FV15-NMASMG PIC X(2).
10 FV15-FILLER PIC X(12).
10 FV15-COINFA PIC 9(6)V99.
05 FV15-ZNB2T REDEFINES FV1 5-ZNPCP3.
10 FV15-MTMGFA PIC 9(4)V99.
10 FV15-FILLER PIC X(4).
10 FV15-IRETCA PIC X(01).
10 FV15-FILLER PIC X(2).
10 FV15-ZNCERT
15 FV15-ZNALEA COMP-2.
15 FV15-NOSCP1 COMP-2.
15 FV15-NOSEC2 COMP-2.
15 FV15-NOCERT PIC 9(4) COMP-3.
15 FV15-FILLER PIC X(16).
 
In the above example, two fields (FV15-ZNPCP3 and FV15-ZNB2T) have different structures: an EBCDIC alphanumeric field in one case and a field composed of EBCDIC data and COMP2, COMP3 data in a second case.
The implementation of a discrimination rule will be necessary to migrate the data to a UNIX platform.
Listing 1‑12 Related Discrimination Rules
Field FV15-ZNPCP3
Rule if FV15-MTMGFA = 12 then FV15-ZNPCP3
elseif FV15-MTMGFA = 08 and FV15-NMASMG = "KC " then FV15-ZNB2T
 
Equivalent Redefinition Called Technical Redefinition
Listing 1‑13 Technical Redefinition Initial Situation
01 FV1.
05 FV1-ZNPCP3.
10 FV1-MTMGFA PIC 9(6)V99.
10 FV1-NMASMG PIC X(25).
10 FV1-FILLER PIC X(12).
10 FV1-COINFA PIC 9(10).
10 FV2-COINFA REDEFINES FV1-COINFA.
15 FV2-ZNALEA PIC 9(2).
15 FV2-NOSCP1 PIC 9(4).
15 FV2- FILLER PIC 9(4).
10 FV15-MTMGFA PIC 9(6)V99.
10 FV15-FILLER PIC X(4).
10 FV15-IRETCA PIC X(01).
10 FV15-FILLER PIC X(2).
 
Listing 1‑14 Technical Redefinition Potential Expected Results
 
01 FV1.                                 01 FV1.
05 FV1-ZNPCP3.                         05 FV1-ZNPCP3.
10 FV1-MTMGFA PIC 9(6)V99.          10 FV1-MTMGFA PIC 9(6)V99.
10 FV1-NMASMG PIC X(25).            10 FV1-NMASMG PIC X(25).
10 FV1-FILLER PIC X(12).            10 FV1-FILLER PIC X(12).
10 FV1-COINFA PIC 9(10).            10 FV2-COINFA.
10 FV15-MTMGFA PIC 9(6)V99.        15 FV2-ZNALEA PIC 9(2).
10 FV15-FILLER PIC X(4).            15 FV2-NOSCP1 PIC 9(4).
10 FV15-IRETCA PIC X(01).           15 FV2- FILLER PIC X(4).
10 FV15-FILLER PIC X(2).             10 FV15-MTMGFA PIC 9(6)V99.
                                         10 FV15-FILLER PIC X(4).
                                         10 FV15-IRETCA PIC X(01).
                                         10 FV15-FILLER PIC X(2).
 
In the above example, the two descriptions correspond to a simple EBCDIC alphanumeric character string (without binary, packed or signed numeric fields). this type of structure does not require the implementation of a discrimination rule.
Preparing the Environment
This section describes the tasks to perform before generating the components to be used to migrate the data files.
Initializing Environment Variables
Before executing Tuxedo ART Workbench set the following environment variables:
— the location for storing temporary objects generated by the process.
You should regularly clean this directory.
— the location of the configuration files.
Implementing the Configuration Files
Three files need to be placed in Tuxedo ART Workbench file structure as described by:
$PARAM for:
Datamap-<configuration name>.re,
mapper-<configuration name>.re.
For a File-to-File conversion you must create these files yourself.
Note:
Two other configuration files:
are automatically placed in the file structure during the installation of Tuxedo ART Workbench . If specific versions of these files are required for particular z/OS files they will be placed in the $PARAM/file file structure.
Configuring the Files
The following examples show the configuration of three files; two QSAM files and one VSAM KSDS file. There are no discrimination rules to implement for these files.
Database Parameter File (db-param.cfg)
For the db-param.cfg file, the only parameter you may need to modify is the target_os parameter.
Listing 1‑15 db-param.cfg Example
# This configuration file is used by FILE & RDBMS converter
# Lines beginning with "#" are ignored
# write information in lower case
# common parameters for FILE and RDBMS
# source information is written into system descriptor file (OS, DBMS=,
# DBMS-VERSION=)
target_rdbms_name:oracle
target_rdbms_version:11
target_os:unix
# optional parameter
target_cobol:cobol_mf
hexa-map-file:tr-hexa.map
#
# specific parameters for FILE to RDBMS conversion
file:char_limit_until_varchar:29
# specific parameters for RDBMS conversion
rdbms:date_format:YYYY/MM/DD
rdbms:timestamp_format:YYYY/MM/DD HH24 MI SS
rdbms:time_format:HH24 MI SS
# rename object files
# the file param/rdbms/rename-objects-<schema>.txt is automatically loaded # by the tool if it exists.
 
Mandatory Parameter
target_os:unix
Name of the target operating system.
Optional Parameter
target_cobol:cobol_mf
Name of the COBOL language. Accepted values are “cobol_mf” (default value) and “cobol_it”.
In this example, the language is Micro Focus COBOL.
hexa-map-file:tr-hexa.map
Specifies a mapping table file between EBCDIC (z/OS code set) and ASCII (Linux/UNIX code set) hexadecimal values; if hexa-map-file is not specified, a warning will be logged.
Datamap Parameter File (Datamap-<configuration name>.re)
Each z/OS file to be migrated must be listed.
The following parameters must be set:
 
Table 1‑15 Datamap Parameters
Note:
In the following example, the first two files are QSAM files, the organization is therefore always sequential. The PJ01AAA.SS.VSAM.CUSTOMER file is a VSAM KSDS file and the organization is therefore indexed. The parameters, keys offset 1 bytes length 6 bytes primary, describe the key. In this example, the key is six bytes long starting in position 1.
Listing 1‑16 Example Datamap File: Datamap-FTFIL001.re
%% Lines beginning with "%%" are ignored
 
data map FTFIL001-map system cat::PROJ001
%%
%% Datamap File PJ01DDD.DO.QSAM.KBCOI001
%%
file PJ01DDD.DO.QSAM.KBCOI001
organization Sequential
%%
%% Datamap File PJ01DDD.DO.QSAM.KBCOI002
%%
file PJ01DDD.DO.QSAM.KBCOI002
organization Sequential
%%
%% Datamap File PJ01AAA.SS.VSAM.CUSTOMER
%%
file PJ01AAA.SS.VSAM.CUSTOMER
organization Indexed
keys offset 1 bytes length 6 bytes primary
 
Mapping Parameter File (mapper-<configuration name>.re)
Each z/OS file to be migrated, that is included in the Datamap configuration file, must be listed.
The following parameters must be set:
 
Table 1‑16 Mapping Parameters
include "#VAR:RECS-SOURCE#/BCOAC01E.cpy"
During the generation, the string #VAR:RECS-SOURCE# will be replaced by the directory name where the copy files are located: $PARAM/file/recs-source
The name of the copy file BCOAC01E.cpy is freely chosen by the user when creating the file.
REC-ENTREE corresponds to the level 01 field name in the copy file.
Note:
You cannot use hyphens (-) in logical names.
Notes:
Listing 1‑17 Example Mapper File: mapper-FTFIL001.re
%% Lines beginning with "%%" are ignored
ufas mapper FTFIL001
%%
%% Desc file PJ01DDD.DO.QSAM.KBCOI001
%%
file PJ01DDD.DO.QSAM.KBCOI001 transferred
include "#VAR:RECS-SOURCE#/BCOAC01E.cpy"
map record REC-ENTREE defined in "#VAR:RECS-SOURCE#/BCOAC01E.cpy"
source record REC-ENTREE defined in "#VAR:RECS-SOURCE#/BCOAC01E.cpy"
logical name FQSAM01
converter name FQSAM01
%%
%% Desc file PJ01DDD.DO.QSAM.KBCOI002
%%
file PJ01DDD.DO.QSAM.KBCOI002 transferred
include "#VAR:RECS-SOURCE#/BCOAC04E.cpy"
map record REC-ENTREE-2 defined in "#VAR:RECS-SOURCE#/BCOAC04E.cpy"
source record REC-ENTREE-2 defined in "#VAR:RECS-SOURCE#/BCOAC04E.cpy"
logical name FQSAM02
converter name FQSAM02
%%
%% Desc file PJ01AAA.SS.VSAM.CUSTOMER
%%
file PJ01AAA.SS.VSAM.CUSTOMER transferred
include "COPY/ODCSF0B.cpy"
map record VS-ODCSF0-RECORD defined in "COPY/ODCSF0B.cpy"
source record VS-ODCSF0-RECORD in "COPY/ODCSF0B.cpy"
logical name ODCSF0B
converter name ODCSF0B
 
Installing the Copy Files
Create a $PARAM/file/recs-source directory to hold the copy files.
Once the COBOL Description files have been prepared, the copy files described in the mapper-<configuration name>.re file should be placed in the $PARAM/file/recs-source directory.
If you use a COBOL copy book from the source platform to describe a file (see note in COBOL Description), then it is the location of the copy book that is directly used in the mapping parameter file as in the "COPY/ODCSF0B.cpy" example above.
Generating the Components
To generate the components used to migrate z/OS files Tuxedo ART Workbench uses the file.sh command. This section describes the command.
file.sh
Name
file.sh — Generate z/OS migration components.
Synopsis
file.sh [ [-g] [-m] [-i <installation directory>] <configuration name> | -s <installation directory> (<configuration name>,...) ]
Description
file.sh generates the components used to migrate z/OS files using Tuxedo ART Workbench .
Options
-g <configuration name>
Generation option. The unloading and loading components are generated in $TMPPROJECT using the information provided by the configuration files.
-m <configuration name>
Modification option. Makes the generated shell scripts executable. The COBOL programs are adapted to the target COBOL fixed format. When present, the shell script that modifies the generated source files is executed.
-i <installation directory><configuration name>
Installation option. Places the components in the installation directory. This operation uses the information located in the file-move-assignation.pgm file.
-s
Not applicable to File-to-File migration except when the attributes clause is set to LOGICAL_MODULE_ONLY.
In this case, this option enables the generation of the configuration files and DML utilities used by the COBOL converter. All configuration files are created in $PARAM/dynamic-config and DML files in <trf>/DML directory.
Example
file.sh -gmi $HOME/trf FTFIL001
Locations of Generated Files
The unloading and loading components generated with the -i $HOME/trf option are placed in the following locations:
 
$HOME/trf/unload/file/<configuration name>
$HOME/trf/reload/file/<configuration name>
The generation log files Mapper-log-<configuration name> can be used to resolve problems.
Modifying Generated Components
The generated components may be modified using a project’s own scripts.These scripts (sed, awk, perl,…) should be placed in:
$PARAM/file/file-modif-source.sh
When present, this file will be automatically executed at the end of the generation process. It will be called using the <configuration name> as an argument.
Using the Make Utility
Make is a UNIX utility intended to automate and optimize the construction of targets (files or actions).
You should have a descriptor file named makefile in the source directory in which all operations are implemented (a makefile is prepared in the source directory during the initialization of a project).
The next two sections describe configuring a make file and how to use Tuxedo ART Workbench File-To-File Converter functions with a make file.
Configuring a Make File
Version.mk
The version.mk configuration file in $PARAM is used to set the variables and parameters required by the make utility.
In version.mk specify where each type of component is installed and their extensions, as well as the versions of the different tools to be used. This file also describes how the log files are organized.
The following general variables should be set at the beginning of migration process in the version.mk file:
In addition, the FILE_SCHEMAS variable is specific to file migration, it indicates the different configurations to process.
This configuration should be complete before using the make file.
Make File Contents
The contents of the makefile summarize the tasks to be performed:
A makefile and a version.mk file are provided with Tuxedo ART Workbench Simple Application.
Using a Makefile with Tuxedo ART Workbench File-To-File Converter
The make FileConvert command can be used to launch Tuxedo ART Workbench File-To-File Converter. It enables the generation of the components required to migrate z/OS files to a UNIX/Linux target platform.
The make file launches the file.sh tool with the -g, -m and -i options, for all configurations contained in the FILE_SCHEMAS variable.
The File-to-Oracle Migration Process
File Organization
When migrating VSAM files from a source platform to an Oracle UNIX target platform, the first question to ask, when VSAM is concerned, is whether to keep a file or migrate the data to an Oracle table.
The following file organizations handled by z/OS can be migrated using Tuxedo ART Workbench to Oracle databases: VSAM RRDS, ESDS and KSDS.
The Tuxedo ART Workbench File-to-Oracle Converter is used for those files that are to be converted to Oracle tables. For files that remain in file format, see Executing the File-to-File Generated Converter Programs.
Migration Process Steps
The principle steps in the File-To-Oracle migration process, explained in detail in the rest of this chapter, are:
1.
2.
3.
4.
5.
6.
7.
8.
9.
10.
11.
Interaction With Other Oracle Tuxedo Application Rehosting Workbench Tools
The migration of data in VSAM files to Oracle tables is dependant on the results of the Tuxedo ART Workbench Cataloger (for more information, see Analyze). The File-to-Oracle migration impacts the COBOL and JCL conversion and should be completed before beginning the COBOL program conversion work.
Initializing the Process
This section describes the steps to be performed before starting the migration of VSAM files to Oracle tables.
Listing the Files to Be Migrated
The first task is to list all of the VSAM files to be migrated (in conjunction with the use of the File -to-File converter), and then identify those files that should be converted to Oracle tables. For example, permanent files to be later used via Oracle or files that need locking at the record level.
File Descriptions and Managing Files With the Same Structure
For each candidate file for migration, its structure should be described in COBOL format. This description is used in a COBOL copy by Tuxedo ART Workbench COBOL converter, subject to the limitations described in COBOL Description.
Once built, the list of files to migrate can be purged of files with the same structure in order to save work when migrating the files by limiting the number of programs required to transcode and reload data.
From the purged list of files, a last task consists of building the files:
Note:
The populate.sh utility (located in REFINEDIR/scripts/file/populate.sh), can be used to help generate these two configuration files automatically. For more information, see REFINEDIR/scripts/file/README.txt.
COBOL Description
A COBOL description is related to each file and considered as the representative COBOL description used within the application programs. This description can be a complex COBOL structure using all COBOL data types, including the OCCURS and REDEFINES notions.
This COBOL description will often be more developed than the COBOL file description (FD). For example, an FD field can be described as a PIC X(364) but really contain a three times defined area including, in one case a COMP-3 based numerals table, and in another case a complex description of several characters/digits fields etc.
It is this developed COBOL description which describes the application reality and therefore is used as a base to migrate a specific physical file.
The quality of the file processing execution depends on the quality of this COBOL description. From this point, the COBOL description is not separable from the file and when referring to the file concerned, we mean both the file and its representative COBOL description. The description must be provided in COBOL format, in a file with the following name:
<COPY name>.cpy
Note:
COBOL Description Format
The format of the COBOL description must conform to the following rules:
Some words are reserved. A list is supplied in the Appendix of the Oracle Tuxedo Application Rehosting Workbench Reference Guide.
Table 1‑18 lists the examples of COBOL description format.
 
COBOL Description and Related Discrimination Rules
Within a COBOL description there are several different ways to describe the same memory field, which means to store objects with different structures and descriptions at the same place.
As the same memory field can contain objects with different descriptions, to be able to read the file, we need a mechanism to determine the description to use in order to interpret correctly this data area.
We need a rule which, according to some criteria, generally the content of one or more fields of the record, will enable us to determine (discriminate) the description to use for reading the re-defined area.
In Tuxedo ART Workbench this rule is called a discrimination rule.
Any redefinition inside a COBOL description lacking discrimination rules presents a major risk during the file transcoding. Therefore, any non-equivalent redefined field requests a discrimination rule. On the other hand, any equivalent redefinition (called technical redefinition) must be subject to a cleansing within the COBOL description (see the example below).
The discrimination rules must be presented per file and highlight the differences and discriminated areas. Regarding the files, it is impossible to reference a field external to the file description.
The following description is a sample of a COPY as expected by Tuxedo ART Workbench :
Listing 1‑18 COBOL COPY Example
01 FV14.
05 FV14-X1 PIC X.
05 FV14-X2 PIC XXX.
05 FV14-X3.
10 FV14-MTMGFA PIC 9(2).
10 FV14-NMASMG PIC X(2).
10 FV14-FILLER PIC X(12).
10 FV14-COINFA PIC 9(6)V99.
05 FV14-X4 REDEFINES FV14-X3.
10 FV14-MTMGFA PIC 9(6)V99.
10 FV14-FILLER PIC X(4).
10 FV14-IRETCA PIC X(01).
10 FV14-FILLER PIC X(2).
10 FV14-ZNCERT.
15 FV14-ZNALEA COMP-2.
15 FV14-NOSCP1 COMP-2.
15 FV14-NOSEC2 COMP-2.
15 FV14-NOCERT PIC 9(4) COMP-3.
15 FV14-FILLER PIC X(16).
05 FV14-X5 REDEFINES FV14-X3.
10 FV14-FIL1 PIC X(16).
10 FV14-MNT1 PIC S9(6)V99.
05 FV14-X6 REDEFINES FV14-X3.
10 FV14-FIL3 PIC X(16).
10 FV14-MNT3 PIC S9(6).
10 FV14-FIL4 PIC X(2).
 
The discrimination rules are written in the following format:
Listing 1‑19 COBOL COPY Discrimination Rules
Field FV14-X3
Rule if FV14-X1 = “A” then FV14-X3
elseif FV14-X1 = “B” then FV14-X4
elseif FV14-X1 = “C” then FV14-X5
else FV14-X6
 
Note:
The copy name of the COBOL description is: <COPY name>.cpy
Redefinition Examples
Non-Equivalent Redefinition
Listing 1‑20 Non-equivalent Redefinition Example
01 FV15.
05 FV15-MTMGFA PIC 9(2).
05 FV15-ZNPCP3.
10 FV15-NMASMG PIC X(2).
10 FV15-FILLER PIC X(12).
10 FV15-COINFA PIC 9(6)V99.
05 FV15-ZNB2T REDEFINES FV1 5-ZNPCP3.
10 FV15-MTMGFA PIC 9(4)V99.
10 FV15-FILLER PIC X(4).
10 FV15-IRETCA PIC X(01).
10 FV15-FILLER PIC X(2).
10 FV15-ZNCERT
15 FV15-ZNALEA COMP-2.
15 FV15-NOSCP1 COMP-2.
15 FV15-NOSEC2 COMP-2.
15 FV15-NOCERT PIC 9(4) COMP-3.
15 FV15-FILLER PIC X(16).
 
In the above example, two fields (FV15-ZNPCP3 and FV15-ZNB2T) have different structures: an EBCDIC alphanumeric field in one case and a field composed of EBCDIC data and COMP2, COMP3 data in a second case.
The implementation of a discrimination rule will be necessary to migrate the data to a UNIX platform.
Listing 1‑21 Related Discrimination Rules
Field FV15-ZNPCP3
Rule if FV15-MTMGFA = 12 then FV15-ZNPCP3
elseif FV15-MTMGFA = 08 and FV15-NMASMG = "KC " then FV15-ZNB2T
 
Equivalent Redefinition Called Technical Redefinition
Listing 1‑22 Technical Redefinition Initial Situation
01 FV1.
05 FV1-ZNPCP3.
10 FV1-MTMGFA PIC 9(6)V99.
10 FV1-NMASMG PIC X(25).
10 FV1-FILLER PIC X(12).
10 FV1-COINFA PIC 9(10).
10 FV2-COINFA REDEFINES FV1-COINFA.
15 FV2-ZNALEA PIC 9(2).
15 FV2-NOSCP1 PIC 9(4).
15 FV2- FILLER PIC 9(4).
10 FV15-MTMGFA PIC 9(6)V99.
10 FV15-FILLER PIC X(4).
10 FV15-IRETCA PIC X(01).
10 FV15-FILLER PIC X(2).
 
Listing 1‑23 Technical Redefinition Potential Expected Results
01 FV1.                                 01 FV1.
05 FV1-ZNPCP3.                         05 FV1-ZNPCP3.
10 FV1-MTMGFA PIC 9(6)V99.          10 FV1-MTMGFA PIC 9(6)V99.
10 FV1-NMASMG PIC X(25).            10 FV1-NMASMG PIC X(25).
10 FV1-FILLER PIC X(12).            10 FV1-FILLER PIC X(12).
10 FV1-COINFA PIC 9(10).            10 FV2-COINFA.
10 FV15-MTMGFA PIC 9(6)V99.        15 FV2-ZNALEA PIC 9(2).
10 FV15-FILLER PIC X(4).            15 FV2-NOSCP1 PIC 9(4).
10 FV15-IRETCA PIC X(01).           15 FV2- FILLER PIC X(4).
10 FV15-FILLER PIC X(2).             10 FV15-MTMGFA PIC 9(6)V99.
                                         10 FV15-FILLER PIC X(4).
                                         10 FV15-IRETCA PIC X(01).
                                         10 FV15-FILLER PIC X(2).
 
 
In the above example, the two descriptions correspond to a simple EBCDIC alphanumeric character string (without binary, packed or signed numeric fields). this type of structure does not require the implementation of a discrimination rule.
Re-engineering Rules to Implement
This section describes the reengineering rules applied by Tuxedo ART Workbench when migrating data from VSAM files to an Oracle database.
Migration Rules Applied
Each table name is stipulated in the mapper-<configuration name>.re file using the table name clause.
For sequential VSAM files (VSAM ESDS):
Tuxedo ART Workbench adds a technical column: *_SEQ_NUM NUMBER(8).
This column is incremented each time a new line is added to the table; the column becomes the primary key of the table.
For relative VSAM files (VSAM RRDS):
Tuxedo ART Workbench adds a technical column *_RELATIVE_NUM.
The size of the column is deduced from the information supplied in the Datamap parameter file; the column becomes the primary key of the table.
The column:
For indexed VSAM files (VSAM KSDS):
Tuxedo ART Workbench does not add a technical column unless duplicate keys are accepted; the primary key of the VSAM file becomes the primary key of the table.
Rules Applied to Picture Clauses
The following rules are applied to COBOL Picture clauses when migrating data from VSAM files to Oracle tables:
 
Becomes CHAR if length <= 2000
Becomes VARCHAR2 if length > 2000
Note:
If the parameter: file:char_limit_until_varchar is set in the db-param.cfg file, it takes precedence over the above rule.
Rules Applied to Occurs and Redefines Clauses
For OCCURS and REDEFINES clauses with discrimination rules, three reengineering possibilities are proposed:
Example VSAM File Migration to Oracle Table
In the following example, the indexed VSAM file described in ODCSFOB uses as a primary key the VS-CUSTIDENT field.
Listing 1‑24 Example VSAM Copy Description
* ------------------------------------------------------------
* Customer record description
* -Record length : 266
* ------------------------------------------------------------
01 VS-ODCSF0-RECORD.
05 VS-CUSTIDENT PIC 9(006).
05 VS-CUSTLNAME PIC X(030).
05 VS-CUSTFNAME PIC X(020).
05 VS-CUSTADDRS PIC X(030).
05 VS-CUSTCITY PIC X(020).
05 VS-CUSTSTATE PIC X(002).
05 VS-CUSTBDATE PIC 9(008).
05 VS-CUSTBDATE-G REDEFINES VS-CUSTBDATE.
10 VS-CUSTBDATE-CC PIC 9(002).
10 VS-CUSTBDATE-YY PIC 9(002).
10 VS-CUSTBDATE-MM PIC 9(002).
10 VS-CUSTBDATE-DD PIC 9(002).
05 VS-CUSTEMAIL PIC X(040).
05 VS-CUSTPHONE PIC 9(010).
05 VS-FILLER PIC X(100).
* ------------------------------------------------------------
 
Listing 1‑25 Oracle Table Generated From VSAM File
WHENEVER SQLERROR CONTINUE;
DROP TABLE CUSTOMER CASCADE CONSTRAINTS;
WHENEVER SQLERROR EXIT 3;
CREATE TABLE CUSTOMER (
VS_CUSTIDENT NUMBER(6) NOT NULL,
VS_SEQ_NUM NUMBER(8) NOT NULL,
VS_CUSTLNAME VARCHAR2(30),
VS_CUSTFNAME CHAR (20),
VS_CUSTADDRS VARCHAR2(30),
VS_CUSTCITY CHAR (20),
VS_CUSTSTATE CHAR (2),
VS_CUSTBDATE NUMBER(8),
VS_CUSTEMAIL VARCHAR2(40),
VS_CUSTPHONE NUMBER(10),
VS_FILLER VARCHAR2(100),
CONSTRAINT PK_CUSTOMER PRIMARY KEY (
VS_CUSTIDENT)
CONSTRAINT UK_CUSTOMER UNIQUE (
VS_SEQ_NUM)
);
 
Note:
The copy book ODCSFOB contains a field redefinition: VS-CUSTBDATE-G PIC 9(008), as this is a technical field, no discrimination rule is implemented. In this case, only the redefined field is created in the generated table VS_CUSTBDATE NUMBER(8).
Preparing the Environment
This section describes the tasks to perform before generating the components to be used to migrate data from VSAM files to Oracle tables.
Initializing Environment Variables
Before executing Tuxedo ART Workbench set the following environment variables:
— the location for storing temporary objects generated by the process.
— the location of the configuration files.
Implementing the Configuration Files
Three files need to be placed in Tuxedo ART Workbench file structure as described by:
$PARAM for:
Datamap-<configuration name>.re,
mapper-<configuration name>.re.
For a File-To-Oracle conversion you must create the Datamap-<configuration name>.re and mapper-<configuration name>.re files yourself.
Two other configuration files:
are automatically generated in the file structure during the installation of Tuxedo ART Workbench . If specific versions of these files are required for particular z/OS files they will be placed in the $PARAM/file file structure.
Configuring the Files
Database Parameter File (db-param.cfg)
For the db-param.cfg file, only the target and file parameters need to be adapted.
Listing 1‑26 db-param.cfg Example
# This configuration file is used by FILE & RDBMS converter
# Lines beginning with "#" are ignored
# write information in lower case
# common parameters for FILE and RDBMS
# source information is written into system descriptor file (OS, DBMS=,
# DBMS-VERSION=)
target_rdbms_name:oracle
target_rdbms_version:11
target_os:unix
# optional parameter
target_cobol:cobol_mf
hexa-map-file:tr-hexa.map
#
# specific parameters for FILE to RDBMS conversion
file:char_limit_until_varchar:29
# specific parameters for RDBMS conversion
rdbms:date_format:YYYY/MM/DD
rdbms:timestamp_format:YYYY/MM/DD HH24 MI SS
rdbms:time_format:HH24 MI SS
# rename object files
# the file param/rdbms/rename-objects-<schema>.txt is automatically loaded # by the tool if it exists.
 
Mandatory Parameters
name of the target RDBMS.
version of the target RDBMS.
Name of the target operating system.
Indicates the maximum field length of a COBOL alphanumeric (PIC X) field before the field be transformed into an ORACLE VARCHAR data type.
In this example, fields longer than 29 characters become VARCHAR, fields shorter than 30 characters become CHAR fields.
Optional Parameters
target_cobol:cobol_mf
Name of the COBOL language. Accepted values are “cobol_mf” (default value) and “cobol_it”.
In this example, the language is Micro Focus COBOL.
hexa-map-file:tr-hexa.map
Specifies a mapping table file between EBCDIC (z/OS code set) and ASCII (Linux/UNIX code set) hexadecimal values; if hexa-map-file is not specified, a warning will be logged.
Datamap Parameter File (Datamap-<configuration name>.re)
Each VSAM file to be migrated must be listed.
The following parameters must be set:
 
Table 1‑20 Datamap Parameters
Note:
The PJ01AAA.SS.VSAM.CUSTOMER file is a VSAM KSDS file and the organization is therefore indexed. The parameters, keys offset 1 bytes length 6 bytes primary, describe the key. In this example, the key is six bytes long starting in position1.
Listing 1‑27 Example Datamap File: Datamap-STFILEORA.re
%% Lines beginning with "%%" are ignored
data map STFILEORA-map system cat::STFILEORA
%%
%% Datamap File PJ01AAA.SS.VSAM.CUSTOMER
%%
file PJ01AAA.SS.VSAM.CUSTOMER
organization Indexed
keys offset 1 bytes length 6 bytes primary
 
Mapping Parameter File (mapper-<configuration name>.re)
Each z/OS file to be migrated, that is included in the Datamap configuration file, must be listed.
A file parameter and its options must be included for every VSAM file to convert to an Oracle table. The following parameters must be set:
 
Table 1‑21 Mapping Parameters
(ufas mapper STFILEORA)
include "COPY/ODCSF0B.cpy"
The name and path of the copy file BCOAC01E.cpy is freely chosen by the user when creating the file.
VS-ODCSF0-RECORD corresponds to the level 01 field name in the copy file.
Note:
The description of the different parameters used is provided in the Oracle Tuxedo Application Rehosting Workbench Reference Guide - File To File Convertor.
Listing 1‑28 Example mapper File: mapper-STFILEORA.re
%% Lines beginning with "%%" are ignored
ufas mapper STFILEORA
%%
%% Desc file PJ01AAA.SS.VSAM.CUSTOMER
%%
file PJ01AAA.SS.VSAM.CUSTOMER transferred converted
table name CUSTOMER
include "COPY/ODCSF0B.cpy"
map record VS-ODCSF0-RECORD defined in "COPY/ODCSF0B.cpy"
source record VS-ODCSF0-RECORD in "COPY/ODCSF0B.cpy"
logical name ODCSF0B
converter name ODCSF0B
attributes LOGICAL_MODULE_IN_ADDITION
 
Installing the Copy Files
Once the COBOL Description files have been prepared, the copy files described in the mapper-<configuration name>.re file should be placed in the $PARAM/file/recs-source directory.
If you use a COBOL copy book from the source platform to describe a file (see note in COBOL Description), then it is the location of the copy book that is directly used in the mapping parameter file as in the "COPY/ODCSF0B.cpy" example above.
Generating the Components
To generate the components used to migrate data from VSAM file to Oracle tables Tuxedo ART Workbench uses the file.sh command. This section describes the command.
file.sh
Name
file.sh — Generate z/OS migration components.
Synopsis
file.sh [ [-g] [-m] [-i <installation directory>] <configuration name> | -s <installation directory> (<configuration name>,...) ]
Description
file.sh generates the components used to migrate VSAM files by Tuxedo ART Workbench .
Options
-g <configuration name>
Generation option. The unloading and loading components are generated in $TMPPROJECT using the information provided by the configuration files.
-m <configuration name>
Modification option. Makes the generated shell scripts executable. The COBOL programs are adapted to the target COBOL fixed format. When present, the shell script that modifies the generated source files is executed.
-i <installation directory> <configuration name>
Installation option. Places the components in the installation directory. This operation uses the information located in the file-move-assignation.pgm file.
-s <installation directory> <schema name>,...)
Enables the generation of the configuration files and DML utilities used by the COBOL converter. All configuration files are created in $PARAM/dynamic-config and DML files in <trf>/DML directory.
Example
file.sh -gmi $HOME/trf FTFIL001
Using the Make Utility
Make is a UNIX utility intended to automate and optimize the construction of targets (files or actions).
You should have a descriptor file named makefile in the source directory in which all operations are implemented (a makefile is prepared in the source directory during the initialization of a project).
The next two sections describe configuring a make file and how to use Tuxedo ART Workbench File-To-File Converter functions with a make file.
Configuring a Make File
Version.mk
The version.mk configuration file in $PARAM is used to set the variables and parameters required by the make utility.
In version.mk specify where each type of component is installed and their extensions, as well as the versions of the different tools to be used. This file also describes how the log files are organized.
The following general variables should be set at the beginning of migration process in the version.mk file:
In addition, the FILE_SCHEMAS variable is specific to file migration, it indicates the different configurations to process.
This configuration should be complete before using the make file.
Make File Contents
The contents of the makefile summarize the tasks to be performed:
A makefile and a version.mk file are provided with Tuxedo ART Workbench Simple Application.
Using a makefile with Oracle Tuxedo Application Rehosting Workbench File-To-File Converter
The make FileConvert command can be used to launch Tuxedo ART Workbench File-To-File Converter. It enables the generation of the components required to migrate z/OS files to a UNIX/Linux target platform.
The make file launches the file.sh tool with the -g, -m and -i options, for all configurations contained in the FILE_SCHEMAS variable.
Locations of Generated Files
The unloading and loading components generated with the -i $HOME/trf option are placed in the following locations:
 
$HOME/trf/unload/file/<configuration name>
$HOME/trf/reload/file/<configuration name>
Example: loadfile-ODCSF0.ksh RELFILE-ODCSF0.cbl
The generation log files Mapper-log-<configuration name> can be used to resolve problems.
Examples of Generated Components
For the example used in this chapter, the following scripts are generated.
The SQL script used to create the CUSTOMER table is named:
The scripts used for the different technical operations are named:
Nine COBOL programs are generated, their usage is described in the Oracle Tuxedo Application Rehosting Workbench Reference Guide.
One PRO*COBOL program for accessing the ORACLE CUSTOMER table is generated:
Modifying Generated Components
The generated components may be modified using a project’s own scripts. these scripts (sed, awk, perl,…) should be placed in:
$PARAM/file/file-modif-source.sh
When present, this file will be automatically executed at the end of the generation process. It will be called using the <configuration name> as an argument.
Migrating data files is described in the following sections:
The File-To-Db2/luw (UDB) Migration Process
File Organizations
When migrating VSAM files from a source platform to an DB2/Luw(udb) UNIX target platform, the first question to ask, when VSAM is concerned, is whether to keep a file or migrate the data to a DB2/Luw(udb) table.
The following file organizations handled by z/OS can be migrated using Tuxedo ART Workbench to Oracle databases: VSAM RRDS, ESDS and KSDS.
The Tuxedo ART Workbench File-To-File Converter is used for those files that are to be converted to Oracle tables. For files that remain in file format, the Oracle Tuxedo Application Workbench Reference Guide, File-to-File Converter.
Migration Process Steps
The principle steps in the File-To-Db2/luw (UDB) migration process, explained in detail in the rest of this chapter, are:
1.
2.
3.
4.
5.
6.
7.
8.
9.
10.
11.
Interaction With Other Oracle Tuxedo Application Rehosting Workbench Tools
The migration of data in VSAM files to DB2/Luw(udb) tables is dependant on the results of the Cataloger. The File-To-Db2/luw (UDB) migration impacts the COBOL and JCL conversion and should be completed before beginning the COBOL program conversion work.
Initializing the Process
This section describes the steps to be performed before starting the migration of VSAM files to DB2/Luw(udb) tables.
Listing the Files to Be Migrated
The first task is to list all of the VSAM files to be migrated (in conjunction with the use of the File-to-File converter), and then identify those files that should be converted to DB2/Luw(udb) tables. For example, permanent files to be later used via DB2/Luw or files that need locking at the record level.
File Descriptions and Managing Files With the Same Structure
For each candidate file for migration, its structure should be described in COBOL format. This description is used in a COBOL copy by Tuxedo ART Workbench COBOL converter, subject to the limitations described in COBOL Description.
Once built, the list of files to migrate can be purged of files with the same structure in order to save work when migrating the files by limiting the number of programs required to transcode and reload data.
From the purged list of files, a last task consists of building the files:
Note:
The populate.sh utility (located in REFINEDIR/scripts/file/populate.sh), can be used to help generate these two configuration files automatically. For more information, see REFINEDIR/scripts/file/README.txt.
COBOL Description
A COBOL description is related to each file and considered as the representative COBOL description used within the application programs. This description can be a complex COBOL structure using all COBOL data types, including the OCCURS and REDEFINES notions.
This COBOL description will often be more developed than the COBOL file description (FD). For example, an FD field can be described as a PIC X(364) but really contain a three times defined area including, in one case a COMP-3 based numerals table, and in another case a complex description of several characters/digits fields etc.
It is this developed COBOL description which describes the application reality and therefore is used as a base to migrate a specific physical file.
The quality of the file processing execution depends on the quality of this COBOL description. From this point, the COBOL description is not separable from the file and when referring to the file concerned, we mean both the file and its representative COBOL description. The description must be provided in COBOL format, in a file with the following name:
<COPY name>.cpy
Note:
COBOL Description Format
The format of the COBOL description must conform to the following rules:
Some words are reserved. A list is supplied in the Appendix of the Oracle Tuxedo Application Rehosting Workbench Reference Guide.
Example
 
COBOL Description and Related Discrimination Rules
Within a COBOL description there are several different ways to describe the same memory field, which means to store objects with different structures and descriptions at the same place.
As the same memory field can contain objects with different descriptions, to be able to read the file, we need a mechanism to determine the description to use in order to interpret correctly this data area.
We need a rule which, according to some criteria, generally the content of one or more fields of the record, will enable us to determine (discriminate) the description to use for reading the re-defined area. In Tuxedo ART Workbench this rule is called a discrimination rule.
Any redefinition inside a COBOL description lacking discrimination rules presents a major risk during the file transcoding. Therefore, any non-equivalent redefined field requests a discrimination rule. On the other hand, any equivalent redefinition (called technical redefinition) must be subject to a cleansing within the COBOL description (see the example below).
The discrimination rules must be presented per file and highlight the differences and discriminated areas. Regarding the files, it is impossible to reference a field external to the file description.
The following description is a sample of a COPY as expected by Tuxedo ART Workbench :
Listing 1‑29 COBOL COPY Sample
01 FV14.
05 FV14-X1 PIC X.
05 FV14-X2 PIC XXX.
05 FV14-X3.
10 FV14-MTMGFA PIC 9(2).
10 FV14-NMASMG PIC X(2).
10 FV14-FILLER PIC X(12).
10 FV14-COINFA PIC 9(6)V99.
05 FV14-X4 REDEFINES FV14-X3.
10 FV14-MTMGFA PIC 9(6)V99.
10 FV14-FILLER PIC X(4).
10 FV14-IRETCA PIC X(01).
10 FV14-FILLER PIC X(2).
10 FV14-ZNCERT.
15 FV14-ZNALEA COMP-2.
15 FV14-NOSCP1 COMP-2.
15 FV14-NOSEC2 COMP-2.
15 FV14-NOCERT PIC 9(4) COMP-3.
15 FV14-FILLER PIC X(16).
05 FV14-X5 REDEFINES FV14-X3.
10 FV14-FIL1 PIC X(16).
10 FV14-MNT1 PIC S9(6)V99.
05 FV14-X6 REDEFINES FV14-X3.
10 FV14-FIL3 PIC X(16).
10 FV14-MNT3 PIC S9(6).
10 FV14-FIL4 PIC X(2).
 
The discrimination rules are written in the following format:
Listing 1‑30 COBOL COPY Discrimination Rules
Field FV14-X3
Rule if FV14-X1 = “A” then FV14-X3
elseif FV14-X1 = “B” then FV14-X4
elseif FV14-X1 = “C” then FV14-X5
else FV14-X6
 
Note:
The copy name of the COBOL description is: <COPY name>.cpy
Redefinition Examples
Non-Equivalent Redefinition
Listing 1‑31 Non-equivalent Redefinition Example
01 FV15.
05 FV15-MTMGFA PIC 9(2).
05 FV15-ZNPCP3.
10 FV15-NMASMG PIC X(2).
10 FV15-FILLER PIC X(12).
10 FV15-COINFA PIC 9(6)V99.
05 FV15-ZNB2T REDEFINES FV1 5-ZNPCP3.
10 FV15-MTMGFA PIC 9(4)V99.
10 FV15-FILLER PIC X(4).
10 FV15-IRETCA PIC X(01).
10 FV15-FILLER PIC X(2).
10 FV15-ZNCERT
15 FV15-ZNALEA COMP-2.
15 FV15-NOSCP1 COMP-2.
15 FV15-NOSEC2 COMP-2.
15 FV15-NOCERT PIC 9(4) COMP-3.
15 FV15-FILLER PIC X(16).
 
In the above example, two fields (FV15-ZNPCP3 and FV15-ZNB2T) have different structures: an EBCDIC alphanumeric field in one case and a field composed of EBCDIC data and COMP2, COMP3 data in a second case.
The implementation of a discrimination rule will be necessary to migrate the data to a UNIX platform.
Listing 1‑32 Related Discrimination Rules
Field FV15-ZNPCP3
Rule if FV15-MTMGFA = 12 then FV15-ZNPCP3
elseif FV15-MTMGFA = 08 and FV15-NMASMG = "KC " then FV15-ZNB2T
 
Equivalent Redefinition Called Technical Redefinition
Listing 1‑33 Technical Redefinition Initial Situation
01 FV1.
05 FV1-ZNPCP3.
10 FV1-MTMGFA PIC 9(6)V99.
10 FV1-NMASMG PIC X(25).
10 FV1-FILLER PIC X(12).
10 FV1-COINFA PIC 9(10).
10 FV2-COINFA REDEFINES FV1-COINFA.
15 FV2-ZNALEA PIC 9(2).
15 FV2-NOSCP1 PIC 9(4).
15 FV2- FILLER PIC 9(4).
10 FV15-MTMGFA PIC 9(6)V99.
10 FV15-FILLER PIC X(4).
10 FV15-IRETCA PIC X(01).
10 FV15-FILLER PIC X(2).
 
Listing 1‑34 Technical Redefinition Potential Expected Results
 
01 FV1.
05 FV1-ZNPCP3.
10 FV1-MTMGFA PIC 9(6)V99.
10 FV1-NMASMG PIC X(25).
10 FV1-FILLER PIC X(12).
10 FV1-COINFA PIC 9(10).
10 FV15-MTMGFA PIC 9(6)V99.
10 FV15-FILLER PIC X(4).
10 FV15-IRETCA PIC X(01).
10 FV15-FILLER PIC X(2). 01 FV1.
05 FV1-ZNPCP3.
10 FV1-MTMGFA PIC 9(6)V99.
10 FV1-NMASMG PIC X(25).
10 FV1-FILLER PIC X(12).
10 FV2-COINFA.
15 FV2-ZNALEA PIC 9(2).
15 FV2-NOSCP1 PIC 9(4).
15 FV2- FILLER PIC X(4).
10 FV15-MTMGFA PIC 9(6)V99.
10 FV15-FILLER PIC X(4).
10 FV15-IRETCA PIC X(01).
10 FV15-FILLER PIC X(2).


In the above example, the two descriptions correspond to a simple EBCDIC alphanumeric character string (without binary, packed or signed numeric fields). this type of structure does not require the implementation of a discrimination rule.
Re-Engineering Rules to Implement
This section describes the reengineering rules applied by Tuxedo ART Workbench when migrating data from VSAM files to a DB2/Luw(udb) database.
Migration Rules Applied
Each table name is stipulated in the mapper-<configuration name>.re file using the table name clause.
For sequential VSAM files (VSAM ESDS):
Tuxedo ART Workbench adds a technical column: *_SEQ_NUM NUMERIC(8).
This column is incremented each time a new line is added to the table; the column becomes the primary key of the table.
For relative VSAM files (VSAM RRDS):
Tuxedo ART Workbench adds a technical column *_RELATIVE_NUM.
The size of the column is deduced from the information supplied in the Datamap parameter file; the column becomes the primary key of the table.
The column:
For indexed VSAM files (VSAM KSDS):
Tuxedo ART Workbench does not add a technical column unless duplicate keys are accepted; the primary key of the VSAM file becomes the primary key of the table.
Rules Applied to Picture Clauses
The following rules are applied to COBOL Picture clauses when migrating data from VSAMfiles to Oracle tables
 
PIC S9(4) BINARY is migrated as NUMERIC(5)
Becomes CHAR if length <= 255
Becomes VARCHAR if length > 255
Note:
If the parameter: file:char_limit_until_varchar is set in the db-param.cfg file, it takes precedence over the above rule.
Rules Applied to Occurs and Redefines Clauses
For OCCURS and REDEFINES clauses with discrimination rules, three reengineering possibilities are proposed:
Example VSAM File Migration to DB2/Luw(udb) Table
In the following example, the indexed VSAM file described in ODCSFOB uses as a primary key the VS-CUSTIDENT field.
Listing 1‑35 Example VSAM Copy Description
* ------------------------------------------------------------
* Customer record description
* -Record length : 266
* ------------------------------------------------------------
01 VS-ODCSF0-RECORD.
05 VS-CUSTIDENT PIC 9(006).
05 VS-CUSTLNAME PIC X(030).
05 VS-CUSTFNAME PIC X(020).
05 VS-CUSTADDRS PIC X(030).
05 VS-CUSTCITY PIC X(020).
05 VS-CUSTSTATE PIC X(002).
05 VS-CUSTBDATE PIC 9(008).
05 VS-CUSTBDATE-G REDEFINES VS-CUSTBDATE.
10 VS-CUSTBDATE-CC PIC 9(002).
10 VS-CUSTBDATE-YY PIC 9(002).
10 VS-CUSTBDATE-MM PIC 9(002).
10 VS-CUSTBDATE-DD PIC 9(002).
05 VS-CUSTEMAIL PIC X(040).
05 VS-CUSTPHONE PIC 9(010).
05 VS-FILLER PIC X(100).
* ------------------------------------------------------------
 
Listing 1‑36 Oracle Table Generated From VSAM File
DROP TABLE CUSTOMER ;
COMMIT ;
CREATE TABLE CUSTOMER (
VS_CUSTIDENT NUMERIC (6) NOT NULL,
VS_CUSTLNAME VARCHAR (30),
VS_CUSTFNAME CHAR (20),
VS_CUSTADDRS VARCHAR (30),
VS_CUSTCITY CHAR (20),
VS_CUSTSTATE CHAR (2),
VS_CUSTBDATE NUMERIC (8),
VS_CUSTEMAIL VARCHAR (40),
VS_CUSTPHONE NUMERIC (10),
VS_FILLER VARCHAR (100),
CONSTRAINT PKCUSTOMER PRIMARY KEY (
VS_CUSTIDENT)) ;
COMMIT ;
 
Note:
The copy book ODCSFOB contains a field redefinition: VS-CUSTBDATE-G PIC 9(008), as this is a technical field, no discrimination rule is implemented. In this case, only the redefined field is created in the generated table VS_CUSTBDATE NUMBER(8).
Preparing the Environment
This section describes the tasks to perform before generating the components to be used to migrate data from VSAM files to DB2/Luw(udb) tables.
Initializing Environment Variables
Before executing Tuxedo ART Workbench set the following environment variables:
— the location for storing temporary objects generated by the process.
You should regularly clean this directory.
— the location of the configuration files.
Implementing the Configuration Files
Three files need to be placed in Tuxedo ART Workbench file structure as described by:
$PARAM for:
Datamap-<configuration name>.re,
mapper-<configuration name>.re.
For a File-To-Db2/luw (UDB) conversion you must create the Datamap-<configuration name>.re and mapper-<configuration name>.re files yourself.
Two other configuration files:
are automatically generated in the file structure during the installation of Tuxedo ART Workbench . If specific versions of these files are required for particular z/OS files they will be placed in the $PARAM/file file structure.
Configuring the Files
Database Parameter File (db-param.cfg)
For the db-param.cfg file, only the target and file parameters need to be adapted.
Listing 1‑37 db-param.cfg Example
# This configuration file is used by FILE & RDBMS converter
# Lines beginning with "#" are ignored
# write information in lower case
# common parameters for FILE and RDBMS
# source information is written into system descriptor file (OS, DBMS=,
# DBMS-VERSION=)
target_rdbms_name:udb
target_rdbms_version:9
target_os:unix
# optional parameter
target_cobol:cobol_mf
hexa-map-file:tr-hexa.map
#
# specific parameters for FILE to RDBMS conversion
file:char_limit_until_varchar:29
# specific parameters for RDBMS conversion
rdbms:date_format:YYYY/MM/DD
rdbms:timestamp_format:YYYY/MM/DD HH24 MI SS FF6
rdbms:time_format:HH24 MI SS
# rename object files
# the file param/rdbms/rename-objects-<schema>.txt is automatically loaded # by the tool if it exists.
 
Mandatory Parameters
Name of the target RDBMS.
Version of the target RDBMS.
Name of the target operating system.
Indicates the maximum field length of a COBOL alphanumeric (PIC X) field before the field be transformed into an DB2/Luw(udb) VARCHAR data type.
In this example, fields longer than 29 characters become VARCHAR, fields shorter than 30 characters becomes CHAR fields.
Optional Parameters
target_cobol:cobol_mf
Name of the COBOL language. Accepted values are “cobol_mf” (default value) and “cobol_it”.
In this example, the language is Micro Focus COBOL.
hexa-map-file:tr-hexa.map
Specifies a mapping table file between EBCDIC (z/OS code set) and ASCII (Linux/UNIX code set) hexadecimal values; if hexa-map-file is not specified, a warning will be logged.
Datamap Parameter File (Datamap-<configuration name>.re)
Each VSAM file to be migrated must be listed.
The following parameters must be set:
 
Table 1‑24 Datamap Parameters
Note:
The PJ01AAA.SS.VSAM.CUSTOMER file is a VSAM KSDS file and the organization is therefore indexed. The parameters, keys offset 1 bytes length 6 bytes primary, describe the key. In this example, the key is six bytes long starting in position1.
Listing 1‑38 Example Datamap File: Datamap-STFILEUDB.re
%% Lines beginning with "%%" are ignored
data map STFILEUDB-map system cat::STFILEUDB
%%
%% Datamap File PJ01AAA.SS.VSAM.CUSTOMER
%%
file PJ01AAA.SS.VSAM.CUSTOMER
organization Indexed
keys offset 1 bytes length 6 bytes primary
 
Mapping Parameter File (mapper-<configuration name>.re)
Each z/OS file to be migrated, that is included in the Datamap configuration file, must be listed.
A file parameter and its options must be included for every VSAM file to convert to an DB2/Luw(udb) table. The following parameters must be set:
 
Table 1‑25 Mapping Parameters
(ufas mapper STFILEUDB)
include "COPY/ODCSF0B.cpy"
The name and path of the copy file BCOAC01E.cpy is freely chosen by the user when creating the file.
Provide a name for the DB2/Luw(udb) table to be created.
VS-ODCSF0-RECORD corresponds to the level 01 field name in the copy file.
Note:
The description of the different parameters used is provided in the Oracle Tuxedo Application Rehosting Workbench Reference Guide - File To File Convertor.
Listing 1‑39 Example Mapper File: mapper-STFILEUDB.re
%% Lines beginning with "%%" are ignored
ufas mapper STFILEUDB
%%
%% Desc file PJ01AAA.SS.VSAM.CUSTOMER
%%
file PJ01AAA.SS.VSAM.CUSTOMER transferred converted
table name CUSTOMER
include "COPY/ODCSF0B.cpy"
map record VS-ODCSF0-RECORD defined in "COPY/ODCSF0B.cpy"
source record VS-ODCSF0-RECORD in "COPY/ODCSF0B.cpy"
logical name ODCSF0B
converter name ODCSF0B
attributes LOGICAL_MODULE_IN_ADDITION
 
 
Installing the Copy Files
Once the COBOL Description files have been prepared, the copy files described in the mapper-<configuration name>.re file should be placed in the $PARAM/file/recs-source directory.
If you use a COBOL copy book from the source platform to describe a file (see note in COBOL Description), then it is the location of the copy book that is directly used in the mapping parameter file as in the "COPY/ODCSF0B.cpy" example above.
Generating the Components
To generate the components used to migrate data from VSAM file to DB2/Luw(udb) tables Tuxedo ART Workbench uses the file.sh command. This section describes the command.
file.sh
Name
file.sh — Generate z/OS migration components.
Synopsis
file.sh [ [-g] [-m] [-i <installation directory>] <configuration name> | -s <installation directory> (<configuration name>,...) ]
Description
file.sh generates the components used to migrate VSAM files by Tuxedo ART Workbench .
Options
-g <configuration name>
Generation option. The unloading and loading components are generated in $TMPPROJECT using the information provided by the configuration files.
-m <configuration name>
Modification option. Makes the generated shell scripts executable. The COBOL programs are adapted to the target COBOL fixed format. When present, the shell script that modifies the generated source files is executed.
-i <installation directory> <configuration name>
Installation option. Places the components in the installation directory. This operation uses the information located in the file-move-assignation-db2luw.pgm file.
-s <installation directory> <schema name>,...)
Enables the generation of the configuration files and DML utilities used by the COBOL converter. All configuration files are created in $PARAM/dynamic-config and DML files in <trf>/DML directory.
Example
file.sh -gmi $HOME/trf FTFIL001
Using the Make Utility
Make is a UNIX utility intended to automate and optimize the construction of targets (files or actions).
You should have a descriptor file named makefile in the source directory in which all operations are implemented (a makefile is prepared in the source directory during the initialization of a project).
The next two sections describe configuring a make file and how to use Tuxedo ART Workbench File-To-File Converter functions with a make file.
Configuring a Make File
Version.mk
The version.mk configuration file in $PARAM is used to set the variables and parameters required by the make utility.
In version.mk specify where each type of component is installed and their extensions, as well as the versions of the different tools to be used. This file also describes how the log files are organized.
The following general variables should be set at the beginning of migration process in the version.mk file:
In addition, the FILE_SCHEMAS variable is specific to file migration, it indicates the different configurations to process.
This configuration should be complete before using the make file.
Make File Contents
The contents of the makefile summarize the tasks to be performed:
A makefile and a version.mk file are provided with Tuxedo ART Workbench Simple Application.
Using a makefile with Tuxedo ART Workbench File-To-File Converter
The make FileConvert command can be used to launch Tuxedo ART Workbench File-To-File Converter. It enables the generation of the components required to migrate z/OS files to a UNIX/Linux target platform.
The make file launches the file.sh tool with the -g, -m and -i options, for all configurations contained in the FILE_SCHEMAS variable.
Locations of Generated Files
The unloading and loading components generated with the -i $HOME/trf option are placed in the following locations:
 
$HOME/trf/unload/file/<configuration name>
$HOME/trf/reload/file/<configuration name>
Example: loadtable-ODCSF0.ksh RELTABLE-ODCSF0.sqb
The generation log files Mapper-log-<configuration name> can be used to resolve problems.
Examples of Generated Components
For the example used in this chapter, the following scripts are generated.
The SQL script used to create the CUSTOMER table is named:
The scripts used for the different technical operations are named:
Nine COBOL programs are generated, their usage is described in the Oracle Tuxedo Application Rehosting Workbench Reference Guide.
One Embedded-SQL program for accessing the DB2/luw (udb) CUSTOMER table is generated:
Modifying Generated Components
The generated components may be modified using a project’s own scripts. these scripts (sed, awk, perl,…) should be placed in:
$PARAM/file/file-modif-source.sh
When present, this file will be automatically executed at the end of the generation process. It will be called using the <configuration name> as an argument.
The DB2-to-Oracle Migration Process
File Organization
When migrating from a z/OS DB2 source platform to an Oracle UNIX target platform, the first question to ask is, which tables should be migrated? When not all DB2 tables are to be migrated, a DB2 DDL representing the sub-set of objects to be migrated should be built.
Migration Process Steps
The principle steps in the DB2- to-Oracle migration process, explained in detail in the rest of this chapter, are:
1.
2.
3.
4.
5.
6.
7.
8.
Interaction With Other Oracle Tuxedo Application Rehosting Workbench Tools
The DB2-to-Oracle migration is dependent on the results of the Cataloger; the DB2-to-Oracle migration impacts the COBOL conversion and should be completed before beginning the program conversion work.
Re-Engineering Rules to Implement
This section describes the reengineering rules applied by Tuxedo ART Workbench when migrating data from a DB2 database to an Oracle database.
Migration Rules Applied
The list of DB2 objects that are included in the migration towards Oracle are described in Creating the Generated Oracle Objects.
Migrated DB2 objects keep their names when migrated to Oracle except for the application of Tuxedo ART Workbench renaming rules (see Preparing and Implementing Renaming Rules).
DB2-to-Oracle Data Type Migration Rules
 
DB2-to-Oracle Column Property Migration Rules
A column property can change the behavior of an application program.
The following table shows all of the DB2 column properties and how they are converted for the target Oracle database.
 
<value> depends on DB2/z/OS data type.
Preparing and Implementing Renaming Rules
Oracle Tuxedo Application Rehosting Workbench permits the modification of the different names in the DDL source file (table name, column name).
Renaming rules can be implemented for the following cases:
Note:
Renaming rules should be placed in a file named rename-objects-<schema name>.txt. This file should be placed in the directory indicated by the $PARAM/rdbms parameter.
Renaming rules have the following format:
table;<schema name>;<DB2 table name>;<Oracle table name>
Column;<schema name>;<DB2 table name>;<DB2 column name>;<Oracle column name>
Comments can be added as following: % Text.
Example:
% Modification applied to the AUALPH0T table
column;AUANPR0U;AUALPH0T;NUM_ALPHA;MW_NUM_ALPHA
Preparing and Implementing LOBS Data Type Migration
Tuxedo ART Workbench permits the download of CLOB and BLOB data types. The DB2 unloading utility downloads each row of CLOB or BLOB columns into a separate file (PDS or HFS dataset type). This utility (DSNUTILB) downloads data of all columns and NULL technical flags into a unique MVS member file, excepted for CLOB or BLOB columns which are replaced by the file name of the CLOB or BLOB separate file.
A PDS dataset type does not allow some files depending on your MVS system configuration, you may need to choose another dataset type for downloading CLOB or BLOB columns.
Based on those two constraints, you should set correct parameters in db-param.cfg configuration file (see Implementing the Configuration Files).
Preparing and Implementing MBCS Data Migration
Tuxedo ART Workbench provides the transcoding for single byte data. However, if your DB2 data contains MBCS characters, you should choose DSNUPROC unloading utility and set csv data format. The MBCS transcoding is done by the transfer tools.
Based on this constraint, you have to set correct parameters in db-param.cfg configuration file (see Implementing the Configuration Files).
Example of a Migration of DB2 Objects
In this example, the DB2 DDL contains a table named ODCSF0 with a primary key and a unique index named XCUSTIDEN:
Listing 1‑40 DDL Example Before Migration
DROP TABLE ODCSF0;
COMMIT;
CREATE TABLE ODCSF0
(CUSTIDENT DECIMAL(6, 0) NOT NULL,
CUSTLNAME CHAR(030) NOT NULL,
CUSTFNAME CHAR(020) NOT NULL,
CUSTADDRS CHAR(030) NOT NULL,
CUSTCITY CHAR(020) NOT NULL,
CUSTSTATE CHAR(002) NOT NULL,
CUSTBDATE DATE NOT NULL,
CUSTEMAIL CHAR(040) NOT NULL,
CUSTPHONE CHAR(010) NOT NULL,
PRIMARY KEY(CUSTIDENT))
IN DBPJ01A.TSPJ01A
CCSID EBCDIC;
COMMIT;
CREATE UNIQUE INDEX XCUSTIDEN
ON ODCSF0
(CUSTIDENT ASC) USING STOGROUP SGPJ01A;
COMMIT;
 
After applying the migration rules, and without implementing any renaming rules the following Oracle objects are obtained:
Listing 1‑41 Oracle Table Example After Migration
WHENEVER SQLERROR CONTINUE;
DROP TABLE ODCSF0 CASCADE CONSTRAINTS;
WHENEVER SQLERROR EXIT 3;
CREATE TABLE ODCSF0 (
CUSTIDENT NUMBER(6) NOT NULL,
CUSTLNAME CHAR(30) NOT NULL,
CUSTFNAME CHAR(20) NOT NULL,
CUSTADDRS CHAR(30) NOT NULL,
CUSTCITY CHAR(20) NOT NULL,
CUSTSTATE CHAR(2) NOT NULL,
CUSTBDATE DATE NOT NULL,
CUSTEMAIL CHAR(40) NOT NULL,
CUSTPHONE CHAR(10) NOT NULL);
 
Listing 1‑42 Oracle Index Example After Migration
WHENEVER SQLERROR CONTINUE;
DROP INDEX XCUSTIDEN;
WHENEVER SQLERROR EXIT 3;
CREATE UNIQUE INDEX XCUSTIDEN ON ODCSF0
(
CUSTIDENT ASC
);
 
Listing 1‑43 Oracle Constraint Example After Migration
WHENEVER SQLERROR CONTINUE;
ALTER TABLE ODCSF0 DROP CONSTRAINT CONSTRAINT_01;
WHENEVER SQLERROR EXIT 3;
ALTER TABLE ODCSF0 ADD
CONSTRAINT CONSTRAINT_01 PRIMARY KEY (CUSTIDENT);
 
Preparing the Environment
This section describes the tasks to perform before generating the components to be used to migrate the DB2 data to Oracle.
Implementing the Cataloging of the DB2 DDL Source Files
The DB2 DDL source files to be migrated are located when preparing for the catalog operations. During the migration process, all valid DB2 syntaxes are accepted, although only the SQL CREATE command is handled and migrated to Oracle.
system.desc File Parameters
For a DB2-To-Oracle migration, a parameter must be set in the system.desc System Description File in the Cataloger that is used by all of Tuxedo ART Workbench tools:
Indicates the version of the RDBMS to migrate.
Schemas
A schema should consist of a coherent set of objects (for example there should be no CREATE INDEX for a table that does not exist in the schema).
By default, if the SQL commands of the DB2 DDL are prefixed by a qualifier or an authorization ID, the prefix is used by Tuxedo ART Workbench as the name of the schema—for example, CREATE TABLE <qualifier or authorization ID>.table name.
The schema name can also be determined by Tuxedo ART Workbench using the global-options clause of the system.desc file.
For example:
system STDB2ORA root ".."
global-options
catalog="..",
sql-schema=<schema name>.
The schema name can also be determined for each DDL directory by Tuxedo ART Workbench using the directory options clause of the system.desc file. For more information, see options-clause in Cataloger.
directory "DDL" type SQL-SCRIPT
files "*.sql"
options SQL-Schema = "<schema name>".
 
Implementing the Configuration Files
Only one file needs to be placed in Tuxedo ART Workbench file structure as described by $PARAM:
Two other configuration files:
are automatically generated in the file structure during the installation of Tuxedo ART Workbench . If specific versions of these files are required, they will be placed in the $PARAM/rdbms file structure.
Initializing Environment Variables
Before executing Tuxedo ART Workbench set the following environment variables:
export TMPPROJECT=/$home/tmp
— the location for storing temporary objects generated by the process.
   You should regularly clean this directory.
— the location of the configuration files.
Generation Parameters
Listing 1‑44 Example db-param.cfg File
#
# This configuration file is used by FILE & RDBMS converter
# Lines beginning by "#" are ignored
# write information in lower case
#
# common parameters for FILE and RDBMS
# source information is written into system descriptor file (OS, DBMS=, # DBMS-VERSION=)
target_rdbms_name:oracle
target_rdbms_version:11
target_os:unix
# optional parameter
target_cobol:cobol_mf
hexa-map-file:tr-hexa.map
#
# specific parameters for FILE to RDBMS conversion
file:char_limit_until_varchar:29
# specific parameters for RDBMS conversion
rdbms:date_format:YYYY/MM/DD
rdbms:timestamp_format:YYYY/MM/DD HH24 MI SS FF6
rdbms:time_format:HH24 MI SS
rdbms:lobs_fname_length:75
rdbms:jcl_unload_lob_file_system:pds
rdbms:jcl_unload_utility_name:dsnutilb
#rdbms:jcl_unload_format_file:csv
# rename object files
# the file param/rdbms/rename-objects-<schema>.txt is automatically loaded by # the tool if it exists.
 
Only the parameters target_<xxxxx> and rdbms:<xxxxx> need to be adapted.
Mandatory Parameters
name of the target RDBMS.
version of the target RDBMS.
Name of the target operating system.
Optional Parameters
target_cobol:cobol_mf
Name of the COBOL language. Accepted values are “cobol_mf” (default value) and “cobol_it”.
In this example, language is Micro Focus COBOL.
hexa-map-file:tr-hexa.map
Specifies a mapping table file between EBCDIC (z/OS code set) and ASCII (Linux/UNIX code set) hexadecimal values; if hexa-map-file is not specified, a warning will be logged.
Optional Parameters in Case of DATE, TIME and TIMESTAMP Data Types
The following rdbms parameters indicate the date, timestamp, and time formats used by z/OS DB2 and stored in DSNZPARM:
rdbms:timestamp_format:YYYY/MM/DD HH24 MI SS FF6
These parameters impact the reloading operations, COBOL date, and time manipulations. They are optional and only necessary if the DB2 database contains the DATE, TIME or TIMESTAMP fields.
WARNING:
Optional Parameters in Case of CLOB or BLOB Data Types
The following rdbms parameters are optional and only necessary if the DB2 schema contains CLOB or BLOB data types.
WARNING:
The number of member files that can be created on a PDS is limited. As the DB2 unloading utility creates a new member file for each CLOB/BLOB column and row, which may exceed the maximum number allowed for LOBS files to be created on a PDS dataset type, in that case you need to choose HFS dataset type. Contact your DB2 MVS administrator for more helps. By default, use “pds”.
You need to calculate the maximum length of the CLOB or BLOB file name as written by the DB2 unloading JCL in the table data file:
If the length of target MVS dataset name is equal to “MIGR.SCH1.TAB1.COLUMN1” (22 characters), the maximum length of the string created by the JCL would be 32: 22 + 2 (parenthesis characters) + 8 (member name).
If the length of target MVS directory name is equal to “/LOB/SCHEMA2/TABLE2/SECOND2” (27 characters), the maximum length of the string created by the JCL would be 36: 27 + 1 (slash character) + 8 (file name).
Note:
You should set value “dsnutilb” for rdbms:jcl_unload_utility_name parameter.
Optional Parameters for JCL Unloading Utility
The following parameters are optional:
You can also change the value depending on the presence of DB2 unloading utility on the MVS.
Note:
The second parameter can be set to “csv” only if the jcl_unload_utility_name is set to “dsnuproc”.
If the database contains MBCS characters, you should choose "dsnuproc" as the unloading utility and "csv" as the unloading format.
Generating the Components
To generate the components used to migrate data from DB2 databases to Oracle databases, Tuxedo ART Workbench uses the rdbms.sh command. This section describes the command.
rdbms.sh
Name
rdbms.sh — Generate DB2 to Oracle database migration components.
Synopsis
rdbms.sh [ [-c|-C] [-g] [-m] [-r] [-i <installation directory>] <schema name> ] -s <installation directory> (<schema name>,...) ]
Description
rdbms.sh generates Tuxedo ART Workbench components used to migrate z/OS DB2 databases to UNIX Oracle databases.
Options
Generation Options
-C <schema name>
The following components are generated in $TMPPROJECT: DDL Oracle, the SQL*LOADER CTL files, the XML file used by the COBOL converter, and configuration files (mapper.re and Datamap.re). If an error or warning is encountered, the process will not abort.
See Executing the Transcoding and Reloading Scripts for information about the SQL scripts created during the generation operation.
-c <schema name>
This option has the same result as the -C option except the process will abort if an error or warning is generated.
-g <schema name>
The unloading and loading components are generated in $TMPPROJECT using the information provided by the configuration files. You should run the rdbms.sh command with -C or -c command before this option.
Modification Options
-m <schema name>
Makes the generated shell scripts executable. The COBOL programs are adapted to the target COBOL fixed format. When present, the shell script that modifies the generated source is executed.
-r <schema name>
Removes the schema name from the generated objects (create table, table name, CTL file for SQL*LOADER, KSH). When this option is used, the name of the schema can also be removed from the COBOL components by using the option: sql-remove-schema-qualifier located in the config-cobol file (COBOL conversion configuration file) used when converting the COBOL components.
Installation Option
-i <installation directory> <schema name>
Places the components in the installation directory. This operation uses the information located in the rdbms-move-assignation.pgm file.
Generate Configuration Files for COBOL Conversion
-s <installation directory> <schema name>,...)
Enables the generation of the COBOL convertor configuration file. This file takes all of the unitary XML files of the project. All these files are created in $PARAM/dynamic-config.
Example: rdbms-conv.txt rdbms-conv-PJ01DB2.xml
Example
rdbms.sh -Cgrmi $HOME/trf PJ01DB2
Using the Make Utility
Make is a UNIX utility intended to automate and optimize the construction of targets (files or actions).
You should have a descriptor file named makefile in the source directory in which all operations are implemented (a makefile is prepared in the source directory during the initialization of a project).
The next two sections describe configuring a make file and how to use Tuxedo ART Workbench File-To-File Converter functions with a make file.
Configuring a Make File
Version.mk
The version.mk configuration file in $PARAM is used to set the variables and parameters required by the make utility.
In version.mk specify where each type of component is installed and their extensions, as well as the versions of the different tools to be used. This file also describes how the log files are organized.
The following general variables should be set at the beginning of migration process in the version.mk file:
In addition, the RDBMS_SCHEMAS variable is specific to DB2 migration, it indicates the different schemas to process.
This configuration should be complete before using the make file.
Make File Contents
The contents of the makefile summarize the tasks to be performed:
A makefile and a version.mk file are provided with Tuxedo ART Workbench Simple Application.
Using a Makefile With Oracle Tuxedo Application Rehosting Workbench File-To-File Converter
The make RdbmsConvert command can be used to launch Tuxedo ART Workbench File-To-File Converter. It enables the generation of the components required to migrate a DB2 database to Oracle.
The make file launches the rdbms.sh tool with the -C, -g, -r, -m and -i options, for all schemas contained in the RDBMS_SCHEMAS variable.
Locations of Generated Files
The unloading and loading components generated with the -i $HOME/trf option are placed in the following locations:
 
$HOME/trf/reload/rdbms/<schema name>/src
$TMPPROJECT/outputs/<schema name>
Location by <schema name> of the COBOL programs for DB load/unload. For the example in this chapter, there're two programs:
Modifying Generated Components
The generated components may be modified using a project’s own scripts. these scripts (sed, awk, perl,…) should be placed in:
$PARAM/rdbms/rdbms-modif-source.sh
When present, this file will be automatically executed at the end of the generation process. It will be called using the <schema name> as an argument.
COBOL Conversion
Migrating data files is described in the following sections:
Requirements & Prerequisites
Cataloguing Requirements
Cataloguing is mandatory before running the COBOL converter in order to check the consistency of the assets to be migrated and fix any errors related either to syntax or to the coherency (missing or unused components) of the asset.
Data Conversion
The data migration process must have been performed before the COBOL conversion is started. This dependency is because the data migration tools generate some of the configuration files read by the COBOL converter. The configuration files from data conversion are documented in the Oracle Tuxedo Application Rehosting Workbench Reference Guide.
Overview of the COBOL Converter in the Replatforming Process
The inputs to Tuxedo ART Workbench COBOL converter process are:
Conversion Steps
Building and Setting the Configuration Files
The main configuration file for translation is config-COBOL. It references other additional configuration files including:
Samples of all the needed configuration files are given in the Simple Application. You only need to check and adapt the values if necessary.
All of the configuration files that the COBOL Converter uses are described in the COBOL Converter chapter of the Oracle Tuxedo Application Rehosting Workbench Reference Guide.
Configuring config-COBOL
After preparing the prerequisites for the COBOL conversion, prepare the main configuration file using the following example as a model.
Note:
post-translation-file used when there is a need to perform some specific transformations. This file is to write manually.
rdbms-conversion-file used when migrating DB2 to an Oracle database. This file is generated by the DB2-to-Oracle Convertor.
conv-ctrl-list-file used when there are files to be converted to Oracle tables. This file should be generated by the File-to-File Converter.
Listing 1‑45 config-cobol File
Config:
"Config version 1.0"
# sql-rules : none.
/* GENERAL */
target-dir: "../trf/".
keywords-file: "../param/keywords-file".
rename-call-map-file: "../param/rename-call-map-file".
accept-date : MW-DATE.
accept-day : MW-DAY.
# post-translation-file: "../param/renov.desc".
hexa-map-file: "../param/tr-hexa.map".
# rdbms-conversion-file : "dynamic-config/rdbms-conv.txt".
conv-ctrl-list-file : "dynamic-config/Conv-ctrl.txt".
on-size-error-call : "ABORT".
 
dcrp. /* Without reconcilation of copies files */
end
 
 
keywords-file
The keywords-file is a hint file for the COBOL Converter to help rename specific variables including reserved keywords probably not renamed systematically by Tuxedo ART Workbench COBOL Converter.
This is a reengineering mechanism offered by the WorkBench to perform a (mass-change) renaming operation for the customer’s own purposes, even when the variables are not Micro Focus COBOL or COBOL-IT reserved keywords.
Place the following entry in the main configuration file config-cobol:
keywords-file: "../param/keywords-file"
Listing 1‑46 Sample Keywords File
( TAB . MW-TAB )
( DOUBLE . MW-DOUBLE )
( POS . MW-POS )
)
 
In this example each occurrence of the item TAB will be replaced by MW-TAB.
tr-hexa.map
The tr-hexa.map file is a mapping table between EBCDIC (z/OS code set) and ASCII (Linux/UNIX code set) hexadecimal values.
Place the following entry in the main configuration file config-cobol:
hexa-map-file: "../param/tr-hexa.map"
This file is used by some translation rules like Tr-Hexa-Map and may help the user to solve problems related to differences between EBCDIC and ASCII codes in values and strings that could lead to different behavior in sorting and in string comparisons.
Note:
Generated hexa-map-file with convert-hexa-copy-to-map.sh script
This script is located in REFINEDIR/scripts/convert-hexa-copy-to-map.sh.
Syntax
REFINEDIR/scripts/convert-hexa-copy-to-map.sh convertmw_copy_file
convertmw_copy_file: location of the CONVERTMW.cpy file
The script generates a tr-hexa.map file inside the current directory (it should be the PARAM directory).
Hexadecimal Code for Space Example
The hexadecimal code for space in z/OS is 40 and the hexadecimal code for space in UNIX is 20.
The statement in the source platform code is:
01 VarName pic X value X'40'.
This is translated as:
Listing 1‑47 Hexadecimal Code Translation
*{ Tr-Hexa-Map 1.4.2.1
*01 VarName pic X value X'40'.
*--
01 VarName pic X value X'20'.
*}
 
Listing 1‑48 Sample of tr-hexa.map
00;00
01;01
02;02
03;03
37;04
2d;05
2e;06
2f;07
...
40;20
...
 
rename-call-map-file
The rename-call-map-file is a mapping file between the old call name and the new one.
It is used by some translation rules like Tr-Rename-External-Call and allows the user to make specific changes if needed.
Place the following entry in the main configuration file config-cobol:
rename-call-map-file: "../param/rename-call-map-file"
Listing 1‑49 Example rename-call-map-file
(
("MQGET" . "MWMQGET")
("KIX-ABEND" . "KIX_ABEND")
("KIX-ASKTIME" . "KIX_ASKTIME")
)
 
In this example all calls to MQGET are changed to MWMQGET.
Conversion
There are many possibilities allowed by the conversion command options (for more information, see theOracle Tuxedo Application Workbench Reference Guide). In this section the following examples are described:
The distinction between programs (Batch and CICS) and sub-programs is mandatory; the option -cobol-type takes the following values:
In the following command lines, the following working variables are set:
 
Translation of Batch, CICS Programs and Sub-Programs
The command lines are:
$REFINEDIR/refine cobol-convert -v version -loop -limit=50 -s $PARAM/system.desc -c $PARAM/config-cobol -cobol-type batch
The COBOL Converter knows which are the batch programs to be translated from the system description file which describes all components. Where version is the release version, for example M2_L5_7
$REFINEDIR/refine cobol-convert -v version -loop -limit=50 -s $PARAM/system.desc -c $PARAM/config-cobol -cobol-type tpr
$REFINEDIR/refine cobol-convert -v version -loop -limit=50 -s $PARAM/system.desc -c $PARAM/config-cobol -cobol-type tpr CICS/PGMM002.cbl
$REFINEDIR/refine cobol-convert -v version -loop -limit=50 -s $PARAM/system.desc -c $PARAM/config-cobol -cobol-type sub
$REFINEDIR/refine cobol-convert -v version -loop -limit=50 -s $PARAM/system.desc -c $PARAM/config-cobol -cobol-type tpr -cics
The log file is generated in the directory from where the command line is executed. If you want to have logs in a specific directory or file use -log-file-base followed by the path and name of the file to store the execution logs.
$REFINEDIR/refine cobol-convert -v version -loop -limit=50 -s $PARAM/system.desc -log-file-base $LOGS/trans-cbl/translate-cobol-datetime -c $PARAM/config-cobol -cobol-type sub
In this example, the logs file will be generated in $LOGS/trans-cbl/translate-cobol-datetime. The logs directory should be previously created.
Reconciling Copybooks
Reconciliation of copybooks can be executed implicitly by the COBOL Converter or can be performed separately (through usage of the dcrp option, see Configuring config-COBOL) after all
programs have been generated.
To apply reconciliation separately, you should execute the following script from the directory where converted programs are located, (in the case of the Simple Application, from the $PROJECT/trf directory:
Listing 1‑50 Copy Reconciliation
for file in `find * -name '*-copies'`
do
$REFINEDIR/scripts/reconcil-copy-opt-imbr $PROJECT/trf $file .cbl
done
 
Checking Results
To check conversion results, verify that:
For empty or truncated programs, the user can refer to execution logs generated in $Logs to analyze errors encountered during the conversion.
Compiling
Compilation is a validation step for conversion. A program cannot be considered fully converted if it has not compiled successfully.
Compilation Options and Settings
You need to check that the compilation environment is configured correctly for Micro Focus COBOL or COBOL-IT compilation according to the following variables:
 
Initializes environment variables (PATH.LD_LIBRARY_PATH...)
Defined LD_LIBRARY_PATH
A compilation options file must be prepared. The compilation options used for the Simple Application are:
Listing 1‑51 MF Compilation Options Example
SOURCEFORMAT"FREE"
DEFAULTBYTE"00"
ADDRSV"COMP-6"
COMP-6"2"
ALIGN"8"
NOTRUNCCALLNAME
NOTRUNCCOPY
NOCOPYLBR
COPYEXT"cpy,cbl"
RWHARDPAGE
PERFORM-TYPE"OSVS"
NOOUTDD
INDD
NOTRUNC
HOSTARITHMETIC
NOSPZERO
INTLEVEL"4"
SIGN"EBCDIC"
ASSIGN"EXTERNAL"
NOBOUND
SETTINGS
REPORT-LINE"256"
WARNING"2"
TRACE
LIST()
 
For more information, see the Oracle Tuxedo Application Rehosting Workbench Reference Guide.
Compilation Command
The command to compile the programs BATCH/PGMMB00.cbl:
Listing 1‑52 MF Compilation Example
# From $PROJECT/trf/BATCH
cd $PROJECT/trf/BATCH
 
export COBCPY=../DML:../Master-copy/COPY:../fixed-copy:.
export PCCINCLUDE="include=../Master-copy/COPY, include=../fixed-copies, include=."
cob -ug PGMMB00.cbl -C "use(../../compil_tools/opt.dir)" -C "list(PGMMB00.lst)" -C XREF -C SETTINGS 2> PGMMB00.err
 
Where:
Note:
For the Simple Application example, there is a compilation makefile that can be used for other projects. See Using a make File.
Using a make File
Configuration
The makefile delivered with the Simple Application example implements all conversion operations and can be used in any other project with the following adaptations:
Update the version.mk configuration file according to your project properties and organization.
This configuration is supplementary to the preceding configuration started in the cataloging step.
Before using the make commands, the user should check the values in the version.mk supplied with the Simple Application:
Listing 1‑53 version.mk Example
#
# Defined extensions converted files
#
ext_trad = cbl
ext_trad_copy = cpy
ext_trad_ksh = ksh
ext_trad_map = bms
 
#
# Define Version variables
# Information
# with GLOBAL_VERSION=CURRENT all -v option in the makefile are ignored
#
GLOBAL_VERSION = M2_L3_5
CATALOG = $(GLOBAL_VERSION)
TRAD = $(GLOBAL_VERSION)
TRAD_JCLZ = $(GLOBAL_VERSION)
DATA_TOOLS = $(GLOBAL_VERSION)
RECONCIL_COPY = $(GLOBAL_VERSION)
TIMEOUT = 900
TIMEOUT_PARSE = 300
 
#
# Define Config and opt files
#
FILE_TRAD_JCL = "$(PARAM)/config-trad-JCL.desc"
FILE_TRAD_COBOL = "$(PARAM)/config-cobol"
COMM_TRADJCL = "-c $(FILE_TRAD_JCL)"
 
COMM_RECONCIL_COPY = "reconcil-copy-opt-imbr"
 
COBOL Conversion
To perform the COBOL conversion the following commands are run from $SOURCE:
make trad
make trad_batch
make trad_cics
make trad_sub
Reconciling Copybooks
To reconcile copybooks invoke the following command from $SOURCE:
make reconcil_copy
Troubleshooting the COBOL Converter
During translation you may encounter error messages or the COBOL Converter may abort. Certain errors are shown below as examples of how to proceed when errors occur.
Configuration File Does Not Exist
Particularly at the beginning of the conversion process, some configuration files could be missing, the COBOL Converter then aborts showing the following error:
Message
Parsing config /home2/wkb7/simpleapp/param/config-cobol...
*FATAL*: Hexa-map-file: this file '/home2/wkb7/simpleapp/param/tr-hexa.map' does not exist
 
Error: Uncaught throw of :MESSAGE-ERROR to :MESSAGE-ERROR.
1 (abort) Quit process.
 
Type :b for backtrace, :c <option number> to proceed, or :? for other options
Solution
Add the missing configuration file or disable the line in the main configuration file if the file requested (in this example, tr-hexa.map) is unnecessary.
Missing POB file
Message
Parsing config /home2/wkb7/simpleapp/param/config-cobol...
Creating target file /home2/wkb7/simpleapp/trf/CICS/PGMM002.cbl ...
*FATAL INTERNAL ERROR*: Can't find POB file /home2/wkb7/simpleapp/source/CICS/pob/PGMM002.cbl.pob; please re-catalog the system.
FIN
Rest in peace, Refine...
Solution
Either the programs is not catalogued yet or the .pob file was wrongly deleted. Recatalog to generate the requested file.
POB File Too Old
Message
Creating target file /home2/wkb7/simpleapp/trf/CICS/PGMM002.cbl ...
*FATAL INTERNAL ERROR*: POB file /home2/wkb7/simpleapp/source/CICS/pob/PGMM002.cbl.pob is less recent than source file /home2/wkb7/simpleapp/source/CICS/PGMM002.cbl; please re-catalog the system.
Solution
This error occurs if the modification date of the source program is more recent than its corresponding POB file. Sometimes the POB file is generated but the source program is updated later, recatalog the program to ensure you have the latest changes.
Parsing error encountered
A program containing parsing errors is not translated, especially programs with fatal errors during cataloging. Generally, COBOL Converter can translate programs containing errors with severities less than FATAL.
Message
Program name is PGMM002
Warning:-- Parse-Error at line 163
*FATAL*: file CICS/PGMM002.cbl contains true parse errors, ABORTING!
 
FIN
Rest in peace, Refine...
Solution
Check the source code of the program and fix any errors, catalog the program and convert again.
More details about the parsing errors can be found in the cataloging reports and logs. In principle, you should not start conversion work before fixing errors identified during the cataloging step.
JCL Conversion
Translating JCL is described in the following sections:
Requirements & Prerequisites
Cataloguing Requirements
Cataloguing is mandatory before running the JCL translator in order to check the consistency of the assets to be migrated and fix any errors related either to syntax or to the coherency (missing or unused components) of the asset.
Data Conversion
The data migration process must have been performed before the JCL translation is started. This dependency is because the file migration tools generate some of the configuration files read by the JCL Translator. The configuration files from data conversion are documented in the Oracle Tuxedo Application Rehosting Workbench Reference Guide.
Overview of the JCL Translator in the Replatforming Process
The inputs to Tuxedo ART Workbench JCL Translator process are:
Generated by other Oracle Tuxedo Application Rehosting Workbench tools, the DB2-to-Oracle Convertor provides the JCL translator with the list of files to be converted to Oracle tables
Translation Steps
This section provides information and procedures for:
Building and Setting the Configuration Files
Translation Steps
Checking Results
Building and Setting the Configuration Files
In addition to the AST of the JCL(s) to convert produced by the Cataloger, Tuxedo ART Workbench JCL Translator takes as input a main configuration file that specifies various aspects of the translation, such as:
This file is very easy to write using any standard text editor, or to generate from other sources of information. below, we comment a sample of configuration file written to translate JCL files in the simple application STFILEORA provided with Tuxedo ART Workbench tools.
The main configuration file also refers to separate sub-files which are either:
Tuxedo ART Workbench comes with examples of configuration files.
The main configuration file for the JCL translation is called config-trad-JCL.desc in this guide for use with the Simple Application application.
The following sections describe the different configuration parameters and configuration sub-files and gives a full sample at the end of this section.
Top Skeleton and Bottom Skeleton
The sub-files specified by the two options top-skeleton and bottom-skeleton represent respectively a header file and a footer file for the generated script. You can customize these files.
Listing 1‑54 Top Skeleton and Bottom Skeleton Entries in the Main Configuration File
top-skeleton = "../param/top-ksh.txt"
bottom-skeleton = "../param/bottom-ksh.txt"
 
Listing 1‑55 Example of top-ksh.txt Prolog Code
#@(#)-------------------------------------------------------------------
#@(#)- SCRIPT NAME == $[JOBNAME].ksh --- VERSION OF $[DATE]
#@(#)- AUTHOR ==
#@(#)- TREATMENT ==
#@(#)- OBSERVATIONS == MAINFRAME MIGRATION
#@(#)- …..
 
Where:
JOBNAME
Will take the name of the current JOB after translation.
DATE
Is the generation date of the KSH script.
List of Data Files Converted to Oracle Tables
When files are converted to Oracle tables, the main configuration file must reference a sub-configuration file such as:
file-list-in-table = "../param/dynamic-config/File-in-table.txt"
This sub-file is generated by the File-to-File Converter. This file indicates to the JCL Translator, which are the files that will be converted to Oracle tables in order to correctly translate the steps involving these files. In our example PJ01AAA.SS.VSAM.CUSTOMER is the file to be converted.
For example, when the JCL source involves files that will be converted to Oracle tables, the corresponding shell script uses the Batch Runtime function m_ProgramExec with the -b option to execute a COBOL program. The -b option indicates a connection to the database must be opened before executing the program. For example:
m_ProgramExec -b RSSABB01
Post-Translation
The sub-file specified by the option post-translation-file contains a sequence of rules which are used to automatically perform post-translation after Tuxedo ART Workbench Converter. See the Post-Translation Configuration File in Workbench Reference Guide.
The Post-Translation entry in the main configuration file is as follows:
post-translation-file = "../param/renov.desc"
Full Example Configuration
The general options root-skeleton, target-proc, label-end, management of FSN, etc. are described in the JCL Translator section of the Oracle Tuxedo Application Workbench Reference Guide.
Listing 1‑56 JCL Translator Configuration File for STFILEORA Simple Application (config-trad-JCL.desc ):
% config.desc :
%
root-skeleton = "../trf-jcl/"
target-proc = "../trf-jcl/Master-Proc"
use-sort=mf-sort
%
var-dataroot = "${DATA}/"
var-tmp = "${TMP}/"
var-spool = "${SPOOL}/"
 
% Ksh heading
%
top-skeleton = "../param/top-ksh.txt"
 
% KSH footer
%
bottom-skeleton = "../param/bottom-ksh.txt"
 
% Files passed in tables
file-list-in-table = "../param/dynamic-config/File-in-table.txt"
% Post-Translation Configuration File
post-translation-file = "../param/renov.desc"
 
% Suffix of translated ksh du ksh traduit
suffix-skeleton = "ksh"
 
% Management of FSN to keep
set-no-delete-fsn = SORTIE ( ZIP390 ),
ENTREE ( ZIP390 ),
* ( DB2CMD,CSQUTIL ),
CFTIN ( CFTUTIL ),
SYSUT1 ( DUMMY ),
* ( ADRDSSU ).
 
% Management of FSN to delete
set-delete-fsn = SYSOUT ( IDCAMS ),
SYSEXEC ( CSCOLMVS ),
SYSTSIN ( * ),
SYSPUNCH ( * ),
TOOLIN ( * ),
SYSUDUMP ( * ),
SYSDBOUT ( * ),
SYSABOUT ( * ),
SYSTSPRT ( * ),
SORTLIB ( * ),
OPLIB ( * ),
STEPLIB ( * ),
JOBLIB ( * ).
 
Launchers Configuration
This file describes how to interpret the source JCL to find for instance the program to be launched, and how this launch operation should be translated; predefined configuration for IKJEFT01, DLIBATCH and other standard launchers.
Listing 1‑57 Launcher Entry in Main Configuration File
global-options jclz-launcher-spec-file = "launchers".
 
Listing 1‑58 Example of Launcher Code
LAUNCHER DFSRRC00
IndexProg : 2,
IndexPSB : 3
END
LAUNCHER DB2BATCH
IndexProg : 2,
IndexPSB : 3
END
LAUNCHER SWCP7110
IndexProg : 2,
IndexParm : 4,
Separator : ";"
END
 
Full Example Configuration
The general options root-skeleton, target-proc, label-end, etc. are described in the JCL Translator section of the Oracle Tuxedo Application Rehosting Workbench Reference Guide.
Listing 1‑59 JCL Converter Configuration File for Simple Application (config-trad-JCL.desc )
%
% config.desc :
%
%
root-skeleton = "../trf-jcl/"
target-proc = "../trf-jcl/Master-Proc"
use-sort=mf-sort
%
%
var-dataroot = "${DATA}/"
var-tmp = "${TMP}/"
var-spool = "${SPOOL}/"
 
%
% Ksh heading
-------------------------------------------------------------------------
%
 
top-skeleton = "../param/top-ksh.txt"
 
% Ksh heading -------------------------------------------------------------------------
 
%
% KSH footer ------------------------------------------------------------------------
%
bottom-skeleton = "../param/bottom-ksh.txt"
%
% KSH footer --------------------------------------------------------------------------
 
%
% File passed in table
%
file-list-in-table = "../param/dynamic-config/File-in-table.txt"
 
% Suffix of translated ksh
suffix-skeleton = "ksh"
 
% Management of FSN to keep
set-no-delete-fsn = SYSIN ( DSNUTILB ),
OUTPUT ( ZIP390 ),
INPUT ( ZIP390 ),
* ( DB2CMD,CSQUTIL ),
CFTIN ( CFTUTIL ),
SYSUT1 ( DUMMY ),
* ( ADRDSSU ).
 
% Management of FSN to delete
set-delete-fsn = SYSOUT ( IDCAMS ),
SYSEXEC ( CSCOLMVS ),
SYSTSIN ( * ),
SYSIN ( IDCAMS,XMFSORT,ICEMAN,SPOOL,SORT ),
SYSPUNCH ( * ),
TOOLIN ( * ),
SYSUDUMP ( * ),
SYSDBOUT ( * ),
SYSABOUT ( * ),
SYSTSPRT ( * ),
SORTLIB ( * ),
OPLIB ( * ),
STEPLIB ( * ),
JOBLIB ( * ).
 
Translation Steps
The Tuxedo ART Workbench JCL Translator executes on a migration platform (Linux) and can automatically translate a single job file, a series of jobs files or the entire system content.
Set Environment Variables
Before executing the translator the following variables must be set:
 
Translation Commands
The following commands can be used to execute the translation. Logs file are generated in $LOGS/trad-jcl.
Command Line to Translate One JCL File
To create a Korn shell script with the same name as the input file except with a .ksh suffix.
Listing 1‑60 Single JCL Translation Script
cd $LOGS/trans-jcl
$REFINEDIR/refine jclz-unix -v version -s $PARAM/system.desc -c $PARAM/config-trad-JCL.desc JCL/defvcust.jcl
 
Command Line to Translate a List of JCL Files
To translate a list of JCL files invoke following command:
Listing 1‑61 List of JCL Translation Script
cd $LOGS/trans-jcl
$REFINEDIR/refine jclz-unix -v version -s $PARAM/system.desc -c $PARAM/config-trad-JCL.desc -f jcl-files-list
 
Command Line to Translate All JCL Files
To translate all JCL files invoke a command:
Listing 1‑62 All JCL Translation Script
cd $LOGS/trans-jcl
$REFINEDIR/refine jclz-unix -v version -s $PARAM/system.desc -c $PARAM/config-trad-JCL.desc
 
JCL Post-translation Steps
Due to the limitations of the JCL translation or when site-specific translation is needed, there is a possibility to perform repetitive post-translation tasks automatically.
The post-translation mechanism allows you to change one block of lines by another.
Post-Translation Example
To illustrate post-translation usage the following example add a comment after line containing m_ProgramExec IEFBR14 "" in the /prtvcust.ksh JCL script.
1.
# by user John Doe on YY/MM/DD
regle add-comment-1
filtre [
+JCL/prtvcust.ksh
]
transform [
m_FileAssign -m R -a R -d SHR VKSDCUST ${DATA}/METAW00.VSAM.CUSTOMER
m_ProgramExec PGMMB01 ""
]
into [
m_FileAssign -m R -a R -d SHR VKSDCUST ${DATA}/METAW00.VSAM.CUSTOMER
m_ProgramExec PGMMB01 ""
# Added comment
2.
$REFINEDIR/M2_L3_5/scripts/post-trans -c=\#META-RENOV\# -r=$PROJECT/param/renov-jcl.desc JCL/prtvcust.ksh < JCL/prtvcust.ksh > JCL/prtvcust.ksh.renov
grep -v "#META-RENOV#" JCL/prtvcust.ksh.renov > JCL/prtvcust.ksh
Checking Results
To check conversion results, verify that:
Check the error messages; the JCL translator prints error messages encountered during the translation in the generated script. Check if any messages are present by searching for the following keywords: " UNDEFINED ", " NIL ", " UNTRANSLATED ". The complete list of error messages along with their explanation can be found in the Oracle Tuxedo Application Rehosting Workbench Reference Guide.
Using a Make File
The use of makefiles when using Tuxedo ART Workbench is recommended because it enables you to:
A makefile should be placed in the source directory in which the operations are implemented at the initialization of a project.
Configuration
See “Make Configuration” in the Cataloger.
JCL Translation
To translate all the JCL in the $SOURCE file system
From the $SOURCE directory launch the command:
make trad_jcl
The JCLs are translated sequentially one by one.
Configure
Database, Compiler, and Others
In order to compile sources, we need collect some information. You can input these information in the configure wizard.
If you choose COBOL-IT as target COBOL compiler and you would use ISAM files in open system, you must set "BDB DbHome Location"; it must point to a directory where the database and log files will be stored. For more information, see "Oracle Berkeley DB" part in "COBOL-IT Compiler Suite Enterprise Edition - Reference Manual" or "The Berkeley DB Environment" part in "Berkeley DB Programmer's Reference Guide".
After building is complete, the root makefile and sub makefile would be generated under related subdirectory. It will also copy entire "fixed-copy" directory from workbench installed directory to build directory.
Tuxedo
Main function of Tuxedo wizard is to generate ubbconfig file for Batch runtime and CICS runtime.
The configurable items include Tuxedo location, IPC KEY, Machine Name, APPDIR and so on. For more information, see Oracle 12c Release 2 (12.1.3)
CICS
Main function of CICS wizard is to generate setenv file for CICS runtime. The configurable items include CICS runtime location,IPC key for common work area and monitor settings.
For more information, see Oracle Tuxedo Application Runtime for CICS and Batch 12c Release 2 (12.1.3).
Batch
Main function of Batch wizard is to generate jesconfig and setenv file for Batch runtime. The configurable items include Batch runtime location, JESROOT and so on.
For more information, see Oracle Tuxedo Application Runtime for CICS and Batch 12c Release 2 (12.1.3).
IMS
Main function of IMS wizard is to generate setenv file for IMS runtime. The configurable items include IMS runtime location, and so on.
For more information, see Oracle Tuxedo Application Runtime for IMS 12c Release 2 (12.1.3).
Build
Build step guide users to build application components, data reloading programs, data access programs and tuxedo configuration files.
Gmake utility will be used when do the building task. Related makefiles are generated in previous step.
Deploy
Pack Target
Generate three tar files, which contain all the files under deploy directory. This tar files are ready for deployment.
Deploy Application
Unpack tar files to the location that user specify.
Setup Runtime
Setup Batch runtime environment
Prepare the environment of Batch runtime. For more information, see Oracle Tuxedo Application Runtime for CICS and Batch 12c Release 2 (12.1.3).
Setup CICS runtime environment
Prepare the environment of CICS runtime. For more information, see Oracle Tuxedo Application Runtime for CICS and Batch 12c Release 2 (12.1.3).
Setup IMS runtime environment
Prepare the environment of IMS runtime. For more information, see Oracle Tuxedo Application Runtime for IMS 12c Release 2 (12.1.3).
Reload File Data
All the defined files will be displayed in the table. Files under the source location will be list while clicking last column of the table.
After click "Finish", all the result of reloading will be placed in the location which user specify.
Reload DB2 Data
This step is similar to previous step, except result data will be placed into database instead of file path user specified.
Run
CICS Runtime
Boot or shutdown ART CICS runtime.
Batch Runtime
Boot or shutdown the ART Batch runtime, and manipulate jobs of ART Batch Runtime.
IMS Runtime
Boot or shutdown the ART IMS runtime.
Reset
Cleanup output from the corresponding steps.
Performing the Data Migration
Executing the File-to-File Generated Converter Programs
This section describes the tasks of unloading, transfer and reloading using the components generated using Tuxedo ART Workbench (see Generating the Components).
Preparation
Configuring the Environments and Installing the Components
Installing the Unloading Components Under z/OS
The components used for the unloading (generated in $HOME/trf/unload/file) should be installed on the source z/OS platform. The generated JCL may need adapting to specific site constraints including JOB cards, library access paths and access paths to input and output files (Data Set Name – DSN).
Installing the Reloading Components on Target Platform
The components used for the reloading (generated in $HOME/trf/reload/file) should be installed on the target platform (Runtime).
The following environment variables should be set on the target platform:
 
If you choose COBOL-IT as target COBOL compiler and you use BDB as ISAM files in an open system, you must set these two environment variables, so that BatchRT can generate BDB format file, otherwise Micro Focus COBOL compatible file will be generated:
export COB_EXTFH_LIB=/path_to_Cobol-IT/lib/libbdbextfh.so
Unloading JCL
An unloading JCL is generated for each z/OS file listed in the Datamap Parameter File (Datamap-<configuration name>.re). These unloading JCLs are named <logical file name>.jclunload
Note:
The .jclunload extension should be deleted for execution under z/OS.
Transferring the Files
Files should be transferred between the source z/OS platform and the target platform in binary format using the file transfer tools available at the site (CFT, FTP, …).
Compiling the Transcoding Programs
The generated COBOL programs used for transcoding and reloading are named:
RELFILE-<logical file name>
For the example provided in Mapping Parameter File (mapper-<configuration name>.re), the generated programs are:
Sequential Files (VSAM ESDS, QSAM, Generation Data Set)
When migrating a sequential file, a target COBOL LINE SEQUENTIAL output file is generated:
Listing 1‑63 FILE CONTROL Example – Extract From Program: RELFILE-FQSAM01.cbl:
SELECT SORTIE
ASSIGN TO "SORTIE"
ORGANIZATION IS LINE SEQUENTIAL
FILE STATUS IS IO-STATUS.
 
 
VSAM KSDS Files
When migrating a VSAM KSDS file, an INDEXED output file will be generated:
Listing 1‑64 FILE CONTROL Example – Extract From Program: RELFILE-ODCSF0B.cbl:
SELECT MW-SORTIE
ASSIGN TO "SORTIE"
ORGANIZATION IS INDEXED
ACCESS IS DYNAMIC
RECORD KEY IS VS-CUSTIDENT
FILE STATUS IS IO-STATUS.
 
These COBOL programs should be compiled with the target COBOL compiler using the options described in the COBOL converter section of the Tuxedo ART Workbench Reference Guide.
Executing the Transcoding and Reloading Scripts
The transcoding and reloading scripts use the following parameters:
Synopsis
loadfile-<logical file name>.ksh [-t/-l] [-c <method>]
loadgdg-<logical file name>.ksh [-t/-l] [-c <method>]
Options
-t
Transcode and reload the file.
-l
Transcode and reload the file (same action as -t).
-c ftp:<…>:<…>
Implement the verification of the transfer (see Checking the Transfers).
Examples
For the example provided in Mapping Parameter File (mapper-<configuration name>.re), the generated scripts are:
Files
By default, the input file is located in the directory indicated by $DATA_SOURCE, and the output file is placed in the directory indicated by $DATA.
These files are named with the logical file name used in the Mapping Parameter File (mapper-<configuration name>.re).
An execution log is created in the directory indicated by $MT_LOG.
A return code different from zero is produced when a problem is encountered.
Checking the Transfers
This check uses the following option of the loadfile-<logical file name>.ksh
-c ftp:<name of transferred physical file>:<name of FTP log under UNIX>
Note:
Troubleshooting
This section describes problems resulting from usage errors that have been encountered when migrating files from the source to target platform.
Overview
When executing any of Tuxedo ART Workbench tool users should check:
If the Mapper-log-<configuration name> file contains any errors (see Common Problems and Solutions).
Error messages and associated explanations are listed in the appendix of the Oracle Tuxedo Application Rehosting Workbench Reference Guide.
Common Problems and Solutions
Error: Unknown file organization *UNDEFINED*
When executing file.sh -gmi $HOME/trf STFILEORA the following message appears:
Refine error...
Log
The contents of the Mapper-log-STFILEORA log file include:
file PJ01AAA.SS.QSAM.CUSTOMER.REPORT loaded/unloaded
file logical name MW-SYSOUT
*** Unknown file organization : *UNDEFINED*
mapping record MW-SYSOUT
record MW-SYSOUT: logical name MW-SYSOUT
Explanation
A file to be migrated is present in the mapper-<configuration name>.re file and absent from the Datamap.<configuration name>.re file.
Error: Record... not found
When executing file.sh -gmi $HOME/trf STFILEORA1 the following message appears:
Refine error...
Log
The contents of the Mapper-log-STFILEORA1 log file include:
file PJ01AAA.SS.QSAM.CUSTOMER.REPORT loaded/unloaded
file logical name MW-SYSOUT
file is sequential: no primary key
*** record `MW-SYSOUT in COPY/MW_SYSOU2T.cpy' not found ***
*** ERROR: all records omitted ***
mapping records
Explanation
The copy file is unknown.
Error: Record... not found
When executing file.sh -gmi $HOME/trf STFILEORA2 the following message appears:
Refine error...
Log
The contents of the Mapper-log-STFILEORA2 log file include:
file PJ01AAA.SS.QSAM.CUSTOMER.REPORT loaded/unloaded
file logical name MW-SYSOUT
file is sequential: no primary key
*** record `MW-SYSOUTTT in COPY/MW_SYSOUT.cpy' not found ***
record MW-SYSOUT reselected (all records omitted)
mapping record MW-SYSOUT
record MW-SYSOUT: logical name MW-SYSOUT
Explanation
The RECORD name (level 01 field) is unknown.
Error: External Variable PARAM is not set
When executing file.sh -gmi $HOME/trf STFILEORA3 the following message appears:
Refine error...
Log
The contents of the Mapper-log-STFILEORA3 log file include:
*=-=-=-=-=-=-=-=-=-=-=-=-=-=-=-=-=-=-=-=-=-=-=-=-=-==-=-=-=-=-=-=-=-=-=-=-=-
############################################################################
Control of schema STFILEORA3
External Variable PARAM is not set!
ERROR : Check directive files for schema STFILEORA3
 
Explanation
The variable $PARAM has not been set.
Executing File-to-Oracle Generated Converter Programs
This section describes the tasks of unloading, transfer and reloading using the components generated using Tuxedo ART Workbench (see Generating the Components).
Preparation
Configuring the Environments and Installing the Components
Installing the Unloading Components Under z/OS
The components used for the unloading (generated in $HOME/trf/unload/file) should be installed on the source z/OS platform. The generated JCL may need adapting to specific site constraints including JOB cards, library access paths and access paths to input and out put files (Data Set Name – DSN).
Installing the Reloading Components Under UNIX
The components used for the reloading (generated in $HOME/trf/reload/file) should be installed on the target platform (runtime).
Installing the Oracle Object Creation Components
The components used for creating the Oracle objects (generated in $HOME/SQL/file/<schema name>) should be installed on the target platform (runtime).
Setting the Target Platform Environment Variables
Table 1‑34 lists environment variables that should be set on the target platform.
 
The following variable should be set according to the information in the Oracle Tuxedo Application Rehosting Workbench Installation Guide:
Unloading the JCL
An unloading JCL is generated for each z/OS file listed in the Datamap Parameter File (Datamap-<configuration name>.re). These unloading JCLs are named <logical file name>.jclunload. These JCL use the REPRO function of the IDCAMS utility to unload the files.
Note:
The .jclunload extension should be deleted for execution under z/OS.
Transferring the Files
Files should be transferred between the source z/OS platform and the target UNIX platform in binary format using the file transfer tools available at the site (CFT, FTP, …).
Compiling the Transcoding Programs
The generated COBOL programs used for transcoding and reloading are named:
RELTABLE-<logical file name>
Example:
RELTABLE-ODCSF0.pco
These COBOL programs should be compiled with the target COBOL compiler using the options described in the COBOL converter section ofOracle Tuxedo Application Workbench Reference Guide.
Each program produces an output file that is then read by the SQL*LOADER utility.
Executing the Oracle Object Creation Scripts
The option -d of the loadtable-<…>.ksh scripts enables the creation of the Oracle objects.
Executing the Transcoding and Reloading Scripts
The transcoding and reloading scripts have the follow parameters:
Synopsis
loadtable-<logical file name>.ksh [-d] [-t/-l] [-c <method>]
Options
-d
Create the Oracle objects.
-t
Transcode and reload the file.
-l
Transcode and reload the file (same action as -t).
-c ftp:<…>:<…>
Implement the verification of the transfer (see Checking the Transfers).
Examples
For the example provided in Mapping Parameter File (mapper-<configuration name>.re), the generated script is:
Files
By default, the input file is located in the directory indicated by $DATA_SOURCE, and the output file is placed in the directory indicated by $DATA.
These files are named with the logical file name used in the Mapping Parameter File (mapper-<configuration name>.re) configuration file.
An execution log is created in the directory indicated by $MT_LOG.
A return code different from zero is produced when a problem is encountered.
Checking the Transfers
This check uses the following option of the loadtable-<logical file name>.ksh
-c ftp:<name of transfered physical file>:<name of FTP log under UNIX>
Note:
Compiling the Access Routines and Utilities
The COBOL and PRO*COBOL access routines should be compiled using the target COBOL compilation options described in the Oracle Tuxedo Application Rehosting Workbench Reference Guide.
Troubleshooting
This section describes problems resulting from usage errors that have been encountered when migrating files from the source to target platform.
Overview
When executing any of Tuxedo ART Workbench tool users should check:
If the Mapper-log-<configuration name> file contains any errors (see Common Problems and Solutions).
Error messages and associated explanations are listed in the appendix of the Oracle Tuxedo Application Rehosting Workbench Reference Guide.
Common Problems and Solutions
Error: External Variable PARAM is not set
When executing file.sh -gmi $HOME/trf STFILEORA the following message appears:
*=-=-=-=-=-=-=-=-=-=-=-=-=-=-=-=-=-=-=-=-=-=-=-=-=-==-=-=-=-=-=-=-=-=-=-=-=-=-
########################################################################
Control of configuration STFILEORA
External Variable PARAM is not set!
ERROR: Check directive files for configuration STFILEORA
Abort
Explanation
The variable $PARAM has not been set.
Error: Target directory does not exist
When executing file.sh -gmi $HOME/trf STFILEORA1 the following message appears:
*=-=-=-=-=-=-=-=-=-=-=-=-=-=-=-=-=-=-=-=-=-=-=-=-=-==-=-=-=-=-=-=-=-=-=-=-
Target output directory /home2/wkb9/trf is missing
Check parameters: -i <output_directory> <schema>
ERROR : usage : file.sh [ [-g] [-m] [-i <output_directory>] <schema_name> | -s <output_directory> (<schema>,...) ]
abort
Error: Unknown file organization
When executing file.sh -gmi $HOME/trf STFILEORA2 the following message appears:
Refine error...
Log
The contents of the Mapper-log-STFILEORA2 log file include:
file PJ01AAA.SS.VSAM.CUSTOMER Oracle
file logical name ODCSF0B
*** Unknown file organization : INDEXD
mapping record VS-ODCSF0-RECORD
record VS-ODCSF0-RECORD: logical name VS
record VS-ODCSF0-RECORD REDEFINES:
field VS-CUSTBDATE as opaque (default strategy)
record VS-ODCSF0-RECORD REDEFINES:
field VS-CUSTBDATE as opaque (default strategy)
Explanation
The file is configured with a file organization of INDEXD instead of INDEXED.
Error: The illegal text is: "converted
When executing: file.sh -gmi $HOME/trf STFILEORA the following message appears:
*=-=-=-=-=-=-=-=-=-=-=-=-=-=-=-=-=-=-=-=-=-=-=-=-=-==-=-=-=-=-=-=-=-=-=-=-
##########################################################################
Control of configuration STFILEORA
##############################
Control of templates
OK: Use Default Templates list file
File name is /REFINE/convert-data/default/file/file-templates.txt
##############################
Control of Mapper
##############################
COMPONENTS GENERATION
 
 
Parsing mapper file /home2/wkb9/tmp/mapper-STFILEORA.re.tmp ...
Parse error at character position 1346 in file:
/home2/wkb9/tmp/mapper-STFILEORA.re.tmp.
The illegal text is: "converrted
table name CUSTOMER
include \"COPY/ODCSF0B.cpy\"
map record VS-ODCSF0-RECORD defin"
While parsing in grammar UFAS-CONVERTER::MAPPER-INPUT-GRAMMAR,
CONVERRTED is a symbol, which is not a legal token
at this point in the input. The legal tokens at this point are:
 
:END "templates" "filler" "field" "file" "one-for-n" "multi-record" "table" "transferred" "mode-tp" ... [14 others]
*ERROR*: parse error is found in /home2/wkb9/tmp/mapper-STFILEORA.re.tmp.
Refine error...
/tmp/refine-exit-status.snICMmElNYF25625
ERROR: generation aborted
abort
Explanation
A typing error in the word ‘CONVERTED’ was made in the mapping file.
Error: Cannot find file in file table named PJ01AAA.SS.VSAM.CUSTOMERS
When executing: file.sh -gmi $HOME/trf STFILEORA the following message appears:
*=-=-=-=-=-=-=-=-=-=-=-=-=-=-=-=-=-=-=-=-=-=-=-=-=-==-=-=-=-=-=-=-==-=-=-=
##########################################################################
Control of configuration STFILEORA
##############################
Control of templates
Project Templates list file is missing /home2/wkb9/param/file/file-templates.txt
OK: Use Default Templates list file
File name is /Qarefine/release/M2_L4_1/convert-data/default/file/file-templates.txt
##############################
Control of Mapper
##############################
COMPONENTS GENERATION
 
 
Point 1 !!
Warning: Can't find file in file table named PJ01AAA.SS.VSAM.CUSTOMERS
Point 2 !!
 
 
Refine error...
/tmp/refine-exit-status.IvmFDYsYDdr31956
ERROR : generation aborted
 
Abort
Explanation
The name of the file to convert to an Oracle table does not correspond to the name present in the Datamap file.
Executing File-to-UDB (formerly DB2/Luw) Converter Programs
This section describes the tasks of unloading, transfer and reloading using the components generated using Tuxedo ART Workbench (see Generating the Components).
Preparation
Configuring the Environments and Installing the Components
Installing the Unloading Components Under z/OS
The components used for the unloading (generated in $HOME/trf/unload/file) should be installed on the source z/OS platform. The generated JCL may need adapting to specific site constraints including JOB cards, library access paths and access paths to input and out put files (Data Set Name – DSN).
Installing the Reloading Components Under UNIX
The components used for the reloading (generated in $HOME/trf/reload/file) should be installed on the target platform (runtime).
Installing the DB2/luw (udb) Object Creation Components
The components used for creating the Oracle objects (generated in $HOME/SQL/file/<schema name>) should be installed on the target platform (runtime).
Setting the Target Platform Environment Variables
The following environment variables should be set on the target platform
 
This UNIX/Linux variable has to contain the directory of Oracle Tuxedo Application Runtime for Batch utilities
The following variable should be set according to the information in the Oracle Tuxedo Application Rehosting Workbench Installation Guide:
Unloading the JCL
An unloading JCL is generated for each z/OS file listed in the Datamap Parameter File (Datamap-<configuration name>.re). These unloading JCLs are named <logical file name>.jclunload. These JCL use the REPRO function of the IDCAMS utility to unload the files.
Note:
The .jclunload extension should be deleted for execution under z/OS.
Transferring the Files
Files should be transferred between the source z/OS platform and the target UNIX platform in binary format using the file transfer tools available at the site (CFT, FTP, …).
Compiling the Transcoding Programs
The generated COBOL programs used for transcoding and reloading are named:
RELTABLE-<logical file name>
Example:
RELTABLE-ODCSF0.sqb
These COBOL programs should be compiled with the target COBOL compiler using the options described in the COBOL converter section of Tuxedo ART Workbench Reference Guide.
Each program produces an output file that is then read by the SQL*LOADER utility.
Executing the Oracle Object Creation Scripts
The option -d of the loadtable-<…>.ksh scripts enables the creation of the Oracle objects.
Executing the Transcoding and Reloading Scripts
The transcoding and reloading scripts have the follow parameters:
Synopsis
loadtable-<logical file name>.ksh [-d] [-t/-l] [-c <method>]
Options
-d
Create the DB2/luw (udb) objects.
-t
Transcode and reload the file.
-l
Transcode and reload the file (same action as -t).
-c ftp:<…>:<…>
Implement the verification of the transfer (see Checking the Transfers).
Examples
For the example provided in Mapping Parameter File (mapper-<configuration name>.re), the generated script is:
Files
By default, the input file is located in the directory indicated by $DATA_SOURCE, and the output file is placed in the directory indicated by $DATA.
These files are named with the logical file name used in the Mapping Parameter File (mapper-<configuration name>.re) configuration file.
An execution log is created in the directory indicated by $MT_LOG.
A return code different from zero is produced when a problem is encountered.
Checking the Transfers
This check uses the following option of the loadtable-<logical file name>.ksh
-c ftp:<name of transfered physical file>:<name of FTP log under UNIX>
Note:
Compiling the Access Routines and Utilities
The COBOL and Embedded-SQL access routines should be compiled using the target COBOL compilation options described in the Oracle Tuxedo Application Rehosting Workbench Reference Guide.
Troubleshooting
This section describes problems resulting from usage errors that have been encountered when migrating files from the source to target platform.
Overview
When executing any of Tuxedo ART Workbench tool users should check:
If the Mapper-log-<configuration name> file contains any errors (see Common Problems and Solutions).
Error messages and associated explanations are listed in the appendix of the Oracle Tuxedo Application Rehosting Workbench Reference Guide.
Common Problems and Solutions
Error: External Variable PARAM is not set
When executing file.sh -gmi $HOME/trf STFILEUDB the following message appears:
*=-=-=-=-=-=-=-=-=-=-=-=-=-=-=-=-=-=-=-=-=-=-=-=-=-==-=-=-=-=-=-=-=-=-=-=-=-=-
########################################################################
Control of configuration STFILEUDB
External Variable PARAM is not set!
ERROR: Check directive files for configuration STFILEUDB
 
Abort
Explanation
The variable $PARAM has not been set.
Error: Target directory does not exist
When executing file.sh -gmi $HOME/trf STFILEUDB1 the following message appears:
*=-=-=-=-=-=-=-=-=-=-=-=-=-=-=-=-=-=-=-=-=-=-=-=-=-==-=-=-=-=-=-=-=-=-=-=-
Target output directory /home2/wkb9/trf is missing
Check parameters: -i <output_directory> <schema>
ERROR : usage : file.sh [ [-g] [-m] [-i <output_directory>] <schema_name> | -s <output_directory> (<schema>,...) ]
abort
Error: Unknown file organization
When executing file.sh -gmi $HOME/trf STFILEUDB2 the following message appears:
Refine error...
Log
The contents of the Mapper-log-STFILEUDB2 log file include:
file PJ01AAA.SS.VSAM.CUSTOMER Oracle
file logical name ODCSF0B
*** Unknown file organization : INDEXD
mapping record VS-ODCSF0-RECORD
record VS-ODCSF0-RECORD: logical name VS
record VS-ODCSF0-RECORD REDEFINES:
field VS-CUSTBDATE as opaque (default strategy)
record VS-ODCSF0-RECORD REDEFINES:
field VS-CUSTBDATE as opaque (default strategy)
Explanation
The file is configured with a file organization of INDEXD instead of INDEXED.
Error: The illegal text is: "converted
When executing: file.sh -gmi $HOME/trf STFILEUDB the following message appears:
*=-=-=-=-=-=-=-=-=-=-=-=-=-=-=-=-=-=-=-=-=-=-=-=-=-==-=-=-=-=-=-=-=-=-=-=-
##########################################################################
Control of configuration STFILEUDB
##############################
Control of templates
OK: Use Default Templates list file
File name is /REFINE/convert-data/default/file/file-templates-db2luw.txt
##############################
Control of Mapper
##############################
COMPONENTS GENERATION
 
 
Parsing mapper file /home2/wkb9/tmp/mapper-STFILEUDB.re.tmp ...
Parse error at character position 1346 in file:
/home2/wkb9/tmp/mapper-STFILEUDB.re.tmp.
The illegal text is: "converrted
table name CUSTOMER
include \"COPY/ODCSF0B.cpy\"
map record VS-ODCSF0-RECORD defin"
While parsing in grammar UFAS-CONVERTER::MAPPER-INPUT-GRAMMAR,
CONVERRTED is a symbol, which is not a legal token
at this point in the input. The legal tokens at this point are:
 
:END "templates" "filler" "field" "file" "one-for-n" "multi-record" "table" "transferred" "mode-tp" ... [14 others]
*ERROR*: parse error is found in /home2/wkb9/tmp/mapper-STFILEUDB.re.tmp.
Refine error...
/tmp/refine-exit-status.snICMmElNYF25625
ERROR: generation aborted
abort
Explanation
A typing error in the word ‘CONVERTED’ was made in the mapping file.
Error: Cannot find file in file table named PJ01AAA.SS.VSAM.CUSTOMERS
When executing: file.sh -gmi $HOME/trf STFILEORA the following message appears:
*=-=-=-=-=-=-=-=-=-=-=-=-=-=-=-=-=-=-=-=-=-=-=-=-=-==-=-=-=-=-=-=-==-=-=-=
##########################################################################
Control of configuration STFILEUDB
##############################
Control of templates
Project Templates list file is missing /home2/wkb9/param/file/file-templates.txt
OK: Use Default Templates list file
File name is /Qarefine/release/M2_L4_1/convert-data/default/file/file-templates.txt
##############################
Control of Mapper
##############################
COMPONENTS GENERATION
 
 
Point 1 !!
Warning: Can't find file in file table named PJ01AAA.SS.VSAM.CUSTOMERS
Point 2 !!
 
 
Refine error...
/tmp/refine-exit-status.IvmFDYsYDdr31956
ERROR : generation aborted
 
Abort
Explanation
The name of the file to convert to an DB2/luw (udb) table does not correspond to the name present in the Datamap file.
Executing DB2-to-Oracle Generated Converter Programs
This section describes the tasks of unloading, transfer and reloading using the components generated using Tuxedo ART Workbench (see Generating the Components).
Preparation
Configuring the Environments and Installing the Components
Installing the Unloading Components Under z/OS
The components used for the unloading (generated in $HOME/trf/unload/rdbms) should be installed on the source z/OS platform. The generated JCL may need adapting to specific site constraints including JOB cards, library access paths and access paths to input and output files (Data Set Name – DSN).
Installing the COBOL programs for DB Load/Unload on target platform.
The COBOL programs for DB Load/Unload (generated in $HOME/trf/DSNUTILS/<schema name>) should be compiled and installed on the target platform (runtime).
Installing the Reloading Components on the Target Platform
The components used for the reloading (generated in $HOME/trf/reload/rdbms) should be installed on the target platform (runtime).
Table 1‑36 lists environment variables that should be set on the target platform.
 
Directory containing the <table name>.ctl files used by the SQL*LOADER ($HOME/trf/reload/rdbms/<schema name>/ctl).
The following variable should be set according to the information in the Oracle Tuxedo Application Rehosting Workbench Installation Guide:
The reloading script loadrdbms-<table name>.ksh uses the SQL*LDR Oracle utility. Because this utility can access to ORACLE servers only, this script should be used in ORACLE servers and not with client connection. This variable should not contain an @<oracle_sid> string, especially for this reloading step.
Installing the MWDB2ORA Package Component on the Target Platform
The package functions called by COBOL programs (converted by the COBOL Converter) should be installed on the target platform (runtime).
The packages are located in REFINEDIR/convert-data/fixed-components/MWDB2ORA.plb and REFINEDIR/convert-data/fixed-components/MWDB2ORA_CONST.plb. You should adapt the MWDB2ORA_CONST.plb package and install these packages under SQLPLUS as documented in the DB2-to-Oracle Convertor.
Unloading JCL
To unload each DB2 table, a JCL using the IBM unloading utility is executed. Generally, the unloading utility creates three files for each table:
If the table contains a CLOB or BLOB data types, the unloading utility creates:
These files are written in another dataset or directory if the parameter rdbms:jcl_unload_lob_file_system is respectively set to pds or hfs.
These unloading JCLs are named <table name>.jclunload
If the table name is longer than eight characters, Tuxedo ART Workbench attributes an eight-character name to the z/OS JCL as close as possible to the original. The renaming process maintains the uniqueness of each table name.
Example:ODCSF0X1.jclunload
In the example used in this chapter, the table named ODCSF0 is lengthened to ODCSF0X1 when naming the z/OS JCL.
Transferring the Files
The unloaded data files should be transferred between the source z/OS platform and the target UNIX platform in binary format using the file transfer tools available at the site (CFT, FTP, …).
The LOG and SYSPUNCH files should be transferred in text mode.
The files transferred to the target UNIX platform should be stored in the $DATA_SOURCE directory.
The CLOB and BLOB data files should be transferred in binary mode and stored in the $DATA_SOURCE/<schema_name>.<column_name> directory.
The MBCS data files should be transferred in text mode and properly transcoded by transfer tools. For more information, see Oracle Tuxedo Application Workbench Reference Guide.
Note:
On MVS, the Rehosting Workbench attributes a six-character name to <column_name> to the dataset or directory, added with a digit number (1 for the first CLOB or BLOB column of the table, 2 for the second, ...). On UNIX/Linux platform, the loadrdbms.sh script uses the real column_name.
Creating the Generated Oracle Objects
The scripts creating Oracle objects (tables, index, constraints, …) are created in the $HOME/trf/SQL/rdbms/<schema name> directory. They should be executed in the target Oracle instance.
The <schema name>.lst file contains the names of all of the tables in hierarchical sequence (parent table then child tables).
Table 1‑37 lists the DB2 objects managed by Tuxedo ART Workbench and the name of the script used to create them:
 
Table 1‑37 DB2 Objects
This file contains all the CREATE INDEXes associated with the table <target_table_name>. This file will not be generated if there are no indexes defined on the table <target_table_name>
Compiling the Transcoding Programs
The generated COBOL programs used for transcoding are named:
MOD_<table name>.cbl
For the example used in this chapter the generated program is:
The programs should be compiled using the target COBOL compiler and the options documented in the Oracle Tuxedo Application Rehosting Workbench Reference Guide.
The programs produce RECORD SEQUENTIAL files on output that will then be read by the SQL*LOADER utility.
Listing 1‑65 FILE CONTROL Example – Extracted from Program: MOD_ODCSF0.cbl
SELECT MW-SORTIE
ASSIGN TO "SORTIE"
ORGANIZATION IS RECORD SEQUENTIAL
ACCESS IS SEQUENTIAL
FILE STATUS IS IO-STATUS.
 
The generated COBOL programs used for transcoding CLOB columns are named:
CLOB_<table name>_<column_name>.cbl
Executing the Transcoding and Reloading Scripts
The scripts enabling the transcoding and reloading of data are generated in the directory:
$HOME/trf/reload/rdbms/<schema name>/ksh
The format of the script names is:
loadrdbms-<table name>.ksh
In the example used in this chapter, the script is named:
loadrdbms-ODCSF0.ksh
Each script launches the COBOL program that performs the transcoding and then the SQL*LOADER utility. The CTL files used by SQL*LOADER are named:
<table name>.ctl.
The CTL file used for the example in this chapter is named:
ODCSF0.ctl
Transcoding and Reloading Command
The transcoding and reloading scripts have the following parameters:
Synopsis
loadrdbms-<table name>.ksh [-t | [-O|-T]] [-l] [-c: <method>]
Options
-t
Transcodes the file and all BLOB or CLOB files if exist.
-T
Transcodes the file associated to the table only (except for CLOB and BLOB files). This option is used when a table contains CLOB or BLOB columns.
-O
For BLOB columns: creates only an UNIX link to all binary BLOB transferred files.
For CLOB columns: transcodes only all binary CLOB transferred files.
-l
Reloads the data into Oracle table.
-c rows:
Implement the verification of the transfer (see Checking the Transfers).
Examples
For the example provided in Example of a Migration of DB2 Objects, the generated script is:
Checking the Transfers
This check uses the following option of the loadrdbms-<table name>.ksh
-c rows
Note:
Troubleshooting
This section describes problems resulting from usage errors that have been encountered when migrating data from a source DB2 database to a target Oracle database.
Overview
When executing any of Tuxedo ART Workbench tools, users should check:
If the rdbms-converter-<schema name>.log file contains any errors (see Common Problems and Solutions).
Error messages and associated explanations are listed in the appendix of the Oracle Tuxedo Application Rehosting Workbench Reference Guide.
Common Problems and Solutions
Error: RDBMS-0105
When executing $REFINEDIR/$VERS/rdbms.sh -Cgrmi $HOME/trf PJ01DB2 STFILEORA the following message appears:
Fatal RDBMS error.
Error: RDBMS-0105: Catalog for /home2/wkb9/param/system.desc is out of date
and needs to be updated externally.
Refine error...
Explanation
Changes have been made to the DDL, re-perform the cataloging operation.
Error: conversion aborted. Can not read
When executing $REFINEDIR/$VERS/rdbms.sh -Cgrmi $HOME/trf SCHEMA the following message appears:
Refine error...
/tmp/refine-exit-status.MOaZwgTphIN14075
ERROR : conversion aborted . Can not read /home2/wkb9/tmp/outputs/SCHEMA/rdbms-converter-SCHEMA.log log file
abort
Explanation
The schema name is not known.
Error: Configuration file /db-param.cfg is missing!
When executing $REFINEDIR/$VERS/rdbms.sh -Cgrmi $HOME/trf PJ01DB2 the following message appears:
*=-=-=-=-=-=-=-=-=-=-=-=-=-=-=-=-=-=-=-=-=-=-=-=-=-==-=-=-=-=-=-=-=-=--=-
#########################################################################
CONVERSION OF DDLs and CTL files and GENERATION of directive files
ERROR : Configuration file /db-param.cfg is missing !
ERROR : Error in reading configuration file
Abort
Explanation
The external variable PARAM is not set.
Error: Target output directory... is missing
When executing $REFINEDIR/$VERS/rdbms.sh -Cgrmi $HOME/bad-directory PJ01DB2 the following message appears:
*=-=-=-=-=-=-=-=-=-=-=-=-=-=-=-=-=-=-=-=-=-=-=-=-=-==-=-=-=-=-=-=-=-=-=-=-
Target output directory /home2/wkb9/bad-directory is missing
Check parameters: -i <output_directory> <schema>
ERROR : usage : rdbms.sh [ [-c|-C] [-g] [-m] [-r] [-i <output_directory>] <schema_name> ] -s <output_directory> (<schema>,...) ]
abort
Explanation
The target directory does not exist.
Error: Abort when using -c option... in case of unsupported features
When executing $REFINEDIR/$VERS/rdbms.sh -c WWARN the following message appears:
*=-=-=-=-=-=-=-=-=-=-=-=-=-=-=-=-=-=-=-=-=-=-=-=-=-==-=-=-=-=-=-=-=-
WARNING: some unsupported db2 objects have been ignored by this tool.
Check file /home2/wkb9/tmp/outputs/WWARN/unsupported-WWARN.log to see a detail of those objects.
ERROR:
RDBMSWB-0199: conversion aborted due to 26 Warning message(s). Check previous error messages and try -C option instead of -c
abort
Explanation
The DDL contains some unsupported features. Check the warning files. You can ignore this abort by replacing the -c option with -C option.
Executing DB2-to-UDB Generated Converter Programs
See Also
Tuxedo ART Workbench Reference Guide

Copyright © 1994, 2017, Oracle and/or its affiliates. All rights reserved.