Table of Contents Previous Next PDF


Oracle Tuxedo Message Queue Administration Guide

Oracle Tuxedo Message Queue Administration Guide
This chapter contains the following topics:
OTMQ and Oracle Tuxedo
Note:
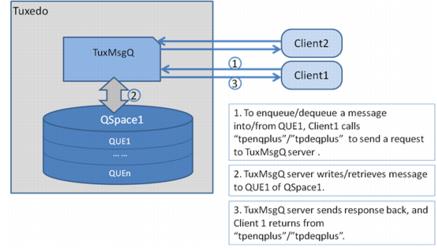
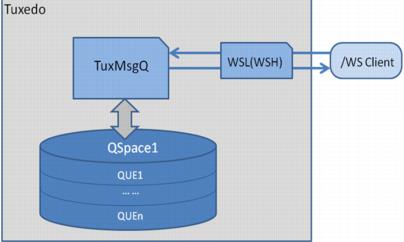
OTMQ is implemented based on the Oracle Tuxedo infrastructure, which is a typical client-server mode. The basic queuing features are provided by the central OTMQ server TuxMsgQ(). For more information, see Oracle Tuxedo Message Queue Reference Guide.
As the foundation and physical storage of OTMQ, the QSpace is the actual physical device that the messages reside in. The QSpace contains one or more message queues. A message is stored in a message queue.
When a client calls the queuing service to enqueue/dequeue messages to/from one message queue, the request will be handled by the TuxMsgQ server. The server will write or retrieve messages from the queue defined in the specific QSpace as the client request.
User processes cannot access the QSpace directly. All requests to operate the QSpace should go through the OTMQ server. Figure 1 show the OTMQ and Tuxedo Architecture.
Figure 1 OTMQ and Oracle Tuxedo Architecture.
There are several server components that enrich the OTMQ queuing features. For more information, see Oracle Tuxedo Message Queue UBB Server Reference.
This section contains the following topics:
OTMQ Based on Oracle Tuxedo
As the foundation of OTMQ, Oracle Tuxedo provides the framework for building scalable multi-tier client-to-server applications in heterogeneous, distributed environment.
Here are a few important Oracle Tuxedo concepts:
An Oracle Tuxedo domain, also known as an Oracle Tuxedo application, is a set of Tuxedo system, client, and server processes administered as a single unit from a single Tuxedo configuration file. An Oracle Tuxedo domain consists of many system processes, one or more application client processes, one or more application server processes, and one or more machines connected over a network.
For one Oracle Tuxedo domain, the architecture can be a single machine (SHM) or multiple machines (MP) connected though networks.
A SHM domain is a single node Oracle Tuxedo domain where all native Oracle Tuxedo processes have access to the same shared memory.
An MP domain is a clustered environment where the application can be spread across multiple machines/nodes. Those nodes can be managed as a single entity, or can be managed as a queue space cluster.
An Oracle Tuxedo application can consist of multiple domains. Each domain is a separately administered unit. Oracle Tuxedo allows the application to separate into multiple domains and still allow applications in one domain to access services in other domains
Using Oracle Tuxedo Domains
As a company's business grows, application engineers may need to organize the business information management into distinct applications, each having administrative autonomy, based on functionality, geographical location, or confidentiality. These distinct business applications can be configured as several domains. The Oracle Tuxedo Domains component provides the infrastructure for interoperability among the domains of a business, thereby extending the Oracle Tuxedo client/server model to multiple domains.
The inter-domain communication between Oracle Tuxedo domains uses the domain gateway. The domain gateway is a highly asynchronous, multi-tasking server process that handles outgoing and incoming services requests to or from remote domains. It makes access to services across domains transparent to both the application programmer and the application user.
For more information, see Using the Oracle Tuxedo Domains Component.
Oracle Tuxedo Configuration
Oracle Tuxedo configuration files are used to describe the Oracle Tuxedo applications. The configuration file is a repository that contains all the information necessary to boot and run an application, such as specifications for application resources, machines, machine groups, servers, available services, interfaces, and so on.
For SHM/MP domains, the UBBCONFIG is the configuration file. It is a text version of the configuration file, which can be created and edited with any text editor. Before booting the application using the configuration file, a binary version of the configuration file TUXCONFIG should be created from the text version by tmloadcf(1) command.
For applications consisting of multiple domains, an additional configuration file for domain connections is required. Similar to the UBBCONFIG file, the DMCONFIG file is the text version, which describes how multiple domains are connected and which services they make accessible to each other. Use the dmloadcf(1) utility to get the binary version of domain configuration file BDMCONFIG.
For more information, see About the Configuration File and Creating the Configuration File.
UBBCONFIG
A UBBCONFIG file is made up of nine possible specification sections:
*RESOURCES, *MACHINES, *GROUPS, *SERVERS, *SERVICES, *INTERFACES, *NETWORK, *NETGROUPS, *ROUTING.
The *RESOURCES section defines parameters that control the application as a whole and server as system-wide defaults.
The *MACHINES section defines parameters for each machine in an application.
The *GROUPS section designates logically grouped sets of servers. At least one server group for a machine should be defined.
The *SERVERS section contains information specific to a server process. Each entry in this section represents a server process to be booted in the application.
The *SERVICES section provides information on services that advertised by server processes.
For more information, see UBBCONFIG(5) in “Section 5 - File Formats, Data Descriptions, MIBs, and System Processes Reference” in the Oracle Tuxedo Reference Guide.
DMCONFIG
The domains configuration file DMCONFIG defines the local/remote domain access points, and local/remote available services through each access point. Application clients can access services through these access points. Also it maps the local access points and remote access points to specific domain gateway groups and network address defined in the UBBCONFIG.
The DMCONFIG file is made up of the following specification sections: *DM_LOCAL, *DM_REMOTE, *DM_EXPORT, *DM_IMPORT, *DM_RESOURCES, *DM_ROUTING, *DM_ACCESS_CONTROL, *DM_TDOMAIN.
The *DM_LOCAL section defines one or more local domain access point identifiers and their associated gateway groups. Correspondingly, the *DM_REMOTE section defines one or more remote domain access point identifiers and their characteristics.
The *DM_EXPORT section provides information on the services exported by each individual local domain access point. And the *DM_IMPORT section provides information on services imported and available to the local domain through remote domain access points defined in the *DM_REMOTE section.
For more information, see DMCONFIG(5) in “Section 5 - File Formats, Data Descriptions, MIBs, and System Processes Reference” in the Oracle Tuxedo Reference Guide.
Using Oracle Tuxedo Workstation Component
The Workstation component of the Oracle Tuxedo system allows application clients to reside on a machine that does not have a full server-side installation, that is, a machine that does not support any administration or application servers. All communication between a Workstation client (an application client running on a Workstation component) and the server application takes place over the network. For more information, see Using The Oracle Tuxedo ATMI Workstation Component.
Advanced Oracle Tuxedo features
Besides being the basic framework for client-to-server applications, Oracle Tuxedo can also provide a series of advanced features, such as:
Application built on Oracle Tuxedo can support a single client on a single server, or they can support tens of thousands of clients and thousands of servers without changing application code. As an application scales, the Oracle Tuxedo system continues to provide end users with consistently high performance and good responsiveness.
In a distributed client-to-server environment with thousands of independent processors and processes, Oracle Tuxedo can ensure no single point of failure by providing replicated server groups, and restores the running application to good condition after failures occur.
Oracle Tuxedo security includes authentication, authorization, and encryption to ensure data privacy when deploying Oracle Tuxedo application across networks. Network level and application level encryptions are supported.
Deploying OTMQ on Oracle Tuxedo Domain(s)
OTMQ can utilize the flexible and scalable Oracle Tuxedo domain configurations, to deploy the QSpace and queues according to the requirements of the application.
To deploy and run a basic OTMQ application, you must do the following steps:
1.
2.
3.
Create application that calls OTMQ API tpenqplus/tpdeqplus for queuing.
4.
5.
OTMQ on Oracle Tuxedo SHM Domain
OTMQ application on an Oracle Tuxedo SHM domain can create one or multiple QSpaces. Each QSpace maps to a service provided by OTMQ server TuxMsgQ. Application clients calls OTMQ API tpqattach() first to attach to a queue to get access to specific QSpace, then calls tpenqplus() to enqueue message, or dequeue message from attached queue.
Also the client can enqueue message to the queue that belongs to another QSpace that it is not attached to, as shown in Figure 2.
Figure 2 OTMQ Application on Oracle Tuxedo SHM Domain
OTMQ on Oracle Tuxedo MP Domain
OTMQ application on an Oracle Tuxedo MP domain can create one or multiple QSpaces on its master and slave node respectively. Each QSpace maps to a service provided by OTMQ server TuxMsgQ. Application clients on master or slave node can first call OTMQ API tpqattach() to attach to a queue to get access to specific QSpace on its own node, and then call tpenqplus() to enqueue message, or call tpdeqplus() to dequeue message from attached queue.
Also the client on node B can enqueue message to the queue that belongs to another QSpace on node A that it doesn't attached to, as shown in Figure 3.
Figure 3 OTMQ Application on Oracle Tuxedo MP Domain
OTMQ on Multiple Oracle Tuxedo Domains
OTMQ application can be deployed across multiple Oracle Tuxedo domains. Each domain can have one or multiple QSpaces. Each QSpace maps to a service provided by OTMQ server TuxMsgQ. Application clients of one domain A can first call OTMQ API tpqattach() to attach to a queue to get access to specific QSpace in its domain, and then call tpenqplus() to enqueue message to queues that belong to the attached QSpace, or call tpdeqplus() to dequeue message from attached queue.
The client of domain B can also enqueue message to the queue that belongs to the QSpace of domain A as long as domain A has exported its service for its own QSpace, as shown in Figure 4.
Figure 4 OTMQ Application on Multiple Oracle Tuxedo Domains
OTMQ Workstation Client Support
OTMQ application can also have workstation clients by utilizing Oracle Tuxedo workstation component, as shown in Figure 5.
Figure 5 OTMQ Application Workstation Client Support
Administrator Tasks
The Oracle Tuxedo administrator is responsible for defining servers and creating queue spaces and queues for the Oracle Tuxedo Message Queue (OTMQ) component.
The administrator must define at least one queue server group with TMS_TMQM as the transaction manager server for the group.
The administrator also must create a queue space using the queue administration program, tmqadmin(1), or the OTMQ_MIB() Management Information Base (MIB) that includes extended classes for OTMQ. There is a one-to-one mapping of queue space to queue server group since each queue space is a resource manager (RM) instance and only a single RM can exist in a group.
The administrator can define a single server group in the application configuration for the queue space by specifying the group in UBBCONFIG or by using tmconfig to add the group dynamically.
Part of the task of defining a queue is specifying the order for messages on the queue. Queue ordering can be determined by message availability time, expiration time, priority, FIFO and LIFO. For more information, see the tmqadmin() qcreate sub-command in Oracle Tuxedo Message Queue Command Reference.
Interoperability
Note:
This section contains the following topics:
Traditional Oracle Tuxedo /Q Client Interoperability
Traditional Oracle Tuxedo /Q clients can communicate with OTMQ with only configuration change, as shown in Figure 6
Of course, to take advantage of the new features introduced in OTMQ, application code need be changed. Traditional Tuxedo /Q tpenqueue(3c)/tpdequeue(3c) functions need be replaced with OTMQ counterparts tpenqplus(3c)/tpdeqplus(3c). Traditional Tuxedo /Q clients including APPQ_MIB classes (T_APPQ, T_APPQMSG, T_APPQSPACE and T_APPQTRANS) need replace them with corresponding OTMQ_MIB(5) classes (T_OTMQ, T_OTMQMSG, T_OTMQSPACE and T_OTMQTRANS).
Figure 6 Interoperability with Traditional Oracle Tuxedo /Q Client
Traditional Tuxedo /Q server Interoperability
Tuxedo /Q server cannot boot on the new OTMQ QSpace, and cannot process queuing requests from the new OTMQ clients.
Oracle Message Queue (OMQ) Interoperability
OMQ Cross-Group Connection
To support cross-group connection with OMQ, OTMQ provides the Link Driver Server TuxMsgQLD(), as shown in Figure 7. With this server deployed, OTMQ and OMQ can have message-level compatibilities, with following limitations:
Direct connection
Only support DISC and RTS UMA.
Routing
Only support AK and NN modes.
Only support DISC UMA.
Only support MEM, DEQ and ACK DIPs when protocol exchange is involved more than once, such as sending message from OMQ to OMQ through OTMQ or from OTMQ to OTMQ through OMQ.
Qspace and queue name
In OTMQ, Qspace and queue name are string characters. In OMQ, the counterparts group and queue number are integer numbers. So, to communicate with OMQ, OTMQ must have numerical Qspace and queue name.
Message Based Service
OTMQ does not support Message Based Service (MBS).
Buffer type
OMQ only supports CARRAY and FML32 buffer types.
Figure 7 Oracle Message Queue (OMQ) Interoperability
OMQ Client Interoperability
To support interoperability between OMQ client application and OTMQ, OTMQ provides Client Library Server TuxCls(). With this server deployed, OTMQ and OMQ client can have message-level compatibilities. The traditional OMQ client can work with OTMQ server without any code change, compile and link, and any configuration change, except for below limitations:.
OMQ Naming Interoperability
To integrate the OTMQ global naming service with OMQ naming, the global naming file, which is indicated by the environment variables DMQNS_DEFAULTPATH and DMQNS_DEVICE, should have the read and write permissions for OTMQ and OMQ naming services.
MQSeries Using MQAdapter Interoperability
To integrate with MQSeries, you must do the following:
Use tpenqueue/tpdequeue or tpenqplus/tpdeqplus.
If you are using tpenqplus/tpdeqplus, you must add tpqattach before invoking tpenqplus/tpdeqplus, and the attached qspace/qname is an OTMQ qspace/qname.
Using buildqclient to re-compile code.
Configuring for OTMQ Application
The configuration and the queue attributes must reflect the requirements of the application.
Configuring OTMQ System Resources
Core servers TMS_TMQM(), TuxMsgQ(), TuxMQFWD() and TMQEVT() are provided by the OTMQ. TMS_TMQM() manages global transactions for the queued message facility. It must be defined in the *GROUPS section of the configuration file. TuxMsgQ() and TuxMQFWD() provide message queuing services to users. They must be defined in the *SERVERS section of the configuration file. TMQEVT() provides publish/subscribe services to users. It must be defined in *SERVERS section of the configuration file.
Supplemental servers TMQ_NA(), TuxMsgQLD() and TuxCls() can be configured at machine level for one or more OTMQ queue space.
Specifying the OTMQ Message Queue Manager Server Group
In addition to the standard requirements of a group name tag and a value for GRPNO, there must be a server group defined for each OTMQ queue space the application will use. The TMSNAME and OPENINFO parameters need to be set. Here are examples:
TMSNAME= TMS_TMQM
and
OPENINFO=" TUXEDO/TMQM:<device_name>:<queue_space_name>"
TMS_TMQM is the name for the transaction manager server for OTMQ. In OPENINFO parameter, TUXEDO/TMQM is the literal name for the resource manager as it appears in $TUXDIR/udataobj/RM. The values for <device_name> and <queue_space_name> are instance-specific and must be set to the pathname for the universal device list and the name associated with the queue space, respectively. These values are specified by the administrator using tmqadmin(1).
Note:
There can be only one queue space per *GROUPS section entry. The CLOSEINFO parameter is not used.
The following example shows the configuration of server group for OTMQ.
Listing 1 OTMQ Server Group Configuration
*GROUPS
QGRP1 GRPNO=1 TMSNAME=TMS_TMQM
       OPENINFO="TUXEDO/TMQM:/dev/device1: queuespace1"
QGRP2 GRPNO=2 TMSNAME=TMS_TMQM
       OPENINFO="TUXEDO/TMQM:/dev/device2: queuespace2"
 
Specifying the OTMQ Message Queue Manager Server
The TuxMsgQ() takes the same CLOPT as TMQUEUE server of Oracle Tuxedo /Q. The TuxMsgQ() reference page gives a full description of the SERVERS section of the configuration file. But still the TuxMsgQ() has several unique properties can be specified:
Attach is the mandatory operation for an OTMQ application to access the OTMQ queue space. The attach operation can be configured with a default timeout value per queue space. To configure the default attach timeout for the queue space, add a service named TuxMQATH<qspace_name> in the SERVICES section, and set the BLOCKTIME property of this service as the default attach timeout value.
TuxMsgQ() provides the sanity check function to remove invalid queue owners. To configure the sanity check interval for the TuxMsgQ() server, set "-i <interval>" in CLOPT. The <interval> value means the TuxMsgQ() server will do sanity check per receiving this number of messages.
Specifying the OTMQ Offline Trade Driver Server
OTMQ Offline Trade Driver Server TuxMQFWD() is part of the OTMQ Reliable Message Delivery feature. It is responsible for resending the recoverable messages to the target if the OTMQ Message Queue Manager Server TuxMsgQ() fails to deliver the message to target at the first time.
Refer to the TuxMQFWD() reference page for a full description of the *SERVERS section of the configuration file for this server.
Any improper configuration that prevents the TuxMQFWD() server from dequeuing or forwarding messages will cause the server booting failure. Some important items should be emphasized:
*SRVGRP of TuxMQFWD() server must have TMSNAME set to TMS_TMQM, and the OPENINFO must be set to associate with the proper device and queue space.
The entry of TuxMQFWD() server in *SERVERS section should not be part of an MSSQ set.
REPLYQ of TuxMQFWD() server should be set to N.
TuxMQFWD() server does not advertise any service.
Only one TuxMQFWD() server process can be configured for one OTMQ queue space.
Specifying the OTMQ Event Broker
OTMQ Event Broker TMQEVT() is required for publish/subscribe feature. It is responsible for notifying subscribers when topics are published. It must be configured in a separate server group from TuxMsgQ() and TuxMQFWD().
Refer to the TMQEVT() reference page for a full description of the *SERVERS section of the configuration file for this server.
Specifying the OTMQ Naming Server
OTMQ Naming Server TMQ_NA() can be configured to provide the naming feature. It allows the application to bind the queue alias to an actual queue name, and also supports lookup the actual queue name through provided queue alias.
Refer to the reference page of TMQ_NA() for a full description of the *SERVERS section of the configuration file for this server.
One limitation for the naming server is only one TMQ_NA() server process can be configured for one OTMQ queue space.
The TMQ_NA() may boot with a pre-defined name space file, which is specified when creating or updating the queue space. The following example shows the content of one static name space file, which defines the association between the user defined queue alias and the actual queue name.
 
Refer to qspacecreate or qspacechange command of tmqadmin(1) for specifying the static name space file.
Creating OTMQ Queue Space and Queues
OTMQ command tmqadmin(1) is used to establish the resources of the OTMQ. The OTMQ_MIB Management Information Base also provides an alternative method of administering OTMQ programmatically. See Oracle Tuxedo Message Queue MIB Reference for more information on the MIB operation.
Working with tmqadmin Command
Creating an Entry to Store a Queue Space
Creating a Queue Space: qspacecreate
Creating a Queue: qcreate
Working with tmqadmin Command
Most of the key commands of tmqadmin have positional parameters. If the positional parameters (those not specified with a dash (-) preceding the option) are not specified on the command line when the command is invoked, tmqadmin prompts you for the required information.
Creating an Entry to Store a Queue Space
You can store queue space either in file system (by default) or in Oracle database.
Creating an Entry in the Universal Device List: crdl
The universal device list (UDL) is a VTOC file under the control of the Oracle Tuxedo system. It maps the physical storage space on a machine where the Oracle Tuxedo system is run. An entry in the UDL points to the disk space where the queues and messages of a queue space are stored; the Oracle Tuxedo system manages the input and output for that space. The UDL is created by tmloadcf(1) when the configuration file is first loaded.
Before you create a queue space, you must create an entry for it in the UDL. The following is an example of the commands:
# First invoke the OTMQ administrative interface, tmqadmin
# The QMCONFIG variable points to an existing device where the UDL
# either resides or will reside.
QMCONFIG=/dev/QUE_TMQ
# Next create the device list entry
crdl /dev/QUE_TMQ 0 5000
# The above command sets aside 5000 physical pages beginning at block number 0
If you are going to add an entry to an existing Oracle Tuxedo UDL, the value for the QMCONFIG variable must be the same pathname specified in TUXCONFIG. Once you have invoked tmqadmin(1), it is recommend that you run a lidl command to see where space is available before creating your new entry.
Creating an Entry in Oracle Database
Do the following steps to store queue space in Oracle Database. Differed from creating an entry in the Universal Device List, you do not need to create queue device by tmqadmin command crdl to create an entry in Oracle Database.
1.
Install Oracle database 10g client (or above releases) and set Oracle database ENV. For example, on Linux platforms, create link libclntsh.so for libclntsh.so.x.x (for example, libclntsh.so.10.1), and set LD_LIBRARY_PATH for link libclntsh.so.
2.
Set QMCONFIG variable with the format of "DB:Oracle_XA:..." (see below example). QMCONFIG will point to the Oracle database schema. The database table will be named as "QS_"+ OTMQ tablesapce name; the database table name TUX_VTOC_UDL will be reserved for Tuxedo.
QMCONFIG="DB:Oracle_XA:ORACLE_XA+SqlNet=ORCL+ACC=P/scott/tiger"
3.
Define OPENINFO in UBBCONFIG. OPENINFO is started with $QMCONFIG and followed with ":$QSPACE_NAME". For example,
OPENINFO="DB:Oracle_XA:ORACLE_XA+SqlNet=ORCL+ACC=P/scott/tiger:QSPACE"
For more information, see OPENINFO in "UBBCONFIG(5)" in Oracle Tuxedo File Formats, Data Descriptions, MIBs, and System Processes Reference.
Note:
Creating a Queue Space: qspacecreate
A queue space makes use of IPC resources; when you define a queue space you are allocating a shared memory segment and a semaphore. As noted above, the easiest way to use the command is to let it prompt you. (You can also use the T_OTMQSPACE class of the OTMQ_MIB to create a queue space.) The sequence looks like this:
Listing 2 qspacecreate
> qspacecreate
Queue space name: 1
IPC Key for queue space: 123567
Size of queue space in disk pages: 2048
Number of queues in queue space: 15
Number of concurrent transactions in queue space: 100
Number of concurrent processes in queue space: 100
Number of messages in queue space: 100
Error queue name: errque
Initialize extents (y, n [default=n]): y
Blocking factor [default=16]:
Create SAF and DQF queue by default: (y, n [default=y]):
Enables PCJ journaling by default: (y, n [default=n]): y
Enable Dead Letter Journal by default: (y, n [default=y]): y
 
The program does not prompt you to specify the size of the area to reserve in shared memory for storing non-persistent messages for all queues in the queue space. When you require non-persistent (memory-based) messages, you must specify the size of the memory area on the qspacecreate command line with the -n option.
Parameter Descriptions describes the required parameters of qspacecreate command in detail. Besides manually inputting each required parameter, you can also leverage template files to set those required parameters; see Easy Configuration for Creating a Queue Space for more information. OTMQ supports you to get error messages in time if you set an invalid value; see Error Report for more information.
You can choose to initialize the queue space as you use the qspacecreate command, or you can let it be done by the qopen command when you first open the queue space. For more information, see QSpace High Availability.
Note:
Parameter Descriptions
The value for the IPC key should be picked so as not to conflict with your other requirements for IPC resources. It should be a value greater than 32,768 and less than 262,143.
The size of the queue space, the number of queues, and the number of messages that can be queued at one time all depend on the needs of your application. Of course, you cannot specify a size greater than the number of pages specified in your UDL entry. In connection with these parameters, you also need to look ahead to the queue capacity parameters for an individual queue within the queue space. Those parameters allow you to (a) set a limit on the number of messages that can be put on a queue, and (b) name a command to be executed when the number of enqueued messages on the queue reaches the threshold. If you specify a low number of concurrent messages for the queue space, you may create a situation where your threshold on a queue will never be reached.
To calculate the number of concurrent transactions, count each of the following as one transaction:
Each TMS_TMQM server in the group that uses this queue space
Each TuxMsgQ or TuxMQFWD server in the group that uses this queue space
If your client programs begin transactions before they join the OTMQ queue space, increase the count by the number of clients that might access the queue space concurrently. The worst case is that all clients access the queue space at the same time.
For the number of concurrent processes count one for each TMS_TMQM, TuxMsgQ or TuxMQFWD server in the group that uses this queue space and one for a fudge factor.
Most of these prompts are the same as the qspacecreate of qmadmin command of Oracle Tuxedo /Q component. The last three prompts are specific for OTMQ.
If SAF and DQF queues are created by default, the recoverable delivery feature using SAF and DQF are enabled. Otherwise they cannot be used until the user create these two queues manually by qcreate command and enable them by OTMQ_MIB.
PCJ and DLJ are created by default as permanent active queues. If they are not enabled by default, they cannot be used until the user enables them by OTMQ_MIB.
You can choose to initialize the queue space as you use the qspacecreate command, or you can let it be done by the qopen command when you first open the queue space.
Easy Configuration for Creating a Queue Space
You can use either way to set parameters of qspacecreate command.
Using Standard Template File
OTMQ offers you three types of standard template files as follows.
1.
2.
3.
qs_low_capacity_template (see Listing 7 for its context)
You can choose the template that you want in either way:
In this way, number "1" stands for qs_high_capacity_template; number "2" stands for qs_general_capacity_template; number "3" stands for qs_low_capacity_template.
Specify the value of -F option of qspacecreate command (see Listing 4 for an example)
In this way, value "H" stands for qs_high_capacity_template; value "G" stands for qs_general_capacity_template; value "L" to use qs_low_capacity_template.
For more information about qspacecreate command, see "tmqadmin" in Oracle Tuxedo Message Queue Command Reference.
Listing 3 Example of Inputting the Number of the Template File
2
QUEUE Space Name: TESTQS
IPC Key for queue space: 56778
Queue '196' created
Queue '197' created
Queue '96' created
Queue '94' created
 
Listing 4 Example of Specifying the Value of -F Option of qspacecreate command
> qspacecreate -F L
Queue space name: tr
IPC Key for queue space: 23451
Queue '196' created
Queue '197' created
Queue '96' created
Queue '94' created
Queue '_SAF_' created
Queue '_ACK__SAF_' created
Queue '_DQF_' created
Queue '_ACK__DQF_' created
>
 
Listing 5 Context of qs_high_capacity_template
$ more qs_high_capacity_template.ini
SizeofQueueSpaceInDiskpages=10240
NumberofQueues=100
NumberofConcurrentTransactions=100
NumberofConcurrentProcesses=100
NumberofMessages=1000
ErrorQueueName=ErrorQ
InitializeExtents=y
BlockingFactor=16
CreateSAFandDQFQueue=y
EnablesPCJJournaling=y
EnableDeadLetterJournal=y
 
Listing 6 Context of qs_general_capacity_template
$ more qs_general_capacity_template.ini
SizeofQueueSpaceInDiskpages=5120
NumberofQueues=100
NumberofConcurrentTransactions=100
NumberofConcurrentProcesses=100
NumberofMessages=100
ErrorQueueName=ErrorQ
InitializeExtents=y
BlockingFactor=16
CreateSAFandDQFQueue=n
EnablesPCJJournaling=n
EnableDeadLetterJournal=n
 
Listing 7 Context of qs_low_capacity_template
$ more qs_low_capacity_template.ini
SizeofQueueSpaceInDiskpages=1024
NumberofQueues=20
NumberofConcurrentTransactions=20
NumberofConcurrentProcesses=20
NumberofMessages=100
ErrorQueueName=ErrorQ
InitializeExtents=y
BlockingFactor=16
CreateSAFandDQFQueue=y
EnablesPCJJournaling=y
EnableDeadLetterJournal=y
 
Creating Custom Template File
You can create your own template file by specifying -D option of qspacecreate command. The template file is located at $TUXDIR/udataobj/OTMQ/template/. You should either name this template file or give this template file an absolute file path. See Listing 8 and Listing 9 for examples.
For more information about qspacecreate command, see "tmqadmin" in Oracle Tuxedo Message Queue Command Reference.
Listing 8 Example A: Creating Your Own Template File
>qspacecreate -D
Please input the name of your self-defining template file:
qs.ini
QUEUE Space Name: QS1
IPC Key for queue space: 56778
Queue '196' created
Queue '197' created
Queue '96' created
Queue '94' created
 
Listing 9 Example B: Creating Your Own Template File
>qspacecreate -D qs.ini
QUEUE Space Name: QS1
IPC Key for queue space: 56778
Queue '196' created
Queue '197' created
Queue '96' created
Queue '94' created
 
Error Report
You will get error message in time if you set an invalid value. Usage examples are listed as follows.
Listing 10 Example A: Error Report Usage
> qspacecreate
Queue space name: %
TMQ_CAT:1425: ERROR: Queue space creation - invalid parameter
Queue space name: QS1
IPC Key for queue space: aa
TMQ_CAT:2239: ERROR: qspacecreate ipckey must be a non-negative number and less than or equal to 2147483647
IPC Key for queue space: 56789
Size of queue space in disk pages: 1000
Number of queues in queue space: 50
TMQ_CAT:1427: ERROR: Queue space creation - extent size too small
TMQ_CAT:1115: If you want to keep the number of queues unchanged,please set the size of queue space greater than 2101
TMQ_CAT:1116: If you want to keep the size of queue space unchanged,please set the number of queues less than 23
 
Listing 11 Example B: Error Report Usage
> qspacecreate
Queue space name: QS1
IPC Key for queue space: 56789
Size of queue space in disk pages: 1000
Number of queues in queue space: 20
Number of concurrent transactions in queue space: 20
Number of concurrent processes in queue space: 20
Number of messages in queue space: 50 Error queue name:
Initialize extents (y, n [default=n]):
Blocking factor [default=16]: -1
TMQ_CAT:2239: ERROR: qspacecreate blocking factor must be a non-negative number and less than or equal to 32767
Blocking factor [default=16]: 16
Create SAF and DQF queue by default: (y, n [default=y]):y
Enables PCJ journaling by default: (y, n [default=n]):n
Enable Dead Letter Journal by default: (y, n [default=y]):y
Queue '196' created
Queue '197' created
Queue '96' created Queue '94'
created Queue '_SAF_'
created Queue '_ACK__SAF_'
created Queue '_DQF_'
created Queue '_ACK__DQF_' created
 
QSpace High Availability
QSpace High Availability is supported by Oracle Tuxedo Automatic Failover feature. The solution is to enable server group migration, and configure master and backup machine for OTMQ server group. When a master machine is down, the OTMQ server group migrates to the backup machine automatically. QSpace must be located under NFS which can be accessed by both master and backup machine. Listing 12 shows a UBBCONFIG file example.
When QSpace is opened for the first time, it is loaded to shared memory. During migration, if QSpace is already in shared memory, it will not be reloaded; new messages will be lost. On the backup machine, it is not recommended to run the tmqadmin qopen command to open QSpace. If needed, after closing the QSpace, it must be removed from shared memory using ipcrm.
Besides enable server group migration, the key configuration is set DBBLFAILOVER and SGRPFAILOVER in the UBBconfig file *RESOURCES section, and set RESTART=Y and MAXGEN greater than 0 for each server in migration group in the *SERVERS section.
Listing 12 UBBCONFIG File Example:
*RESOURCES
MODEL MP
OPTIONS LAN,MIGRATE
DBBLFAILOVER 1
SGRPFAILOVER 1

*MACHINES
"machine1 "LMID=L1
"machine2 "LMID=L2

*GROUPS
QGRP1
        LMID=L1,L2 GRPNO=1 TMSNAME=TMS_TMQM TMSCOUNT=2
        OPENINFO="TUXEDO/TMQM:/dev/device1:queuespace1"

*SERVERS
TuxMsgQ
        SRVGRP=QGRP1 SRVID=11 RESTART=Y CONV=N MAXGEN=10
        CLOPT = "-s queuespace1:TuxMsgQ -- "
TuxMQFWD
        SRVGRP=QGRP1 SRVID=12 RESTART=Y CONV=N MAXGEN=10
 
Creating a Queue: qcreate
Each queue that you intend to use must be created with the tmqadmin(1) qcreate command. First you have to open the queue space with the qopen command. If you do not provide a queue space name, qopen will prompt for it. (You can also use the T_OTMQ class of the OTMQ_MIB to create a queue.)
The prompt sequence for qcreate looks like the following:
Listing 13 qcreate Prompt Sequence
> qcreate -t PQ -a Y
Queue name: my_que
Queue order (priority, time, expiration, fifo, lifo): fifo
Out-of-ordering enqueuing (top, msgid, [default=none]):
Retries [default=0]: 0
Retry delay in seconds [default=0]: 30
High limit for queue capacity warning (b for bytes used, B for blocks used,
% for percent used, m for messages [default=100%]):
Default high threshold: 100%
Reset (low) limit for queue capacity warning [default=0%]:
Default low threshold: 0%
Queue capacity command:
No default queue capacity command
Queue 'my_que' created
 
The program does not prompt you for a default delivery policy and memory threshold options. The default delivery policy option allows you to specify whether messages with no specified delivery mode are delivered to persistent (disk-based) or non-persistent (memory-based) storage. The memory threshold option allows you to specify values used to trigger command execution when a non-persistent memory threshold is reached. To use these options, you must specify them on the qcreate command line with -d and -n, respectively. When the delivery policy is specified as persistent, using -q option can specify the storage threshold.
Most of these prompts and options are the same as the qcreate of qmadmin command of Oracle Tuxedo /Q component. Still OTMQ provides more specific options:
-t [qtype]
OTMQ queue can has following types: PQ (Primary Queue), SQ (Secondary Queue), MRQ (Multi-Resource Queue), and UNLIMITQ (Unlimited Queue). When not specified, the default type is UNLIMITQ.
-o [queue_name]
If the queue type is specified as "SQ", you can define the controlling queue of this SQ using the option "-o". Only the PQ can be defined as the owner of one SQ. When not specified, there is no owner by default.
-a [active]
The queue can be specified as permanent active or temporary active. A permanent active queue can always receive and store messages even there is no application attaching to it, while a temporary active queue can only receive and store messages when it is attached by application. Setting the value of the option "-a" to "Y" or "N" to specify the active property. When not specified, the default property is temporary active.
-c [confirm_style]
The confirm style of the queue determines the behavior of how the recoverable messages are confirmed by the receiving application that attaches to this queue. Using option "-c" to specify. The allowed values of this option are: EO (Explicit, out-of-order confirmations); II (Implicit, in-order confirmations). When not specified, the default confirm style is EO.
Besides manually inputting each required parameter, you can also leverage template files to create queues; see Easy Configuration for Creating a Queue for more information.
Easy Configuration for Creating a Queue
OTMQ supports you to do the followings.
See Using Default Template File to Create a Queue for more information.
Use default template files and -t option to create different queues: queue MRQ, PQ, SQ, and UNLIMITQ.
See Using Default Template Files and -t Option to Create Different Queues for more information.
See Using Existing Queue as Template File to Create a Queue for more information.
See Define Custom Template File to Create a Queue for more information.
Using Default Template File to Create a Queue
You can use the default template file q.ini to create a queue in FIFO (First In, First Out) order by specifying -F option of qcreate command; the location of q.ini template file is $TUXDIR/udataobj/OTMQ/template/q.ini. See Listing 14 for its context and Listing 15 for a usage example.
Listing 14 Context of Default Template File to Create a Queue
$ more q.ini
queueorder=fifo
outoforderingenqueue=top
retries=0
retrydelay=30
highlimitwarning=90%
lowlimitwarning=10%
queuecapacitycommand=none
 
Listing 15 Example of Using -F Option to Create a Queue
> qcreate -F
You have set '-F' option to create the queue using default template file udataobj/q.ini.
No default queue capacity command
Queue name: Q1
Queue 'Q1' created
 
Using Default Template Files and -t Option to Create Different Queues
You can use default template files and -t option of qcreate command to create different queues: queue MRQ, PQ, SQ, and UNLIMITQ. A usage example is listed as follows.
Listing 16 Example of Using -F and -t Option to Create Different Queues
>qcreate -F -t PQ
You have set '-F' option to create the queue using default template file /u01/common/patches/tuxuser/TUX12cR264rp/LC/bld/udataobj/OTMQ/template/q.ini
No default queue capacity command
Queue name: A
Queue 'A' created
 
Using Existing Queue as Template File to Create a Queue
You can use one of the existing queues as template to create a new queue. A usage example is listed as follows.
Listing 17 Example of Using Existing Queue as Template File to Create a Queue
> qcreate
Queue name: Q1
Queue order (priority, time, expiration, fifo, lifo): fifo
Out-of-ordering enqueuing (top, msgid, [default=none]): none
Retries [default=0]: 2
Retry delay in seconds [default=0]: 30
High limit for queue capacity warning (b for bytes used, B for blocks used,
% for percent used, m for messages [default=100%]): 80%
Reset (low) limit for queue capacity warning [default=0%]:
Default low threshold: 0%
Queue capacity command:<enter>
No default queue capacity command
Queue 'Q1' created
 
>qcreate Q2 as Q1
Queue 'Q2' created
 
Define Custom Template File to Create a Queue
You can define your own template file to create a queue by specifying -D option of qcreate command. You should either assign an absolute path for your own template file or name your template file in $TUXDIR/udataobj/OTMQ/template/. Usage examples are listed as follows.
Listing 18 Example A: Using Absolute Path to Define Custom Template File to Create a Queue
> qcreate -D /u01/common/patches/tuxuser/TUX12cR264rp/LC/bld/udataobj/OTMQ/template/q_template.ini
You have set '-D' option to create the queue using user defined template file /u01/common/patches/tuxuser/TUX12cR264rp/LC/bld/udataobj/OTMQ/template/q_template.ini
No default queue capacity command
Queue name: TEST
Queue 'TEST' created
 
Listing 19 Example B: Using Absolute Path to Define Custom Template File to Create a Queue
> qcreate -D
please input user defined template file information
/u01/common/patches/user/TUX12cR264rp/LC/bld/udataobj/OTMQ/template/q_template.ini
You have set '-D' option to create the queue using user defined template file /u01/common/patches/zhewang/TUX12cR264rp/LC/bld/udataobj/OTMQ/template/q_template.ini
No default queue capacity command
Queue name: a
Queue 'a' created
 
Listing 20 Example A: Naming Custom Template File to Create a Queue
> qcreate -D q_template.ini
You have set '-D' option to create the queue using user defined template file /u01/common/patches/tuxuser/TUX12cR264rp/LC/bld/udataobj/OTMQ/template/q_template.ini
No default queue capacity command
Queue name: a
Queue 'a' created
 
Listing 21 Example B: Naming Custom Template File to Create a Queue
> qcreate -D
please input user defined template file information
q_template.ini
You have set '-D' option to create the queue using user defined template file /u01/common/patches/tuxuser/TUX12cR264rp/LC/bld/udataobj/OTMQ/template/q_template.ini
No default queue capacity command
Queue name: a
Queue 'a' created
 
Configuration for Queue Space Cluster
You can use queue space cluster to improve OTMQ scalability.
A queue space cluster consists of multiple queue servers concurrently running on multiple groups; all queue servers within a cluster provide the same service name; this service name is also the queue space name.
When you use qspacecreate command to create a queue space on shared storage, you can specify whether this newly created queue space is clustered. If positive, within one queue space cluster, the first created queue space is called this cluster's primary queue space; all changes of this primary queue space (such as creating a queue) will be propagated to other groups. Queue spaces created after this primary queue space are called physical queue spaces; each group has its dedicated physical queue space. Therefore, a queue space cluster has one primary queue space and at least one physical queue space.
When requests arrive at a queue space cluster, OTMQ distributes those requests among groups of the cluster. All messages that you enqueue to a physical group will not be replicated to other groups and thus this message can be available only on the group where you enqueue this message. Consequently, you can dequeue a message only from the group where that message is enqueued; if that group fails, all messages attached on that group become unavailable until this group is restarted; you can use Tuxedo failover function to continue your work.
Within one group, messages are enqueued or dequeued in exact order; cluster-wide ordering is not supported.
This section contains the following topics:
Notes:
Creating Queue Space Cluster and Queue Space Groups
tmqadmin Configuration
You can use qspacecreate command -c option in the following format to create queue space cluster and all its groups.
qspacecreate (qspc) -c group1,group2,...,groupn
group1,group2,...,groupn are comma-separated group names; those group names should be the same as the group names specified in GROUPS in UBBCONFIG. The first group name should be the group name of the primary group. The maximum length of queue_space_name + group_name is 14.
To add new queue space groups to an existing cluster, use qsgroupadd (qsga) queue_space_name group_name command. Each cluster can accommodate 32 groups at maximum.
For more information, see tmqadmin in Oracle Tuxedo Message Queue Command Reference.
UBBCONFIG Configuration
Set TMSNAME and OPENINFO parameters of UBBCONFIG; instance name must be specified in OPENINFO.
TMS_TMQM is the name of the transaction manager server for OTMQ.
For OPENINFO parameter, TUXEDO/TMQM is the literal name of the resource manager as it appears in $TUXDIR/udataobj/RM. <device_name> must be set to the universal device list pathname; <queue_space_name> must be set to the name that qspacecreate specifies.
The following listing is an example of server group UBBCONFIG configuration for queue space cluster.
Listing 22 Example of Server Group UBBCONFIG Configuration for Queue Space Cluster
*MACHINES
hostname1 LMID=GROUP1
hostname2 LMID=GROUP2
*GROUPS
QGRP1 LMID=GROUP1 GRPNO=1 TMSNAME=TMS_TMQM OPENINFO ="TUXEDO/TMQM:/dev/devicecluster:TESTQS"
QGRP2 LMID=GROUP2 GRPNO=2 TMSNAME=TMS_TMQM OPENINFO ="TUXEDO/TMQM:/dev/devicecluster:TESTQS"
 
Notes:
Group names specified by LMID in UBBCONFIG must be the same as the group names provided in qspacecreate and qsgroupadd.
The configuration of OTMQ server (TuxMsgQ) in SERVERS section of UBBCONFIG is the same as ordinary non-cluster queue space. For example,
TuxMsgQ
SRVGRP = QGRP1 SRVID = 1
CLOPT = "-s TESTQS:TuxMsgQ -- "
TuxMsgQ
SRVGRP = QGRP2 SRVID = 1
CLOPT = "-s TESTQS:TuxMsgQ -- "
For more information, see UBBCONFIG in File Formats, Data Descriptions, MIBs, and System Processes Reference.
Specifying Client/Server Affinity
Application clients call OTMQ API tpqattach() first to attach to a queue to get access to a specific queue space, and then call tpenqplus() to enqueue message or call tpdeqplus() to dequeue message from that attached queue. Attach is the mandatory operation for an OTMQ application to access the OTMQ queue space. OTMQ leverages Tuxedo client/server affinity feature to guarantee one application client's subsequent requests are routed to the same OTMQ server on the same group, which is attached by OTMQ API tpqattach().
To use this Tuxedo client/server affinity feature, set AFFINITYSCOPE=GROUP in SERVICES section of UBBCONFIG. For example,
*SERVICES
TuxMQATHTESTQS SESSIONROLE=BEGIN AFFINITYSCOPE=GROUP
Propagating Queue Space Metadata
Only metadata changes, made by qcreate, qchange, or qdestroy command and executed on primary queue space, will be propagated to other queue spaces in the cluster. All other commands on primary queue space and all commands on physical queue spaces are applied locally.
If all queue space groups are running, the propagation can take effect immediately by using MIB (TUXCONFIG environment variable must be configured). OTMQ server on physical groups will check with OTMQ server on primary group at startup; if it finds its queue space metadata is not consistent with primary queue space, it will automatically synchronize with primary queue space.
Dealing with Queue Space Group Failures
OTMQ server is an Oracle Tuxedo server; when a queue space group fails, OTMQ server uses Tuxedo automatic failover feature as normal Tuxedo application servers do. With this feature, queue space high availability is supported. For more information, see QSpace High Availability.
Tuxedo routing policy is used. If a message is routed to a group that fails, subsequent requests attached to that failed group will fail. In this scenario, new requests will be routed to other groups; it is application's responsibility to check the returned error and re-attach failed requests to backup group.
If a group fails when a transaction is processing, it is application's responsibility to check the returned error and decide whether to commit or rollback the transaction.
Configuration for Communication crossing OTMQ Queue Spaces
Applications that belong to different OTMQ queue spaces can communicate with each other; we call it the cross queue space communication. The most common scenario is the sender application that attaches to one OTMQ queue space A can enqueue messages to a remote receiver application that attaches to another OTMQ queue space B.
These OTMQ queue spaces can reside in the same Oracle Tuxedo domain or in different Oracle Tuxedo domains.
Configuration for Communication crossing OTMQ Queue Spaces in One Oracle Tuxedo Domain
Multiple OTMQ queue spaces can be configured in one Oracle Tuxedo Domain. Different OTMQ queue spaces should belong to different server groups in the UBBCONFIG. Accordingly the TMS and OPENINFO should be defined for each OTMQ queue space.
The following example shows the configuration of two OTMQ queue spaces that reside in the same Oracle Tuxedo Domain.
Listing 23 Two OTMQ Queue Spaces in Same Oracle Tuxedo Domain
*GROUPS
QGRP1   GRPNO=1 TMSNAME=TMS_TMQM
        OPENINFO="TUXEDO/TMQM:/dev/device1: queuespace1"
QGRP2   GRPNO=2 TMSNAME=TMS_TMQM
        OPENINFO="TUXEDO/TMQM:/dev/device2: queuespace2"

*SERVERS
TuxMsgQ
        SRVGRP=QGRP1 SRVID=11 RESTART=Y CONV=N MAXGEN=10
        CLOPT = "-s queuespace1:TuxMsgQ -- -i 60 "
TuxMsgQ
        SRVGRP=QGRP2 SRVID=12 RESTART=Y CONV=N MAXGEN=10
        CLOPT = "-s queuespace2:TuxMsgQ -- -i 30 "
 
Configuration for Communication crossing OTMQ Queue Spaces in Multiple Oracle Tuxedo Domains
OTMQ queue spaces can be configured on different Oracle Tuxedo Domains. Applications belong to these queue spaces can communicate with each other once the DMCONFIG is configured properly.
Just like the normal DMCONFIG configuration for Oracle Tuxedo cross domain service invoking, to enable one application to access the OTMQ queue space on a remote domain, the OTMQ queue space should export itself to the peers as a service. The local domain should import this service accordingly for local OTMQ applications.
The following example shows the configuration of two OTMQ queue spaces that reside in the different Oracle Tuxedo Domains.
*GROUPS
QGRP1 GRPNO=1 TMSNAME=TMS_TMQM
        OPENINFO="TUXEDO/TMQM:/dev/device1: QS1"

*SERVERS
TuxMsgQ
        SRVGRP=QGRP1 SRVID=11 RESTART=Y CONV=N MAXGEN=10
        CLOPT = "-s QS1:TuxMsgQ -- -i 60 "
*GROUPS
QGRP1 GRPNO=1 TMSNAME=TMS_TMQM
        OPENINFO="TUXEDO/TMQM:/dev/device2: QS2"

*SERVERS
TuxMsgQ
       SRVGRP=QGRP1 SRVID=11 RESTART=Y CONV=N MAXGEN=10
        CLOPT = "-s QS2:TuxMsgQ -- -i 30 "
*DM_EXPORT
QS2 LDOM=DomB RDOM=DomA
*DM_IMPORT
QS2 LDOM=DomA RDOM=DomB
After properly configuration, an application that attaches to the queue space QS1 then can directly enqueue messages, via tpenqplus() to a remote queue of queue space QS2 that resides in a remote domain.
Configuration for /WS Clients
This section describes how to configure the OTMQ WS Client. OTMQ WS client must set some environments to take advantage of WS SAF feature. The following configuration options can be set using script, WSENVFILE or default value. WSENVFILE is name of a file containing environment variable settings to be set in the client's environment. The description of its format can be seen on Oracle Tuxedo documentation.
WSC_JOURNAL_ENABLE: If set to 1, WS SAF is enabled. If set to 0, WS SAF is disabled. The default value is 0.
WSC_JOURNAL_PATH: Specifies the journal file path. The default value is "./" on UNIX and ".\\" on Windows.
WSC_JOURNAL_SIZE: Initial size of the journal file. The default value is 49150.
WSC_JOURNAL_CYCLE_BLOCKS: the journal cycles (reuses) disk blocks when full and overwrites previous messages. The default value is 0.
WSC_JOURNAL_FIXED_SIZE: Determines if the journal size is fixed or allowed to grow. The default value is 0.
WSC_JOURNAL_PREALLOC: the journal file disk blocks are pre-allocated when the journal is initially opened. The default value is 1.
WSC_JOURNAL_MSG_BLOCK_SIZE: Defines the file I/O block size, in bytes. The default value is 0.
Configuration for Communication with Oracle Tuxedo /Q
Upgrade from Oracle Tuxedo /Q
OTMQ provides a utility ConvertQSPACE() to upgrade Oracle Tuxedo /Q Qspace to OTMQ Qspace, so that the customers who already deployed Oracle Tuxedo /Q applications can benefit from OTMQ new features without data lost.
Refer to the ConvertQSPACE(1) reference page for a full description of usage.
You must do the following steps:
1.
2.
3.
Make sure the QMCONFIG environment variable is configured as /Q device.
4.
Run the utility with a) OTMQ device name, b) Qspace to be migrated and c) OTMQ Qspace ipckey:
ConvertQSPACE -d [OTMQ device name] -s [Qspace name] -i [OTMQ ipckey]
5.
6.
Make sure the QMCONFIG environment variable is configured as OTMQ device. Configure the OTMQ servers in the Oracle Tuxedo UBBCONFIG file according to OTMQ device and Qspace name.
7.
Communication with Oracle Tuxedo /Q client
After Tuxedo /Q Qspace is upgraded to OTMQ Qspace, and OTMQ servers are booted, Tuxedo /Q clients can communicate with OTMQ without any change. Alternatively Tuxedo /Q clients can be re-compiled and re-linked with OTMQ libraries to use /Q compatible APIs tpenqueue()and tpdequeue() provided by OTMQ.
To take advantage of OTMQ new features, the application code need be changed using OTMQ APIs. In one application or applications communicating with each other, /Q compatible APIs (for example, tpenqueue() and tpdequeue() ) should not be mixed with other OTMQ APIs (for example, tpenqplus(), tpdeqplus(), tpqconfirmmsg()), otherwise the result is unpredictable.
Configuration for Communication with Oracle Message Queue
Link Driver Server
OTMQ provides Link Driver Server TuxMsgQLD() as counterpart of OMQ Link Driver to achieve message level compatibilities for cross-group communication between OTMQ and OMQ applications.
Also TuxMsgQLD() provides the routing functionality like traditional OMQ Link Driver but with limitations. For more information, see Interoperability
Create Link Table and Routing Table in Queue Space
TuxMsgQLD() requires pre-created link table and routing table in corresponding OTMQ Qspace. Link table consists of entries that each stands for one remote OMQ group. Routing table consists of entries that each stands for one combination of target group and routing through group. Link table and routing table are created by tmqadmin(1) qspacecreate command. The default size of link table is 200, or a different size can be specified with -L option. The default size of routing table is 200, or a different size can be specified with -R option.
Refer to qspacecreate command of tmqadmin(1) for specifying link table and routing table size.
Configure Environment
To notify remote OMQ that we are in the same bus, environment variable DMQ_BUS_ID should be defined before booting up TuxMsgQLD().
Configuration File
TuxMsgQLD() requires a configuration file placed under APPDIR. The configuration file name is specified by CLOPT-f parameter. Refer to the TuxMsgQLD() reference page for a full description of the SERVERS section of the configuration file for this server.
Following is an example of the Link Driver Server's configuration file:
Listing 24 Link Driver Server Configuration File
# Define cross-group connections with remote OMQ,
# only the remove OMQ group info should be listed here
%XGROUP
#Group  Group   Node/  Init-  Thresh  Buffer  Recon-  Window        Trans-  End-
#Name   Number  Host       iate    old     Pool   nect  Delay  Size(Kb)  port  point
GRP_11   11   host1.abc.com  Y      -       -         30   10    250     TCPIP  10001
GRP_12   12   host2.abc.com  Y      -        -         30  10      250   TCPIP  10002
%EOS
 
%ROUTE
#----------------------------------
# Target Route-through
# Group Group
#----------------------------------
2 11
3 12
%EOS
%END
 
%XGROUP Section
Following attributes are mandatory for OTMQ to setup XGROUP connection to the remote OMQ group:
Following attributes are optional. If not set, default values will be used:
Following attributes are not supported by OTMQ Link Driver Server, just to keep align with traditional OMQ XGROUP settings:
%ROUTE
Following attributes are mandatory for OTMQ to setup ROUTE info for the remote OMQ/OTMQ groups that can't be connected directly:
Notes:
Client Library Server
OTMQ provides Client Library Server TuxCls() as counterpart of OMQ Client Library Server to achieve message-level compatibilities with OMQ workstation clients. With TuxCls() deployed, OMQ workstation clients can work with OTMQ servers without any change.
TuxCls() works as OMQ proxy clients, so the max count of supported OMQ clients is configured by MIN and MAX parameters of TuxCls() in the UBBCONFIG *SERVERS section.
On windows, MIN must be set to 1 or not configured, MAX must be set in the range 2-512. The max OMQ clients count connected to OTMQ is limited to 511.
On UNIX, MIN must be set to 1 or must be not configured, MAX has no limitation. The max OMQ clients count connected to OTMQ depends on the operating system and Oracle Tuxedo limitations.
See Also

Copyright © 1994, 2017, Oracle and/or its affiliates. All rights reserved.