Tracking Supporting Information for Prospects and Applicants
This section discusses how to track and view the following information for prospects and applicants:
Academic interests.
Electronic addresses.
Extracurricular activities.
Honors and awards.
Languages.
Names.
Publications.
Relations with your institution.
Relationships.
Residency data.
Student group involvement.
Work experience.
Test results.
Test summary information.
|
Page Name |
Definition Name |
Navigation |
Usage |
|---|---|---|---|
|
Academic Interests |
ADM_INTERESTS |
|
Record a person's external subject areas of interest, whether your institution offers them. You can also record the person's level of academic interest. For example, Pre-Law could be a person's first priority and Technology could be the person's second priority. You can use this information for recruiting purposes by determining what areas you offer that are similar to the person's preferences. This information is also valuable for reporting and academic program planning purposes. |
|
Test Results |
STDNT_TEST_SCORE |
|
Enter test scores and related test information for a person manually. You can also load various test information into this page through an external test score load. Test results are stored under a person's name and can be used when evaluating any application for the person. Link test scores to an application on the Application Materials page. Store additional test score information by Test Date using the Common Attribute Framework. |
|
Test Summary |
STDNT_TEST_SUMMARY |
|
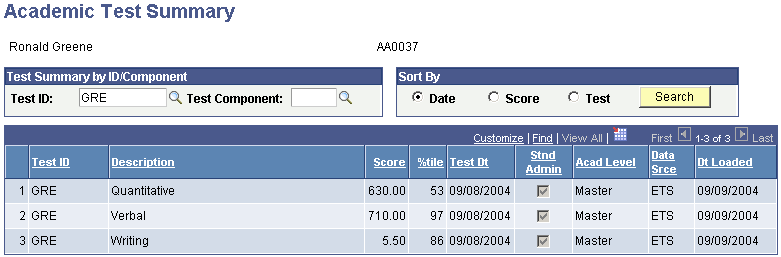
View a summary of academic test information for prospects and applicants. This page includes information such as test score and data source. |
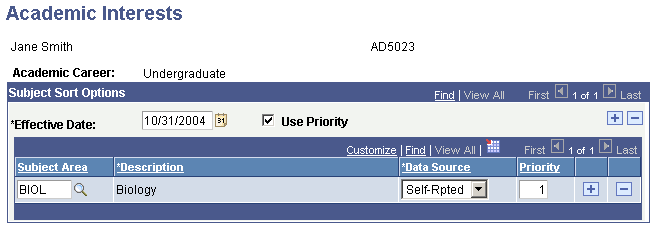
Access the Academic Interests page ().
Image: Academic Interests page
This example illustrates the fields and controls on the Academic Interests page. You can find definitions for the fields and controls later on this page.
|
Field or Control |
Definition |
|---|---|
| Effective Date |
Enter the effective date if it is different than the current date. The current date is the default. The effective date defines when the information you enter is valid. |
| Use Priority |
Select this check box to prioritize a person's academic interests. The default for this field is selected if you enabled the Use Priority Academic Interest feature on the Installation Defaults - AD page. |
| Subject Area |
Enter a subject area. Define external subject areas on the External Subject Table page. |
| Description |
The description for this subject appears. If the person expressed an interest for which no subject area code is defined, leave the Subject Area field blank and enter a free-form. |
| Data Source |
Select a value to indicate how this information was provided to your institution. For example, you might have received this information directly from the applicant or through a data load. Values for this field are delivered with your system as translate values. You can modify these translate values. |
| Priority |
Enter a priority level (for example 1, 2, 3). 1 is the highest priority. The default for this field is selected if you have enabled the Use Priority Academic Interest feature on the Installation Defaults - AD page. |
| Go |
Click this button to go to another component. |
Use the Electronic Addresses page to enter or update electronic addresses for a person. To navigate to the Electronic Addresses page, select .
Use the Extracurricular Activities page to record information regarding a person's external interests. To navigate to the Extracurricular Activities page, select .
Use the Honors and Awards page to record a prospect's or applicant's honors and awards. For example, an external honors could be National Merit Finalist or Valedictorian. Internal honors and awards could be a scholarship for an incoming applicant or the Dean's List for a matriculated student. To navigate to the Honors and Awards page, select .
Use the Languages page to enter, update, and view language proficiency information. To navigate to the Languages page, select .
Use the Names page to enter, update, and review name information. You can store various names for a person, such as their primary name, preferred name, former name, and maiden name. You can also search on these names using the Search/Match feature. When generating letters, you can specify the specific name that you want to use.
To navigate to the Names page, select .
Use the Publications page to enter, update, and review publication information. For example, a person might have written a book, produced a video, or published a thesis. To navigate to the Publications page, select .
See Also
"Research Tracking Additions to Admissions Functionality" document in the Recruiting and Admissions documentation package for Bundle 24 (CS_Bundle_24_Recruiting_and_Admissions _9_0.pdf). This package is available on My Oracle Support (CS 9.0 Bundle #24 Functional Documentation and Additional Features January 2012 - Doc ID 1400708.1).
Important! Mass Change is a deprecated product. Support will be maintained for this product, but no new development will be produced for Mass Change. It is strongly recommended that you use Application Engine instead. For more information on PeopleSoft Application Engine, see PeopleTools: Application Engine.
Use the Relations With Institution page to enter, update, and review information regarding relationships a person has with your institution. The status you designate here is reflected on the Search/Match Results page. There is a mass change definition delivered with your system that can update and move multiple peoples' status as a background process. To navigate to the Relations With Institution page, select .
Use the Relationships page to enter, update, and review information regarding relationships a prospect or applicant has with any person in your database. For example, a prospect or applicant could have a friend or a relative in the database. The Relationships page can store data for people who already exist in the system (those who have an ID) or for people who do not exist in the system. If you enter information on this page for people who do not exist in the system, the system creates a new ID. To navigate to the Relationships page, select .
Use the Residency Data component to enter, update, and review residency information for a person.
Use the Student Groups page to enter any student groups that your institution has defined to which this person belongs. To navigate to the Student Groups page, select .
Use the Work Experience page to enter, update, and review work experience information you might have for a person. To navigate to the Work Experience page, select .
See Also
"Research Tracking Additions to Admissions Functionality" document in the Recruiting and Admissions documentation package for Bundle 24 (CS_Bundle_24_Recruiting_and_Admissions _9_0.pdf). This package is available on My Oracle Support (CS 9.0 Bundle #24 Functional Documentation and Additional Features January 2012 - Doc ID 1400708.1).
Access the Test Results page ( or ).
Image: Test Results page
This example illustrates the fields and controls on the Test Results page. You can find definitions for the fields and controls later on this page.

|
Field or Control |
Definition |
|---|---|
| Test ID |
Enter the test you are recording. Define tests on the Test Tables page. |
| Checklist Item Update |
Select this check box to indicate that the checklist related to this row of data is updated when you run the Checklist Item Update Automated process. When you save the page, the system selects this check box automatically. To clear this check box, save the page, clear the check box, then save the page again. |
| Test Date |
Select the date on which this test was taken. The value you enter here populates the corresponding field in the bottom region of the page. |
| Data Source |
Select how this test information was reported. For example, the data could have been self-reported or received from a testing agency. The value you select here populates the corresponding field in the bottom region of the page. Values for this field are delivered with your system as translate values. You can modify these translate values. |
| Acad Level (academic level) |
Select the applicant's academic level at the time this test was taken. This level can be different from the applicant's current level. The value you enter here defaults to the corresponding field in the bottom region of the page. Values for this field are delivered with your system as translate values. You can modify these translate values. |
| Component |
Enter the first test component. Values for this field are determined by the test ID that you enter. Define test components on the Test Component Table page and link them to tests on the Test Tables page. |
| Score %tile (score percentile) |
Enter the score, percentile, or both for this test component. |
| Test Date |
The system automatically populates this field from the value you entered in the Defaults for Components group box. You can edit the date if necessary. |
| Data Source |
The system automatically populates this field from the value you entered in the Defaults for Components group box. You can edit the value if necessary. |
| Acad Level |
The system automatically populates this field from the value you entered in the Defaults for Components group box. You can edit the value if necessary. |
| Letter Score |
Enter a letter score for this test component, if applicable. |
| Date Loaded |
The default for the loaded date is your system date. Edit this field if necessary. If this information is electronically loaded, this field is automatically populated with your system date the day the data is loaded. |
| Index |
The LSAT 3-Year Test Index appears if this information has been loaded. |
| Stnd Admin (standard administration) |
The system selects this check box by default, which indicates that this test was administered in a standard way. Clear this check box if the test was administered in a nonstandard or non-timed way. |
| Go |
Click this button to go to another component for this record. |
Additional Test Data
This section enables you to store additional test score data that does not have a home in the core Campus Solutions records. Populate this section by test date with values for common attributes defined within the Common Attribute Framework. Attributes can be manually added on this page or can also be populated from the Prospect/Admissions Data Load process. The prompts in the Field column will display attributes associated on the record context for SAD_TESTDT.
Access the Academic Test Summary page ( or ).
Image: Academic Test Summary page
This example illustrates the fields and controls on the Academic Test Summary page. You can find definitions for the fields and controls later on this page.
|
Field or Control |
Definition |
|---|---|
| Test ID and Test Component |
Enter the test ID and test component about which you want to view summary information. |
| Date, Score, or Test |
Select the order in which you want the summary information to appear (for example, by date, score or test). |
| Search |
Click to access information that matches your search criteria. |