Defining Buildings, Rooms, and Classroom Facilities
To set up facilities, use the Building Table (BLDG_TBL), Room Characteristics Table (ROOM_CHRSTC_TBL), and Facility Table (FACILITY_TBL) components.
During the class scheduling process, you will probably need to assign classes to classrooms, and you should set up your classroom facilities in advance. This section discusses how to:
Define buildings.
Define room characteristics.
Define facilities and rooms.
Define facility components.
Define facility characteristics.
|
Page Name |
Definition Name |
Navigation |
Usage |
|---|---|---|---|
|
Building Table |
BLDG_TBL |
|
Define all campus buildings that you might use in class and event scheduling. Building codes that you create here are prompt values on the Facility Table page. |
|
Room Characteristics Table |
ROOM_CHRSTC_TBL |
|
Define room characteristics, such as types of seating and resources that are available. You attach room characteristics to facilities on the Facility Characteristic page and you can use them when you:
You must enter a numeric room characteristic code from 01 to 96. |
|
Facility Table |
FACILITY_TBL |
|
Define facilities and facility components. |
|
Facility Component |
FACILITY_COMPONENT |
|
Link components of facilities to parent facilities. |
|
Facility Characteristic |
FACILITY_CHRSTC |
|
Define room characteristics and facility blackout times. |
Access the Building Table page ().
|
Field or Control |
Definition |
|---|---|
| Status |
Select the status of the building. Select Active when the building is being used on the Facility Table page. Select Inactive when you no longer use the building. |
| Description |
Enter a description of the building. |
| Short Description |
Enter a short description of the building. |
Access the Room Characteristics Table page ().
|
Field or Control |
Definition |
|---|---|
| Status |
Select a status for this room characteristic. Select Active when adding a new room characteristic. Select Inactive only if your institution no longer uses this room characteristic. |
| Description |
Enter a description. |
| Short Description |
Enter a short description. |
Access the Facility Table page ().
Image: Facility Table page
This example illustrates the fields and controls on the Facility Table page. You can find definitions for the fields and controls later on this page.
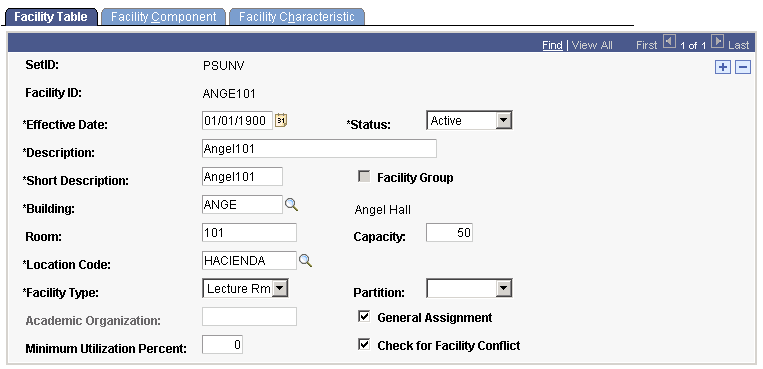
As an example, you might want to define Angel Hall Room 125 and its components, Angel 125A, 125B, and 125C. You cannot link components to parent facilities on the Facility Component page unless you first define both the parent facility and the facility components on the Facility Table page.
|
Field or Control |
Definition |
|---|---|
| Status |
Select a status for this facility. Select Active when adding a new facility. Select Inactive only if your institution no longer uses this facility. |
| Facility Group |
If this check box is selected and unavailable for entry, the facility is a parent facility with facility components. |
| Building |
Enter the building in which the facility is located. Define buildings on the Building Table page. |
| Room |
Enter the room number. |
| Capacity |
Enter the maximum number of people that a facility accommodates. |
| Location Code |
You can specify locations such as a building cluster on campus or satellite campuses. Define location codes on the Location Table in the Human Resources menus in your system. See PeopleSoft HCM: Application Fundamentals “Setting Up Organization Foundation Tables” |
| Facility Type |
Select a facility type to further define the space. Values for this field are delivered with your system as translate values. You can modify these values. |
| Partition |
Select a partition field value to indicate the section of the campus where the facility is located, such as First, Second, Third, or Fourth quadrant. Use the Partition field to interact with Universal Algorithm Schedule25, which can look at where an instructor's office is located and attempt to schedule the instructor's classes in facilities within the same partition. The maximum number of partitions for Universal Algorithm Schedule25 is 96. Therefore, be sure that you select a value between 01 and 96. Values for this field are delivered with your system as translate values. You can modify these values. For more information about the interface with Universal Algorithm Schedule25, refer to the Universal Algorithm Schedule25 documentation. |
| Academic Organization |
Enter an academic organization to indicate that this facility is reserved for the sole use of that academic organization. Locations might be reserved by an academic organization so that only classes for that academic organization are assigned to that location when you are using the Universal Algorithm product, Universal Algorithm Schedule25. When using the PeopleSoft internal facility search and assignment feature, the system does not use academic organization. |
| General Assignment |
Select to open the location for general assignment. When you select this check box, the Academic Organization field becomes unavailable. |
| Minimum Utilization Percent |
Enter the minimum usage that a facility should experience. This field is for internal record keeping only, and has no programming associated with it. |
| Check for Facility Conflict |
Select to have the system allow only one class to be scheduled for this facility at any given period of time. If you want to schedule more than one class at the same time in this particular facility, such as a field or gymnasium, do not select this check box. |
Access the Facility Component page ().
Image: Facility Component page
This example illustrates the fields and controls on the Facility Component page. You can find definitions for the fields and controls later on this page.
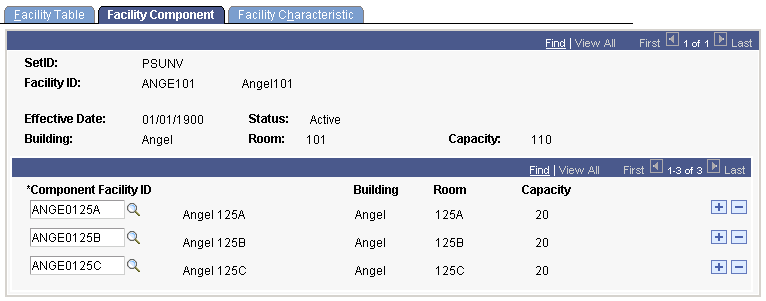
As an example, Angel 125A, B, and C might be linked as components of Angel 125. To link facility components to a parent facility, you must first define all facilities on the Facility Table page. As soon as components are linked to a parent facility, the system calculates the capacity of that facility by adding up the capacities of all components. If a class is scheduled in a component of a facility and someone attempts to schedule a class in the parent facility, the system prevents the new scheduling.
|
Field or Control |
Definition |
|---|---|
| Component Facility ID |
Select the component facility ID for a component that you want to link to this facility. All facilities on the Facility Table page are available for selection. To link more than one component to a parent facility, add rows. |
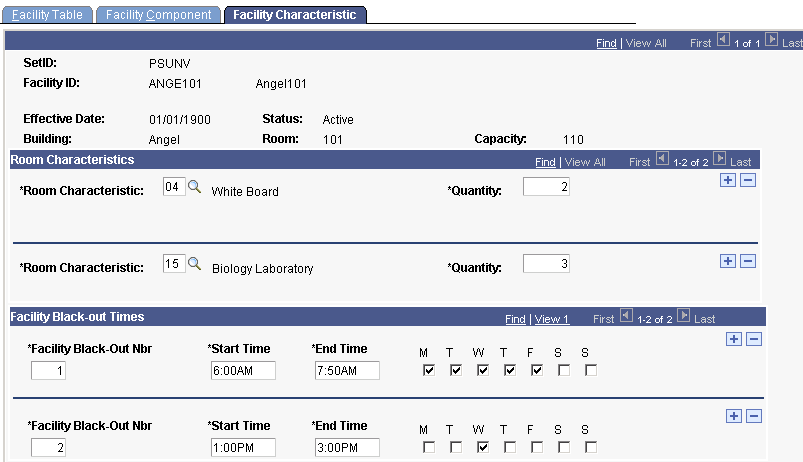
Access the Facility Characteristic page ().
Image: Facility Characteristic page
This example illustrates the fields and controls on the Facility Characteristic page. You can find definitions for the fields and controls later on this page.
|
Field or Control |
Definition |
|---|---|
| Room Characteristic |
Select characteristics for this room. Room characteristics are defined on the Room Characteristic Table page. Insert rows to add characteristics. The system uses the Room Characteristic field to interact with Universal Algorithm Schedule25. The maximum number of room characteristics for Universal Algorithm Schedule25 is 96. Therefore, be sure that you select values between 01 and 96. |
| Quantity |
Enter the quantity of the room characteristic. For example, enter 2 to indicate that the room has two white boards. |
| Facility Black-Out Nbr (facility black-out number) |
You can define periods when a facility is unavailable. The facility blackout number is system-generated. This number indicates the number of blackout periods that exist for a facility. You can override the system-assigned facility blackout number. |
| Start Time and End Time |
Enter a start and end time for the blackout period. |
| M (Monday), T (Tuesday), W (Wednesday), T (Thursday), F (Friday), S (Saturday), and S (Sunday) |
Select the days of the week for which the blackout period applies. |
Note: Student Records provides the facility blackout structure for compatibility with Resource 25. When using Resource 25, the system prevents class and event scheduling during blackout periods. When using PeopleSoft internal conflict checking logic, the system does not use this structure.