To install the Corente Virtual Services Gateway Software on the Citrix
XenServer 6.2, set up a Windows file share that contains the
Corente Gateway Software .iso file. Then
use Citrix XenCenter to connect to the XenServer
Complete the following steps:
Configure a storage repository for theCorente Gateway Software
.isofile. Right-click the name of the XenServer on the top right of the main screen and choose New Storage Repository.On the screen that is displayed, select Windows File Sharing and then click Next.
On this screen, enter the path to the Windows file share where the
.isofile is located and enter login information, if necessary. Click Finish when you are done.Once finished, select New VM from the top toolbar of XenCenter. On the list that is displayed, scroll all the way down and choose Other Install Media. Click Next.
Enter a name for the VM and click Next.
On this screen, select ISO image and then select the Corente Gateway Software
.isofile from the previously configured CIFS storage repository. Click Next.Allocate memory on the XenServer for the new VM. Oracle recommends 1 GB of memory (1024 MB). Click Next.
Add a virtual disk for the VM. Oracle recommends 40 GB of disk space for the virtual disk. Click Next.
Add a network interface for the VM. Click Next.
Click Finish on the final screen when you are finished.
On the main screen of XenCenter, select the new VM in the left panel and then choose the Console tab. Choose OK when prompted.
When installation of the Corente Virtual Services Gateway Software is complete, you will see the screen below.
CautionDo not reboot at this time, as the boot properties must first be set and the gateway configuration file supplied.
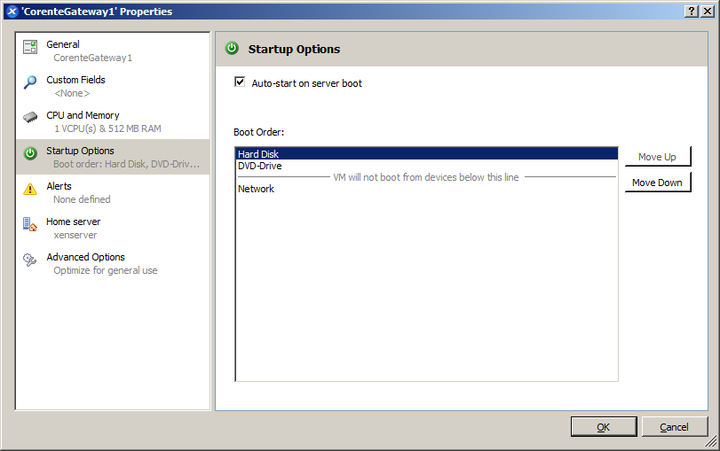
Right-click the new VM again and choose Properties. On this screen, choose Startup Options and move Hard Disk to the top. Also, make sure the option Auto-start on server boot is selected.
If you have not already done so, download the new Corente Virtual Services Gateway configuration file onto a USB flash drive via App Net Manager. Then insert the USB flash drive into the XenServer.
Select the new VM on the left panel of XenCenter and then select the Storage tab. Click Attach and select the USB flash drive. XenCenter will inform you that the drive will be attached the next time the VM starts.
Right-click the new VM on the left panel and force a reboot. The Corente Virtual Services Gateway will automatically detect the USB drive and copy over the configuration. The gateway will now activate. It will restart itself after it obtains its complete configuration from the Corente Services Control Point (SCP), which should take about one (1) minute. You can confirm that the new gateway is up and active using App Net Manager.


