Oracle® Enterprise Manager Ops Center
Creating Non-Global Zones Using a SAN Storage Library
12c Release 3 (12.3.0.0.0)
E65613-01
October 2015
This guide provides an end-to-end example for how to use Oracle Enterprise Manager Ops Center.
Introduction
Oracle Enterprise Manager Ops Center provides comprehensive lifecycle management for Oracle Solaris and Linux operating systems in your data center.
In M7 servers, NFS or iSCSI resources are not discovered during storage discovery, including the DSL library. Therefore, new non-global zones will have to use a static SAN library for file system and NAS storage library for metadata.
In this document, you learn how to create non-global zones using a SAN storage library.
See Related Resources for links to related information and articles about discovering and managing other assets.
The following sections are described in detail:
Prerequisites
The following are the prerequisites:
-
Oracle SuperCluster discovered and managed by Oracle Enterprise Manager Ops Center.
-
Access to ZFS storage appliance user interface.
-
NAS storage library for zone metadata created on the ZFS storage and discovered in Oracle Enterprise Manager Ops Center.
-
At least one global zone discovered in Oracle Enterprise Manager Ops Center.
Creating Resources on the ZFS Storage Appliance
Create a new target on the ZFS storage appliance, assign it to a target group, and then create a new LUN within the target group.
Create a Target
Perform the following steps to create a target.
-
Log in to Oracle Enterprise Manager Ops Center.
-
Navigate to Storage, then select the active storage appliance.
-
In the Actions pane, click Launch Appliance UI.
-
Log in using the required credentials.
-
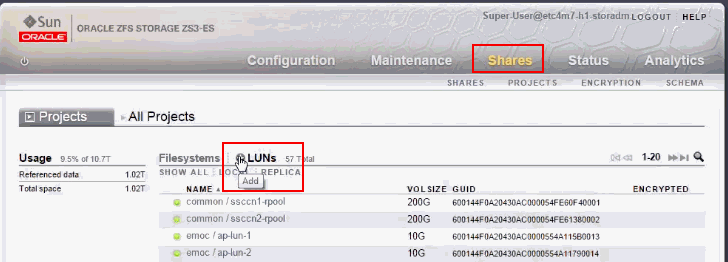
In the ZFS home screen, click Configuration, then click SAN tab.
Figure 1 ZFS Storage Appliance User Interface
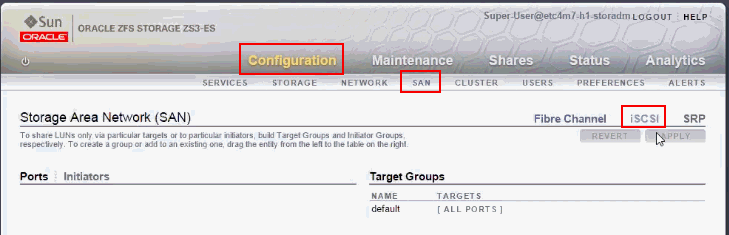
Description of ''Figure 1 ZFS Storage Appliance User Interface''
-
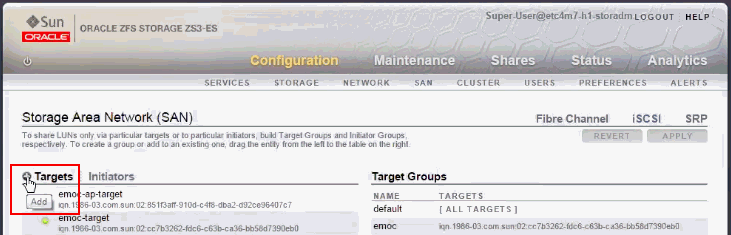
In the Storage Area Network area, click iSCSI.
-
In the Targets column, click the Add icon to add a target.
-
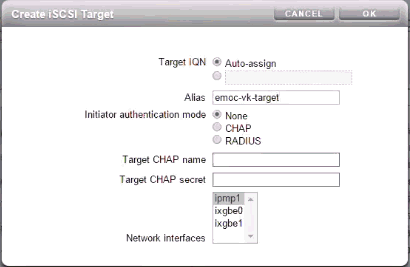
The Create iSCSI Target screen opens. In the Alias field, enter the target name, then click OK.
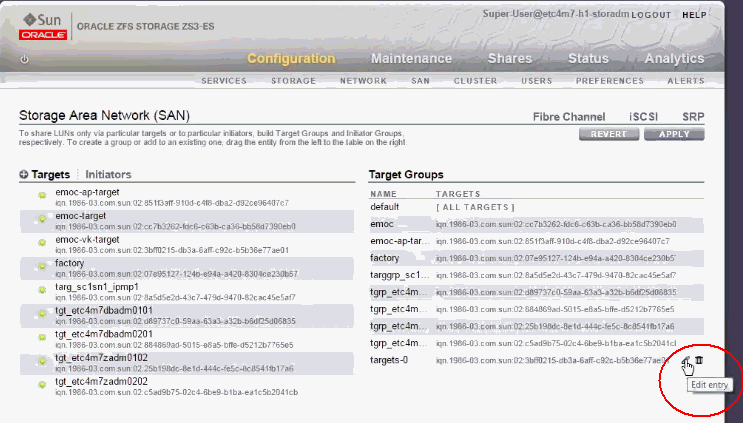
Assign the Target to a Target Group
After you have the target created, you must assign the target to a target group.
Perform the following steps to assign the target to a target group.
-
In the Targets column, select the new target.
-
Drag and drop the target to the Target Groups column.
If you want to create a new Target Group, drag and drop the Target to the bottom of Target Groups list in the placeholder. -
Click Apply.
Create LUNs and Assign to a Target Group
Perform the following steps to create logical units.
-
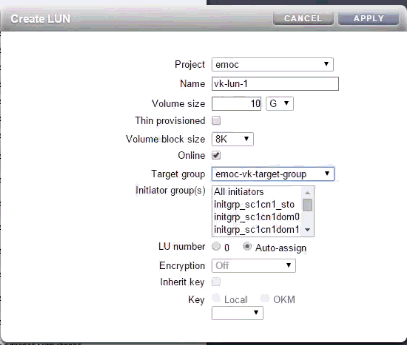
In the ZFS storage appliance user interface, click Shares, then click LUNs.
-
Click the Add icon next to LUNs. The Create LUN screen opens.
-
In the Project field, select emoc from the drop-down list.
-
In the Name field, enter a name for the LUN.
-
In the Volume field, enter the required size of the LUN.
-
In the Target group field, select the new target group from the drop-down list.
-
In the Initiator group(s) field, select All Initiators.
-
Click Apply. The LUN is created and is displayed in the Logical Units list.
Creating Resources in Oracle Enterprise Manager Ops Center
You can create a new SAN storage library containing the new LUNs, assign the library to a server pool, discover iSCSI targets on the server pool members, and create a new non-global zone in the server pool using the new SAN storage library.
Within a single SAN storage library, use LUNs only from a single storage pool. Do not mix LUNs from different storage pools.
The new SAN storage library can be created both within and outside the server pool.
Create a SAN Storage library Within the Server Pool
Perform the following steps to create a new SAN storage library within the server pool.
Create New SAN Storage Library
Perform the following steps to create a new SAN storage library.
-
Log in to Oracle Enterprise Manager Ops Center.
-
In the Navigation pane, click Libraries, then expand Storage Libraries.
-
Expand Block Storage, then click Static Block Storage.
-
In the Actions pane, click New SAN Storage Library. The Create New SAN Storage Library wizard opens.
-
Enter a name and description for the library, then click Next.
-
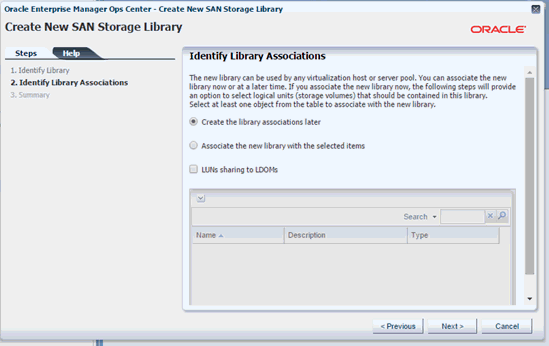
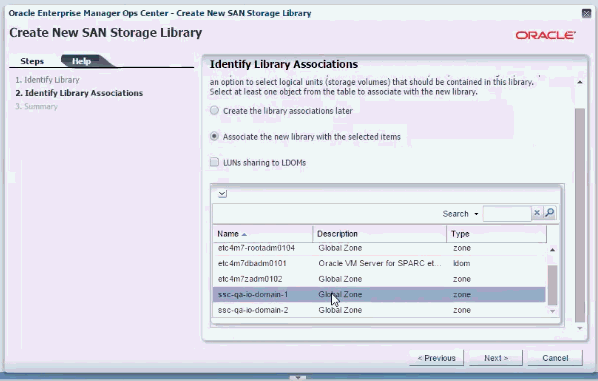
In the Identify Library Associations screen, select Create the library associations later, then click Next.
-
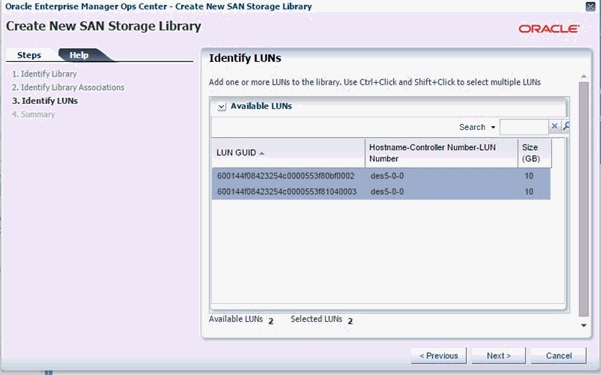
In the Identify LUNs screen, select all the LUNs that you want to associate to the library, then click Next.
-
Review and click Finish to submit the job.
After the job completes, the new SAN storage library is created.
Create Server Pool and Assign Members
Create a server pool backed by zone metadata NAS storage library and assign the new SAN storage library to it. After the SAN storage library is assigned, add global zones to the server pool.
-
Select Server Pools in the Resource Management Views.
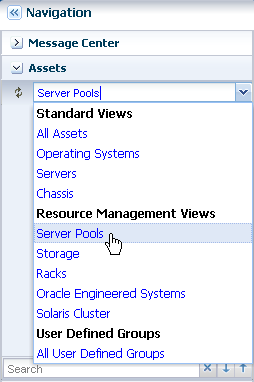
Description of the illustration ''server_pool_select.png''
-
Click Create Server Pool in the Actions pane.
The Create Server Pool Wizard is displayed.
-
Enter the following details in the server pool identification:
-
A name and description for the server pool.
-
It is optional to enter tags for the server pool. In this example, do not enter the tags.
-
Select Oracle Solaris Zones - x86 or SPARC in the list of Virtualization Technology.
Click Next to continue.
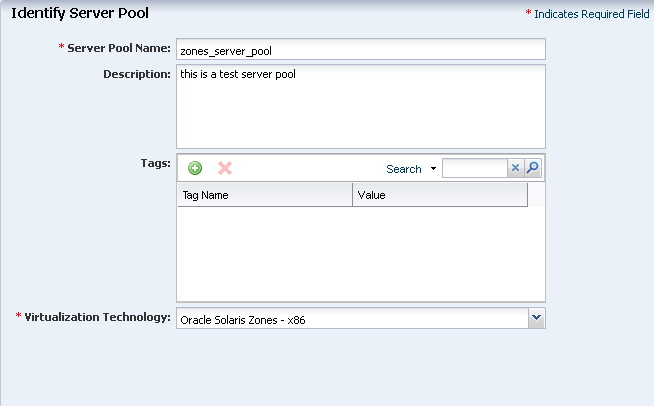
Description of the illustration ''server_pool_identify.png''
-
-
From the list of compatible managed global zones, select the two global zones to add to the server pool and click Next.
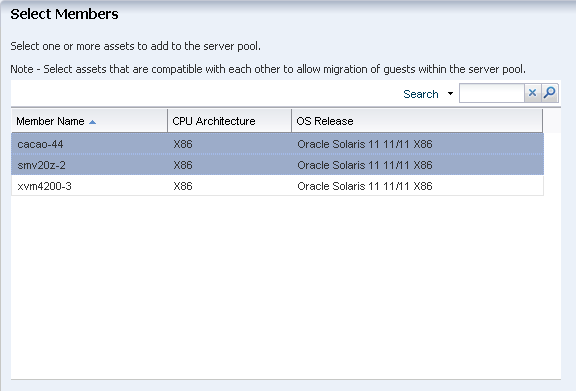
Description of the illustration ''select_members.png''
-
Select the default network domain to associate with the server pool.
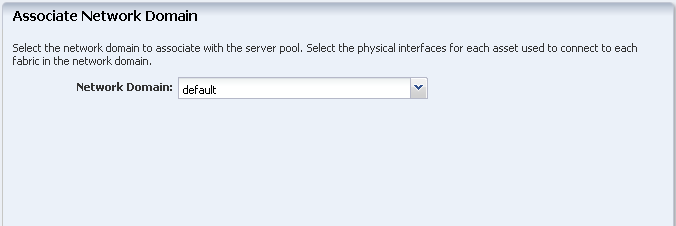
Description of the illustration ''asso_netw_domain.png''
For default network domain, you are not required to establish the connection between the server and the network fabrics. You can directly proceed to attach the networks and configure the interfaces of the servers. Click Next.
-
Select the networks from the list to attach to all the selected global zones of the server pool.
For Oracle Solaris 11 OS, the network is always attached to it in exclusive IP mode. This is because the zones that will be created on Oracle Solaris 11 OS are exclusive IP zones by default. You can connect to multiple networks and make multiple connections to each network for Oracle Solaris 11 OS. You must have sufficient NICs to cater to the number of network connections. In this example, the server pool is connected to the management network of the global zones and the number of network connections is also limited to one (1).
Click Next.

Description of the illustration ''asso_network.png''
-
The selected network in the previous step is already connected to the selected global zones, therefore the configuration settings for the network connection are not displayed.
Click Next to continue.
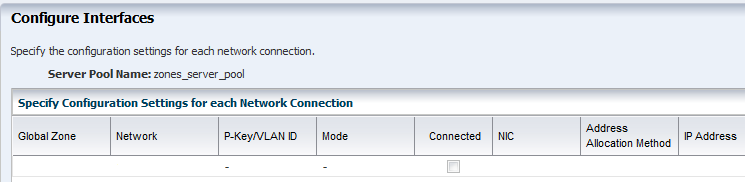
Description of the illustration ''configure_interface122.png''
-
The storage libraries that are accessible from the selected global zones are listed. Select the storage libraries that you want to associate with the server pool.
In this example, select the SAN and NAS storage library, and click Next.

Description of the illustration ''asso_library.png''
-
Set the server pool policy as follows:
-
Select the Placement Policy to place the zone on the global zone with lowest relative load.
Set the CPU Utilization threshold value to be 85% for 10 minutes.
-
Select the Automatic balancing of the server pool option.
Set the balancing to occur everyday at 12:00 a.m.
Select Approval required, send notification option. This will ensure that the zones are migrated with your approval.
-
Deselect the automatic recovery option.
Click Next to view the summary.
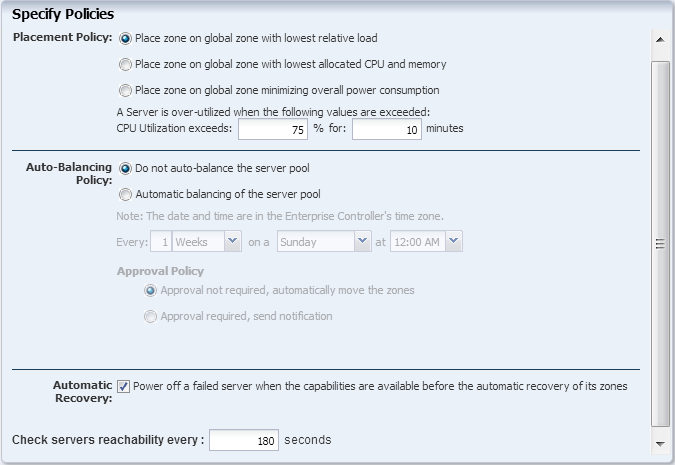
Description of the illustration ''server_pool_policy.png''
-
-
Review the information and click Finish to create the server pool.
The new server pool appears in the Server Pools list.
You can view the server pool dashboard for the policies selected as shown in the following figure:
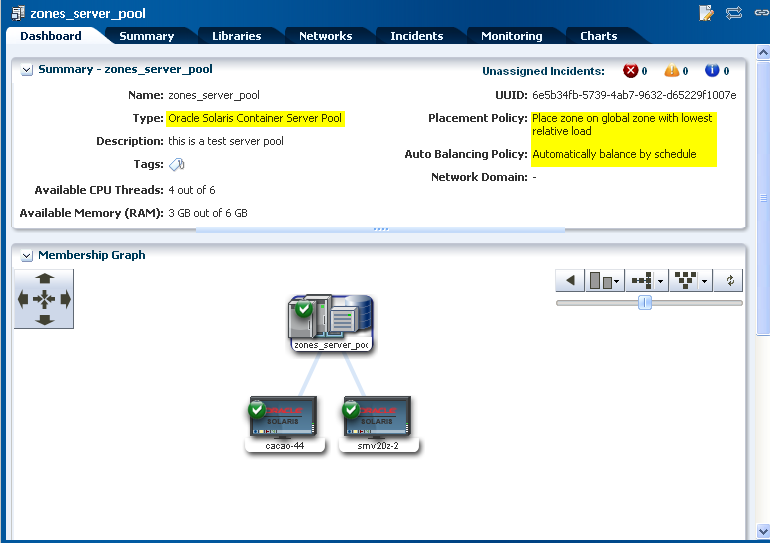
Description of the illustration ''server_pool_dash.png''
Select the server pool Summary tab to view the settings as seen in the Dashboard. From here, you can also edit the server pool configuration.

Description of the illustration ''server_pool_summary.png''
The Actions pane lists the options that are available to manage the server pool, such as editing the attributes, editing the tags, balancing the resources, associating the network domain, attaching networks, associating libraries, and adding global zones.
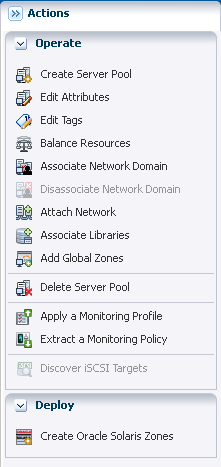
Description of the illustration ''server_pool_act_opt.png''
When you have networks configured with VLAN ID, you can set the tagging mode for the global zones added to the server pool.
Discover iSCSI Target on the Server Pool Members
Perform the following steps to discover the iSCSI target on the server pool members.
-
In the Navigation pane, under Assets, select Server Pools and choose the new server pool.
-
In the Actions pane, click Discover iSCSI Targets. The Add iSCSI Targets wizard opens.
-
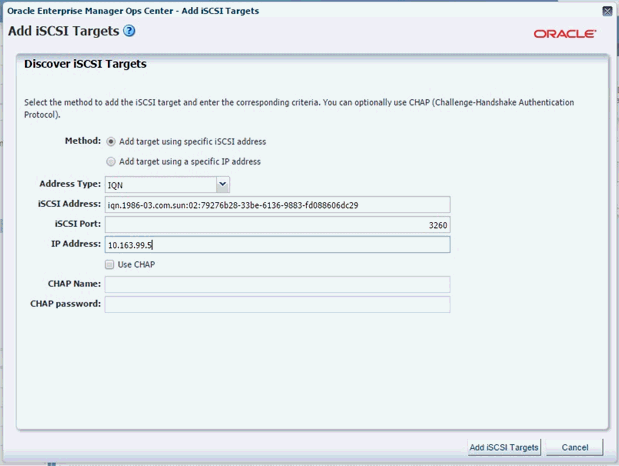
In the Discover iSCSI Targets screen, select Add target using specific iSCSI address option in the Method field.
-
In the Address Type field, select IQN from the drop-down list.
-
In the ISCSI Address field, enter the target group IQN address. (See Create a Target.)
-
In the IP Address field, enter the ZFS storage appliance (default IP is 192.168.28.1).
-
Click Add iSCSI Targets.
After the job completes, the LUNs are displayed. Refresh the list to populate new data.
Create a SAN Storage Library Outside the Server Pool
Perform the following steps to create a new SAN storage library outside the server pool.
Add iSCSI Targets to a Global Zone
Perform the following steps to add iSCSI elements to a global zone.
-
Log in to Oracle Enterprise Manager Ops Center.
-
In the Navigation pane, under Assets, select a global zone.
-
In the center pane, click Storage, then click iSCSI Targets tab.
-
In the iSCSI Target Addresses section, click the Discover iSCSI Targets icon. The Add iSCSI targets screen opens.
-
In the Method field, choose Add target using specific iSCSI address.
-
In the Address Type field, select IQN from the drop-down list.
-
In the iSCSI Address field, enter the target group IQN address. (See Create a Target.)
-
In the IP Address field, enter the IP address of the ZFS storage.
-
Click Add iSCSI Targets.
After the job completes, the logical units are displayed in the List of LUN(s) table.
Create a SAN Storage Library
Perform the following steps to create a new SAN storage library.
-
Log in to Oracle Enterprise Manager Ops Center.
-
In the Navigation pane, click Libraries, then expand Storage Libraries.
-
Expand Block Storage, then click Static Block Storage.
-
In the Actions pane, click New SAN Storage Library. The Create New SAN Storage Library wizard opens.
-
Enter a name and description for the library, then click Next.
-
In the Identify Library Associations screen, select Associate the new library with the selected items, then select the global zone from the list.
-
Click Next.
-
In the Identify LUNs screen, select all the LUNs that you want to associate to the library, then click Next.
-
Review and click Finish to submit the job.
After the job completes, the new SAN storage library is created.
Creating Non-Global Zone Using SAN Storage Library
Perform the following steps to create a non-global zone using SAN storage library.
-
Create an Oracle Solaris 11 Zone Profile and Plan
The profile captures the zone configuration, including defining the storage and network details. The plan executes the configuration on selected targets.You can use and reuse the profile and plan to create zones with a consistent configuration.
-
Deploy the Plan to Create a New Zone
When you deploy a plan, you identify the target operating systems and the number of zones to create. Before you submit the job to deploy the plan, you can modify some configuration details. In this example, the profile uses a default host name that you will modify when you deploy the plan.
Create an Oracle Solaris 11 Zone Profile and Plan
Creating a zone profile defines the zone configuration details and creates a deployment plan.
-
Click Plan Management, then expand Profiles and Policies. Right-click Oracle Solaris Zone, then click Create Profile.
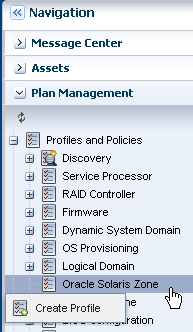
Description of the illustration ''nav.png''
-
Enter a name and description for the profile, then select Oracle Solaris 11 from the Subtype list. The option to create a deployment plan for this profile is selected.
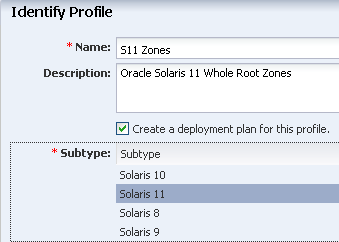
Description of the illustration ''profile_id.png''
-
To identify the zones that are created with this profile, enter a zone prefix name, such as Myzone, and a number to start the series. The name of a new zone includes its number. Do not add any tags for the zone for this example.
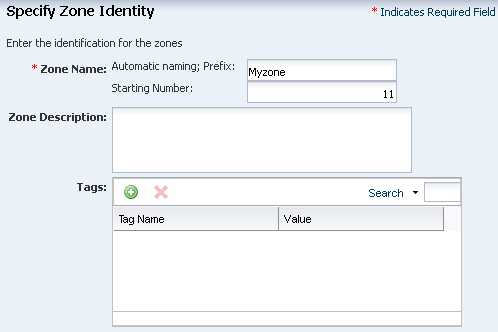
Description of the illustration ''zone_id.png''
-
Select Install from IPS Repository, then click Next.
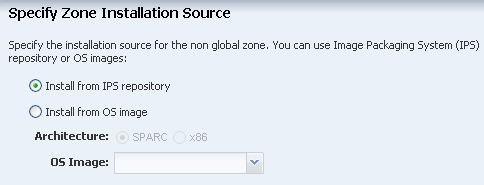
Description of the illustration ''install_source.png''
-
Select the Shared CPU model and enter 1 (one) to define the number of CPU shares. Set the memory thresholds and verify that the locked memory threshold value is less than or equal to the physical memory threshold. For automatic recovery of the zone, and the priority level of the recovery, select the Automatic Recovery check box, then enter the priority level. In this example, recovery priority of this zone is 17. If there are only enough resources to recover three zones, only the zones with highest numbers are recovered. For example, if you have a global zone with five zones: z1, z2, z3, z4, z5 with respective priority 6, 30, 17, 66, 100. When there are only enough resources to recover three zones, only z5(100), z4(66) and z2(30) are recovered.
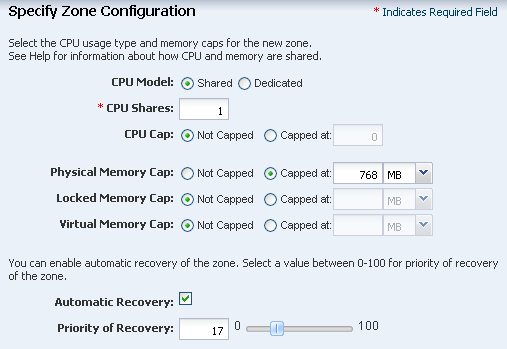
Description of the illustration ''cpu.png''
-
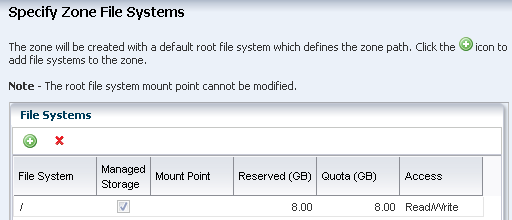
The default root file system appears. Do not define additional file systems. You define the SAN storage when you apply the deployment plan. Click Next.
Description of the illustration ''filesys.png''
-
Select NAS Filesystem Storage for the zone metadata in the drop-down menus. Select Static Block Storage as the SAN storage for the zone data. Select the library and size. This example uses 20 GB in SAN storage, the minimum required size is 8 GB.
Note:
It is possible to specify an NFS share for the zone data, but this is not an officially supported configuration.Click Next.
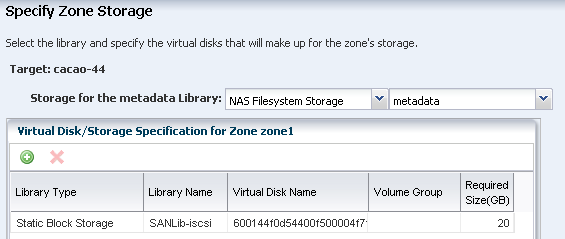
Description of the illustration ''nas.png''
-
The default network domain appears on the page. Enter a network for the zone and the number of connections. This example uses 1 network connection.

Description of the illustration ''specify_network.png''
-
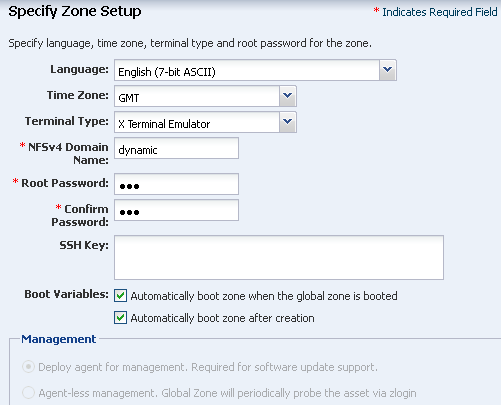
Define the language, time zone, terminal-type, and root password for the zone, and for all zones that you create with this profile.
-
A naming service is not configured in the environment. For this example, accept the default value,
dynamic, for the NFSv4 Domain Name. -
Enter the root password.
-
Set the boot variables for the new zone. You can set the zone to boot after it is created or whenever the global zone boots. This example has both options selected: automatically boot zone when the global zone is booted and automatically boot zone after creation.
Description of the illustration ''zone_setup.png''
-
-
Enter a name, a user name, password and confirm password to create a user account. The name must begin with a letter and can only contain letters and numbers. Click Next.
Note:
You are not required to create a user account. If you do not create a user account, then you must still provide a root password. In this case, root is a regular user.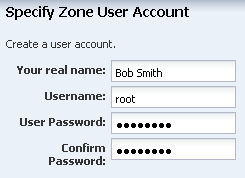
Description of the illustration ''user_account.png''
-
Click Next to skip the Zone Naming Service.

Description of the illustration ''name_svc.png''
-
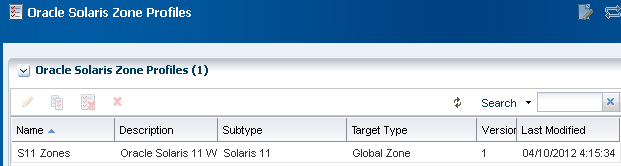
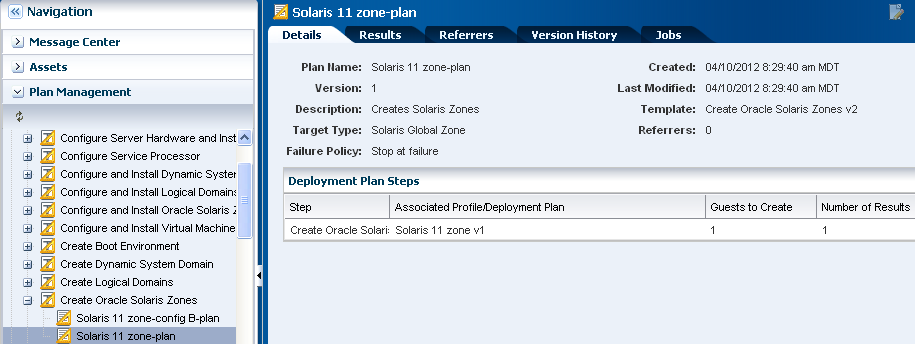
Click Finish to create the zone profile and deployment plan.
The zone profile and the corresponding deployment plan appear in the list of Oracle Solaris Zone Profiles and Oracle Solaris Zone Plans.
Description of the illustration ''zone_plan.png''
Deploy the Plan to Create a New Zone
Use the plan that you created in Create an Oracle Solaris 11 Zone Profile and Plan to create a non-global zone, and then view the new zone in the UI. You have the opportunity to make changes in the plan before you submit the job to apply the plan. For example, you could edit the plan to create multiple zones.
You can create non-global zones within and outside the server pool.
Create Non-Global Zones Within the Server Pool
Perform the following steps to create non-global zones within the server pool.
-
In the Navigation pane, under Assets, select Server Pools from the drop-down list.
-
Select a server pool, then in the Actions pane, click Create Oracle Solaris Zones.
-
In the Create Oracle Solaris Zones screen, select a deployment plan, then click Apply Plan.
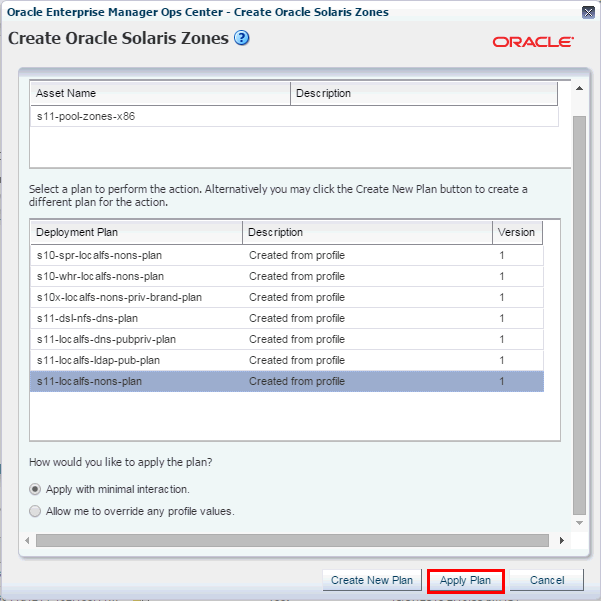
Description of the illustration ''apply_plan.gif''
-
In the Specify the Zone Identity wizard, the Automatic Naming; Prefix field and Starting Number field are populated with the information from the profile.
Description of the illustration ''zone_id.png''
-
The zone storage is populated based on the profile. Click Next.
Description of the illustration ''nas.png''
-
Select the Exclusive zone IP stack. Select a network from the list of available networks, then enter the IP address in the IP Range field. Click Next.
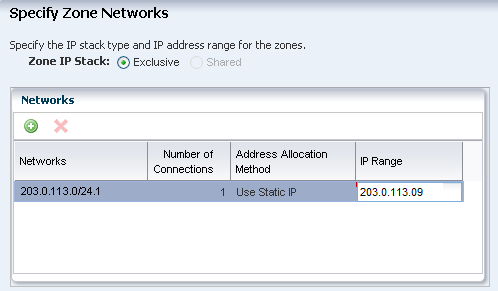
Description of the illustration ''apply_network_b.png''
-
The Network Resource Assignments page shows the host name, shared network and IP address that you defined in the profile. In the Host Name field, change the name from the default name that you provided in the profile to a different name. In this example, change the host name from Myzone to My_vhost2.
You can change the following parameters before you deploy the plan:
-
Host name: You can change the zone's host name to be different from the zone name, which might be useful when you are using a naming server.
-
Network Connections: You can add, modify, or delete network connections. For example, you can have Network1 and Network2. When you create two zones you can connect Myzone1 to Network1 and Network 2 and connect Myzone2 to Network1 and remove Network2.
-
IP address: The IP address for a set of zones appears in a range. You can enter the IP addresses in a comma delimited list.
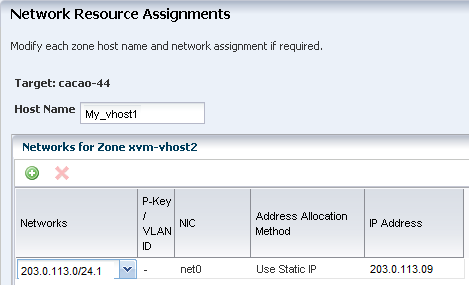
Description of the illustration ''host_name_change.png''
-
-
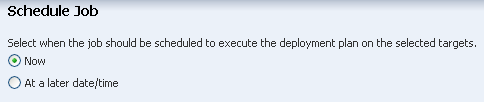
Select Now to start the job when you finish the wizard and apply the plan. Click Next to display the Summary page.
Description of the illustration ''apply_zoneplan.png''
-
Click Apply to run the job. When the job finishes successfully, the new zone appears in the Asset tree.
-
Click the operating system in the Assets section of the Navigation pane to display the dashboard with both zones.

Description of the illustration ''zone_dashboard_b.png''
-
Click the zone in the Assets section of the Navigation pane to view the zone dashboard.
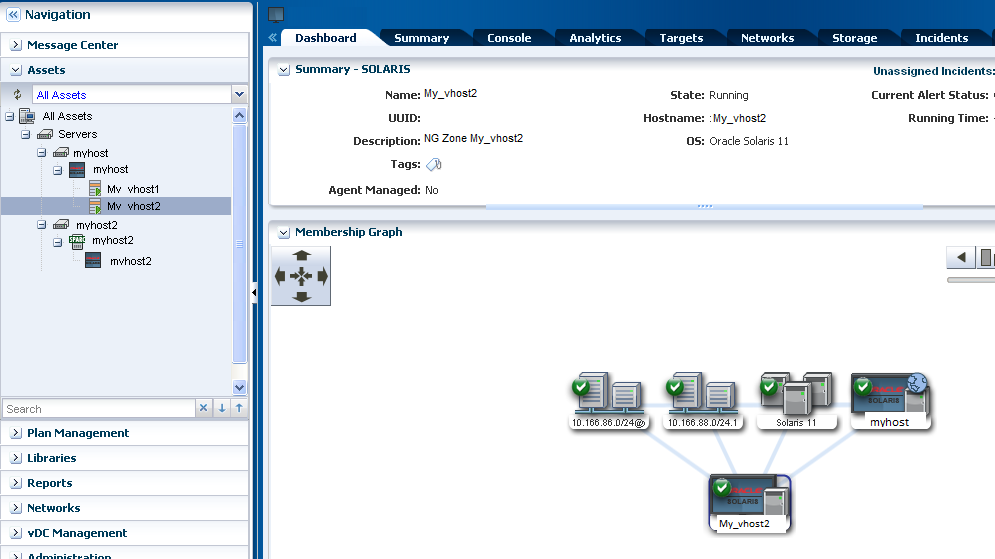
Description of the illustration ''dashboard_zone.png''
Create Non-Global Zones Outside the Server Pool
Perform the following steps to create non-global zones outside the server pool.
-
Click Plan Management, expand Deployment plans, expand Create Oracle Solaris Zones, then click the plan that you created.
Description of the illustration ''plan.png''
-
Right click, then click Apply Deployment Plan.
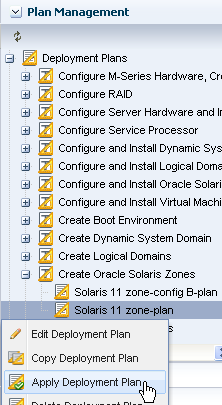
Description of the illustration ''apply_plan.png''
-
Select a global zone target from the list of Available Items. Click Add to Target List. Use the default setting for applying the plan with minimal interaction. Click Next.
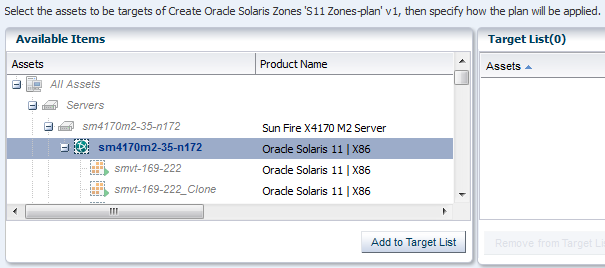
Description of the illustration ''selecttarget_b.png''
-
Perform steps 4 to 11 described in "Create Non-Global Zones Within the Server Pool" to complete the procedure.
Related Resources
For more information, see the Oracle Enterprise Manager Ops Center Documentation Library at http://docs.oracle.com/cd/E59957_01/index.htm.
Documentation Accessibility
For information about Oracle's commitment to accessibility, visit the Oracle Accessibility Program website at http://www.oracle.com/pls/topic/lookup?ctx=acc&id=docacc.
Oracle customers that have purchased support have access to electronic support through My Oracle Support. For information, visit http://www.oracle.com/pls/topic/lookup?ctx=acc&id=info or visit http://www.oracle.com/pls/topic/lookup?ctx=acc&id=trs if you are hearing impaired.
Oracle Enterprise Manager Ops Center Creating Non-Global Zones Using a SAN Library, 12c Release 3 (12.3.0.0.0)
E65613-01
Copyright © 2007, 2015, Oracle and/or its affiliates. All rights reserved.
This software and related documentation are provided under a license agreement containing restrictions on use and disclosure and are protected by intellectual property laws. Except as expressly permitted in your license agreement or allowed by law, you may not use, copy, reproduce, translate, broadcast, modify, license, transmit, distribute, exhibit, perform, publish, or display any part, in any form, or by any means. Reverse engineering, disassembly, or decompilation of this software, unless required by law for interoperability, is prohibited.
The information contained herein is subject to change without notice and is not warranted to be error-free. If you find any errors, please report them to us in writing.
If this is software or related documentation that is delivered to the U.S. Government or anyone licensing it on behalf of the U.S. Government, then the following notice is applicable:
U.S. GOVERNMENT END USERS: Oracle programs, including any operating system, integrated software, any programs installed on the hardware, and/or documentation, delivered to U.S. Government end users are "commercial computer software" pursuant to the applicable Federal Acquisition Regulation and agency-specific supplemental regulations. As such, use, duplication, disclosure, modification, and adaptation of the programs, including any operating system, integrated software, any programs installed on the hardware, and/or documentation, shall be subject to license terms and license restrictions applicable to the programs. No other rights are granted to the U.S. Government.
This software or hardware is developed for general use in a variety of information management applications. It is not developed or intended for use in any inherently dangerous applications, including applications that may create a risk of personal injury. If you use this software or hardware in dangerous applications, then you shall be responsible to take all appropriate fail-safe, backup, redundancy, and other measures to ensure its safe use. Oracle Corporation and its affiliates disclaim any liability for any damages caused by use of this software or hardware in dangerous applications.
Oracle and Java are registered trademarks of Oracle and/or its affiliates. Other names may be trademarks of their respective owners.
Intel and Intel Xeon are trademarks or registered trademarks of Intel Corporation. All SPARC trademarks are used under license and are trademarks or registered trademarks of SPARC International, Inc. AMD, Opteron, the AMD logo, and the AMD Opteron logo are trademarks or registered trademarks of Advanced Micro Devices. UNIX is a registered trademark of The Open Group.
This software or hardware and documentation may provide access to or information about content, products, and services from third parties. Oracle Corporation and its affiliates are not responsible for and expressly disclaim all warranties of any kind with respect to third-party content, products, and services unless otherwise set forth in an applicable agreement between you and Oracle. Oracle Corporation and its affiliates will not be responsible for any loss, costs, or damages incurred due to your access to or use of third-party content, products, or services, except as set forth in an applicable agreement between you and Oracle.