6 Managing Jobs with the Job Scheduler
You can schedule one or more jobs to execute at a specific time. To enhance performance, you can manage your jobs across one or more Job Schedulers. Each mobile server in the farm starts a Job Scheduler, also known as a Job engine.
By default, jobs are not registered for specific Job Schedulers. Instead, all Job Schedulers distribute and execute the registered jobs. All Job Schedulers work in tandem with each other, providing failover to each other. Only one job can execute at a Job engine at a time.
You can further manage your jobs by selecting which Job Scheduler on a specified mobile server is to execute the job. Or you can start a Standalone Job engine to execute jobs, where a Standalone Job engine exists outside of the mobile servers.
The following sections describe how you can schedule jobs through the Mobile Manager and manage one or more job engines.
-
Section 6.1, "Scheduling a Job to Execute at a Specific Time or Interval"
-
Section 6.3, "Manage Scheduled Jobs Using the Mobile Manager"
-
Section 6.4, "Managing or Creating Jobs Using ConsolidatorManager APIs"
6.1 Scheduling a Job to Execute at a Specific Time or Interval
You can choose to execute any job—which can be any application—at a specific time or interval. For example, the default MGP process (see Section 5.1, "How Does the Synchronization Process Work?") is a job that executes at a regular interval. The default behavior is for the MGP process to execute every 60 seconds to apply all incoming modifications from the clients and compose all outgoing messages to the clients from the repository. You can define how often the MGP process executes, or even schedule a time for it to stop execution. You can schedule any job with this same mindset.
Note:
For an overview on how to create a job out of one of your applications, see Section 6.4, "Managing or Creating Jobs Using ConsolidatorManager APIs".The Job engine that monitors the job execution is the Job Scheduler. For example, by default, the Job Scheduler fires off the default MGP process every 60 seconds. It is the mechanism that tracks all of the scheduled jobs and ensures that your defined job is executed when you wanted it to be executed. You can turn it on and off, and monitor alerts specific to the Job Scheduler.
Each mobile server in the farm starts a Job Scheduler to enhance the performance of your job execution through failover and executing jobs concurrently. You can also start a Standalone Job engine, as described in Chapter 6, "Create and Manage Jobs With APIs" in the Oracle Database Mobile Server Developer's Guide.
See Section 6.2, "Managing the Job Engine" for details on how to manage the Job Schedulers; see Section 6.3, "Manage Scheduled Jobs Using the Mobile Manager" on how to create and manage jobs that you want scheduled.
6.2 Managing the Job Engine
The Job Scheduler manages jobs that you create and schedule. However, each Job Scheduler needs to be managed, as well. You navigate to each Job Scheduler page in the Mobile Manager by selecting the desired mobile server from the list of mobile servers on the mobile server farm screen. At the bottom of the mobile server screen, click "Job Scheduler", which brings up the "Home" screen for that Job Scheduler.
Note:
If you schedule jobs at any of the Job Schedulers, they will be managed across all Job Schedulers in the farm unless you designate the job to be executed on a specified mobile server.The following sections describe how to manage the Job Scheduler:
6.2.1 Starting the Job Scheduler
Figure 6-1 displays the Job Scheduler's default status on the Job Scheduler home page. To start the Job Scheduler, click "Start". At this stage, the "Start" button is replaced by the "Stop" button. The following image displays that the Job Scheduler is up and running.
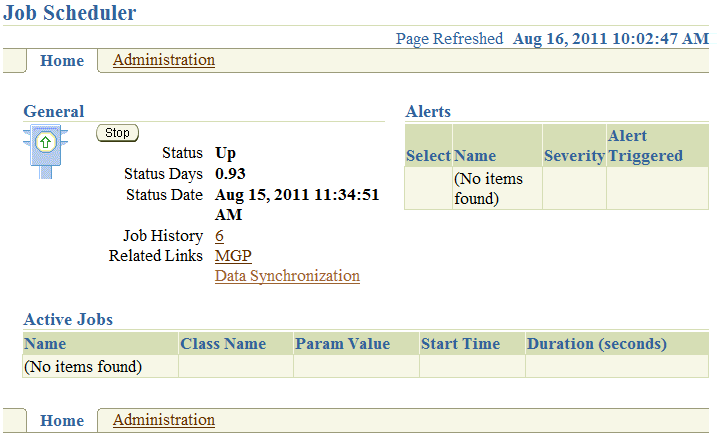
To stop the Job Scheduler, click "Stop". Stopping the Job Scheduler prevents any new jobs from starting on this mobile server. However, any existing jobs on this mobile server will continue to execute until finished. Stopping the Job Scheduler does not kill any existing jobs. All other jobs are moved to other available Job Schedulers in the farm.
If you want to prevent a single job from being launched, disable the application on the Administration screen. See Section 6.3.5, "Enabling or Disabling Jobs" for more information on disabling applications.
6.2.2 Checking Job Scheduler Alerts
When the Job Scheduler fails, then the Alerts table displays these exceptions as critical alerts. When the Job Scheduler has trouble with executing your job, then these exceptions are displayed as warning alerts.
The Job Scheduler home page enables administrators to check alerts that are registered in the job engine. To check alerts, locate the "Alerts" table and select the alert that you need to view under the "Select" column. Click "Check".
6.2.3 Managing Active Jobs
As shown in Figure 6-1, the Active Jobs table on the Job Scheduler home page contains information—such as job name, class name, parameter value, job start time, and duration.
For more information on how to manage jobs, see Section 6.3, "Manage Scheduled Jobs Using the Mobile Manager".
To terminate a job, click the "Administration" tab, select the job, and click "Delete". This does not terminate active jobs, but prevents the job from executing in the future.
6.2.4 Managing the Job History List
The number of current registered jobs in the Job History list is listed on the Job Scheduler home page under the Status Date line. All registered jobs from all Job Schedulers are listed. Click on the number displayed to bring up the Job History page. The Job History page enables you to provide criteria to search, sort, and manage the job history based on job properties—such as name, class name, result, or a specific date and time. Based on your search criteria, the Job History page displays job history details under the "Results" section.
Figure 6-2 displays the "Job History" page.
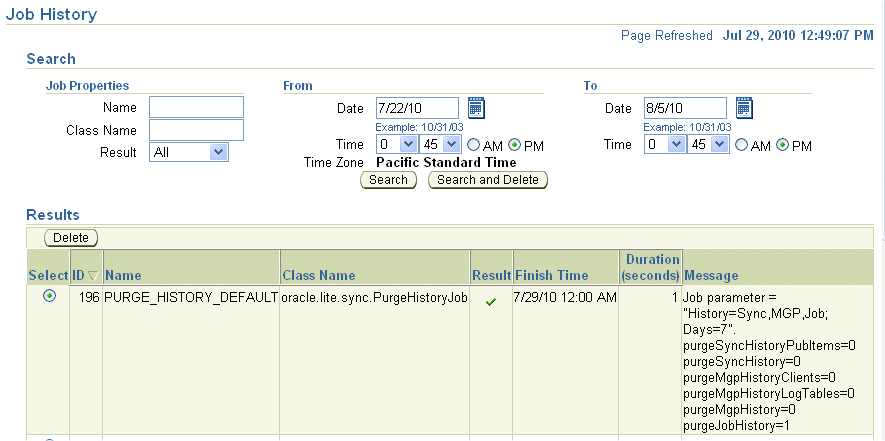
You can sort the messages by any of the headers. For example, to sort the job history details by name, click "Name" in the header title region. It toggles between A-Z and Z-A.
To delete a single job, select the job and click "Delete". To delete all job history entries that match your search criteria, click "Search and Delete".
6.3 Manage Scheduled Jobs Using the Mobile Manager
The most notable scheduled job is the MGP (see Section 5.1, "How Does the Synchronization Process Work?"). By default, it is scheduled to execute every 60 seconds to perform a specific task for data synchronization. You can modify the schedule of this existing job, as well as create other jobs for your own purposes to execute at a regular interval.
From the "Job Scheduler" screen, click the "Administration" tab, where you can create a new job or edit existing jobs. The Scheduled Jobs section displays the jobs that are scheduled in the job engine.
The following sections enable administrators to accomplish the following tasks:
6.3.1 Creating a New Job
In order to create a new job, you create the schedule of how often and when an existing application is executed. To create this schedule, navigate to the Job Scheduler Administration screen and click "Create A New Job".
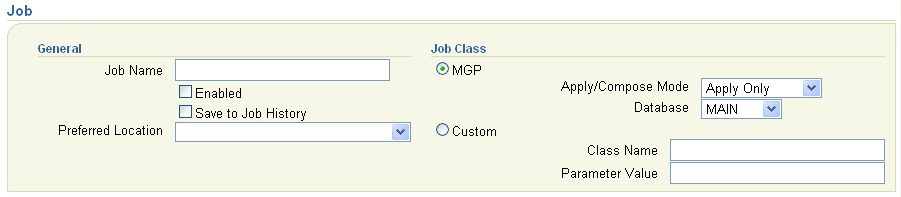
Figure 6-3 displays the top section of the "Create a New Job" page. Give the job a name, select the checkbox for Enabled to enable the job (or leave blank to leave disabled), and select the checkbox for "Save to Job History" if you want a record of this application executing.
In the Preferred Location field, specify a preferred Job Scheduler location. This enables you to specify that the job executes on a specific mobile server or, if available, a Standalone Job engine. All available Job Schedulers and the Standalone Job engine are shown in the drop-down list.
If you do not specify a preferred location, the job is executed by one of the available Job Schedulers in the registered mobile servers or Standalone Job Scheduler, if any. This job can fail over to any of the Job Schedulers, if necessary. However, if a job has been given a preference for specific Job Scheduler, it will keep running on that Job Scheduler as long as the Job Scheduler is available. Only if that Job Scheduler becomes unavailable will it failover to another Job Scheduler in the farm.
Note:
You can start a Standalone Job engine if all the mobile servers are busy with processing and you want to execute one or more jobs in a separate process for performance reasons.A Standalone Job engine can be started with the ConsolidatorManager API, as described in Chapter 6, "Create and Manage Jobs With APIs" in the Oracle Database Mobile Server Developer's Guide.
Figure 6-3 Create a New Job - Top Section
Description of "Figure 6-3 Create a New Job - Top Section"
Under the "Job Class" section, select if the Job class is for an MGP process or another class.
-
MGP process: For an MGP process, select if this is for "Apply Only" or "Apply and Compose". The MGP process can be modified to perform application only of new and modified records from the clients. This is beneficial for applications that never have to update information from the back-end server database.
For the "Select Database" pull-down, select the database where the MGP job process shall execute.
Choosing "Apply Only" saves performance if it is relevant for your application. For example, if you had a company that performed a lot of updates throughout the day, but no one needed to know the new information until the next day, you could schedule an MGP process to perform "Apply Only" all day to update the repository, and schedule another MGP process that executes only at night with "Apply/Compose" to perform the last updates and then bring down all of the days modifications to all of the users.
-
Custom class: If this is not for an MGP process, then enter the class name to be executed for this job and any parameter values. Since you design the class, enter the parameter as you have designed the parameter format. There are two default jobs, which are described in Section 6.3.7, "Default Jobs".
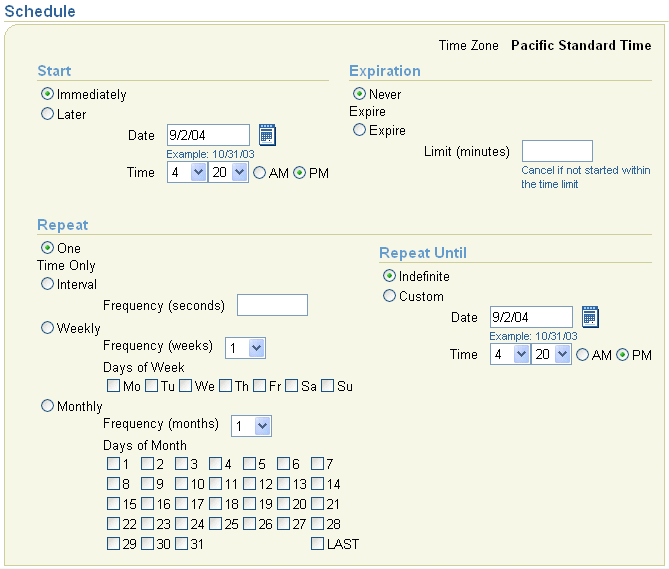
Figure 6-4 displays the bottom section of the "Create a New Job" page, which is where you define when and how often your job executes.
Figure 6-4 Create a New Job - Bottom Section
Description of "Figure 6-4 Create a New Job - Bottom Section"
Enter data in the "Create a New Job" page as described in the following tables.
Table 6-1 describes data that must be entered in the "Start" section.
Table 6-1 Start Details Description - Schedule Section
| Field | Description | Required |
|---|---|---|
|
Immediately |
To start the job immediately, select this option. |
Optional |
|
Later |
To start the job at a later time, select this option and specify the date and time when this job is to start. |
Optional |
Table 6-2 describes data that must be entered in the "Expiration" section.
Table 6-2 Expiration Details Description - Schedule Section
| Field | Description | Required |
|---|---|---|
|
Never Expire |
To ensure that the chosen job schedule does not expire—that is, this job always executes—select this option. |
Optional |
|
Expire |
If you want the job to expire after a specified number of minutes—even if it has not execute yet—then specify the number of minutes in this field. The Job Scheduler cancels jobs that do not start at the specified time. However, it does not stop jobs that have already started. |
Optional |
Table 6-3 describes how often the job executes in the "Repeat" section.
Table 6-3 Repeat Details Description - Repeat Section
| Field | Description | Required |
|---|---|---|
|
One Time Only |
The job executes only once. |
Optional |
|
Interval |
The job executes after a specified interval has passed. The interval duration between execution of the job is defined in seconds. |
Optional |
|
Weekly |
The job executes on the specified day of the week. You can specify an interval of whether this executes weekly (1 in the Frequency pulldown), every other week (2 in the Frequency pulldown) and so on. |
Optional |
|
Monthly |
The job executes on a specified day of the month. Same as above, but with the months of the year. |
Optional |
Table 6-4 defines whether the chosen schedule repeats indefinitely or whether you want it to execute only on a certain date/time.
Table 6-4 Repeat Until Details Description - Repeat Section
| Field | Description | Required |
|---|---|---|
|
Indefinite |
To repeat the job schedule indefinitely, select this option. |
Optional |
|
Custom |
To specify how long this job executes until, specify the date and time of when the job is canceled. |
Optional |
To implement the job schedule after specifying changes to the schedule, click "OK". To retain or restore previous job schedule values, click "Cancel".
Note:
The calendar does not display the selected date if the Java script feature in your browser, any pop up blocking tools, or search tools are installed and enabled.6.3.2 Editing Existing Jobs
Navigate to the Job Scheduler Administration screen. To edit existing jobs, click "Edit". Modify the same fields that are described in Section 6.3.1, "Creating a New Job".
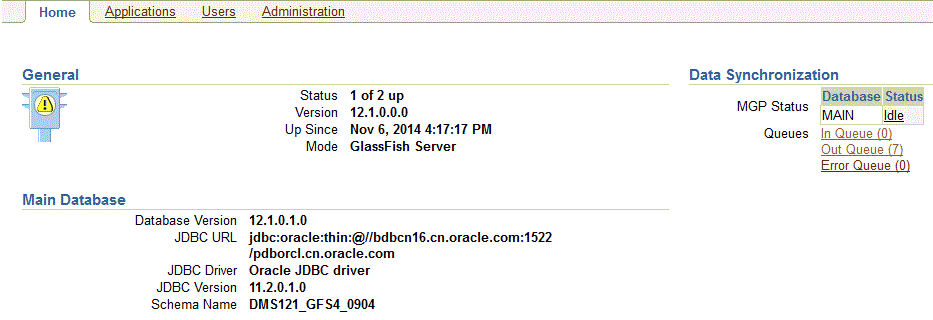
6.3.3 Viewing MGP Current Cycle Statistics
As shown in the Mobile Manager Home page, the status for all MGP Jobs are listed in the "MGP Status" table under the "Data Synchronization" section on the top. To see the statistics for each MGP Job, select the link under the "Status" column for the desired MGP Job.
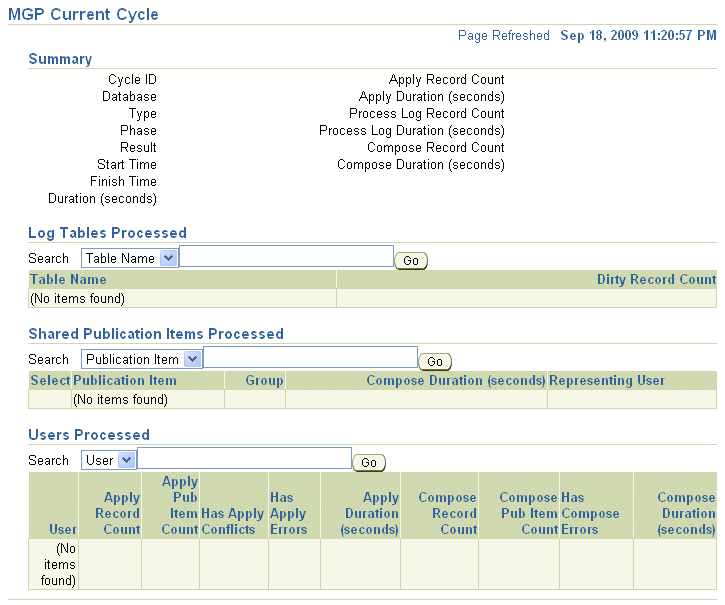
On the MGP Current Cycle page as shown in Figure 6-6, the administrator can view the current cycle status of the desired MGP Job.
6.3.4 Viewing MGP Cycle Statistics
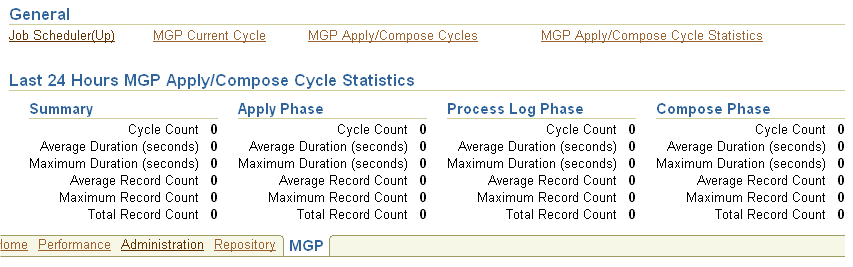
From the mobile server home page, select "Data Synchronization" and navigate to the "MGP" tab to display more MGP Job statistics. The mobile server administrator can view MGP job statistics as shown on Figure 6-7. The columns are separated so that you can see how, in the last 24 hours, the MGP has performed overall, as well as for each individual phase: apply, compose and process.
When you click on "MGP Current Cycle", you can see what the MGP process is currently doing. For instance, you can check if the apply or compose cycle is running when the MGP cycle is in progress. If you have set the MGP_HISTORY instance parameter, (see Section 5.6, "Configuring Data Synchronization For Farm or Single Mobile Server"), then upon completion of the apply or compose cycle, the cycle details are stored in Cycle History.
Since the front page only shows the last 24 hours, you can view farther back by clicking on the MGP Apply/Compose Cycle Statistics. You can set a date range to search and can even specify whether to search based upon the following:
-
Apply Only or Apply/Compose
-
Success, Failure, or Conflict results
When you click "MGP Apply/Compose" cycles, you can search for a range of historical records of these cycles and then view the details of each cycle.
6.3.5 Enabling or Disabling Jobs
You can enable or disable a job from the Administration screen off of the main Job Scheduler screen. Select the job that you need to modify and either click "Enable" or "Disable". The "Status" column confirms the changed status.
6.3.6 Deleting Jobs
Navigate to the Job Scheduler Administration screen. To delete a job, select the job that you need to delete and click "Delete". The Job Scheduler displays a warning message that seeks your confirmation to delete the chosen job. Click "Yes". You will be returned to the "Administration" tab.
6.3.7 Default Jobs
Oracle Database Mobile Server contains default jobs. As a user, you can enable or disable these default jobs and edit or delete them. This edition contains the following default jobs.
-
MGP Process:
MGP_DEFAULT -
Purging History:
PURGE_HISTORY_DEFAULT
6.3.7.1 MGP_DEFAULT
You have to have at least a single MGP process for apply/compose phase of the synchronization phase. The MGP_DEFAULT is this process. You can modify this process to be apply only, or you can modify when the MGP process is executed. You can create other MGP processes, if you wish.
MGP_DEFAULT
oracle.lite.sync.MgpJob
APPLY_COMPOSE
The parameter value must be a string of the value APPLY_COMPOSE or APPLY_ONLY. When scheduling or editing this parameter using the "Job Scheduler's Edit Jobs" page, you can choose the required parameter value from the "Apply/Compose" list.
6.3.7.2 PURGE_HISTORY_DEFAULT
In order to preserve disk space, the administrator wants to purge the history. This job is created for you to automatically purge the history at a selected interval. You can modify the interval or disable this job, if you wish. This section describes the job class, job parameter value and its corresponding description.
PUR GE_HISTORY_DEFAULT
oracle.lite.sync.PurgeHistoryJob
History=Sync,MGP,Job;Days=7
Since this Job is a customized class, the parameter is defined and parsed within the purge history class. The structure of this parameter is a string with two name/value pairs: what type of history to purge and for how many days. In this example, the history purged is for the Sync, MGP, and Job historical data. The history is purged for the last seven days. You can modify the number of days or add/delete the history logs that this applies to. The only options are Sync, MGP, or Job. For example, if you want every record that is 3 days old or more to be erased, modify the 7 to a 3.
6.4 Managing or Creating Jobs Using ConsolidatorManager APIs
Application developers can create and manage their jobs using the ConsolidatorManager APIs. For full details, see Chapter 6, "Create and Manage Jobs With APIs" in the Oracle Database Mobile Server Developer's Guide.