22 Configuring a Software Library
This chapter describes how you can configure a new Software Library using Cloud Control console, the various users and the privileges required to access the Software Library, and finally how to maintain an existing Software Library in the Enterprise Manager Cloud Control environment.
Note:
Oracle strongly recommends that you select the Configure Oracle Software Library option and configure it at the time of installation so that the installer can automatically configure it for you, thus saving your time and effort. For more information on this, see Oracle Enterprise Manager Cloud Control Basic Installation Guide.However, if you have not already configured the Software Library, you can do so from the Enterprise Manager Cloud Control Console as described in this chapter.
In particular, this chapter covers the following:
22.1 Overview of Software Library
Oracle Software Library (Software Library) is one of the core features offered by Enterprise Manager Cloud Control. Technically, it is a repository that stores software entities such as software patches, virtual appliance images, reference gold images, application software, and their associated directive scripts. In addition to storing them, it also enables you to maintain versions, maturity levels, and states of these software entities.
To access the Software Library console page, from the Enterprise menu, select Provisioning and Patching, then click Software Library. On the Software Library home page, as shown in Figure 22-1, there are two types of folders: Oracle-owned folders (marked by a lock symbol) and User-owned folders.
Oracle-owned folders and their contents (including other subfolders and entities) offered with the product by default, and appear on the Software Library home page after Software Library is configured. User-owned folders are logical top level folders that the user creates to organize the entities that he/she intends to create.
The Software Library Page facilitates storage of Enterprise Manager entities. For example,
-
Self Update entities like plug-ins, connectors, DB workload, and so on.
-
Provisioning and Patching entities like gold images, application archives, Perl/shell scripts, and so on.
Advantages:
-
Software Library supports patching and provisioning in Online mode and Offline mode. For example, if database patches cannot be downloaded directly from My Oracle Support, you can download them separately, and stage them from Software Library for offline deployment.
-
Starting with Enterprise Manager Cloud Control 12c, Referenced File Locations are supported, which means that the Software Library allows you to leverage your organizations existing IT infrastructure (like file servers, web servers, or storage systems) to stage the files to host targets as part of a provisioning or patching activity.
-
Software Library allows you to organize the entities, which basically refer to the software binaries or directive scripts in your enterprise, into logical folders for efficient management.
From the Software Library Console page, you can perform the following tasks:
-
Configure Software Library Storage, see Section 22.7, "Configuring Software Library Storage Location" for more information.
-
Create Software Library Entities. For example, Creating a Generic Component, Creating Directives, and so on.
-
Manage Software Library Entities. For example, Viewing Entities, Editing Entities, Deleting Entities, Searching Entities, and so on.
22.2 Users, Roles, and Privileges
By default, all the Software Library folders and entities that are offered with the product are viewable by all the Enterprise Manager users. Fine grained privileges provide a way to control user access to the different entities in the Software Library. Administrators by default do not have any Software Library privileges, it is for the Super Administrator to grant access, privileges to an Administrator.
Note:
To run any procedure on a Windows host which involves executing some Software Library entities (for example, directive scripts), you (the Windows user) must be granted the following privileges:-
Act as part of the operating system
-
Adjust memory quotas for a process
-
Logon as batch job
-
Replace a process level token
If not, the execution of the directive steps in the procedure may fail.
Software Library user roles can be broadly classified as:
-
Designers are administrators who perform design time tasks such as setting up Software library, migrating entities, granting privileges to the Operators, deleting entities, and so on. They can perform both design time activities and run-time activities that the Operator can perform. Designers in Enterprise Manager Cloud Control can be granted Super Administrator role or the
EM_PROVISIONING_DESIGNERrole which allows him to create and maintain any Software Library entity. -
Operators are administrators who can perform run-time activities like deleting entities, changing the maturity status, and so on. Operators are typically granted roles like
EM_PROVISIONING_OPERATORorEM_PATCH_OPERATORand so on.
Any Enterprise Manager user requires, at the very least, a view privilege on an entity for the entity to be visible on the Software Library Home page. Users will not be able to see this entity until the Super Administrator or the owner of the entity grants them at least a view privileges on the entity.
Note:
All the folders and entities that are offered along with the product also known as the Oracle-owned entities, by default are viewable by all the Enterprise Manager users.Administrator by default do not have any Software Library privileges, it is for the Super Administrator, to grant access, privileges to an Administrator. Table 22-1 describes all the available Software Library privileges that can be granted to a user or role.
Users and roles can be granted privileges on specific entities by the owner of the entity or the Super Administrator. For more details, see Oracle Enterprise Manager Administrator's Guide for Software and Server Provisioning and Patching.
Table 22-1 Software Library Privileges for Administrators
| Resource Type | Description |
|---|---|
|
View any Template Entity |
Ability to view any Template Entity |
|
Export Any Software Library Entity |
Ability to export any Software entity |
|
Edit any Software Library Entity |
Ability to edit any Software Library entity |
|
Manage Any Software Library Entity |
Ability to create, view, edit, and delete any Software Library entity |
|
Import Any Software Library Entity |
Ability to import any Software Library entity |
|
Create Any Software Library Entity |
Ability to create any Software Library entity |
|
View Any Software Library Entity |
Ability to view any Software Library entity |
|
View Any Assembly Entity |
Ability to view any Assembly entity |
|
Grant Any Entity Privilege |
Ability to grant view, edit, and delete privileges on any Software Library entity.This privilege is required if the user granting the privilege on any entity is not a Super Administrator or owner of the entity. |
Table 22-2 describes all the primary users of Software Library, and their associated privileges:
Table 22-2 Roles and Privileges
| Role | Software Library Privileges |
|---|---|
|
Super Administrator |
All Software Library Privileges |
|
|
Create Any Software Library Entity |
|
|
View Any Software Library Entity |
|
|
Create Any Software Library Entity View Any Software Library Entity |
|
|
Access Enterprise Manager |
Super Administrators have complete privileges on all the entities present in Software Library, and can exercise access control on the entities by granting one or more privileges, and later revoking the previously granted privilege to another user or role.
Designers by default are given create privileges, which allow them to create entities and manage them.
Operators by default are given view privileges, which allow them to view all the entities in Enterprise Manager Cloud Control.
Any Enterprise Manager user requires, at the very least, a view privilege on an entity for the entity to be visible on the Software Library console. The Super Administrator can choose to grant additional privileges described in Table 22-1 to the user or role. Users will not be able to see this entity till the Super Administrator grants them at least a view privilege on the entity.
22.3 What's New in Software Library
For Enterprise Manager 12c Software Library enhancements, refer to Enterprise Manager Cloud Control Introduction Guide.
22.4 Performing Software Library Tasks Using EM CLI Verbs or in Graphical Mode
Starting with Oracle Enterprise Manager Cloud Control 12c Release 2 (12.1.0.2), command line utility has been introduced for Software Library users in Oracle Enterprise Manager Cloud Control that enables you to perform some of the console-based Software Library operations using the text-based consoles.
The following table describes both approaches to perform some of the Software Library tasks:
-
Enterprise Manager Command Line Interface (EM CLI)
-
Enterprise Manager Graphical User Interface (EM GUI)
Note:
For more information about the syntax and usage of the EM CLI verbs described in Table 22-3,along with workflow examples, refer to Oracle Enterprise Manager Lifecycle Management Administrator's Guide.Table 22-3 Software Library EMCLI Verbs
| Description | Approach A: Using EM CLI Verb | Approach B: Using Enterprise Manager Cloud Control Console |
|---|---|---|
|
Adding a Software Library storage location |
|
Configuring an OMS Shared File system Location |
|
Creating a Software Library entity |
|
|
|
Creating a Software Library folder |
|
|
|
Listing the Software Library entities |
|
|
|
Listing Software Library entity types |
|
NA |
|
Listing Software Library entity subtypes |
|
NA |
|
Listing Software Library folders |
|
NA |
|
Listing Software Library storage locations |
|
|
|
Referring files from a Software Library entity |
|
|
|
Re-Importing Software Library metadata |
|
|
|
Removing a Software Library storage location |
|
|
|
Modifying a Software Library entity |
|
|
|
Uploading files to a Software Library entity |
|
|
|
Modifying a Software Library OMS Agent storage location to change the associated OMS Host and the credential for accessing the location. |
|
NA |
|
Verifying the files uploaded to software library, and reporting the missing files in the storage locations. This action is typically initiated when some provisioning/patching/deployment activity fails due to missing file in the associated storage location. |
|
NA |
|
Staging one or more files associated with an entity revision available in the Software Library to a file system location on a host target. |
|
|
|
Staging one or more files associated with an entity revision in the Software Library to the local file system of a host not monitored by an EM Agent. |
|
|
|
Creating an entity of the |
|
|
|
Modifying an entity of the |
|
|
|
Listing all the details of an entity revision. |
|
|
|
Exporting files of Software Library entities to be imported on a cache node as cached files. |
|
|
|
Importing Software Library entity files from a compressed file to a cache node. |
|
|
|
Invoking resynchronize for one or all cache nodes. |
|
Note:
For more information on the usage of EM CLI verbs, refer to Oracle Enterprise Manager Command Line Interface Guide.22.5 Software Library Storage
The Software Library Administration console allows you to configure and administer Software Library. To start using the Software Library, you must add at least one upload file storage location (OMS Shared File System, or OMS Agent File System) on the host where the OMS is running. A storage location in Software Library represents a repository of files that are either uploaded to Software Library or referenced by it.
Note:
If you choose to newly configure an OMS Shared Storage Location, then ensure that the file system path that you specify for the location is either a shared path or a mounted path. By doing so, the newly configured location can be made accessible in a multiple OMS environment in the future. If the new location is being added in a multiple OMS environment, then the file system path should be accessible from all the OMS hosts.However, if you have configured the OMS Shared Storage Location on a local file system, then perform the steps listed in the Section 22.7 to migrate this location to another OMS Shared Storage Location that has a shared or mounted path.
To access the administration console, log in to Enterprise Manager Cloud Control with Administration access, and follow these steps:
In Cloud Control, from Setup menu, select Provisioning and Patching, and then click Software Library.
OR
In Cloud Control, from the Enterprise menu, select Provisioning and Patching and then, click Software Library. On the Software Library home page, from Actions menu, select Administration.
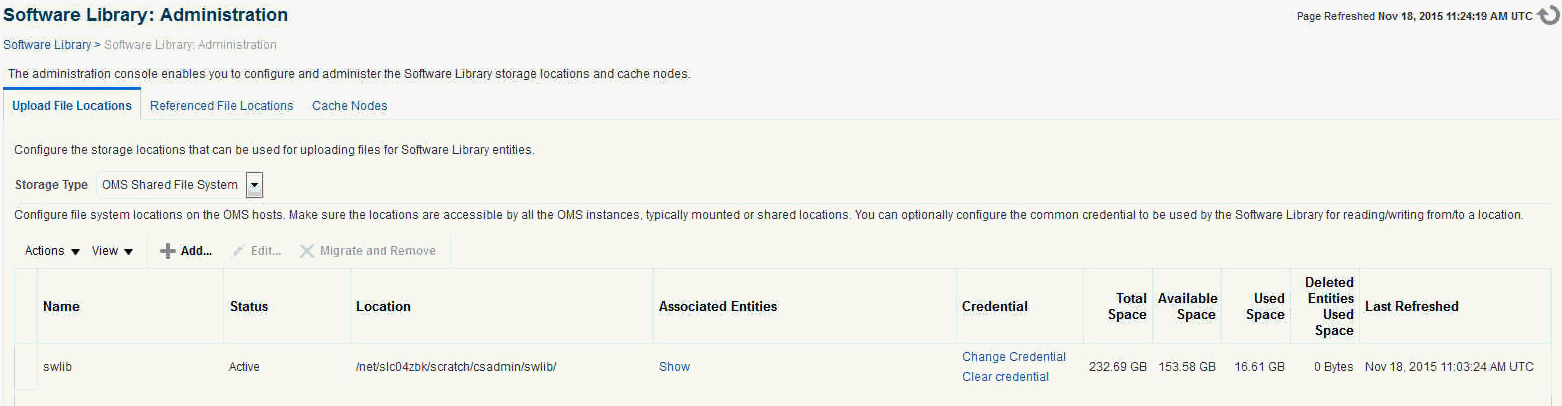
The Software Library Administration Page is a GUI based screen that enables you to create one or more storage locations to store or refer to files that are associated with an entity. To view the entities present in the storage location, click show on the Administration page. You can create a storage location on the OMS or the agent running on the same host as the OMS. With Enterprise Manager 12c, a new feature called Referenced File Location has been introduced, wherein Software Library entities can refer to files that are stored on another host. These locations are however read-only for Software Library, and will not be used for uploading files.
The space requirements for configuring Software Library depends on the amount of space required for storing the software binaries, and its associated scripts. Understandably, this space requirement increases over a period of time as you create more entities. Depending on the features or software required for provisioning and patching, you must decide and configure the Software Library storage space.
Note:
For production environments, Oracle recommends allocating a minimum 100GB of storage for your software library. Also, ensure that this storage can easily be extended in future, if it starts running out of space.Once the storage location starts running out of space, it is important to deactivate the configured storage location so that no new uploads can happen to this location. For more information about removing a storage location, see Section 22.13
The following types of storage locations are available:
22.5.1 Upload File Locations
Upload File Locations are locations configured for storing files uploaded by Software Library as part of creating or updating an entity.
For Software Library to become usable, at least one upload file location must be configured. On adding the first upload file location, a job is submitted to import the Software Library metadata from the Oracle home of each of the installed Enterprise Manager plug-in. Ensure that you wait for this job to complete successfully, before performing other patching or provisioning operations.
Note:
To physically delete a file system configured as an Upload storage location with Software Library, you must ensure that you first configure an alternate storage location where you can migrate the existing contents (entities). If you fail to perform this migration, then the entities dependent on the files from this location will be rendered unusable. For more information about deleting a storage location, and migrating the contents, see Section 22.13.3.Prerequisites
As a prerequisite, before using Upload File Locations as storage option, you must set credentials for using an OMS Shared File System or OMS Agent File System:
-
For multiple OMS environment, all the OMS hosts must have a preferred normal host credential set.
When OMS instances are added, it is necessary to ensure that the configured locations are accessible from the designated host where the new OMS will be provisioned. For an OMS that will be provisioned using the Add Management Service functionality, the shared location configured as upload location should be mounted on the designated host, and verified manually.
-
For OMS Agent File System location configuration, a credential (preferred or named) has to be specified.
Upload File Locations support two storage options as follows:
OMS Shared File System (Recommended Storage Option)
An OMS Shared File System location is required to be shared (or mounted) across all the Oracle Management Server (OMS) hosts. This option is ideal for UNIX systems.
Note:
Oracle recommends using OMS Shared File System option for storing files uploaded to Software Library. However, if you are not able to set up a shared file system because of some constraints, then you may use the OMS Agent File System. For more information, see "OMS Agent File System"For single OMS environments, you can configure the Software Library either on the host where the OMS is running, or in a shared location. However, in future, if you plan to expand the single OMS setup to a multiple OMS setup, then local file system path is not recommended.
Note:
For a multi-OMS scenario, you must set up clustered file system using NFS, or ACFS, or DBFS. On Windows, for sharing, the OCFS2 cluster file system is recommended.If you are implementing multiple management servers for high availability you should also make the Software Library file system highly available. Besides accessibility and availability, it is important to ensure that there is enough space (more than 100 GB for production deployment of Enterprise Manager) available for the storage of software binaries, and associated scripts for the entities that you want to create and store.
An OMS Agent File System location should be accessible to the agent running on the host machine where the OMS is deployed. To use OMS Agent File system storage option, ensure that you have a preferred, or a named credential for the OMS host. Click Change Credential to change the associated credential to be used to access this location.
Note:
If you can not set up an OMS Shared File System for storage because of some constraints, then you may use the OMS Agent File System.22.5.2 Referenced File Location
Referenced File Locations are locations that allow you to leverage the organization's existing IT infrastructure (like file servers, web servers, or storage systems) for sourcing software binaries and scripts. Such locations allow entities to refer to files without having to upload them explicitly to a Software Library storage.
Referenced File Locations support three storage options:
-
HTTP: An HTTP storage location represents a base URL which acts as the source of files that can be referenced.
For example, the base URL
http://my.files.com/scriptscould be configured as an HTTP location for sourcing files such ashttp://my.files.com/scripts/perl/installMyDB.plorhttp://my.files.com/scripts/linux/stopMyDB.sh. -
NFS: An NFS storage location represents an exported file system directory on a server. The server need not be an Enterprise Manager host target.
For example, the directory
/exported/scriptsis exported on servermy.file.servercould be configured as an NFS location for sourcing files such as/exported/scripts/generic/installMyDB.plor/exported/scripts/linux/stopMyDB.shonce mounted on a target host file system. -
Agent: An Agent storage location is similar to the OMS Agent File System option, but can be any host monitored by an Enterprise Manager Agent. The Agent can be configured to serve the files located on that host.
For example, the directory
/u01/binarieson the Enterprise Manager Hostmy.em.file.servercould be configured as an Agent location for sourcing files such as/u01/binaries/rpms/myCustomDB.rpmor/u01/binaries/templates/myTemplate.tar.gz.These locations require a named credential to be associated which will be used to access the files from the base location on the host through the Enterprise Manager Agent.
Note:
To use entities referring files of a location, you must have view privilege on the credentials associated with the locations.22.5.3 Cache Nodes
Cache Nodes is a feature in Enterprise Manager that enhances the file transfer experience to distant servers and data centers by reducing the load on the OMS. Cache nodes work on a set of predefined targets that function as one unit called the Group, and each cache node is an intermediate storage location on a host that serves a particular group of targets that it is associated with. For more information about Cache Nodes, see Section 22.9.1
22.6 Prerequisites for Configuring Software Library
To administer the different storage types, and to configure software library, keep the following points in mind:
-
Depending on the features or software required for provisioning and patching, you must decide and configure the Software Library storage space. The storage needs change based on the usage pattern.
-
Each OMS host must have a preferred normal host credential set before configuring the location. For OMS Agent File System location configuration, a credential (preferred or named) has to be specified.
-
You (the user configuring the Software Library) must have view privilege on all the OMS, and the agent targets running on the host machine. As per the accessibility verification, you must be able to view, and edit these newly configured locations.
-
To add an OMS Agent storage location, ensure that you have view privileges on the target OMS host, and the agents running on that target host.
22.7 Configuring Software Library Storage Location
System Administrators are responsible for configuring a storage location. Only after the storage location is configured, you can start uploading the entity files.
Note:
Deployment procedures and area-specific jobs in your on-prem Cloud setup may in turn use entities like Components and Directives from the Software Library for managing Oracle Public Cloud (OPC) targets. For your procedure to successfully manage the OPC targets, Software Library must be configured to use an OMS Shared File system storage for the uploaded files. If these Components and Directives use OMS Agent File system storage, the procedure will fail when attempting to transfer the files to the OPC targets.You can configure the Software Library in one of the following locations:
Note:
Starting with Oracle Enterprise Manager Cloud Control 12c Release 2 (12.1.0.2), in addition to using the GUI as described in this section, you can alternatively use the command line interface tool to Configure the Software Library. To do so, refer to Oracle Enterprise Manager Lifecycle Management Administrator's Guide.22.7.1 Configuring an OMS Shared File system Location
To configure an OMS Shared File System storage location that can be used for uploading Software Library entity files, perform the following steps:
-
From the Setup menu, select Provisioning and Patching, then select Software Library.
-
On the Software Library: Administration page, select OMS Shared File system.
-
To add a new OMS Shared File System, click +Add.
-
In the Add OMS Shared File System location dialog box, provide a unique name, host name, and location on the OMS host, where you want to set up the upload location.
Providing Credentials is optional. If you provide, then it will be used for transferring files.
Ensure that the configured storage location is a shared location that is accessible by all the OMS instances. For a Multi OMS setup, set the Normal Preferred Credentials for all the OMS(s).
When you configure an upload location for the first time, a metadata registration job is submitted which imports all the metadata information of all the installed plug-ins from the Oracle home of the OMS.
To track the progress of the job, click Show Detailed Results. Typically, the name of the job starts with
SWLIBREGISTERMETADATA_*.If the Import job fails, see Section 22.13 for information on Re-importing metadata for Oracle-owned files.
-
Click OK to create a new entry for the storage location in the table, with details like Name, Location, Host, Status, and Host Credentials.
In addition to this, you can click Associated Entities to view or search the entities present in the selected upload location.
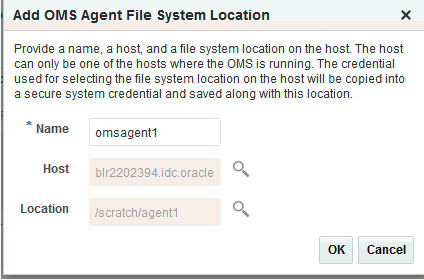
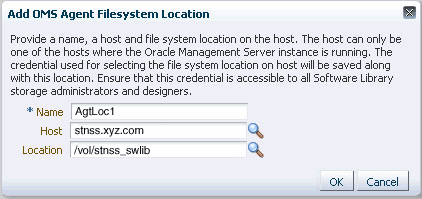
22.7.2 Configuring an OMS Agent File system Location
Note:
The OMS Agent File system must be set up only when the recommended storage option, which is the OMS Shared File System cannot be set up because of some constraints. For more information, see Section 22.5.1.To configure an OMS Agent location, perform the following steps:
-
From the Setup menu, select Provisioning and Patching, then select Software Library.
-
On the Software Library: Administration page, select OMS Agent File system.
-
Click +Add, in the Add OMS Agent File System Location dialog box, enter the following details:
-
In the Name field, enter a unique name for the storage.
-
In the Host field, click the magnifier icon. From the Search and Select: Hosts dialog box, select a host where the OMS is running, and click Select.
For example,
xyz.acme.com -
In the Location field, click the magnifier icon. In the Remote File Browser dialog box, click Login As to log in to the host machine with either Preferred, Named or New credentials.
Note:
For a user to access and leverage an OMS Agent File system upload location successfully, the owner of the Named Credential (basically, the credential used to connect to the host machine), must grant a View Privilege on the credential chosen to all the Administrators (or users) accessing this OMS Agent File system location.For more information about granting privileges on a Named Credential, refer to Oracle Enterprise Manager Lifecycle Management Administrator's Guide.
Navigate to the location on the host where you want to create the Agent File System, and click OK.
The selected credential is saved along with the host and selected file system path. The saved credential is used to upload files and stage the uploaded files to a host target as part of some provisioning or patching activity.
Note: The credential is copied into a system owned credential with a generated name that starts with SWLIB. This will appear as the original credential name during Edit Credential flow.
-
-
Click OK to create a new entry for the storage location in the table, with details like Name, Location, Host, Status, and Host Credentials.
In addition to this, you can click Associated Entities to view or search the entities present in the selected upload location.
These newly configured OMS Agent locations are now available for storing entity files.
22.7.3 Configuring a Referenced File Location
To configure storage location that can be used for referring to files from the Software Library entities, perform the following steps:
-
From the Setup menu, select Provisioning and Patching, then select Software Library.
-
On the Software Library: Administration page, click Referenced File Locations tab.
-
To add an HTTP location that can be accessed through a HTTP URL, select HTTP from the Storage Type list and click +Add.
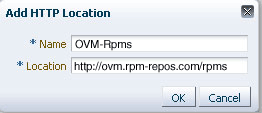
In the Add HTTP Location dialog box, enter a unique name and a HTTP location for the storage that you want to reference, and click OK.
A new entry for the storage location is created, with details like Name, Location, and Status.
-
To add an NFS shared location, select NFS from the Storage Type list and click +Add.
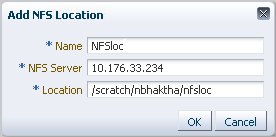
In the Add NFS Location dialog box, do the following:
-
Enter a unique name in the Name field for the storage.
-
In NFS server field, provide a fully qualified domain name or the IP address of the hosted machine that has NFS services running on them.
-
In the Location field, provide the shared location or directory path on the NFS server to define a storage location, then click OK.
A new entry for the storage location is created in the table, with details like Name, Location, and Status.
Note:
While creating a procedure, if you have a component step or a directive step that refers to an NFS file location, then you must ensure that you set the preferred privileged credentials for the target host before the procedure is submitted for execution. -
-
To add an Agent location that has read-only privileges set on it, select Agent from the Storage Type list and click +Add.
In the Add Agent Location dialog box, enter the following details:
-
In the Name field, enter a unique name for the storage.
-
In the Host field, click the magnifier icon to select a target from the list available.
For example,
xyz.company.com -
In the Location field, click Login As to select the credentials and browse the previously selected host.
The credential selected, either Preferred, Named or New, is saved along with the host and selected file system path. The saved credential is used for staging the files to a host target as part of some provisioning or patching activity.
Note: The administrator configuring the Software Library must grant view privilege (at least) on the credential chosen to all designers uploading or staging the files to or from this location.
-
Note: When you create a new entity, these newly configured Referenced File Locations are available as storage options.
22.8 Configuring Software Library on a Multi-OMS System
Oracle recommends that you configure each OMS Shared Storage Location to use a shared or mounted file system path. Doing this will ensure that this newly configured location remains accessible from any OMS host as and when they are added. All upload and stage requests for the files will happen through the Management Agent monitoring the OMS host.
Note:
Starting with Enterprise Manager 12c, use the EM CLI utility to migrate files across upload locations of different storage types. To migrate files from an OMS Shared storage location to an OMS Agent storage location, use the EM CLI verbremove_swlib_storage_location. The same verb supports the reverse action as well. Alternatively, you can also use the Cloud Control UI. For information about how to use the Cloud Control to migrate files across storage locations, see Section 22.13.3.If however, you have configured the OMS Shared storage location to use a local file system path, then you must migrate it to another OMS Shared Storage Location that uses a shared or mounted path. To do so, follow these steps:
-
In Cloud Control, from Setup menu, select Provisioning and Patching, then select Software Library.
-
On the Software Library Administration page, add a new OMS Shared storage location by specifying a name (for example: NewShared), and a shared file system path.
-
On successful completion, select the location you want to migrate, (For example: OldNonShared), and click Migrate and Remove.
-
In the popup dialog box, select the new OMS Shared File System as the storage plugin type, and the new OMS shared storage location (NewShared) as the destination to migrate the files.
-
Click Remove to submit a job, which on successful completion deletes the storage location entry from the table.
22.9 Software Library Cache Nodes
The Oracle Enterprise Manger Cloud Control 13c R1 introduces support for configuring one or more cache nodes in close proximity to a group of targets. Once configured, the Software Library File Transfer job ensures that entity files are picked from the appropriate cache node, caching the entity files as needed, thereby reducing the time taken for transferring files to targets distant from the Oracle Management Service.
22.9.1 Configuring the Cache Nodes
Cache Nodes is a feature in Enterprise Manager that enhances the file transfer experience to distant servers and data centers by reducing the load on the OMS. Cache nodes work on a set of predefined targets that function as one unit called the Group, and each cache node is an intermediate storage location on a host that serves a particular group of targets that it is associated with.
Typically, creating a group with targets that belong to the same geographical location is beneficial. Proximity of these targets ensures efficient file transfers. Having a cache node is also hugely beneficial to reduce the load on the OMS. For example, patching 100 targets at the same time is a huge load on the OMS, as the OMS will have to orchestrate file transfers with each of the 100 targets individually. However, you can counter this by using cache nodes in a way that the OMS just needs to transfer the files to the cache node once, and the cache node in turn processes the file transfer to the individual targets in the group that it is serving. Note that a given group of targets can be linked to more than one cache node. This approach is employed to ensure that the load is equally balanced across the nodes, which in turn helps in maximizing the performance of the individual cache node of the associated group.
In particular, this section covers the following:
22.9.1.1 Adding Cache Nodes
Note:
The credential is copied into a system owned credential with a generated name that starts with SWLIB. This will appear as the original credential name during the Edit Credential flow.Before your begin adding cache nodes, you must ensure that you have created a group of targets to associate with the relevant cache nodes. For information on creating groups, see Groups page.
To add cache nodes, follow these steps:
-
In Cloud Control, from the setup menu select Provisioning and Patching, then click Software Library.
-
On the Software Library Administration page, select Cache Nodes.
-
On the Cache Node tab, click Add.
-
In the Add Cache Node dialog box, enter the following details:
-
Enter a display name for the cache node. For example: Austin Nodes.
-
Add a short description for the cache node for your reference. For example, these are the targets on different hosts restricted to Austin, U.S.A.
-
Provide the host target machine that will be used as the cache node. For example, slc01.example.com
-
Provide a location on the host to store the files that are transferred from the OMS. Note that the directory must already exist and must be empty. For example,
/usr/cachenodes -
Search and select the group to be associated with the cache node. For example, Austin Group.
-
Quota by default is 10 GB, you can change this value and customize it to your requirement.
-
-
Click OK to create a cache node that serves the targets added to the group specified.
A summary of the available disk space, the file transfer history, and the information about the cache node is displayed once the node is successfully created.
Once the cache node is successfully created, you can click show to view all the entities associated with the targets in the group. Additionally, you can view the group details by clicking the group name.
22.9.1.2 Editing the Cache Nodes
To edit cache nodes, follow these steps:
-
In Cloud Control, from the setup menu select Provisioning and Patching, then click Software Library.
-
On the Software Library Administration page, select Cache Nodes.
-
On the Cache Node tab select the cache node that you want to update, and click Edit. This is particularly useful when you want to change the group associated with the cache or update the quota details.
-
Click OK to reflect the changes.
22.9.1.3 Deleting the Cache Nodes
To remove a cache, follow these steps:
-
In Cloud Control, from the setup menu select Provisioning and Patching, then click Software Library.
-
On the Software Library Administration page, select Cache Nodes.
-
On the Cache Node tab select one or more cache nodes, and click Delete.
22.9.1.4 Activating or Deactivating the Cache Nodes
If you want to temporarily suspend the functioning of a particular cache node, click Deactivate. Typically, when the quota is full or when you have to carry out some maintenance tasks on the cache nodes, this option becomes useful.
To deactivate a cache node, follow these steps:
-
In Cloud Control, from the setup menu select Provisioning and Patching, then click Software Library.
-
On the Software Library Administration page, select Cache Nodes.
-
On the Cache Node tab select a cache node, and click Deactivate.
22.9.1.5 Clearing the Cache Nodes
If you want to remove all the files associated with a cache node in order to free up the quota, click Clear.
To clear a cache node, follow these steps:
-
In Cloud Control, from the setup menu select Provisioning and Patching, then click Software Library.
-
On the Software Library Administration page, select Cache Nodes.
-
On the Cache Node tab select a cache node, and click Clear.
22.9.1.6 Synchronizing the Cache Nodes
To identify and clean up the inconsistencies within the cache node, follow these steps:
-
In Cloud Control, from the setup menu select Provisioning and Patching, then click Software Library.
-
On the Software Library Administration page, select Cache Nodes.
-
On the Cache Node tab select a cache node, and click Resynchronize.
22.9.2 Exporting and Importing Files for Cache Nodes
EM CLI verbs are available for exporting Software Library entities' files into compressed files. These compressed files can be transported to a cache node host and imported into the cache node. If Software Library entities are staged to one or more targets in the group served by the cache node, then the files will be served directly from the cache node in place of the OMS.
22.9.2.1 Export
Create a file with one Software Library entity internal ID per line. The internal ID of entities can be revealed by emcli verb list_swlib_entities. The file /u01/urnfe in the following example is such a file. Files of entities represented by lines in this file will be exported as /u01/exportcache/cachefiles.zip on host syq.acme.com, using credential named creds1 owned by the EM user ADMIN1.
emcli export_swlib_cache_files -dest_dir_path=/u01/exportcache -zip_file_name=cachefiles.zip -dest_host_name=syq.acme.com -urn_file_entry_file="/u01/urnfe" -dest_host_tmp_dir=/tmp -credential_name=creds1 -credential_owner=ADMIN1
Once the file cachefiles.zip has been exported, it can be taken to the intended destination cache node, such as skx.af.acme.com.
22.9.2.2 Import
The zip file can now be imported into the cache node using the following emcli verb: emcli import_swlib_cache_files -src_dir_path=/u01/cachefiles -zip_file_name=cachefiles.zip -cache_node_name=afcachenode -src_host_tmp_dir=/tmp -src_host_name=skx.af.acme.com
The credential associated with the cache node will be used for performing the import.
For more details, see Oracle Enterprise Manager command line interface guide.
22.10 Software Library File Transfers
The Software Library File Transfer jobs submitted as part of different provisioning/patching procedure/job runs can be searched and viewed from the File Transfer Activity page.
File Transfer Activity Page
The File Transfer Activity page enables you to track file transfers related to Software Library.
To access this page, log in to Enterprise Manager Cloud Control and from the Enterprise menu, select Provisioning and Patching, then click Software Library. On the Software Library home page, from the Actions menu, select File Transfer Activity.
The table on this page shows all file transfer activities that have been performed recently. The Job Name column displays the job for which the file transfer activity was performed, and the Procedure Run Name column displays the Deployment Procedure run name if it is run within a Deployment Procedure. Both these columns together can be used to identify the file transfer activity.
22.11 Using Software Library Entities
To access the Software Library Home Page, in Cloud Control, from the Enterprise menu, select Provisioning and Patching and then, click Software Library. Software Library is a repository that stores certified software binaries such as software patches, virtual appliance images, reference gold images, application software and their associated directive scripts, generally referred to as Entities. Accesses and privileges on these entities are decided by the Super Administrators or the owner of the entity.
Entities can broadly be classified as:
| Types | Description |
|---|---|
| Oracle-owned Entities | These entities are available by default on the Software Library Home page, once the Software Library is configured. In the following graphic, all the entities that are owned by Oracle, qualify as Oracle-owned entities, and all the folders that appear with a lock icon against them are Oracle-owned folders like Application Server Provisioning, Bare Metal Provisioning, Cloud, and so on. |
| Custom Entities | These entities are created by the Software Library users. For example, in the following graphic you can see a custom folder called My Entities, and entities called os2 and os1 created by the owner of the entity. These entities are called User-owned entities. |
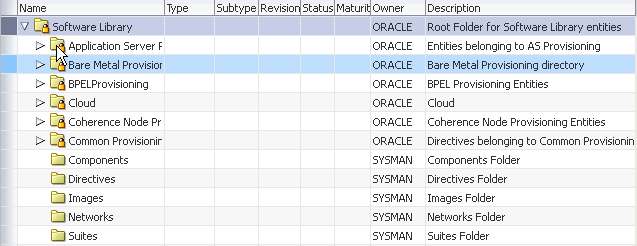
Note:
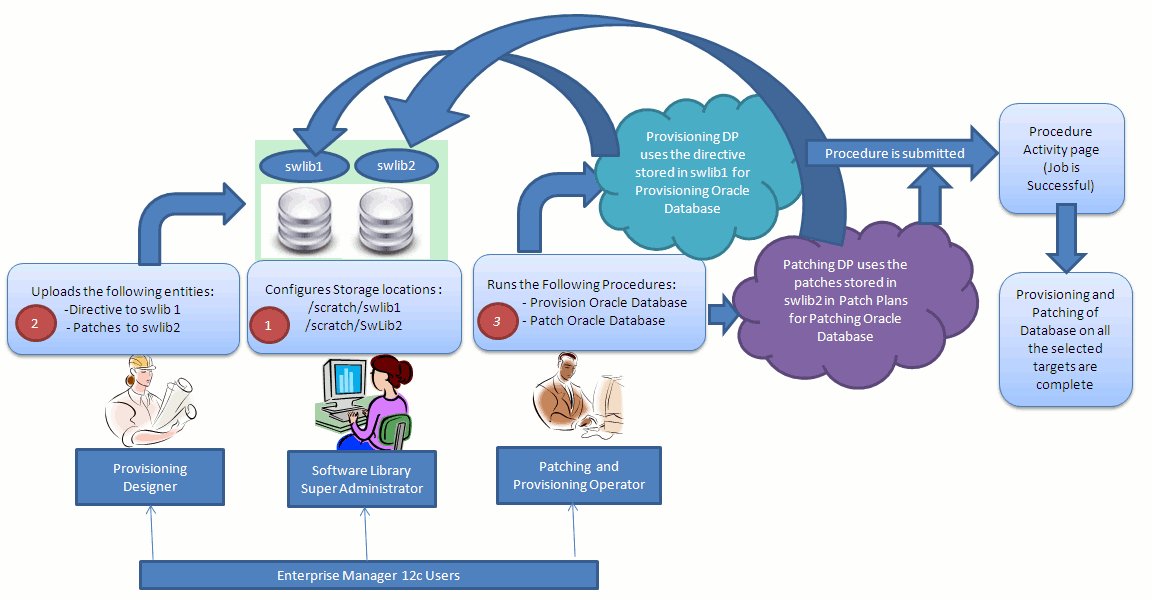
All Oracle-owned folders (and entities) are available on the Software Library Home page by default. The Oracle-owned folders have a read-only privilege, so you cannot select these folders to create an entity. You must create a custom folder to place your entities in them.A number of lifecycle management tasks such as patching and provisioning deployment procedures make use of the entities available in Software Library to accomplish the desired goal. Here is a pictorial representation of how a Provisioning Deployment Procedure and a Patching Deployment Procedure makes use of the entities available in the Software Library:
22.12 Tasks Performed Using the Software Library Home Page
From the Software Library Home page, you can do the following:
22.12.1 Organizing Entities
Only designers who have the privilege to create any Software Library entity, can create folders.
Note:
Starting with Oracle Enterprise Manager Cloud Control 12c Release 2 (12.1.0.2), in addition to using the GUI as described in this section, you can alternatively use the command line interface tool to Create Folders. To do so, refer to Oracle Enterprise Manager Lifecycle Management Administrator's Guide.To create a custom folder, perform the following steps:
-
From the Enterprise menu, select Provisioning and Patching, then select Software Library.
-
On the Software Library Home page, from Actions menu, click Create Folder to create a custom folder of your own.
The custom folder can contain User-owned folders, entities, and customized entities created by using the Create Like option.
-
In the Create Folder dialog box, enter a unique name for the folder. Also, select the parent folder in which you want to create this new custom folder and click Save.
For example, if the root folder is
Software Libraryand you created a custom folder in it calledCloud12gTest, then the Parent Folder field is populated as follows:/Software Library/Cloud12gTest.Note: Only the owner of the folder or the Super Administrator has the privilege to delete the folder, nobody else can.
22.12.2 Creating Entities
From the Software Library Home page, you can create the following entities:
Note:
Starting with Oracle Enterprise Manager Cloud Control 12c Release 2 (12.1.0.2), in addition to using the GUI as described in this section, you can alternatively use the command line interface tool to Create Entities. To do so, refer to Oracle Enterprise Manager Lifecycle Management Administrator's Guide.22.12.2.1 Creating Generic Components
To create a generic component from the Software Library Home page, perform the following steps:
-
From the Enterprise menu, select Provisioning and Patching, then select Software Library.
-
On the Software Library Home page, select a custom folder that is not owned by Oracle.
Note: You cannot create a generic component in an Oracle Owned Folder. To create a custom folder, see Section 22.12.1.
-
From the Actions menu, select Create Entity and click Component. Alternately, right click the custom folder, and from the menu, select Create Entity and click Component.
-
From the Create Entity: Component dialog box, select Generic Component and click Continue.
Enterprise Manager Cloud Control displays the Create Generic Component: Describe page.
-
On the Describe page, enter the Name, Description, and Other Attributes that describe the entity.
Note: The component name must be unique to the parent folder that it resides in. Sometime even when you enter a unique name, it may report a conflict, this is because there could be an entity with the same name in the folder that is not visible to you, as you do not have view privilege on it.
Click +Add to attach files that describe the entity better such as readme, collateral, licensing, and so on. Ensure that the file size is less than 2 MB.
In the Notes field, include information related to the entity like changes being made to the entity or modification history that you want to track.
-
On the Configure page, you can customize the generic component that you are creating by adding some new properties or updating the existing properties of the component.
Note: Select Shared Type to reuse the component property. Shared Type can be stored as a template, which can be used for creating different and more complicated top level types.
To add a new property, do the following, and click Next:
-
Select Top Level Type or Shared Type, and click Add.
-
Enter a unique name for the property. Depending on the property type selected, enter an initial or default value for the property.
-
To add a constraint, specify the Minimum or Maximum value for the selected property type, and click Add Constraint.
The Configured Constraints table lists all the constraints added. To remove a particular constraint from the property, select the property and click Remove.
-
-
On the Select Files page, you can select one or more files to be associated with the entity. Select one of the following options:
-
Upload Files: If you want to upload some entity files from the local file system or the agent machine to the selected destination location.
To select the destination location, in the Specify Destination section, in the Upload Location field, click the magnifier icon to select one of the following options:
-
OMS Shared File System
-
OMS Agent File System
The corresponding Storage Type and Location Path of the selected location is populated.
Note:
To upload the files, the status of the storage location to which the files are to be uploaded should be Active.If you select OMS Agent File system location, then ensure that you have the necessary privileges to access the location
In the Specify Source section, enter the location from where the files are being sourced, these locations can either be local file system or a remote file system monitored by the Management Agent. Select one of the following options for File Source:,:
-
If you select Local Machine, and click Add, the Add File dialog box appears. Click Browse to select the entity file from the source location, and give a unique name, and click OK.
You can upload the files to any of the configured storage locations available in OMS Shared File system location or OMS Agent File system location
-
If you select Agent Machine, select the name of the host machine from where you want to pick up the entity files. Click +Add and log in to the host machine with the desired credentials. For more information about the different credential types and their setup, see Oracle Enterprise Manager Lifecycle Management Guide.
Once you log in to the host machine, browse to the location where the files to be uploaded are present. You can upload the files to any of the configured storage locations available in OMS Shared File system location or OMS Agent File system location.
-
-
Refer Files: If you select the Refer Files option, you only need to enter the source location details, since you are not technically uploading anything to the Software Library. In the Specify Source section, select from HTTP, NFS, or Agent Storage types, and click OK. The corresponding Storage Type and Location Path of the selected location is populated.
Click +Add to reference the entity present at the selected Referenced File Location. In the Add Referenced File dialog box, enter a relative path to the file under Base Location. Click Stage As to organize the file in a temporary stage location with a unique name.
For details about each of these storage options, see Section 22.7.3
-
-
On the Set Directives page, click Choose Directives to associate a component with one or more directives. Click Next.
-
On the Review page, review all the details, and click Finish to create the component and upload it on the Software Library.
22.12.2.2 Creating Directives
Directives are entities in the Software Library that represent a set of instructions to be performed. These are constructs used to associate scripts with software components and images. These scripts contain directions on how to interpret and process the contents of a particular component or an image.
To create a directive from a Software Library Home page, perform the following steps:
-
From the Enterprise menu, select Provisioning and Patching, then select Software Library.
-
On the Software Library Home page, select a custom folder that is not owned by Oracle.
Note: You cannot create a generic component in an Oracle Owned Folder. To create a custom folder, see Section 22.12.1.
-
From Actions menu, select Create Entity and click Directive. Enterprise Manager Cloud Control displays the Create Entity: Directives wizard.
-
On the Describe page, enter the Name, Description, and Other Attributes that describe the entity.
Note: The component name must be unique to the parent folder that it resides in. In case you enter a unique name and it reports a conflict, it may be due to an entity with the same name in the folder that is not visible to you, as you do not have view privilege on it.
Click +Add to attach files that describe the entity better such as readme, collateral, licensing, and so on. Ensure that the file size is less than 2 MB.
In the Notes field, include information related to the entity like changes being made to the entity or modification history that you want to track.
-
On the Configure page, specify the command line arguments that must be passed to the directive to configure it. This command provides the parameters required to execute the directive.
To add the command line arguments or parameters, click Add.
In the Add Command Line Arguments dialog box, enter the values in the following fields:
-
Argument Prefix, is a switch or a constant command line argument.
The Argument Prefix eliminates the error-prone task of manually specifying the order of the parameter executions in a given directive. This is specially useful when a directive is made of multiple parameters.
Oracle recommends that you create command line arguments using an Argument Prefix.
-
Property Name, is the name of the property, that must be a string value.
-
Argument Suffix, is the text that must follow the command line property.
Though the suffix is rarely used, it determines how the parameters must be executed, based on the suffix value.
For example, if the command line argument you want to pass is as follows:
./test.sh -user={username}Then,
Argument Prefix is:
–userProperty Name is:
usernameAll the parameters added appear in the order of addition against the Command Line field.
To change the order of the parameter or edit any property of an existing parameter, click Edit.
To remove any of the parameters, click Remove.
In the Configuration Properties section, select either Bash or Perl as defined in the script.
Select Run Privileged to run the script with
rootprivileges. -
-
On the Select Files page, you can select one or more files to be associated with the entity. Select one of the following options:
-
Upload Files: If you want to upload some entity files from the local file system or the agent machine to the selected destination location.
To select the destination location, in the Specify Destination section, in the Upload Location field, click the magnifier icon to select one of the following options:
-
OMS Shared File System
-
OMS Agent File System
The corresponding Storage Type and Location Path of the selected location is populated.
Note:
To upload the files, the status of the storage location to which the files are to be uploaded should be Active.
If you select OMS Agent File system location, then ensure that you have the necessary privileges to access the location.
In the Specify Source section, enter the location from where the files are being sourced, these locations can either be local file system or a remote file system monitored by the Management Agent. Select one of the following options for File Source:
-
If you select Local Machine, and click Add, the Add File dialog box appears. Click Browse to select the entity file from the source location, and give a unique name, and click OK.
You can upload the files to any of the configured storage locations available in OMS Shared File system location or OMS Agent File system location
-
If you select Agent Machine, select the name of the host machine from where you want to pick up the entity files. Click +Add and log in to the host machine with the desired credentials. For more information about the different credential types and their setup, see Oracle Enterprise Manager Lifecycle Management Guide.
Once you log into the host machine, browse to the location where the files to be uploaded are present. You can upload the files to any of the configured storage locations available in OMS Shared File system location or OMS Agent File system location.
-
-
Refer Files: If you select the Refer Files option, you only need to enter the source location details, since you are not technically uploading anything to the Software Library. In the Specify Source section, select from HTTP, NFS, or Agent Storage types, and click OK. The corresponding Storage Type and Location Path of the selected location is populated.
Click +Add to reference the entity present at the selected Referenced File Location. In the Add Referenced File dialog box, enter a relative path to the file under Base Location. Click Stage As to organize the file in a temporary stage location with a unique name.
For details about each of these storage options, see Section 22.7.3
-
-
On the Review page, review all the details, and click Finish to create the component and upload it on the Software Library.
22.12.3 Customizing Entities
You cannot edit an entity present in an Oracle owned folder. However, to edit an Oracle-owned entity, you can make a copy of the entity and store it in a custom folder. Since you now have full access on the entity, you can customize the entity based on your requirement and may even choose to grant other users access to this entity.
To create a custom entity from an Oracle owned entity, perform the following steps:
-
From the Enterprise menu, select Provisioning and Patching, then select Software Library.
-
On the Software Library Home page, select an entity or alternately, search and select an entity.
For more information about searching for an entity, see Section 22.12.4.10.
-
From Actions menu, select Create Like.
-
On the Create Like: <Entity Name> dialog box, enter a name that is unique to the parent folder and a description for the entity.
By default, the root directory Software Library is preselected in the Parent Folder field.
To change the parent folder and organize the entities, click Change Parent Folder. and select the desired folder.
-
Click OK to apply the changes.
The new entity appears in the Entities table, under the selected parent folder.
You as the owner have all the privileges on the entity, and can update the properties as per your requirement.
To update the properties of the entity, see Section 22.12.4.8.
For more information on Oracle Owned Entities and User Owned Entities, see Section 22.11.
22.12.4 Managing Entities
From the Software Library Home page, you can perform the following maintenance tasks on the existing entities:
Note:
Starting with Oracle Enterprise Manager Cloud Control 12c Release 2 (12.1.0.2), you can either use the GUI or use the command line interface tool to perform all the tasks listed in Table 22-3.22.12.4.1 Accessing Software Library Home Page
To access the Software Library Home page, from the Enterprise menu, select Provisioning and Patching, then select Software Library.
22.12.4.2 Accessing Software Library Administration Page
To access the Software Library Administration page, from the Setup menu, select Provisioning and Patching, then select Software Library.
22.12.4.3 Granting or Revoking Privileges
An Enterprise Manager user requires, at the very least, a view privilege on an entity for the entity to be visible on the Software Library Home. The owner or super administrator can choose to grant additional privileges like edit (Update notion) or manage (or full) or at a later point of time, revoke the previously granted privilege.
To grant or revoke privileges, perform the following steps:
-
From the Enterprise menu, select Provisioning and Patching, then select Software Library.
-
To grant or revoke fine-grained privileges to the other users on any entity that you own, select the custom entity and from Actions menu, click Grant/Revoke Privileges.
-
On Grant/Revoke Privileges on: <entity_name> window, you can either grant or revoke Software Library privileges depending on the users roles and responsibilities in the organization.
Granting Privileges: To grant one or more new privileges, click +Add and search for the users. You can grant them one of the following privileges on the entity you own:
-
View Software Library Entity: This is normally an operator privilege where the user can only view the entity on the Software Library Home. The user cannot edit or manage the entity. All the Oracle owned entities can be viewed by all Enterprise Manager users.
-
Edit Software Library Entity: This is a designer privilege where a user has Create, Update, and Edit privileges on the entity.
-
Manage Software Library Entity: This is a super-administrator privilege where the user has complete access on the entity. With this privilege, you can grant or revoke accesses on this entity to other users, or delete the entity.
Revoking Privileges: To revoke previously granted privileges, select the user and click Remove.
-
-
Click Update to apply the selected grants on the entity.
22.12.4.4 Moving Entities
To move all the revisions of an entity from one folder to another, do the following:
-
From the Enterprise menu, select Provisioning and Patching, then select Software Library.
-
On the Software Library Home page, select an entity or alternately, search and select an entity.
For more information about searching for an entity, see Section 22.12.4.10.
-
From the Actions menu, click Move Entity and accept the confirmation.
-
From the Move Entity dialog box, select the destination folder for the entities and click Set New Parent Folder.
Note: Ensure that the source and the destination folders are not owned by Oracle, as you cannot move or edit them.
22.12.4.5 Changing Entity Maturity
When an entity is created from the Enterprise Manager Home, it is present in an Untested state. It is the responsibility of a designer to test the entity, and change the maturity level based on the test result.
To manage the lifecycle and indicate the quality (maturity level) of an entity, perform the following steps:
-
From the Enterprise menu, select Provisioning and Patching, then select Software Library.
-
On the Software Library Home page, select an entity or alternately, search and select an entity.
For more information about searching for an entity, see Section 22.12.4.10.
-
From the Actions menu, click Change Maturity to change the maturity value an entity after testing.
For example, an Oracle Database Clone component would be tested by selecting it in a deployment procedure interview flow that provisions a database. Once the entity is tested, the designer can change the maturity of the entity to either Beta or Production based on test results. Only when the entity is marked with Production level, the Operator can use it.
22.12.4.6 Adding Notes to Entities
To log information about the changes or updates made to an existing entity, perform the following steps:
-
From the Enterprise menu, select Provisioning and Patching, then select Software Library.
-
On the Software Library Home page, select an entity or alternately, search and select an entity.
For more information about searching for an entity, see Section 22.12.4.10.
-
From Actions menu, click Notes to include any important information related to the entity. You can also add notes while editing an entity.
The most recent note appears on top of the table, and the older notes appear below.
-
After updating the details, click Finish to submit the changes, and return to the Software Library Home page.
22.12.4.7 Adding Attachments to Entities
To add or upload files that are typically documents (like README, installation, configuration) related to the software the entity represents, perform the following steps:
-
From the Enterprise menu, select Provisioning and Patching, then select Software Library.
-
On the Software Library Home page, select an entity or alternately, search and select an entity.
For more information about searching for an entity, see Section 22.12.4.10.
-
From Actions menu, click Attachments to include one or more files related to the entity. These files contain some important information about the entity. You can also attach files while editing an entity.
For example, you can attach a readme file to a patch or a component, attach a test script to a directive and so on. However, you must ensure that the file size of each attachment is not more than 2 MB.
-
Click Finish to submit the changes, and return to the Software Library Home page.
22.12.4.8 Viewing, Editing, and Deleting Entities
To view, edit, or delete the details of an entity, perform the following steps:
-
From the Enterprise menu, select Provisioning and Patching, then select Software Library.
-
On the Software Library Home page, select an entity or alternately, search and select an entity.
For more information about searching for an entity, see Section 22.12.4.10.
-
To manage an existing entity, select the entity and perform any of the following functions:
-
View: Click View icon on the table to view the details of an entity. You cannot update the properties of the entity from here.
-
Edit: Click Edit icon on the table or right-click the entity and select Edit from the context menu to update the properties of an entity.
If you are satisfied with the details, click Save and Upload to make the changes available on the Software Library Home page.
-
Delete: Click Delete icon to remove the entity from the Software Library Home page.
Note: By deleting an entity, the entity is no longer available for selection, viewing, or editing, and will not be displayed on the Software Library Home page. However, the entity continues to exist in the repository and the associated files, if uploaded, continue to exist in the respective disk storage. To delete the entity completely from the repository and the associated files from the file system, you must purge the deleted entities from the administration page. The purge job not only deletes the files associated with the deleted entity, but removes the deleted entities itself from the repository tables.
For more information about how to purge the deleted entities from the storage location, see Section 22.12.4.9.
-
22.12.4.9 Purging Deleted Entities
To purge the deleted entities from all the configured Agent Storage locations, you can run a purge job. To do so, follow these steps:
-
In Cloud Control, from the Enterprise menu, select Provisioning and Patching, then select Software Library.
-
On the Software Library home page, from Actions menu, select Deleted Entities. A list of entities that are deleted from Software Library are displayed.
Note:
The Space Used attribute is displayed only for the deleted entities that had uploaded files to Software Library. -
On the Deleted Entities page, click Purge to permanently remove these entities from Oracle Management Repository, and the associated files from upload storage locations.
-
A Confirmation Message dialog box is displayed. Click Job Details to view the status of the purge job submitted.
Note:
A periodic job namedSWLIBPURGEruns daily to purge the deleted entities from the Software Library.
22.12.4.10 Searching Entities
This section contains the following topics:
22.12.4.10.1 Performing Basic and Advanced Searches
To perform a basic or an advanced search for an entity, follow these steps:
-
From the Enterprise menu, select Provisioning and Patching, then select Software Library.
-
To search for an entity, perform one of the following operations:
-
Find: On the Software Library Home page, you can search for an entity by its Name, Description, or Type. Select the search category, enter the desired value and then click the arrow icon.
On clicking the arrow icon, the result page displays a number of matching results, and allows you to toggle between the result rows by clicking the up and down arrows.
-
Search: To perform a detailed search for an entity, click Search. The search option, by default, allows you to search by Type, Name, Description, Revision, Maturity, Status, and File Name to retrieve a more granular search result.
Note: If you choose entities that have associated subtypes (like Components), then the page is refreshed with Subtype as an additional search category.
Specify appropriate values in All or Any of the search fields, and click Search.
To add more search parameters, in the Advanced Search section, click Add Fields menu and, select the desired search fields. The selected fields appear in the Advanced Search section as new search parameters. This new search feature enables you to refine your search, and drill down to the most accurate and desired search result.
To revert to the simple search view, click Close Search.
-
22.12.4.10.2 Saving Searches
Optionally, search criteria on the Advanced Search screen of the console, can be saved. Saved searches can be retrieved and executed again. They can also be edited and deleted.
-
Search for entities.
-
Click Save Search.
-
Enter the preferred name for the search in the text box, and click Ok.
22.12.4.10.3 Retrieving Saved Searches
To retrieve saved searches, follow these steps:
-
Search for entities.
-
Click Saved Searches, and select the preferred saved search from the list.
Alternatively, you can also select the preferred saved search from the Favorites menu. To do so, from the Favorites menu, select Saved Software Library Searches, and select the preferred saved search.
22.12.4.10.4 Managing Saved Searches
Using the Manage Saved Searches option, you can edit the name of the saved search, or delete the saved search. To do so, follow these steps:
-
To manage saved searches, you can perform one of the following steps:
-
From the Favorites menu, select Manage Favorites.
-
Click Saved Searches, and select Manage Saved Searches.
-
-
To edit the name of the saved search, select the preferred saved search, and in the Name text field, enter the new name. Click Ok to save changes.
-
To delete or remove a saved search, select the preferred saved search, and click Remove Selected. Click Ok to save changes.
22.12.4.11 Exporting Entities
To export selected entities, perform the following steps:
-
From the Enterprise menu, select Provisioning and Patching, then select Software Library.
-
On the Software Library Home page, from the Actions menu, click Export to export entities present in the Software Library as a Provisioning Archive (PAR) file.
The PAR file can be used for recreating the entities on an Enterprise Manager with a different repository.
-
On the Export Software Library Entities page, do the following:
-
Click +Add to search and select an entity.
-
In Directory Location, enter a directory location accessible to OMS for storing the generated PAR files.
-
In PAR File, enter the name of the PAR file with a
.parextension generated during export. -
To encrypt and securely store all the secret property values of the PAR file being exported, enter a value in the Oracle Wallet Password field.
Note: Specify the same password for importing this PAR file. For more information on importing, see Section 22.12.4.12.
-
Select Exclude Associated Files, to exclude the files, binaries, or scripts associated with an entity, from being exported.
For example, let us consider that you have a separate test and production environment and want to import only the entities that have been tested and certified in the test environment into production. The entities exported from the test system are made available as a Provisioning Archive (PAR) file. You can now choose to import this PAR file into the production system (which is identical to the test system) and use the tested entities.
-
-
Click Submit to submit an export job. Once the job runs successfully, the selected entities from the Software Library are exported as a PAR file.
Note:
Provisioning Archive Files that were exported from any Enterprise Manager version prior to 12c can not be imported into Enterprise Manager 12c.22.12.4.12 Importing Entities
To import PAR (Provisioning Archive) files into the Software Library or deploy them to an OMS, perform the following steps:
-
From the Enterprise menu, select Provisioning and Patching, then select Software Library.
-
On the Software Library Home page, from Actions menu, click Import to import the PAR files.
-
On the Import Software Library Entities page, specify the PAR File to be imported.
To import the PAR file successfully, in the Password field, enter the same password that was set on the PAR file to secure the secret property values during export.
For example, let us consider that you have a separate test and production environment and want to import only the entities that have been tested and certified in the test environment into production. The entities exported from the test system are made available as a Provisioning Archive (PAR) file. You can now choose to import this PAR file into the production system (which is identical to the test system) and use the tested entities.
-
If a revision of the entity being imported already exists in Software Library, then you can overwrite the existing entity with a newer revision during import by selecting Force New Revision.
Note: If a revision of the entity being imported already exists in the repository, and you do not select the Force New Revision option, then import process fails.
-
Click Submit to submit an import job. On successful completion of the job, the PAR files are imported into the Software Library.
Note:
Provisioning Archive Files that were exported from any Enterprise Manager version prior to 12c can not be imported into Enterprise Manager 12c.22.12.5 Staging Entities
For transferring files associated with multiple entities to multiple target hosts, follow the steps outlined in this section.
Prerequisites
Ensure that you meet the following prerequisites before staging the files:
-
Only hosts that are monitored by the Enterprise Manager can be specified as the destination for staging the files associated with an entity.
-
For each entity, only files that have been successfully uploaded to the entity (hence, in Ready status) can be selected for staging.
Note:
To verify if the entity has any files in the Ready state, follow these steps:-
Select the entity, and click View.
-
On the View Entity page, select Select Files tab, to verify the files associated with the entity.
-
Unless there is at least one file with a Ready status, you cannot proceed with the staging process.
-
-
Only users with View Job Privileges can perform staging.
-
Only entities for which the user has at least view privileges can be selected for staging.
-
The location should be writeable using the credential given for the target host.
-
If the source files to be staged are on NFS, then the credentials used for browsing the destination target should have
rootpermissions to be able to mount the NFS location.
Staging Procedure
Log in to Enterprise Manager Cloud Control and perform the following steps:
-
From the Enterprise menu, select Provisioning and Patching, then select Software Library.
-
From the Actions menu, select Stage Entities.
-
On the Stage Entities page, expand the Entities section (if not already expanded).
-
Click +Add to search and select the entities. Only those entities which are not already added and those that have at least one file in the READY status can be added.
-
All the files in the READY status are selected for staging by default. To change the selection, expand the row of the added entity in the table and check/uncheck the Select column.
-
You can optionally select the Overwrite files on the staging location to overwrite an existing version of the same file. If not, ignore this option and proceed.
-
In the Staging Destination section, click +Add to add the stage destination details.
-
Click +Add to select the target hosts for staging.
-
Specify the Stage Location in the text box applicable for the host targets selected.
-
Choose the credentials that should be used for staging. If more than one host target is selected, then the stage location should be writeable using the selected credential on each host.
-
Click OK to update the selected hosts in the staging destination table.
-
Click Submit.
-
To verify the status of the submitted job, click the Job Details link that leads to the File Transfer Activity page displaying the file transfer details. Alternately, from the Enterprise menu, select Job, then click Activity and search for the job.
22.13 Maintaining Software Library
To maintain the health and proper functionality of the Software Library, the administrator who configured the Software Library, or the Designer who has administration access on it must perform the tasks listed here.
This section includes:
22.13.1 Periodic Maintenance Tasks
Periodically, the Administrator must perform the following tasks for proper functioning of the Software Library:
-
Refresh the Software Library regularly to compute the available space, free space, and the space used by deleted entities. To do so, on the Administration page, in the upload file locations tab, select the storage location. From the Actions menu, select Refresh. On successful refresh, a confirmation is displayed. Alternately, you can search for the periodic refresh job
SWLIBREFRESHLOCSTATS, and edit the schedule and other attributes to suit your requirements. By default, this job is scheduled to run every 6 hours. -
Purge deleted entities to conserve disk space. To do so, see Section 22.13.6. Alternatively, you can search for the periodic purge job
SWLIBPURGE, and edit the schedule and attributes to suit your requirements. By default, this job is scheduled to run every 24 hours. -
Check accessibility of the configured Software Library locations. To do so, on the Administration page, in the upload file locations tab, select the storage location. From the Actions menu, select Check Accessibility.
22.13.2 Re-Importing Oracle Owned Entity Files
Note:
Re-importing metadata applies only to the Oracle owned files, which means all the entity files offered with the Enterprise Manager product by default. The metadata of User owned entity files cannot be recovered through the Re-import functionality.Re-Importing the metadata of Oracle owned entity files is not a periodic activity. Re-import helps to recover the metadata files in one of the following situations:
-
If you delete the file system location where the metadata was imported. For example,
/scratch/swlib1/ -
If the import job submitted while creating the first upload location fails.
To re-import the metadata of Oracle owned files, do the following:
-
In Cloud Control, from Setup menu, select Provisioning and Patching, and then click Software Library.
-
On the Software Library Administration page, in the Upload File Location tab, from Actions menu, select Re-Import Metadata option to submit a job that re-initiates the re-import process.
22.13.3 Removing (and Migrating) Software Library Storage Location
Software Library Storage Administrators have the required privileges to delete a storage location. If a storage location is not in use, then you can remove it instantly. However, if it is in use, then you must migrate the contents to another location so that the entities using these files continue to remain usable.
Before removing a storage location that is currently in use, you are prompted for an alternate location for the files. After you select an alternate location, a migration job is submitted, and the location is marked as Migrating. After successful migration of the entity files to the new location, the location configuration is deleted. In case of any errors during migration, the location is marked as Inactive. Once the errors are fixed, and the storage administrator ascertains that the location is good to use, the location is marked as Active.
Note:
To remove a location from OMS Agent File System or Referenced Agent File System storage, you must have a view privilege on the credentials for the location being removed, and the alternate location where the files are migrated.To delete a configured storage location, perform the following steps:
-
In Cloud Control, from Setup menu, select Provisioning and Patching, then select Software Library.
-
On the Software Library Administration page, select the storage location, and click Migrate and Remove.
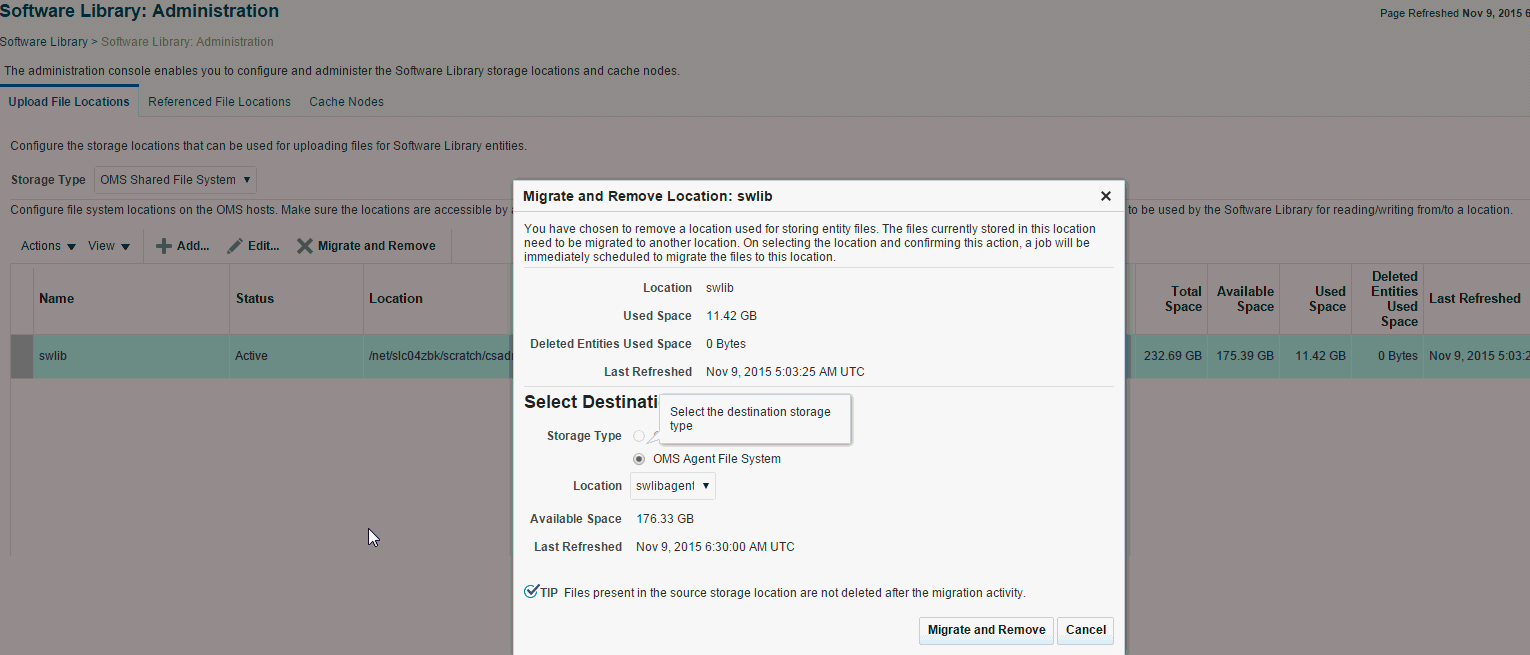
-
On the Migrate and Remove Locations dialog box, select either OMS Shared File System or OMS Agent File System. A list of available active storage locations are displayed, select one and click Migrate and Remove.
Note:
At least one upload location (either OMS Shared File System or OMS Agent File System) should be present. The last active upload location cannot be removed. Use ei using the steps listed inther Cloud Control or EMCLI to migrate an upload location to another upload location of either upload storage types (either OMS Shared File System or OMS Agent File System). For example, you can migrate an OMS Shared File System storage location to an OMS Agent File System storage location. Even the reverse operation is supported. However, note that this type of migration, across storage types, is supported specifically for upload storage types, and is not applicable for the reference storage types.For a storage location, if there are no active upload locations (OMS Shared File System or OMS Agent File System), then the Migrate and Remove button will not be enabled for that location
To migrate the files from one upload location to another, you can also use the EM CLI verb
emcli remove_swlib_storage_location.For more information about this command, see Section 22.4. -
In the confirmation dialog box, click Migrate and Remove to submit a job, which on successful completion deletes the storage entry from the table.
Note:
When one storage location is migrated to another location, for example, from/vol/swlib1to/vol/swlib2, the file system contents of the source location (/vol/swlib1) are not deleted during the migration. However, going forward, the source location and the files are never referenced by Software Library.
22.13.4 Removing a Referenced Storage Location
To remove a configured reference storage location (HTTP/ NFS/ External Agent Location), perform the following steps:
-
In Cloud Control, from Setup menu, select Provisioning and Patching, then select Software Library.
-
On the Software Library Administration page, select the storage location, and click Migrate and Remove.
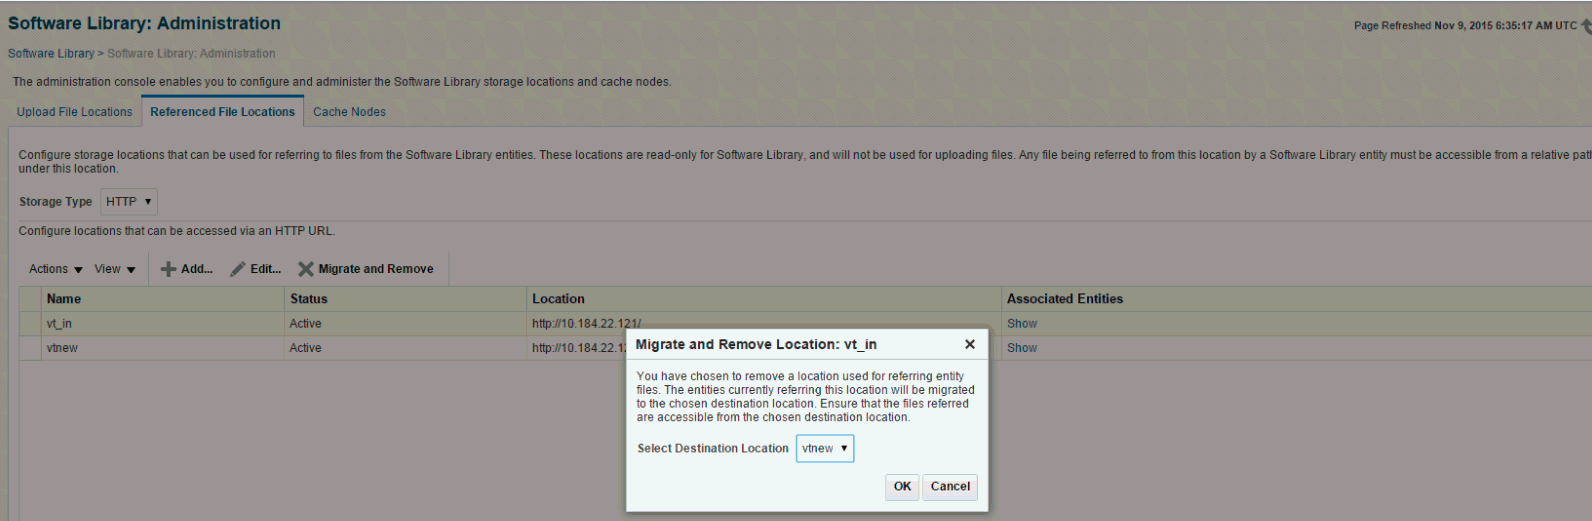
Note:
If a location is not in use, then select the storage location and click OK to remove the location. However, if some entities are using a storage location, then you must migrate the files to another location before deleting the existing location. -
To migrate the files to another location from the Migrate and Remove Locations dialog box, select a destination location from the list of active storage locations, then click OK.
Note:
If there are no active locations of the same storage type available for migration, then the Migrate and Remove button is disabled for the location.
22.13.5 Deactivating and Activating a Storage Location
An upload or reference storage location can be deactivated. Once deactivated, the status of the storage location becomes Inactive and no further uploads will be allowed to the upload storage location. A storage location in an inactive state can be activated to be put back in use.
To deactivate a storage location, follow these steps:
-
In Cloud Control, from Setup menu, select Provisioning and Patching, then select Software Library.
-
On the Software Library Administration page, select the storage location that is in an Active state, then from the Actions menu select Deactivate. A confirmation dialog is displayed.
-
Upon confirmation, the storage location is deactivated, and state changes to Inactive.
To activate a storage location, follow these steps:
-
In Cloud Control, from Setup menu, select Provisioning and Patching, then select Software Library.
-
On the Software Library Administration page, select the storage location that is in an inactive state, then from the Actions menu select Activate. A confirmation dialog is displayed.
-
Upon confirmation, the storage location is activated, and state changes to Active.
22.13.6 Scheduling Purge Job
Starting with Enterprise Manager 12c the purge job can be scheduled. To do so follow these steps:
-
In Cloud Control, from Setup menu, select Provisioning and Patching, then select Software Library.
-
On the Software Library Administration page, select the storage location, and from the Actions menu select Purge. The following dialog box appears where you can schedule the purge job:
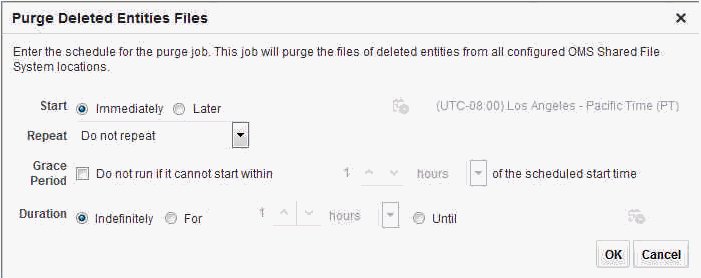
-
Enter all the details and click OK to submit the job, on successful completion of the job all the deleted entities are removed from the storage location.
However, you can also perform this operation in the following method:
-
In Cloud Control, from Setup menu, select Provisioning and Patching, then select Software Library.
-
On the Software Library Administration page, from the Actions menu, select Deleted Entities. The list of deleted entities with type, subtype, owner, and size is displayed.
-
Click Purge to submit the job, on successful completion of the job all the deleted entities are removed from the storage location.
22.13.7 Backing Up Software Library
For information about backing up your Software Library, see the chapter on "Backing Up and Recovering Enterprise Manager" in the Enterprise Manager Advanced Installation and Configuration Guide.