15 Installing JVMD Agents with Advanced Install Options
This chapter describes how you can install JVM Diagnostics (JVMD) Agents manually in the Enterprise Manager Cloud Control environment.
In particular, this chapter covers the following:
15.1 Overview of JVMD Architecture
JVM Diagnostics is integrated with Oracle Enterprise Manager Cloud Control. It primarily enables administrators to diagnose performance problems in Java applications in the production environment. By eliminating the need to reproduce problems, it reduces the time required to resolve these problems, thus improving application availability and performance. Using JVMD, administrators can identify the root cause of performance problems in the production environment, without having to reproduce them in the test or development environment.
The following diagram shows the JVMD Architecture:
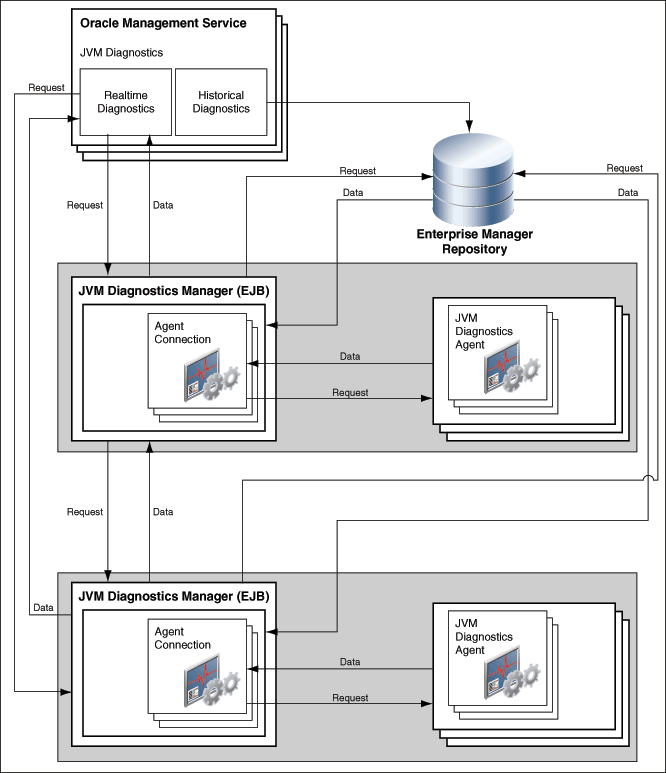
JVMD Engine is the core analytical engine of the JVMD monitoring system and it is configured out-of-the-box in release 13c. JVMD Engine collects runtime data from JVMD Agents on request from the OMS, and stores the data in the repository. Multiple JVMD Engines can be configured.
Note:
To restart JVMD Engine (deployed on the OMS host) without restarting the Cloud Control application, use the WebLogic Administration console.JVMD Agents are the data collectors of the target JVM. JVMD Agents are deployed to managed application servers to collect JVM monitoring data related to JVM threads, stacks, heap and CPU usage, and so on, in real-time, while introducing minimal overhead.
The JVMD Engine runs as an Enterprise JavaBeans (EJB) technology on a WebLogic Server. The JVMD Agent is deployed on the targeted JVM (the one running a production WebLogic Server). It collects real-time data and transmits it to the JVM Diagnostics Engine. This data is stored in the Management Repository, and the collected information is displayed on the Enterprise Manager Cloud Control console for monitoring purposes. The communication between JVMD Engine and JVMD Agent can be secure (SSL), or non-secure.
15.2 Before you Begin Installing JVMD Agent
Before installing a JVMD Agent, review the points outlined in Oracle Enterprise Manager Cloud Control Basic Installation Guide.
15.3 Prerequisites for Installing JVMD Agent
Before installing a JVMD Agent, ensure that you meet the prerequisites described in Oracle Enterprise Manager Cloud Control Basic Installation Guide.
15.4 Deploying JVMD Agents Using Advanced Installation Options
This section describes how to deploy JVMD Agents manually.
Note:
If you have removed an agent and you want to deploy it again, you must restart JVM before deploying it.This section consists of the following:
-
Deploying JVMD Agents Manually by Downloading and Deploying jamagent.war
-
Ensuring Secure Communication by Connecting JVMD Agent to the JVMD Engine Secure Port
15.4.1 Deploying JVMD Agents Manually by Downloading and Deploying jamagent.war
To deploy JVMD Agents manually, follow these steps:
-
Download jamagent.war.
To download
jamagent.warusing Cloud Control, follow these steps:-
In Cloud Control, from the Setup menu, select Middleware Management, then select Setup.
-
On the Setup page, click Download JVMD Agent. The Download JVM Diagnostics Components dialog box is displayed.
-
From the JVMD Component menu, select JVMD Agent to download
jamagent.warand then click OK. The JVM Diagnostics Agent web.xml Parameters dialog box is displayed. -
From the Available Engines menu, select an option from the list:
Select the HTTP URL if you want the JVMD Agent to connect to the JVMD Engine using a non-secure connection.
Select the HTTPS URL if you want the JVMD Agent to connect to the JVMD Engine using a secure connection.
Select Custom if you want the JVMD Agent to connect to a JVMD Engine through a Load Balancer or a firewall. Specify the host name and the port that the JVMD Agent must connect to.
For example:
HTTP:
http://sl1.us.example.com:3800HTTPS:
https://sl1.us.example.com:3801 (secure communication)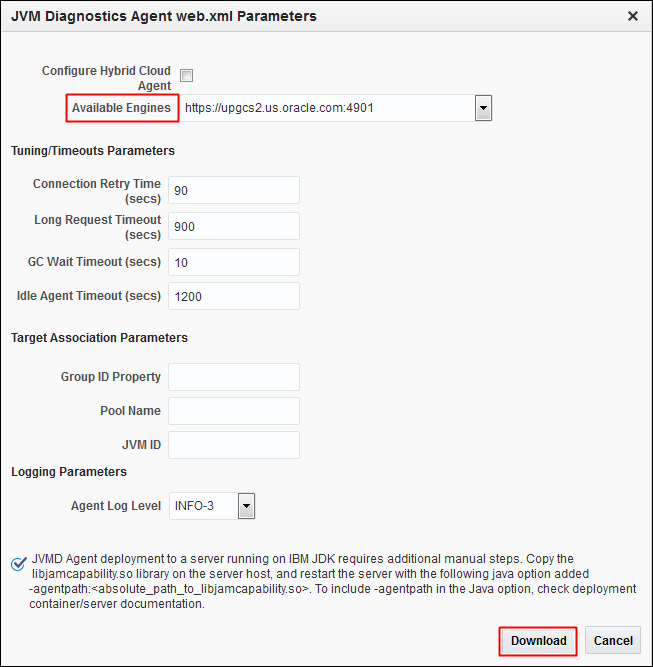
-
-
Deploy JVMD Agent manually.
See the relevant steps below:
Deploying JVMD Agent on WebLogic Server
To deploy JVMD Agent on a WebLogic Managed Server manually, follow these steps:
-
Make a copy of the deployment profile
sample_jvmdagent_deploy.propertiesavailable in thejvmd.zipfile. Update the location of thejavadiagnosticagent.earfile, the name of the WebLogic domain, and the server information. Save the profile asjvmdagent_deploy.properties.For more information about the parameters, view the
README.txtfile present in thecustomprovfolder of thejvmd.zipfile. -
Run the following perl script available in the
customprovfolder of thejvmd.zipfile to deploy JVMD Agent on all the specified servers.
Deploying JVMD Agent on GlassFish
To deploy JVMD Agent on a GlassFish server manually, follow these steps:
-
Log in to the Glassfish Administration console.
-
In the Common Tasks section, click Applications.
-
In the Deployed Applications section, click Deploy.
-
For Location, select Packaged File to Be Uploaded to the Server, then specify the location on your local host where
jamagent.waris present. -
For Selected Targets, add the server on which you want to deploy
jamagent.war. -
Click OK.
To deploy JVMD Agent on JBoss manually, follow these steps:
-
Log in to the JBoss Administration console.
-
Under Applications, click Web Application (WAR)s.
-
Click Add a new resource.
-
Enter the absolute path to
jamagent.warpresent on your local host. -
For both Deploy Exploded and Deploy Farmed, select No.
-
Click Continue.
To deploy JVMD Agent on JBoss manually, you can also do the following:
-
Transfer
jamagent.warto the following location:<JBOSS_HOME>/server/all/deploy -
Restart the application server.
Deploying JVMD Agent on Tomcat
To deploy JVMD Agent on Tomcat manually, follow these steps:
-
Transfer
jamagent.warto the following location:$CATALINA_BASE/webapps -
Restart the application server.
For the latest versions of Tomcat, if the
autoDeployflag is set totruein$CATALINA_BASE/conf/server.xml,you do not need to restart the application server. Tomcat will pick upjamagent.warat runtime.
Deploying JVMD Agent on Websphere
To deploy JVMD Agent on Websphere manually, follow these steps:
-
Log in to the Websphere Administration console.
-
Expand Applications, then click New Application.
-
Click New Enterprise Application.
-
For Path to the new application, select Local file system, then specify the location on your local host where
jamagent.waris present. -
Provide the context root for
jamagent.war. -
Save the configuration.
-
Start the application.
To deploy JVMD Agent on OC4J manually, follow these steps:
-
Log in to the OC4J Administration console.
-
Click Applications.
-
Click Deploy.
-
Select Archive is present on local host. For Archive Location, specify the location on your local host where
jamagent.waris present. Click Next. -
For Application Name, enter
jamagent.For Context Root, enter/jamagent. -
Click Deploy.
Deploying JVMD Agent on a Standalone JVM
A JVMD Agent can be deployed on a standalone JVM such that the inputs are read from
web.xml,or such that you specify the inputs on the command line.To deploy a JVMD Agent on a standalone JVM such that all the inputs are read from
web.xml,run the following command from the command line:java -cp <absolute_path_to_jamagent.war> jamagent.jamrun <java_class_with_a_main_method>To deploy a JVMD Agent on a standalone JVM by specifying all the inputs on the command line, run the following command from the command line:
java -cp <absolute_path_to_jamagent.war> jamagent.jamrun <java_class_with_a_main_method> jamconshost=<jvmd_engine_host> jamconsport=<jvmd_engine_listen_port> jamjvmid=<unique_jvmd_identifier> jamtimeout=<timeout_period_in_seconds> jamloglevel=<jvmd_agent_log_level>Note:
Whenjamagent.waris run using an IBM Java Development Kit (JDK), you may see the following warning in the logs:******can_tag_objects capability is not set.Copy library libjamcapability to another directory and restart Java with argument "-agentpath:<absolute_path_to_libjamcapability.so>" ******
To troubleshoot this warning, include the
libjamcapability.solibrary and restart the IBM JVM:/scratch/IBM/WebSphere/AppServer/java/bin/java -agentpath:/scratch/libjamcapability.so -cp /scratch/jamagent.war jamagent.jamrun MyFirstProgram -
15.4.2 Deploying JVMD Agents Manually Using deploy_jvmdagent.pl
You can deploy JVMD Agents manually, using the deploy_jvmdagent.pl script. You can run this script only in silent mode, that is, you must specify all the input details using a properties file.
To deploy JVMD Agents manually using deploy_jvmdagent.pl, follow these steps:
-
Ensure that the latest version of
jamagent.warhas been downloaded.For information on how to download
jamagent.war,see Step 1 in Section 15.4.1. -
Navigate to the following location on the OMS host:
$<MIDDLEWARE_HOME>/plugins/oracle.sysman.emas.oms.plugin_13.1.1.0.0/archives/jvmd/deployment_Scripts/agent/jvmd/ -
View the
README.txtfile for information on how to use thedeploy_jvmdagent.plscript. -
Specify all the inputs in a properties file, then use the following command:
perl deploy_jvmdagent.pl [-appserver <server_type>] [-file <name_of_properties_file>]For example,
perl deploy_jvmdagent.pl -appserver WLS -file wls_deploy.properties.Deploying JVMD Agents using
deploy_jvmdagent.plis supported only on WebLogic Server and GlassFish, and not on other application servers. The-appserverparameter defines the application server on which you want to deploy a JVMD Agent. If you are deploying a JVMD Agent on a WebLogic Managed Server, specifyWLSfor-appserver.If you are deploying a JVMD Agent on a GlassFish server, specifyGFfor-appserver.If you do not specify the-appserverparameter, it is assigned the valueWLSby default.The
-fileparameter defines the name of the properties file containing the deployment inputs. If you do not specify this parameter, and have specifiedWLSfor-appserver,deploy_jvmdagent.plsearches for a properties file namedweblogic_deploy.propertiesin the folder containing the script. If you do not specify the-fileparameter, and have specifiedGFfor-appserver,deploy_jvmdagent.pllooks for a properties file namedglassfish_deploy.propertiesin the folder containing the script. To learn how to specify the input details in a properties file, view the sample properties filessample_weblogic_deploy.propertiesorsample_glassfish_deploy.properties.
15.4.3 Deploying JVMD Agents for High Availability
If you have multiple JVMD Engines in your setup, and have configured a load balancer for them, you can deploy JVMD Agents such that they connect to the load balancer, and not to any of the individual JVMD Engines. This increases the availability of the JVMD Agents, and creates a failover mechanism, that is, even if a particular JVMD Engine goes down, the JVMD Agents remain active.
You can deploy JVMD Agents for high availability using the Setup page, or manually.
Deploying JVMD Agents for High Availability Using the Setup Page
To deploy JVMD Agents for high availability using the Setup page, follow these steps:
-
Follow the steps mentioned in Oracle Enterprise Manager Cloud Control Basic Installation Guide to deploy a JVMD Agent.
Note:
By default, the JVMD Agent connects to the load balancer using HTTP. If you want the JVMD Agent to connect to the load balancer using HTTPS, you must deploy the JVMD Agent manually, as described in Step 2 of Section 15.4.1. -
On the JVMD Agents Configurations page, for Available JVMD Engines, select Other. Provide the load balancer host name and port.
Click Next.
-
On the Review page, review all the information, then click Deploy.
Deploying JVMD Agents for High Availability Manually
To deploy JVMD Agents for high availability manually, follow these steps:
-
Follow the steps mentioned in Step 1 of Section 15.4.1 to download
jamagent.war. -
When the JVM Diagnostics Agent web.xml Parameters dialog box is displayed, from the Available Engines menu, select Custom. Provide the load balancer host name and port.
Click Download.
-
Deploy the JVMD Agent as mentioned in Step 2 of Section 15.4.1.
Note:
By default, the JVMD Agent connects to the load balancer using HTTP. If you want the JVMD Agent to connect to the load balancer using HTTPS, you must use a certificate, as described in Section 15.4.4. Ensure that the common name of the certificate you use matches the host name of the load balancer.15.4.4 Ensuring Secure Communication by Connecting JVMD Agent to the JVMD Engine Secure Port
To ensure secure communication with the JVMD Engine, the JVMD Agent must have access to a KeyStore in which the certificate of the Managed Server (on which the JVMD Engine is deployed) is added. The KeyStore of the Enterprise Manager Cloud Control domain (that is, the EMGC domain in which the JVMD Engine Managed Server is created) can be used for the same.
If the JVMD Engine and the JVMD Agent are running on the same host, the JVMD Agent will have access to the EMGC domain and the default KeyStore. In this case, follow these steps to ensure secure communication:
-
Locate the KeyStore. It is usually available in the following location:
<WEBLOGIC_HOME>/server/lib/DemoTrust.jksWEBLOGIC_HOMErefers to the installation directory of the WebLogic Server software. -
Log in to the WebLogic Server Administration Console.
-
From the Environment menu, select Servers.
-
Select the Managed Server on which the JVMD Agent is deployed, then select the Server Start tab.
-
For Arguments, specify the following arguments:
-Djavax.net.debug=ssl -Djavax.net.ssl.trustStore=<location_of_DemoTrust.jks>-Djavax.net.ssl.trustStorePassword=<DemoTrust.jks_KeyStore_password> -
Restart the Managed Server.
If the JVMD Engine and the JVMD Agent are running on different hosts, which is the case in most environments, you must download the SSL certificate from the JVMD Engine Managed Server, then add the certificate to a new or an existing KeyStore on the target Managed Server where the JVMD Agent is deployed. This enables the JVMD Agent to access the certificate and communicate with the JVMD Engine secure port. To do this, follow these steps:
-
Follow these steps to download the JVMD Engine Managed Server certificate:
-
Access the following URL using a browser:
https://<jamconshost>:<jamconsport(secure)> -
From the Tools menu, select Options.
-
Select the Advanced tab, then select the Encryption tab.
-
Click View Certificates.
-
Select the Servers tab, search for the
<jamconshost>:<jamconsport(secure)>certificate, then select it. Click Export. -
Save the certificate as
JVMDCert.crt.
-
-
Add the certificate to an existing KeyStore (for example,
DemoTrust.jks),or create a new KeyStore (for example,keystore.jks)and then add the certificate to it. To do this, run the following command:keytool -import -trustcacerts -alias root -file JVMDCert.crt -keystore <name_of_existing_or_new_KeyStore>If you specify an existing KeyStore name for the
-keystoreparameter, you are prompted for the KeyStore password. If you specify a new KeyStore name for the-keystoreparameter, a new KeyStore is created with the default passwordchangeit. -
Log in to the WebLogic Server Administration Console.
-
From the Environment menu, select Servers.
-
Select the Managed Server on which the JVMD Agent is deployed, then select the Server Start tab.
-
For Arguments, specify the following arguments:
-Djavax.net.debug=ssl -Djavax.net.ssl.trustStore=<location_of_KeyStore>-Djavax.net.ssl.trustStorePassword=<KeyStore_password>Note:
The default password for the DemoTrust.jks KeyStore isDemoTrustKeyStorePassPhrase. -
Restart the Managed Server.
Note:
When a WebLogic Managed Server running on a Sun or JRockit Java Virtual Machine (JVM) attempts to connect to an external resource using HTTPS, you may encounter the following exception:java.lang.ClassCastException: weblogic.net.http.SOAPHttpsURLConnection
This exception occurs because a HTTP API attempts to use an underlying WebLogic implementation, instead of using the Sun implementation. To avoid this exception, using the runtime argument, set the following flag:
-DUseSunHttpHandler=true
15.5 After Installing JVMD Agents
After installing a JVMD Agent, follow the steps outlined in Oracle Enterprise Manager Cloud Control Basic Installation Guide.