4 Installing Cygwin and Starting the SSH Daemon
This chapter explains how to install Cygwin and start the SSH daemon on Microsoft Windows hosts. This chapter is applicable only when you want to install a Management Agent on a Microsoft Windows host, using the Add Host Targets Wizard or EM CLI. In particular, this chapter covers the following:
Important:
If you do not want to install Cygwin to deploy Management Agents on Microsoft Windows hosts using the Add Host Targets Wizard or EM CLI, you can choose to deploy Management Agents on these hosts using the PsExec process utility. For information on how to deploy Management Agents on Microsoft Windows hosts using PsExec, see Appendix E.4.1 About the Cygwin Requirement for Installing Management Agents
The Add Host Targets Wizard is an application built into the Enterprise Manager Cloud Control console. It offers GUI-rich, interactive screens that enable you to install Oracle Management Agents (Management Agents) on unmanaged hosts and convert them to managed hosts, so that they can be monitored and managed in Enterprise Manager Cloud Control.
When you use the Add Host Targets Wizard or EM CLI to install a Management Agent on a host running on Microsoft Windows, as a prerequisite, you must install Cygwin and start the SSH Daemon on the host. To do so, follow the steps listed in Section 4.3.
Cygwin is essentially a utility that offers a Linux-like environment on a Microsoft Windows host. Technically, it is a DLL (cygwin1.dll) that acts as a Linux API layer providing substantial Linux API functionality. Once you install Cygwin, you can configure the SSH Daemon on the host. The Add Host Targets Wizard is certified and supported with Cygwin 1.7.
The SSH Daemon enables the Add Host Targets Wizard to establish SSH connectivity between the OMS host and the host on which you want to install a Management Agent. Using this connectivity, the wizard transfers the Management Agent software binaries to the destination host over SSH protocol, installs the Management Agent, and configures it.
4.2 Before You Begin Installing Cygwin
-
With Cygwin version cygcheck (cygwin) 2.0.1, short passwords with fewer than 8 characters are not allowed.
-
Before starting with the SSHD setup, ensure you are not using OpenSSH and MKSNT when using the Add Host Targets Wizard. To do so, perform the following checks:
-
Ensure
OpenSSH\binandmksntare not in yourPATHenvironment variable. If they are, remove them by doing the following:-
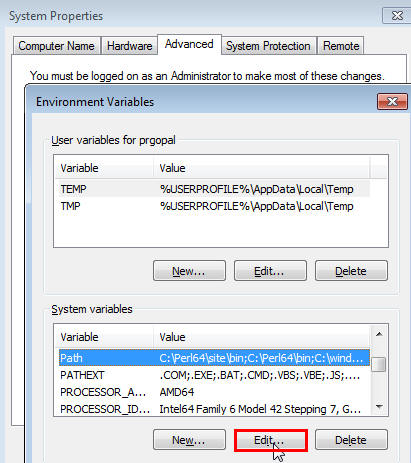
Right-click on My Computer and go to Properties.
-
In the System Properties window, click Advanced.
-
In this tab, click Environment Variables.
-
Here, search for the
PATHsystem variable, select it, and if theOpenSSH\binandmksntare present inPATH,click Edit. -
In the Edit System Variable dialog box, delete these two values from
PATH,then click OK.
-
-
Stop the SSH Daemon if it is running from
OpenSSH,MKSor any other vendor. If the SSH Daemon is running, stop it by doing the following:-
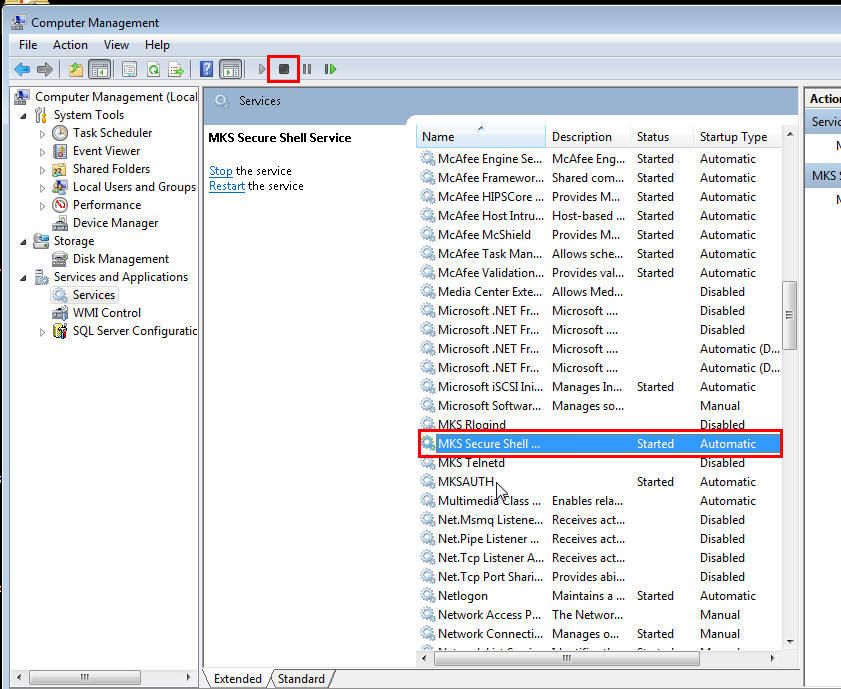
Right-click on My Computer, and select Manage.
-
In the Computer Management window, in the left pane, expand Services and Applications, and select Services.
-
In the right pane, click the SSH Daemon/MKS Secure Shell service, then click the Stop button.
-
Note:
The navigational steps described in this section may vary for different Microsoft Windows operating systems. -
4.3 Installing Cygwin
To install Cygwin on a Microsoft Windows host, follow these steps:
-
Access the following URL, then click Install Cygwin:
-
Download the 32-bit version (if you are running a 32-bit version of Microsoft Windows) or the 64-bit version (if you are running a 64-bit version of Microsoft Windows) of the Cygwin setup executable.
-
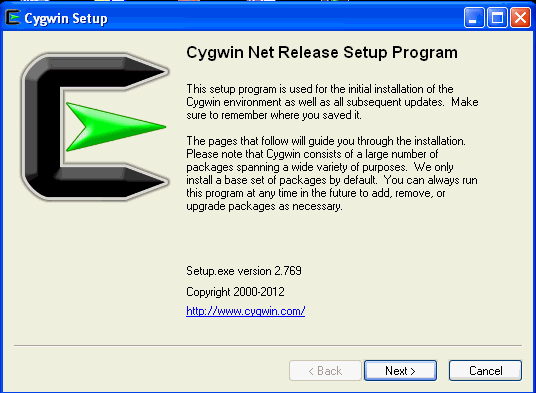
Run the setup executable, then click Next to proceed.
-
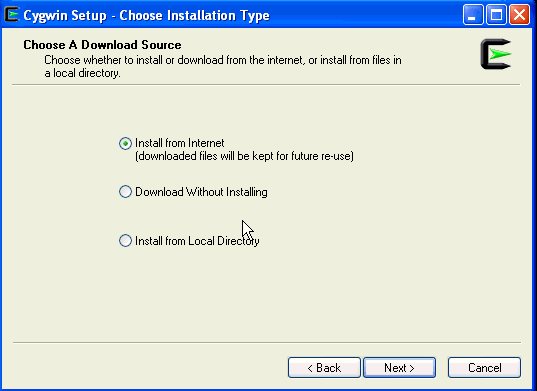
On the Choose Installation Type screen, select Install from Internet, then click Next.
-
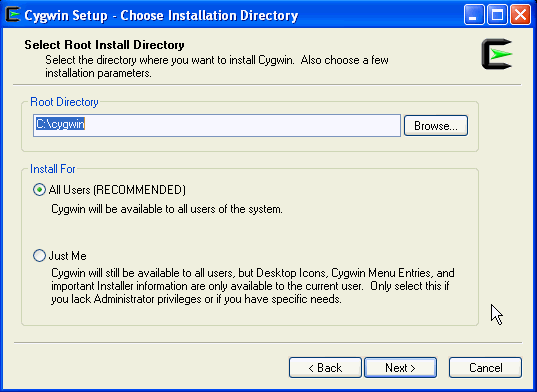
On the Choose Installation Directory screen, enter C:\cygwin as the Root Directory, then click Next.
Note:
If you choose to install Cygwin in a different directory, then ensure that you update theSSH_PATH, SCP_PATH, MKDIR_PATH, SH_PATH, CHMOD_PATH, andTRUEproperties present in the$<ORACLE_HOME>\oui\prov\resources\ssPaths_msplats.propertiesfile to their proper Cygwin binary values, after installing the Enterprise Manager system.For example, if you choose to install Cygwin in the
D:\software\cygwindirectory, then update the specified properties in the following manner:SCP_PATH=D:\software\cygwin\bin\scp.exe SH_PATH=D:\software\cygwin\bin\sh.exe CHMOD_PATH=D:\software\cygwin\bin\chmod.exe LS_PATH=D:\software\cygwin\bin\ls.exe
-
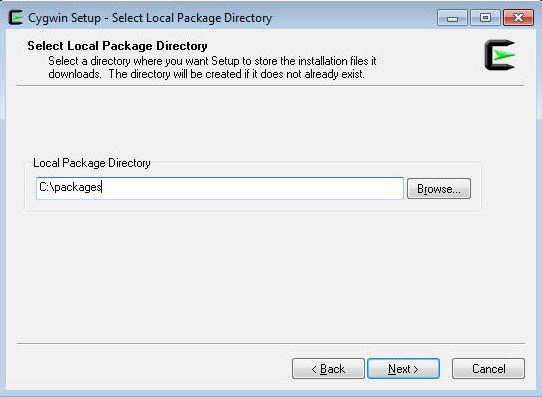
On the Select Local Package Directory screen, select a directory on your local machine where you want to store the downloaded installation files, then click Next.
-
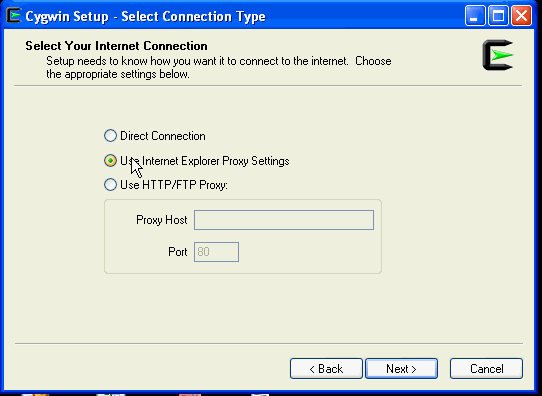
On the Select Connection Type screen, select appropriate settings to connect to the internet, then click Next.
-
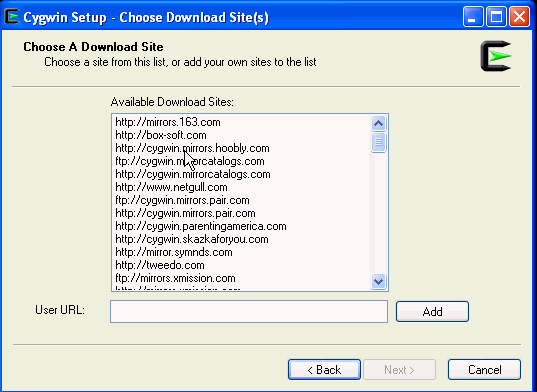
On the Choose Download Site(s) screen, select any site from the available list, then click Next.
-
On the select packages screen, ensure that you select the following packages, then click Next:
From the Archive category, select
unzipandzipas follows: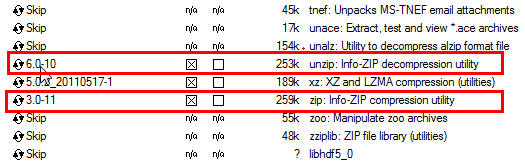
From the Net category, select
opensshandopensslas follows:
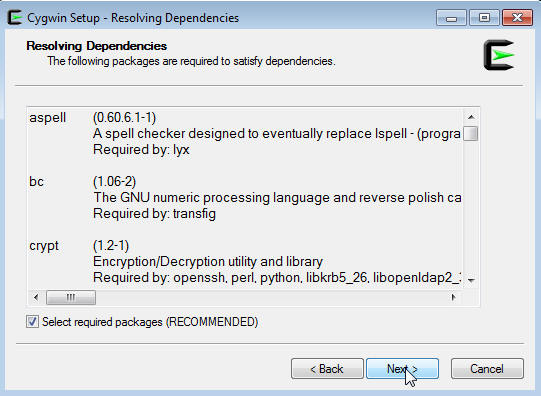
After selecting the packages and clicking Next, the Resolving Dependencies screen is displayed. Click Next to proceed.
-
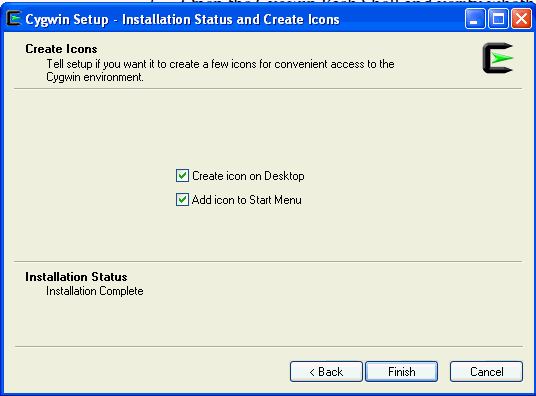
On the Installation Status and Create Icons screen, do not make any changes. Click Finish to complete the installation process.
4.4 Configuring SSH
This section describes how to configure SSH and test your Cygwin setup after installing Cygwin on a host.
Note:
While configuring SSH, you may need to run thecygwin.bat script. While running cygwin.bat in Microsoft Windows Server 2008 and Microsoft Windows Vista, ensure that you invoke it in administrator mode. To do this, right-click the cygwin.bat file and select Run as administrator.To configure SSH and test your Cygwin setup, follow these steps:
-
After you install Cygwin, navigate to the
C:\cygwindirectory, open theCygwin.batfile in edit mode using any editor, and add the following line before invoking the bash shell.set CYGWIN=binmode ntsecFor example, here are the contents for the
Cygwin.batfile after adding the above line:@echo off C: chdir C:\cygwin\bin set CYGWIN=binmode ntsec bash --login -i -
To verify if Cygwin (
cygrunsrv)is installed properly, runC:\cygwin\Cygwin.bat, and execute the following command:cygrunsrv -h
If Cygwin is installed properly, then all the Cygwin help options are displayed on the screen. However, if this command returns an error message, then you may have to reinstall Cygwin.
-
To configure the SSHD service, run
C:\cygwin\Cygwin.bat, and execute the following command:ssh-host-config
After running the command, you are prompted the following questions:
*** Info: StrictModes is set to 'yes' by default.
*** Info: This is the recommended setting, but it requires that the POSIX
*** Info: permissions of the user's home directory, the user's .ssh
*** Info: directory, and the user's ssh key files are tight so that
*** Info: only the user has write permissions.
*** Info: On the other hand, StrictModes don't work well with default
*** Info: Windows permissions of a home directory mounted with the
*** Info: 'noacl' option, and they don't work at all if the home
*** Info: directory is on a FAT or FAT32 partition.
*** Query: Should StrictModes be used? (yes/no) no
*** Query: Should privilege separation be used? <yes/no>: yes
*** Query: New local account 'sshd'? <yes/no>: yes
*** Query: Do you want to install sshd as a service?
*** Query: <Say "no" if it is already installed as a service> <yes/no>: yes
*** Query: Enter the value of CYGWIN for the deamon: [] binmode ntsec
*** Query: Do you want to use a different name? (yes/no) yes/no
At this point, if you want to use the same name, that is
cyg_server,enterno.You are then prompted the following questions:*** Query: Create new privileged user account 'cyg_server'? (yes/no) yes *** Query: Please enter the password: *** Query: Renter:However, if you want to use a different name, enter
yes.You are then prompted the following questions:*** Query: Enter the new user name: cyg_server1 *** Query: Reenter: cyg_server1 *** Query: Create new privileged user account 'cyg_server1'? (yes/no) yes *** Query: Please enter the password: *** Query: Reenter:If the configuration is successful, you will see the following message:
Host configuration finished. Have fun!
-
Backup the
c:\cygwin\etc\passwdfile and then use any editor to open the file in edit mode. Remove only those entries of the user that you will use to connect to the host on which you want to install a Management Agent. Ask the user to make a backup of thec:\cygwin\etc\passwdfile before editing.-
If the user that you are employing to connect to the host on which you want to install the Management Agent is a local user, run
C:\cygwin\Cygwin.batand execute the following:/bin/mkpasswd -l –u <USER> >> /etc/passwd (for example, /bin/mkpasswd -l -u pjohn >> /etc/passwd)
-
If the user you are employing to connect to the host on which you want to install the Management Agent running is a domain user, run
C:\cygwin\Cygwin.batand execute the following:/bin/mkpasswd -d -u <USER> >> /etc/passwd (for example, /bin/mkpasswd -d -u pjohn >> /etc/passwd) mkdir -p /home/<USER> (for example, mkdir -p /home/pjohn) chown <USER> /home/<USER> (for example, chown pjohn /home/pjohn)
-
-
(Only if the Cygwin software you have installed is of version 1.7.32 or higher) Open
C:\cygwin\etc\sshd_configin a text editor and add the following line to the end of the file:KexAlgorithms diffie-hellman-group-exchange-sha1,diffie-hellman-group1-sha1 -
(For a domain user only) If the user you are employing to connect to the host on which you want to install the Management Agent is a domain user, do the following to start the SSH daemon:
-
Right-click on My Computer, and select Manage.
-
In the Computer Management dialog box that appears, go to Services and Applications, and select CYGWIN sshd.
-
Right-click CYGWIN sshd and select Properties.
-
In the Properties dialog box, go to the Log On tab.
-
Here, specify the domain/user name and password. Click Apply.
-
Run
C:\cygwin\Cygwin.bat, and execute the following:chown <USERNAME> /var/log/sshd.log chown -R <USERNAME> /var/empty chown <USERNAME> /etc/ssh* chmod 755 /var/empty chmod 644 /var/log/sshd.log
Note:
If/var/log/sshd.logdoes not exist, you do not have to execute the following commands:chown <USERNAME> /var/log/sshd.log chmod 644 /var/log/sshd.log
-
-
Perform one of the following steps to start the SSH daemon:
Run
C:\cygwin\Cygwin.batand execute the following command:/usr/sbin/sshdOR
Run
C:\cygwin\Cygwin.batand execute the following command:cygrunsrv -S sshdOR
Perform these steps:
-
Right-click on My Computer, and select Manage.
-
In the Computer Management dialog box that appears, go to Services and Applications, and select CYGWIN sshd.
-
Click CYGWIN sshd, then click the Start button.
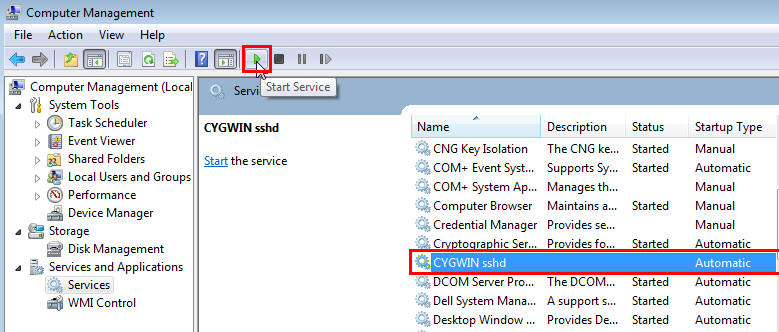
Note:
If the SSH daemon does not start up, view thec:\cygwin\var\log\sshd.logfile for information on why the start up failed. -
-
You can now test your Cygwin setup.
To do this, go to a different machine (that has the
sshclient running), and execute the following command:ssh -l <USERNAME> <localhost> 'date' OR ssh -l <USERNAME> <this node> 'date'
For example,
ssh -l pjohn example.com 'date'
This command will prompt you to specify the password. When you specify the correct password, the command should return the accurate date.
Note:
If you experience a process fork failure, memory leak error, or a file access error after configuring SSH, view the following website for a workaround:If you are unable to find a workaround for your problem, report your problem to the Cygwin community using the following website:
4.5 After Installing Cygwin and Configuring SSH
After installing Cygwin (as described in Section 4.3) and configuring SSH (as described in Section 4.4), follow these steps:
-
If the OMS host runs on a Microsoft Windows platform, perform the following on the OMS host:
-
Right click My Computer, then select Properties. In the window that appears, select Advanced system settings, then select Environment Variables. In the System Variables section, create the
CYGWINvariable, and specify its value asnodosfilewarningNote:
You do not need to restart the host after performing this step. -
Navigate to the Cygwin install directory (that is,
C:\cygwinif you chose to install Cygwin in the default location), open theCygwin.batfile in edit mode using any editor, then edit the following line:set CYGWIN=binmode ntsec nodosfilewarningFor example, these are the contents of the
Cygwin.batfile after editing the above line:@echo off C: chdir C:\cygwin\bin set CYGWIN=binmode ntsec nodosfilewarning bash --login -i
-
From the Start menu, select Run. For Open, enter
services.msc,then click OK. Search for the Cygwin SSHD service and stop it. -
Navigate to the Cygwin install directory (that is,
C:\cygwinif you chose to install Cygwin in the default location), then runCygwin.bat.Run the following command to start the SSHD service:$ /usr/sbin/sshd
Note:
Running this command may return an error mentioning that/var/emptymust be owned by the root user. If you encounter this error, run the following from the Cygwin terminal:$ chown <windows_install_user>:<windows_install_group> /var/empty
After running this command, retry the
$ /usr/sbin/sshdcommand.
-
-
Perform the tasks mentioned in Step 1 on all the Microsoft Windows target hosts (on which you want to install Management Agents using the Add Host Targets Wizard or EM CLI).