2 Discovering the Oracle Private Cloud Appliance
This chapter provides instructions for discovery of the Oracle Private Cloud Appliance (PCA) through Enterprise Manager Cloud Control 13c.
The following topics are provided:
2.1 Installing the Management Agent on Oracle PCA
Before discovering the Oracle PCA in Enterprise Manager, you must first prepare the PCA and install a Management Agent. Follow the steps below to properly configure your Oracle PCA:
-
Change the
oracleuser password to a known password on both management nodes of the PCA Rack:# passwd oracle
-
Verify the VIP and public Enterprise Manager IP are in the
/etc/hostsfile on both management nodes:YOUR.VIP vip-host1.example.com vca1-vip-vip YOUR.EMIP em-host1.example.com em01
-
On an active management node, create an agent directory on the shared NFS directory:
# mkdir /nfs/shared_storage/oemagent
# chown oracle !$
# chgrp dba !$
-
Open an Enterprise Manager agent port in the firewall by running the following command. Make sure you choose the same port while pushing the agent in step 5:
# iptables -A INPUT -m state --state NEW -m tcp -p tcp --dport <agent_port> -j ACCEPT
# service iptables save
# service iptables restart
Note:
By default, the Enterprise Manager agent port 3872 is pre-populated by PCA software. If you use this default Enterprise Manager agent port 3872 for pushing the agent, then this step is not needed. -
Push the Management Agent from the OMS. From Enterprise Manager Cloud Control:
-
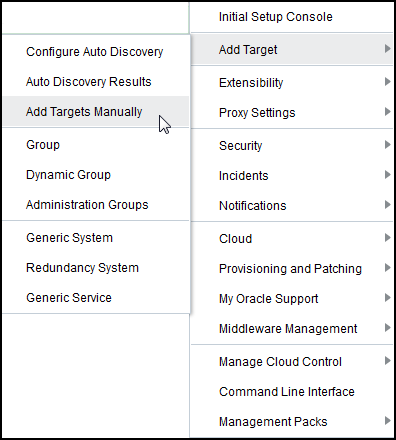
From the Setup menu, select Add Target, then select Add Targets Manually.
-
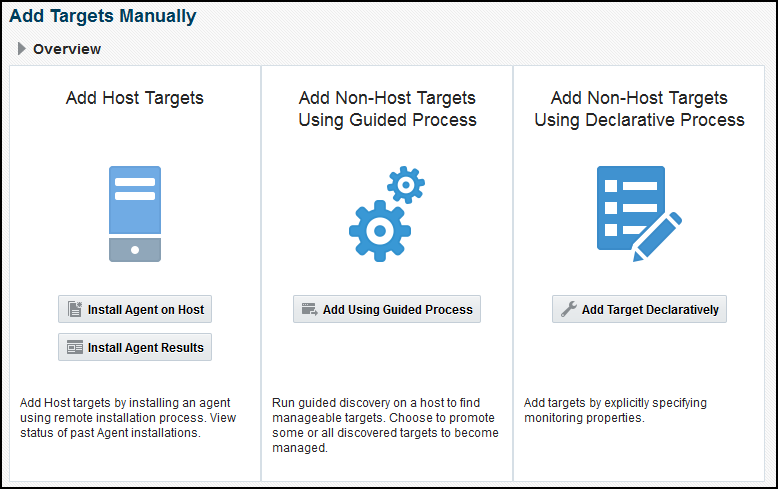
In the Add Host Targets area of the Add Targets Manually page, click Install Agent on Host. The Add Host wizard will begin.
-
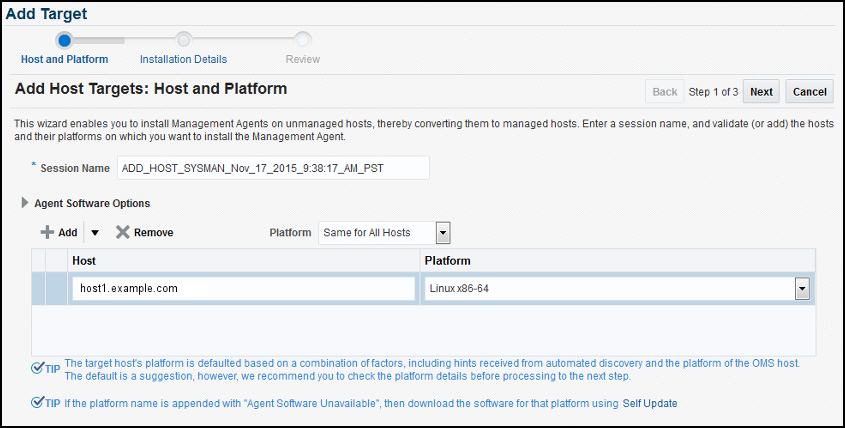
Add a Host and Platform. On this page, click Add and select Manually. Enter a host name (fully qualified) in the Host field. This name should be the fully qualified virtual IP host name of the PCA rack for deploying the agent. Select Linux x86-64 from the Platform drop-down menu. Figure 2-1 shows an example:
Note:
The target host's platform is defaulted based on a combination of factors, including hints received from automated discovery and the platform of the OMS host. The default is a suggestion; however, you should check the platform details before processing to the next step.If the platform name is appended with "Agent Software Unavailable," then download the software for that platform using Enterprise Manager's Self Update feature.
Click Next.
-
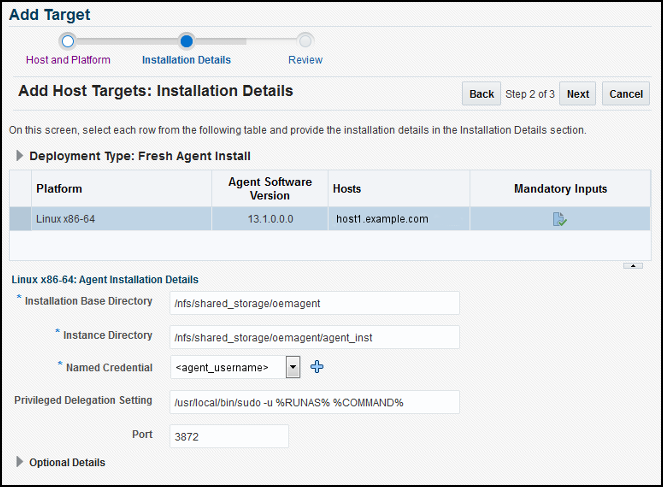
On the Installation Details page (Figure 2-2), enter the following information:
Installation Base Directory:
/nfs/shared_storage/oemagentInstance Directory:
/nfs/shared_storage/oemagent/agent_inst(This value is automatically completed based on the Installation Base Directory input.)Named Credential:
<agent_username>If this is the first time you are adding a credential, an add icon (
 ) appears. Click this icon for a dialogue box that prompts for the credentials of the agent user (
oracle/password for example).Create a Named Credential for the
oracleuser with the password you set in step 1 above.Once created, that credential and any other credentials that have already been added to Enterprise Manager will be available for selection. For an existing installation of an Enterprise Manager, a user may already have the necessary credentials available for selection for Oracle PCA discovery.
Privileged Delegation Setting: Leave the default. By default, this field is populated with
/usr/bin/sudo -u %RUNAS% %COMMAND%Port: By default, this field is populated with
3872Preinstallation Script: Leave this field blank.
Postinstallation Script: Leave this field blank.
Additional Parameters: Leave this field blank.
Once the fields are complete, click Next.
-
On the Review page, review the details of the host information. Click Deploy Agent.
-
-
If you get a failure, make a link (both management nodes):
# /nfs/shared_storage/oemagent to /u01/oemagent
# chown oracle /u01/oemagent
# chgrp dba /u01/oemagent
-
Rerun step 5 and set the Installation Base Directory to the link with the corrected permissions:
Installation Base Directory:
/u01/oemagent
-
-
Run the privileged agent scripts on the active node:
# cd /u01/oemagent -or- cd /nfs/shared_storage/oemagent
#./agent_13.1.0.0.0/root.sh
# /u01/app/oraInventory/orainstRoot.sh
-
On the active management node, set the emd property
AgentListenOnAllNICsto false by running following command with the agent user (i.e.,oracle):<Agent_BASE_DIR>/agent_inst/bin/emctl setproperty agent -name "AgentListenOnAllNICs" -value "false"
-
Copy the following agent installation files to the passive management node (
ovcamn06r1is passive in this example):# scp /etc/init.d/gcstartup root@ovcamn06r1:/etc/init.d/ # rsync -og /etc/oragchomelist root@ovcamn06r1:/etc/oragchomelist # rsync -rog /u01/app/oraInventory/ root@ovcamn06r1:/u01/app/oraInventory/
-
On the active management node, remove all
gc rc.dlinks (no startup of agent on startup):# for x in `find /etc/rc.*/rc* | grep gcstart`; do rm $x; done
-
Restart the Enterprise Manager agent on the active management node as
rootfrom the startup script or asoraclefrom the agent'semctlcommand:# /etc/init.d/gcstartup stop # /etc/init.d/gcstartup start
or
% /nfs/shared_storage/oemagent/agent_inst/bin/emctl stop agent
% /nfs/shared_storage/oemagent/agent_inst/bin/emctl stop agent
2.2 Discovering the Oracle PCA in Enterprise Manager
The steps below provide the prerequisites and instructions to discover an Oracle Private Cloud Appliance (PCA) target in Enterprise Manager Cloud Control:
-
From the Setup menu, select Add Targets, and then select Add Targets Manually (Figure 2-3):
-
On the Add Targets Manually page (Figure 2-4), click Add Targets Using Guided Process.
-
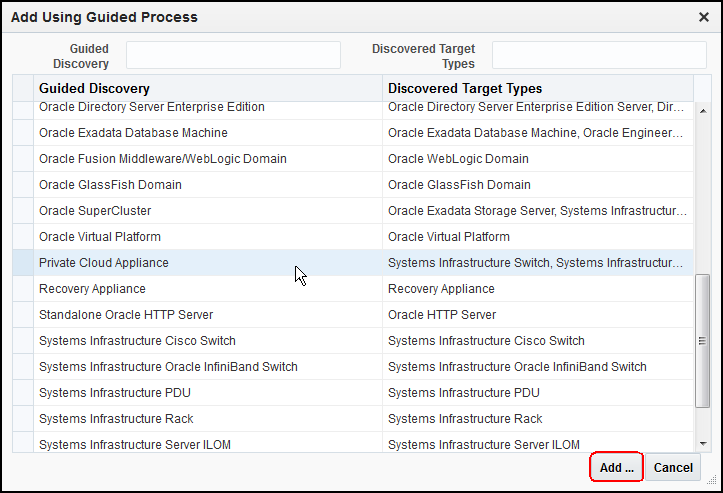
On the Add Using Guided Process window, select Private Cloud Appliance. Click Add (Figure 2-5) to begin the discovery wizard.
-
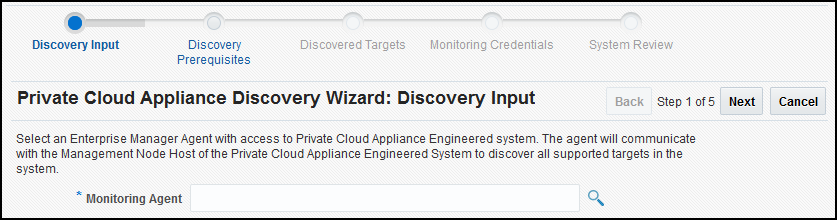
On the Discovery Inputs page (Figure 2-6), you will need to enter the Monitoring Agent host location.
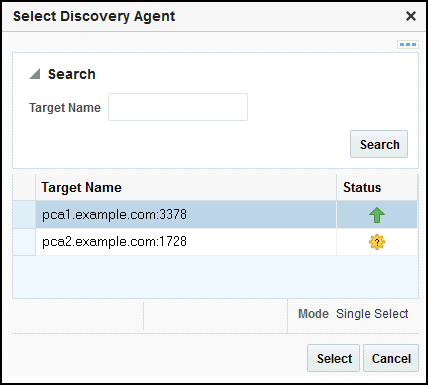
Click the Search icon to display the Select Discovery Agent pop-up window:
Select the URL from the available list. Once you select the URL, the Management Agent field on the Discovery Input page should auto-populate with the required information.
Click Next.
-
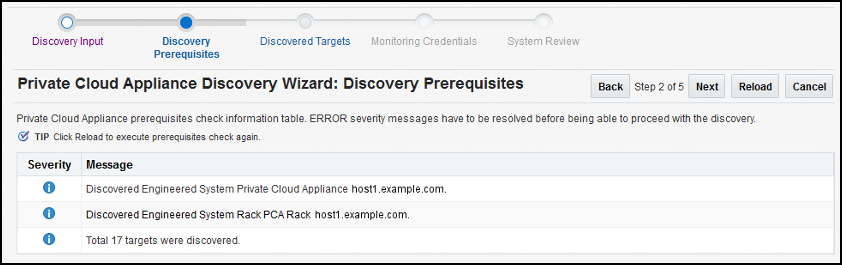
On the Discovery Prerequisites page (Figure 2-8), a series of checks are conducted automatically. Any errors returned must be resolved before continuing.
Note:
Click Reload to run the prerequisite checks again.Click Next.
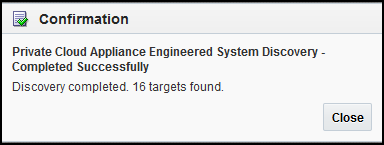
A confirmation pop-up window (Figure 2-9) will appear to show how many targets to be discovered:
Click Close to continue.
-
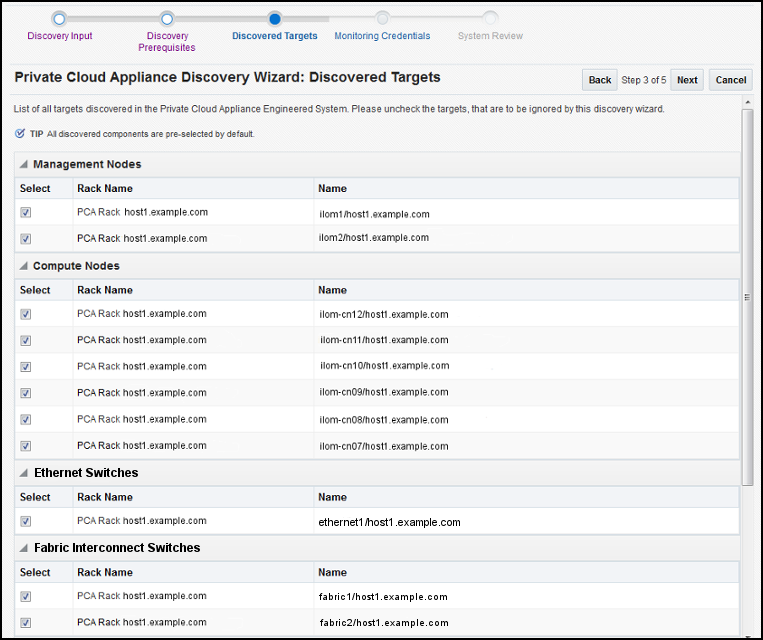
On the Discovered Targets page (Figure 2-10), select the targets you want included in the discovered PCA rack. By default, all available targets are pre-selected.
Click Next.
-
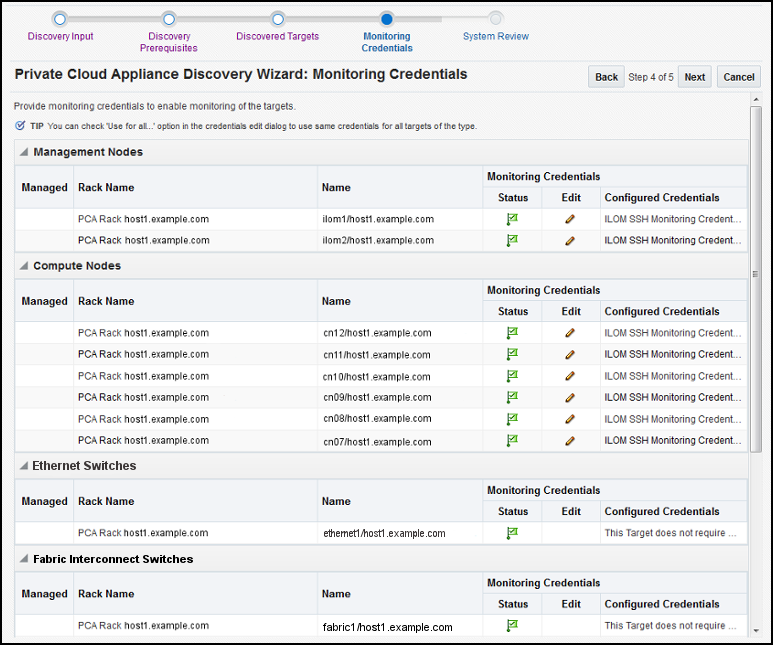
On the Monitoring Credentials page, the credentials must be set for each component in the Oracle PCA rack. A red status flag is shown for all components where the credentials are not set.
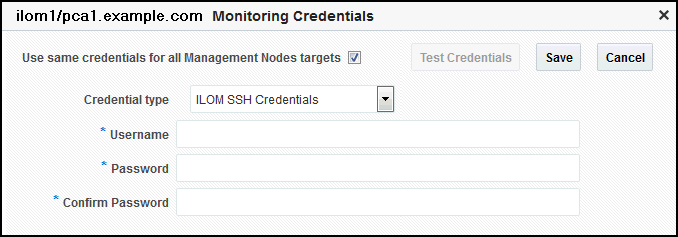
For each component type, click the Edit icon. In the Monitoring Credentials pop-up (Figure 2-11), enter the user name and password for each component in the Oracle PCA rack:
Note:
For the InfiniBand Switch, enter public in the Community String mandatory field input.You can select Use same credentials for all in the credential's edit dialog to use the same credentials for all targets of the type. Figure 2-12 shows an example of the Monitoring Credentials page with all credentials set:
Click Next.
-
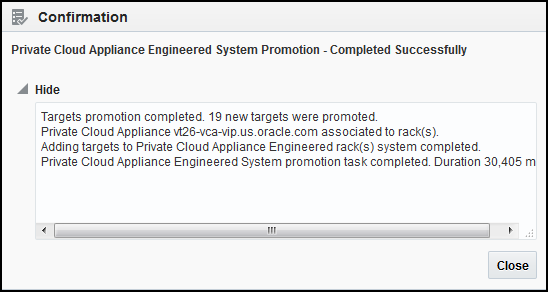
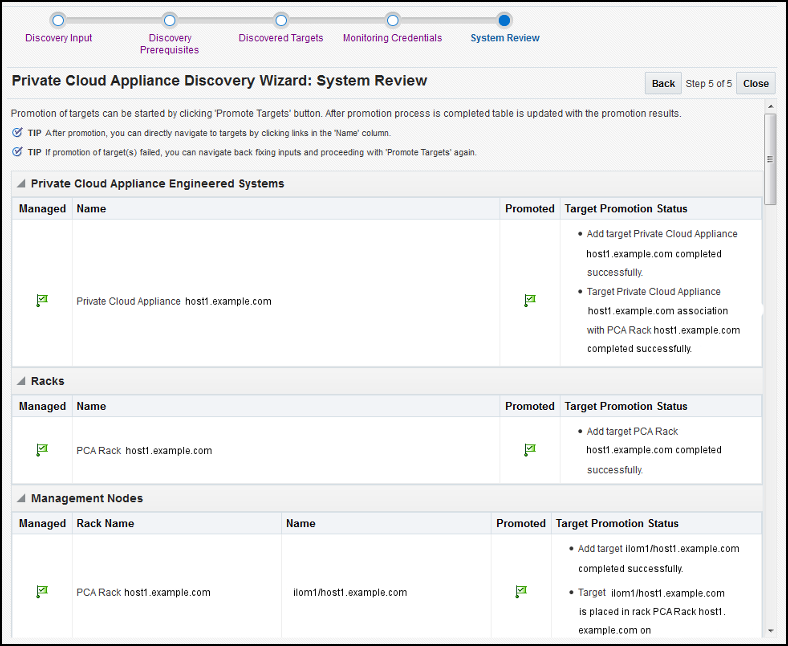
On the System Review page, click Promote Targets to promote all components of the Oracle PCA rack. If any component fails the promotion process, click Back to update the inputs for that component. A pop-up window will appear to show the progress. Once complete (Figure 2-13), click Close.
Figure 2-14 shows an example of completed promotion of all components:
Click Close.
2.3 Enterprise Manager Agent Recovery After Oracle PCA Upgrade
To recover an Enterprise Manager agent after the Oracle PCA is upgraded:
-
Backup the
oraInventoryagent to the NFS-shared location:# cd /u01/app # tar -cvf EMagent_oraInventory.tar oraInventory # cp EMagent_oraInventory.tar /nfs/shared_storage
-
After you have updated the Oracle PCA Rack, copy the
oraInventoryagent from the NFS-shared location and untar it to the previousoraInventorylocation:# cp /nfs/shared_storage/EMagent_oraInventory.tar /u01/app # tar -xvf EMagent_oraInventory.tar
-
Keep the same password you created in Installing the Management Agent on Oracle PCA for the
oracleuser on both management nodes:# passwd oracle
-
Run the privileged agent scripts on the active management node:
# cd /u01/oemagent
or
# cd /nfs/shared_storage/oemagent

#./agent_13.1.0.0.0/root.sh
# /u01/app/oraInventory/orainstRoot.sh
-
On the active management node, remove all
gc rc.dlinks (that is, no startup of agent on startup):# for x in `find /etc/rc.*/rc* | grep gcstart`; do rm $x; done
-
Copy the following agent installation files to the passive management node (
ovcamn06r1is passive in this example):# scp /etc/init.d/gcstartup root@ovcamn06r1:/etc/init.d/ # rsync -og /etc/oragchomelist root@ovcamn06r1:/etc/oragchomelist # rsync -rog /u01/app/oraInventory/ root@ovcamn06r1:/u01/app/oraInventory
-
Add the Enterprise Manager agent port to the number chosen during agent push (see Installing the Management Agent on Oracle PCA) (default 3872) to the firewall settings on both management nodes (active and passive):
# iptables -A INPUT -m state --state NEW -m tcp -p tcp --dport <agent_port> -j ACCEPT
# service iptables save
# service iptables start
Note:
By default, the Enterprise Manager agent port 3872 is pre-populated by PCA software. If you use this default Enterprise Manager agent port 3872 for pushing the agent, then this step is not needed. -
Restart the Enterprise Manager agent on the active management node as
rootfrom the startup script or asoraclefrom the agent'semctlcommand:# /etc/init.d/gcstartup stop # /etc/init.d/gcstartup start
or
% /nfs/shared_storage/oemagent/agent_inst/bin/emctl stop agent
% /nfs/shared_storage/oemagent/agent_inst/bin/emctl stop agent
2.4 Removing the Oracle PCA Target from Enterprise Manager
To remove the Oracle Private Cloud Appliance (PCA) target from Enterprise Manager monitoring:
Note:
Removing the Oracle PCA target from Enterprise Manager monitoring will also remove all PCA components from monitoring as well (for example, the Compute and Management Nodes, InfiniBand switches, Ethernet and Fabric Interconnect switches, Storage Servers, and so forth).-
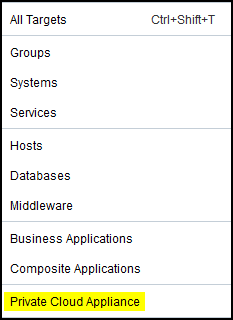
From the Targets menu, select the Private Cloud Appliance item (Figure 2-15):
Then, on the Targets page, select the Private Cloud Appliance item and click Remove.
-
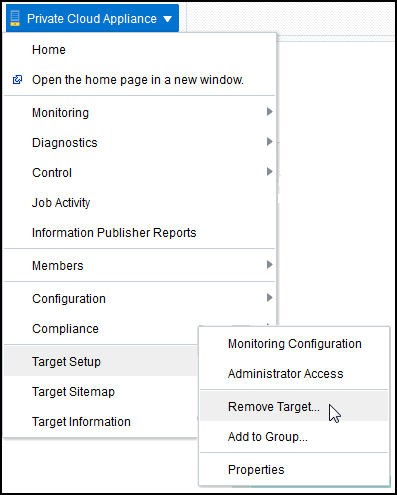
Alternatively, you can remove the target from the PCA target home page. Click the Private Cloud Appliance menu, then select Target Setup, then select Remove Target (Figure 2-16):
-
A confirmation pop-up window appears (Figure 2-17):
Click Yes to continue.
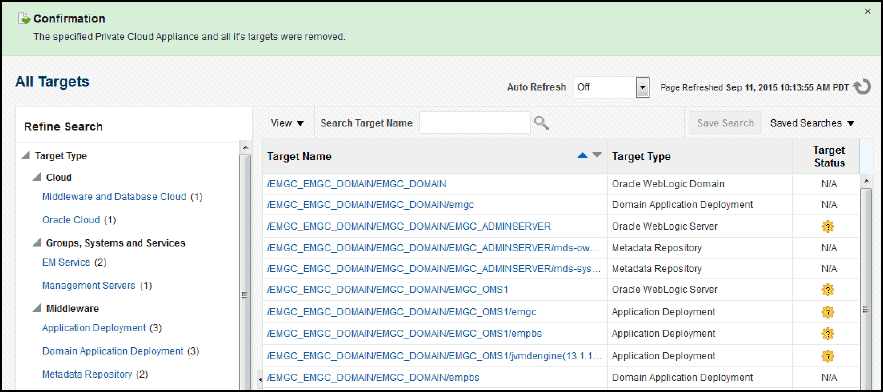
-
After the PCA target is removed, the All Targets page will reload. A confirmation message will show that the PCA target and all of its components have been removed (Figure 2-18):