A Installing the Oracle Database Software
This appendix presents a summary of the procedure for installing the Oracle database software. Note that the complete installation procedure is described in the product documentation.
The information in this appendix is based on the Oracle Database 12c for Linux x86-64 Quick Installation Guide and Oracle Database 11g for Linux x86-64 Quick Installation Guide. It is recommended that you download and review it. It is available from the Oracle Database Documentation Library at the following location:
http://www.oracle.com/pls/db121/portal.portal_db?selected=11
Note:
While RUEI is supported on Oracle Database releases 11gR2 and later, the best performance for RUEI 13.2.1.1 is achieved with Oracle Database 12c Release 1.If you experience an ORA-12805: Parallel Query Server Died Unexpectedly error, see Section G.2 for a suitable workaround.
A.1 Download the Oracle Database Software
Download Oracle Database (12c Release 1 or 11g Release 2) Standard Edition, Standard Edition One, or Enterprise Edition from the Oracle database home page at the following location:
http://www.oracle.com/technetwork/database/enterprise-edition/downloads
A.2 Operating System Prerequisites
Assuming you have a working Yum repository, you can install the required operating system dependencies for the database software with the following command:
yum install gcc gcc-c++ compat-libstdc++-33 glibc-devel libstdc++-devel \
elfutils-libelf-devel glibc-devel libaio-devel sysstat perl-URI \
bitstream-vera-fonts xorg-x11-xinit unixODBC unixODBC-devel xorg-x11-xinit rsync \
ksh
A.3 Creating the Database User Accounts and Groups
-
Create two groups (
dbaandoinstall) with the following commands:/usr/sbin/groupadd dba /usr/sbin/groupadd oinstall
-
Create the
oracleuser, and specifyoinstallas the primary group anddbaas the secondary group, with the following command:/usr/sbin/useradd -g oinstall -G dba oracle
-
Set the
oracleuser password with the following command:passwd oracle
A.4 Configuring the Kernel Parameter Settings
-
Modify the
/etc/sysctl.conffile to satisfy the Oracle installer's requirements by adding the following lines:kernel.sem = 250 32000 100 128 net.ipv4.ip_local_port_range = 9000 65500 net.core.rmem_default = 4194304 net.core.rmem_max = 4194304 net.core.wmem_default = 262144 net.core.wmem_max = 1048576 fs.aio-max-nr = 1048576 fs.file-max = 6815744
-
Make these changes effective immediately with the following command:
/sbin/sysctl -p
A.5 Setting Shell Limits for the Oracle User
-
To improve the performance of the software, you must increase the shell limits for the
oracleuser. Add the following lines to the/etc/security/limits.conffile:oracle soft nproc 2047 oracle hard nproc 16384 oracle soft nofile 1024 oracle hard nofile 65536
-
If not already present, add the following lines to the
/etc/pam.d/loginfile:session required /lib64/security/pam_limits.so session required pam_limits.so
-
Depending on the
oracleuser's default shell, you need to make changes to it. For the Bourne, Bash, or Korn shell, add the following lines to the bottom of the/etc/profilefile:if [ $USER = "oracle" ]; then if [ $SHELL = "/bin/ksh" ]; then ulimit -p 16384 ulimit -n 65536 else ulimit -u 16384 -n 65536 fi fi
For information about other shells, you should refer to the Oracle Database 12c for Linux x86-64 Quick Installation Guide or Oracle Database 11g Release 2 for Linux x86-64 Quick Installation Guide available at the following location:
http://download.oracle.com/docs/cd/B28359_01/install.111/b32285/toc.htm
A.6 Creating the Database Directory
Throughout this guide it is assumed that the directory /u01/app is the root of the Oracle installation. This is specified in the ORACLE_BASE environment variable.
-
Enter the following command to display information about all mounted file systems:
df -k
This command displays information about all the file systems mounted on the system, including:
-
The physical device name.
-
The total amount, used amount, and available amount of disk space.
-
The mount point directory for that file system.
-
-
Create the necessary subdirectories in the mount point directory that you identified and set the appropriate owner, group, and permissions for them using commands similar to the following:
mkdir -p /u01/app
chown -R oracle:oinstall /u01
chmod -R 775 /u01/app
A.7 Configuring the Oracle User's Environment and Installing the Database
Perform the following steps to create the oracle user's environment and install the software:
Note:
The screenshots show an 11g installation, but similar screens apply for 12c.-
Logon to the system as the
oracleuser. -
Add or edit the
umasksetting in the~/.bash_profilefile to the following:umask 022
-
Make the setting active for the current shell by issuing the following command:
. ./.bash_profile
-
Set the
ORACLE_BASEenvironment variable to define the location of the root of the Oracle directory tree:export ORACLE_BASE=/u01/app/oracle
-
Unzip the Oracle database installation zip file. This creates the directory
database. Then, run the graphical installer (note this will not run under userroot). Ensure that your X Window environment is properly set up. In addition, when logging on remotely with SSH, ensure X forwarding is enabled. Use the following commands:cd <location of the zip file> unzip linux_11gR2_database.zip ./database/runInstaller
-
Use the installation wizard, and specify the values shown in Figure A-1. When ready, click Next.
Figure A-1 Specify Installation Location Dialog
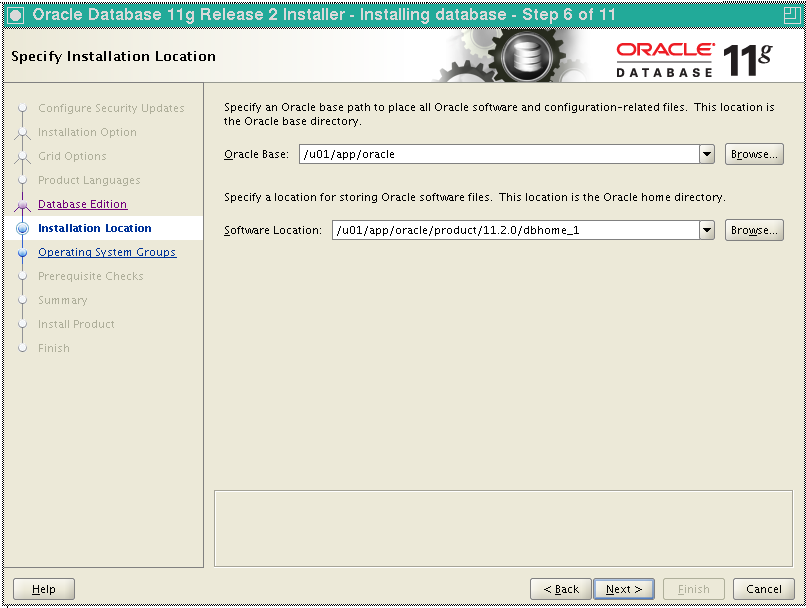
Description of ''Figure A-1 Specify Installation Location Dialog''
-
Specify the values shown in Figure A-2. When ready, click Next.
Figure A-2 Specify Inventory Directory and Credentials Dialog
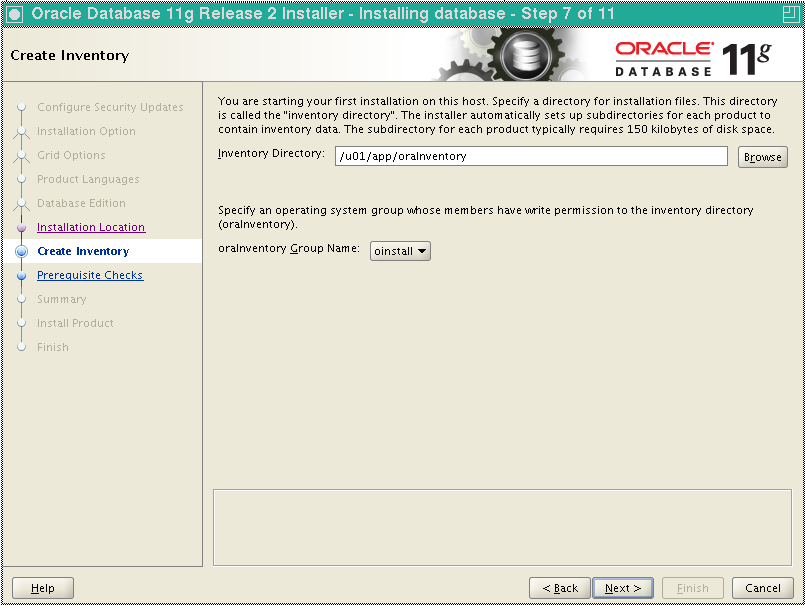
Description of ''Figure A-2 Specify Inventory Directory and Credentials Dialog''
Important:
Any warnings or errors reported during database installation (especially any missing prerequisites) must be resolved before proceeding. See Section 2.1.6, "Installing the RUEI Prerequisites" and Appendix G, "Troubleshooting" for information about required components.If all dependencies are met, you can click Next.
-
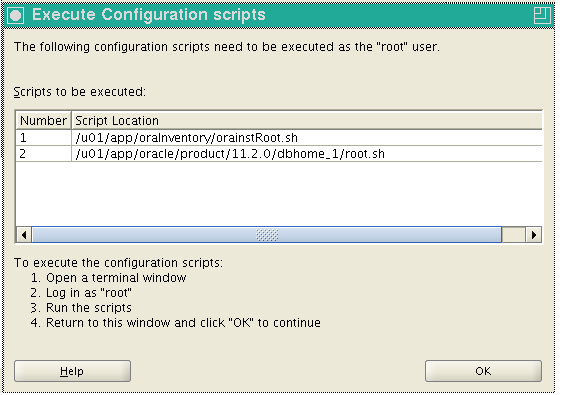
When installation is almost complete, you are prompted to run two scripts,
orainstRoot.shandroot.sh, asroot. This is shown in Figure A-3.Run the two scripts indicated in Figure A-3. They should be run in a terminal window as
root. You will receive output similar to the following:/u01/app/oraInventory/orainstRoot.sh Changing permissions of /u01/app/oraInventory. Adding read,write permissions for group. Removing read,write,execute permissions for world. Changing groupname of /u01/app/oraInventory to oinstall. The execution of the script is complete.
The second script generates the following output:
/u01/app/oracle/product/11.2.0/dbhome_1
/root.sh
Running Oracle 11g root.sh script...

The following environment variables are set as:
    ORACLE_OWNER= oracle
    ORACLE_HOME=  /u01/app/oracle/product/11.2.0/dbhome_1

Enter the full pathname of the local bin directory: [/usr/local/bin]:
   Copying dbhome to /usr/local/bin ...
   Copying oraenv to /usr/local/bin ...
   Copying coraenv to /usr/local/bin ...

Creating /etc/oratab file...
Entries will be added to the /etc/oratab file as needed by
Database Configuration Assistant when a database is created
Finished running generic part of root.sh script.
Now product-specific root actions will be performed.
Finished product-specific root actions.
On completion of each script, return the dialog shown in Figure A-3, and click OK. In the main installer screen, verify that the message "The installation of Oracle database 11g was successful" appears. Click Exit, and confirm by clicking Yes.
A.8 Creating an Oracle init Script File
-
Logon as the
rootuser. -
Create an
/etc/init.d/oracledbscript file to start and stop the Oracle database. An example of this initialization script is available in the RUEI installation zip file (/root/RUEI/extra/oracledb) explained in Chapter 2, "Installing the RUEI Software". Note that you will need to modify the settings for theORACLE_BASEandORACLE_HOMEenvironment variables shown above if you selected a different installation directory for the Oracle database. -
Make the script file executable and use it to start the Oracle database with the following commands:
chmod +x /etc/init.d/oracledb
/sbin/chkconfig --add oracledb
/sbin/service oracledb start
The Oracle database is now installed, and the database listener should be up and running.