11 Working with the Backup and Restore Page
This chapter describes the TimesTen database Backup and Restore page. The TimesTen database backup and restore page enables you to schedule database backups, restore from available backups, and view recovery history.
Topics include:
Viewing the backup and restore page
Before using database backup and restore, ensure that preferred credentials are set for your TimesTen database target. For more information about setting preferred credentials, see "Setting preferred credentials for a target".
To view the backup and restore page, ensure that you are on the TimesTen database target page. For information on navigating to the TimesTen database target page, see "Navigating to the TimesTen target page".
From the TimesTen Database Home menu, select Availability, then select Backup and Restore.
Analyzing information on the TimesTen backup and restore page
Figure 11-1 shows the three backup and restore specific areas that have been customized for your TimesTen database targets. Click a specific tab to view detailed information.

A description of each area follows:
Backup schedule
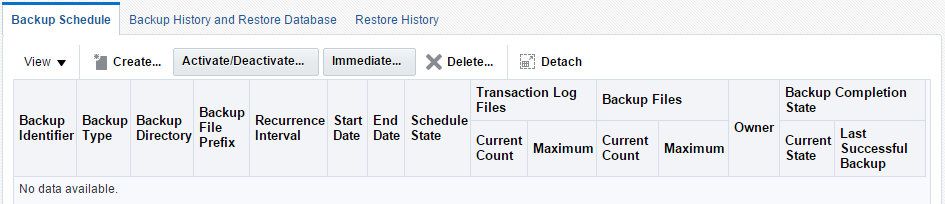
The backup schedule tab enables you to create, edit, and delete backup schedules for your TimesTen database. TimesTen calls the ttBackup utility to perform backups of your TimesTen database. For more information on the ttBackup utility, see "ttBackup" in the Oracle TimesTen In-Memory Database Reference.
You can perform these actions on the backup schedule tab:
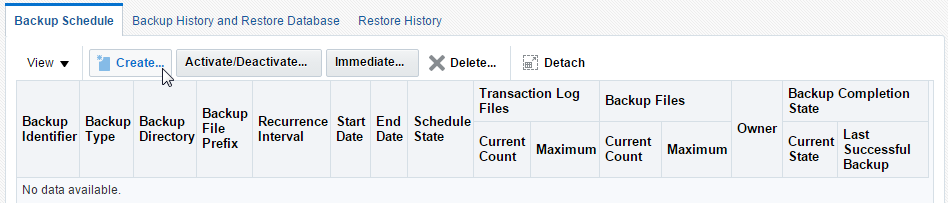
Create a backup schedule
To create a backup schedule, ensure that you are on the Backup Schedule tab of the Backup and Restore page.
Note:
The backup and restore functions for the TimesTen database in Enterprise Manager cannot backup and restore TimesTen databases with cache groups. For more information on backing up and restoring TimesTen databases with cache groups, see "Backing up and restoring a database with cache groups" in the Oracle TimesTen Application-Tier Database Cache User's Guide.-
Click Create.
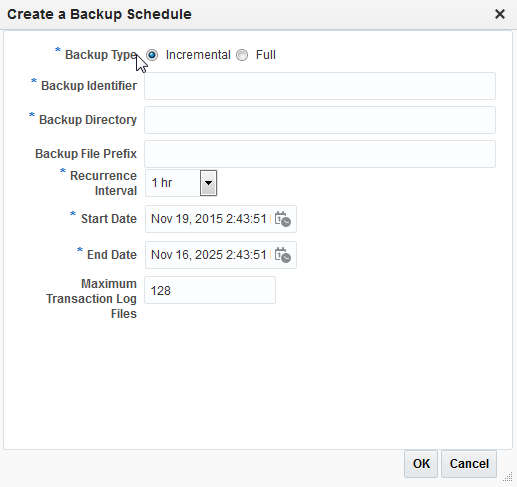
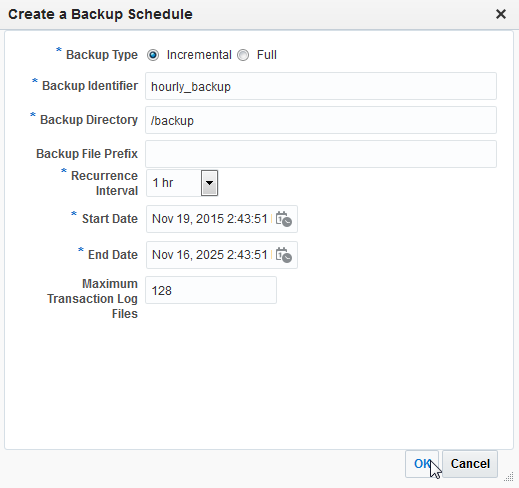
The Create a Backup Schedule dialog displays. The first property is the Type of Backup.
-
Select a backup type from the Type options. These are the available backup types:
-
An incremental backup augments an existing incremental-enabled backup of the same database. An incremental backup moves the backup point of an existing backup forward in time by augmenting the backup with all of the transaction log files created since its last backup point.
-
A full backup saves the entire database. For full backups, you must have enough disk space available to hold both the existing backup and the new backup, until the new backup succeeds.
You are now ready to define your new backup schedule.
-
Incremental
An incremental backup augments an existing incremental-enabled backup of the same database. An incremental backup moves the backup point of an existing backup forward in time by augmenting the backup with all of the transaction log files created since its last backup point.An incremental backup typically completes much faster than a full backup, as it has less data to copy. The performance gain of incremental backups over full backups comes at the cost of increased disk usage and longer restoration times. Use incremental backups in concert with full backups to achieve a balance between backup time, disk usage, and restoration time.
Before defining a backup schedule, ensure that you have completed the steps up to step 2 from "Create a backup schedule".
Note:
For more information about TimesTen backup types, see "Types of backup provided" in the Oracle TimesTen In-Memory Database Installation Guide.-
In the * Backup Identifier text field, type a meaningful backup schedule name. (For example,
hourly_backup.) -
In the * Backup Directory text field, type the directory where the backup files should be stored. Ensure that this directory exists.
-
In the Backup File Prefix text field, type a file prefix for the backup files in the backup directory. The Backup File Prefix field is optional. The default value for this option is the file name portion of the
DataStoreattribute of the database's ODBC definition. For more information about theDataStoreattribute, see "DataStore" in the Oracle TimesTen In-Memory Database Reference. -
From the * Recurrence Interval drop-down list, select a recurrence for when TimesTen checks the maximum transaction log files criteria. If the maximum transaction log files criteria is met, TimesTen performs an incremental backup. The default value is 1 hour.
-
Click the calendar button to the right of the * Start Date field, then select the start date and time for the backup schedule. The default value is the current date and time of the Enterprise Manager server.
-
Click the calendar button to the right of the * End Date field, then select the end date for the backup schedule. The default value is 10 years after the current date of the Enterprise Manager server.
-
In the Maximum Transaction Log Files text field, type the number of transaction log files when an incremental backup is performed. TimesTen only performs the incremental backup if the maximum transaction log files criteria is met during a recurrence check. The default value is 128.
-
Click OK.
The Create a Backup Schedule dialog closes and you are returned back to the Backup Schedule tab of the Backup and Restore page. Notice the backup schedule you created is auto-filled in the backup schedule table.
If you see a "No preferred credentials set" error message, set preferred credentials for your TimesTen database target and activate the backup schedule you created. Ensure that your backup schedule works by requesting an immediate backup. For more information, see "Setting preferred credentials for a target", "Activate a backup schedule", and "Request an immediate backup".
You successfully created a TimesTen incremental backup schedule.
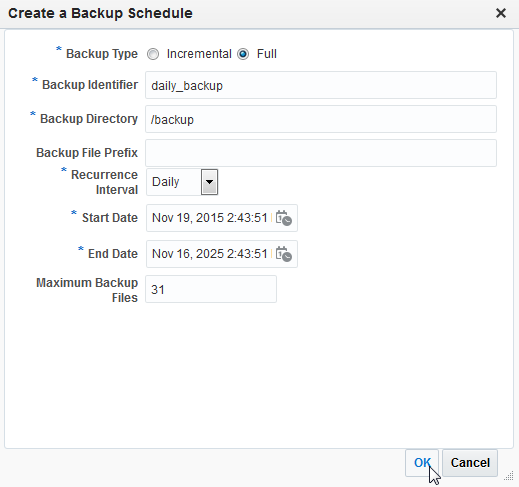
Full
A full backup saves the entire database. For full backups, you must have enough disk space available to hold both the existing backup and the new backup, until the new backup succeeds.
Note:
For more information about TimesTen backup types, see "Types of backup provided" in the Oracle TimesTen In-Memory Database Installation Guide.-
In the * Backup Identifier text field, type a meaningful backup schedule name. (For example,
daily_backup.) -
In the * Backup Directory text field, type the directory where the backup files should be stored. Ensure that this directory exists.
-
In the Backup File Prefix text field, type a file prefix for the backup files in the backup directory. The Backup File Prefix field is optional. The default value for this option is the file name portion of the
DataStoreattribute of the database's ODBC definition. For more information about theDataStoreattribute, see "DataStore" in the Oracle TimesTen In-Memory Database Reference. -
From the * Recurrence Interval drop-down list, select a recurrence for when TimesTen checks the maximum transaction log files criteria. If the maximum transaction log files criteria is met, TimesTen performs an incremental backup.
-
Click the calendar button to the right of the * Start Date field, then select the start date and time for the backup schedule. The default value is the current date and time of the Enterprise Manager server.
-
Click the calendar button to the right of the * End Date field, then select the end date for the backup schedule. The default value is 10 years after the current date of the Enterprise Manager server.
-
In the Maximum Backup Files text field, type the maximum number of full backup files that TimesTen can store at any given time. When the maximum backup files value is exceeded, TimesTen deletes the oldest backup file before creating a new backup file. The default value is 31.
-
Click OK.
The Create a Backup Schedule dialog closes and you are returned back to the Backup Schedule tab of the Backup and Restore page. Notice the backup schedule you created is auto-filled in the backup schedule table.
If you see a "No preferred credentials set" error message, set preferred credentials for your TimesTen database target and activate the backup schedule you created. Ensure that your backup schedule works by requesting an immediate backup. For more information, see "Setting preferred credentials for a target", "Activate a backup schedule", and "Request an immediate backup".
You successfully created a TimesTen full backup schedule.
Activate a backup schedule
When you create a backup schedule Enterprise Manager activates the backup schedule. An active backup schedule runs based on its configured schedule.
To activate a backup schedule, ensure that you are on the Backup Schedule tab of the Backup and Restore page:
-
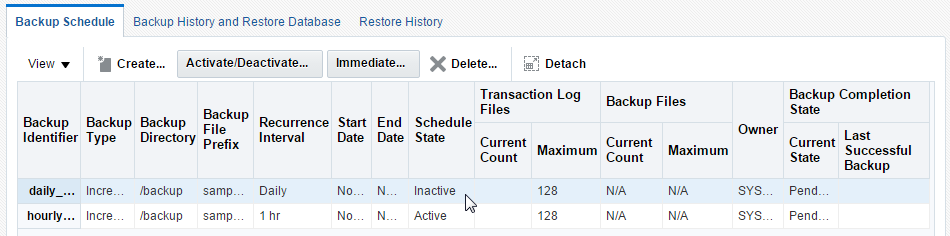
In the Backup Schedule table, click in the row that identifies the Backup Identifier of your backup schedule. Ensure that the Schedule State is Inactive.
-
Click Activate/Deactivate.
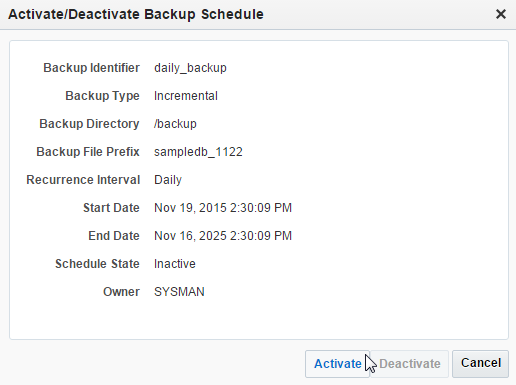
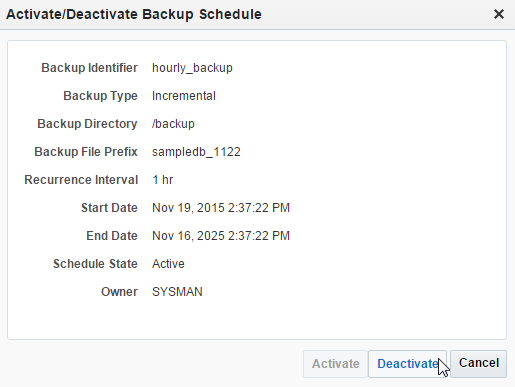
The Activate/Deactivate Backup Schedule dialog displays. Locate the Activate button.
-
Click Activate.
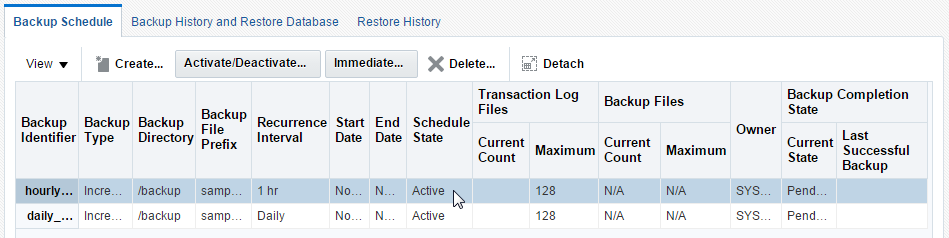
The Activate/Deactivate Backup Schedule dialog closes and the Backup Schedule tab of the Backup and Restore page refreshes. Notice that the Schedule State of your Backup Identifier is now Active.

You have successfully activated your backup schedule.
Deactivate a backup schedule
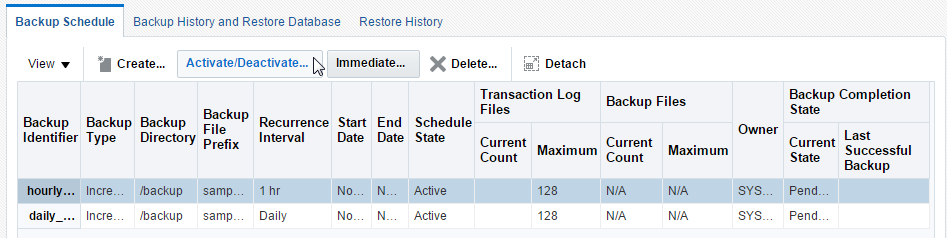
To deactivate a backup schedule, ensure that you are on the Backup Schedule tab of the Backup and Restore page:
-
In the Backup Schedule table, click in the row that identifies the Backup Identifier of your backup schedule. Ensure that the Schedule State is Active.
Figure 11-10 Select your backup schedule
Description of ''Figure 11-10 Select your backup schedule''
-
Click Activate/Deactivate.
The Activate/Deactivate Backup Schedule dialog displays. Locate the Deactivate button.
-
Click Deactivate.
The Activate/Deactivate Backup Schedule dialog closes and the Backup Schedule tab of the Backup and Restore page refreshes. Notice that the Schedule State of your Backup Identifier is now Inactive.
You have successfully deactivated your backup schedule.
Request an immediate backup
To request an immediate backup, ensure that you are on the Backup Schedule tab of the Backup and Restore page:
-
In the Backup Schedule table, click in the row that identifies the Backup Identifier of your backup schedule. Ensure that the Schedule State is Active.
Figure 11-13 Select your backup schedule
Description of ''Figure 11-13 Select your backup schedule''
-
Click Immediate.
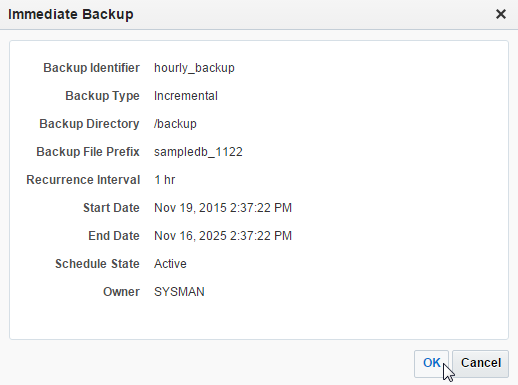
The Immediate Backup dialog displays. Locate the OK button.
-
Click OK.
The Immediate Backup dialog closes. TimesTen runs the
ttBackuputility to complete your backup request. The backup time varies depending on the size of your database. Review the Backup History tab to see the status of your TimesTen backup. For more information on the Backup History tab, see "Backup history and restore database". For more information on thettBackuputility, see "ttBackup" in the Oracle TimesTen In-Memory Database Reference.

You have successfully requested an immediate TimesTen backup.
Delete a backup schedule
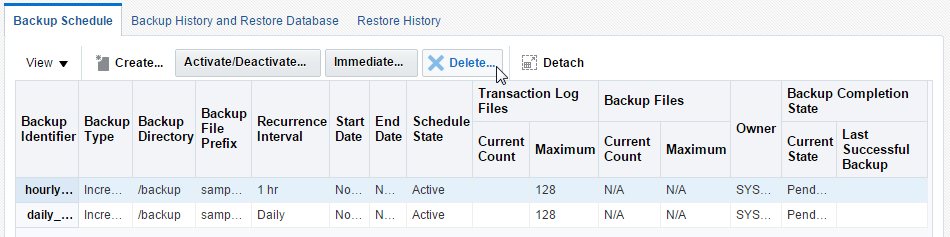
To delete a backup schedule, ensure that you are on the Backup Schedule tab of the Backup and Restore page:
-
In the Backup Schedule table, click in the row that identifies the Backup Identifier of your backup schedule.
Figure 11-16 Select your backup schedule
Description of ''Figure 11-16 Select your backup schedule''
-
Click Delete.
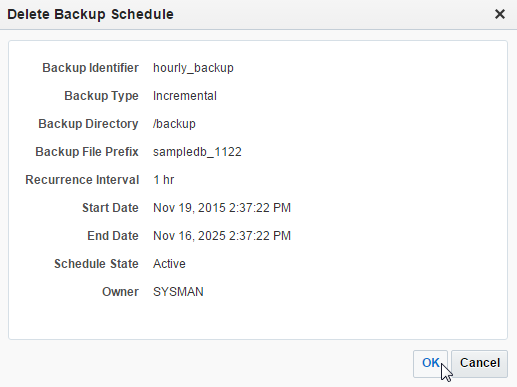
The Delete Backup Schedule dialog displays. Locate the OK button.
-
Click OK.
The Delete Backup Schedule dialog closes and the Backup Schedule tab of the Backup and Restore page refreshes. You can verify the backup schedule has been deleted by reviewing the Backup Schedule tab of the Backup and Restore page. You should no longer see your TimesTen backup schedule.
You have successfully deleted your TimesTen backup schedule.
Backup history and restore database

The backup history tab and restore database enables you to view backup history, delete backups, and recover your TimesTen database. TimesTen calls the ttRestore utility to restore your TimesTen database from a backup. For more information on the ttRestore utility, see "ttRestore" in the Oracle TimesTen In-Memory Database Reference.
You can perform these actions on the backup history tab:
Restore the TimesTen database with an available backup
To restore your TimesTen database with an available backup, ensure that you are on the Backup History and Restore Database tab of the Backup and Restore page and that your TimesTen database is unloaded from memory. For more information on unloading your TimesTen database from memory, see "Load/unload RAM".
Note:
During the restoration procedure, Enterprise Manager does not collect any TimesTen database metric information. Enterprise Manager starts collecting TimesTen database metric information when the TimesTen database is restored.-
In the Backup History and Restore Database table, click in the row that identifies the Backup Identifier of your backup. Ensure that the Status is Success.
-
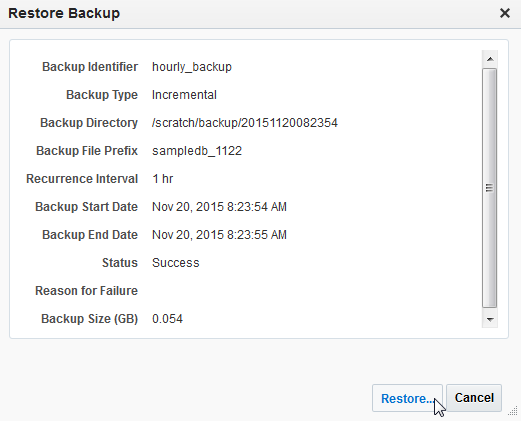
Click Restore.
The Restore Backup dialog displays. Locate the OK button.
-
Click Restore.
The Restore Backup dialog closes. TimesTen runs the
ttRestoreutility to complete your TimesTen database restoration request. The restore time varies depending on the size of your database. Review the Restore History tab to see the status of your TimesTen database restoration. For more information on the Restore History tab, see "Restore history". For more information on thettRestoreutility, see "ttRestore" in the Oracle TimesTen In-Memory Database Reference

You have successfully requested a TimesTen database restoration.
Delete a TimesTen database backup file
To delete a TimesTen database backup file entry or a failed TimesTen database backup entry, ensure that you are on the Backup History tab of the Backup and Restore page:
Note:
Ensure that you delete TimesTen backup files from the Backup History table. If you delete TimesTen backup files directly from the file system, Enterprise Manager does not remove the entry from the Backup History table.-
In the Backup History and Restore Database table, click in the row that identifies the Backup Identifier of your TimesTen backup file or failed TimesTen database backup entry.
Figure 11-23 Select your TimesTen database backup file

Description of ''Figure 11-23 Select your TimesTen database backup file''
-
Click Delete.
The Delete Available Backup dialog displays. Locate the OK button.
-
Click OK.
The Delete Available Backup dialog closes and the Backup History tab of the Backup and Restore page refreshes. You can verify that the TimesTen backup entry has been deleted by reviewing the Backup History tab of the Backup and Restore page. You should no longer see your TimesTen backup entry.

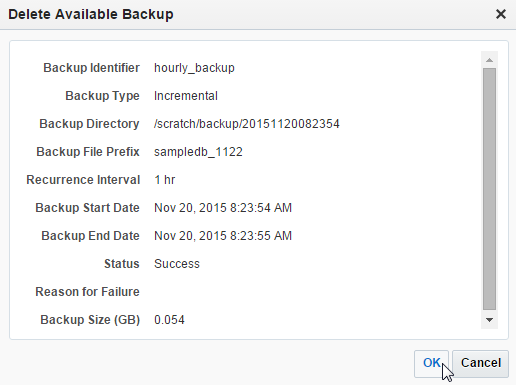
You have successfully deleted your TimesTen backup entry from Enterprise Manager and Enterprise Manager deletes the TimesTen backup from your file system.
Restore history

The restore history tab enables you to review and delete TimesTen database recovery entries.
You can perform these actions on the restore history tab:
Review a restore history entry
The restore history table shows all of the restore operations that have been performed on the TimesTen database from Enterprise Manager. This information is useful in keeping track of recovery operations and reviewing the causes of recovery failures.
Delete a restore history entry
To delete a TimesTen database restore entry ensure that you are on the Restore History tab of the Backup and Restore page:
-
In the Restore History table, click in the row that identifies the Backup Identifier of your TimesTen database restore entry.
Figure 11-27 Select your TimesTen database recovery entry

Description of ''Figure 11-27 Select your TimesTen database recovery entry''
Locate the Delete button.
-
Click Delete.
The Delete Recovery History dialog displays. Locate the OK button.
-
Click OK.
The Delete Recovery History dialog closes and the Restore History tab of the Backup and Restore page refreshes. You can verify that the TimesTen restore history entry has been deleted by reviewing the Restore History tab of the Backup and Restore page. You should no longer see your TimesTen restore history entry.

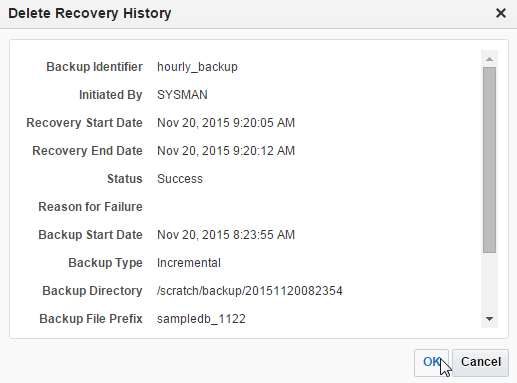
You have successfully deleted your TimesTen restore history entry.