4 Performing Basic DMU Tasks
This chapter shows the step-by-step use of the Database Migration Assistant for Unicode in a few typical scenarios of the character set migration process. If you follow the examples presented here, you can then use the tool to migrate your database. Most of the steps in this chapter are common throughout all scenarios.
This chapter contains the following sections:
Initializing the Database
The initialization of a database for use with the DMU includes the following tasks:
Installing Required Patches
-
In the downloaded, newest DMU release notes, check if any database patches are required for your database release to work with the DMU. Then use the
opatchutility to check if the required patches are already installed. Finally, set theORACLE_HOMEenvironment variable to the Oracle home directory of the database, change the current directory to theOPatchsubdirectory of the Oracle home, and issue the following statement:opatch lsinventory –patch
If the
opatchutility identifies the lack of a validoraInst.locfile, locate the file in the Oracle home of the database and pass its location in the-invPtrLocparameter, as shown in the following example:opatch lsinventory –patch –invPtrLoc ../oraInst.loc
The output from the
opatchutility will resemble the following:Invoking OPatch 10.2.0.5.0 Oracle interim Patch Installer version 10.2.0.5.0 Copyright (c) 2005, Oracle Corporation. All rights reserved.. Oracle Home : C:\oracle\product\10.2.0\db_1 Central Inventory : C:\Program Files\Oracle\Inventory from : n/a OPatch version : 10.2.0.5.0 OUI version : 10.2.0.5.0 OUI location : C:\oracle\product\10.2.0\db_1\oui Log file location : C:\oracle\product\10.2.0\db_1\cfgtoollogs\opatch\opatch2010-05-17_22-50-28PM.log Lsinventory Output file location : C:\oracle\product\10.2.0\db_1\cfgtoollogs\opatch\lsinv\lsinventory2010-05-17_22-50-28PM.txt -------------------------------------------------------------------------- Interim patches (2) : Patch 5556081 : applied on Mon Feb 08 15:50:52 CET 2010 Created on 9 Nov 2006, 22:20:50 hrs PST8PDT Bugs fixed: 5556081 Patch 5557962 : applied on Mon Feb 08 15:50:45 CET 2010 Created on 9 Nov 2006, 23:23:06 hrs PST8PDT Bugs fixed: 4269423, 5557962, 5528974 -------------------------------------------------------------------------- OPatch succeeded. -
Check if the required database patches are listed among interim patches. Download any missing patches from the My Oracle Support site and install them. Then review the documentation that is part of the patches for installation instructions. These patches can be found at:
Installing Supporting Packages
If your database has not been initialized for the DMU yet, it will not contain the necessary PL/SQL supporting packages to access its dedicated database kernel functions.
To install supporting packages:
-
Connect to the database server host as an operating system user who can run the SQL*Plus utility from the Oracle home directory of the database.
-
Start the SQL*Plus utility and connect as a user with the
SYSDBAprivilege. For example, on Linux or Microsoft Windows, enter the following command:sqlplus / as sysdba
-
After you have logged in, execute the following command:
SQL> @?/rdbms/admin/prvtdumi.plb
The output from the script should resemble the following:
Library created.

Package created.

No errors.

Package body created.

No errors.
In addition, you should perform the preceding steps if installation documentation from any installed database patches requires them.
Creating a Tablespace for the Migration Repository
For ease of maintenance and to avoid fragmentation of other production tablespaces, Oracle recommends that a separate tablespace be used for database objects (tables and indexes) forming the migration repository of the DMU. In order to follow this recommendation, create a suitable tablespace now, so that you can select it for the migration repository in the following steps. See Oracle Database 2 Day DBA or Oracle Database Administrator's Guide for instructions about creating a tablespace.
To create a tablespace for the Migration Repository:
Oracle recommends that the tablespace be locally managed with the default extent allocation policy and with the autoextension feature switched on.
-
Use the result of the following SQL query (run as
SYSDBA) as the initial size of the tablespace:SELECT CEIL((t.cnt*300+c.cnt*1000)/1048576)||' MB' "Initial Size" FROM (SELECT COUNT(*) cnt FROM sys.tab$) t, (SELECT COUNT(*) cnt FROM sys.col$ WHERE obj# IN (SELECT obj# FROM sys.tab$) AND BITAND(property,65536)=0 AND type# IN (1,8,58,96,112) AND charsetform=1) cThe size of the tablespace could grow significantly if you collect a lot of rowids for use by the Cleansing Editor or if you apply the "Convert only updatable rows" conversion method to many tables with large numbers of convertible cells. Therefore, Oracle recommends that the autoextend feature be switched on to allow the tablespace to grow as necessary.
Creating a Database Connection
Refreshing, Reinstalling, or Upgrading the Migration Repository
After a repository has been installed, it is automatically refreshed at predefined points in the DMU workflow to account for any objects containing character data that may have been added to, altered in, or removed from the database. In addition, you can refresh, reinstall, or upgrade the repository by selecting appropriate option from the Migration menu.
Refreshing the Migration Repository
You can explicitly refresh the repository to immediately include any recent changes to the database objects by selecting Refresh DMU Repository from the Migration menu or from the context menu of the database node in the Navigator pane. After the refresh has finished, a confirmation message appears announcing that the repository has been successfully refreshed.
Reinstalling the Migration Repository
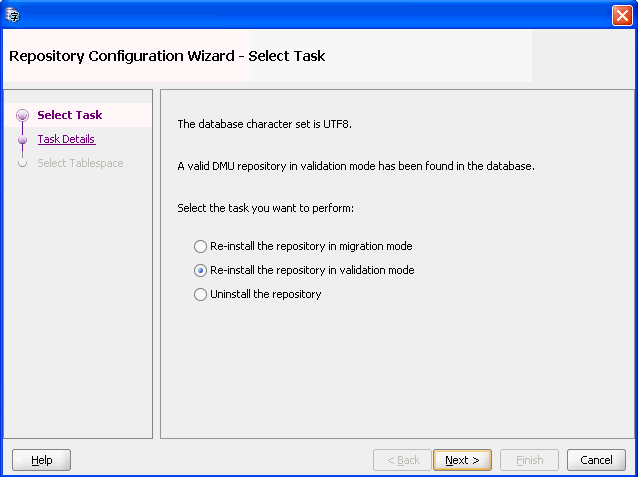
You can explicitly reinstall the repository by using the Repository Configuration Wizard.
To reinstall the Migration Repository:
-
Select Configure DMU Repository from the Migration or Validation menu. Figure 4-1, "Repository Configuration Wizard - Reinstallation" appears.
Figure 4-1 Repository Configuration Wizard - Reinstallation
Description of "Figure 4-1 Repository Configuration Wizard - Reinstallation"
-
Choose either migration mode or validation mode. Then click Next. Figure 4-2, "Repository Configuration Wizard - Reinstallation/Archiving" appears.
Figure 4-2 Repository Configuration Wizard - Reinstallation/Archiving

Description of "Figure 4-2 Repository Configuration Wizard - Reinstallation/Archiving"
-
Ensure that "Archive the existing repository for diagnostic purpose" is selected and click Next. Figure 4-3, "Repository Configuration Wizard - Select Tablespace" appears.
Figure 4-3 Repository Configuration Wizard - Select Tablespace
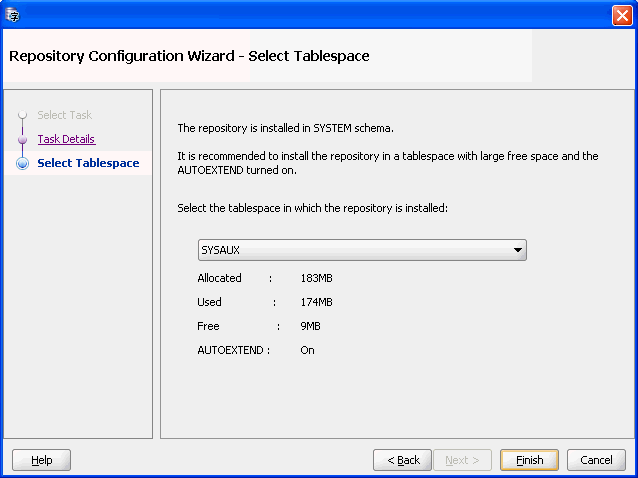
Description of "Figure 4-3 Repository Configuration Wizard - Select Tablespace"
-
Click Finish. The repository is reinstalled.
Upgrading the Migration Repository
When connecting with DMU 2.1 to a database that has an existing repository installed by DMU 2.0, the Repository Configuration Wizard provides the option to upgrade the repository from DMU 2.0 version to DMU 2.1 version.
Note:
You must have a valid DMU 2.1 version repository installed before you can perform the migration tasks with the DMU 2.1 software.To upgrade the Migration Repository from DMU 2.0 version to DMU 2.1 version:
-
Select Configure DMU Repository from the Migration or Validation menu. The Select Task page of the Repository Configuration Wizard is displayed.
-
For the Migration mode, select the following option on the Select Task page:
Upgrade an older version of the repository in migration mode
For the Validation mode, select the following option on the Select Task page:
Upgrade an older version of the repository in validation mode
-
Click Next. A progress bar showing the progress of the repository upgrade process is displayed. After successful completion of the repository upgrade process, a dialog box containing the following message is displayed:
Repository has been upgraded successfully.
Uninstalling the Migration Repository
To uninstall the Migration Repository:
-
To remove a repository, from the Migration menu or the context menu of the database node in the Navigator pane, select Configure DMU Repository. A dialog box will appear that offers you the option to uninstall the repository. If you select Uninstall the repository and click Next, the repository is uninstalled. When the repository has been uninstalled, a confirmation message appears to confirm the success of the operation.
Scanning the Database
The next step is to scan your current data. In general, what you want to achieve in this step is to analyze what is causing problems and to choose a cleansing strategy to resolve the data issues.
Scanning is the process of reading character values from the database, converting them to the target character set, and counting how many values change in conversion, do not fit into their columns, do not fit into their data types, or contain invalid character codes. Additional statistics, such as the maximum post-conversion length of values in a column, are calculated as well. The DMU stores the calculated counts and statistics in the migration repository as scan results. The character values resulting from the test conversion are themselves discarded. They are not stored permanently in the database.
Before a database can be converted to Unicode, the character data in the VARCHAR2, CHAR, LONG, and CLOB table columns must be analyzed to assess if any issues could prevent the conversion from finishing successfully without causing data corruption. The DMU analyzes the data by converting character column values in the database from their declared character set to the target Unicode character set, and checking each value to determine if:
-
The conversion result differs from the original value
-
The conversion result fits into the length limit of its column
-
The conversion result fits into its data type
-
The conversion result does not contain any replacement characters, that is, each converted source character code is valid in the declared character set of the column
This section discusses:
Setting Database Properties
Before you start scanning the database, you should provide the DMU with the language and character set information that you collected while preparing the migration process, as described in "Review Your Preparations for Migration".
-
Open the Database Properties tab, which is illustrated in Figure 4-4. This tab is automatically opened in the client pane of the DMU window when you connect to a database. The title of the tab is the name of the connection.
You can also view this tab by right-clicking the database node in the Navigator pane and selecting Properties from the context menu. From the left sidebar of the tab, choose the General subtab. On the subtab, set the Assumed Database Character Set property to the identified real character set of data in the database. If your database is used in a correct character set configuration, as opposed to the pass-through configuration, this property should remain equal to the Current Database Character Set property.
Figure 4-4 Database Properties Tab - General
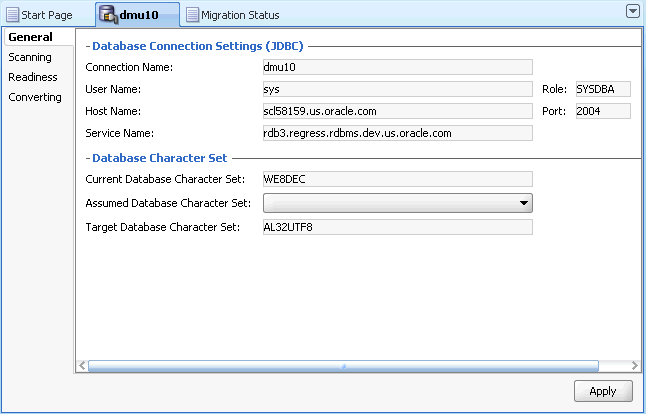
Description of "Figure 4-4 Database Properties Tab - General"
See Also:
Chapter 3, "Viewing and Setting Object Properties in the DMU" for more details about database and other propertiesScanning the Database with the Scan Wizard
You are now ready to run the first scan of the database contents. This process is started through the Scan Wizard. The scan results inform you if any data needs cleansing before it can be converted permanently without data loss. Also, the DMU uses the scan results to select the most effective conversion method for each table.
Three elements of the DMU user interface let you control the scanning process and view the scan results. You use the Scan Wizard to start the scanning process, the Scan Progress tab to monitor this process (See "Monitoring the Progress of a Scan"), and the Database Scan Report tab to view the scan results (See "Overview of the Database Scan Report").
The DMU might collect during scanning the rowid addresses of column cells that contain convertible values or values with expansion or invalid binary representation issues.
CLOB columns are not scanned or even listed in the Navigator pane in a multibyte database. Any multibyte database, including databases in AL32UTF8 and UTF8 character sets, store CLOB values in the same internal storage character set (Unicode UTF-16), and so CLOB values need no conversion when the database character set is migrated from one multibyte character set to another.
The source character set used for the test conversion of column values is the assumed character set of the column. See "Cleansing the Data".
To scan the database using the Scan Wizard:
-
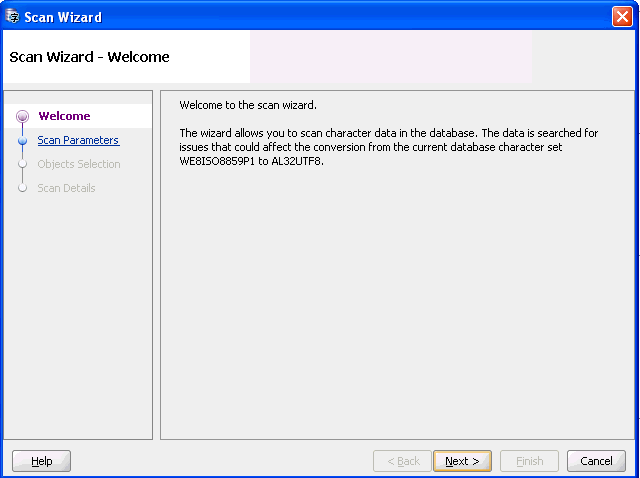
To open the Scan Wizard, select Scan Database from the Migration menu or Scan Database, Scan Schema, Scan Table, or Scan Column from the context menu of the corresponding object node in the Navigator pane. The Scan Wizard is displayed, as in Figure 4-5, "Scan Wizard - Welcome".
The DMU might also open the Scan Wizard after you start the conversion process from the Conversion Details tab. The DMU opens the wizard if one or more tables in the database are to be converted using the conversion method "Update only convertible rows". The additional scan collects rowid addresses that this conversion method requires. The Scan Wizard opened during the conversion phase has a different first page, as shown in Figure 4-6, "Scan Wizard - Welcome: Rowid Collection". It also lacks the object selection page. See "Converting the Database" for more information about the conversion phase.
Figure 4-6 Scan Wizard - Welcome: Rowid Collection
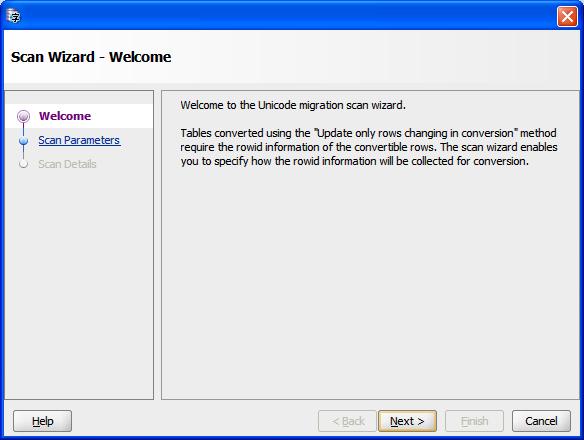
Description of "Figure 4-6 Scan Wizard - Welcome: Rowid Collection"
-
Click Next to skip the Welcome page.
-
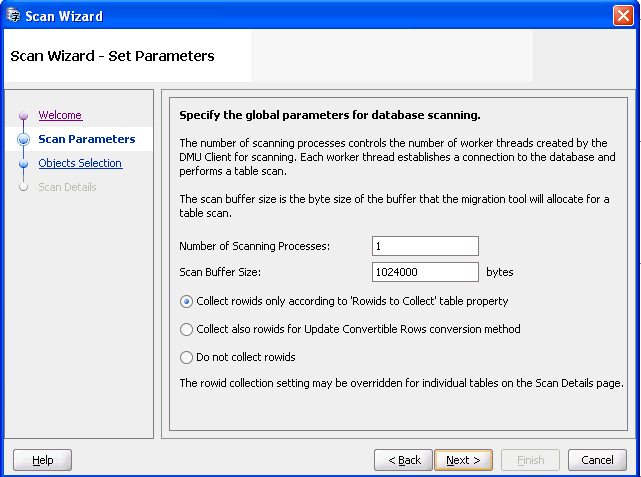
The second page of the wizard lets you set general parameters for the scanning process, as shown in Figure 4-7, "Scan Wizard - Set Parameters".
The Number of Scanning Processes is the number of threads that the DMU spawns to perform the scanning process. Each thread opens a separate database connection. The DMU assigns a set of tables to each thread to scan independently. Larger tables might be split into chunks and scanned by multiple threads. Smaller tables are scanned entirely by one thread. The default value for this parameter is the value of the
CPU_COUNTinitialization parameter of the database. You can increase the parameter to see if the scanning time decreases, leveraging the parallel processing of CPUs and disks of the database server, or you can decrease the parameter to limit the negative impact that the scanning process might have on the performance of a busy production database.The parameter Scan Buffer Size controls the size in bytes of a buffer that the DMU allocates in each database server session to scan a table. The default value is 1000 kilobytes. The total buffer space used in a single scan is the number of scanning processes times the value of this property. Increasing the value of the property could speed up scanning, but only for as long as the allocated buffer memory fits into the available RAM on the database server.
The three radio buttons let you define the initial rowid collection level for tables selected for this scan. This initial level can be subsequently changed on the Scan Details page of the wizard, as described in point 5 below. The option "Collect rowids only according to 'Rowids to Collect' table property" tells the DMU to use the value of the table property 'Rowids to Collect' as the initial rowid collection level for each table. See "Table Properties: Scanning" for more details about this property.
The option "Collect also rowids for Update Convertible Rows conversion method" can be selected to let the DMU pre-collect rowid addresses for the "Update only convertible rows" conversion method. The option causes the initial rowid collection level to be set to "All to Convert" for all selected tables that have been assigned this conversion method and to the value of the property Rowids to Collect for all other selected tables. Usually, the rowids for this conversion method are collected by the already mentioned additional scan that starts automatically at the beginning of the conversion phase.
Pre-collection of rowids removes the need for this additional scan, shortening the required downtime window and enabling the database to be closed for business for a shorter time. However, if any additional convertible rows are added to a table after the last scan that pre-collected rowids for the table has been performed, these rows will not be converted during the conversion phase and will become incorrectly encoded data after the migration. Therefore, use the pre-collection feature sparingly, only on large tables confirmed to have static contents. The option "Collect also rowids for Update Convertible Rows conversion method" has no effect during the first scan of a table as no conversion method has been assigned yet to the table.
The last option, "Do not collect rowids", enables you to switch off rowid collection during the current scan. This may be useful if you just want to count the number of convertible cells and cells with convertibility issues, and you do not plan to use the filtering option of the Cleansing Editor on any of the scanned tables. The rowid collection cannot be switched off for a few special data dictionary tables in the
SYSschema, which have their property "Rowids to Collect" fixed to "All to Convert".In the Scan Wizard that the DMU opens in the conversion phase for collection of rowids, the Scan Parameters page changes as shown in Figure 4-8, "Scan Wizard - Set Parameters: Rowid Collection". The check box "Collect rowids for Update Convertible Rows conversion method" is automatically selected and the additional parameter Maximum Age is present on the page. This parameter enables you to skip rescanning of tables for which rowids have already been pre-collected in the recent Maximum Age hours. It also enables you to discard pre-collected rowids that you consider too old.
Figure 4-8 Scan Wizard - Set Parameters: Rowid Collection
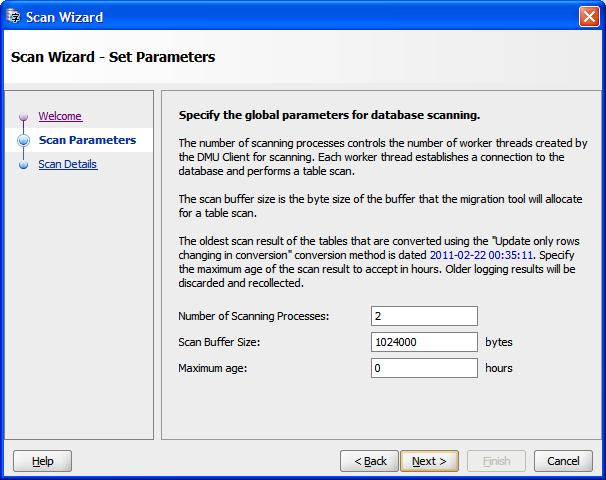
Description of "Figure 4-8 Scan Wizard - Set Parameters: Rowid Collection"
See "Converting the Database" for more information about the conversion process.
Click Next to accept the scan parameters and open the Object Selection page.
-
For the first scan, you usually select all tables in the database by opening the Scan Wizard from the Migration menu. For subsequent scans, you can select a subset of database objects for which you want the scan results to be refreshed, for example, because they have been invalidated by cleansing actions, or because you want recent DML activity on the objects to be analyzed in the context of possibly introduced conversion issues.
If you want only invalidated scan results to be recalculated, you can select all columns in the database, by selecting the database node, and then click Exclude Scanned. When this option is selected, the DMU automatically deselects all columns that already have valid scan results. Now, you can manually select additional tables and columns for which you want existing scan results to be refreshed.
If the "Collect rowids for Update Convertible Rows conversion method" option is selected, the Exclude Scanned option does not exclude tables that do not have required rowids collected by previous scans.
Oracle strongly recommends that you refresh all scan results in the database before you start the conversion, preferably in the downtime window, when no new data can be added to the database. This ensures that all data requiring conversion is accounted for.
Figure 4-9 Scan Wizard - Select Scan Objects

Description of "Figure 4-9 Scan Wizard - Select Scan Objects"
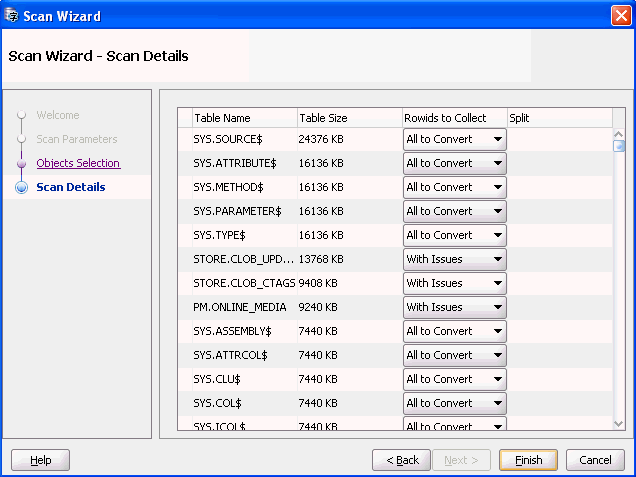
Click Next to accept the object selection and open the Scan Details page. It might take a while to display the page, because, first, the wizard has to prepare a scanning plan for all the selected objects.
-
On the Scan Details page, shown in Figure 4-10, "Scan Wizard - Scan Details", you can verify that all objects you wanted to be scanned are included. You can also set the rowid collection level in the drop-down lists that can be opened by selecting fields in the Rowids to Collect column. The choices for the rowid collection level are None (no collection is performed), All to Convert (collects rowids for all data that is not classified as needing no conversion), and With Issues (collects rowids for data with conversion issues only). Finding data that requires cleansing using the filtering and search features of the Cleansing Editor will be faster if rowids for problematic data cells are collected during scanning. See Chapter 6, "Using the DMU to Cleanse Data" for more information about the Cleansing Editor.
The rowid collection level set in the Scan Wizard is valid only for the current scan. It does not modify the table property "Rowids to Collect" and it does not persist across invocations of the Scan Wizard.
The DMU automatically handles splitting of large tables into chunks for parallel scanning by multiple scanning processes. However, if necessary, you can prevent a table from being split by deselecting the corresponding check box in the Split column.
Clicking Finish will start the scan.
Monitoring the Progress of a Scan
When the scanning starts, the DMU automatically opens the Scan Progress tab, shown in Figure 4-11. You can use this tab to monitor the progress of the scanning task.
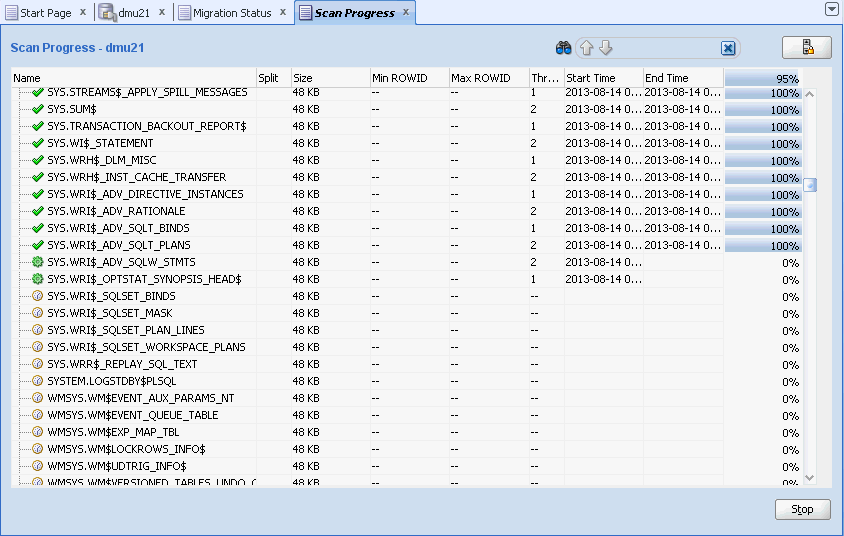
The Scan Progress tab contains a grid that displays scan information for all tables in the scanned set. The columns of the tab grid are as follows:
-
Name
The column shows the name of the table that is described by the corresponding row of the grid. The icon to the left of the name shows the scan status. A green check mark shows that the table has already been scanned. A green sprocket-like icon marks tables that are currently being scanned. A clock marks tables that are waiting to be scanned.
If a table is split into multiple chunks, you can click the plus sign to the left of the status icon to show information for all chunks to which the table has been split.
Note:
The meaning of the green check mark icon differs between the Scan Progress tab and the Navigator pane/Scan Report tab (see "Overview of the Database Scan Report"). On the Scan Progress tab, the icon shows that a table has been successfully scanned, but without indicating if it contains any problematic data. In the Navigator pane or on a Scan Report tab, the icon means that a table, a schema or database has been scanned and also that its contents does not have any issues that might prevent successful conversion to Unicode. -
Split
The number shown is the number of chunks to which the corresponding table has been split. The column is empty in grid rows showing chunk information.
-
Size
The column shows the size of the corresponding table or table chunk. The topmost row of the grid shows the added size of all tables in the scanned set.
-
Min
ROWIDFor chunks, the column shows the rowid of the first row in the chunk. It is empty for tables.
-
Max
ROWIDFor chunks, the column shows the rowid of the last row in the chunk. It is empty for tables.
-
Thread ID
The number shown in this column is the ID of a particular thread that is scanning or that has scanned the corresponding table or table chunk.
-
Start Time
The column shows the time when scanning of the corresponding table or table chunk started. If a table has been split, its row shows the earliest (minimum) start time for all its chunks. The topmost row of the grid shows the start time of the whole scanning task.
-
End Time
The column shows the time when the scanning of the corresponding table or table chunk finished. If a table has been split, its row shows the latest (maximum) end time for all its chunks. The topmost row of the grid shows the end time of the whole scanning task.
-
Progress
The column displays a progress bar and a percentage that indicate how much of the corresponding table or table chunk has already been scanned. The topmost row of the grid shows the overall progress of the scanning task.
If a database error is encountered during the scanning of a table, the grid row corresponding to the table displays a prefix of the reported error message in this column. You can click the prefix to open a dialog box with the full message text.
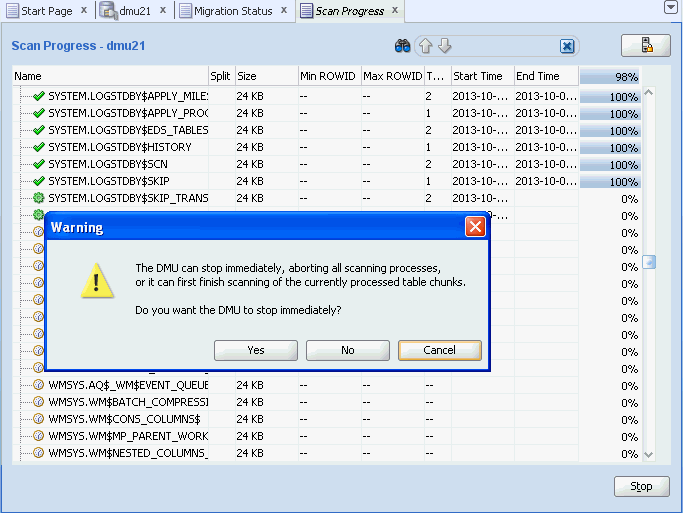
The DMU scrolls down the tab grid automatically to bring new grid rows into view when the corresponding tables are assigned to scanning threads. You can suspend the automatic scrolling by clicking the Scroll Lock icon in the top right-hand corner of the Scan Progress tab. Suspending the automatic scrolling enables you to monitor the overall progress of the scanning by looking at the progress indicators in the topmost row of the grid. To resume automatic scrolling, click the Scroll Lock icon again.
You can suspend the scanning process by clicking Stop on the bottom of the Scan Progress tab. The button will change to Continue. Click Continue to resume scanning. See "Database Scan Report: Stopping the Scan" for more information.
After the scan finishes, the DMU shows an information dialog box. You can now analyze the scan results on the Database Scan Report tab.
Viewing the Database Scan Report
After the scan is completed, you can view the most current scan results either on the Scanning subtabs of various Properties tabs, described in Chapter 3, "Viewing and Setting Object Properties in the DMU", or, in a much more convenient way, on the Database Scan Report tab.
Depending on what the scan results are, you should follow one of the migration scenarios described in "Cleansing Scenario 1: A Database with No Issues", "Cleansing Scenario 2: Cleansing Expansion Issues", or "Cleansing Scenario 3: Cleansing Invalid Representation Issues".
To view the Database Scan Report:
-
Open the Database Scan Report tab with scan results for the whole database by selecting Database Scan Report from the Migration menu. You can open a Database Scan Report tab for tables in a single schema, for a single table, or for a single column, by selecting Scan Report from the context menu of the corresponding schema, table, or column node in the Navigator pane.
A Database Scan Report tab for the whole database is shown in Figure 4-12, "Database Scan Report".
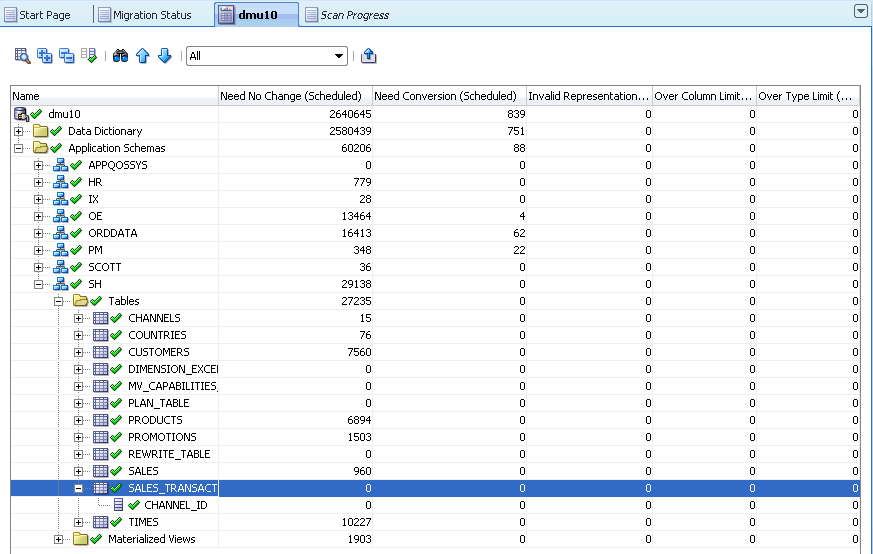
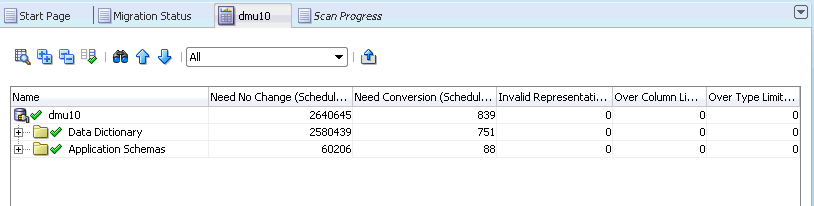
Overview of the Database Scan Report
The Database Scan Report tab contains a toolbar on the top and a result grid under the toolbar. You can use three methods to quickly locate scan results in the Database Scan Report in which you are interested, and, in addition, export the Report:
Database Scan Report: Result Grid
The result grid is a user interface item, in form of a tree table, that displays scan results and, optionally, other properties of database objects. The first column of the grid contains a database object tree that has the same appearance as the tree on the Navigator pane (see "Introduction to the DMU User Interface"). The root of the tree is the database, schema, table, or column for which the Database Scan Report has been opened. Each node of the tree is associated with a row of the grid. This row shows various properties of the database object corresponding to the node.
The status icon to the left of the name of the node shows the convertibility status for the database object described by the node. The meaning of icons is defined in Table 2-1, "Database Migration Assistant for Unicode Icons".
A node can be expanded and collapsed to show or hide results of its child nodes by clicking the plus icon to the left of the node. You can expand all descendants of a node at once by selecting the row containing the node and clicking Expand All, the second icon on the toolbar (see Table 2-1, "Database Migration Assistant for Unicode Icons"). You can collapse all descendants by selecting the node and clicking Collapse All, the third icon on the toolbar.
When the Database Scan Report tab is opened, the columns displayed in the grid by default are: Need No Change (Scheduled), Need Conversion (Scheduled), Invalid Binary Representation (Scheduled), Over Column Limit (Scheduled), and Over Type Limit (Scheduled). The values shown in these columns are equal to scan results shown under the heading "Including Effects of Scheduled Cleansing" on the Scanning subtab of the Properties tab for the corresponding node. Those scan results are described in Chapter 3, "Viewing and Setting Object Properties in the DMU".
By clicking on Customize Report, the fourth icon on the toolbar, you can open the Customize Scan Report dialog box. In this dialog box, you can select further property columns to display along the default ones. You can also hide the default columns. The available columns correspond to properties described in Chapter 3, "Viewing and Setting Object Properties in the DMU". The columns Need No Change, Need Conversion, Invalid Binary Representation, Over Column Limit, and Over Type Limit, without the suffix "(Scheduled)", correspond to scan results presented on Scanning subtabs under the heading "Current Data".
If a property displayed in the Database Scan Report grid column is valid only for certain types of nodes, the grid column displays no text in rows corresponding to other types of nodes. For example, the Conversion Method property is valid only for tables. Grid rows for the database, schemas, and columns do not show anything in the Conversion Method column, if it is added to the Database Scan Report tab.
If you right-click a row in the Database Scan Report grid, you can select Scan, Cleansing Editor, or Properties from the context menu. The Scan menu item opens the Scan Wizard in which only the object described by the current grid row is selected for scanning. This way you can quickly instruct the DMU to refresh scan results for this object. Cleansing Editor opens the Cleansing Editor tab for the selected table or table column. See Chapter 6, "Using the DMU to Cleanse Data" for the description of the Cleansing Editor tab. Clicking Properties opens the Properties tab of the object described by the selected grid row (see Chapter 3, "Viewing and Setting Object Properties in the DMU").
The context menu for data dictionary tables contains the Data Viewer instead of the Cleansing Editor. The Data Viewer tab, opened by clicking Data Viewer, is a read-only version of the Cleansing Editor.
Database Scan Report: Navigating by Status Icons
You can locate database columns that contain data with convertibility issues by expanding Database Scan Report nodes that are marked with the yellow triangle icon. This icon signals that one or more columns among descendants of the node have some convertibility issues. Expand a node marked with such an icon, then look through its children to locate child nodes marked with the same icon, expand those nodes, and so on, until you reach the column nodes. The column nodes marked with a yellow triangle icon describe database columns that must be cleansed. Nonzero counts in the grid columns Invalid Binary Representation (Scheduled), Over Column Limit (Scheduled), and Over Type Limit (Scheduled) show how many issues of each type have been found in the given database column. The counters are displayed as links that you can click to directly open the Cleansing Editor or the Data Viewer tab to take a closer look at the issues.
Database Scan Report: Filtering
A useful feature of the Database Scan Report tab is the filtering function. You can open the drop-down filter list on the toolbar of the tab, as shown in Figure 4-13, "Database Scan Report: Filtering", and select which type of results you would like to see in the report.
Figure 4-13 Database Scan Report: Filtering
Description of "Figure 4-13 Database Scan Report: Filtering"
The available filters are:
-
All
Switches the filtering off. All objects are displayed.
-
Scanned
Displays only objects with valid scan results.
-
Scan Failed
Displays objects that could not be scanned, because a database error was reported.
-
Not Scanned
Displays objects without valid scan results. An object might have no valid scan results because it has never been scanned, its scan results have been invalidated by a cleansing action or a DDL, or the last scan of the object failed.
-
Requiring No Conversion
Displays objects that have valid scan results and contain only changeless data that requires no conversion.
-
Requiring Conversion, Without Issues
Displays objects that have valid scan results and contain a mixture of changeless data that requires no conversion and convertible data that requires conversion. No issues are expected during conversion of these objects.
-
Blocking Conversion
Displays objects with unresolved convertibility issues that must be acted upon before the database can be successfully converted.
-
With Invalid Representation
Displays objects that have valid scan results and contain some data with invalid binary representation, that is, with character codes that are not valid in the declared column character set.
-
Exceed Dataytpe Limit
Displays objects that have valid scan results and contain some data that exceeds its data type limit after conversion.
-
Exceed Column Limit
Displays objects that have valid scan results and contain some data that exceeds its column limit after conversion.
-
With Length Issues
Displays objects that have valid scan results and contain some data that exceeds its column limit or its data type limit after conversion.
-
Not Changeless
Displays objects that have valid scan results and contain some data that will require conversion. The data may or may not have convertibility issues. That is, it may belong to any of the categories: "Need Conversion", "Invalid Representation", "Over Column Limit", or "Over Type Limit".
-
With Some Issues
Displays objects that have valid scan results and contain data with any of the possible problems for which the DMU searches. For data dictionary schemas, this includes convertible data in columns that the DMU cannot convert.
After a filter is selected, all nodes and associated grid rows for database columns whose scan results do not fulfill the filtering condition are hidden. If all children of a node are hidden, the node is hidden as well. The exception is the root node of the report, which is never hidden.
Filtering is useless and thus disabled in Database Scan Report tabs opened for a single database column.
You can also rescan only the filtered objects in the scan report by selecting the first icon of the toolbar, which is the Rescan Filtered Objects button. As an example, if the the "Exceed Column Limit" filter is set in the scan report, then the Rescan Filtered Objects button will select all tables with "Over Column Limit" issues for the rescan.
Database Scan Report: Searching
Another feature of the Database Scan Report tab that makes analyzing scan results easier in large scan reports is the search feature. You initiate a search by clicking one of the following toolbar buttons:
-
Find
The fifth button on the toolbar opens a dialog box that enables you specify the search criteria for objects.
-
Find Previous
The sixth button on the toolbar highlights the previous instance of the originally searched item.
-
Find Next
The seventh button on the toolbar highlights the next instance of the originally searched item.
If you select Find, a dialog box such as that shown in Figure 4-14, "Database Scan Report: Searching" is displayed.
Figure 4-14 Database Scan Report: Searching
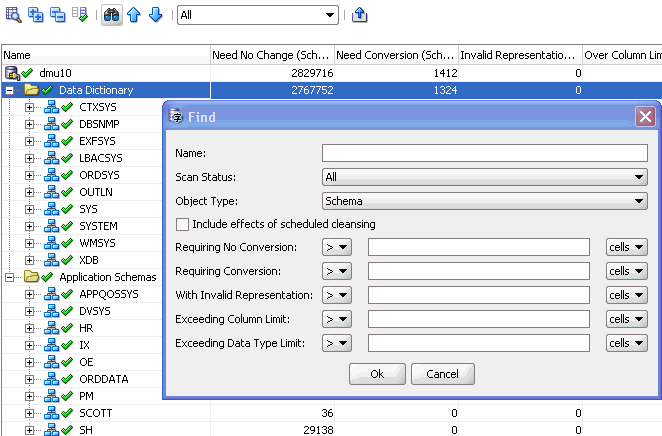
Description of "Figure 4-14 Database Scan Report: Searching"
You can specify the following search criteria in the dialog box to describe objects that you want located:
-
Name
Specify a string that should be contained in the name of the object (case-insensitive).
-
Scan Status
Specify the scan status of the object.
-
Object Type
Specify object type if you want to search among schemas, tables, or columns. Only one type can be selected.
-
Include effects of scheduled cleansing
Select this option if the results for which to search should include effects of the scheduled cleansing action. If the option is selected, the compared results are those displayed in grid columns with the phrase "(Scheduled)" in heading.
-
Requiring No Conversion
Select the comparison operator and the value to compare with the Need No Change results.
-
Requiring Conversion
Select the comparison operator and the value to compare with the Need Conversion results.
-
With Invalid Representation
Select the comparison operator and the value to compare with the Invalid Binary Representation results.
-
Exceeding Column Limit
Select the comparison operator and the value to compare with the Over Column Limit results.
-
Exceeding Data Type Limit
Select the comparison operator and the value to compare with the Over Type Limit results.
After you select OK, the grid row for the first schema, table, or column, as selected in Object Type, that fulfills all the specified criteria is highlighted in the scan report. You can select the Find Previous or the Find Next toolbar button to highlight the previous or the next row of the same type that fulfills the criteria.
Database Scan Report: Exporting to HTML
To save the scan results for future reference, you can export them to an HTML file. Select Export as HTML, the last button on the toolbar. This will open the Export Scan Report dialog box, as shown in Figure 4-15, "Export Scan Report".
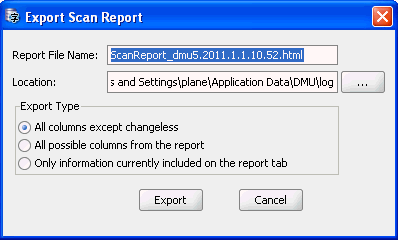
Specify the name and directory (folder) for the HTML file. By choosing one of the options in the Export Type group, specify if you want to export, correspondingly, any one of the following:
-
Only grid rows for columns and their parent objects that require conversion or have data with convertibility issues
-
The entire content of the scan report
-
Only those rows and columns of the result grid that are visible on the report tab (not hidden or collapsed)
Click Export to create the HTML report.
Database Scan Report: Stopping the Scan
You can stop a scan in progress by clicking Stop, in which case a warning dialog appears. You have a choice of selecting Yes to terminate the scan immediately, No to stop the scanning process after the current process finishes, or Cancel to go back to the scanning.
Generating the Problem Data Report
You can use DMU to generate a Problem Data Report in the form of .xls spreadsheet containing detailed information about the data in the database objects having convertibility issues.
To generate the Problem Data report:
-
Select Problem Data Report from the Migration menu. The Welcome page of Problem Data Report Wizard is displayed.
-
Click Next. The Select Problem Data page is displayed showing all the database objects that have convertibility issues.
-
Select the database objects whose details you want to see in the Problem Data report.
-
Click Next. The Generate Report page is displayed.
-
Enter the values for the following fields on the Generate Report page:
-
Preview Data Length: Number of bytes of data that you want to see in the Problem Data report for the data cells having convertibility issues.
-
Report File Path: Name of the Problem Data report file along with its directory path. Problem Data report file has
.xlsextension.Note:
The default Problem Data report file name is in the formatProblemDataReport_ProjectName_yyyyMMddHHmmss.xls. The default directory path is the value specified for the Log Directory field in the Preference panel. You can either use the default values provided by DMU or specify any other values for Problem Data report file name and its directory path.
-
-
Click Finish to generate the Problem Data report.
Problem Data report shows the details of the database objects that contain the data having convertibility issues. Figure 4-17 shows a sample Problem Data report:

Note:
-
For the invalid representation and over size limit data, the problem characters are highlighted in the Cell Data and Hexadecimal Value columns in the Problem Data report.
-
DMU does not support converting
ANYDATAorANYDATASETto Unicode format and considers it as problem data. This type of data is shown in the Unsupported Convertible Data tab.
Cleansing the Data
Data issues that have been identified in the scanning process must be resolved before the database can be converted. The DMU does not allow the conversion process to start until all issues have been resolved or explicitly marked as ignorable. The actions that you can take to resolve the convertibility issues are called cleansing actions.
See Also:
-
Chapter 6, "Using the DMU to Cleanse Data" for details regarding cleansing
-
My Oracle Support Note #124721.1 for data cleansing instructions for migrating an Oracle E-Business Suite database to Unicode
Converting the Database
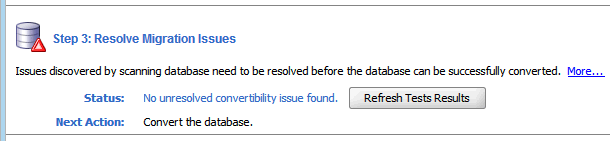
The final step is the actual conversion of your database character data, which you can perform after all issues in the database have been resolved, and the Migration Status tab resembles what is shown in Figure 4-18, "Migration Status Tab - No Unresolved Issues".
Figure 4-18 Migration Status Tab - No Unresolved Issues
Description of "Figure 4-18 Migration Status Tab - No Unresolved Issues"
-
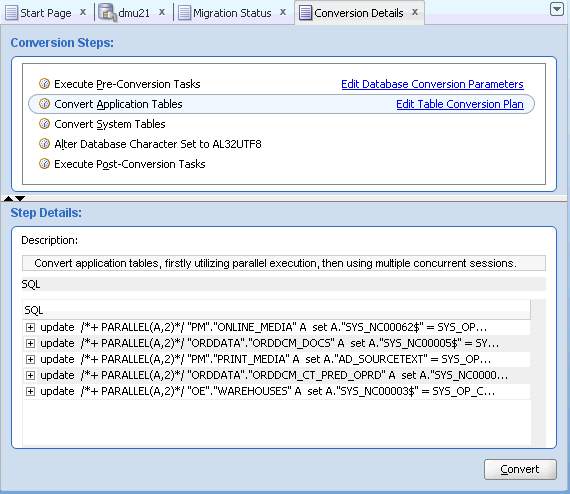
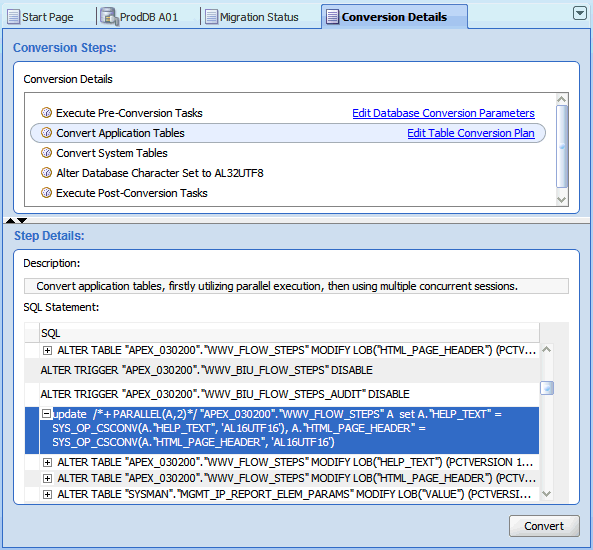
To begin the conversion process, select Convert Database from the Migration menu or the context menu of the database node in the Navigator pane. The DMU generates a conversion plan, which is a list of SQL statements to run in the conversion phase, and shows it on the Conversion Details tab in the client pane of the DMU window, as shown in Figure 4-19, "Conversion Details Tab". The Conversion Steps area on the tab lists the successive steps of the conversion process. When you click a step in the list, the Step Details area shows the list of SQL statements to be executed as part of the step. For a more detailed explanation of this tab's capabilities, see "Conversion Details Tab".
-
Click Edit Database Conversion Parameters to display the Converting subtab of the Database Properties tab. See "Viewing and Setting Database Properties" for a description of parameters that you can set on this subtab.
-
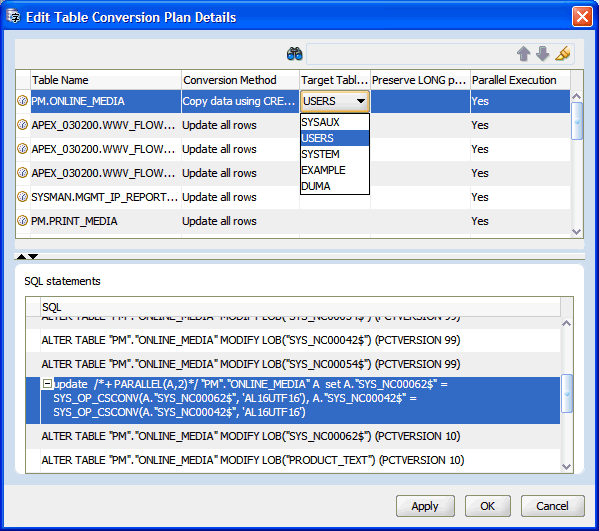
Click Edit Table Conversion Plan to show the conversion plan details for application tables. The upper part of the displayed dialog box contains a list of all tables that will be processed during the conversion. When you select a table from the list, the lower part shows the SQL statements that will be used to process the table and its dependent objects. You can customize this list by setting the properties Conversion Method, Target Tablespace, Preserve LONG Position, and Parallel Execution. See "Viewing and Setting Table Properties" for a description of these parameters.
Figure 4-20 Edit Table Conversion Plan Details: Example 1
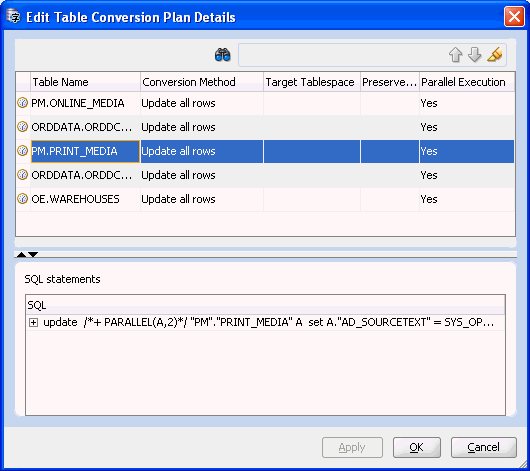
Description of "Figure 4-20 Edit Table Conversion Plan Details: Example 1"
-
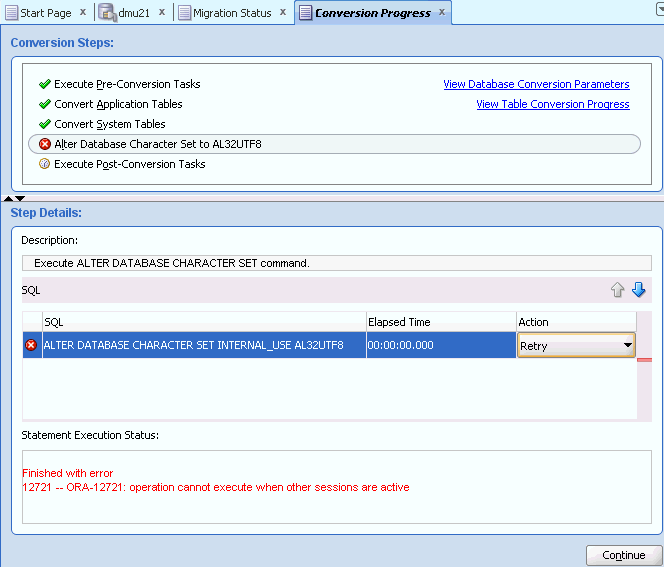
Click the Convert button on the Conversion Details tab to start the conversion process. The DMU might display warnings about unexpected sessions present in the database and about the age of the oldest scan results. Review the warnings as described below. Accept the warning messages to continue.
The SQL statement ALTER DATABASE CHARACTER SET, which the DMU uses in the conversion phase, succeeds only if the session executing the statement is the only user session logged into the database. Therefore, before starting the conversion, the DMU warns you about any user sessions logged into the database that are not opened by the DMU itself. You may use the following SQL statement in SQL*Plus or SQL Developer to find out the details of the offending sessions:
SELECT sid, serial#, username, status,
       osuser, machine, process, program
FROM v$session
WHERE username IS NOT NULL
AND program <> 'Database Migration Assistant for Unicode';
If the column V$SESSION.PROGRAM in a row returned by the above query contains the name of the Oracle Database executable, in an operating system dependent format, followed by "(Jnnn)", where nnn are three decimal digits, for example "ORACLE.EXE (J000)", then the user session described by the row has been created by the database server itself to execute a job submitted through the PL/SQL package DBMS_JOB or DBMS_SCHEDULER. You can query the Data Dictionary views DBA_JOBS_RUNNING and DBA_SCHEDULER_RUNNING_JOBS to identify jobs currently running in the database. Before continuing with conversion, ensure that all the jobs have finished their work and that their sessions have disappeared from V$SESSION.
To prevent further jobs from starting, issue the following SQL statement:
ALTER SYSTEM SET job_queue_processes=0 SCOPE=MEMORY
You can stop an already running DBMS_SCHEDULER job using the procedure DBMS_SCHEDULER.STOP_JOB. You cannot stop a DBMS_JOB job unless you shut down the database in immediate mode.
If you accept the warning message about unexpected sessions without disconnecting the sessions, the conversion will start but the step ALTER DATABASE CHARACTER SET TO target_character_set will fail reporting "ORA-12721: operation cannot execute when other sessions are active". At this moment, you can still disconnect the offending sessions and resume the conversion as described in the next section.
The warning message about the oldest scan result in the database lets you estimate the staleness of scan results. The DMU does not monitor DML changes to table data and it does not know if there are any data convertibility issues or any columns requiring conversion introduced into the database beyond those identified in the existing scan results. If the scan results are too old, you risk that some recently added data will remain unconverted or will be converted incorrectly. Oracle recommends that you perform a full database scan just before starting conversion, already in the migration downtime window, after all applications have been shut down and no new data comes into the database. If the database is very large and a full database scan takes long time, you may identify all large tables that are known to always contain only changeless data and deselect them in the Scan Wizard.
After you accept all warnings, if there are tables to be converted using the conversion method "Update only convertible rows" in the database, the DMU opens the Scan Wizard to rescan those tables. This is to ensure that the required rowid information for the tables is available and up-to-date. If you have just performed a full database scan in the downtime window or you have scanned all affected tables individually with the "All to Convert" rowid collection level, according to an time-optimized schedule, you may prefer to accept existing rowid information for the tables. Use the "Maximum age" parameter on the Scan Parameters page of the Scan Wizard to tell the DMU that it should accept available rowid information that is not older than the specified value in hours. After the scan has finished, the conversion process starts.
When the conversion starts, the Conversion Details tab changes its form and begins to display progress information for the conversion process. The link Edit Table Conversion Plan becomes View Table Conversion Progress. Clicking View Table Conversion Progress opens a table conversion progress dialog box, where you can view the detailed conversion progress of application tables.
When the conversion is completed, the DMU displays a confirmation message. If there is an error caused by any of the conversion SQL statements, it is signaled by a red icon next to the name of the step on the Conversion Steps list and next to the affected SQL statement in the Step Details list. Error details are displayed at the bottom of the Conversion Details tab, after you click the failed statement.
Conversion Details Tab
The Conversion Details tab works in two modes. Immediately after you open the tab by selecting Convert Database, the tab works in the planning mode. The tab contains a list of SQL statements that the DMU plans to execute to convert the database to the target character set. The statements are grouped into steps listed in the Conversion Steps area. When you click a conversion step, the DMU displays the SQL statements associated with the step in the Step Details area. If a plus icon is shown to the left of a SQL statement, you can click the icon to expand the area to show the full text of the statement.
Figure 4-21 Conversion Details Tab: Planning Mode
Description of "Figure 4-21 Conversion Details Tab: Planning Mode"
If you click the link Edit Database Conversion Parameters, the Converting subtab of the Database Properties tab is opened in a dialog box. See "Column Properties: Converting" for a description of available parameters.
If you click the link Edit Table Conversion Plan, the DMU opens the Edit Table Conversion Plan Details dialog box, described in "Edit Table Conversion Plan Details Dialog".
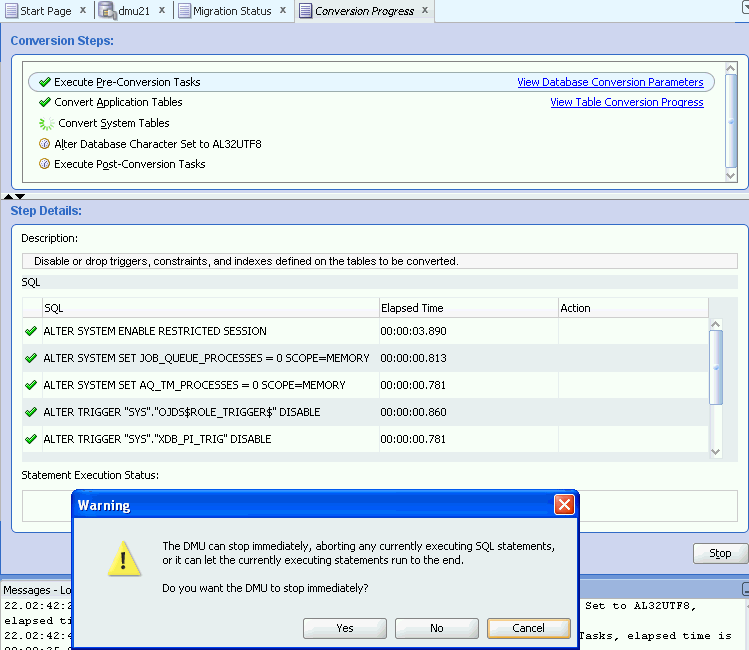
When you are ready to start conversion, click Convert at the bottom of the tab. The Conversion Details tab switches to monitoring mode, as shown in Figure 4-22, "Conversion Details Tab: Monitoring Mode".
Figure 4-22 Conversion Details Tab: Monitoring Mode
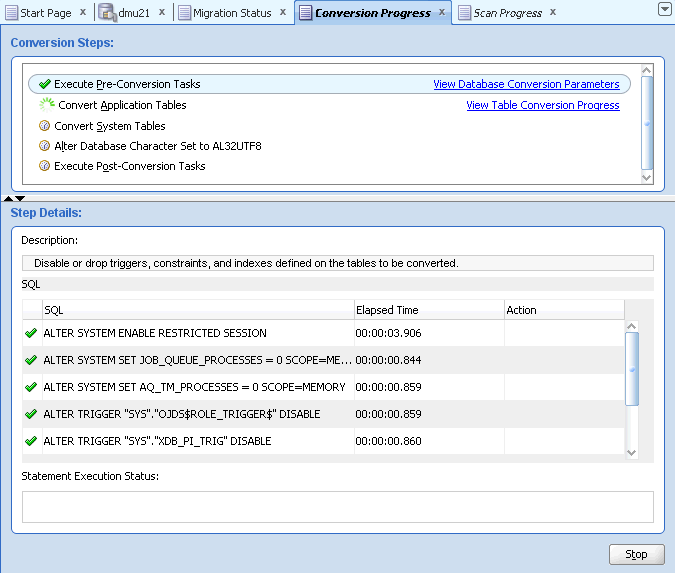
Description of "Figure 4-22 Conversion Details Tab: Monitoring Mode"
In the monitoring mode, the Convert button is replaced with a Stop button. If you click Stop, a warning dialog is displayed. In this dialog, you have the options of terminating the conversion process immediately (Yes), stopping the conversion process after the current running process finishes (No), or returning to the conversion operation (Cancel).
In the monitoring mode, the link Edit Table Conversion Plan changes to View Table Conversion Progress. The link opens the View Table Conversion Progression dialog box in the monitoring mode.
The green check mark marks the steps and the SQL statements that have already been successfully executed. The animated circle icon marks the currently executed step, while the sprocket-like icon marks the currently executed SQL statement.
If the database reports an error during the conversion process, the currently executed step and the statement that caused the error are marked with the red X error icon, as shown in Figure 4-23, "Conversion Errors Tab". The conversion process is suspended.
If you click the failing statement, the reported database error messages are displayed in the Statement Execution Status field. You can tell the DMU to retry or skip the statement by selecting the corresponding option from the drop-down list in the Action column of the SQL Statement area. Use the Skip option very cautiously because leaving a statement out of the conversion process could leave the database in an inconsistent state. After you select how to proceed with the failing statement, click Continue to resume the conversion process.
When the conversion process finishes, the DMU displays a confirmation dialog box. Status icons are removed from the Navigator pane. You can now reinstall the repository in Unicode Validation Mode by selecting Configure DMU Repository from the Migration menu.
Edit Table Conversion Plan Details Dialog
The Edit Table Conversion Plan Details dialog box, show in Figure 4-24, enables you to modify conversion parameters for individual tables. To modify a parameter for a table, click the corresponding cell in the upper grid of the dialog box. The cell can then be edited, if the conversion method of the table allows this. When you click a row of a table in the upper grid of the dialog box, the lower grid displays the SQL statements associated with conversion of the table.
Figure 4-24 Edit Table Conversion Plan Details: Example 2
Description of "Figure 4-24 Edit Table Conversion Plan Details: Example 2"
The conversion parameters that you can set for an individual table are:
-
Conversion Method
-
Target Tablespace
-
Preserve LONG Position
-
Parallel Execution
The first three parameters are described in "Table Properties: Converting". The Parallel Execution parameter specifies if parallel hints are added to the SQL statements for the given table to use the Parallel DDL and Parallel DML features of the database.
The search toolbar on the top of the dialog box enables you to quickly locate tables with a particular substring in their names. Enter the substring into the search box and press ENTER. If the substring is found in some names, the arrow icons are enabled to let you navigate between those names. If you click the marker pen icon, the matching tables are highlighted.
When you are ready, click OK to accept parameter changes and close the dialog box. Click Apply to accept the changes but leave the dialog box open. When Apply or OK is clicked, the SQL statements for the changed tables are regenerated.
The Edit Table Conversion Plan Details dialog box can also be opened in monitoring mode during the conversion process by clicking the link View Table Conversion Progress. In the monitoring mode, the upper grid of the dialog box gets two additional columns: Elapsed Time and Progress, which show the time used to convert individual tables and progress bars reporting the percentage of the already processed table data. The lower grid also gets two additional columns: Elapsed Time and Action, which show the time used to execute individual SQL statements and an action to select if a statement fails, either Retry or Skip.
Stopping a Conversion
You can stop a conversion when it is in progress by clicking Stop, in which case, a warning dialog appears. In this dialog, you have the options of terminating the conversion process immediately (Yes), stopping the conversion process after the current running process finishes (No), or returning to the conversion operation (Cancel).
Validating Data as Unicode
In addition to migrating a database to Unicode, the DMU can validate the contents of an existing AL32UTF8 or UTF8 database. Such a database might have been converted earlier or initially created in the Unicode character set. In either case, you can use the DMU to check the data you have now.
The Database Migration Assistant for Unicode can be used with databases already converted to AL32UTF8 or UTF8, or with new databases in these character sets, to verify that all data is indeed in the declared database character set. Because the processes to validate and migrate data differ, the DMU user interface differs for the two usage types as well. The type of the user interface presented by the DMU is decided at the repository installation time. The DMU activates the migration mode automatically, if the current database character set is neither AL32UTF8 nor UTF8. It activates the validation mode, if the current database character set is AL32UTF8. If the current database character set is UTF8, the first page of the Repository Configuration Wizard (see "Installing the Migration Repository") gives you the choice between migration to AL32UTF8, the recommended Unicode character set, and activation of the validation mode. To activate the validation mode after you have migrated your database to Unicode, reinstall the migration repository.
You can perform the validation of current character data by performing a scan, and see if any problems occur in the Database Scan report. The report shows which table columns contain sequences of bytes that do not form valid UTF-8 character codes. If any invalid data is reported, you can view the data and analyze where the problem is in the GUI. The DMU also offers you the means to correct the data in the Cleansing Editor. You can repeat the process of scanning and fixing the issues until no more invalid data is reported.
Fixing the data should usually be accompanied by fixing an application configuration problem that caused the invalid data to be stored in the database. Client configuration issues, usually a pass-through configuration one, are the most common reason for incorrectly encoded character data being stored in an AL32UTF8 or UTF8 database. You should periodically scan your AL32UTF8 and UTF8 databases in validation mode to discover any encoding issues as early as possible.
Introduction to the User Interface in Validation Mode
The DMU user interfaces in validation and migration modes are similar. The following are the main differences:
-
The Migration Status tab becomes the Validation Status tab, shown in Figure 4-26.
-
The Migration menu becomes the Validation menu.
-
The Convert Database item in the Migration menu becomes the Convert Invalid Columns item in the Validation menu – the item invokes the procedure to convert columns from their assumed character set to the database character set.
-
The Database Scan Report shows only the database object name, scan results for current database contents and the Assumed Character Set property. Other report columns are not available.
-
Context menus in the Cleansing Editor tab do not have options to open Schedule Column Modification and Schedule Attribute Modification dialog boxes. Only the immediate operations Modify Column and Modify Attribute are possible.
-
The button Show Impact of Scheduled Cleansing is absent from the toolbar of the Cleansing Editor.
-
The Conversion Details tab for the Convert Invalid Columns process is very similar to the user interface for the conversion step of the migration mode, except that fewer conversion steps are present.
-
The Table Conversion Plan dialog box is simplified compared to the migration mode. It shows the tables and columns to be converted and the associated SQL statements but it does not allow you to set any table-level conversion parameters. Also, this version of the dialog box does not show conversion progress. You can monitor conversion progress only on the Conversion Details tab.
-
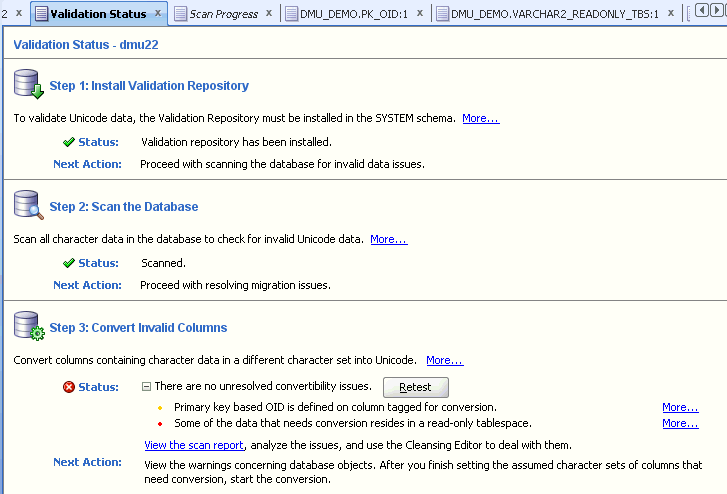
You can find any remaining issues preventing the conversion of the invalid columns under the "Status" field of step 3 on the Validation Status Panel. The reported issues need to be reviewed and resolved until the status indicates there are no more unresolved convertibility issues, at which point you can proceed to convert the columns tagged with assumed character sets to Unicode.
How to Validate Data
-
Install the repository
The DMU repository is installed in the validation mode, as described previously. After installation, the repository can be used many times in repeated application of the validation process. The repository must be reinstalled only if you upgrade the database or the DMU.
-
Scan the database
The whole database or selected schemas, tables, or columns are scanned to look for illegal codes. Scanning of the whole database is highly recommended but you can choose to scan only a subset of objects if the database is too large to be scanned regularly without affecting production work and a preceding migration process revealed that only a small set of tables actually contains non-ASCII data.
If the scan result shows only columns with data not requiring conversion, the contents of the database are correct and this part of the validation process is finished.
The value of the property "Report U+FFFD as an invalid character" on the Scanning sub-tab of the Database Properties tab determines how the DMU interprets the Unicode default replacement character U+FFFD (the byte sequence 0xEF 0xBF 0xBD in AL32UTF8 and UTF8). If the property value is "Yes", the character is treated as invalid data. This is the default behavior, because the presence of this character in data usually indicates that the data is the result of character set conversion of some input that was not properly tagged with its real character set. If you use the character U+FFFD for some internal processing purposes and you do not want the DMU to report it as invalid, change the property value to "No".
You initiate scanning and view the results as they were in the migration mode. See "Scanning the Database" for more details.
-
Cleanse the data
If the scan results show any columns with data having invalid binary representation, you must diagnose the source of this data and fix the associated application or configuration problem. See "Cleansing Scenario 3: Cleansing Invalid Representation Issues" for information about possible reasons for data having invalid binary representation.
You have two options to cleanse invalid representation issues: migrating a column to a binary data type, if its contents is binary, or converting it in the database character set, if it is encoded in some other character set. The first step to convert column data is to tag it with its proper character set by setting the column's Assumed Character Set property. Refer to "Cleansing Scenario 3: Cleansing Invalid Representation Issues" and "Setting the Assumed Character Set" for more information.
If none of the columns has its Assumed Character Set property changed, the scan results never show any data length issues. However, if you change this property for a column and rescan the column, cells exceeding column limit or data type limit might be reported. You must resolve the length issues before you proceed to the next step. You can lengthen columns or migrate them to another data type in immediate mode, the same way you do this in migration mode. See Chapter 6, "Using the DMU to Cleanse Data" and in particular "Modifying Columns" for more information.
All cleansing actions are immediate in validation mode. Setting the Assumed Character Set property is immediate in that the new value immediately affects scan results and data display, but the character set conversion is not performed at the time of setting. The character set conversion must be performed in a separate conversion step. After the Assumed Character Set of a column has been set properly, the column is reported in scanning as not having invalid binary representation issues. Go to the Validation Status tab to see if the conversion step is needed to convert any column from its assumed character set to the database character set. Before the conversion step is performed, the database is not yet clean.
Cleansing actions invalidate scan results of affected tables. Rescan the tables to confirm that the cleansing actions were successful. If you have set the Assumed Character Set property of a column, rescanning will tell you if column data can be converted from the assumed character set to the database character set without truncation issues.
-
Convert incorrectly encoded data
If any column had its Assumed Character Set property set during cleansing, this step should be executed to convert content of the column from the assumed character set to the database character set. In this step, all columns marked with an Assumed Character Set different from the database character set are physically converted to the database character set. The conversion is performed with SQL
UPDATEstatements. You start the process by selecting Convert Invalid Columns from the Validation menu or from the context menu of the database node in the Navigator pane, and then by clicking Convert on the displayed Conversion Details tab.After the column content is converted, the Assumed Character Set property is reset to the database character set. You can rescan the converted columns to confirm that the conversion was successful.
Reapply the validation process regularly, but at least after each change to the configuration of your system, for example, upgrade of an application or the database, addition of a new application, or addition of new application users, especially from a new country. Let some time pass between the configuration change and the scanning so that there is high probability that some scanned data has been stored in the database already in the new configuration.
If the database character set is UTF8, the DMU repository is installed in the validation mode and if you decide to migrate the database to AL32UTF8, you must uninstall the repository and install it again, selecting the migration mode.
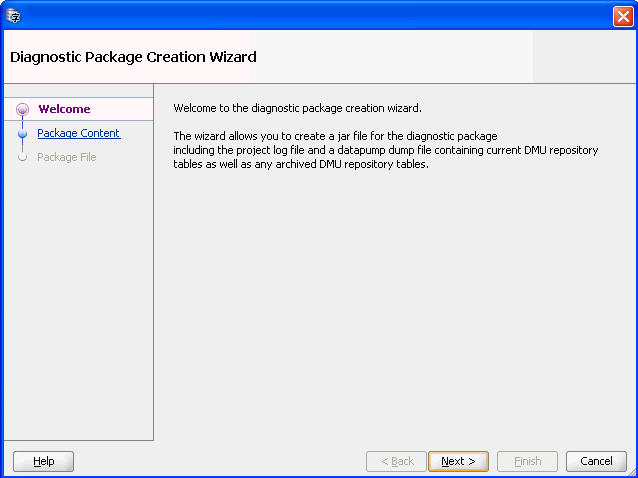
Creating a Diagnostic Package
You can create a diagnostic package for later analysis by Oracle to help resolve any problems that occurred while using the DMU. This package is a jar file that contains a project log file, a scan report, and a datapump dump file containing current and any archived DMU repository tables.
To create a diagnostic package:
-
From the Tools menu, click Create Diagnostic Package. Figure 4-27, "Diagnostic Package Wizard" is displayed.
-
Click Next. Figure 4-28, "Diagnostic Package Wizard - Package Content" is displayed.
Figure 4-28 Diagnostic Package Wizard - Package Content
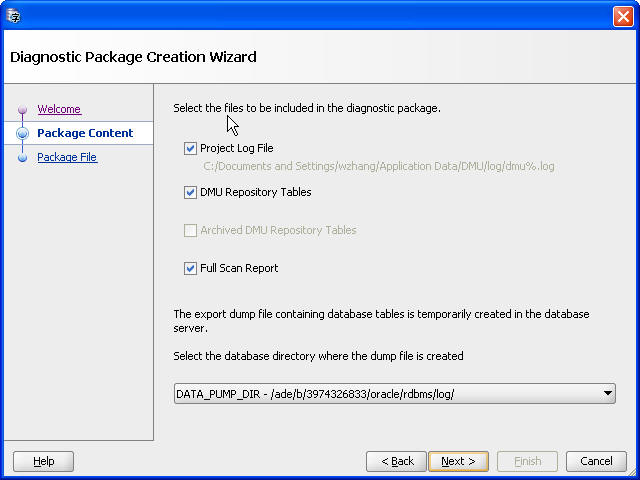
Description of "Figure 4-28 Diagnostic Package Wizard - Package Content"
-
Click Next. Figure 4-29, "Diagnostic Package Wizard - Package File" is displayed.
Figure 4-29 Diagnostic Package Wizard - Package File
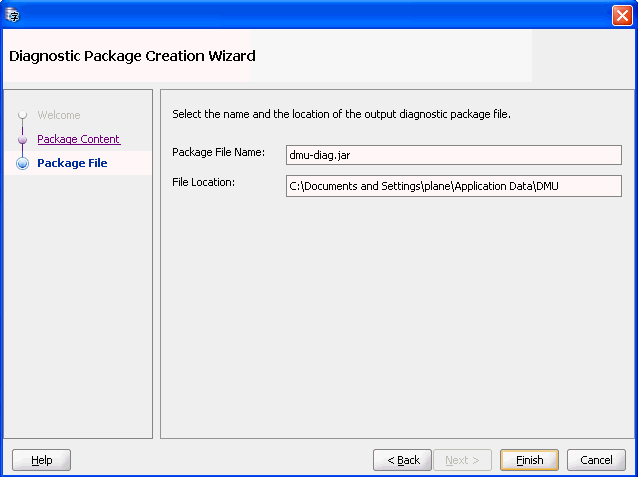
Description of "Figure 4-29 Diagnostic Package Wizard - Package File"
-
After clicking Finish, the diagnostic jar file is created in the path chosen.