9. Maintenance for Straight through Processing
9.1 Introduction
For straight through processing of uploaded funds transfer contracts, you would need to maintain all the reference information that you would typically maintain for normal funds transfer contracts and a few other parameters which are specific to STP.
This chapter contains the following sections
- Section 9.1.1, "Maintaining Funds Transfer Products"
- Section 9.1.2, "Maintaining Settlement Instructions"
- Section 9.1.3, "BIC Directory"
- Section 9.1.4, "Messaging Maintenance"
- Section 9.1.5, "Mapping Message Types to Products and Queues"
- Section 9.1.6, "D to A Converter Records Maintenance"
- Section 9.1.7, "STP Rule Maintenance"
- Section 9.1.8, "Specifying Branch Details"
- Section 9.1.9, "Indicating ‘Pending Cover Match’"
- Section 9.1.10, "Selecting ‘Suppress Message’ Option"
- Section 9.1.11, "Maintenance Related to Upload Source"
- Section 9.1.12, "Maintaining Branch-Level STP Preferences"
- Section 9.1.13, "External Account Maintenance"
- Section 9.1.14, "Overrides Maintenance":
9.1.1 Maintaining Funds Transfer Products
A product, in Oracle FLEXCUBE, is a service your bank offers to your customers. The different types of funds transfers that your bank supports could be thought of as products. You would need to maintain products for funds transfer contracts that are initiated through straight through processing. The preferences for such products would need to be defined in the same manner as you would for a normal funds transfer product.
The product maintenance is required for the system to interpret the incoming message and create the appropriate FT contract. Since the STP process invokes the FT upload process, the product becomes one of the most important fields to be derived for creation of the contract upload table.
For more information on setting up products and defining specific preferences and attributes for products used for processing funds transfer contracts, consult the Funds Transfer user manual.
9.1.2 Maintaining Settlement Instructions
For each of the customers or banks (i.e., BIC Codes), you must maintain details of settlement accounts and settlement preferences, which would be used for processing funds transfer contracts being initiated through straight through processing. You must maintain this information for the straight through processing feature, just as you would do for normal funds transfer contracts. These standard instructions would be used when the incoming message itself does not contain the account information for the debit and credit accounts. The actual pick-up of the account is based on the contents of the incoming message itself. Details of this process are described in the discussion of the logic of pick-up of debit and credit accounts.
For more information on the settlements service in Oracle FLEXCUBE, and defining specific settlement preferences and attributes for funds transfer contracts, consult the Funds Transfer user manual.
9.1.3 BIC Directory
You will need to maintain the Bank Identifier Codes for the banks, just as you would do for normal funds transfer processing.
For more information on BIC Codes, consult the Funds Transfer user manual.
9.1.4 Messaging Maintenance
9.1.4.1 Media Maintenance
Advices and messages are generated at the specified events in the lifecycle of funds transfer contracts. You should maintain the different media through which these advices and messages would be generated (from and to your bank).
At your bank, you can only receive or route messages through a media that you have maintained in Oracle FLEXCUBE. These specifications can be made only at the main branch and will be applicable to all the branches of your bank.
You must maintain the media that would be used for generation of advices and messages relating to funds transfer contracts that have been initiated through straight through processing, in the Media Maintenance screen.
In the context of STP, the relevant media type for which STP function is supported would be SWIFT.
For more information about the Media Maintenance screen and the messaging system module, consult the Messaging System user manual.
9.1.4.2 Queues Maintenance
As discussed earlier, all Incoming SWIFT and Non Swift Messages are routed through a messaging queue. You are therefore, required to maintain the different user queues to which incoming messages will be directed. Users with appropriate rights will be allowed to access a particular queue.
To invoke this screen, click on Messages in the Application Browser, select Queues and click on Detailed under it. You can invoke the ‘Message Queue Maintenance’ screen by typing ‘MSDQUEUE’ in the field at the top right corner of the Application tool bar and clicking the adjoining arrow button.
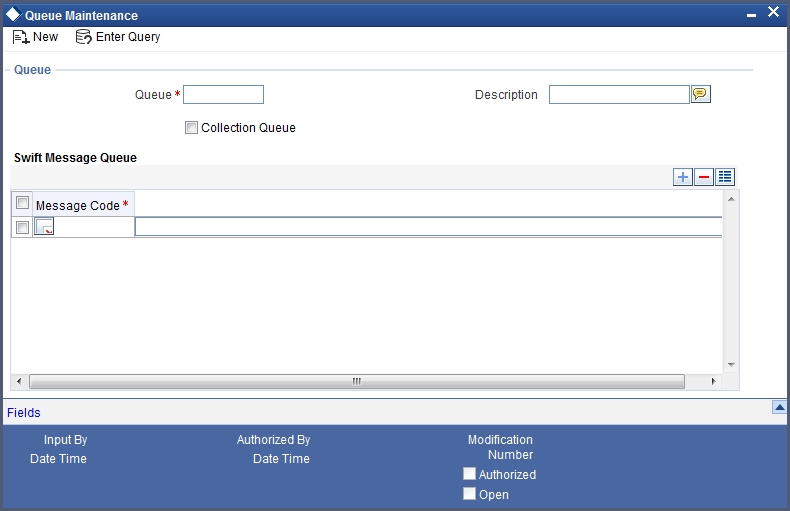
In this screen you can capture the following details for a queue:
- A name to identify the queue uniquely throughout the system.
- A short description of the queue
- The codes of various SWIFT and Non SWIFT messages that would be routed to this queue.
- If the unique queue you are maintaining is a collection Queue, select collection queue flag.
Note
The codes of various SWIFT and Non SWIFT messages list in the grid is not applicable for the collection queue.
You can assign a message to more than one messaging queue. At the time of maintaining rules for a message (discussed in the subsequent sections of this document), you can select the appropriate queue for each rule from the list of queues to which the message is linked.
As and when an Incoming SWIFT and Non SWIFT Common Payment Gateway Messages satisfy a particular rule, the system will automatically route it to the relevant queue associated with the rule. The product and other associated details (maintained at the product mapping level, discussed later) defined for the branch; queue and message type combination will be made applicable to translate the Message into a normal FT Contract.
Select ‘Add’ from the Actions menu in the Application tool bar or click add icon to add a message to the queue being defined. To remove a message from the queue, Select ‘Delete’ from the Actions menu in the Application tool bar or click delete icon.
9.1.4.3 Customer Address Maintenance
As mentioned earlier, the messages and advices that are sent to the customers of your bank can be transmitted through different media types. You will need to maintain the address details for each media type. In the STP context, the relevant media type would be SWIFT. You can maintain multiple addresses for each media type. The unique location specified for each address will help you to differentiate between one address of a customer and another for a given media type. These details are captured in the ‘Customer Address’ screen.
For more information about the Customer Address Maintenance consult the Messaging System User Manual.
9.1.4.4 Message Format Maintenance
The advices that are generated from your bank will have a definite format. In the Advice Format Maintenance screen you can specify formats and indicate the messages and advices that should use the formats you have defined.
By maintaining message formats you can ensure consistency across the branches of your bank.
Message formats are maintained at the bank level and will be applicable to all the branches of your bank.
For each message format, you can specify the following details:
- A unique code to identify the format
- The number of lines that should be contained in a page when the advice is printed
- The number of columns that should be contained in a page when the advice is printed
- The language of the message
- The form type attached to the format
For more information about message formats, refer to the chapter ‘Maintaining Advice Formats’ in the Messaging System User Manual.
9.1.5 Mapping Message Types to Products and Queues
You must also map the message types and queue combinations to the relevant funds transfer products / product types / instrument types that you create, for straight through processing. This can be specified in the Product Mapping Screen, for each branch.
For each product / product types / instrument type, you must specify the message types, with details such as whether the messages would be incoming or outgoing and whether a cover is required.
From the Application Browser, you can invoke the Product Mapping Detailed screen.
You can invoke the ‘Message Product Mapping Maintenance’ screen by typing ‘MSDPRMAP’ in the field at the top right corner of the Application tool bar and clicking the adjoining arrow button.
Through this screen, you can map a message type to a product / product type / instrument that you have created in Oracle FLEXCUBE thereby supporting creation of instrument transactions and mapping of message queues for instrument types.

In the Product mapping screen on indicating the branch and message type you can map a product / product type / instrument to the combination.
All messages belonging to the ‘type’ you have indicated will be enriched with attributes defined for the product to which it is mapped.
Queue
For a branch, message and product combination, you can also specify the messaging queue to which the messages should be routed. As discussed earlier, you can assign multiple queues to a message type. All the queues defined for a message is available in the option-list. Select the appropriate queue from the list.
At the time of maintaining rules for a message type, you will indicate the queue to which the message must be routed, if it satisfies the rule being defined. The STP process will then associate the payment message with the product (and other related details) mapped to the queue to which it is routed and will subsequently process the payment transaction.
Note
You can map a message type with different funds transfer products and maintain unique preferences for each branch, message and product combination. Depending on the message type, the appropriate product will be picked up for creating the FT contract.
Cover Required
Whether a cover is required or not is decided based on the settlement instructions maintained for the party to which the onward message is sent.
Based on whether a cover needs to be sent to the reimbursement bank along with the payment message the appropriate FT product is selected for creating an FT contract.
Direction Flag
Specify whether the message for which you are maintaining details will result in an incoming FT or an outgoing FT.
Depending on your specification here the appropriate product will be picked up by the upload process and an FT Contract will be generated automatically.
Product
The system displays the FT product for creating an FT contract. It is selected on the basis of the requirement to send a cover to the reimbursement bank along with the payment message.
9.1.5.1 Indicating Preferences when Message Carries No Information of Beneficiary
For your branch, you can indicate how Oracle FLEXCUBE should handle S.W.I.F.T. messages that do not carry information on the ultimate beneficiary and Non SWIFT Common Payment Gateway. The options available for SWIFT Messages that do not carry beneficiary information are:
- Suspense
- Repair
If you indicate Suspense, the transfer amount indicated in the MT100, MT 103 or MT 202 is posted to suspense GL of your bank. This is applicable only when the incoming message results in an incoming Funds Transfer. In other words, your bank should be the last stop in the transfer route.
When you receive adequate information on the beneficiary, you can transfer the funds posted to the suspense GL to the customer account by liquidating the transfer. If you indicate ‘Repair’, the message will not be processed, and will be placed in ‘Repair’ status.
The preference that you stated for your branch in the Product Mapping detailed screen is defaulted. You can change the default to suit the current upload session.
9.1.6 D to A Converter Records Maintenance
An incoming SWIFT payment message may contain information regarding parties involved in a funds transfer, in the ‘D’ format, i.e., names and addresses, instead of the appropriate BIC Codes (or the ‘A’ format).
You can maintain mappings, which translate the ‘D’ formats to ‘A’ formats (BIC codes), which the STP process can use while processing. These details are known as converter records. These are maintained in the ‘D to A Converter Maintenance’ screen invoked from the Application Browser.
You can invoke the ‘D to A Converter Maintenance’ screen by typing ‘ISDDACNV’ in the field at the top right corner of the Application tool bar and clicking the adjoining arrow button.

When an incoming SWIFT payment message contains party information in the form of names and addresses (D format), the STP function uses the converter records to derive the BICs (A format) for the parties involved in the funds transfer.
The STP function replaces the name and address information (D format) in the message with the corresponding BIC (A format), picked up from the converter record.
The name and address information contained in the incoming SWIFT message will be matched exactly, line for line, literally and without case sensitivity, with the address lines information in the converter record to fetch the corresponding BIC to be used by the STP function.
The STP function will not convert this information using the converter record, as it does not literally match, line for line, with the address details maintained in the converter record.
As a convenience feature, Oracle FLEXCUBE also allows you to Copy the ‘D’ field from an incoming message’ and ‘Paste’ it onto the Converter Record.
9.1.7 STP Rule Maintenance
In addition to the core processing logic that has been built into the system for processing SWIFT and Non SWIFT Common Payment Gateway Payment Messages, Oracle FLEXCUBE also allows you to maintain certain rule based processing logic and status control on the Incoming Messages, based on the contents of specific fields of the message.
Just as you define custom fields (User Defined Fields - UDF) to be associated with the various Oracle FLEXCUBE Products and Function Ids (Maintenance screens), you can also maintain UDFs for each Incoming Message (MT 100, MT 103, MT 200, MT 202). Based on your requirement, you can specify the default values (derived from field logic) and validations for the UDF. The system will validate all the entries made to the field of an Incoming Message against the validations (rules) you define for a field. All unprocessed messages in the Incoming Message Browser will be assigned a status (Repair, Pending Cover Match or Suppress) depending on the rules that you maintain for each message.
You can define the STP related fields (UDFs) and assign values to it in the ‘User Defined Fields for SWIFT Messages’ invoked from the Application Browser.
You can invoke the ‘STP Rule Maintenance’ screen by typing ‘MSDRLSTP’ in the field at the top right corner of the Application tool bar and clicking the adjoining arrow button.
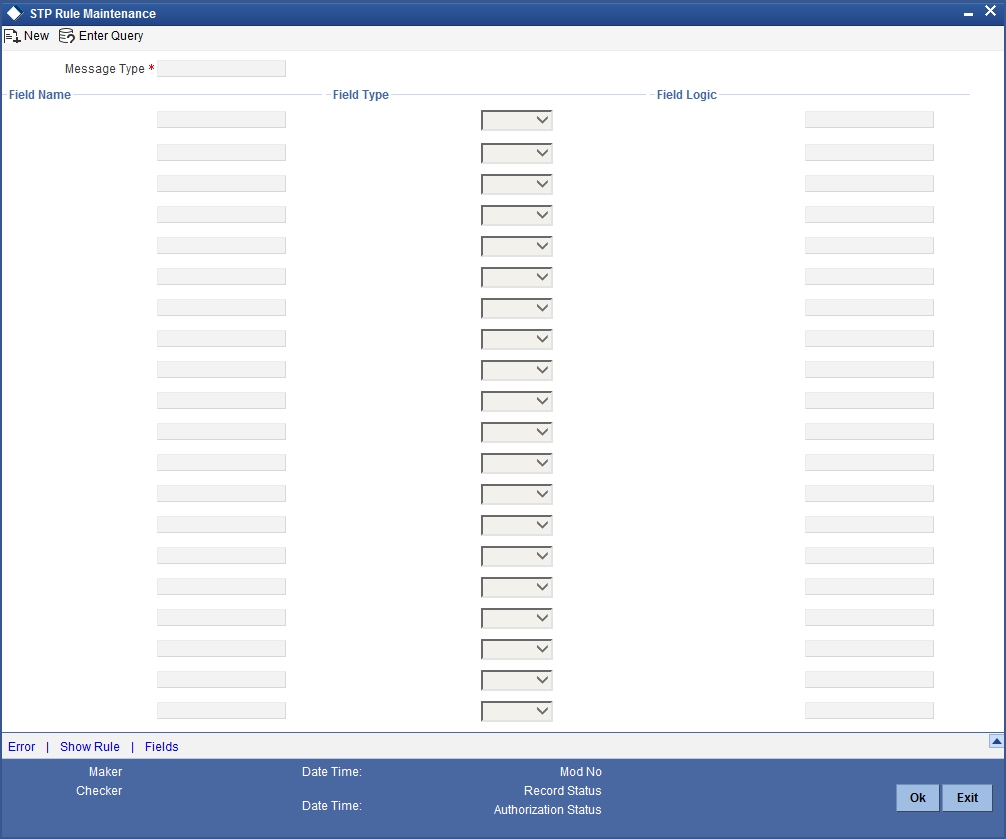
Message Type
Maintain UDFs for the following SWIFT Payment Messages:
- MT 103
- MT 103+
- MT 200
- MT 202
Specify the message for which you want to define the Rule based on which the STP will process the same.
Field Name
Specify a unique name to identify a field that you define. The STP process will get the value of the field from the logic specified in the ‘Field Logic’ column and will validate the entries made to these fields based on certain pre-defined conditions. You can use a maximum of 16 characters to assign a name to the UDF being defined.
Field Type
The type of field that you can create can be of the following formats:
- Number — Select this option to create a Numeric field
- Text — Select this option to create a Text field
- Date— Select this option to create a Date field
Field Logic
The value of the field (UDF) being defined for a message type is derived based on the logic that you specify here. The value derived thus is subsequently validated against the rules maintained for the UDF.
The tags and the syntax for using these in the ‘Field Logic’ are as follows:
| TAGS | SYNTAX | Value of the Field | |||
|---|---|---|---|---|---|
| @SENDER | @VALUE:=@SENDER() | Sender of the Message | |||
| @BIC | @VALUE:=@BIC('TAG') | BIC code of the tag contained within quotes, for example, @BIC(‘57’) | |||
| @ACC | @VALUE:=@ACC('TAG') | Account number specified in the tag | |||
| @TAGVALUE | @VALUE:=@TAGVALUE('TAG') | The value of the tag specified | |||
| @AMT | @VALUE:=@AMT(3) | The amount in the field 32 | |||
| @CCY | @VALUE:=@CCY(2) | The currency of the transfer | |||
| @VALDT | @VALUE:=@VALDT(1) | The value date of the transfer | |||
| @TRAILER | @VALUE:= @TRAILER | The trailer of the message | |||
| @HEADER | @VALUE:= @HEADER(3); | To get the value of tag 119 in block 3 | |||
| @CUST_TYPE | @VALUE:= @CUST_TYPE() | The value returned is ‘I’, ‘B’ or ’C’ ( ‘Individual’,’Bank’,’Corporate’ respectively) | |||
| @VALDT | @VALUE:=@VALDT(1); |
Depending on the value of the UDF (obtained from the Field Logic), you can define additional conditions (or rules) to process the message. You can also specify a status for each condition. If a particular condition is satisfied, the system will automatically assign the corresponding status to the message.
To define the conditions for a message, click ‘Show Rule’ button in the ‘User Defined Fields for SWIFT Messages’ screen. The ‘Rule Maintenance’ screen is displayed.

If you expect user interaction for the Non Swift Message, choose ‘Waiting for Queue change’ as the Status.
The Message Type is defaulted from the previous screen.
Priority
For a particular message type, you can define multiple conditions to validate the UDF’s based on which the message is assigned a particular status. Each set of five conditions will be associated with a priority number. The system automatically assigns the next available priority number to the next set of five conditions. If a condition with a higher priority level is satisfied, the status associated with that condition is assigned to the message.
Select ‘Add’ from the Actions menu in the Application tool bar or click add icon to specify the next set of conditions. To remove a set of conditions, select ‘Delete’ from the Actions menu in the Application tool bar or click delete icon.
Conditions
Using the tags mentioned above, you can specify the following conditions for processing the Incoming SWIFT and Non SWIFT Messages:
- @EXISTS: Depending on your requirement, you can use this tag to check for the existence of a specific field in the Incoming SWIFT Message. For instance, you may want to check for the presence of field 56 in the message. If present, the function will return ‘TRUE’. If the field is not present in the message, it will return a ‘FALSE’ value
- @BIC: This function will check for the presence of the BIC code in the party information fields of the message. It will then validate the BIC and if found valid will assign it to the field (UDF) for which you are defining the condition. For instance, you may want all incoming MT100 messages with 'BMRLUSLY' in field 57 to be routed to Queue 'XYZ' with the status as 'Repair'. For this you will need to maintain the following details:
- Define an UDF ‘57BIC.
- Specify the field logic as ‘@VALUE: =@BIC ('57')’
- Maintain the condition as ‘UDF_57BIC='BMRLUSLY'
- Assign the result as ‘TRUE’.
This Rule will ensure that any Incoming MT100 with ‘BMRLUSLY’ in field 57 is routed to the queue XYZ with a status as Repair.
- @ACC: Likewise, this function will check for the account no. of the party initiating the transaction. If the field exists, the system will validate the account no. before assigning it to the UDF.
- @TAGVALUE: This will assign the value of a specific field of the SWIFT message to the UDF. For example, you may want to suppress all MT 100 messages with ‘CITI001’ in field 56A (Intermediary). For this you will define:
- Define an UDF, VAL56.
- The field logic as ‘@VALUE:=@TAGVALUE('56A')
- Specify the condition as UDF_VAL56 = ‘CITI001’
- Assign the result as ‘TRUE’
- This will ensure that all MT 100 messages with ‘CITI001’ in field 56A are assigned with the ‘Suppress’ status.
- @OCCVALUE: Some fields of the SWIFT message may contain more than one line of information. You can use this function to check and assign the value of such fields to the UDF.
- @NUMOCC: Using this function, you can track the number of times a particular field appears in the SWIFT message. For instance you may want to route all MT 100 messages to the ‘Pending Cover’ queue if field 32A is present only once in the message. For this you can maintain the following:
- Define an UDF ‘OCC01’.
- Specify the filed logic as ‘@VALUE: =@NUMOCC('32A')
- Maintain the condition as ‘UDF_OCC >1’.
- Assign the result as ‘FALSE’.
- This Rule will ensure that all MT 100 messages will be routed to the ‘Pending Cover’ queue if field 32A has occurred only once in the message.
- @AMT: This function will assign the value of the transaction amount, if present in field 32 of the SWIFT message to the UDF that you have defined.
- @CCY: Similarly, you can use this function to assign the transaction currency as the value of the UDF being defined and subsequently define a condition to suit your requirement.
- @VALDT: This function will assign the value date of the transaction, if present in the SWIFT message, to the UDF.
- @SENDER: This function will assign the name of the sender of the message to the field being defined.
- @TRAILER: This function will check for the trailer in the message and assign the value of the trailer to the UDF.
- @MT: This function will identify the type of message being received.
- To assign the value of a field in the Common Payment Gateway Rule
Maintenance, the following will be used:
AWI = @VALUE:=@PYMTGATEWAYFIELD('ACC_WITH_INSTN1'); - @HEADER: This function will retrieve the value of tag 119 in block 3
Result
Select multiple conditions for validating the value (derived from the Field logic) of an UDF. Each condition can be assigned one of the following values:
- TRUE
- FALSE
Queue Name
Choose the queue, to which a message will be routed if a particular condition is satisfied. As discussed earlier, you can specify multiple queues for a message. All the queues maintained for a specific message will be available for selection in the form of an option-list. Select the appropriate ‘Queue Name’ from the list.
Status
Each condition that you define can be associated with a status. If a condition is satisfied, the status defined for that condition will be assigned to the Incoming Message. The following statuses are available for selection:
- Repair
- Pending Cover Match
- Suppressed
Repair Reason
In case you choose to assign the status as ‘Repair’, you can indicate the reason for repair. Select the appropriate error code from the option list.
Note
The ‘Repair Reason’ field is enabled only if you have chosen the status as ‘Repair’.
The repair reason that you can assign is in turn user definable, as explained below.
9.1.7.1 Maintaining Error Codes
You can invoke the ‘Error Message Maintenance’ screen by typing ‘CSDERRMS’ in the field at the top right corner of the Application tool bar and clicking the adjoining arrow button.
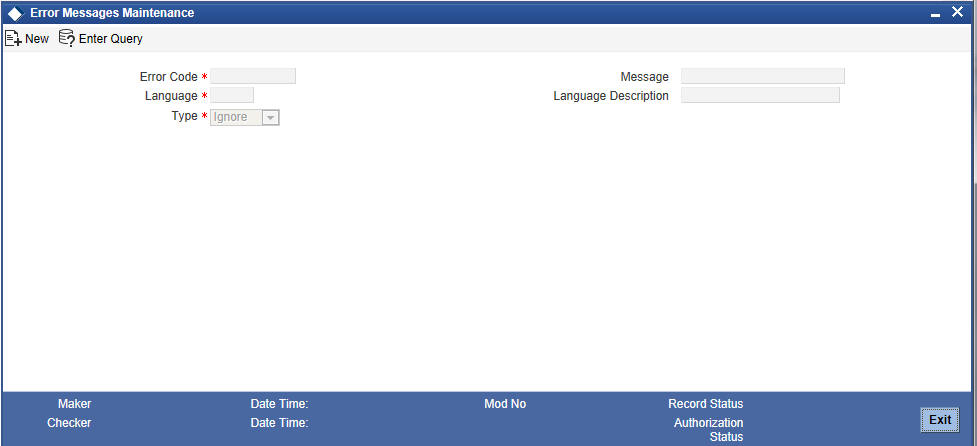
In the Error Messages screen, you can maintain your own error codes and appropriate messages. These will be displayed during message upload if that particular condition (for which the error message is mapped) occurs.
You can specify the following details for an error message:
- The language in which the message is to be displayed and its short description.
- A unique code to identify the error throughout the system
- The text of the message
- The function Id
- The number of parameters that can be taken
- The type of message - Error, Override or Ignore
- The type of message occurred while running a batch - Error, Override or Ignore
- Whether confirmation is required from the authorizer for the error or override
9.1.8 Specifying Branch Details
Specify the details pertaining to the branch for converting the old error code to a new one for a branch based on the Function Id.
Branch Code
Specify the code of the branch for which you want to map update the error code.
Old Error Code
Specify the old error code that needs to be replaced with the new one.
New Error Code
Specify the new error codes that with which you want to replace the old one.
Function Id
Specify the Function Id on the basis of which you want to replace the error code.
9.1.9 Indicating ‘Pending Cover Match’
If you wish to defer processing of a message till receipt of a cover, based on certain criteria, then you can select the ‘Pending Cover Match’ status for that condition. If that condition is encountered, Oracle FLEXCUBE will update the message status to ‘Pending Cover Match’ and process the payment only after receipt of the cover.
9.1.9.1 Processing MT103/MT202/MT200
When the system receives an MT103/MT202/MT200, it will process the message based on the STP Rule you have defined for the same.
Straight through processing of MT103 and MT202 can be performed based on the customer type and amount limit. You can maintain STP rules for a combination of customer type and transaction amount, based on which the transaction is either processed or moved to ‘Repair’ status.
If, as per the rule, the message moves to a queue which requires ‘Cover Matching’, it will be marked as ‘Pending Cover Match’. Subsequently, as mentioned above, when the Cover message is received, the system will process the original MT103/MT202 message.
If the Queue is mapped to a PC Product Category then a PC Contract will be created. The ‘PC Message Mapping’ screen will be used to map the message fields to the PC Contract fields.
While processing an incoming MT200, the system checks for the following:
- Whether AWI in the incoming message is different from the receiver of the message
If the BIC of the receiver and the AWI are same then the transaction is treated as the transaction ending with us. If this condition is not satisfied, the system will not upload this incoming message which would further result in the generation of outgoing MT205.
In case of an incoming MT103, if the beneficiary account is a Trust account, the system will put the transaction in ‘Unauthorized’ status even if the post upload status has been maintained as ‘Authorized’ in the STP preference. If field 70 is null in the incoming MT103 message for Trust account payment, the system will not process that payment. Instead, it will move the transaction in the repair queue. It will also raise the override message as ‘Project Details needs to be captured for the trust account transaction’.
You will have to manually unlock the transaction and capture project details for it. While saving the transaction, the system will check whether project details have been captured or not.
9.1.9.2 Processing of Incoming MT101
- System checks the execution date. Messages with execution date in the past or matching the application date would be taken up for processing. Messages with execution date in the future would be stored as unprocessed messages & would be taken up on the execution date. If the execution date falls on a holiday, these would be taken up for processing on the previous working day.
- Individual transactions in the MT101 would be uploaded into Common Payments Gateway.
- Individual transactions would undergo a product code resolution via the STP rule maintenance.
- Individual transactions in the message would be booked as FT or PC contracts in the system.
Note
Following maintenances are mandatory before initiating MT101 from interfaces. Function IDs to access the respective maintenance screens are given in brackets.
- ‘MT101’ flag should be checked for a BIC code (ISDBICDI)
- Bilateral agreements between sender and receiver (ISDCCYRS)
- Transfer agreements between customer and bank (CFTDCXFRA)
- In case of a single debit to the customer account is required, system would debit the total amount from the Ordering Customer’s account upfront and the corresponding credit would be posted to a suspense GL.
- In case of multiple debits to the customer account, system would post accounting entries to the customer account directly.
By routing the transaction to the appropriate module & product, without manual intervention system will be capable to interrupt the following instruction codes and also book appropriate transactions
- NETS (payment settled via Net Settlement)
- RTGS (payment should be settled via RTGS)
- CHQB (pay beneficiary by cheque)
Transactions View
- The Common Payment Gateway Summary Screen can be used to view all transactions of an incoming MT 101 message for the sender’s reference number.
9.1.9.3 Incoming MT201
MT201 message is for Multiple Financial Institution Transfer for its Own Account. The Incoming MT201 message is processed in the same manner as MT203. The Incoming MT201 is split into individual MT200 messages and then these generated MT200 messages are processed as individual MT200.
Refer the ‘Maintenance’ chapter of the Payment & Collections (PC) User Manual for details on mapping the SWIFT tags to the PC contract fields.
Let us understand the processing of different messages for various types of transactions through few examples:
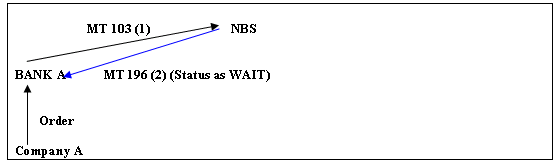
Case 1:
The following example illustrates the successful processing of MT103 in the system.
Assume Company A orders Bank A to pay Company B’s account in Bank B. The diagram depicts the transaction and message flow in the system.

Once the PC transaction is booked and if the product is an RTGS product, the system processes the transaction in the following sequence:
- First the system generates an MT103 with the funding status of the message as ‘WAIT’ and Reply Status as NULL.
- Secondly, NBS which is the RTGS servicing bank sends an MT900. This MT900 puts the MT103 funding status as ‘FUNDED’ and the funds are debited from Bank A’s account in NBS.
- Thirdly, NBS then sends an MT103 to Bank B. If the message has to wait for the MT910 to be processed, then the message is in a ‘Pending Cover Match’ status. If the message need not wait for the MT910 to be processed, the MT103 will be processed as a PC transaction.
- Next, NBS credits the Bank B’s account and then sends out an MT910 message to Bank B. Bank B then tries to process this MT910 as a cover message. If it does not find a matching transaction, it suppresses the same.
Thus, a payment initiated from Bank A is successfully processed in Bank B.
Case 2:
The following example illustrates the processing MT103 in case of insufficient Funds in Initiating Bank.
Assume Company A orders Bank A to pay Company B’s account in Bank B. The diagram below depicts the transaction and message flow in the system.

Once the PC transaction is booked and if the product is an RTGS product, the system processes the transaction.
When a payment initiated from Bank A is rejected by NBS for lack of funds, the message is processed in the following manner:
- First the system generates an MT103 with the funding status of the message as ‘WAIT’ and the Reply Status as ‘NULL’.
- Subsequently, NBS which is the RTGS servicing bank sends an MT196 message. If the status of MT196 is ‘ERRC’, then the original transaction is reversed. The Funding Status of the Original MT103 is updated to NON-FUNDED and the Reply Status of the original MT103 is updated to ‘CANC’.
Case 3:
The following example illustrates the processing of MT103 message which is in Wait State.
Assume Company A orders Bank A to pay Company B’s account in Bank B. The diagram below depicts the transaction and message flow in the system.
Once the PC transaction is booked and if the product is an RTGS product, the system processes the transaction.
When a payment initiated from Bank A is in the wait status in NBS, the message is processed in the following manner:
- First the system generates an MT103 with the funding status of the message as ‘WAIT’ and the Reply Status as ‘NULL’.
- Consequently, NBS which is the RTGS servicing bank sends an MT196 message. If the status of the message MT196 is ‘WAIT’, then the system marks the Reply Status of the original MT103 message as ‘WAIT’ state.
Case 4:
The following example illustrates the MT195 check carried out for MT103 message in Wait State.
Assume Company A orders Bank A to pay Company B’s account in Bank B.

Let us assume the following:
- MT103 is sent from Bank A to NBS
- NBS sends an MT196 with a wait state
- Bank sends an MT195 to check the status of the 103
- NBS sends an MT196 with a wait state
Once the PC transaction is booked and if the product is an RTGS product, the system processes the transaction. When a payment initiated from Bank A is in the wait status in NBS and subsequent checking from the Bank on the status of the message, the processing for the message is done in the following sequence:
- First the system generates an MT103 message with the funding status ‘WAIT’ and the Reply Status as ‘NULL’.
- Subsequently, NBS which is the RTGS servicing bank sends an MT196. If the status of the MT196 is ‘WAIT then the Reply Status of the original MT103 is marked as ‘WAIT’ state.
- The bank then sends an MT195 to verify the status of the MT103 message.
- Finally, NBS sends an MT196. If the status of this MT196 is ‘WAIT’ then the reply status of the MT195 is marked as ‘WAIT’ state.
Case 5:
The following example illustrates the process in which MT192 request for cancellation of the MT103 in Wait State is handled in the system along with the approval of cancellation by NBS.
Assume Company A orders Bank A to pay Company B’s account in Bank B. The diagram below depicts the transaction and message flow in the system.

Let us assume the following:
- MT103 is sent from Bank A to NBS
- NBS sends an MT196 with a wait state
- Bank sends an MT195 to check the status of the 103
- NBS sends an MT196 with a wait state
- Bank sends an MT192 requesting for cancellation of the 103
- NBS sends an MT196 indicating Success for the request for Cancellation.
Once the PC transaction is booked and if the product is an RTGS product, the system processes the transaction.
- The system generates an MT103 with the funding status as ‘WAIT’ and the Reply Status as ‘NULL’.
- NBS which is the RTGS servicing bank sends an MT196. If the status of this MT196 is ‘WAIT’, then the Reply Status of the original MT103 is marked as ‘WAIT’ state.
- Then an MT195 is sent to verify the status of the MT103 message.
- NBS sends an MT196 and if the status of MT196 is ‘WAIT’, then the reply status of the MT195 is marked as ‘WAIT’ state.
- The bank sends out an MT192 requesting for cancellation of the MT103 message sent earlier.
- NBS sends out an MT196 message indicating that the Cancellation request is accepted. The system then reverses the original transaction. The Funding Status of the original MT103 is marked as ‘NON-FUNDED’ and the Reply Status of the MT192 is marked as CANC.
9.1.10 Selecting ‘Suppress Message’ Option
If you choose the ‘Suppressed’ status, the incoming message itself gets suppressed. The Oracle FLEXCUBE STP process will not pick up SWIFT Payment Messages with a Suppressed status for further processing.
If a message is in repair, you can pre-define two possible statuses to which the message would go after the message is manually repaired. These are indicated by the two check boxes viz.:
- Cover Required
- Suppress Message
If ‘Cover Required’ flag is checked, the message would move to the ‘Pending Cover Match’ status after repair of the message, while if the ‘Suppress message’ flag is on, the payment (post-repair) would be processed normally, but the resultant outgoing messages would be suppressed.
Viewing Errors
After you specify the logic for deriving the value of an UDF, it will be validated by the system (on Save of the Rule maintenance). The system automatically generates a procedure based on the logic specified by you and if any checks fail, you can view the errors in the ‘Errors’ screen invoked from the ‘User Defined Fields for SWIFT Messages’ screen. The statement containing the error will be highlighted for easy identification. You can return to the previous screen and alter the statement so that the validations are carried out successfully.
Click ‘Error’ button to view the errors.

9.1.11 Maintenance Related to Upload Source
FT contracts can be uploaded onto Oracle FLEXCUBE from any external source. However, the details that come in the form of SWIFT messages are converted to data in the FT Upload tables by the Message Upload function, from where the FT Upload function picks them up for processing.
When you maintain details of a source, you can also specify characteristics for contracts coming into the FT Upload tables from the source. Besides defining the operations that can be performed on contracts uploaded from the source, you can also define the status that uploaded contracts should be marked with.
Upload sources can be maintained at the Head Office level and propagated to the branches of your bank.
The maintenance of upload sources helps to retrieve information for a given source.
The procedure for maintaining details of an upload source has been discussed under the head ‘Maintaining upload sources’, in the Batch Upload chapter of the Funds Transfer user manual
9.1.12 Maintaining Branch-Level STP Preferences
You can maintain preferences for contracts uploaded by the FT Upload process, to be applicable based on the branch that is initiating the upload. The following preferences can be set:
- How contracts for which no Beneficiary has been resolved must be handled
- Whether the contracts must be uploaded as authorized or unauthorized contracts.
- How contracts in respect of which errors and / or overrides are encountered during upload.
To set up the branch-level preferences, to be applicable for uploads, for a branch and message type combination, you can use the STP Branch Preferences screen.
You can invoke the ‘STP Preferences’ screen by typing ‘MSDSTPRF’ in the field at the top right corner of the Application tool bar and clicking the adjoining arrow button.

In this screen, you can maintain the preferences to be applicable for uploads initiated in:
- All branches and applicable for all message types (this setup can be done at the head office branch only).
- All branches and applicable for a specific message type (this setup can be done at the head office branch only).
- For a specific branch, applicable for a specific message type
- For a specific branch, applicable for all message types
Queue Name
Specify STP Preferences at a messaging Queue level for FT contracts uploaded from a source for a particular branch. The adjoining option list displays all valid queue names maintained in the system. You can choose the appropriate one.
If an account statement (MT 940/950) is identified as a Cover message for a corresponding payment message, then the system will pick the corresponding Payment message (MT 103/ 202) that was kept on hold for further processing.
When an MT 103/ 202 is received from any other banks apart from our correspondent banks, then as part of STP processing, the system moves the Payment message (MT 103/202) to a Cover matching queue with status as ‘Pending Cover Match’.
The messages corresponding to account statement (i.e.,) MT 940 / 950 will also be available in Incoming Browser using NR module.
If an MT 940 / 950 is received, the system will validate the following criteria to check if a corresponding credit entry in the account statement message can be considered as an acknowledgement of cover for a Payment message (MT 103/202).
| Sub Field | Description | Format | Value | Applicable Values | |||||||||||
|---|---|---|---|---|---|---|---|---|---|---|---|---|---|---|---|
| 3 | (Debit/Credit Mark) | 2a | C | C, D, RD, RC | (C-Credit, D-Debit, RC – Reversal Credit, RD – Reversal Debit) | ||||||||||
| 6 | (Transaction Type Identification Code) | 1!a3!c | S, 103/202 | N, S, F | (S - For entries related to SWIFT transfer instructions and subsequent charge messages | S - For entries related to payment and transfer instructions, including related charges messages, not sent through SWIFT | F - For entries being first advised by the statement (items originated by the account servicing institution) | In case of fund code – S, The three characters will indicate the message type of the SWIFT message causing the entry (for debit entries) or the message type of the SWIFT message used to advise the account owner (for credit entries) | In case of Fund code – N or F, it can contain any of the swift identified Transaction type codes. |
On receipt of above identified MT 940/ 950 message, the STP process matches the credit entries with the corresponding Payment message MT 103/202 that satisfies the following condition:
- Field 20 of 103 = Sub-field 8 in Field 61 of MT950 / MT 940
- Inter bank Settlement amount and currency specified in 32 A of MT 103 = Sub field 5 in Field 61 and 60F (for currency) of MT 950 / MT 940
- Value date specified in field 32 A of MT 103 = Sub field 1 in Field 61 of Mt 950 / MT 940
If the above condition is satisfied, then the system will pick the corresponding Payment message MT 103/202 from Pending Cover queue for further processing.
If a corresponding Cover message (or) funds are not received for a Payment Message (MT 103 / 202), you should manually do a force cover matching to proceed with further processing on MT 103 or manually return the Payment message due to funds not received.
This maintenance will be used to define following preferences applicable for uploads initiated in the branches:You can maintain the following preferences:
| Branch | Message Type | Queue | |||
|---|---|---|---|---|---|
| Specific | Specific | Specific | |||
| Specific | Specific | All | |||
| Specific | All | Specific | |||
| Specific | All | All | |||
| All | Specific | Specific | |||
| All | Specific | All | |||
| All | All | Specific | |||
| All | All | All |
Post Upload Status
The status of the contract on successful upload (Post Upload Status). This could be :
- Authorized – The uploaded contract is created as an authorized contract if all validations are successful
- Unauthorized – The uploaded contract is created as an unauthorized contract if all validations are successful.
- On Hold– The uploaded contract is put on ‘Hold’ if all validations are successful.
When no Beneficiary Found
How incoming funds transfers in respect of which the beneficiary is not found, are handled during upload. You can specify any of the following options:
- Use Suspense – If the Beneficiary is not found, the DAO GL defined for the product of the contract is used.
- Repair - The message is marked for repair and no contract is created
On Error
How errors encountered in respect of contracts during upload, would be handled (On Error). You can specify any of the following options:
- Put on hold – The message is marked as processed but the created contract is placed on ‘Hold’.
- Reject Record – The message is marked for repair and no contract is created.
On Override
How overrides encountered in respect of contracts during upload, would be handled (On Error). You can specify any of the following options:
- Put on hold - The message is marked as processed but the created contract is placed on ‘Hold’.
- Ignore – The message will be marked as processed but the created contract will be created based on the Post Upload Status.
- Reject Record – The message is marked for repair and no contract is created.
Note
- These preferences are applicable only for the FT Upload process, and not the message interpretation process or the Message Upload process.
- ‘When No Beneficiary’ is not applicable in case of Non SWIFT incoming payment message.
9.1.13 External Account Maintenance
This maintenance is part of the Reconciliation module of Oracle FLEXCUBE. This is used to map the nostro accounts in your Bank’s books to the actual account numbers in the books of you Correspondent Banks.
The procedure for maintaining details of External Accounts has been discussed in the Reconciliation Module user manual
9.1.14 Overrides Maintenance
The STP process (apart from the User defined Error Codes) also checks for various error conditions based on the contents of the message and their interpretation during the processing of the message., for instance limit checks, available balance checks, dormant account checks, etc. The actual result of the upload (whether it fails with an error or goes through with an override) depends on the configuration of the error codes.