Before You Begin
Purpose
This tutorial guides you through the steps of creating a simple Oracle Mobile Application Framework application based on a Mobile Cloud Service API utilizing the Client Data Model.
In Mobile Application Framework version 2.3.1, Oracle has released Client Data Model (CDM), the new cross-platform development framework for mobile applications. This CDM adds significant value to Oracle MAF: it allows easy consumption of MCS APIs and provides a complete persistence layer that allows you to use the mobile application in offline mode using a SQLite database. You can read and write data while not connected to the internet, and synchronize any pending data changes later when you are online again.
The CDM consists of a design-time component and a runtime component. This tutorial teaches you to connect to a MCS instance, use design-time functionality to consume an API and build a default MAF feature, task flow and data bound pages.
It is strongly recommended to communicate through REST-JSON services with your back-end applications. The reason for this is simplicity and performance. The REST architectural pattern is very easy to work with. The performance overhead with SOAP web services is bigger. XML payloads are more verbose than JSON, which means the size of the data packets sent over the wire is bigger. In the mobile client, XML parsing is a relatively expensive task compared to JSON payloads that can be used directly in JavaScript. So, if you have existing SOAP-based web services you want to consume in a mobile application, we recommend to transform these web services to RESTful services using Oracle Service Bus (OSB) 12c. For new web services that you still need to build, you might consider using JAX-RS which is a standard Java API that makes it fast and easy to disclose your back-end data and business logic through a RESTful API.
If you are interested in upgrading APMA environments to CDM, then view this blog: Migrating AMPA Apps to Oracle MAF 2.3.1 Client Data Model
This tutorial was developed with JDeveloper 12.2.1.0.0 and MAF 2.3.1. Please only use JDeveloper that is certified with MAF, otherwise it may not work as described.
What Do You Need?
| Assumptions: |
|---|
To complete this tutorial you must have installed JDeveloper 12.2.1.0.0 and have installed the MAF 2.3.1 Extension, as well as access to a Mobile Cloud Service. If you are using an iOS environment, you can use the following tutorial to set up the development environment: Set Up and Configure an iOS Environment. If you are using an Android environment, you can use the following tutorial: Set Up and Configure an Android Environment. You must also have access to a Mobile Cloud Service instance to provide backend artifacts to the application. In this tutorial, the backend API only uses example data and does not access any database. To complete this tutorial, you MUST download and unzip the "labs.zip" file onto your local machine. |
Step 1: Import
In this section, you'll import a package into your MCS instance. The package contains everything you need. The /setup endpoint will (re-)create some database tables and fill them with the seed data. You can re-run this endpoint as much as you want to reset seed data to original set. To be able to run this endpoint, you need to add a user to the HumanResources Realm that has Mobile Database Management role.(this role is required to create DB tables). The other endpoints can be run with the anonymous user.
-
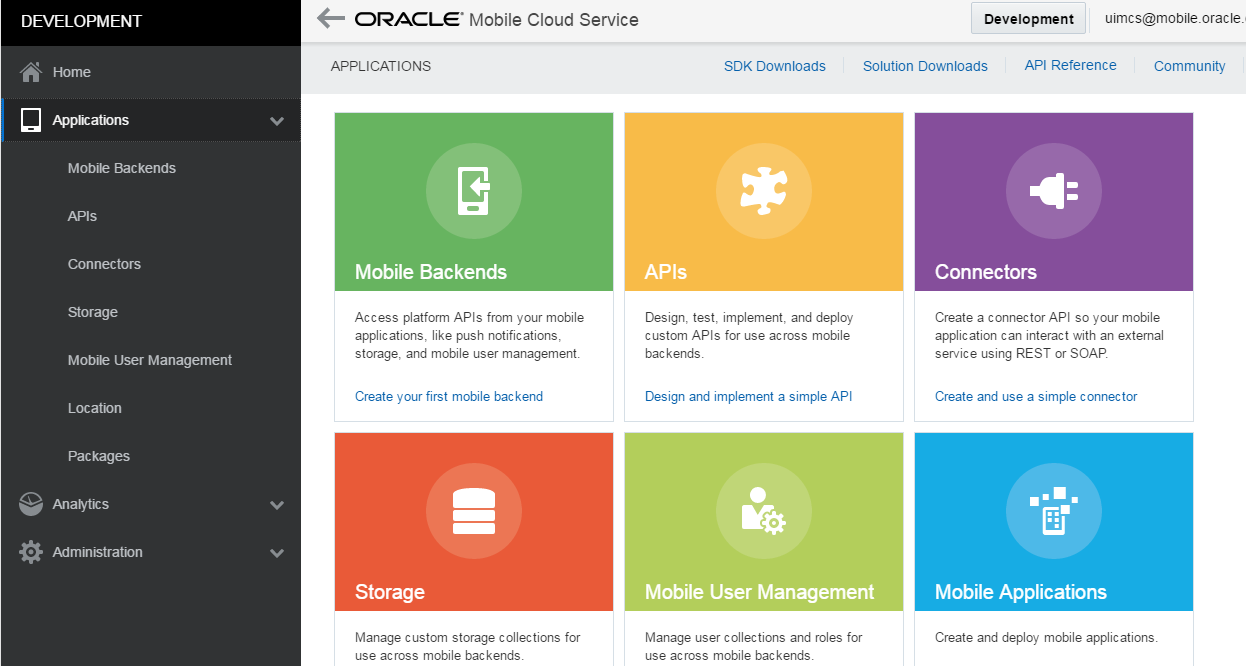
Launch MCS in a browser (e.g. http://<your_MCS_server>:<port>/ ). Select Applications from the side menu.
-
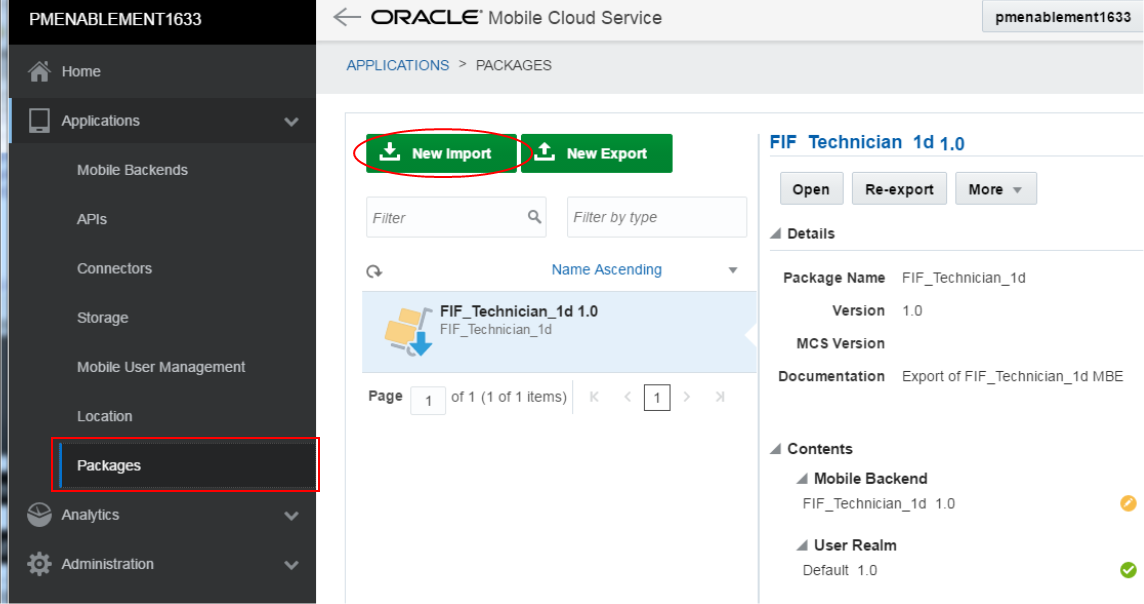
Select the Package menu option.
Then, from the Package page, click the New Import button.
-
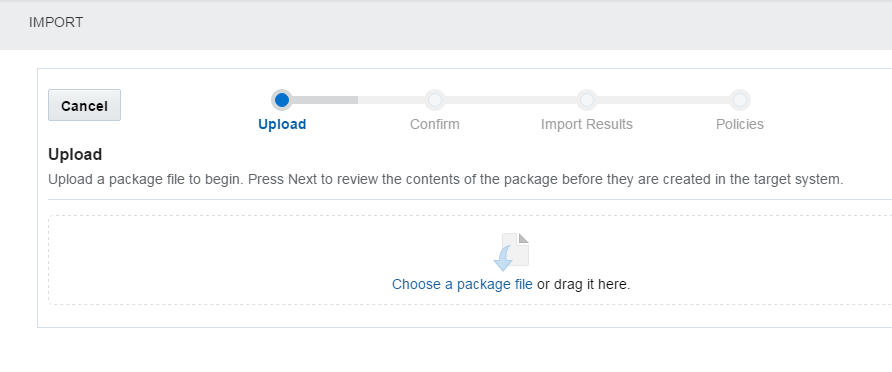
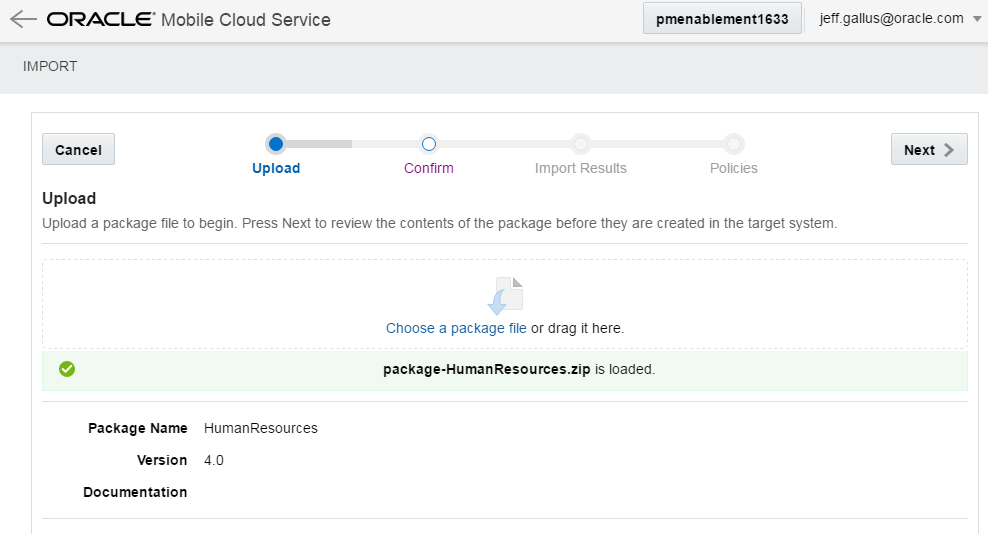
In the Import page, click the Choose a package file text.
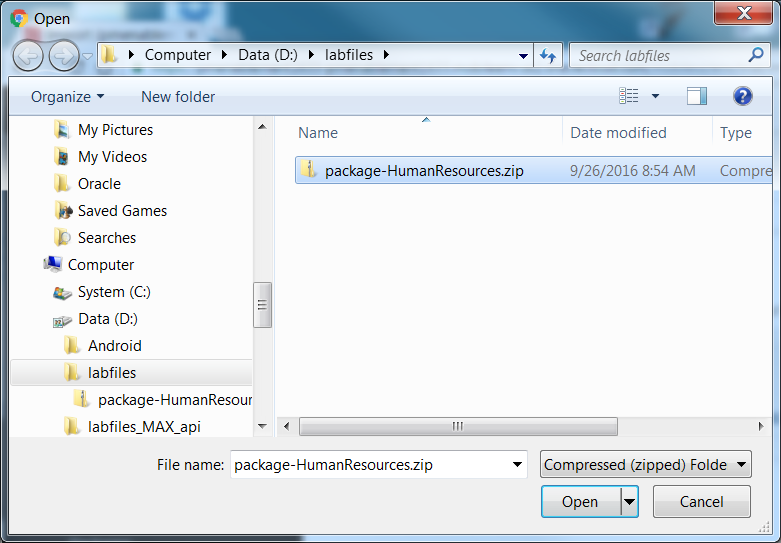
In the Open dialog, navigate the where you unzipped the labfiles and select the package-HumanResources.zip file. If you haven't downloaded and unzipped the file you can access it from here (labfiles).
Then, click Open.
-
In the Upload step, the package should load.
Click Next.
-
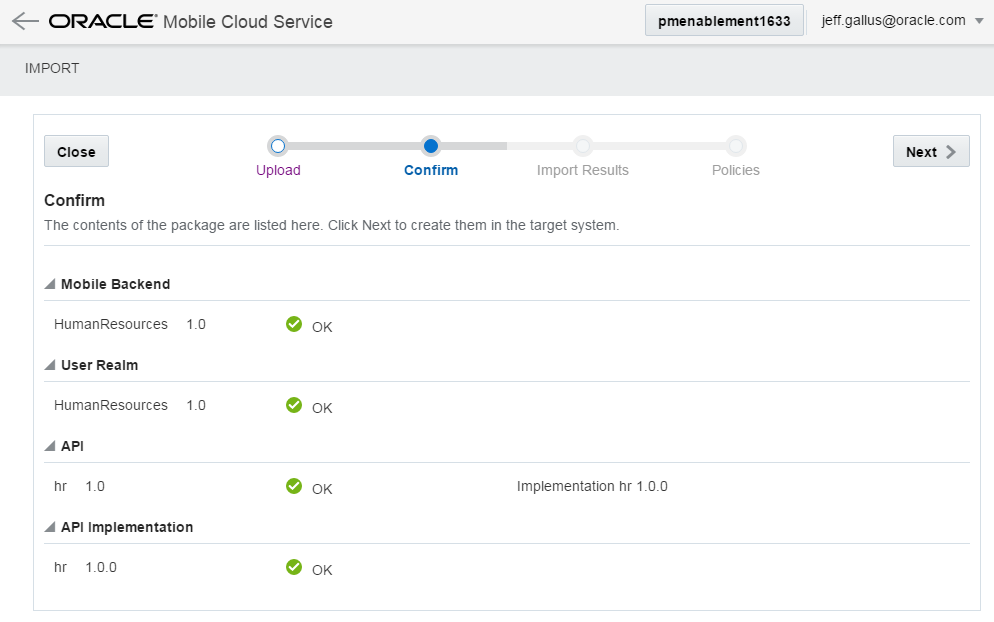
In the Confirm page, you should see all the artifacts the package will load.
Confirm they all have green checks next to them and click Next.
-
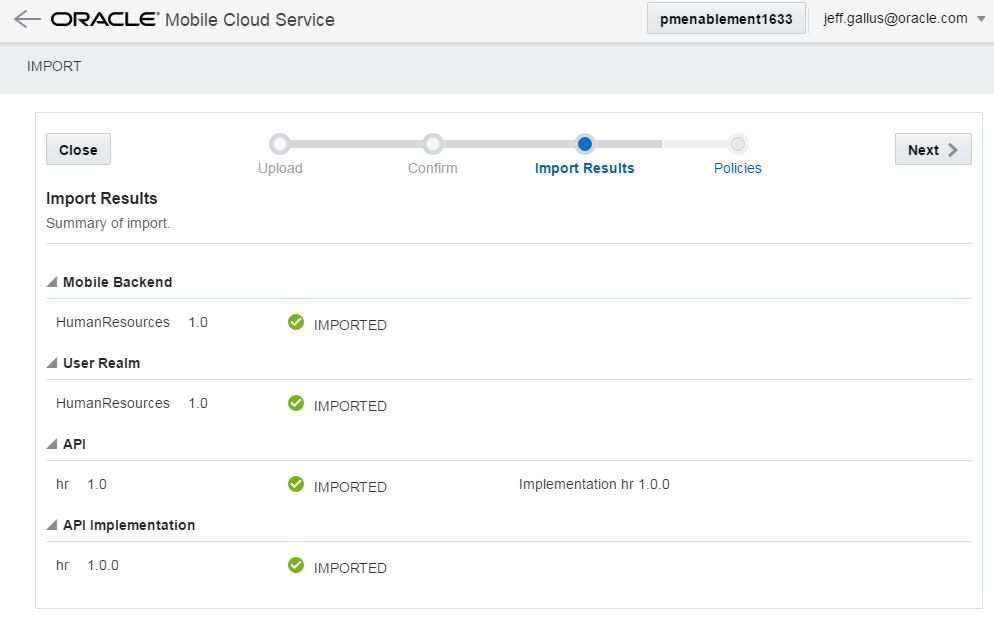
Everything should successfully import. In the Import Results step, click Next.
Then in the Policies step, click Skip as there are no extra policies needed for the tutorial.

-
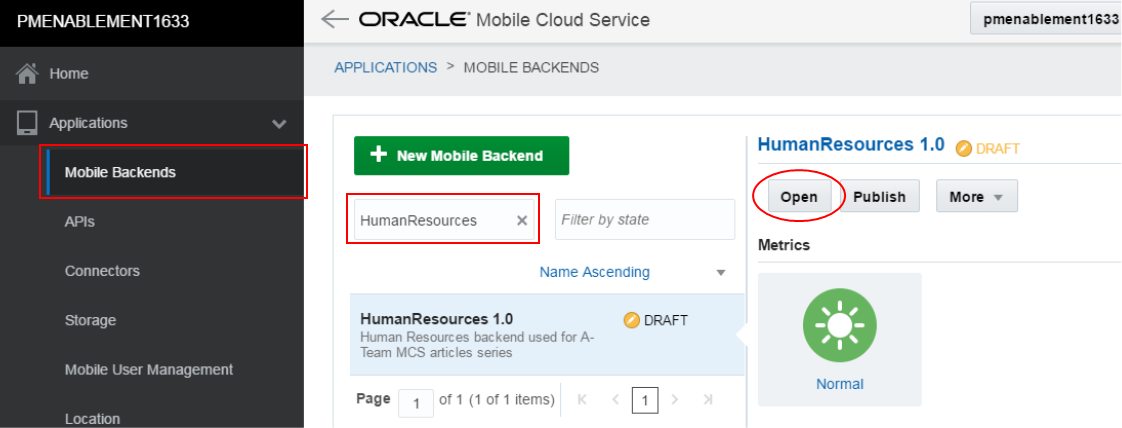
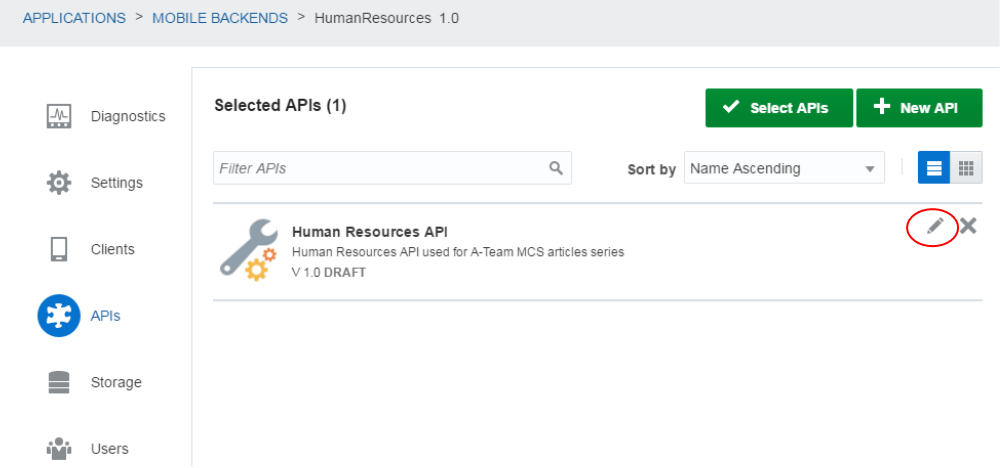
Let's take a minute to explore the artifacts that were imported.
Under the Applications menu, click Mobile Backend option and find the Human Resources MBE. Then, select it and click the Open button.
-
Click the API menu option on the left, and you see the Mobile Backend uses a HumanResources API.
To examine the API, click the pencil icon in the upper right.
-
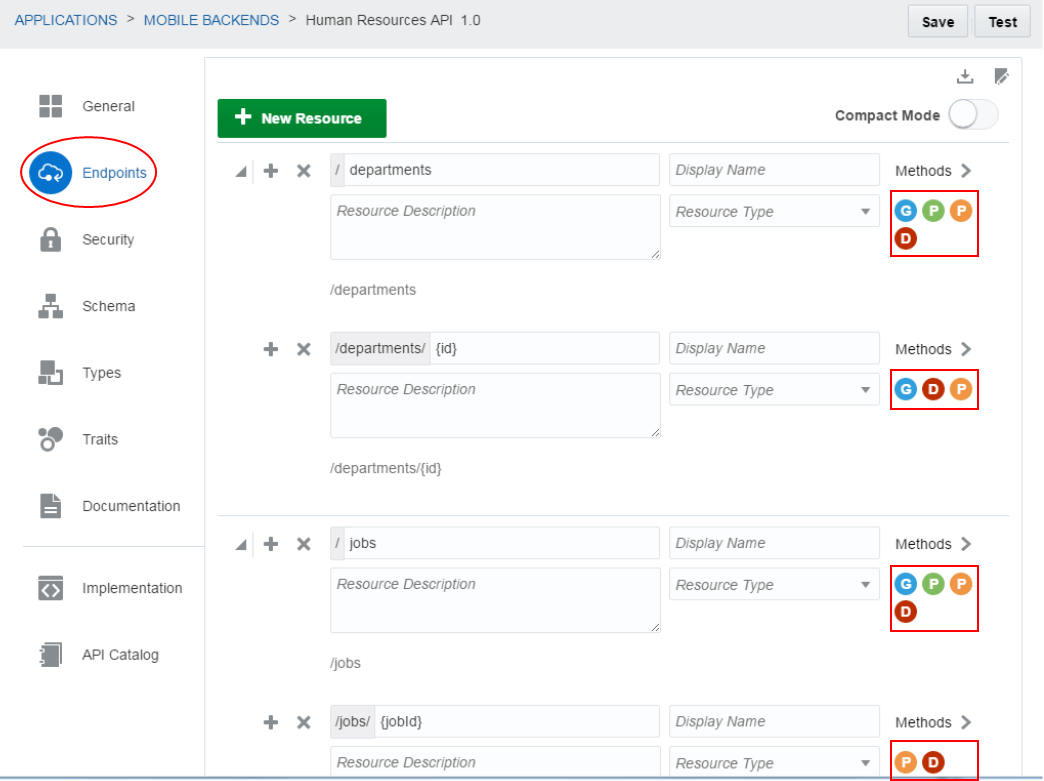
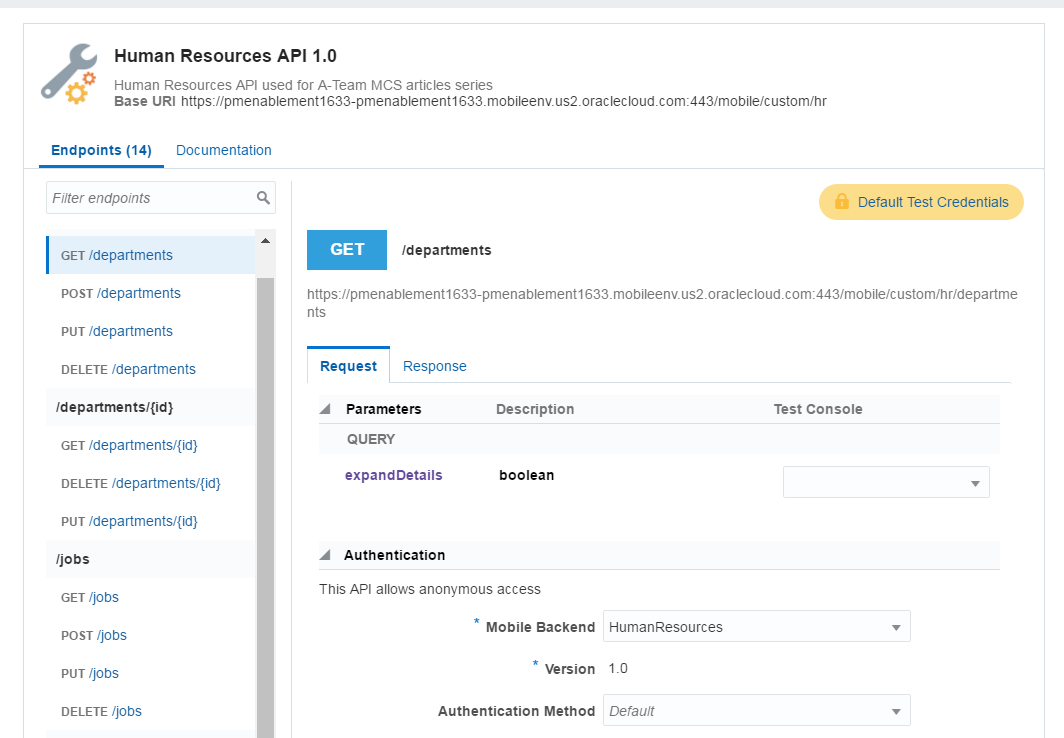
Click the Endpoints option on the left, and you will see all the methods. Each of the methods is represented by a colored circle on the right. The GET method is a blue circle, the POST a green one, the PUT an orange one and the Delete a red one. Some methods don't require parameters, like the departments and jobs. Other ones do and are noted by a value between scrolling brackets {}, like {id} and {jobid}.
-
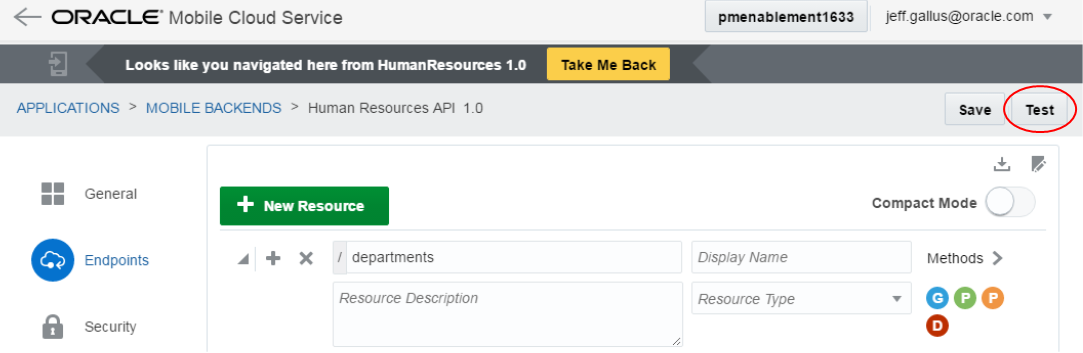
In the upper right of the Endpoints page, click the Test button.
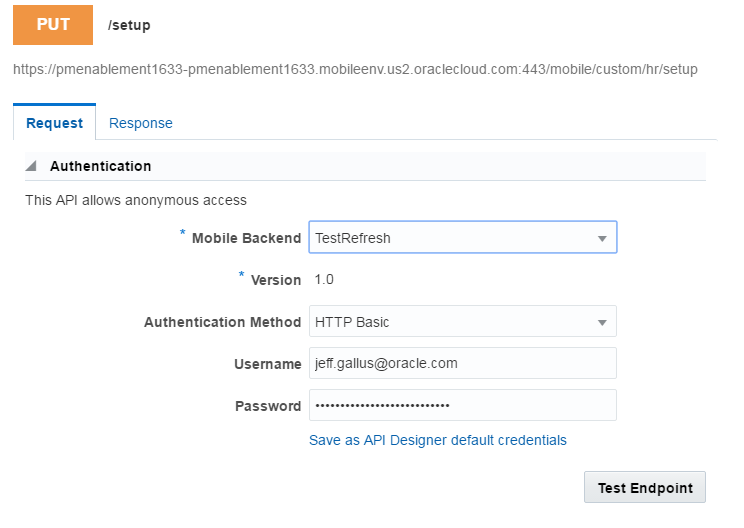
Scroll down, find and select the PUT/setup method.
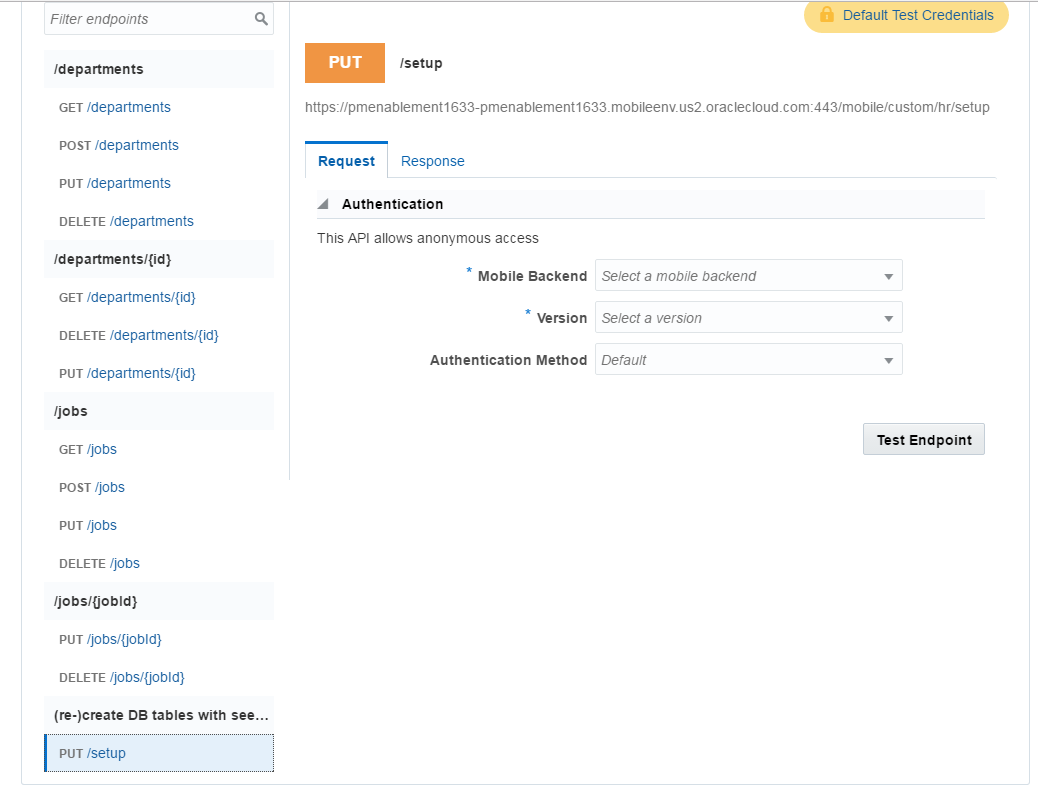
On the right side of the page, set the Mobile Backend to any Mobile Backend (do NOT use HumanResources due to restrictions on realms). Any MBE will do that you already have in the instance.
Select HTTP Basic for the Authentication Method and enter the credentials you used to logon to your MCS instance.
Then click the Test Endpoint button.
-
The API will run and a 200 should be returned to the API. If you look at the body a message is displayed stating the "Tables recreated with seed data".

-
Now, lets test one of the APIs to see that what data has been loaded.
Scroll up to the top of the API list and select GET/departments. This API, like all the APIs that access the seeded data do not require any authentication.
Set the Authentication Method to Default and then set the Mobile Backend to HumanResources.
-
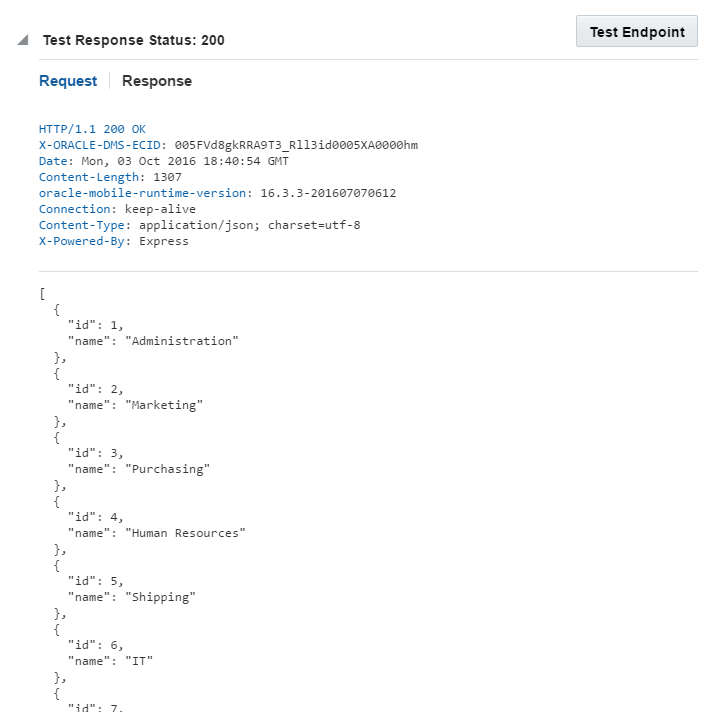
Click the Test Endpoint button and you should see a return status of 200 and a list of departments in the body.
-
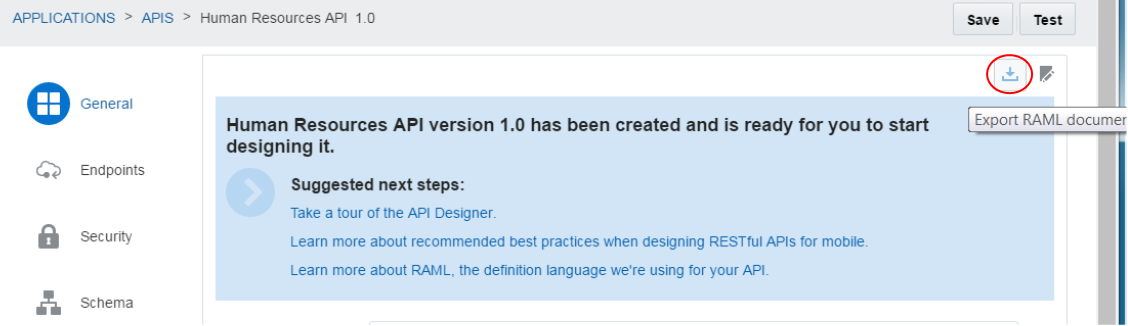
The last thing we need to do is save a RAML document of the API structure to your local machine's hard drive. We'll use this later on when defining the business object in the MAF application.
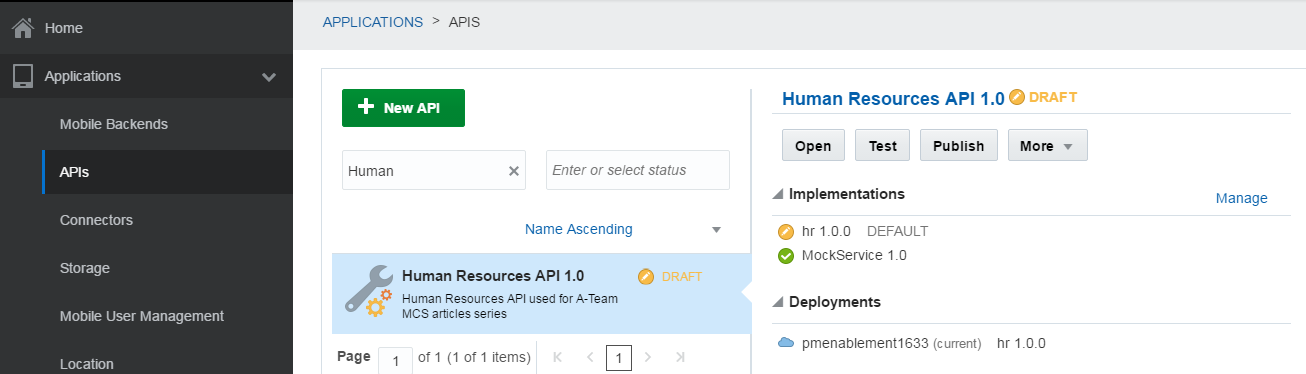
From the Application menu option, select APIs. In the Filter box, type Human and the HumanResources API will display. Select it and click the Open button.
In the upper right, click the download button and the RAML document will be exported and saved to your machine's hard drive. Remember where you've saved this document, you will need it in a later step.
You have now completed the necessary steps to set up your MCS instance to be accessed by CDM.
Step 2: Create the Client Data Model to Access the MCS API
In this part of the tutorial, you use the Oracle MAF Client Data Model wizard in Jdeveloper, to create the objects to access the API in MCS and provide CRUD functionality in online mode as well as offline mode.
-
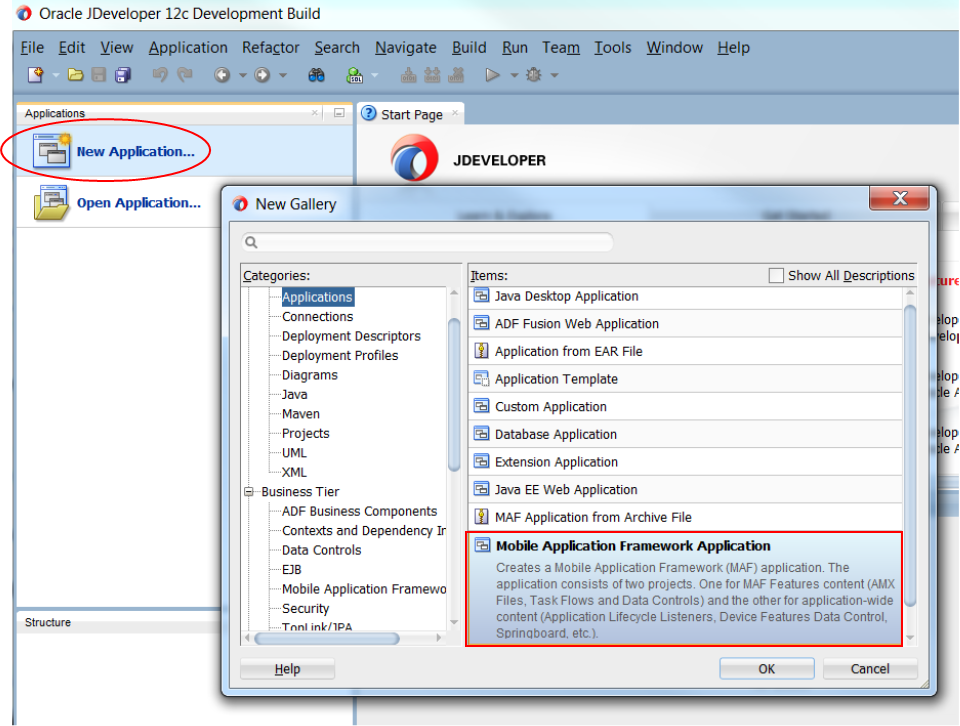
First start JDeveloper and create a new Mobile Application Framework application.
Once in JDeveloper, click the New Applications button. Then, double click the Mobile Application Framework Application item to create a new application.
-
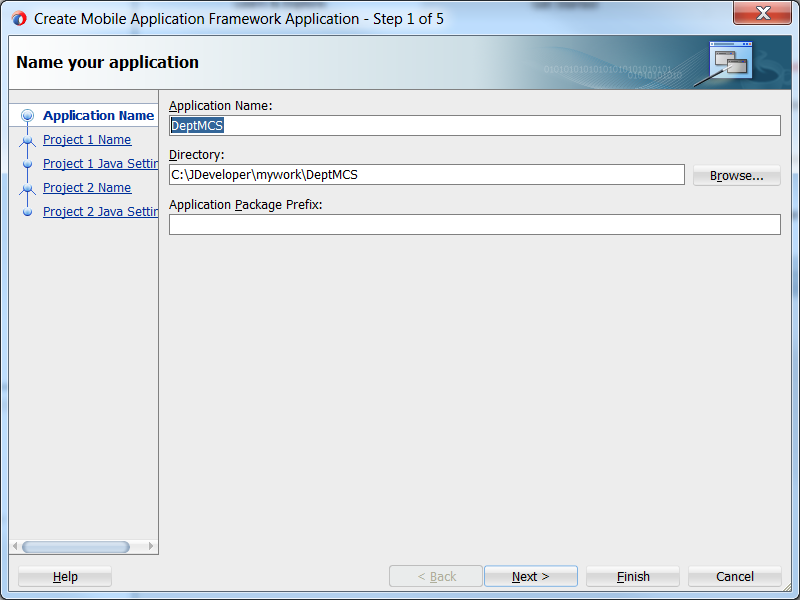
In the wizard, name the application DeptMCS and click Finish.
-
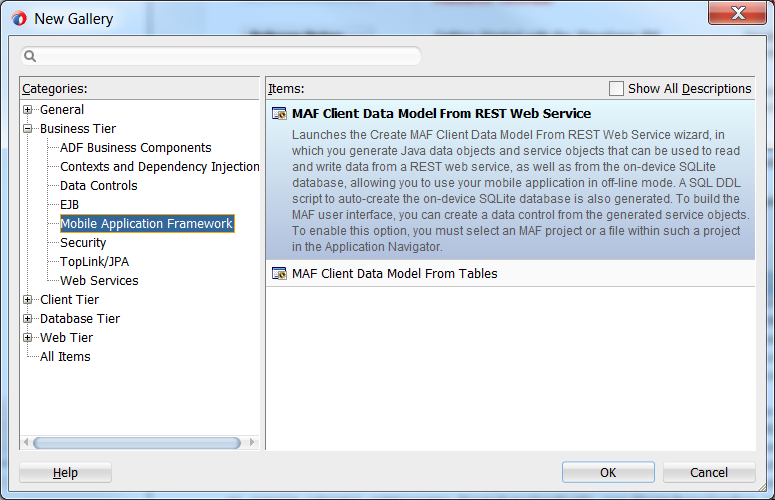
Now in the mobile application, create business objects to access the MCS API.
In the Applications window, select the ApplicationController project and invoke the New Gallery. Expand the Business Tier category and select the Mobile Application Framework category. Then, double click the MAF Client Data Model From REST Web Service item.
-
This invokes a wizard that will create Java classes to read and write data to and from a REST web service. It also creates a SQL DDL script to create the database tables, and a persistence-mapping.xml file, and a persistence configuration file. If the application goes off line, then the data is be saved in a SQLite database stored locally on the device to be synced at a later time.
Note: When running this wizard you create a mobile application which stores data on the mobile device. This is potentially a security risk. If the device is ever lost or stolen, the data could fall into hands of people who could abuse it. Also, it would be prudent to define a policy for what happens when the device is retired or the owner no longer may access the application. Although all data is stored encrypted in the on-device SQLite database, you might want to exclude specific data objects, or individual attributes from on-device storage.
Click Next in the first step.
-
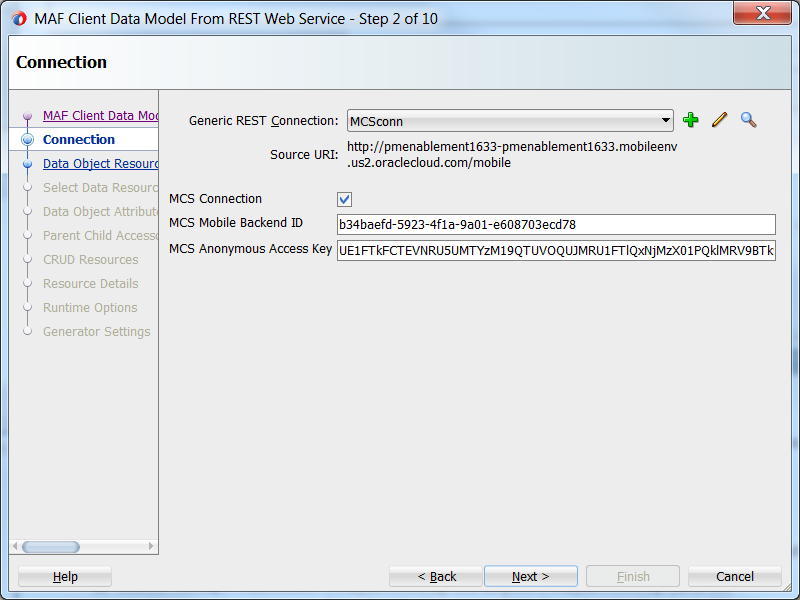
In Step 2, you specify the MCS connection for the wizard to use. Click the green plus sign
 to create a new connection.
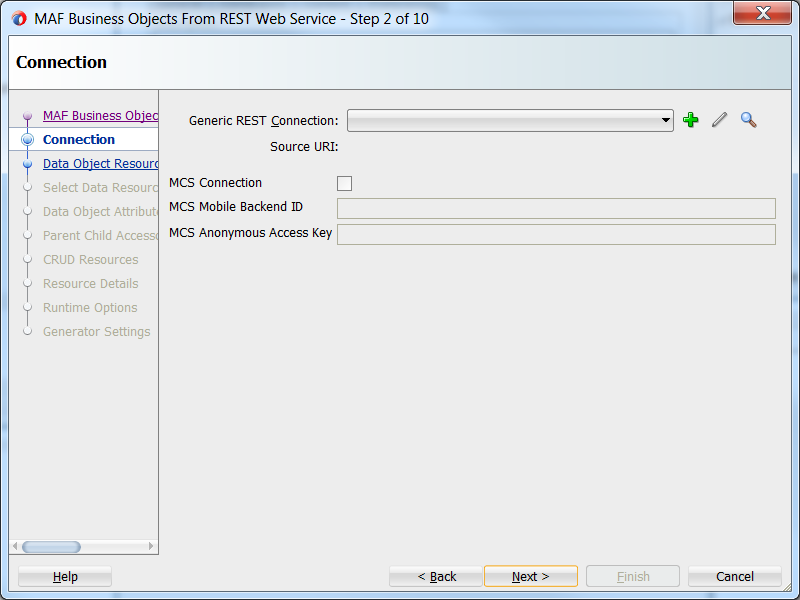
-
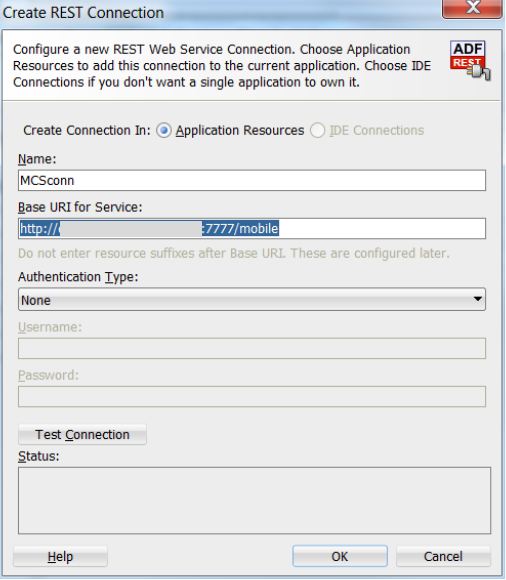
In the Create REST Connection dialog, set the Name property to MCSconn and the URL Endpoint to your MCS URL : https://<your_MCS_URL>:<PORT>/ and append "mobile" to the end of it.
If you click the Test Connection button it will be unsuccessful since there is no resource being passed. Then click OK.
-
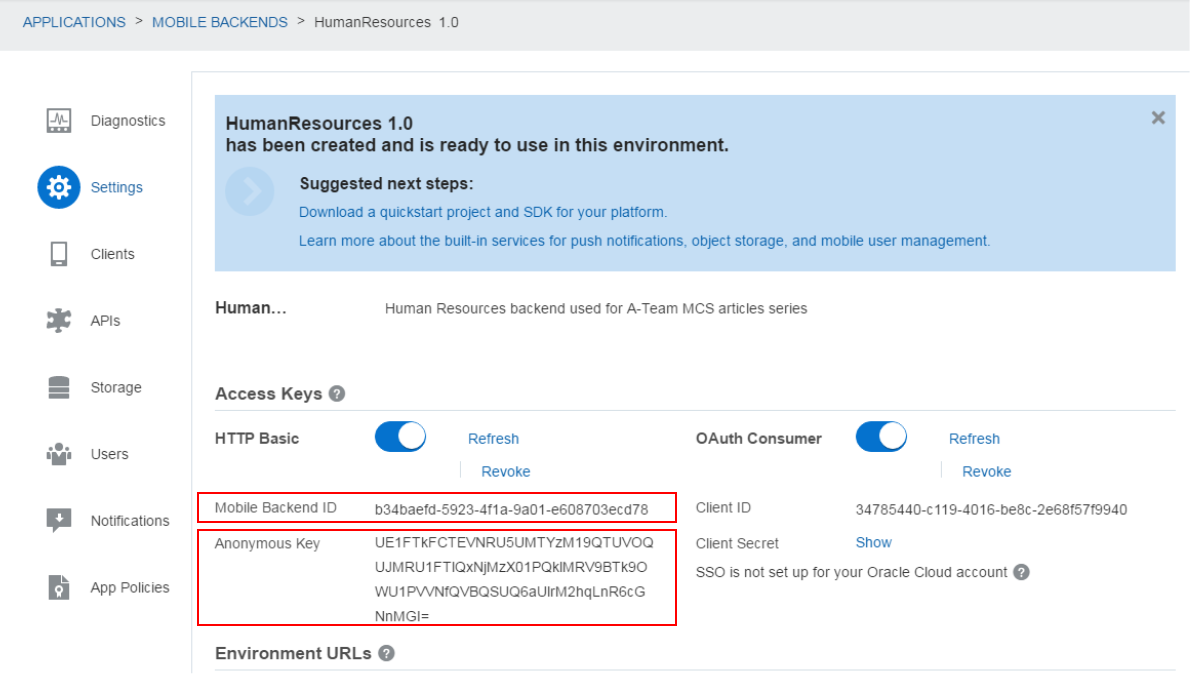
Back in Step 2, you now need to set the Mobile Backend Id and authentication password. These can be found in the MBS Settings page.
In JDeveloper click the MCS Connection checkbox. Then in the MBE Settings page copy the MBE Id and paste it into the Mobile Backend Id property. Then, in the MBE, click the Show text to expose the Anonymous Key value. Paste that value into the MCS Anonymous Key property.
Then, click Next.
-
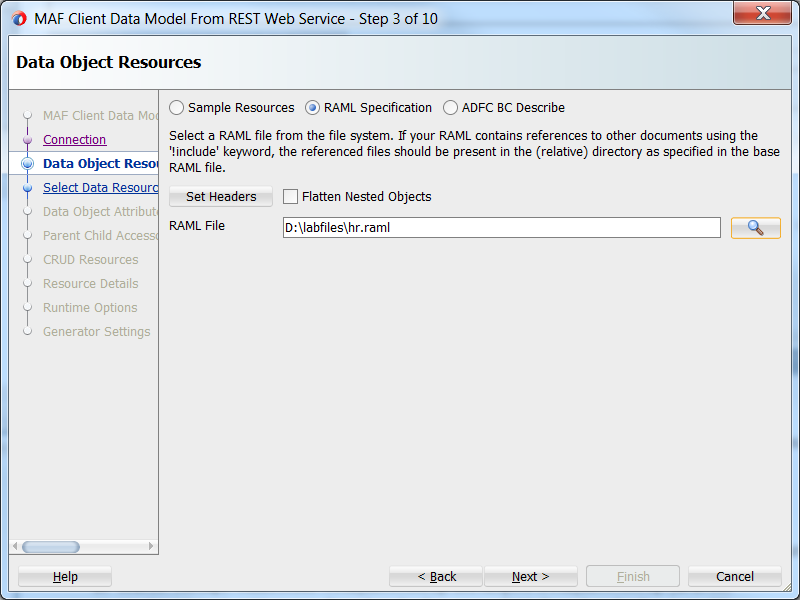
In Step 3, you specify the resources to be used. The resources you specify on this page are ONLY used to identify candidate data objects that you want to create and use in your application. In later steps in the wizard you specify the exact resources that must be used for the various read and write actions.
For this tutorial, we want to use the department. We can use the RAML document we used to create the API to define the resources. Click the RAML Specification radio button and find the RAML document (hr.raml) you created from the API. If you missed that step, you can find it in the /labfiles directory.
Then, click Next.
-
Next, in Step 4, determine which objects will be included and what data may be persisted. You do not need data objects for the Setup, so uncheck the Select checkbox for this data objects.
Also, modify the class names for the departments, employees and jobs data objects to Department, Employee, Job so you get Java classes generated with nice singular class names.
To support offline mode, check the Persist checkbox for both Department and Employee data objects. Then click Next.

-
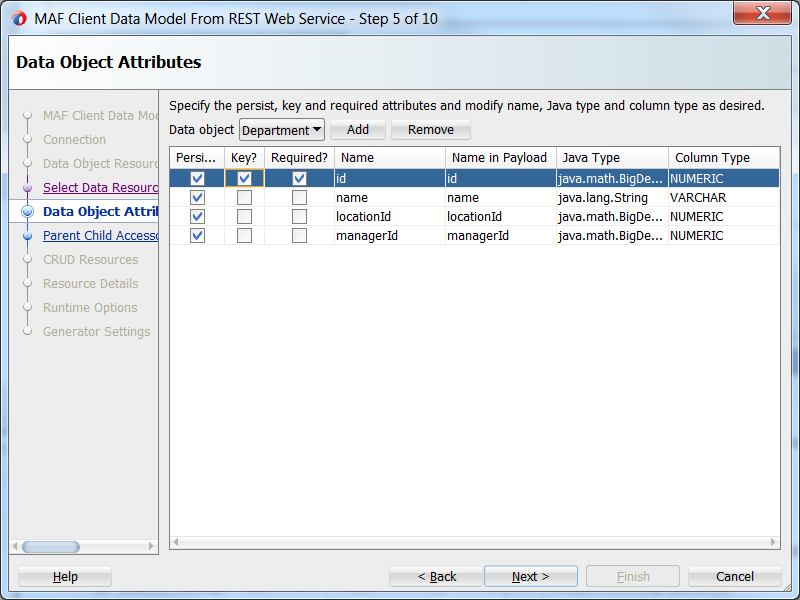
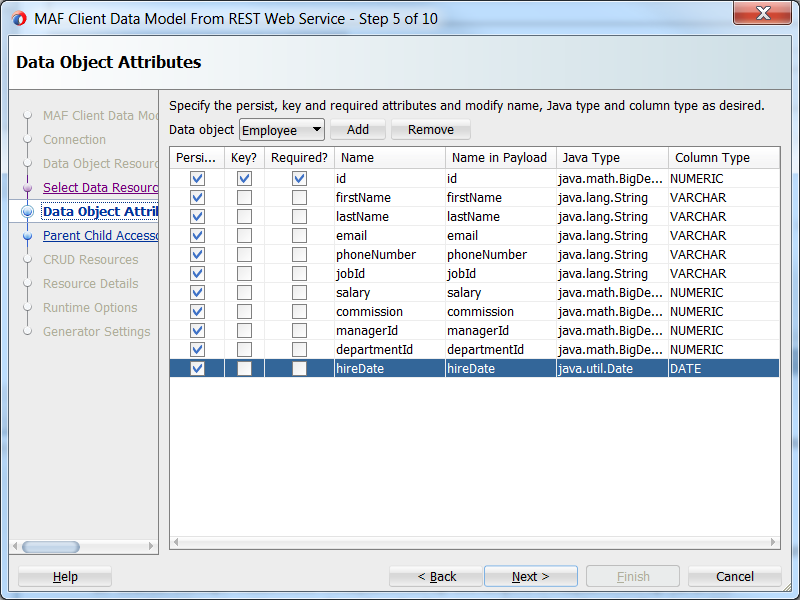
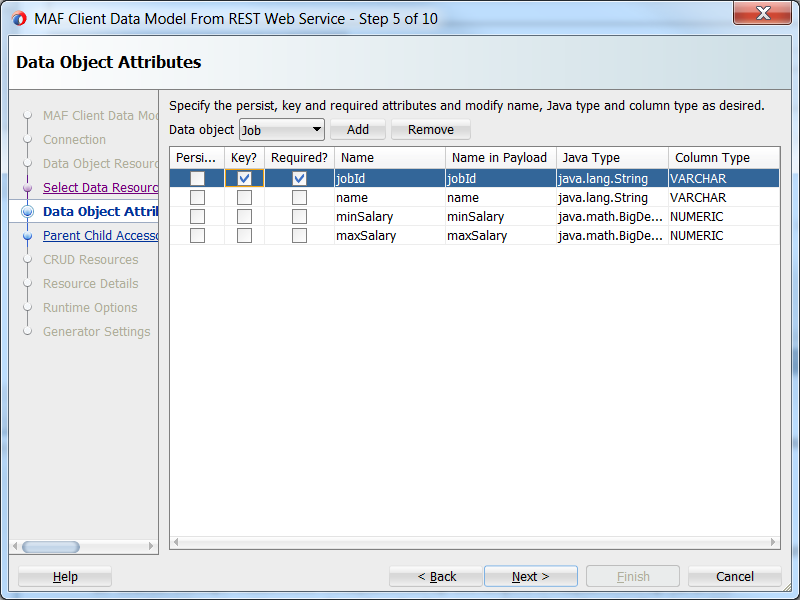
Then, in Step 5, set the way the data objects are presented. You may set or change the Key, Required, Name, Java Type and DB Column Type of each attribute as desired. For an attribute carrying very sensitive data you may decide to not persist it, which causes the attribute value to be null when running the app in offline mode. You usually need to modify the Java type for the attributes as they typically will show up as java.lang.String. Some attributes may show up as java.math.BigDecimal when the payload value is not enclosed in double quotes.
Set the values the Department data object in the wizard to persist all the attributes and the Id to also be Required and a Key.
Then, select the Employee object and make the Id a Required attribute and a Key. Then set the hireDate to java.util.Date.
Next, select the Job object and make the Id a Key attribute and the Required attribute will also be selected. We won't persist Jobs, but there still needs to be a key.
Then, click Next.
-
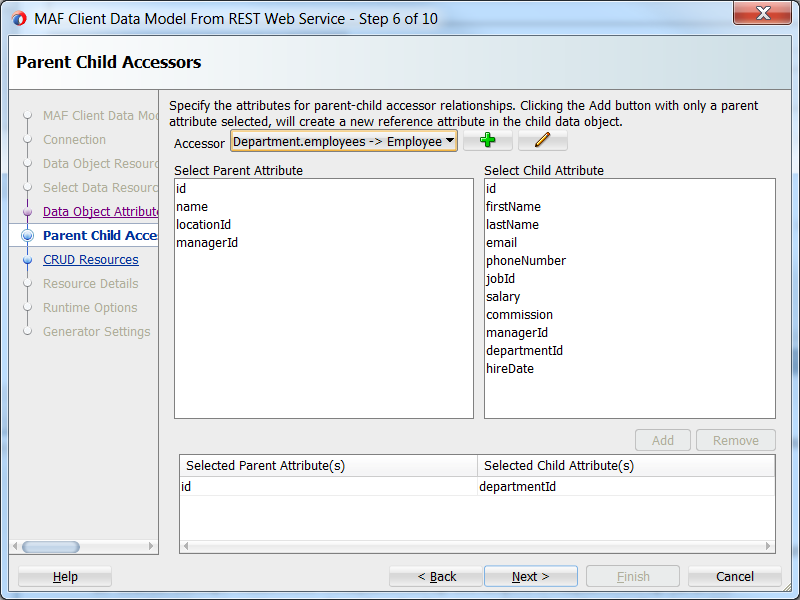
In Step 6, you can establish parent/child relationships from the existing data objects.
Now we need to define the attribute mapping for this relationship. Select the id as the parent attribute and then select the departmentId as the child attribute. Then, click the Add button.
Though this attribute is not included in the REST payload when querying the employee details for a department, the persistence runtime code will populate this attribute (and underlying column value) based on the department instance for which the employee details are retrieved.
-
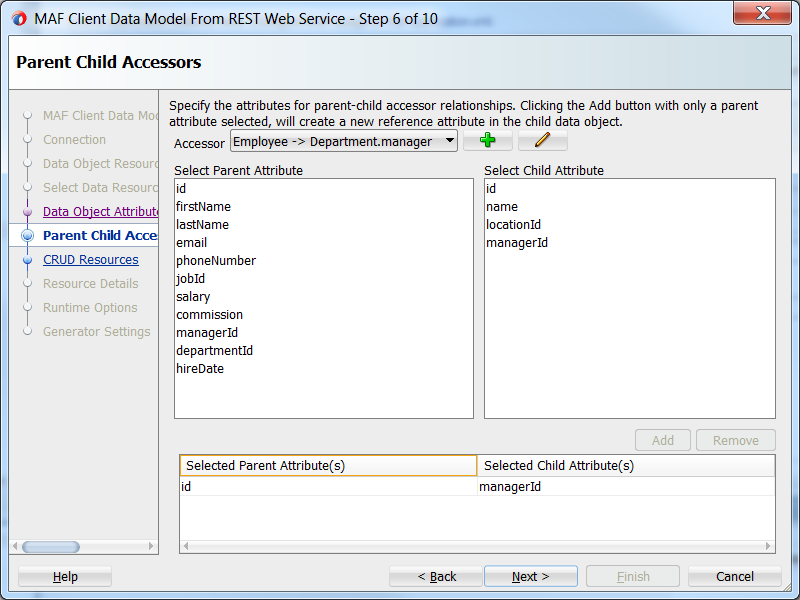
Next, while still in Step 6, add a relationship to show the manager's name with the department they manage.
Click the green plus sign again, and in the New Parent-Child Accessor popup, set the following properties:
Parent Data Object = Employee
Child Data Object = Department
Child Accessor Resource = /query/Department.findAll
Parent Accessor Resource = /entity/Department/{id}/employees1
Parent Accessor Attribute = manager
This time we define the parent accessor instead of the child accessor. This is because we want a getManager method in the department data object. We do not need a getManagedDepartments method in the employee data object because the user interface will not show a list of departments managed by an employee. So, indeed, whether or not you need to specify parent and/or child resources depends on the user interface requirements. If you are not (yet) sure about these UI requirements, you can stay on the safe-side and define both accessors. The persistence runtime will only invoke the associated REST resource when the data is actually requested by the user interface.
Then click OK.

Back in the Parent-Child Accessors dialog, select the id as the parent attribute and the managerId as the child, then click the Add button. Like before, this will do two things, move the employeeId as the parent side of the relationship and add an EmployeeId in the department to support the child side of the relationship.
Then, click Next.
-
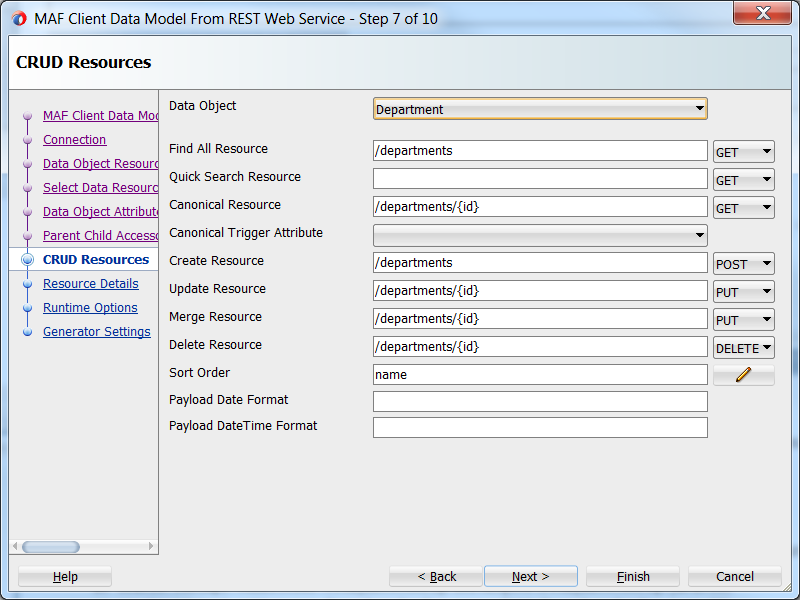
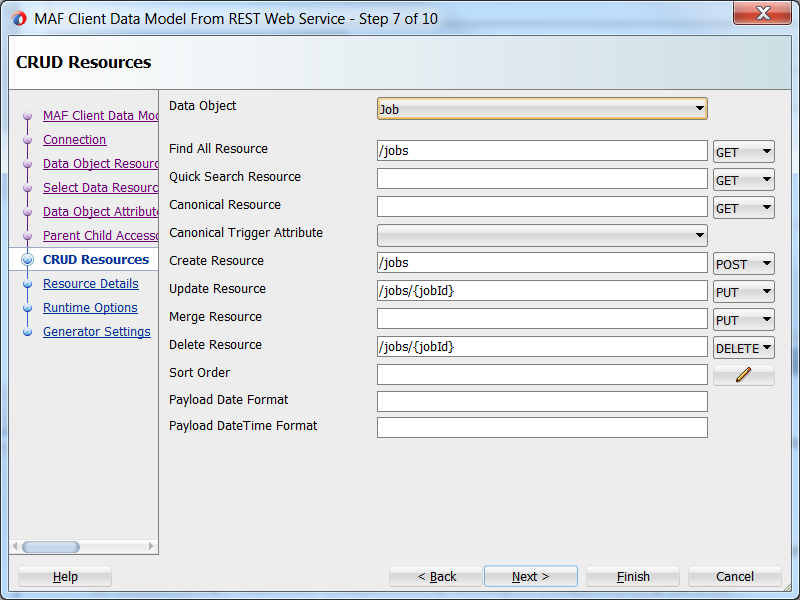
In Step 7, you determine what persistence resources you'd like to perform on the data objects. For the Department, service object, ensure or set the following properties:
Find All Resource = /departments GET (in the select one drop down)
Canonical Resource = /departments/{id} GET (in the select one drop down)
Create Resource = /departments POST (in the select one drop down)
Update Resource = /departments/{id} PUT (in the select one drop down)
Merge Resource = /departments/{id} PUT (in the select one drop down)
Delete Resource = /departments/{id} DELETE (in the select one drop down)
Sort Order = name
For the Employee service object, ensure or set the following properties:
Find All Resource = /employees GET (in the select one drop down)
Canonical Resource = /employees/{id} GET (in the select one drop down)
Create Resource = /employees POST (in the select one drop down)
Update Resource = /employees/{id} PUT (in the select one drop down)
Merge Resource = /employees/{id} PUT (in the select one drop down)
Delete Resource = /employees/{id} DELETE (in the select one drop down)
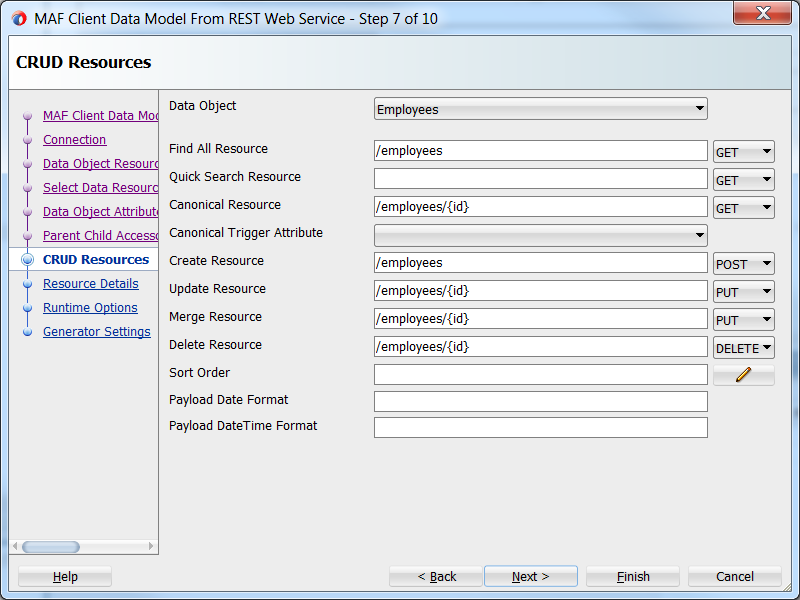
The Job data object is fine as it is defined.
Then, click Next.
-
In Step 8 of the wizard, you may specify parameters and their values for the various REST resources that were defined in step 8. The wizard provides some smart defaulting, but it is good practice to check whether these defaults also make sense in your specific situation.
Any path parameters, enclosed in curly brackets, that you used in the REST resources specified on the previous page will be pre-displayed. Using the Add button you can add additional query parameters. REST resources that perform a POST, PUT or PATCH typically do not use parameters but instead send the data as a JSON object or JSON array in the payload.In such a case you need to check the Send Serialized Data Object as Payload checkbox.
In our scenario, there is nothing you need to do other than examine the values.
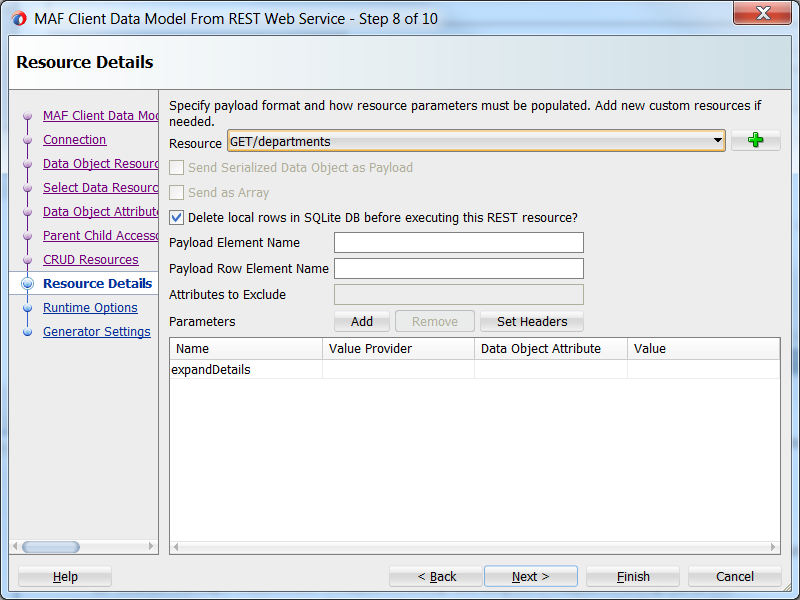
The persistence runtime automatically populates the resource parameter values based on the Value Provider you choose in this wizard:
- DataObjectAttribute: Populates the parameter with the value of a data object attribute. When using this value provider, you need to set the attribute name using the drop down list in the next column. The data object whose attributes are displayed in the drop down list are determined by the usage of the resource. For example, the above resource returns the employees within a department, so it is assumed you want to select an attribute from the department data object to set the context for the employees list.
- SerializedDataObject: If the data that must be persisted should be sent through a dedicated parameter, you choose this setting. With this value provider, the other columns should remain empty.
- LiteralValue: Populates the parameter with a literal value specified in the Literal Value column.
- ELExpression: Populates the parameter with a value obtained by evaluating an EL Expression. You specify the EL Expression in the Literal Value column. You can use EL Expressions with any scope (applicationScope, pageFlowScope, viewScope, deviceScope, preferenceScope) but it is your own responsibility that the expression is valid in the execution context of the REST service call. Remember that when making transactions in offline mode, the REST service will be invoked later and the EL expression context will then be determined by the task flow and page that triggers the data synchronization.
- SearchValue: Populates the parameter with the value of the quick search value entered in the user interface. You will typically use this value provider only with the Quick Search Resource that you can define in step 8.
-
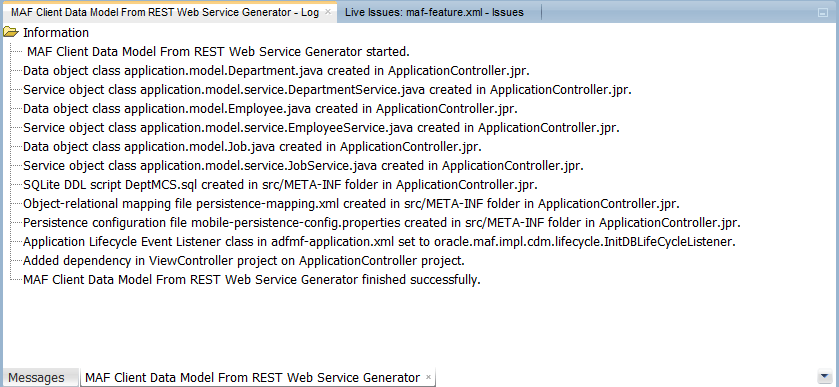
Click Next and then Finish to complete the wizard.
The log window will show you the classes and files created from the wizard values.
-
The Applications window should look like the image below, including the application.model and application.model.service classes.
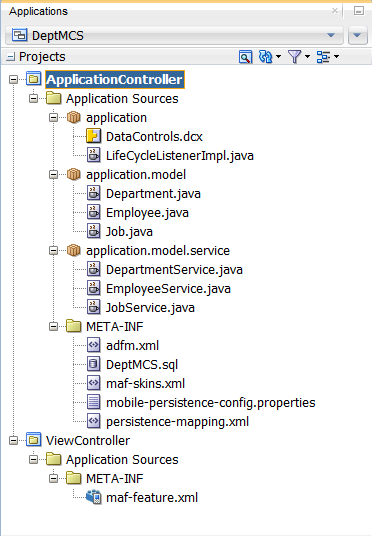
Here you can see the following files:
Department.java, Employee.java & Job.java– Standard Java data class, with attributes, getters and setters. Driven by the RAML document definition.
DepartmentService.java, EmployeeService.java & JobService.java- Service class that provides CRUD and custom operations against the departments data object. The behavior of this class is driven by the departments classMappingDescriptor in persistence-mapping.xml. If you created a data control for this service class, the data control will use this constructor, allowing you to immediately show data in your user interface when accessing the data control for the first time. Includes other constructors, some with autoquery on others with it off. Also included are methods to add and delete ‘departments’ as well as one to ‘save’ the record during inserts and updates. By default a find all method is included and a method to reset instances in the local SQLite database.
DeptMCS.sql – Includes a variety of DDL statements: create departments, create storage object (auditing info & constraints), create data_sync_actions (service & entity classes, json payload and audit info) and create web_service_call (connection, method, headers, payload, …)
mobile-persistance-config.properties – SQLite settings (db name), location of XML mapping file, MCS connection details (connection, MBE and anonymous key), flag to use analytic events and enable background rest calls.
persistence-mapping.xml – Contains all the attribute mapping, API methods, class mapping descriptor (audit attributes, payloads, connection details).
-
The final thing to do with the data side of the application is create data controls.
To create data controls from the DepartmentService, right click on it and select Create Data Control.
The Create Bean Data Control wizard that appears and you can accept all the defaults, click Next and then click Finish.
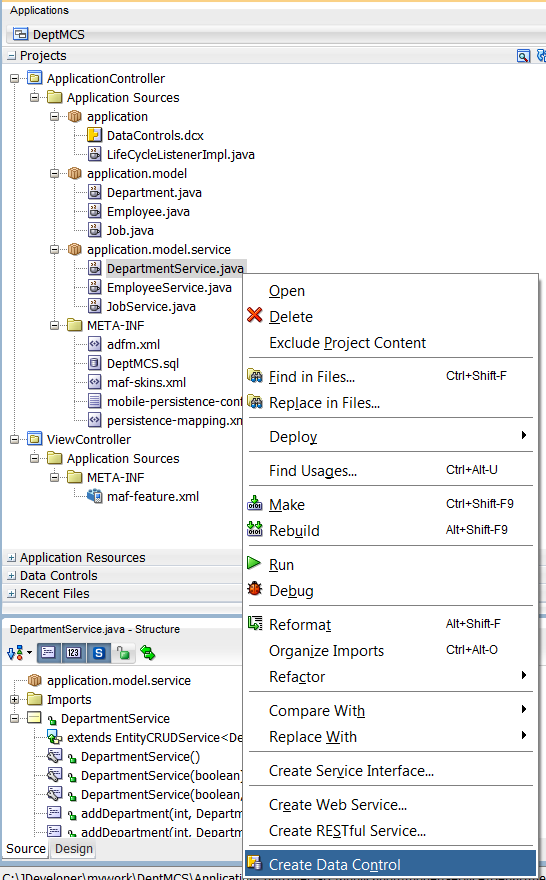
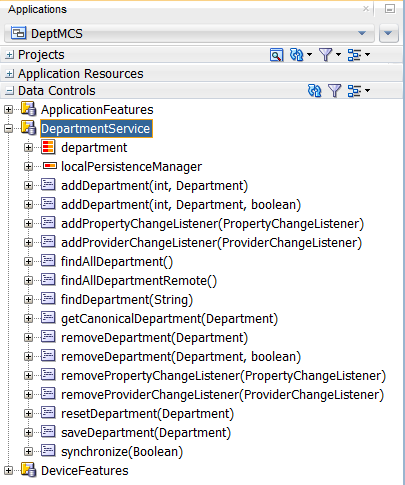
When the wizard has finished, expand the Data Controls window to see the new data control. Expand the DepartmentService node to see all the available resources. You may need to click the blue arrow refresh button to see all the data controls.
Save all your work.
Step 3: Run the MAF User Interface Generator and create a Mobile Feature and Content
In this section, create a MAF user interface capable of performing CRUD operations using the DepartmentService REST service.
-
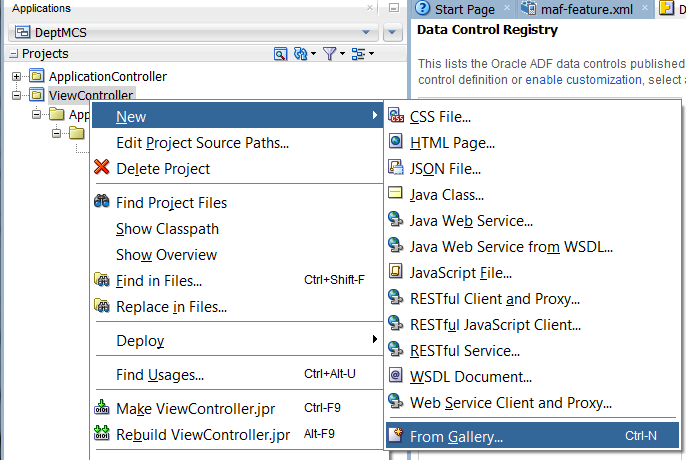
In the Applications window, right click the ViewController project and from the context menu, select New > From Gallery...
-
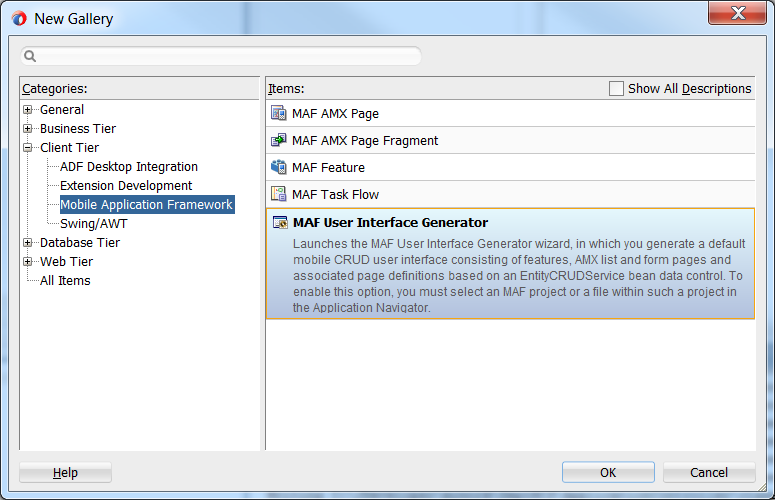
In the New Gallery, expand the Client Tier node, select the Mobile Application Framework category and then double click the MAF User Interface Generator.
-
Click Next in Step 1, to continue.
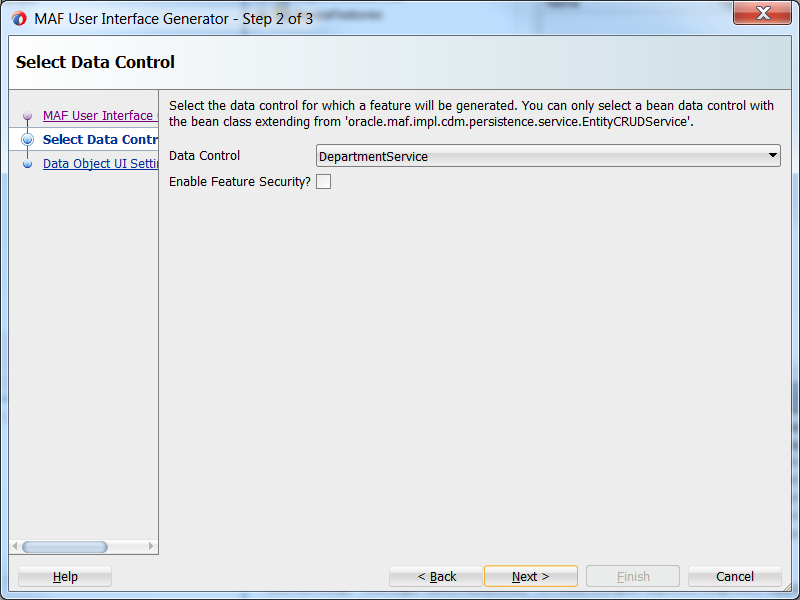
In Step 2, you select the data control to be used for the UI. By default the Data Control property should be populated with the newly create DepartmentService data control.
If you wanted to generate a UI based on a different data control, you'd select it here. Leave the value set to DepartmentService and click Next.
-
In Step 3, you specify the items that will appear on the generate page, based on the different data objects.
For the Department data object, set the following properties to determine where the fields will be displayed. After the UI has been generated, you may always make customizations to the page.
Display Title Plural = Departments
Main Left = name
Main Right = idThen, switch to the Employee data object.
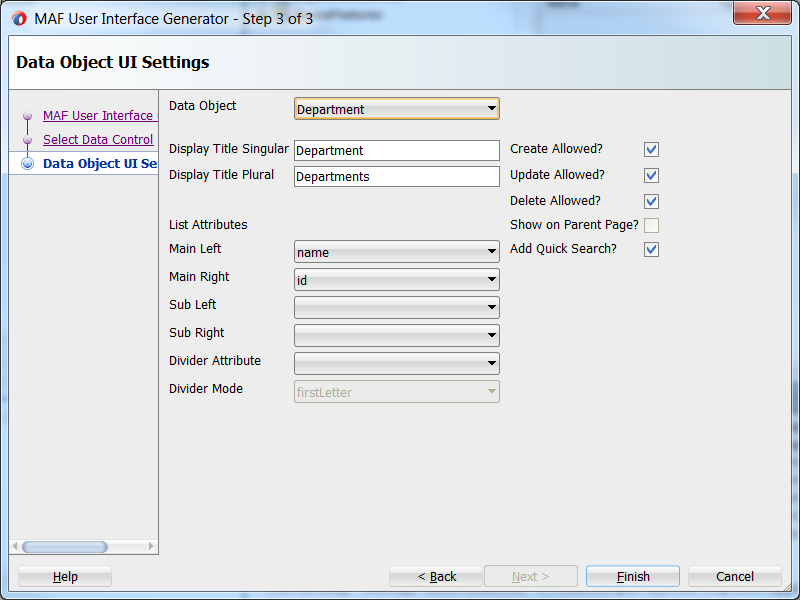
Click the Data Object field, and select the Employee data object. Then, set the following properties.
Display Title Plural = Employees
Main Left = lastName
Main Right = firstName
Sub Left = email
Sub Right = phoneNumberThen, unselect the Create, Update and Delete checkboxes since they are not supported by the Database API Implementation.)
-
Click Finish to complete the wizard and a new task flow is opened in the editor and the Applications window shows the newly created pages.
For each data object a list and form page (fragment) will be generated, and you can configure whether a list for a child data object should be included on the same page as the form fields of the parent data object. The generated user interface is optimized for rendering on mobile phones, but can easily be adapted to take advantage of additional screen real estate when your target device is a (mini-) tablet.
Save all your work.

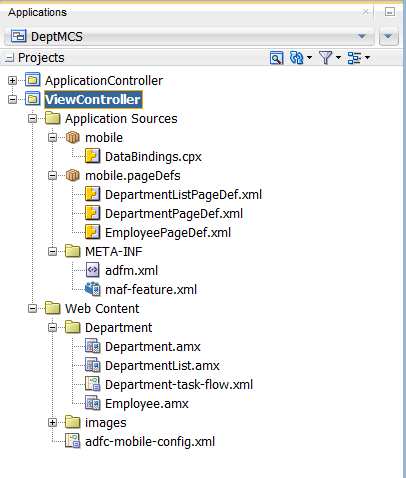
Here you see some new files created in the ViewController project.
DepartmentsListPage.amx – (and PageDef) Department List page
Departments.amx & Employees.amx (and PageDef) Department details page
Departments-task-flow.xml – both pages are included and, List first then details including navigation
images folder – Includes png file for icons used on the pages
Step 4: Deploy and Test the User Interface
Now that the MCS API service is created, the data object defined and the UI created, deploy and test the UI on an emulator. Before you attempt to deploy the application, make sure the emulator you are using is up and running. In the examples below, the application is running in an iPad simulator.
-
From JDeveloper's menu, select Application > New Deployment Profile...
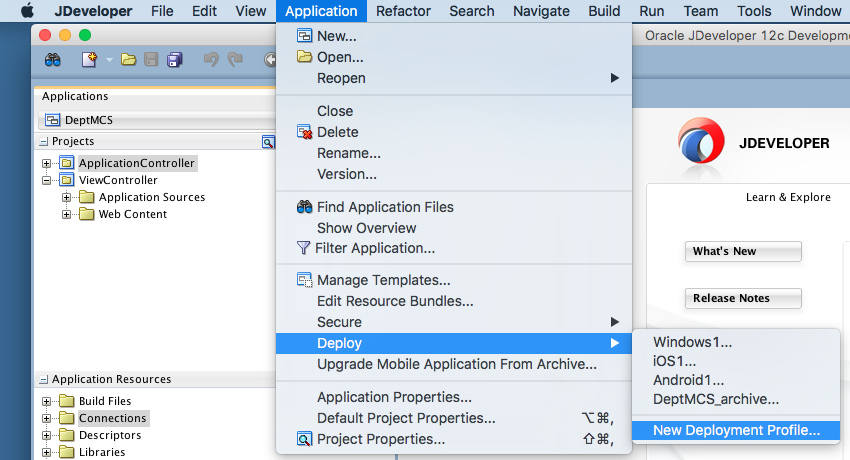
-
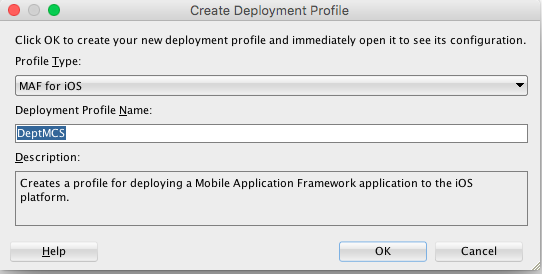
Since we will show you the application. running in an iOS simulator, in the Create Deployment Profile dialog, set the Profile Type to MAF for iOS and the Deployment Profile Name to DeptMCS. If you are using an Android emulator, then set the profile type to MAF for Android.
-
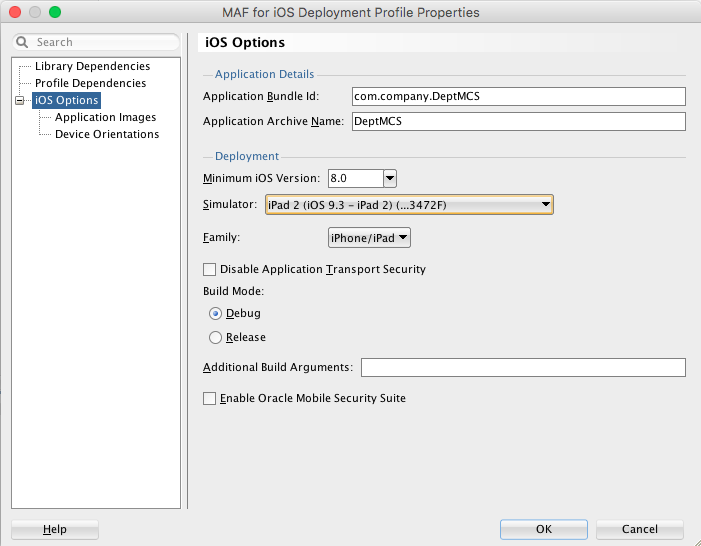
Then click OK and then click the iOS Options. The default Application Details derive their values from the application name but can not contain any underscores. Set the Simulator value. I've selected an iPad.
If you are using an Android emulator, make sure it is up and running.
-
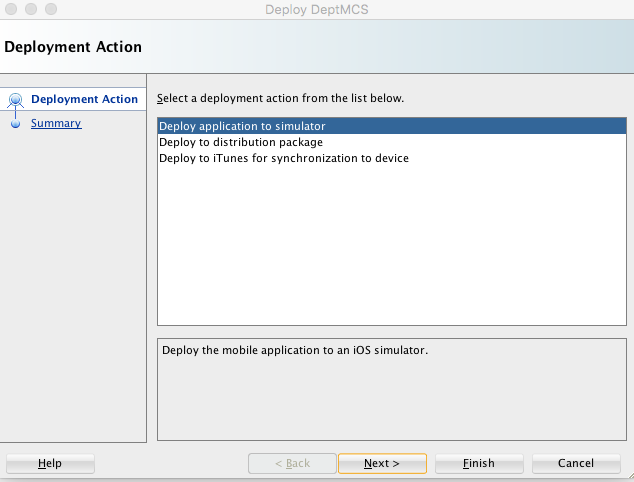
From the menu, select Application > DeptMCS...
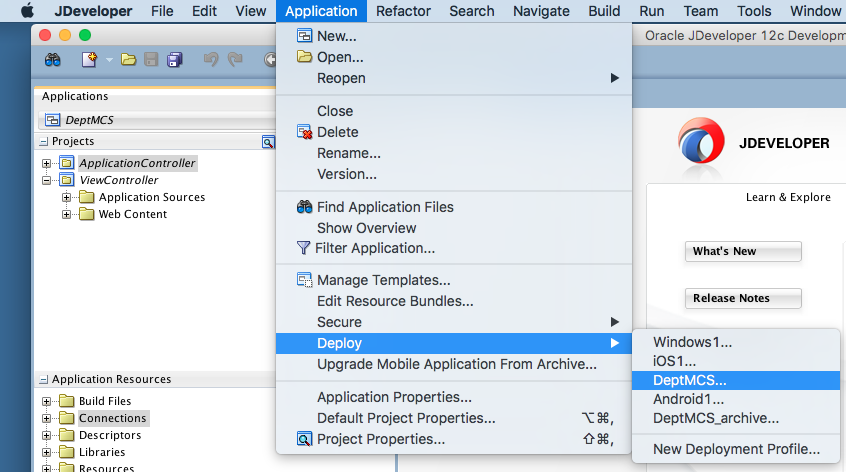
In the Deployment Action dialog, select Deploy application to simulator, then click Finish.
-
When the application deploys, the DeptMCS icon will be added and automatically invoked.
-
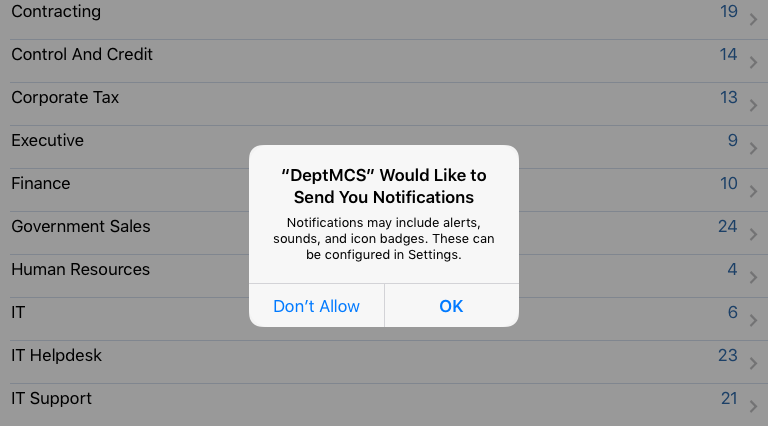
When the application opens, you'll be prompted to allow the app to send you notifications. Click OK.
-
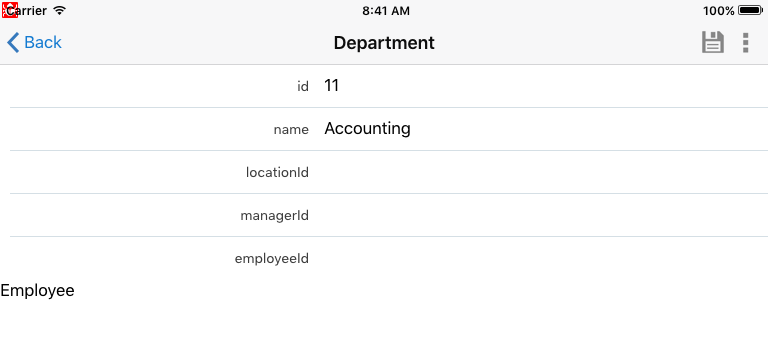
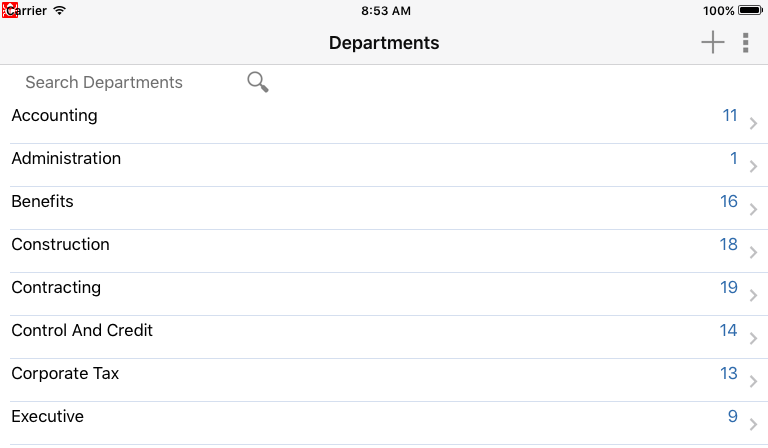
You now see the MAF page with a list of all the departments, retrieved from the MCS API you created earlier.
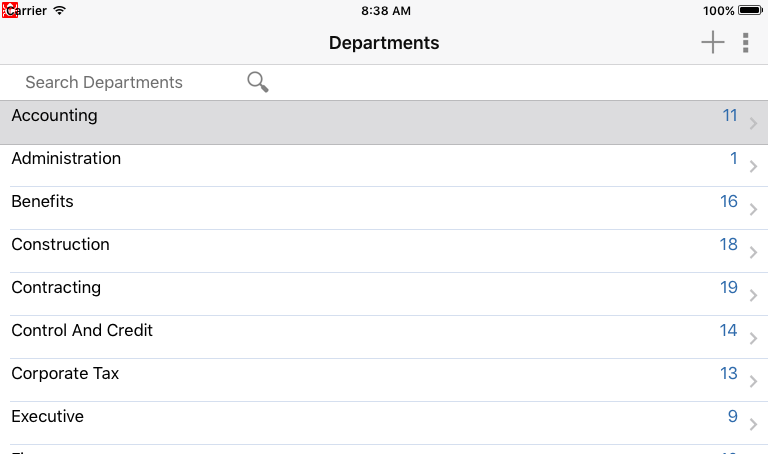
Click on the Accounting department and you'll navigate to a page showing the details of the department. Right now, there are no employees working in the accounting department.
-
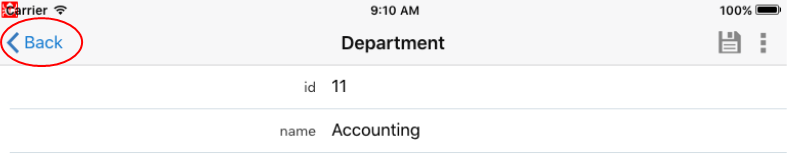
In the upper left corner of the page, click the blue greater than - Back icon to return to the department list.
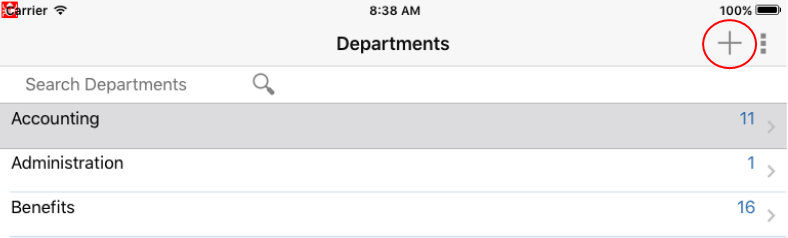
In the upper right corner, click the gray plus sign and you are taken to a page where you can create new departments.
-
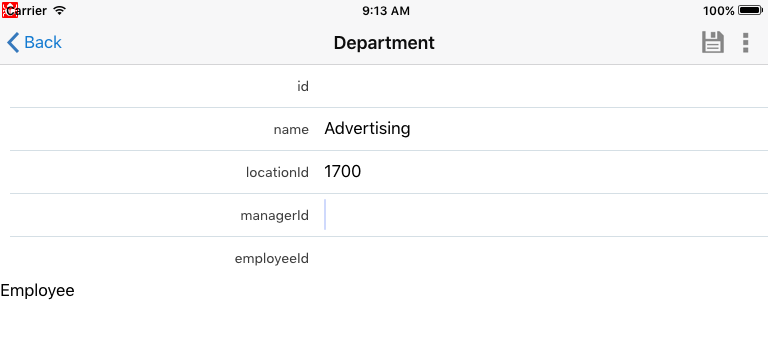
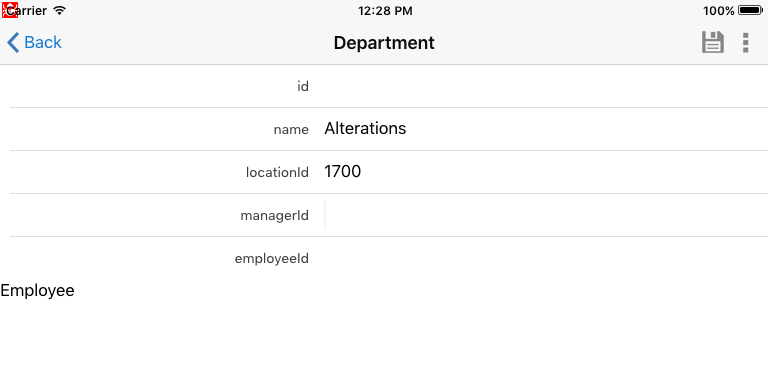
Set Advertising as the name and 1700 as the location and click the 'diskette' icon in the upper right of the page. You can leave the id value blank, this will be filled in when it is saved.
All departments are also stored in the on-device SQLite database allowing you to use the application in offline mode. When you make changes, for example updating or creating new departments in offline mode, these transactions are stored as pending data sync action.You can use the overflow menu to navigate to a reusable feature that comes with this extension, to look at these pending data sync actions.
You will navigate back to the department list. You now see the new Advertising department at the top of the alphabetic list, with a value. In my case it is 31.
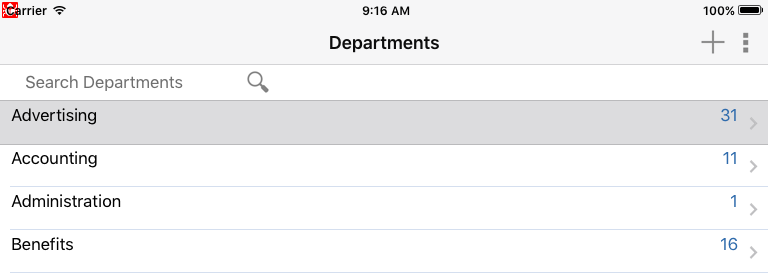
Click the new Advertising department to navigate to it's details.
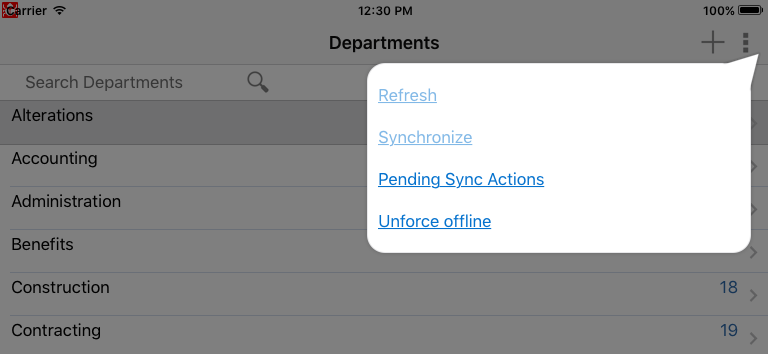
In the upper right corner, click on the gray, three vertical dots, overflow icon to invoke a popup menu. Here you can do a variety of things including synchronizing any data stored in the SQLite database when offline, with the remote MCS instance.
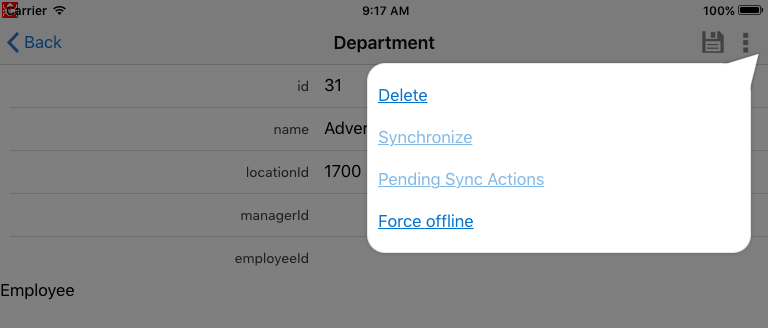
-
Click the Delete text and you navigate back to the list of departments, and notice the Advertising department is no longer in the list.
-
Now that you've seen how the CRUD operations work, lets examine the offline capabilities.
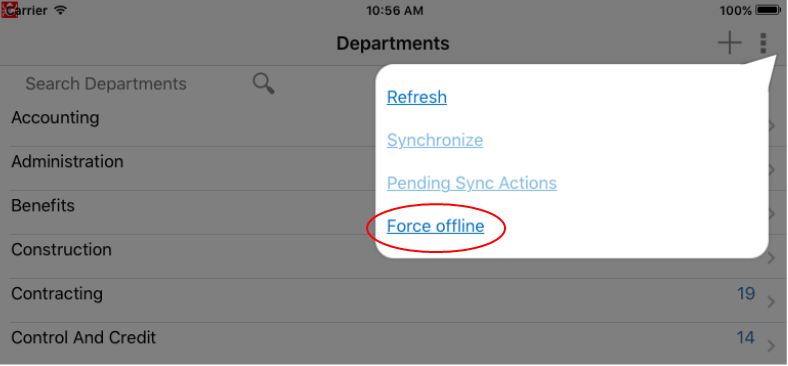
Turn off the online aspect of the simulator so that the web service will be unavailable.
In the upper right corner of the app, click the three vertical dots and you'll see a popup menu. Select Force offline to emulate the device no longer having a network connection and not being able to pass records to the web service.
-
Click the gray plus sign again to create a new record.
Create a new department like you did before and click the Save diskette icon to save it.
-
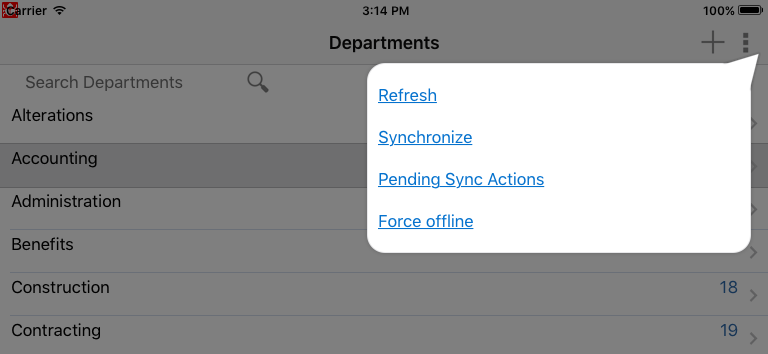
Then, back in the department list page, click the gray three vertical dots, overflow icon to invoke a popup menu.
The Pending Sync Actions lists the actions that need to be performed.
Select the pending record, you see details about it.

-
Go back to the three vertical dots and from the menu select Synchronize.
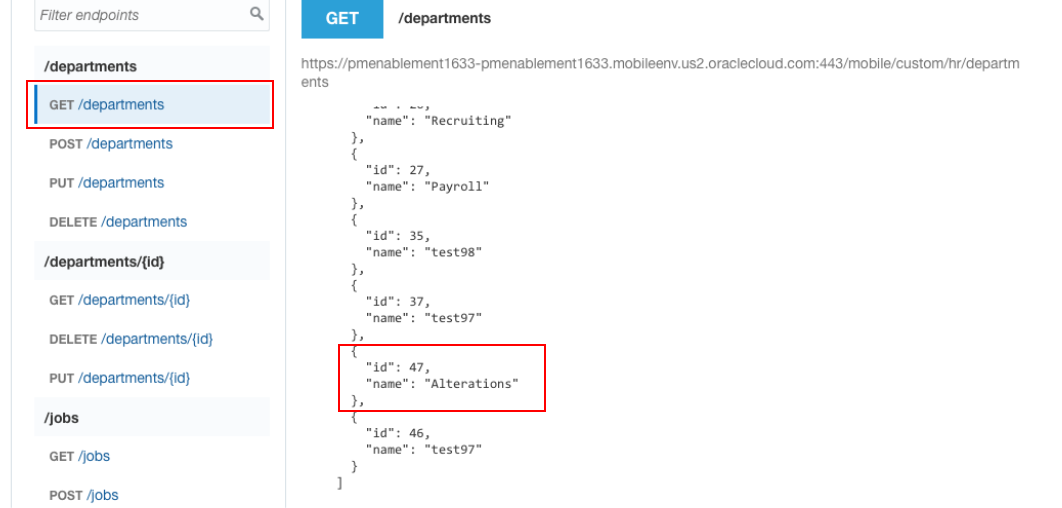
Then, go back in MCS and find the Human Resources API and test the GET/departments API. You should see your new department (Alterations) in the list.
Congratulations! You've now completed this tutorial. You have now built a MAF application that retrieves and persists data from an MCS instance.