Before You Begin
Purpose
This tutorial walks you through creating an API that you can use to create a mobile app with Oracle Mobile Application Accelerator (MAX). You'll create the API by uploading a RAML document that defines the mock data and the endpoints. To use this API with MAX, you'll then update the RAML with JSON schemas that frame the APIs endpoints as MAX-accessible business objects. You'll also upload an implementation to the API which allows it to use live data. With the API complete, you'll then publish it so that MAX can consume it and make it available within the MAX Designer. In the final rounds of this tutorial, you'll use the MAX Designer to build the mobile app. Throughout this process, we'll show you how the schemas allow you to build the app's screen flows. Finally, you'll use the test tool in the MAX Designer to see how the mobile app's screens interact with one another and use live data.
What Do You Need?
| Required Files | Download Files
|
|---|---|
This archive contains the MCS backend definitions you will need during the tutorial. Unzip the file to your local machine, taking care to remember the location. |
 |
Step 1: Create a custom API from a RAML document
In this section, you'll define an API, one that has two endpoints. Each of these endpoints has two methods: a GET method, to find all incidents and incidents by a specific id, and a PUT method, to update a specific incident and to create new incidents. You could create this manually, but to make things easier you'll use a RAML document instead.
-
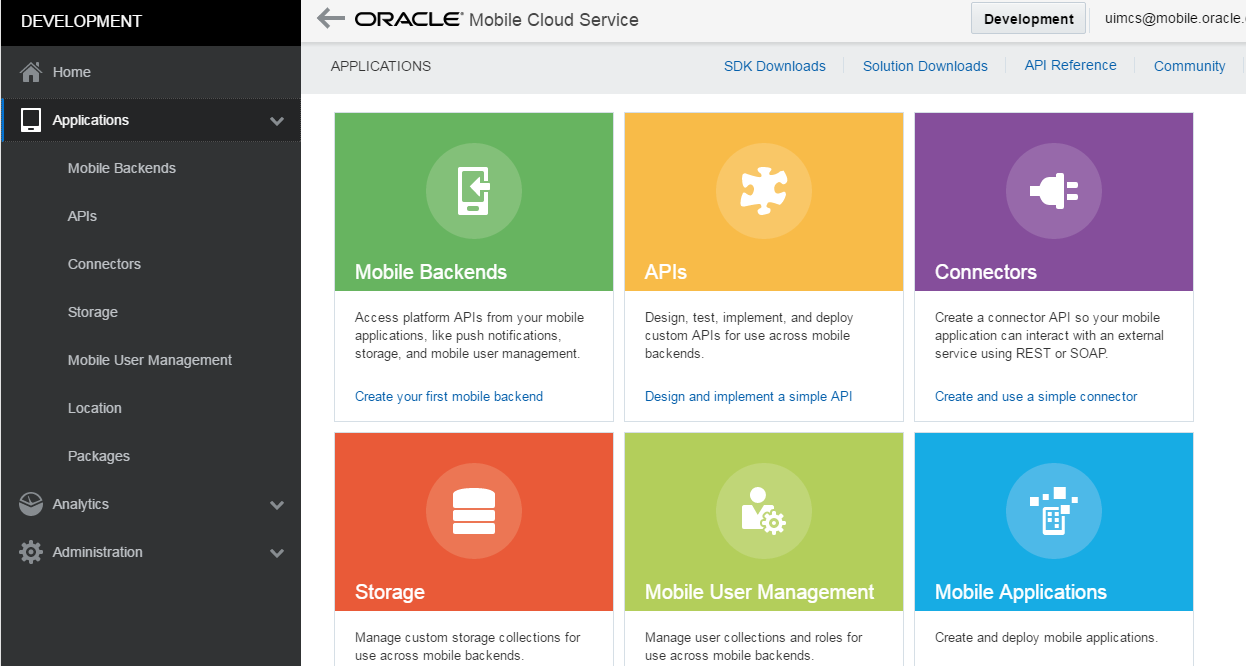
Launch MCS in a browser (e.g. http://<your_MCS_server>:<port>/ ). Be sure that the environment is DEVELOPMENT. Choose Applications from the side menu.
-
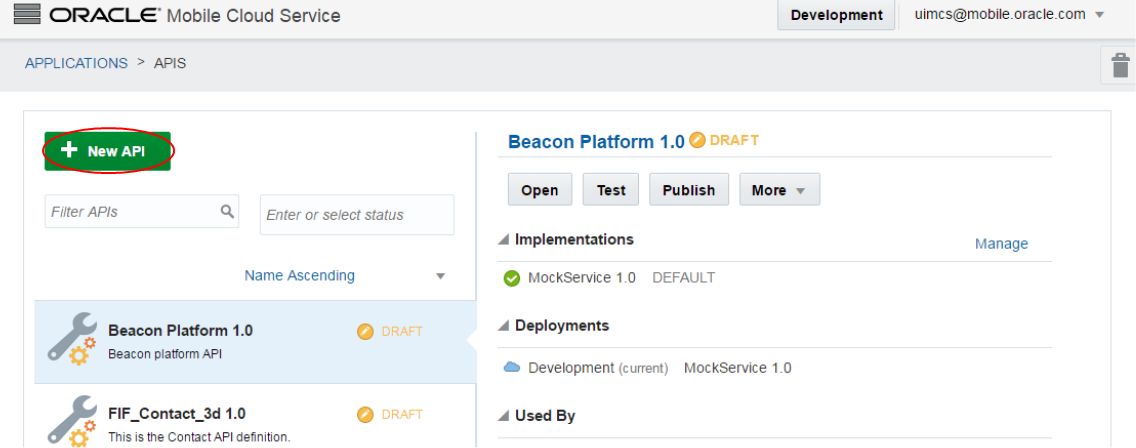
Click the APIs icon and dismiss the menu.
Click the New API button.
-
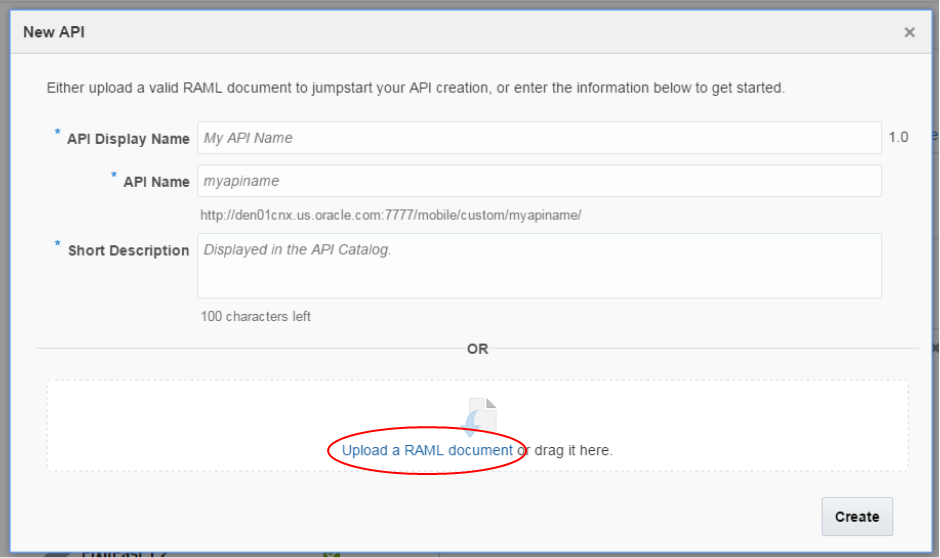
In the New API popup, click the Upload a RAML document text link.
-
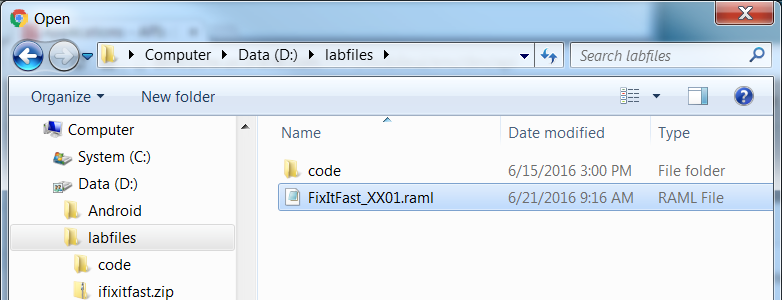
In the Open window, navigate to where you unzipped the labfiles archive. Then find and select the file FixItFast_XX01.raml.
Click Open.
-
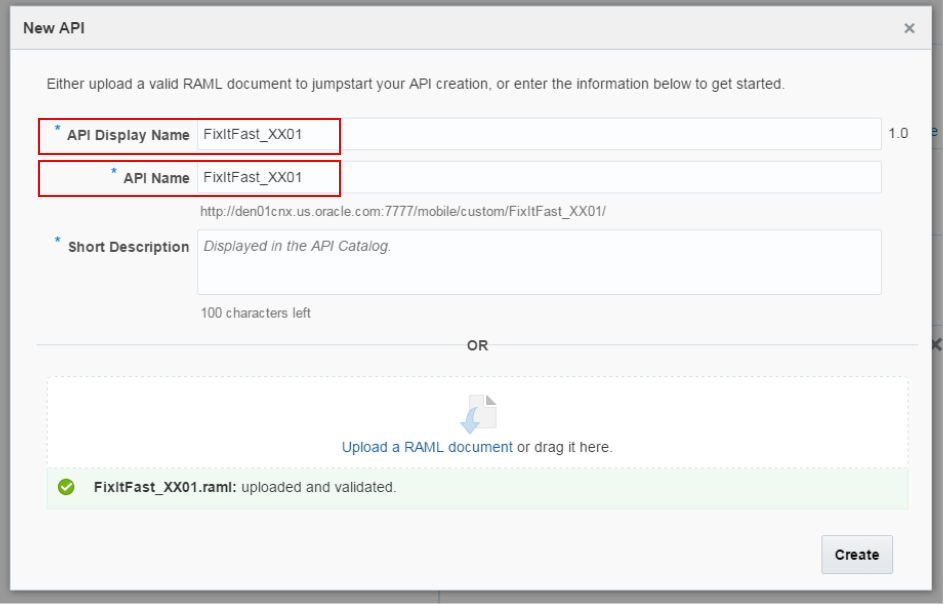
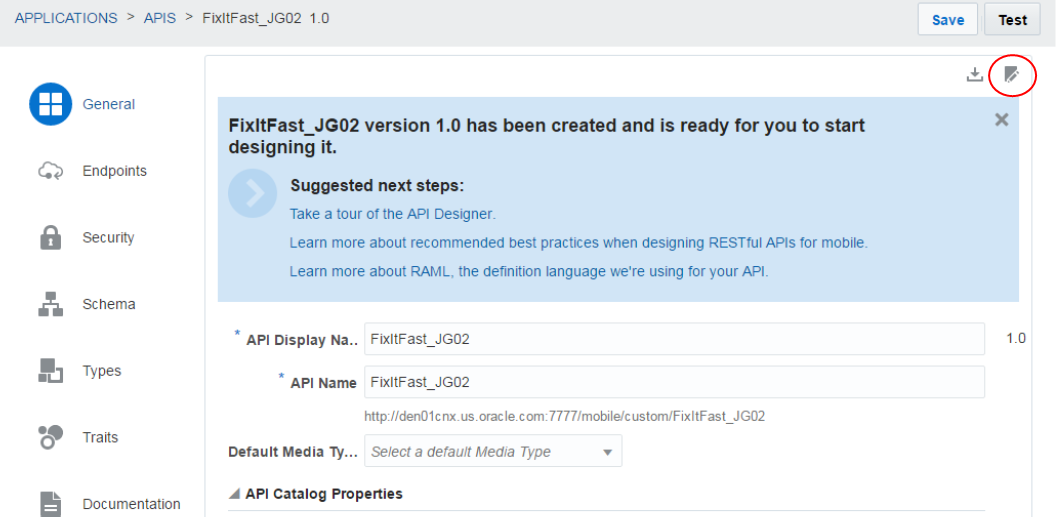
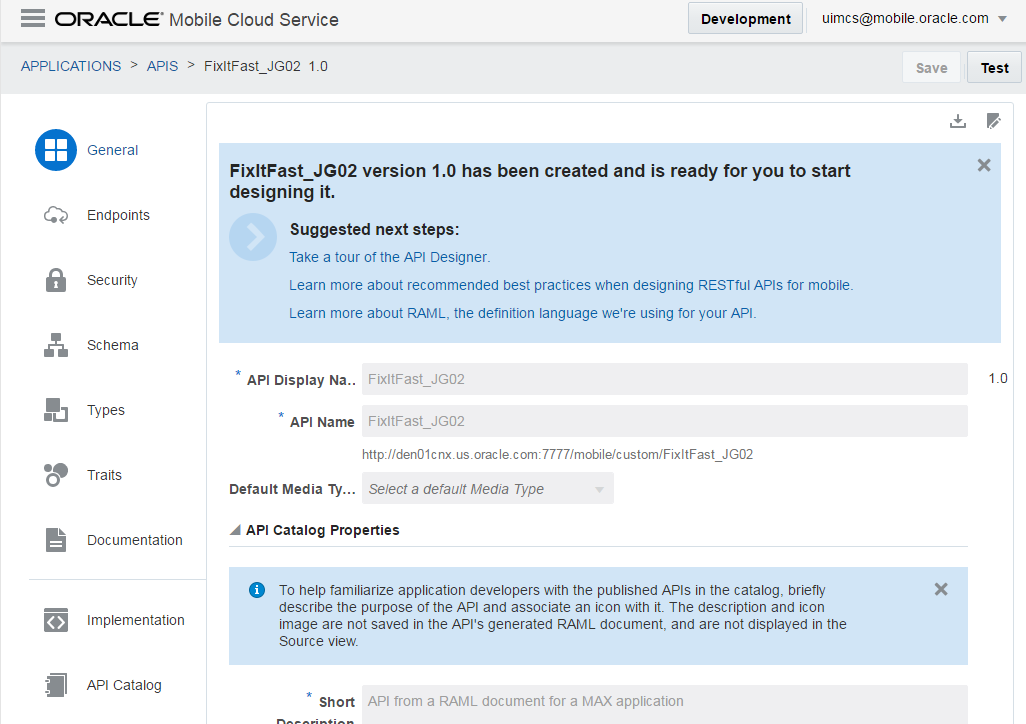
The New API dialog is populated with values from the RAML document, as shown here:
Make the API name unique by replacing XX with your initials, and 01 with two random digits in both the API Display Name and API Name fields. In this example, the new values are JG and 02.
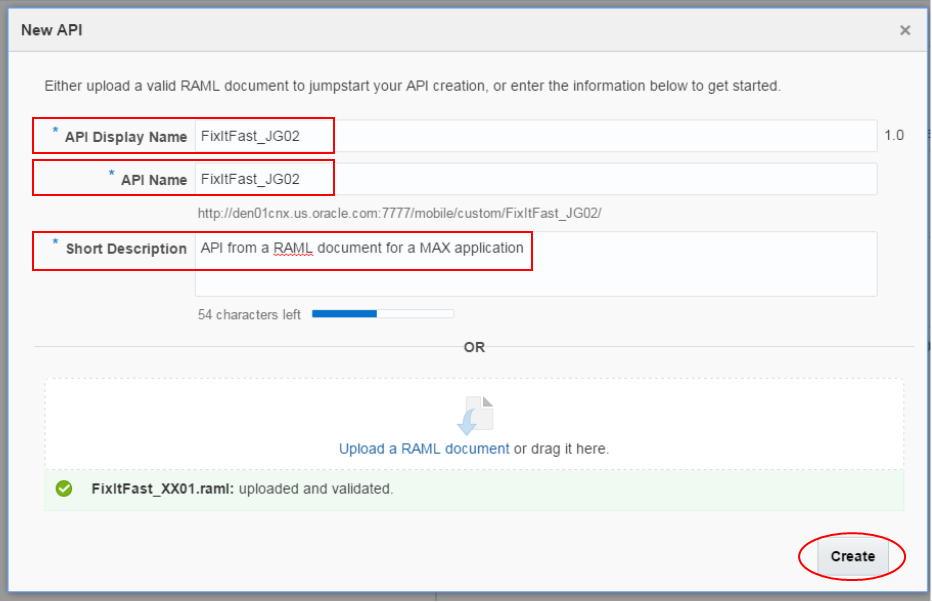
Then, add a description and click Create.
-
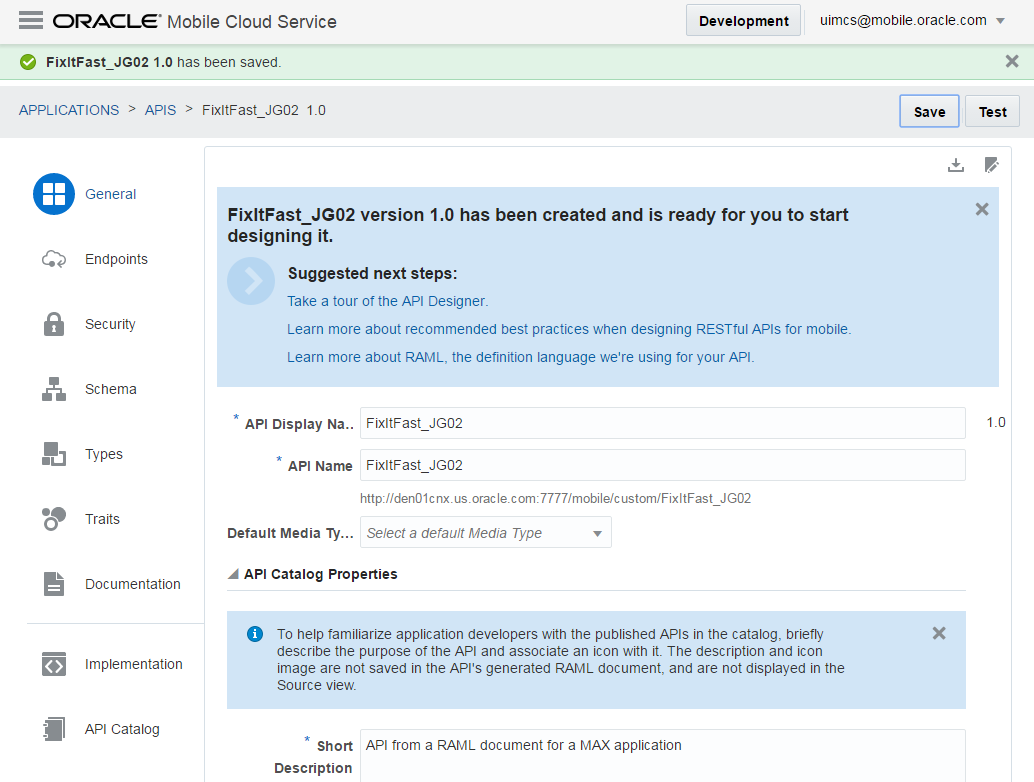
Now you're on the Designer main page.
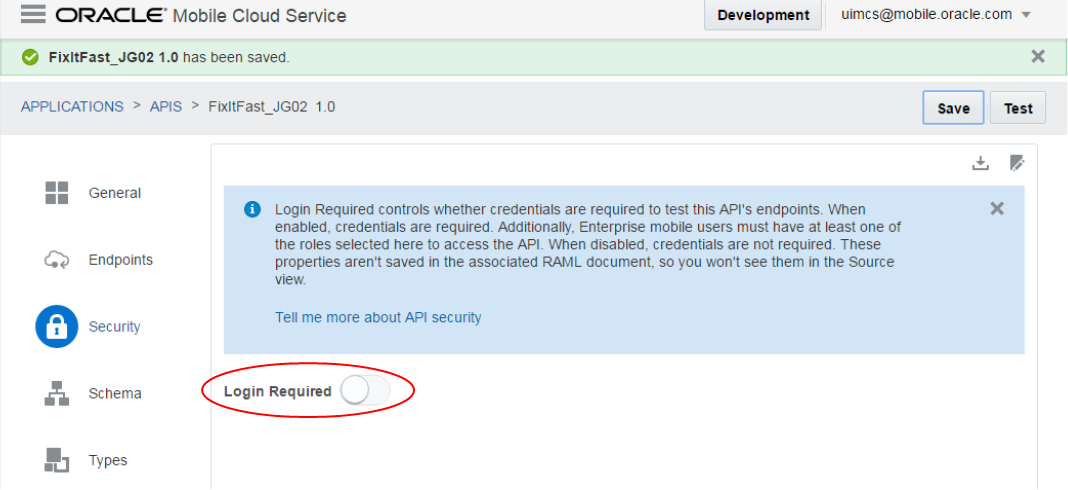
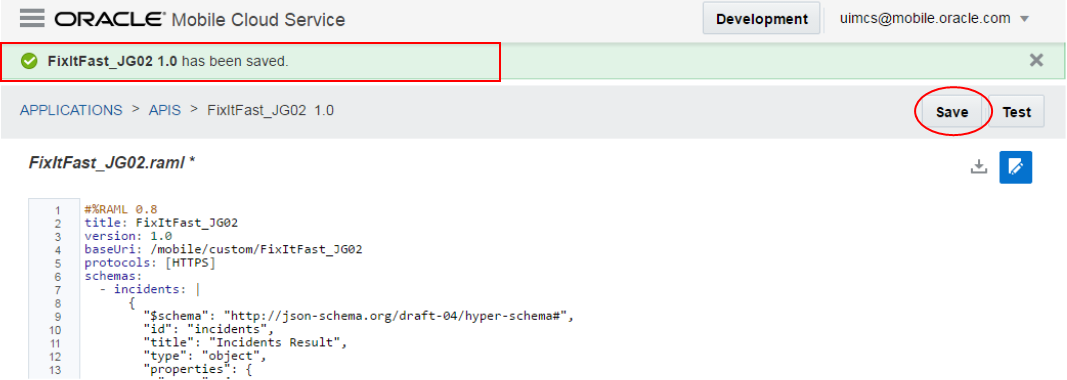
Click Security in the left navigation panel and set the Login Required switch to Off.
Then click Save.
-
Let's take a minute to explore the pre-configured API.
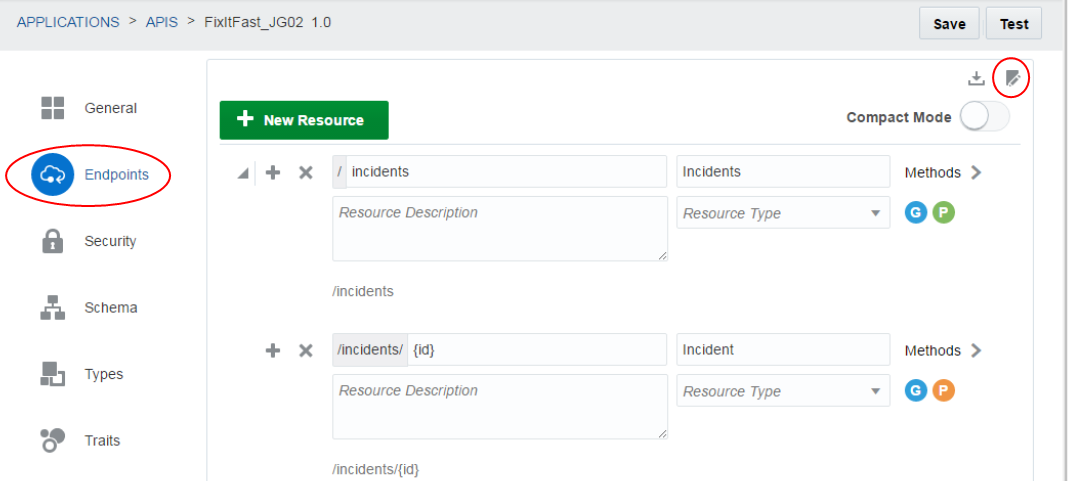
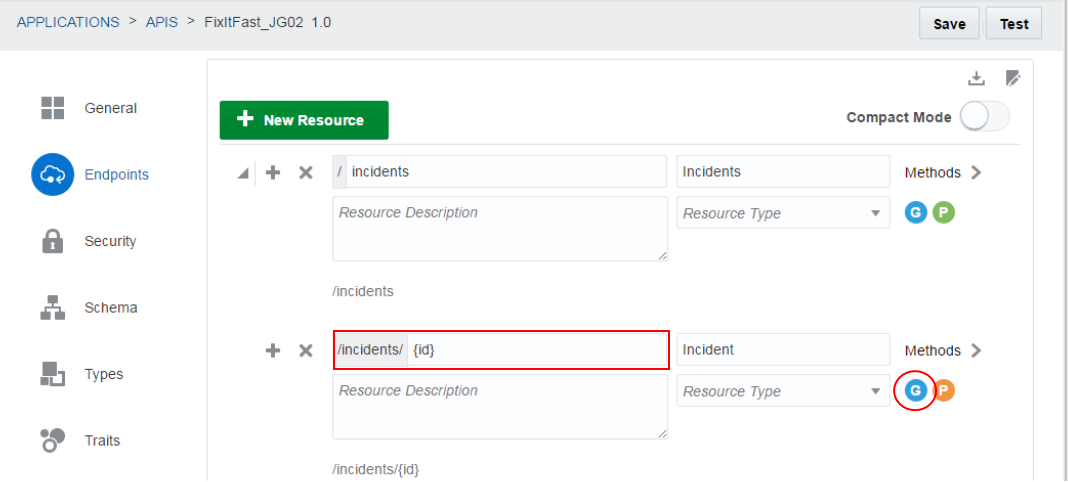
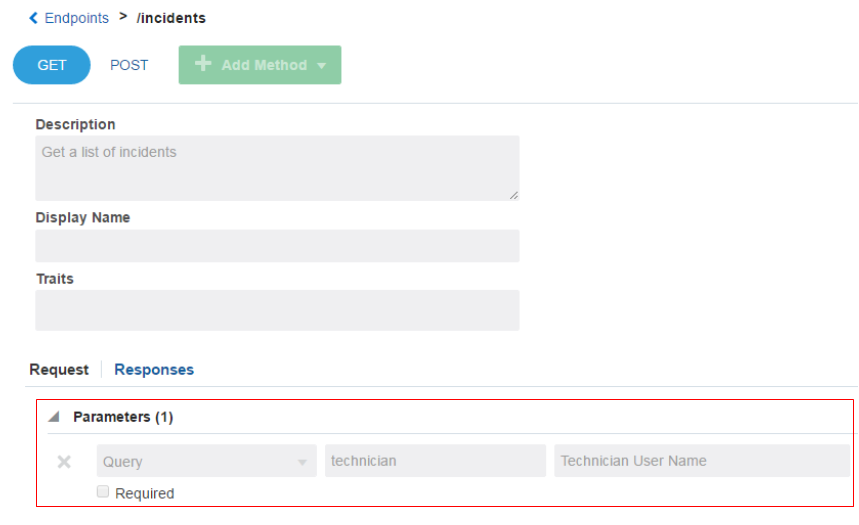
Click Endpoints and notice there are two endpoints for this API: /incidents and /incidents/{id}.
The first, /incidents, is used to retrieve all incidents using a GET method, and to create a new incident using a POST method. The small blue G and green P circles on the right (below the Methods text) represent these two methods.
The second, /incidents/{id}, is used to retrieve a single incident based on its id using a GET method, and then to update it using the PUT method.
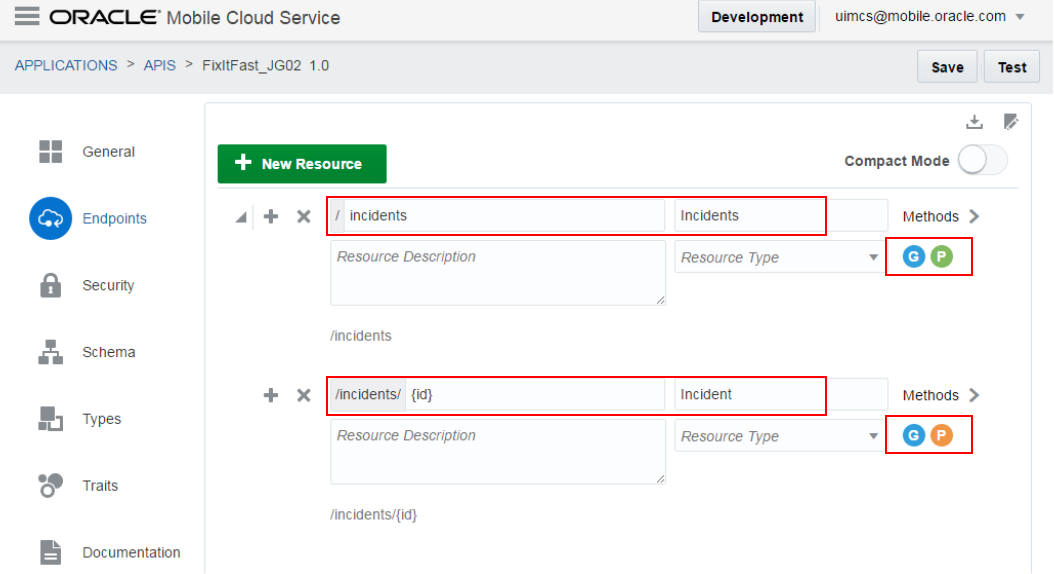
Each of these methods has Request and Response values added to them, but not the schemas that portray them as business objects. In the next few steps of this tutorial, you'll learn about the schema structure and populate the methods with schema values.
-
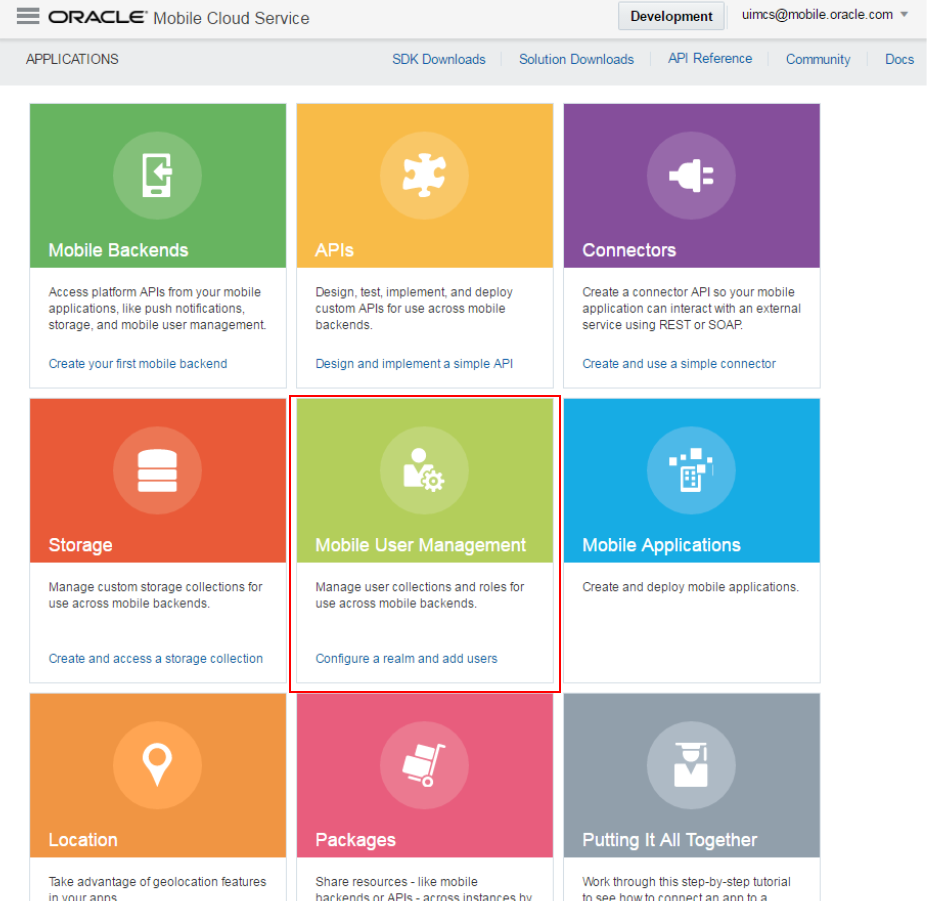
You have one more thing to do while you're still in MCS: create a user to log in to the MAX application. In this tutorial, this user is a technician who is responsible for a series of incidents. You'll log in as this user to view the sample data. While any MCS mobile users can connect to this app, the incidents in the sample data have been assigned to a some hard-coded users (like jeff, charlie, and so on).
Go back to the Applications page and click the Mobile User Management icon.
-
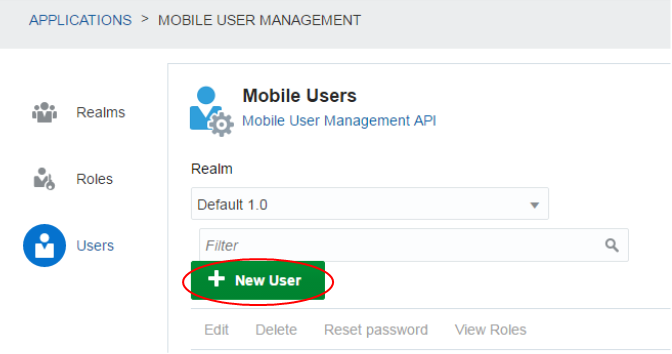
On the left, click Users.
-
Define the user using the following values and then click the Create button. The mail address is where a temporary password will be sent. You can use this when you log onto the MAX application.
Username: hcr
Email: <valid_email>
First Name: Hcr
Last Name: Max
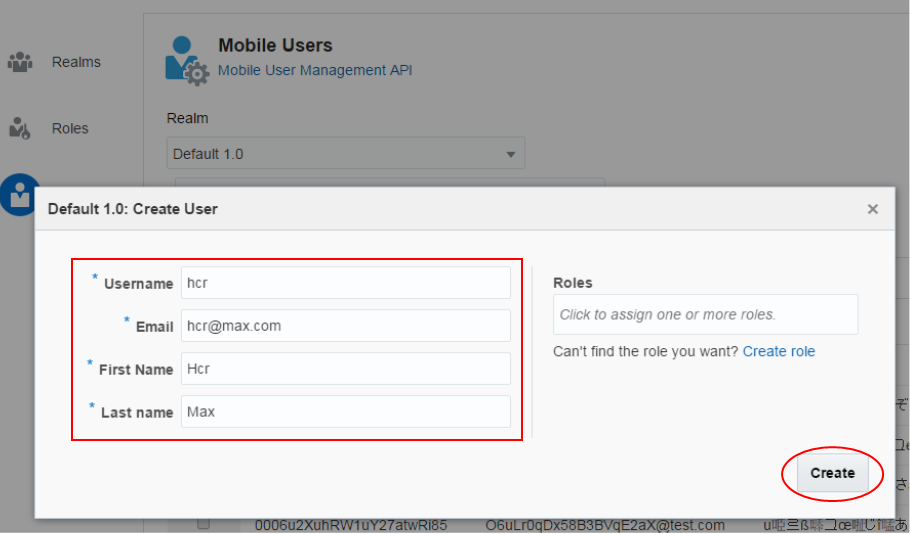
You're password will be sent to the email you list while creating the user.
Step 2: Examine the schema associated with the incidents
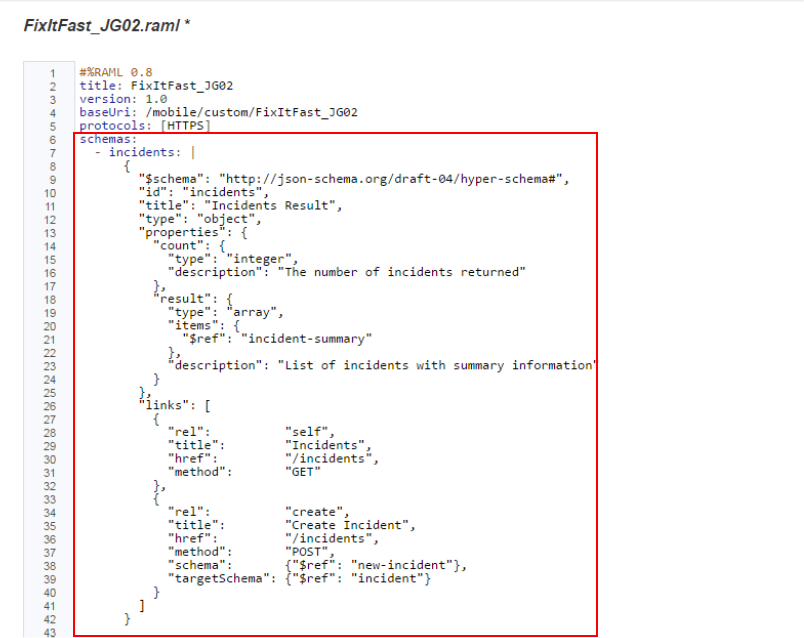
In this section, we'll take a look at the RAML document that you just uploaded. Specifically, we'll see how JSON schemas describe the actions for returning a list of incidents, returning a specific incident, and creating a new incident.
Now that we have the endpoints, we'll need to add some schemas for their request and responses. You'll do this in Step 4 using the FixItFast_Schemas.txt file. But before we move on to that, let's take a look at how JSON schemas work. These schemas aren't data, nor are they computer programs; they just describe the JSON data's structure and format. With that in mind, we'll start off with the schema called incidents which defines the summary information that's appropriate for a list view.
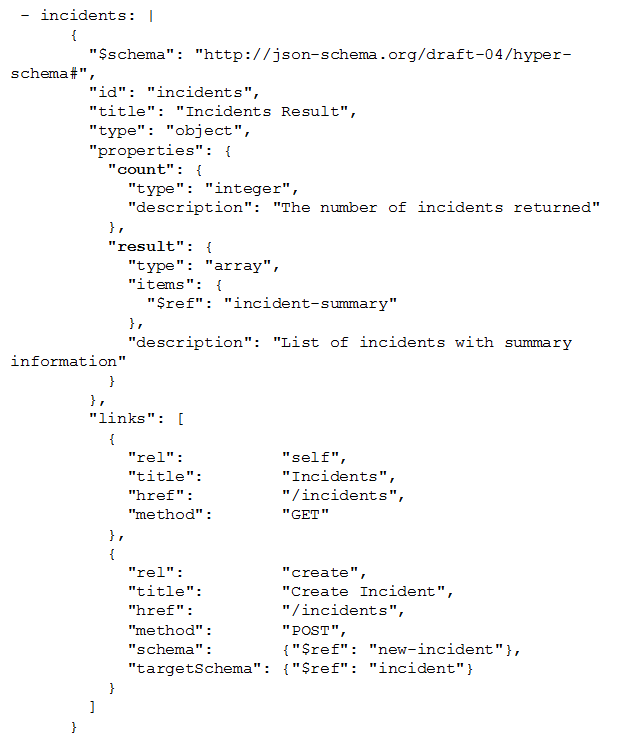
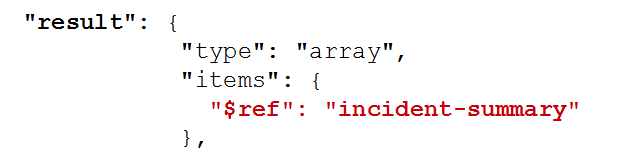
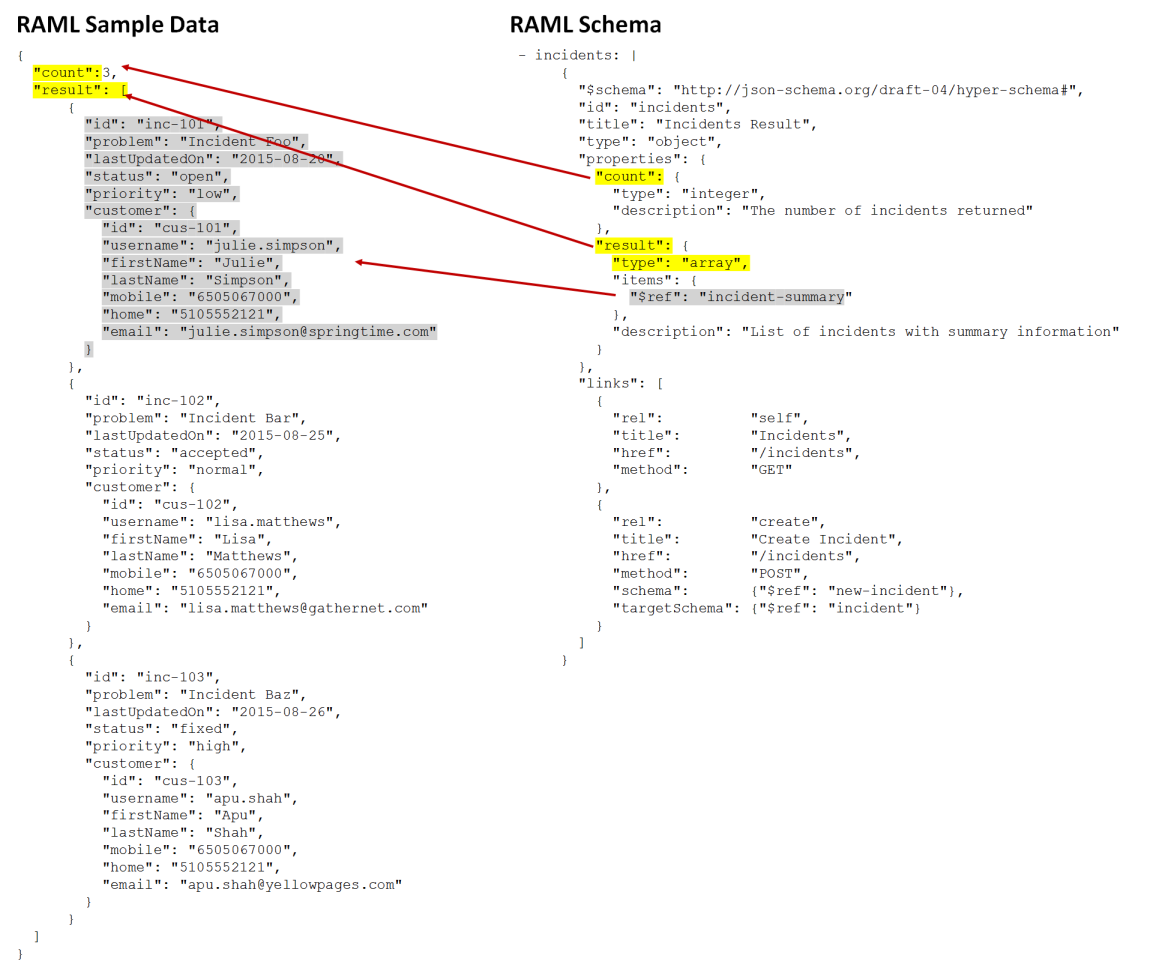
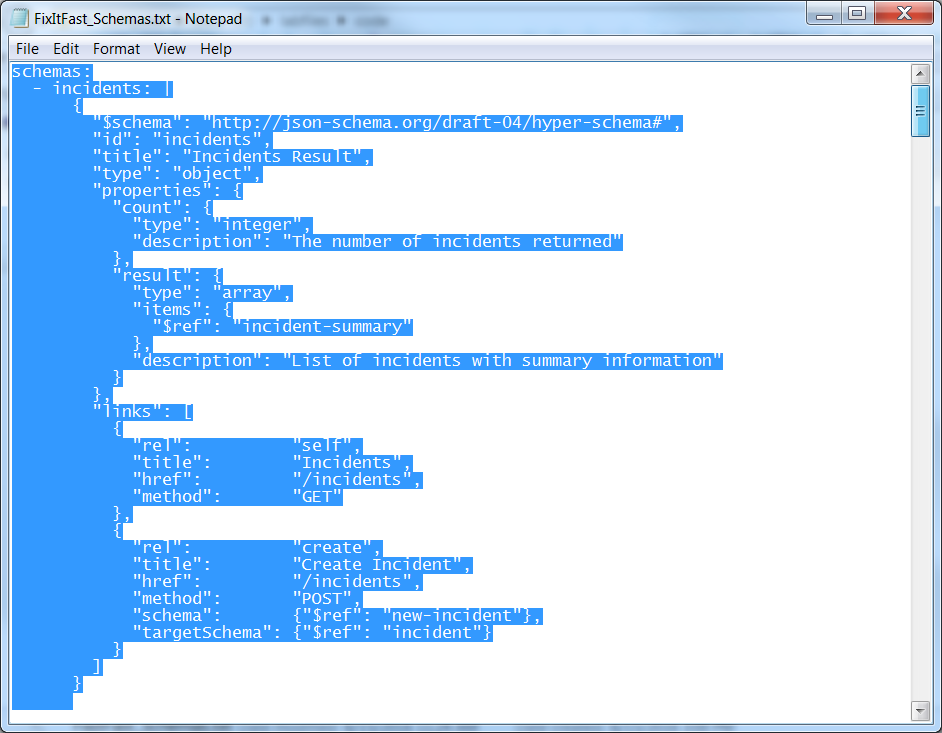
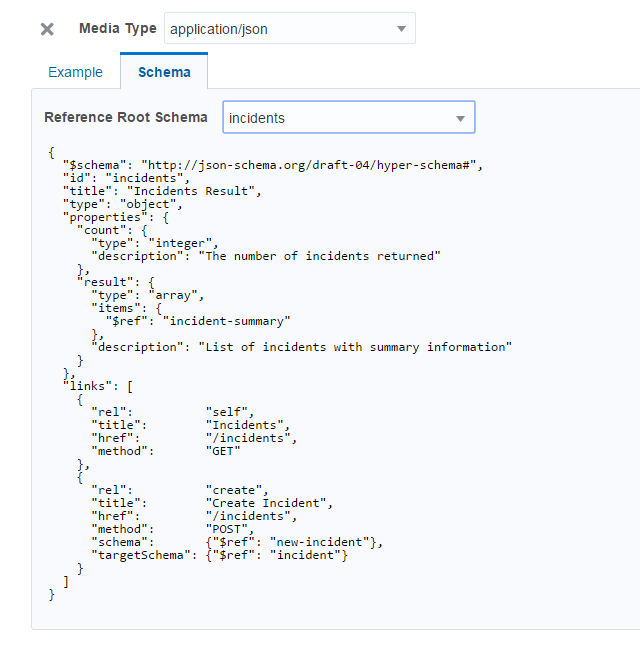
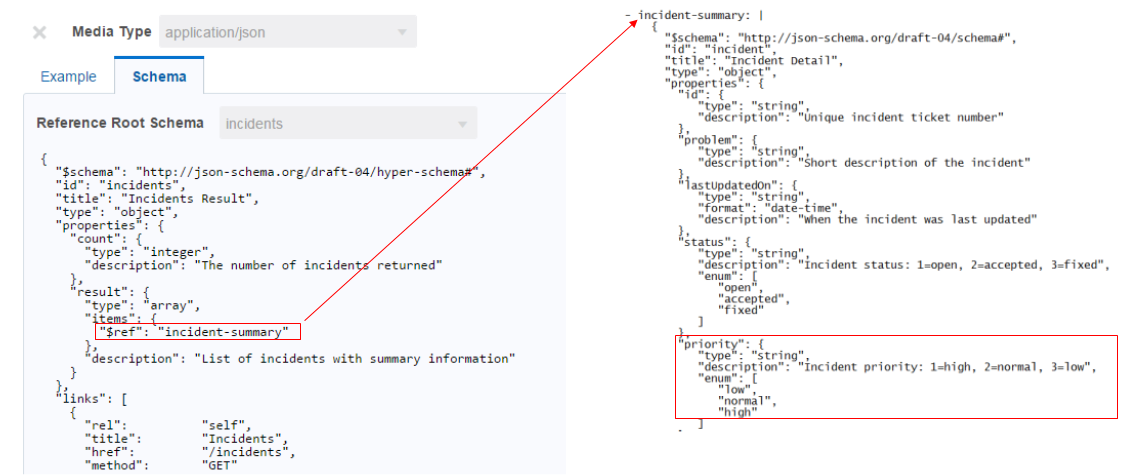
Because this schema returns multiple items, it's defined as a collection: its count property describes how many list items can be returned in the JSON response payload and result defines the returned JSON payload itself as an array of the items that are defined by the referenced schema, incident-summary. The following code snippet shows how the $ref keyword points to this schema.
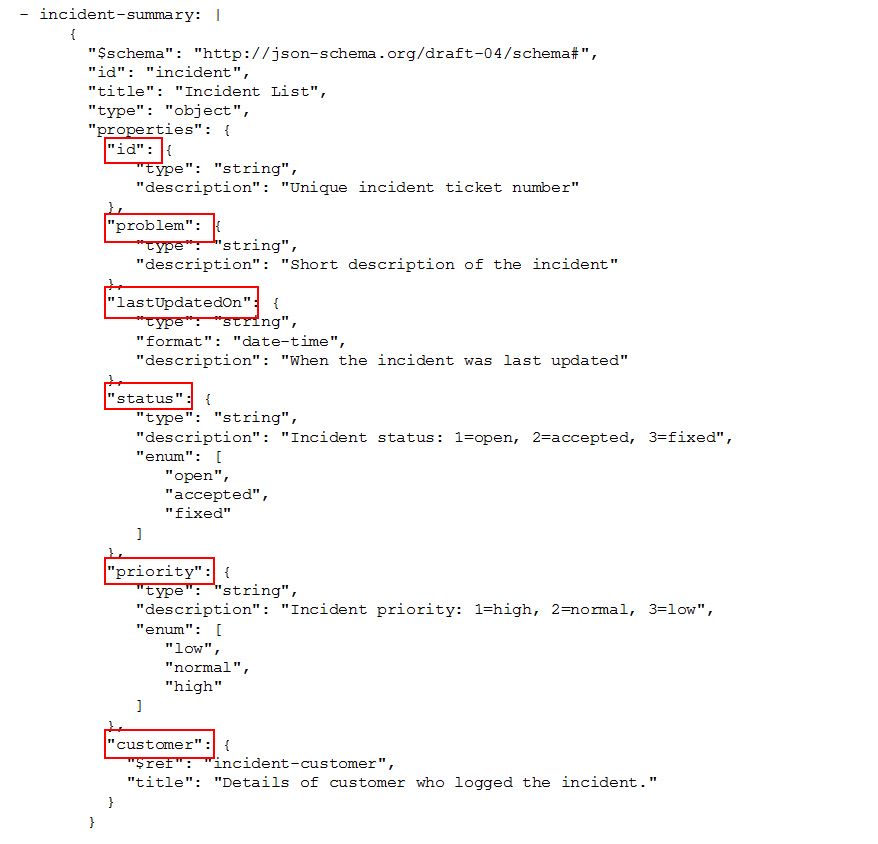
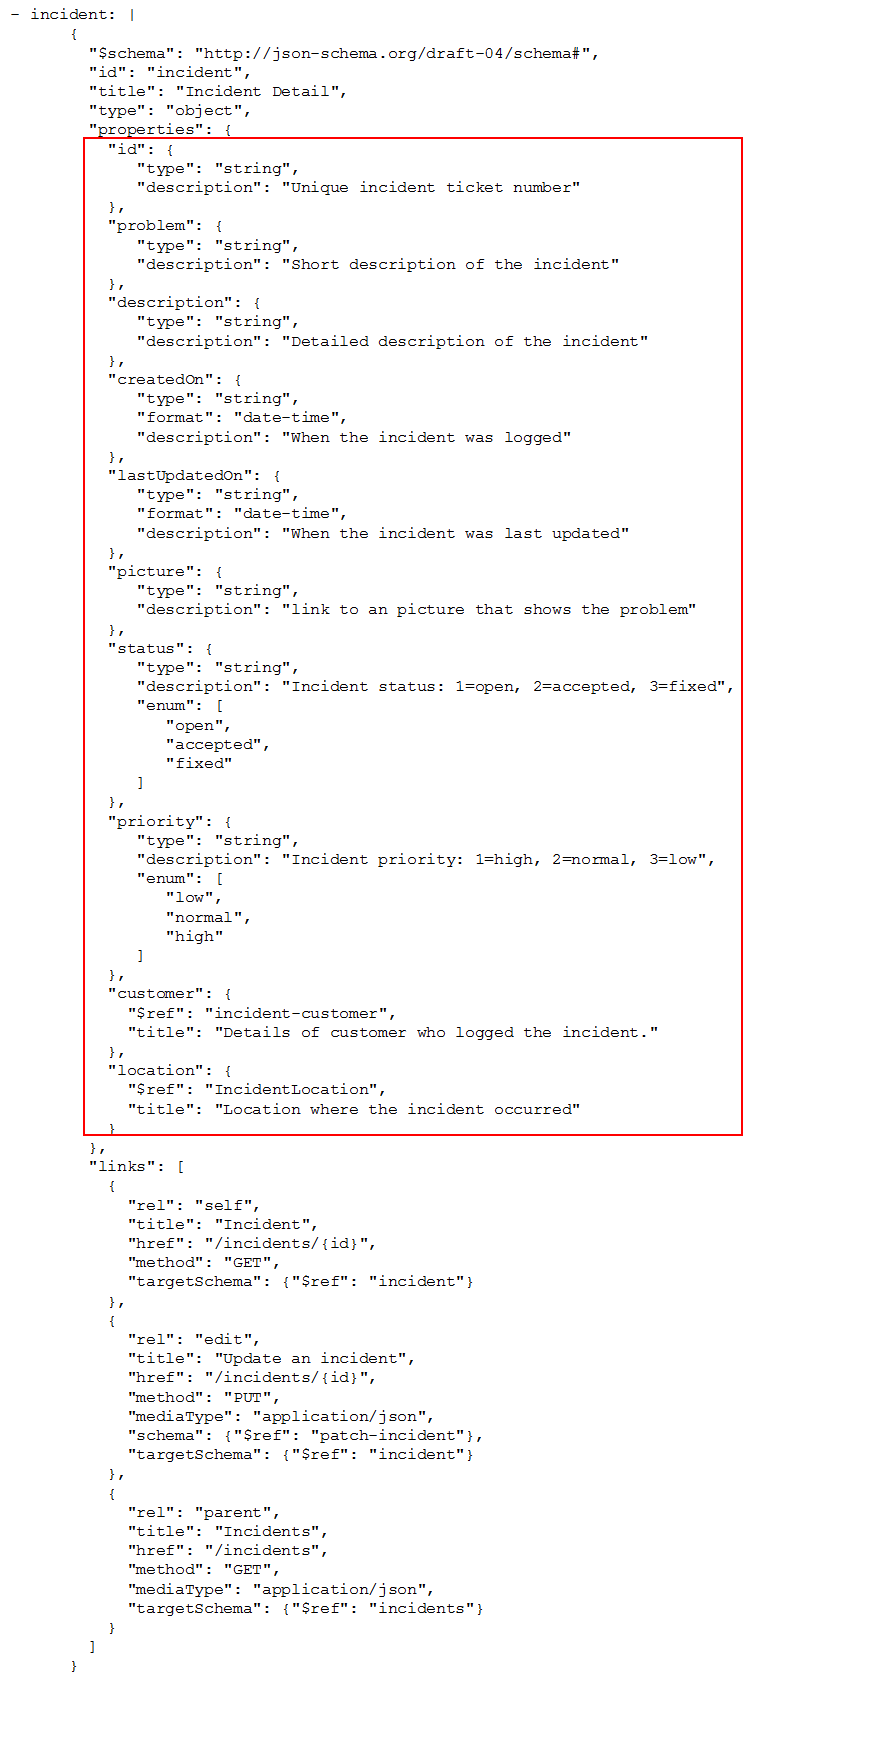
The incident-summary schema's properties describe the fields that provide the kind of high-level information that's appropriate for a list, like id, problem, lastUpdatedOn, status, priority, and customer. Because the status and priory fields are LOVs, they're described using enum arrays.
Note: If the incident-summary schema weren't referenced, then all of the properties (meaning the fields used for both list view and detail screens) defined from the Incident business object sample data would display as part of the list. (You'll learn more about the relationship between sample data and fields in Step 3.)
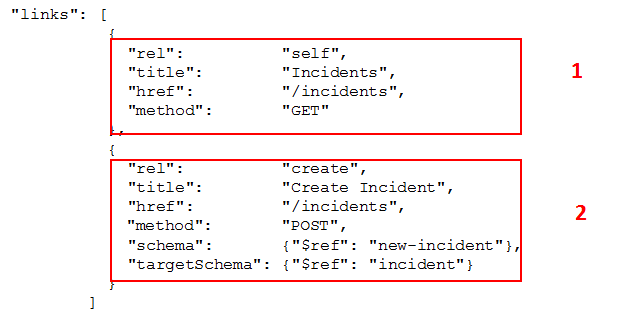
So far, we've seen how the incidents schema describes the data, but now we're going to take a look at its links property array to see how the GET and POST methods return a list of incidents and create a new incident. Within this array:
-
A self relation uses the GET method of the /incidents MCS API resource.
-
A create relation for new incident uses POST method of the /incidents MCS API resource => Because creating a new incident doesn't’t involve all of the properties (fields) of an incident, the create incident action is described by a specific schema: new-incident. The labels of the fields are driven by the title attribute.
Here is the links array defined for the incident-summary schema:
-
'canonical' - the definitive URL for directly accessing the linked resource. This is the base URL.
-
‘parent’ - the parent URL /incidents described by incidents schema.
-
'edit' - the URL for editing an incident /incidents/{id} described by patch-incident schema.

In this snippet, linked resource defined for the incident schema is incident, which returns all of the the properties for an individual incident.
Step 3: Resource Request & Response sample data
In this section, we'll examine the sample data and the incidents schema definition. The sample data in the RAML for the requests and responses must match up exactly to the properties defined in the schema.
-
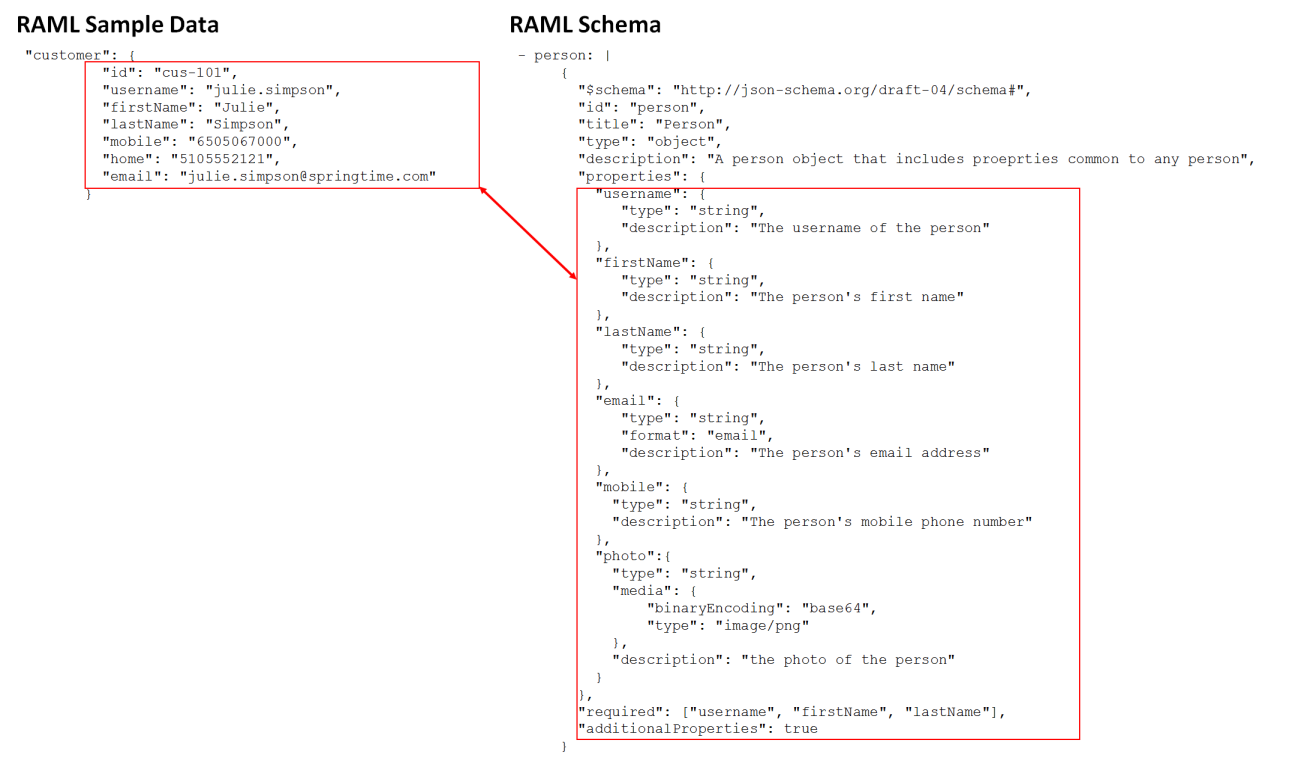
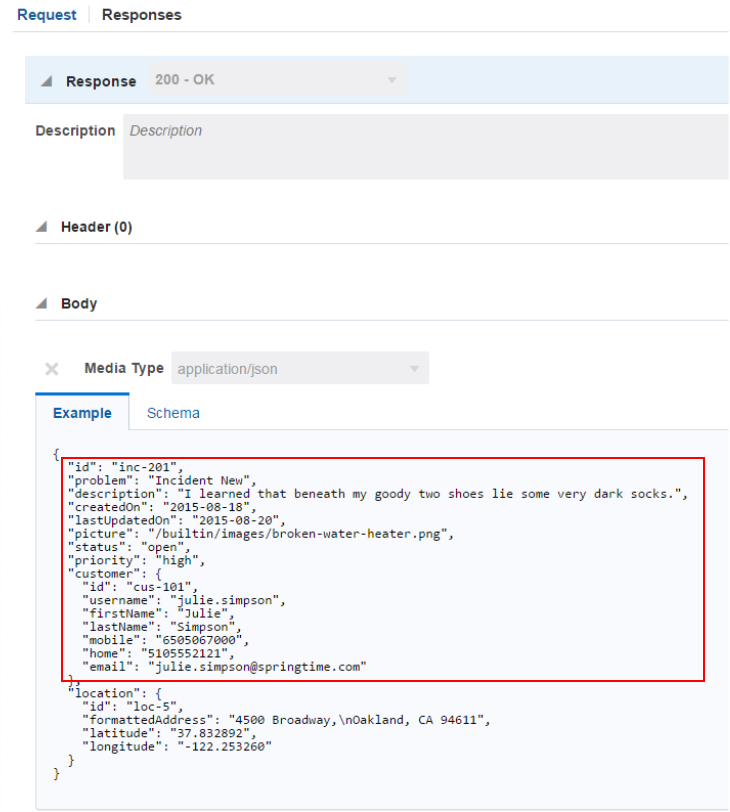
Look at the schema definition for incidents on the right, compared with the sample data supplied on the left.
On the right, we see that an incident has two properties: a count, which is defined as an integer, and a result, which is defined as an array whose properties, in turn, are defined in a referenced schema, incident-summary.
-
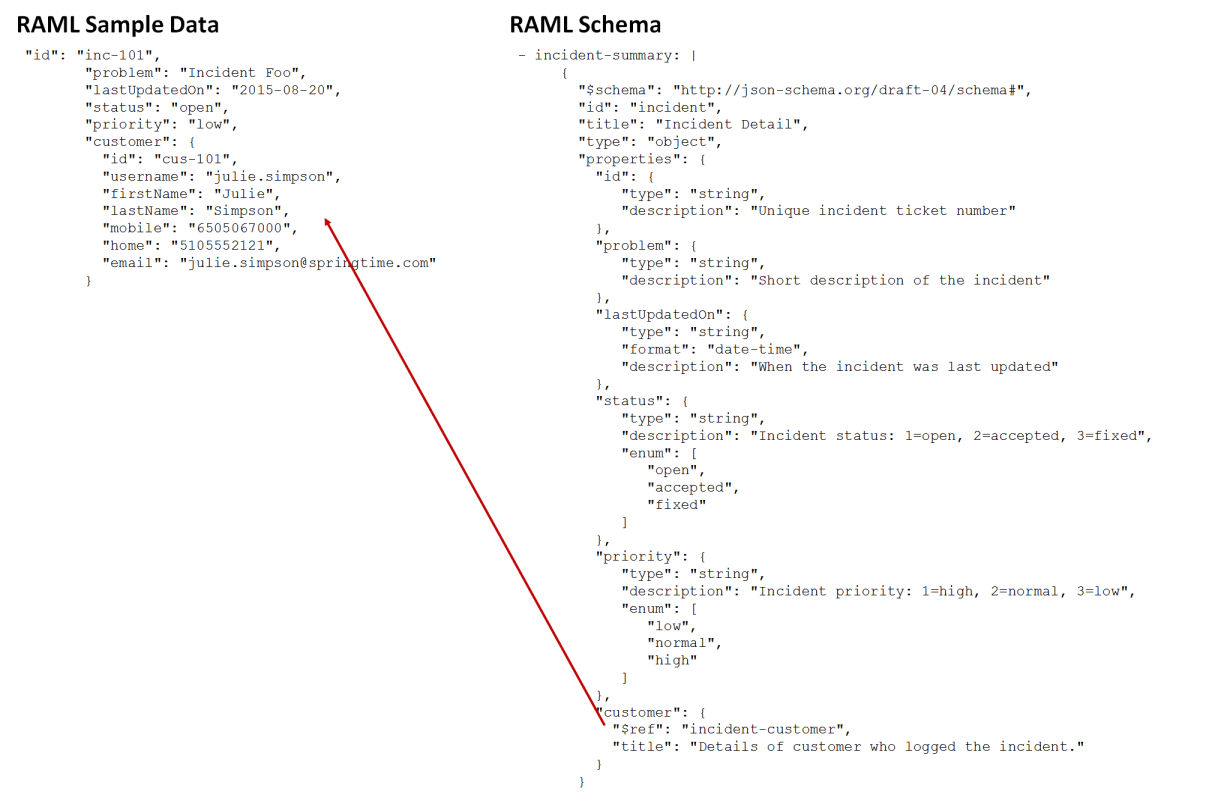
Looking at the incident-summary schema definition, we see that the schema has the properties id, problem, lastUpdatedOn, status, and priority defined, but that the customer attributes are defined by yet another referenced schema, incident-customer.
-
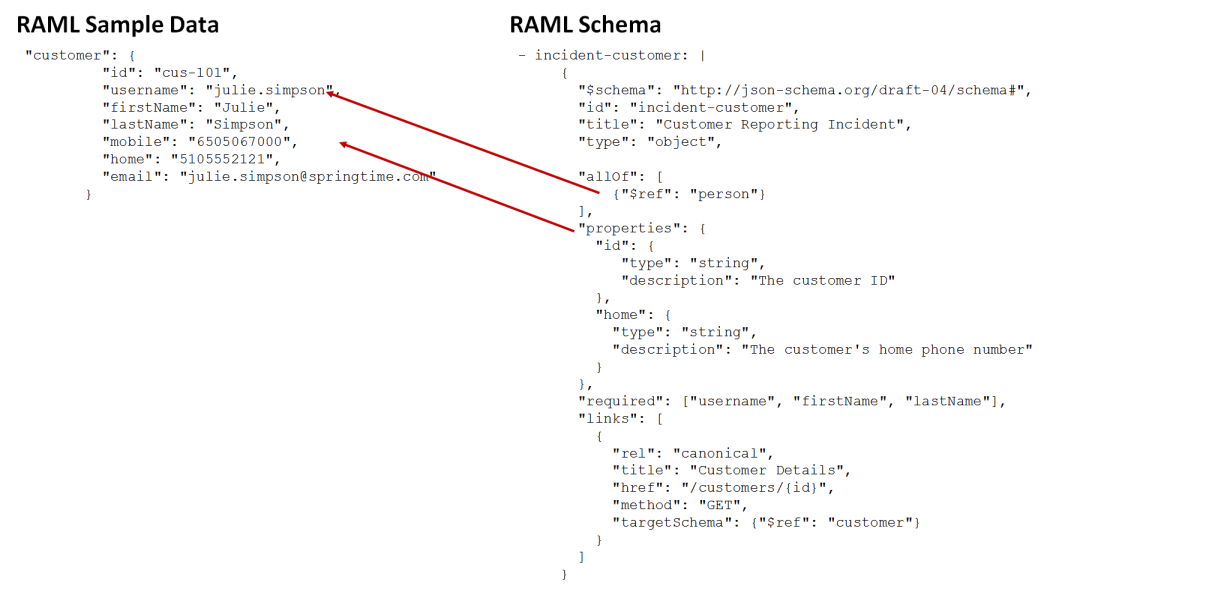
Moving on to incident-customer, it appears that part of the schema definition refers to a person schema, plus some additional properties. That is, the id and home properties have been added to person to form a complete customer definition.
-
Finally, here are all the details on person and its relationship to a customer.
Step 4: Develop the MCS Custom API including schemas
In this section you'll modify your API and include the schemas we looked at earlier.
-
Click General in the left navigation, then switch to the RAML Source Editor by clicking the pencil/paper icon in the upper right.
-
Navigate to the /labfiles/code/ directory, then find and open the FixItFast_Schemas.txt file.

This should look familiar, since we just examined the schemas in the previous step. Select the entire file and copy it.
-
Go back to the RAML Source Editor and open a blank line at position 6 after the protocols: HTTPS line.
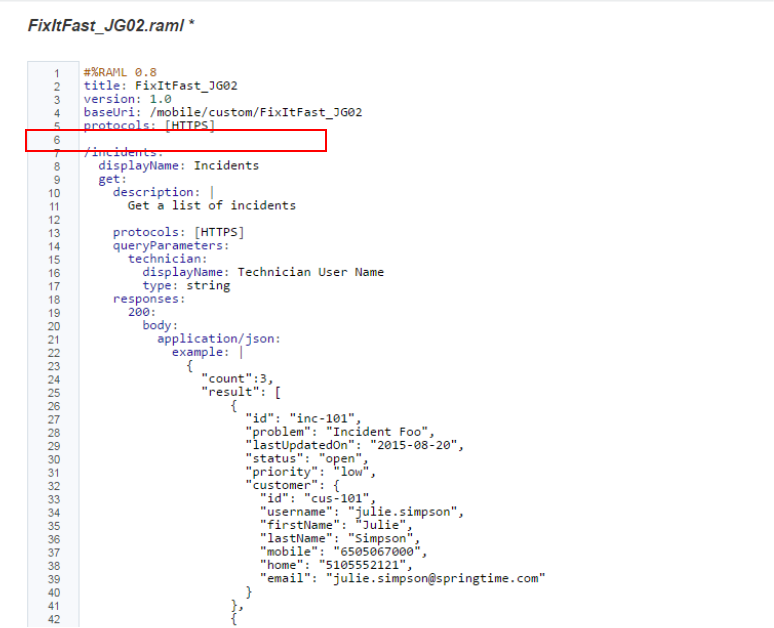
-
Paste the code from the FixItFast_Schemas.txt at line 6.
Click Save.
Tip:
In addition to the schema definitions, this text file adds an optional property called schemas to the root of the RAML document. It specifies the collections of schemas that can be used anywhere in the API definition. For consistency and simplicity, you should include this property in the root section of the RAML document.
Step 5: Associate Request and Responses sample data with corresponding schema
In this section, you'll modify your API to use the newly added schemas.
-
In the next few steps, you'll set the schema to the appropriate Request or Responses.
Click the pencil/paper icon again to return to the API Designer.
On the left, click Endpoints.
-
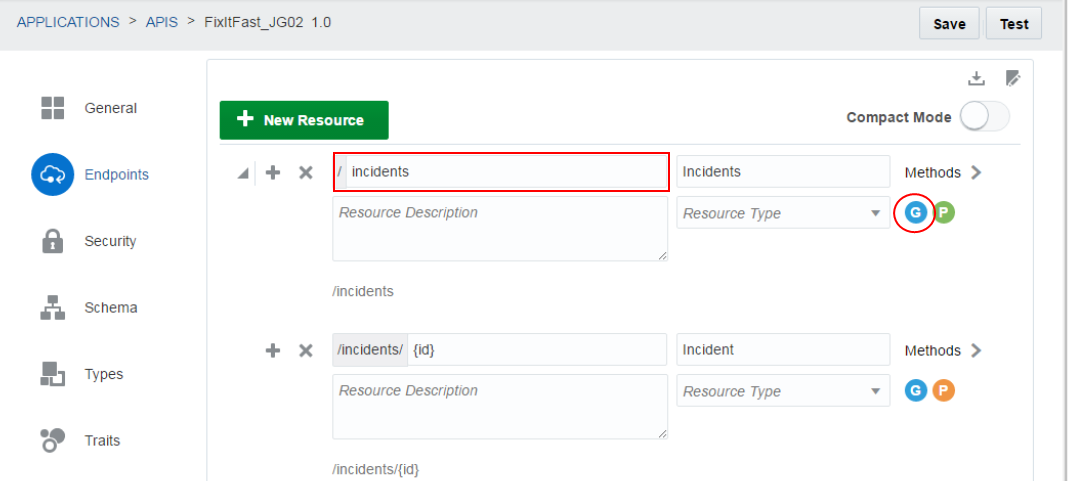
Navigate to the GET method for /incidents. You can easily do this by clicking the blue G below the Methods link for the /incidents endpoint.
-
Now we're going to add a schema to the Response for the /incidents GET method.
Click the Responses tab, then scroll down and click the Schema tab.
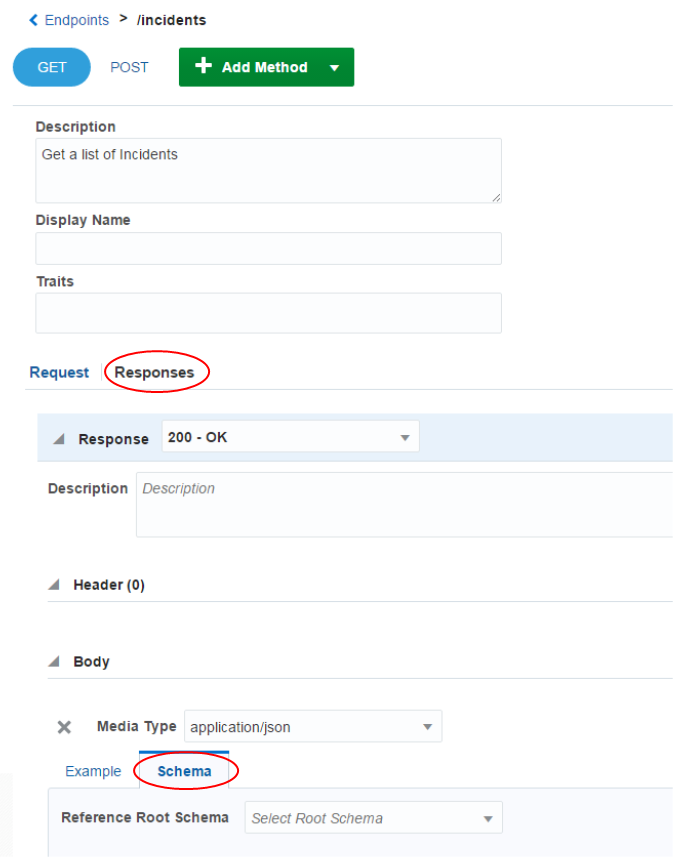
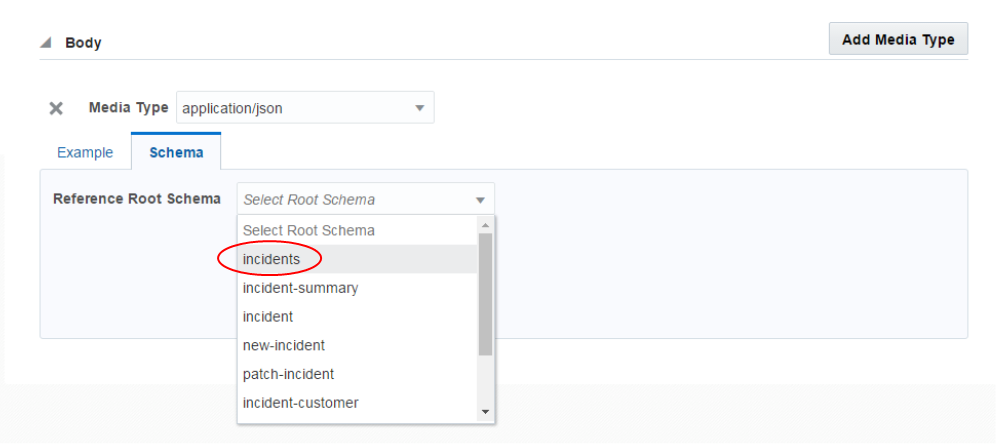
In the Reference Root Schema dropdown, select incidents (plural).
Once selected, the schema code is displayed.
At the top of the page, click Save.
-
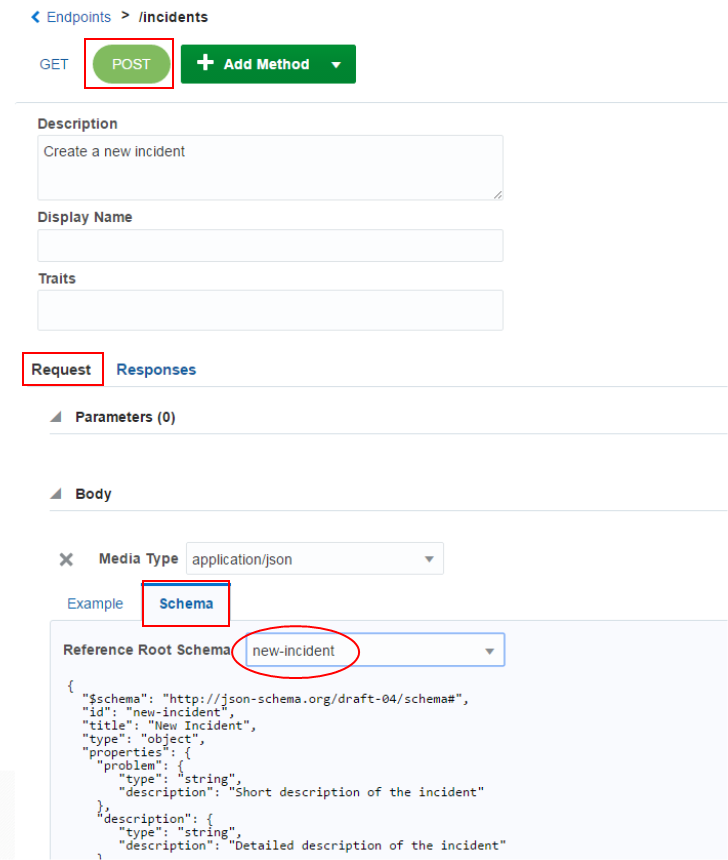
Next, set the schema for the /incidents POST method.
Near the top of the page, click the green POST button. Scroll down to the Request, click the Schema tab and set the Reference Root Schema to new-incident.
Then Save.
-
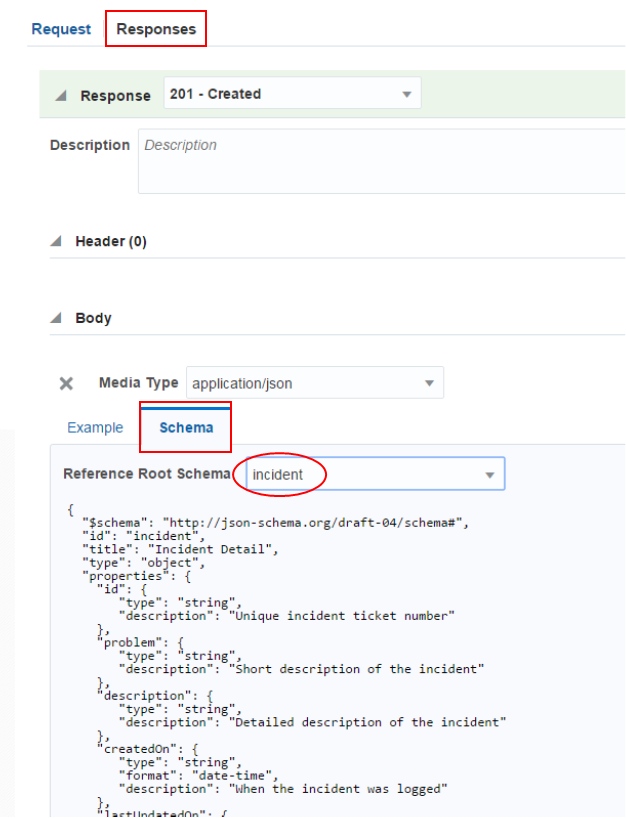
Now set the Responses for the /incidents POST method.
Click the Responses tab, then the Schema tab, and set the Reference Root Schema to incident (singular).
Click Save.
-
Now let's work on the /incidents/{id} methods.
At the top, in the breadcrumbs, click Endpoints so we can set the GET method.
Click the blue G below the Method text for /incidents/{id}.
Select the Responses tab, then the Schema tab. Set the Reference Root Schema to incident (singular).
Click Save.

-
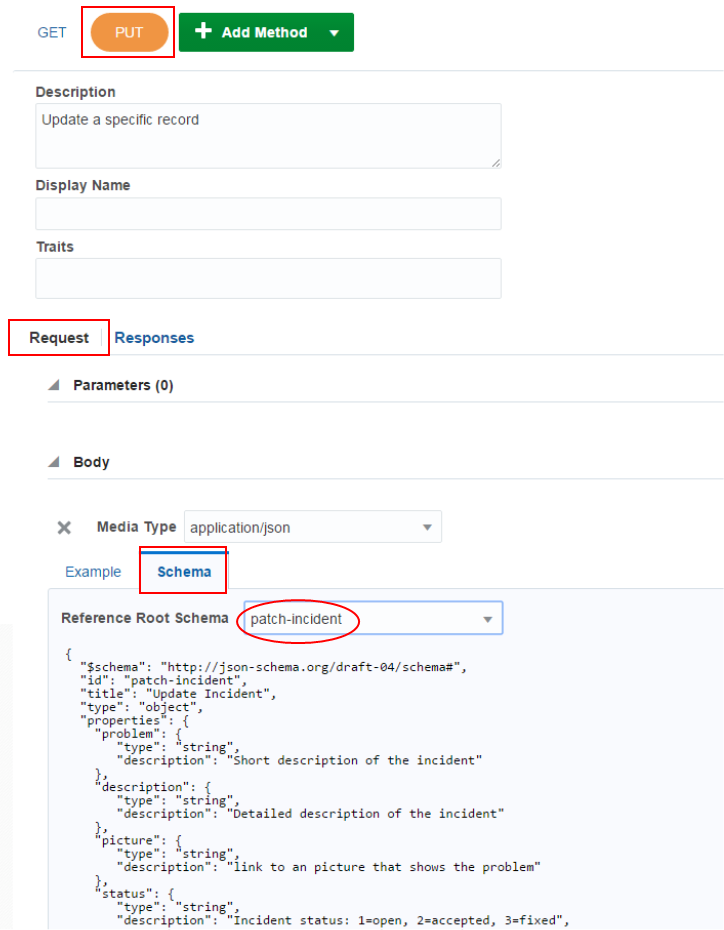
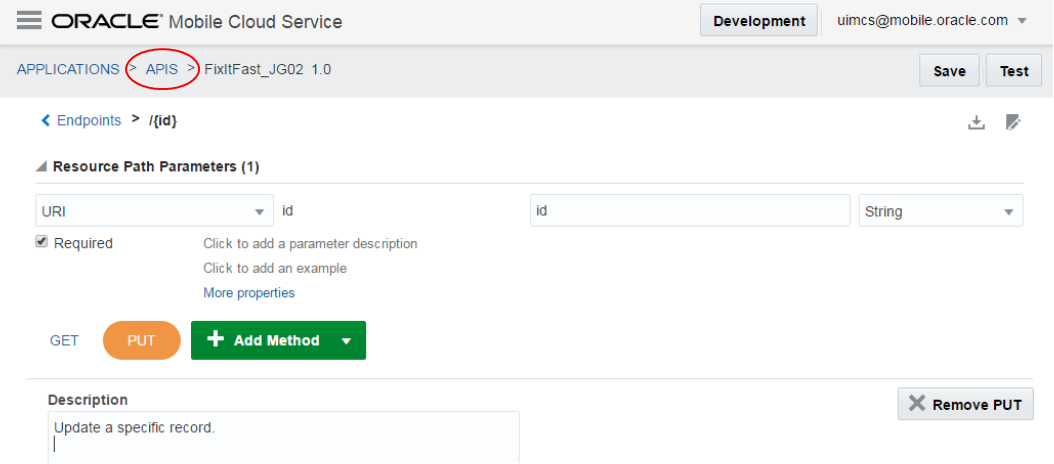
Now set the schema for /incidents/{id} PUT.
At the top of the page, click the orange PUT button.
Click the Request tab, then the Schema tab. Set the Reference Root Schema to patch-incident and click Save.
-
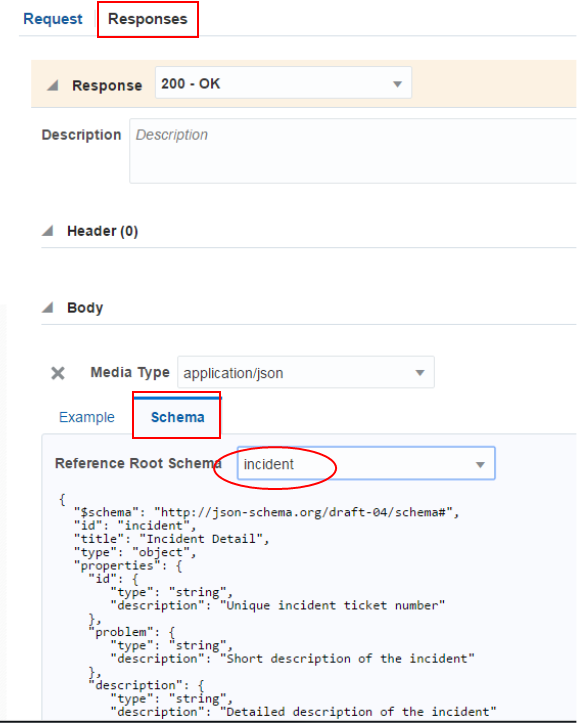
Next, set the Responses for the PUT.
Click the Responses tab, then the Schema tab. Set the Reference Root Schema to incident (singular) and Save.
-
You won't be able to see the new schema definitions in MAX until you publish the API in MCS.
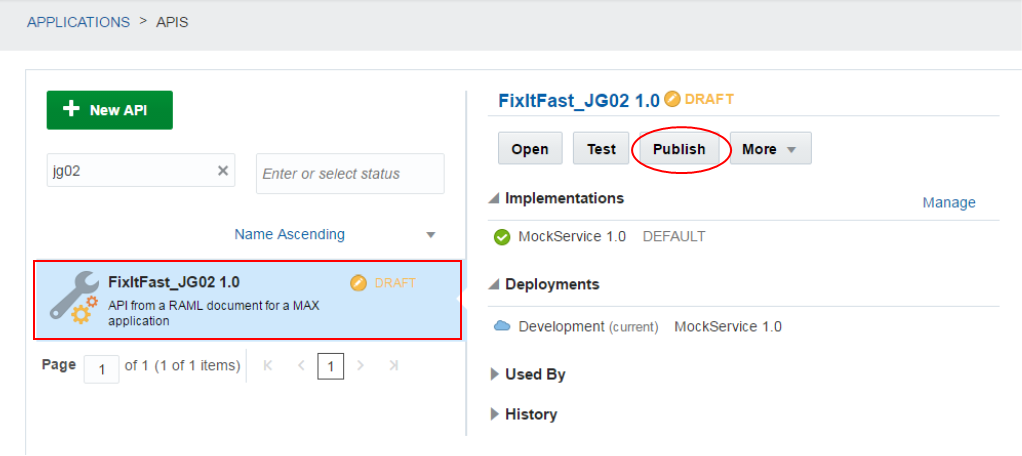
At the top of the page, click the APIS breadcrumb and find your API.
Select your API, then click the Publish button.
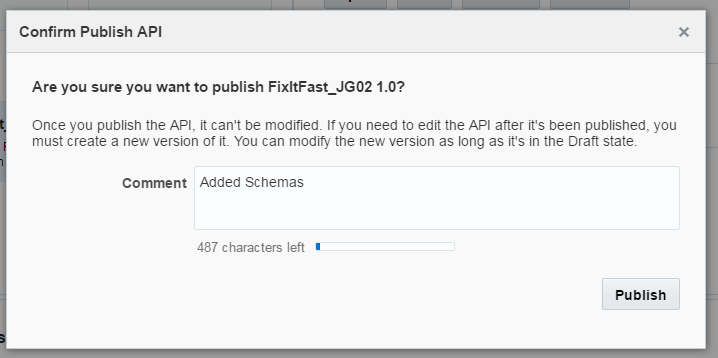
In the popup, set the Comment to something like Added Schemas. Click Publish.
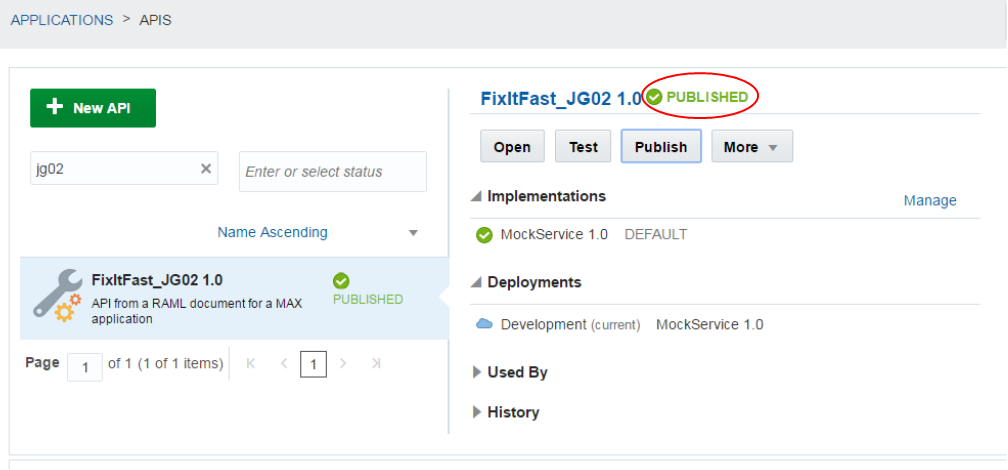
The state of the API is now changed to Published. You're almost ready to use the API to build an application in MAX!
Step 6: Add an Implementation to the API
In this step, you will modify and upload an implementation file to your MCS API. This implementation will provide some real data for your application to use.
-
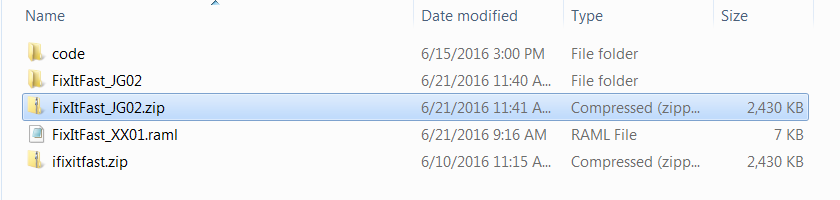
In the /labfiles/ directory, find and unzip ifixitfast.zip.

Open the ifixitfast.zip directory and you will see all the files needed for the implementation.
We need to modify some of these files to make them work with your API.
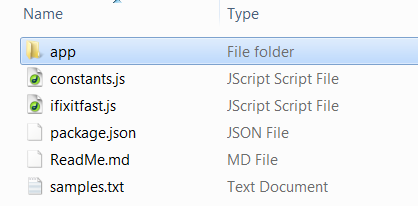
-
First, it's always a good practice to make API implementation names unique, so change the name of the ifixitfast.js file to the name of your API; for example, FixItFast_JG02.js.
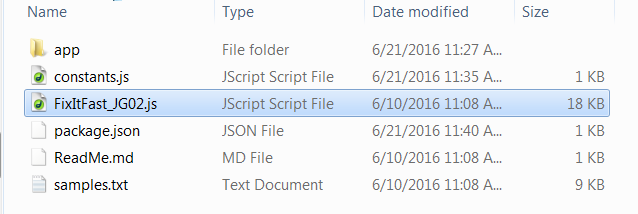
Next, open the constants.js file in an editor and replace the ifixitfast text with the name of your API (e.g., FixItFast_JG02). Save the file.

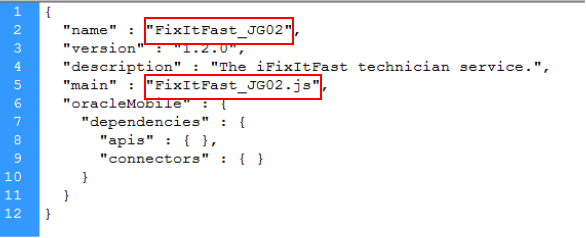
Open the package.json file in an editor and replace the ifixitfast text with the name of your API. Be sure to change the name in two places: name and main. Save the file.
-
All implementations are loaded into MCS in a zip format, so now you must zip up all the files. The easiest way is to change the root directory containing the files from ifixitfast to the name of your API.
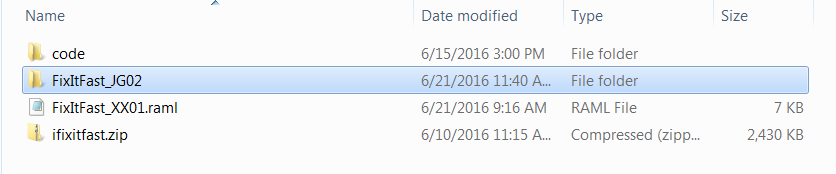
Now create a zip file from the directory. You are ready to load the implementation into MCS.
-
Go back into MCS and navigate to your API.
-
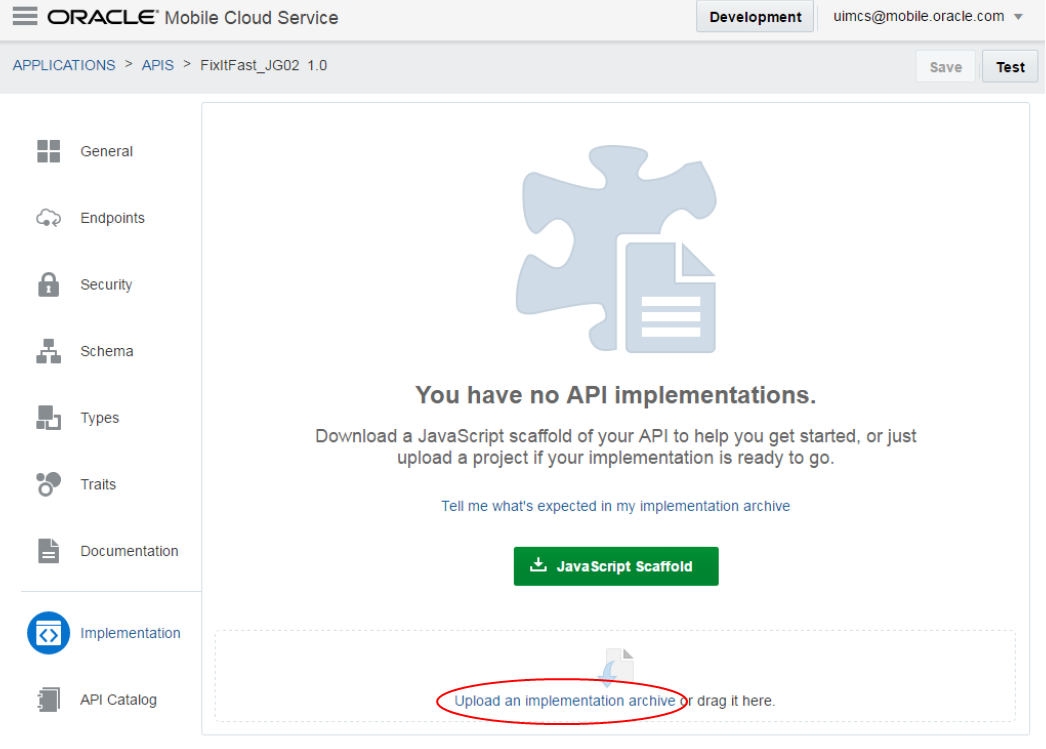
Once in your API, on the left, click Implementation.
Then click the Upload an Implementation archive text link.
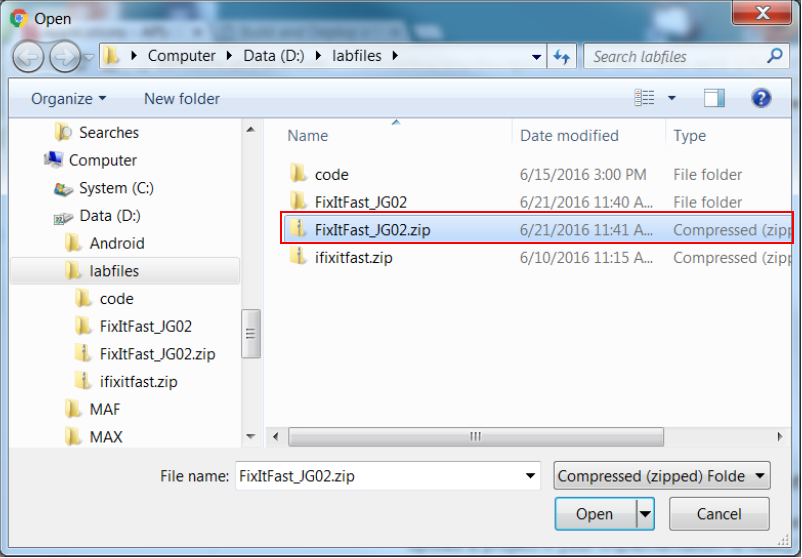
Navigate to your /labfiles/ directory and select your zip file (e.g., FixItFast_JG02.zip).
Click Open.
-
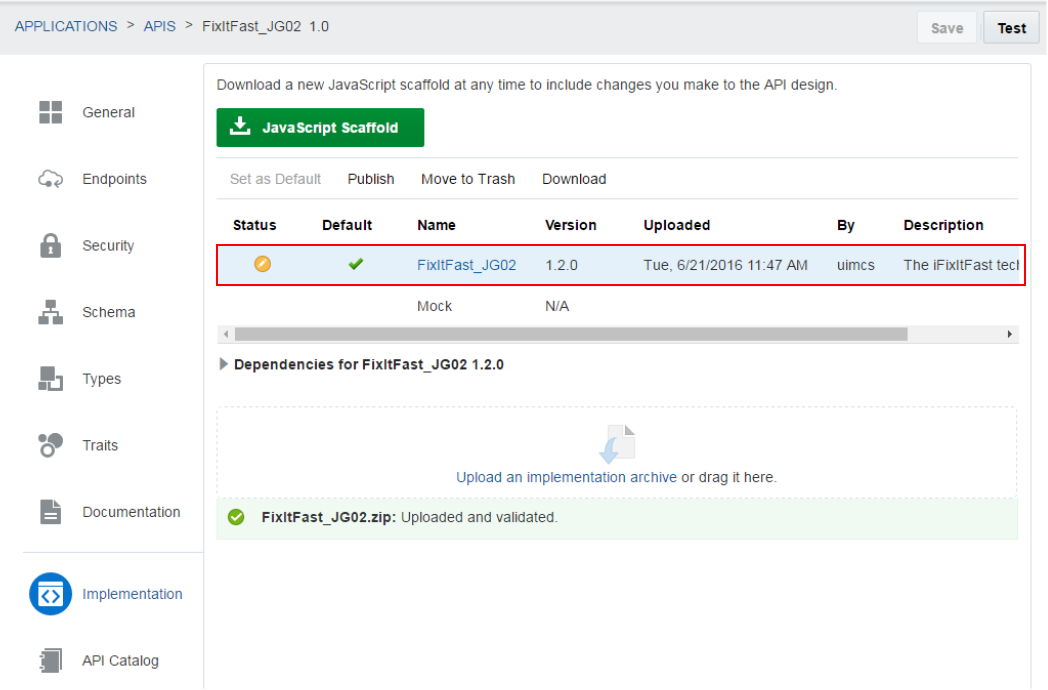
The implementation is loaded and validated.
Once the process is complete, the implementation will be displayed in MCS.
In the next step, you will build a MAX application based on this API.
Step 7: Build a MAX application to see the API schema at work
In this part of the tutorial, you create a new MAX application and see the difference between an API with a schema and one without.
-
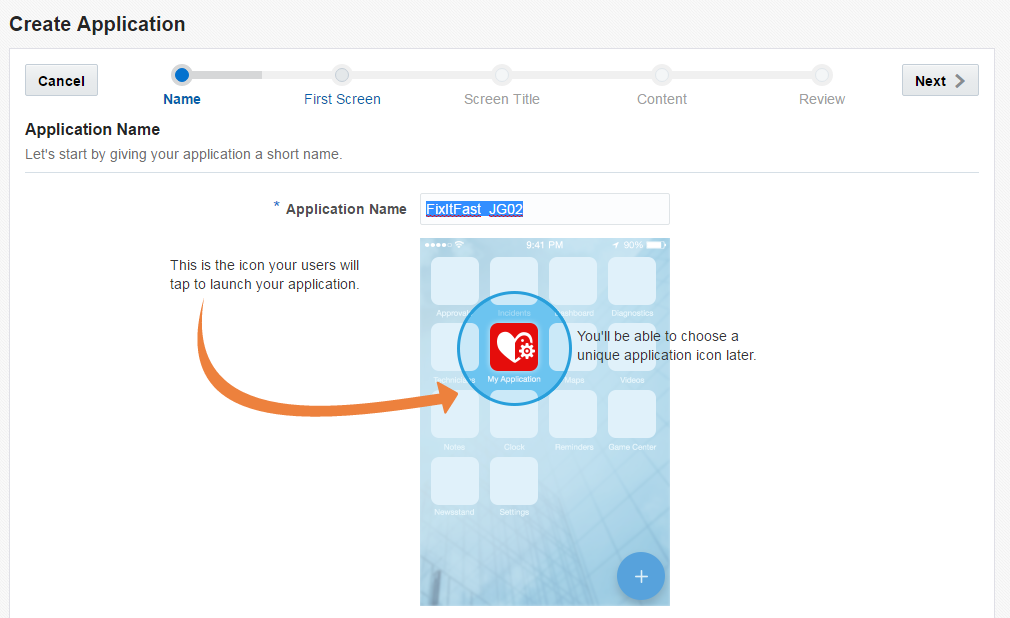
Launch MAX in a browser (e.g. http://<your_MCS_server>:<port>/max/ ) and click the New Application area.

This time, name your application FixItFast_XX02 (where XX are your initials). Click Next.
-
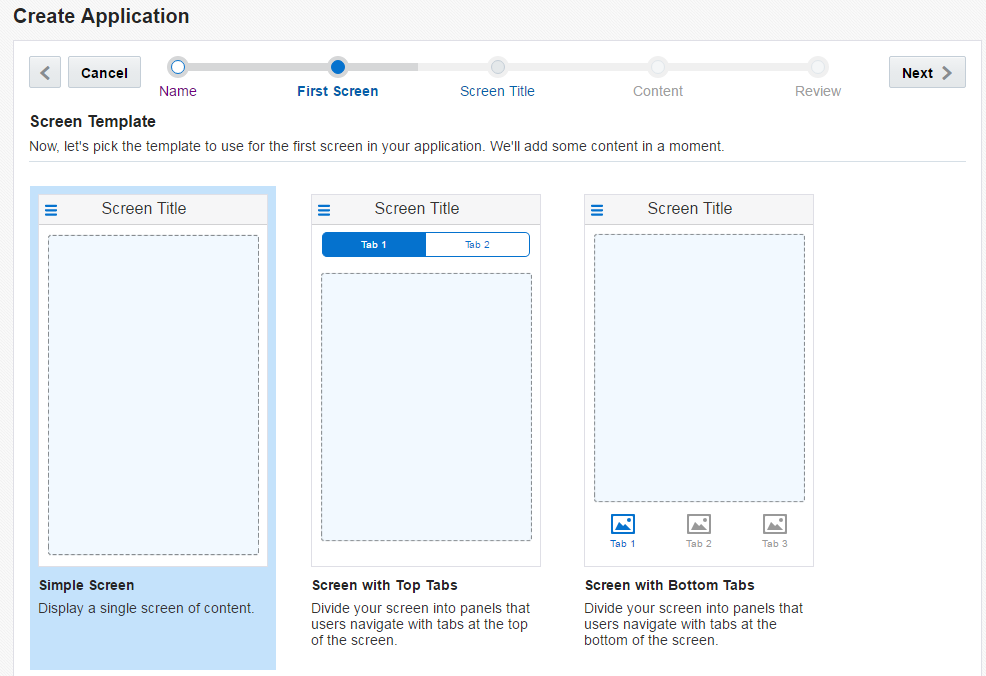
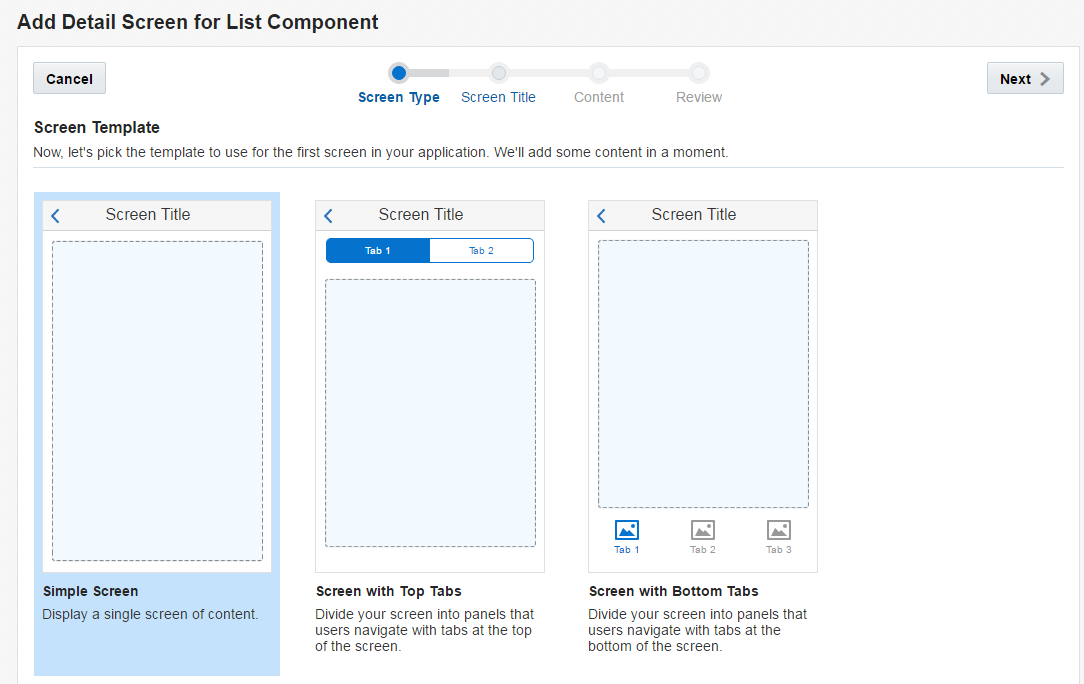
Ensure the Simple Screen template is selected and click Next.
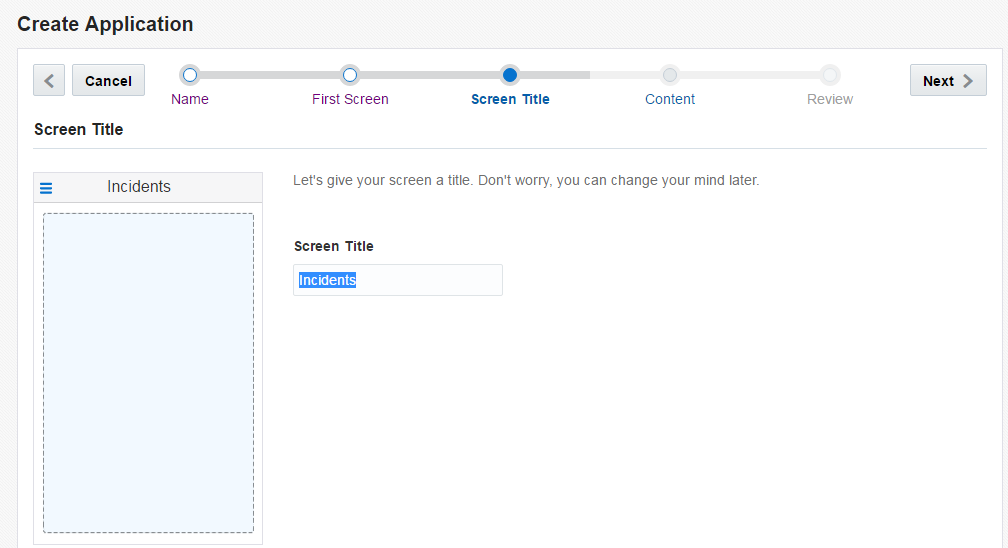
Set the Screen Title to Incidents and click Next.
In the Content page select List, then click Next.
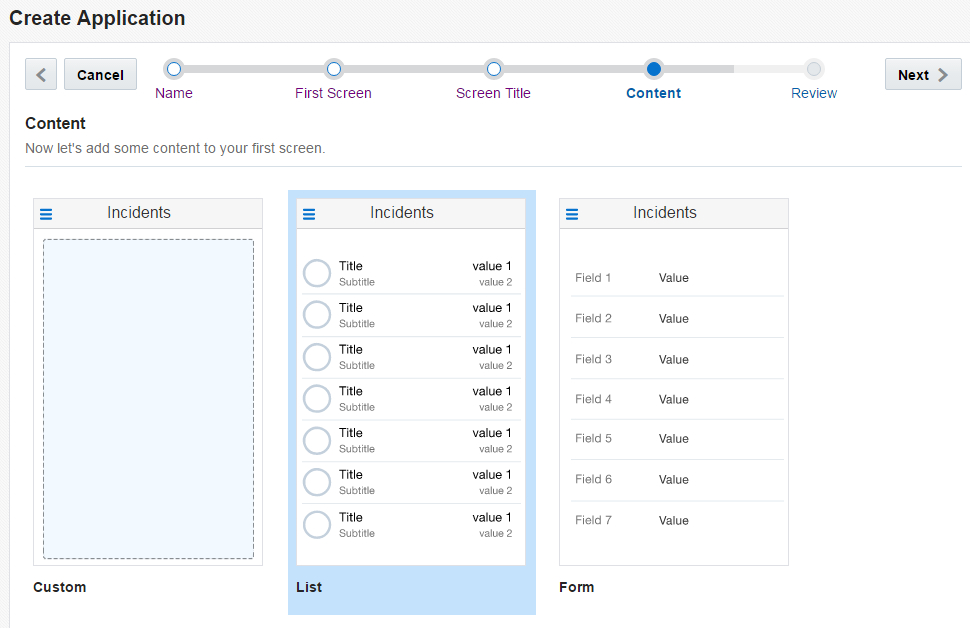
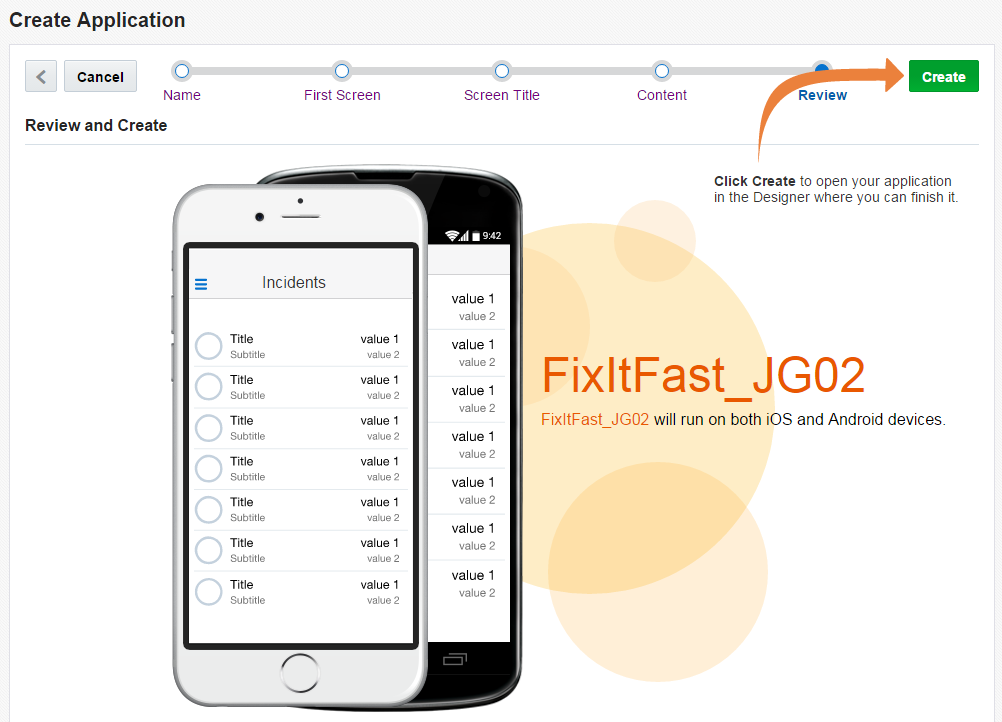
On the last page, Review, you should see a mock up of the application. Click Create to finish this process.
-
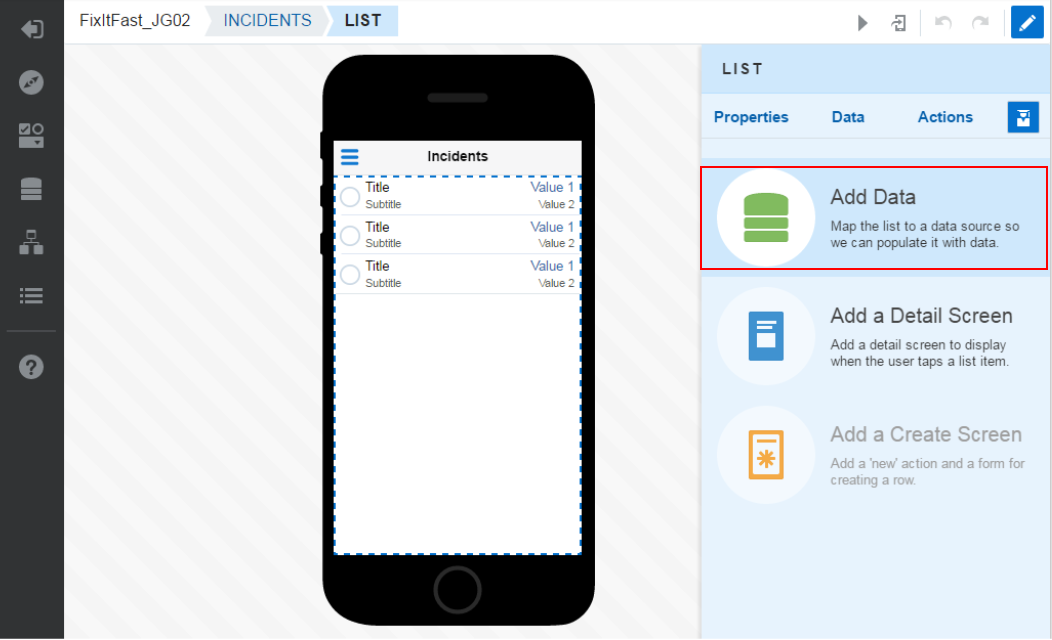
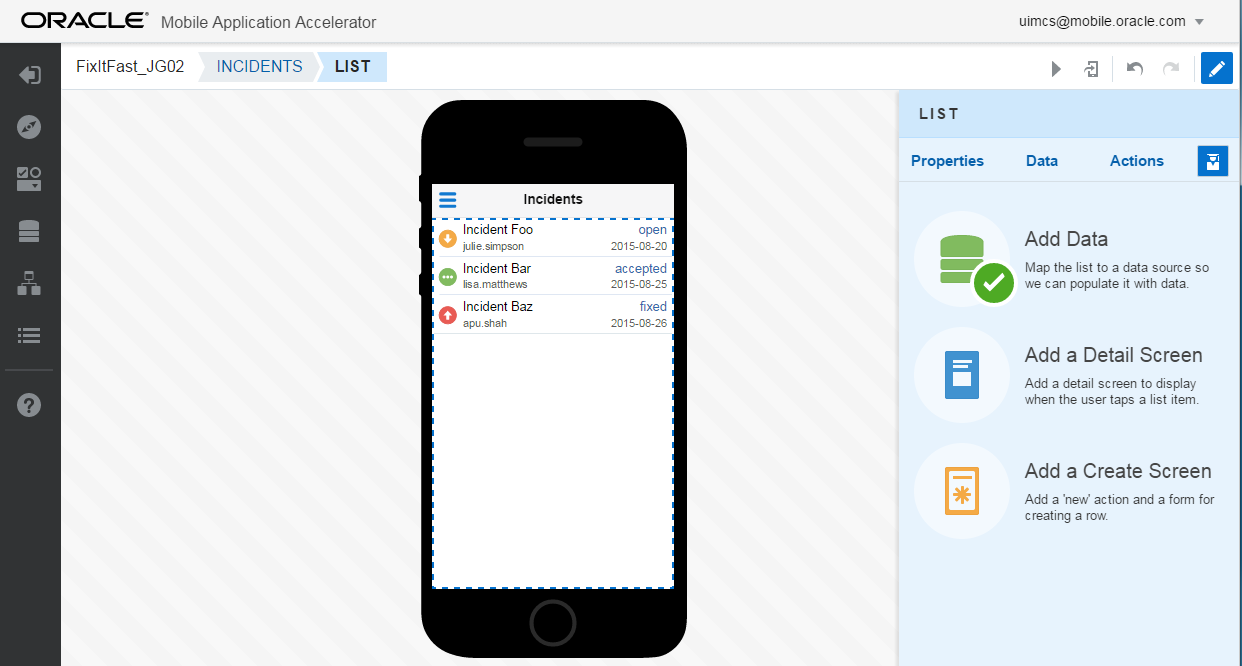
Now you're in the MAX Designer. Notice that the Preview (the phone-like image in the middle) shows you the first screen of your application.
On the right you see the Quick Start menu. This helps guide you through steps available depending on the components you select.
Click Add Data to start adding objects from your MCS API.
-
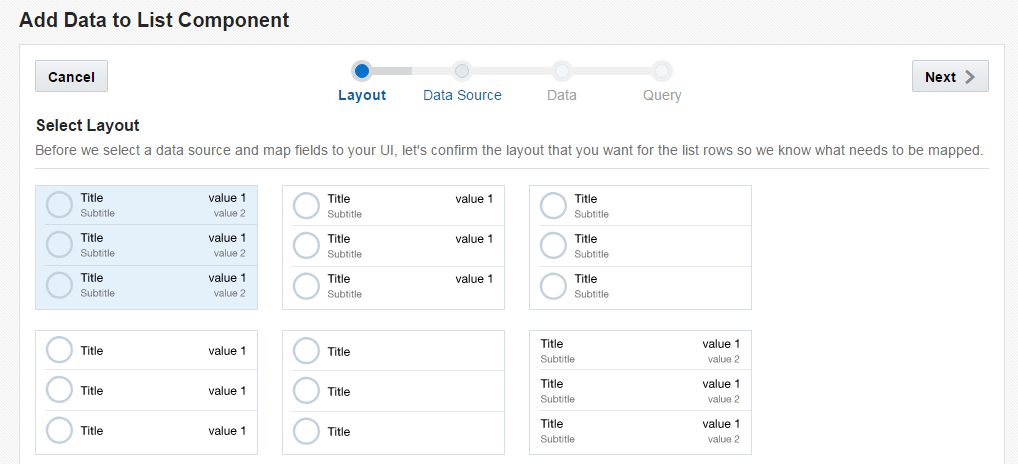
In the Select Layout page, select the upper left layout and click Next.
-
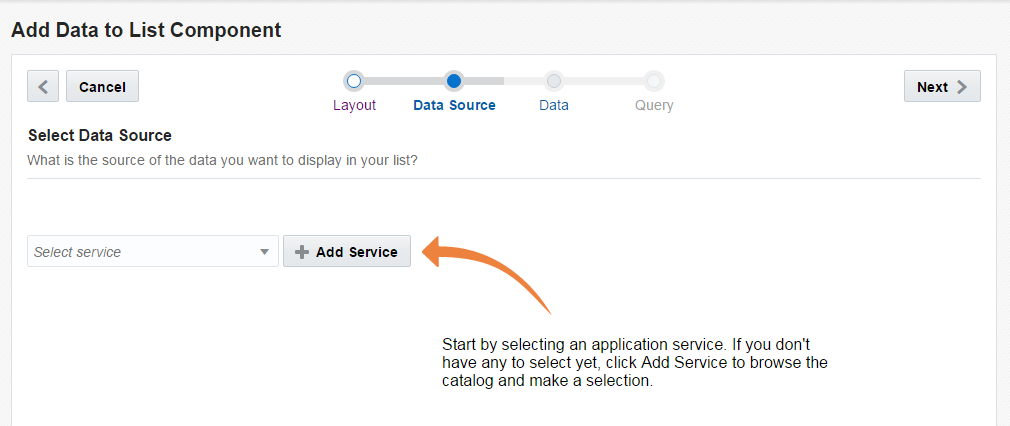
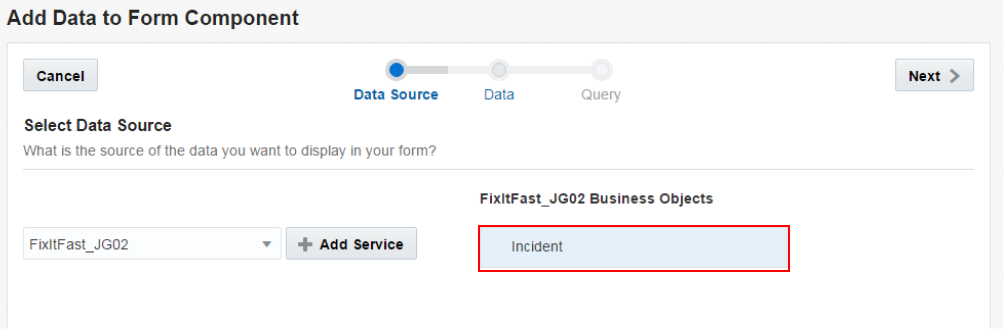
Now, let's select the data source you want to use for the List component.
Click the Add Service button. The first time you add data to a MAX application you are asked to select a service (that is, an API), but after that the business object you need will be pre-selected.
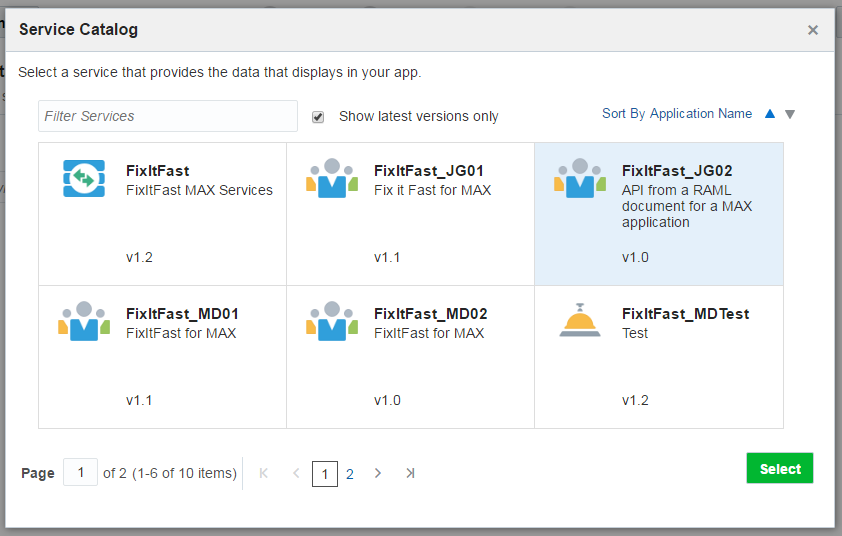
In the Service Catalog, find and select your FixItFast_XXNN API. Click the Select button.
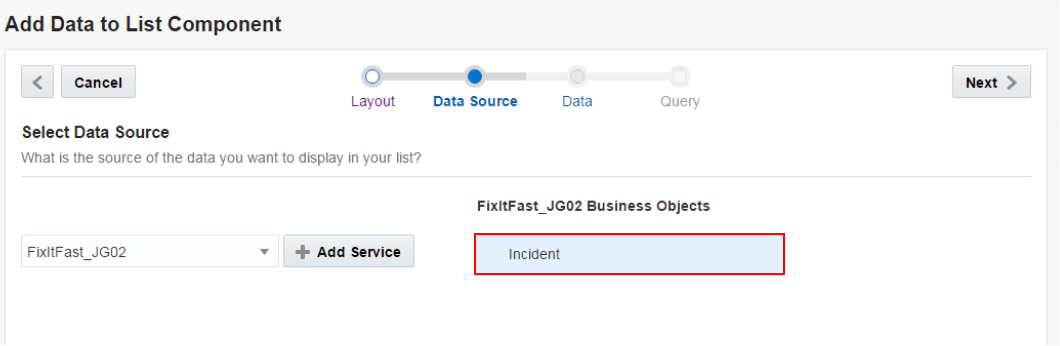
The Incident business object is now exposed for you to use. This business object was extracted from the API you created earlier in MCS. Select it, then click Next.
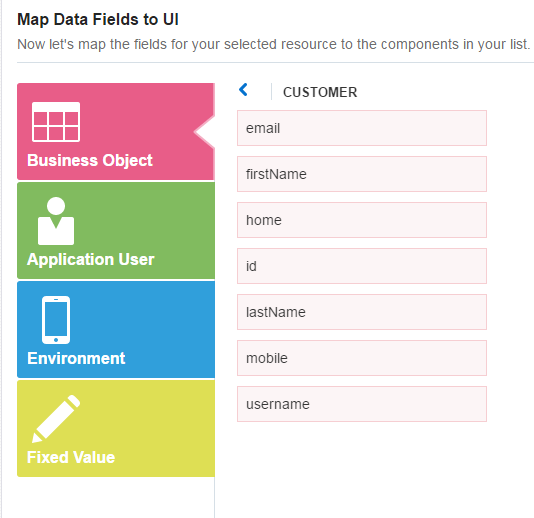
-
Here are all the Incident attributes you can add to your MAX application. These are the same attributes that were defined in the API from the RAML definition. Specifically, they are the incident fields that are suitable for a List, which came from the incident-summary schema.
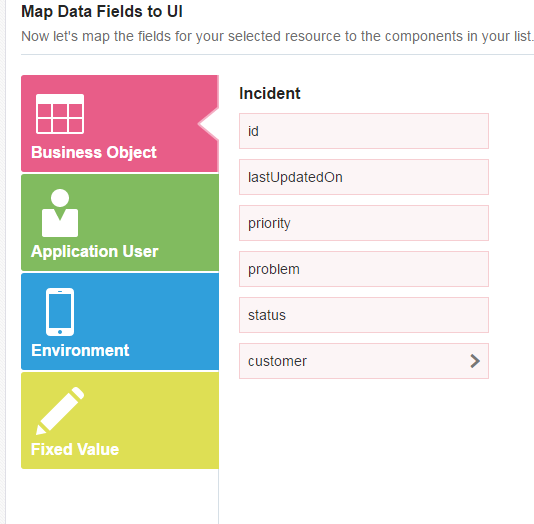
Click the customer field to see the attributes that were defined in the MCS customer schema.
Let's look back at the sample data that was supplied for /incidents/GET in the RAML. This is the same data that will be used to populate the fields in the app as you work on it in MAX.

-
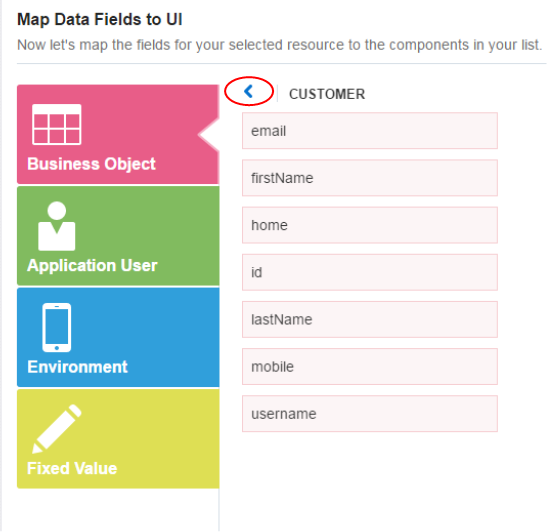
Click the blue left arrow next to CUSTOMER to go back to INCIDENTS.
-
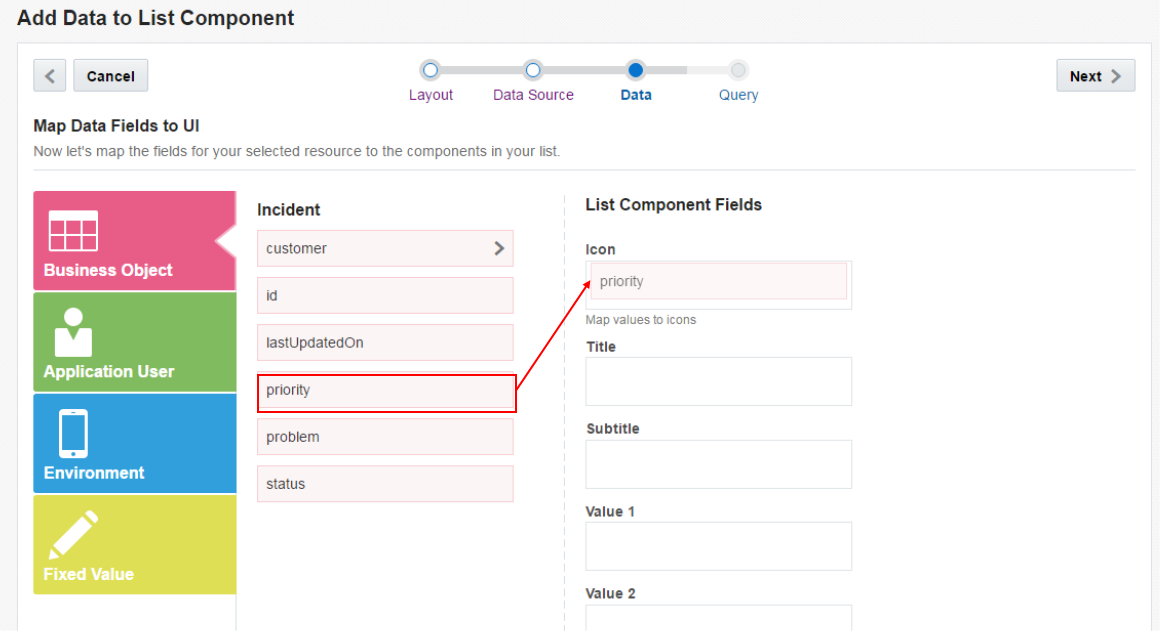
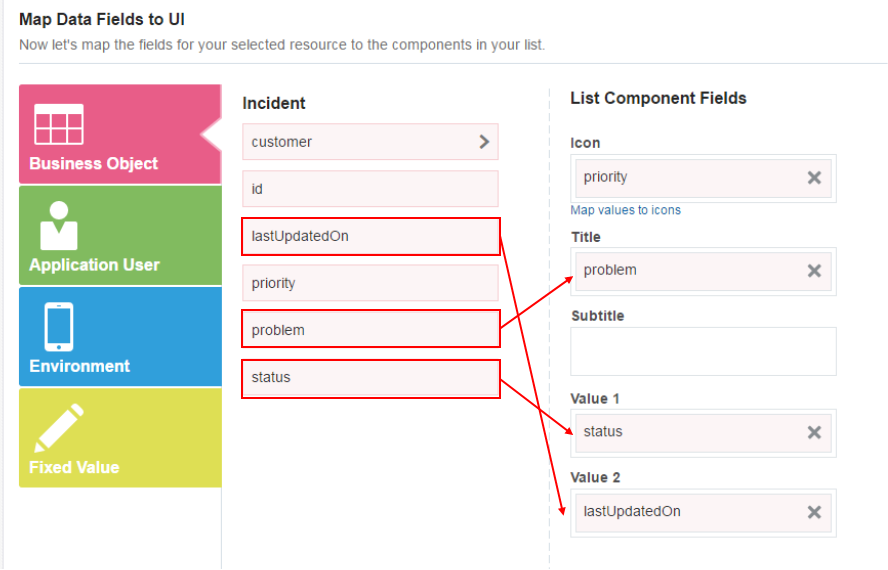
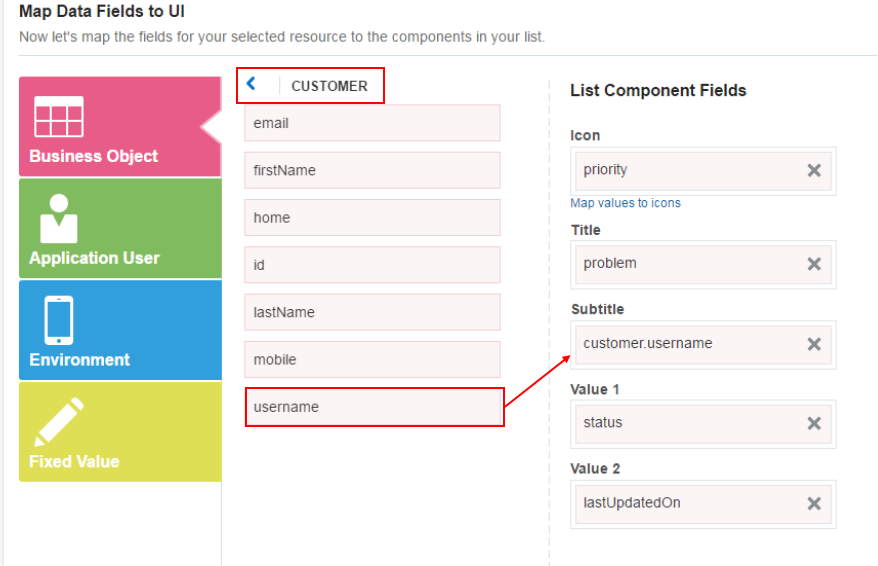
Let's add some fields to our List component.
The first field we'll add is the Priority field. Drag it from the left and drop it on the Icon property in the List Component Fields column.
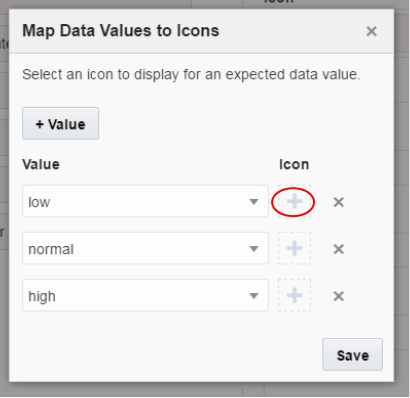
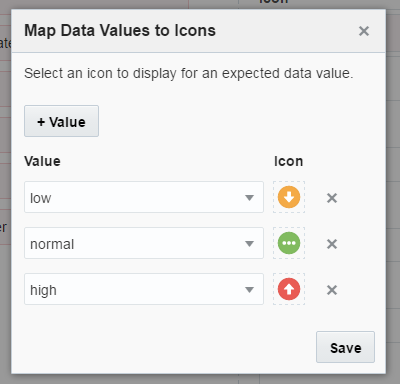
A popup box is displayed, which lets you map different attribute values to the icon. If you didn't have a schema, you wouldn't have any values here. But because they've been defined in the incident-summary schema, there are three: low, normal and high. Let's map a different icon to each of them.
Click the plus sign to the right of the low value.
Just to drive home the point, let's take another look at the schema definition. The three values for our Priority field are defined in the incidents-summary schema, which is referenced from the root or parent schema, Incidents. You can see that our three values (low, normal, and high) are defined in the enum array.
Getting back to MAX, in the Image Gallery, select the Priority Low icon and click the Select button. The icon is now displayed next to the value it represents and will be displayed on the page.
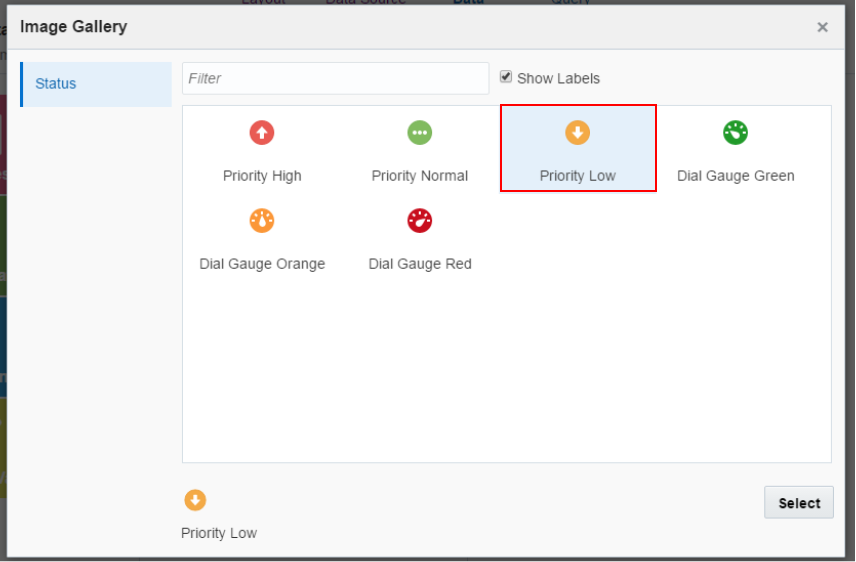
Use the plus sign to associate Priority Normal with the normal value and Priority High with the high value.
When you're done, click Save.
-
Now let's add the fields to display for the incident. Drag and drop the following fields onto the following properties.
Title = problem
Value 1 = status
Value 2 = lastUpdatedOn
Leave the Subtitle blank for now.
Next, click the customer collection to expose all of its attributes.
Drag and drop username onto the Subtitle property.
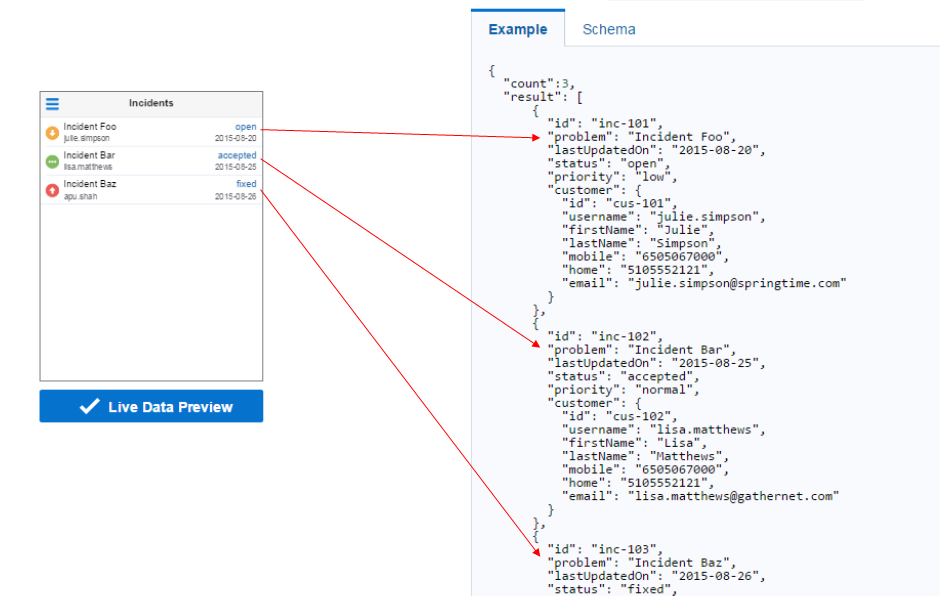
-
Click the Live Data Preview button. Where did the data come from? From the sample data you added as responses when defining the API RAML in MCS. Notice, too, that there are now icons associated with the priority attribute, one for low, normal, and high.
Click Next.
-
Let's supply the query parameter that will identify the technician.
Click the green Application User category and drag and drop username into the Technician query parameter. This will pass the username of the user (like hcr) who will sign in to run this mobile app.
Click Finish.
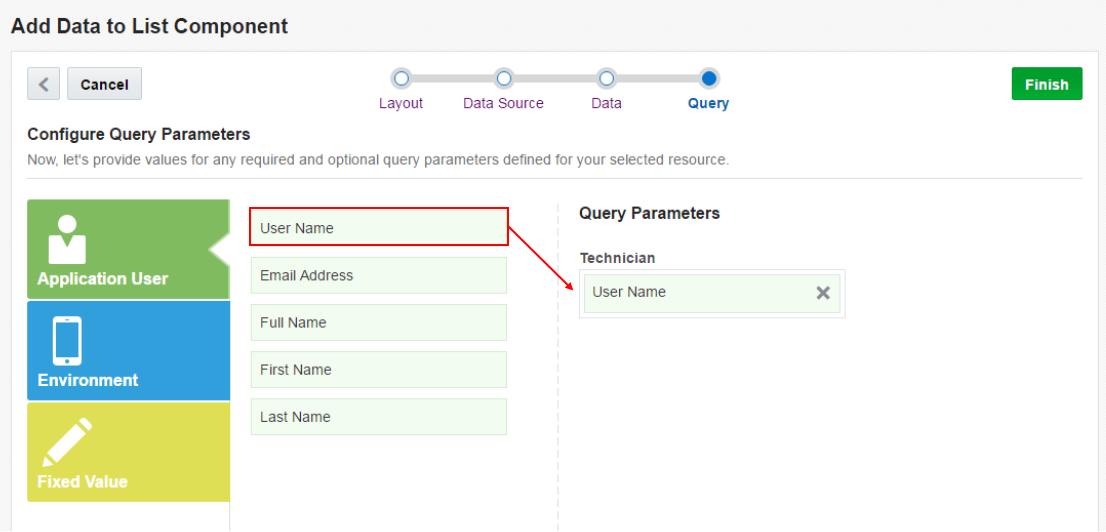
Recall that the query parameter "technician" was defined in the MCS API. It's now surfaced in MAX.
With the Add Data Quick Start completed, you can see a preview of your page that includes icons for the three priority values, as well as sample data from the schema definition.
Now that you've finished the UI for the main screen of your app, it's time to add some more detailed data.
Step 8: Add a Detail screen to the MAX application
In this step, you'll add a Detail screen to focus on one specific incident. You'll also modify some properties of the fields.
-
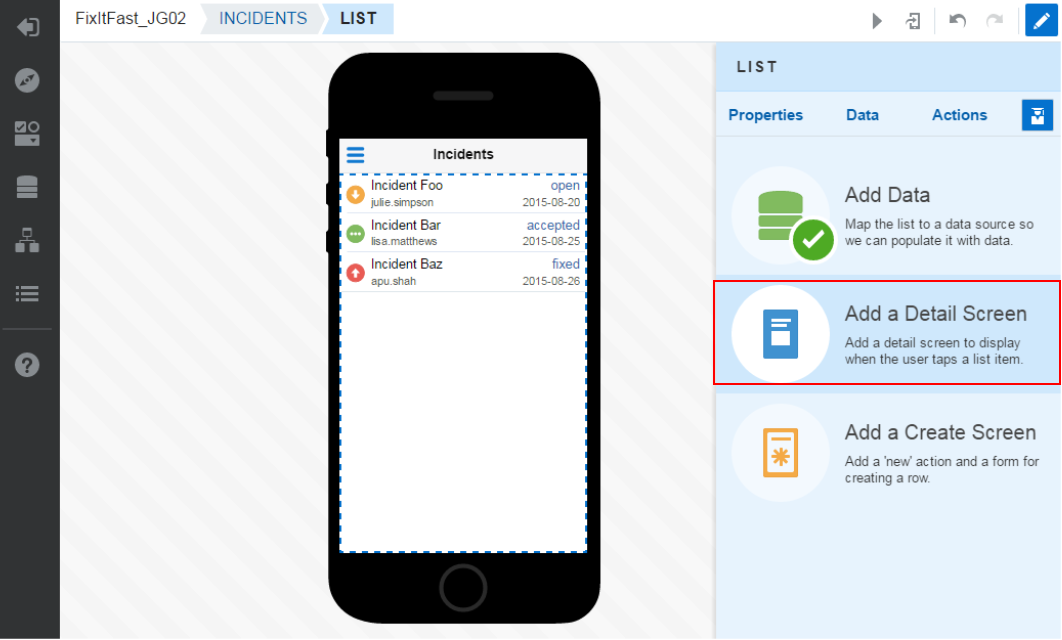
On the right, in the Quick Starts menu, click Add a Detail Screen.
-
Select the Simple Screen template, then click Next.
-
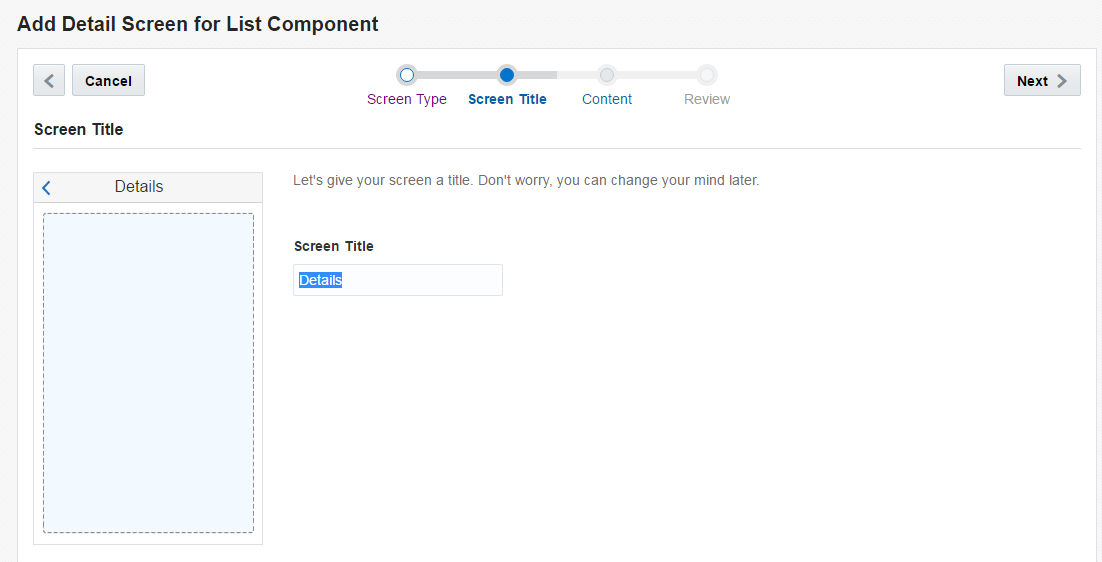
Set the Screen Title to Details, then click Next.
-
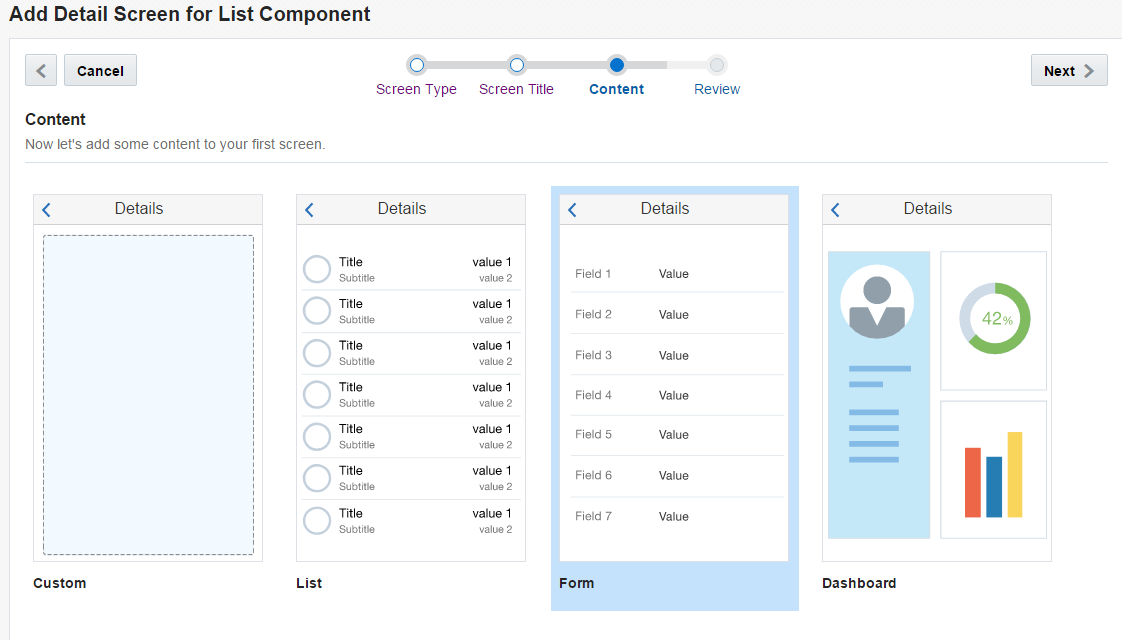
In the Content page, select Form, then click Next.
-
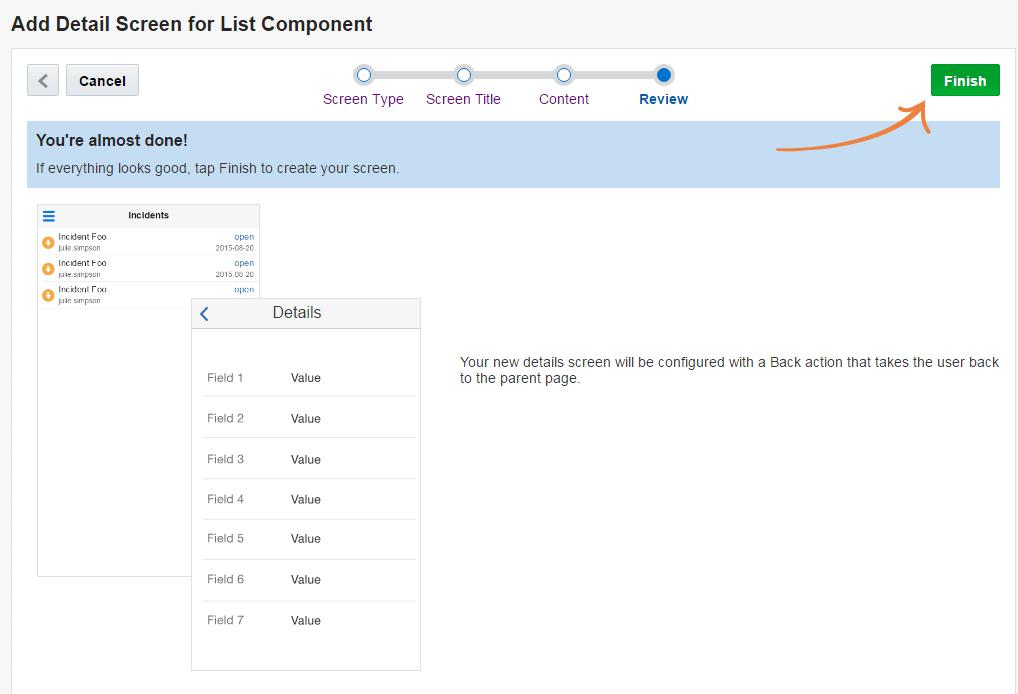
In the Review page, click Finish.
-
In the Quick Start menu, just below Add a Detail Screen, click the Go to Detail Screen text link.
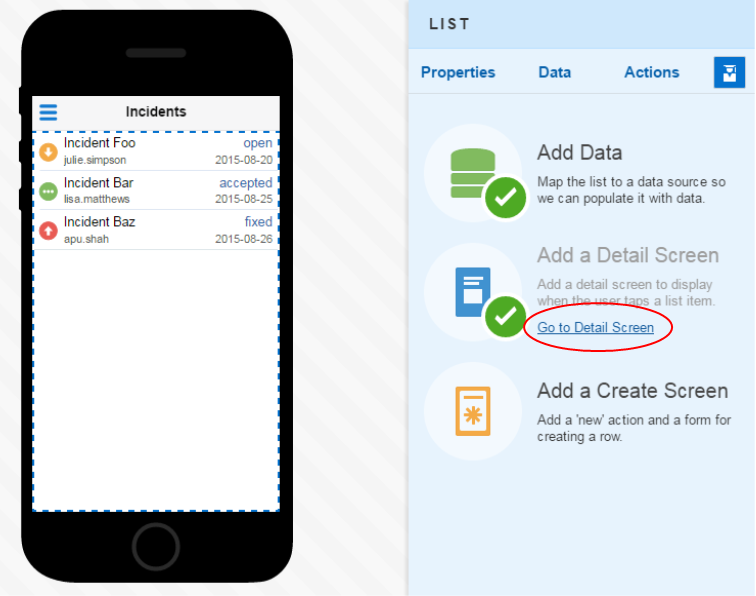
Now click the Add Data area.
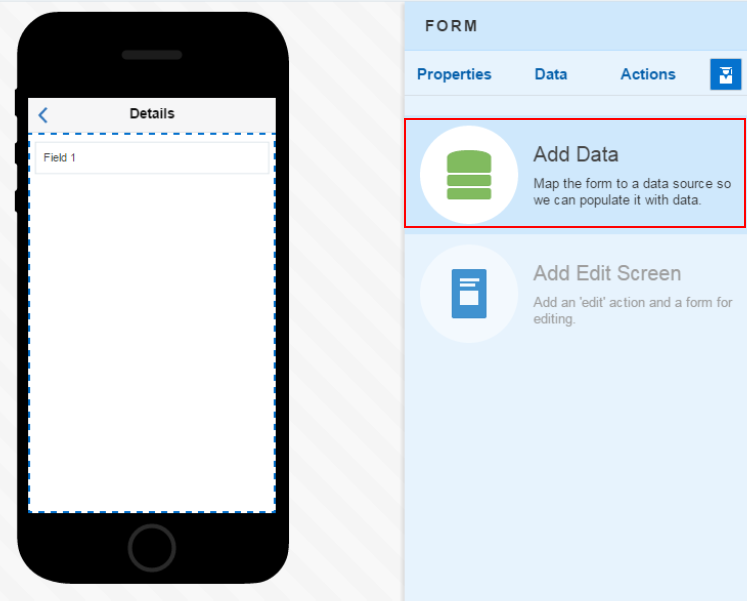
-
We want to use the same data source as we did for the List page, so click the Incident business object, then click Next.
-
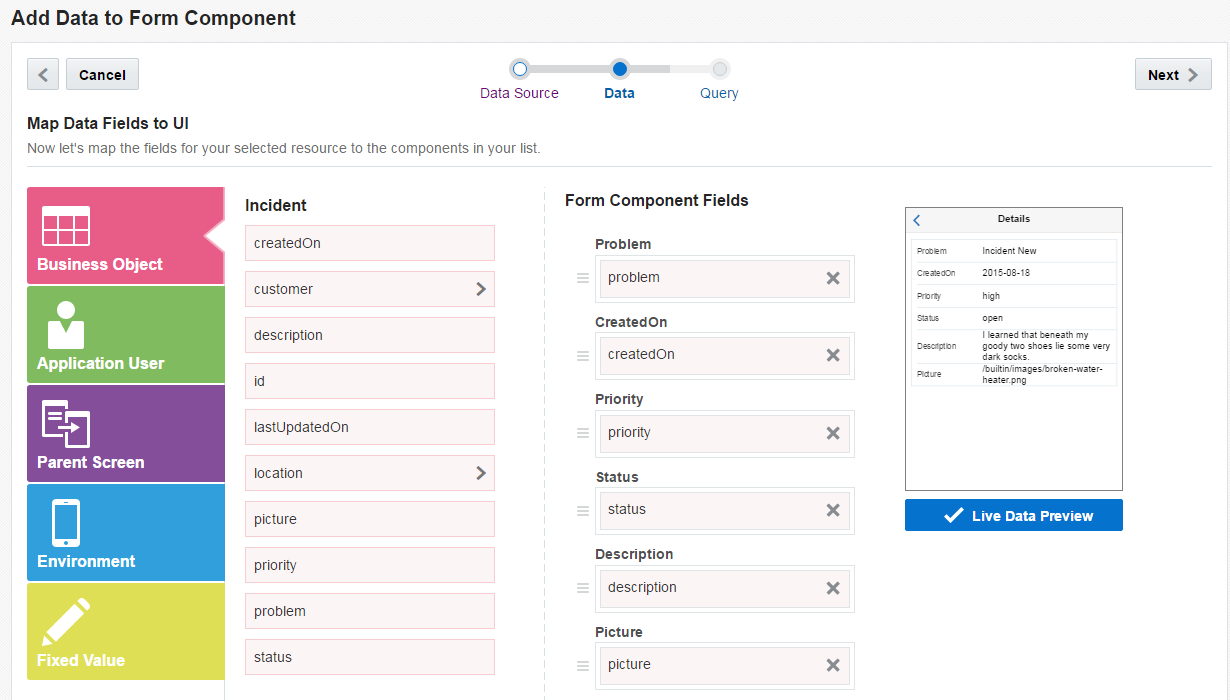
Just as we did before, we now see all the available fields from the MCS API we can add to this mobile app's Detail screen. Add the fields in the following order: problem, createdOn, priority, status, description and picture.
Click the Live Data Preview button to see the screen populated with sample data from the API.
Now click Next.
-
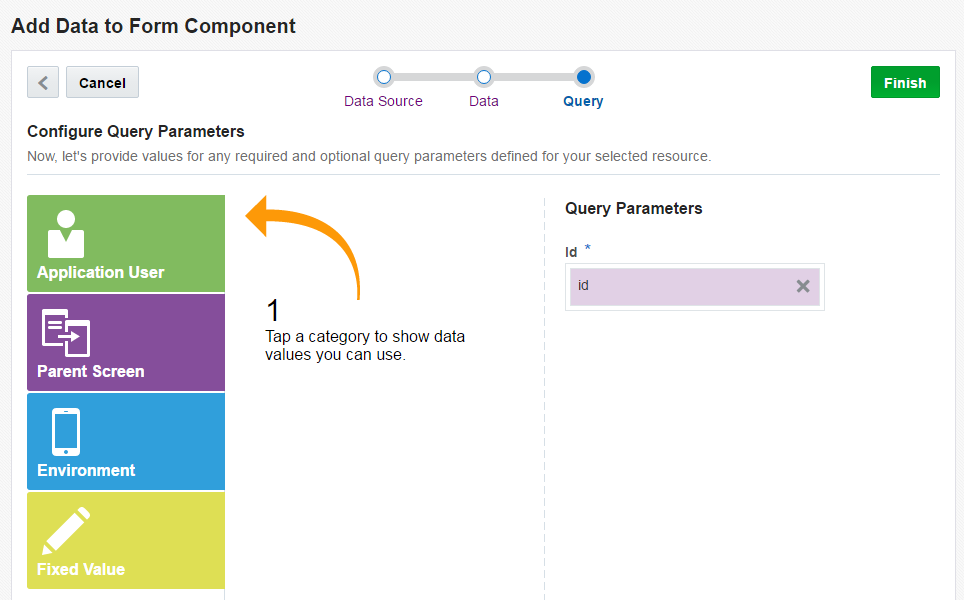
In the Query Parameters screen, id automatically is added because the resource path parameter incidents/{id} has the same name as the id field in the incident definition and example data. The purple color coding indicates that the id belongs to the Parent Screen category; that is, that's where the value for the field comes from.
Click Finish.
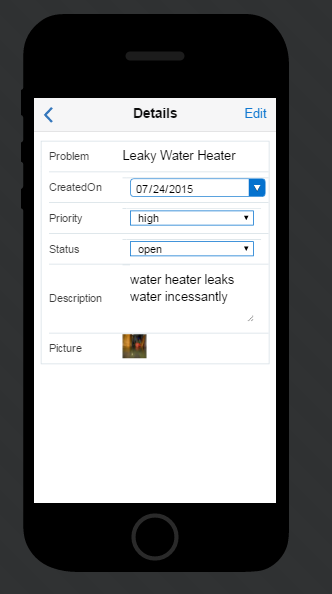
Now you're in the Designer, where you can see a preview of the screen.
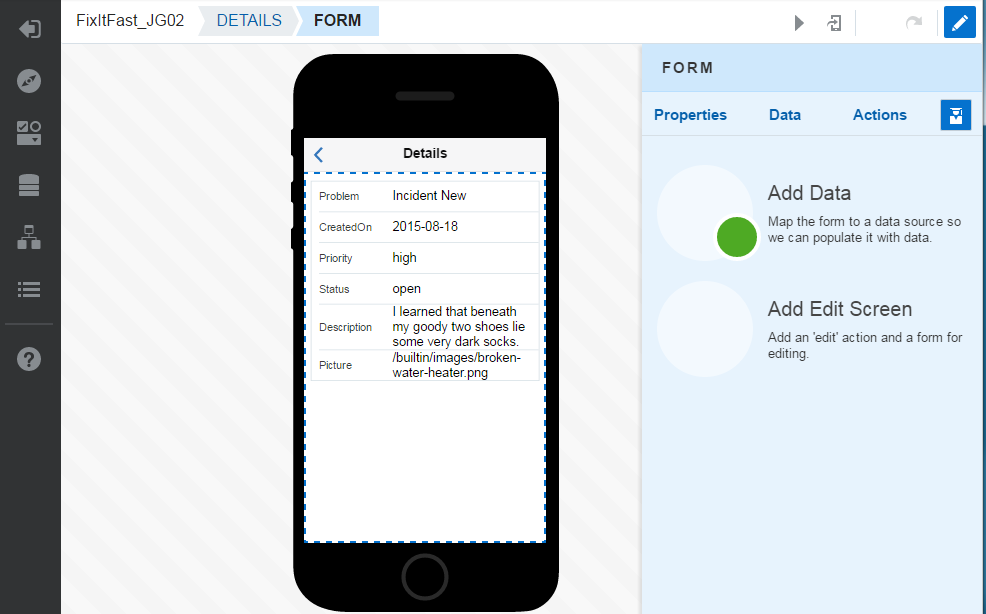
The values you see in the Preview come from the sample data that was provided for the /incidents/{id}'s GET method in the API.
-
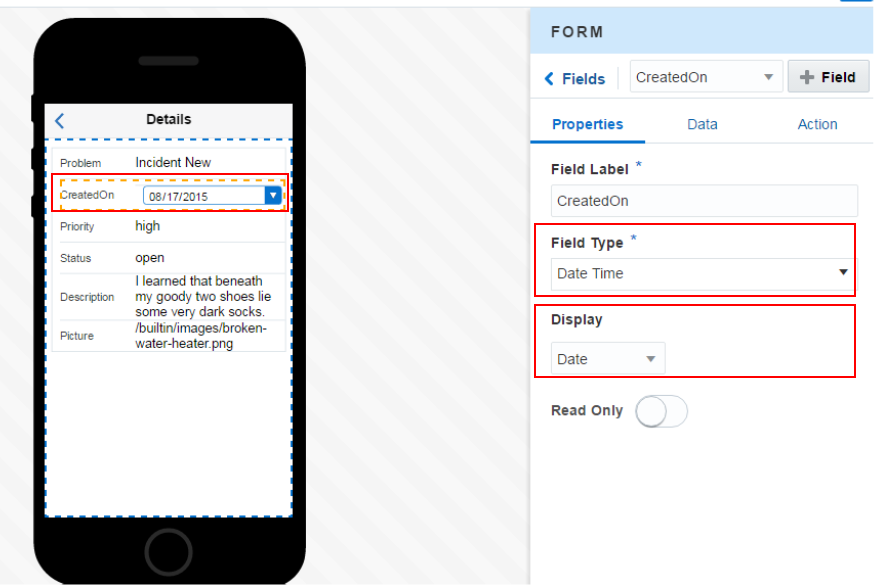
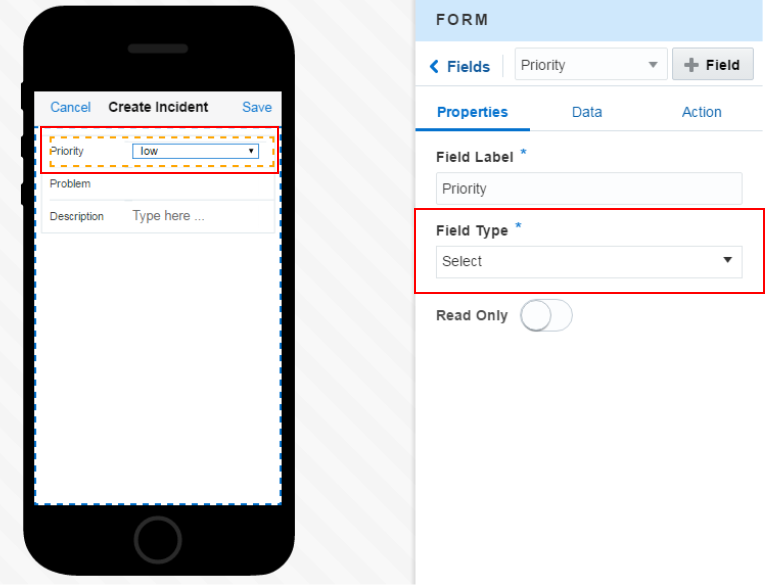
Let's change some of the properties of the fields. Click CreatedOn in the Preview, then, using the dropdown in the Designer, change the Field Type to Date Time and change Display to Date.
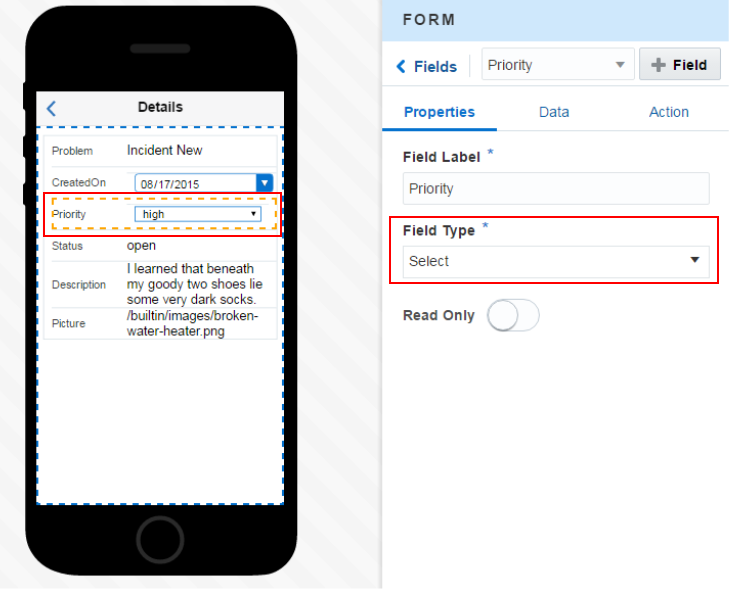
Next, click the Priority field in the Preview, then set the Field Type to Select. Notice in the Preview that the Priority field already has a value in it. That value comes from the enum definition that was included in the incident schema--specifically, the values in the response body's sample data: low, medium, and high.
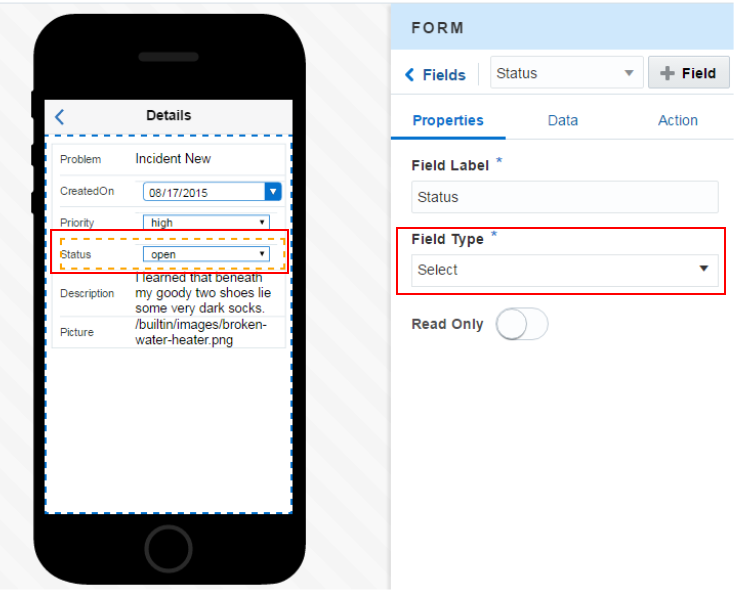
Select the Status field and set the Field Type to Select. This field also has a default value, which came from the enum definition in the incident schema.
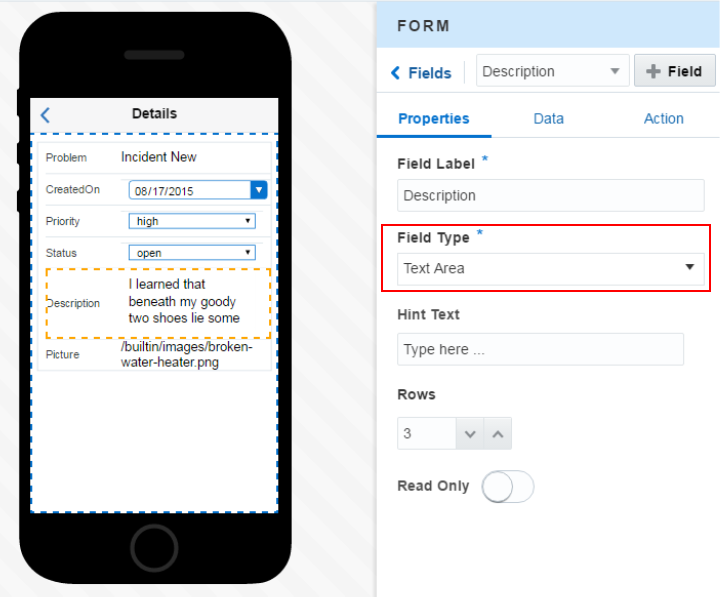
Now select the Description field in the Preview and set the Field Type to Text Area. The Hint Text should change to Type here.... The number of rows should change to 3.
Finally, select the Picture field in the Preview and set its Field Type to Image. Select the Use Full Width checkbox.

In the next step, you will add two screens to the app: one for editing incidents and one for creating them.
Step 9: Add Edit and Create screens to the MAX application
In this step, you add Edit and Create screens, which include fields that interact with the MCS API.
-
Let's enable our mobile app users to edit the Incident information.
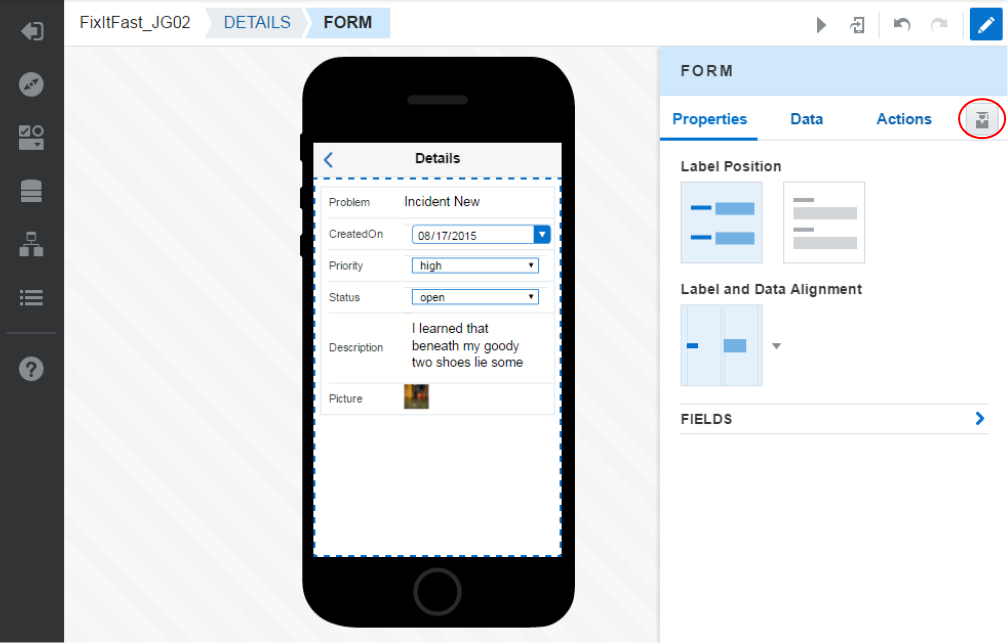
In the breadcrumb at the top of the screen, click FORM. Then, click the scholar icon in the upper right to invoke the Quick Start menu.
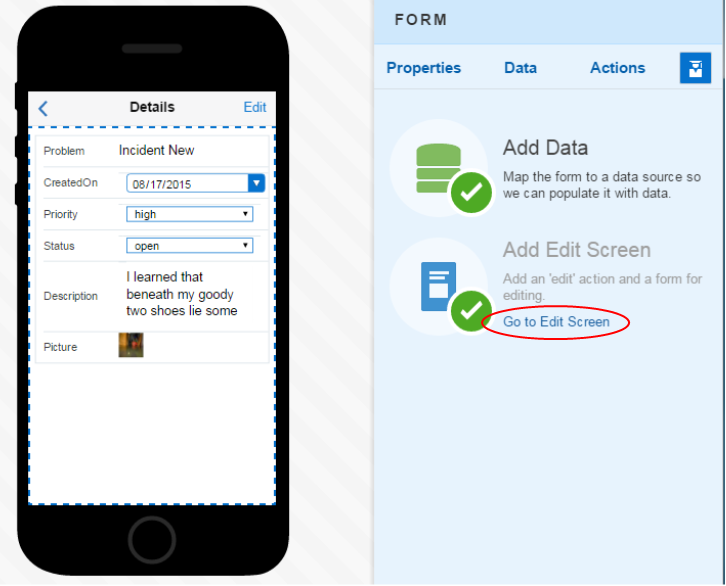
Click the Add Edit Screen area.

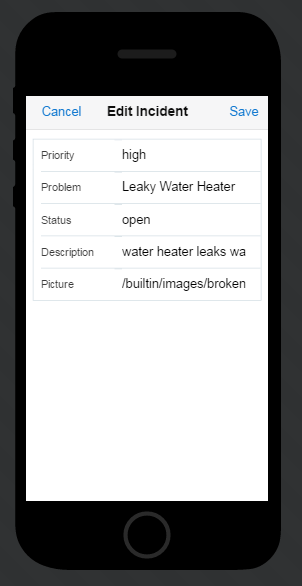
Click the Go to Edit Screen text link. Notice that an Edit link has been added to the top right of the header in the screen.
-
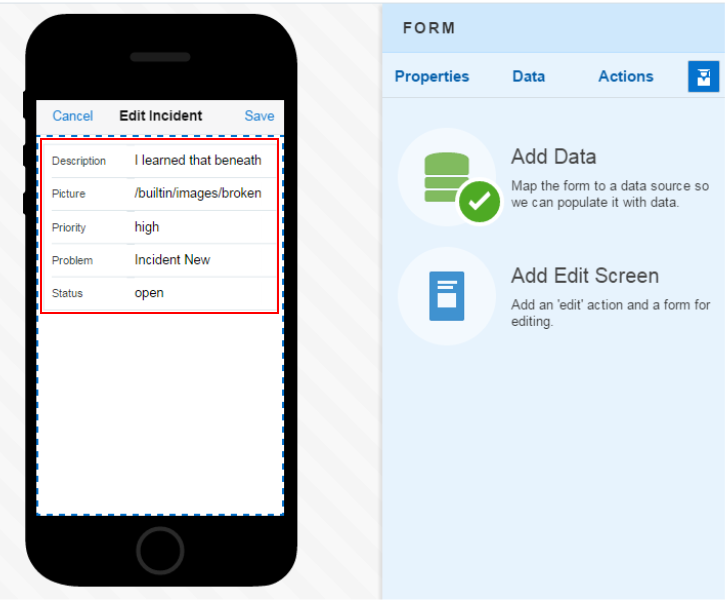
Here you see all the fields you can edit:
-
Let's change the order of the fields.
First, click the Properties menu, then click the Fields option.
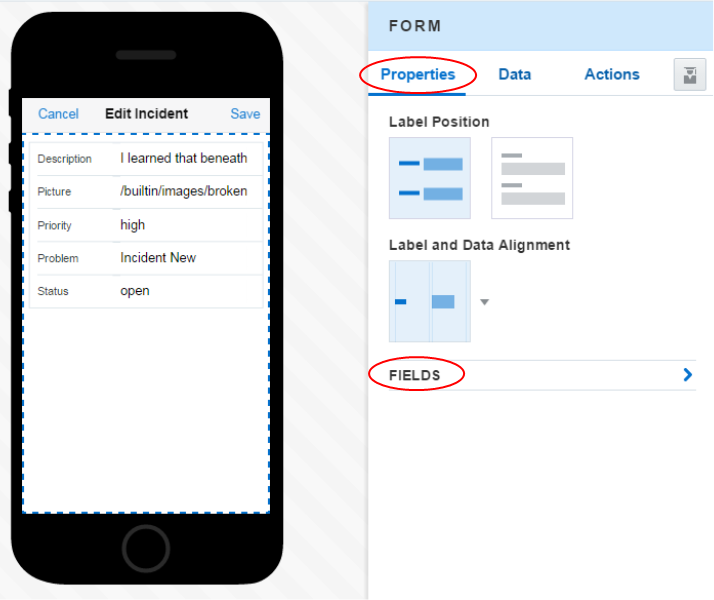
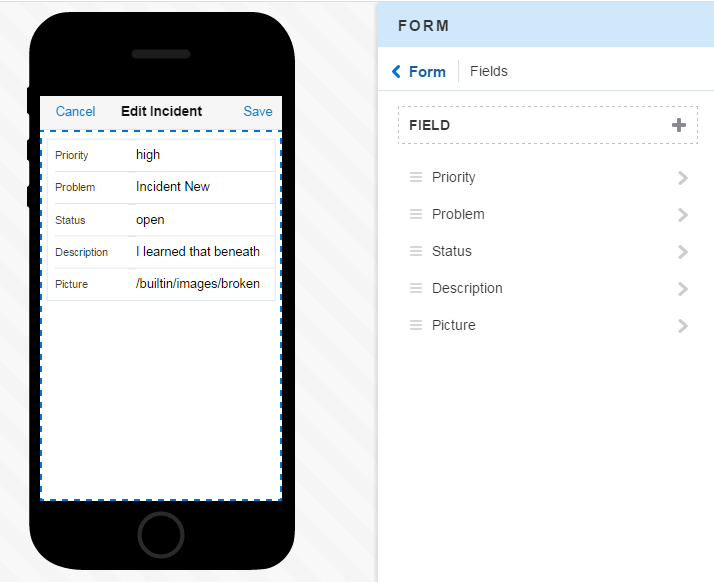
Using the hamburger icon to the left of the field name, drag the fields into the following order: Priority, Problem, Status, Description, Picture. The Preview updates as you release each field to its new location.
-
Next, let's add a screen to create new incidents.
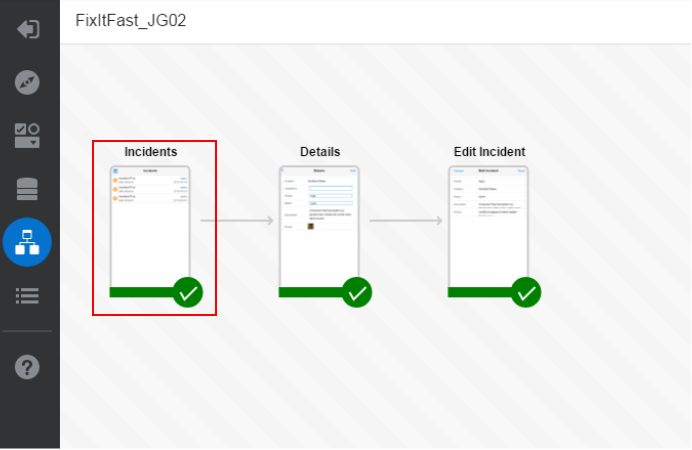
On the far left toolbar, click the fifth item from the top, Screen Flow. This will show you all the screens that you've created so far. Double-click the Incidents screen to open it in the Preview.
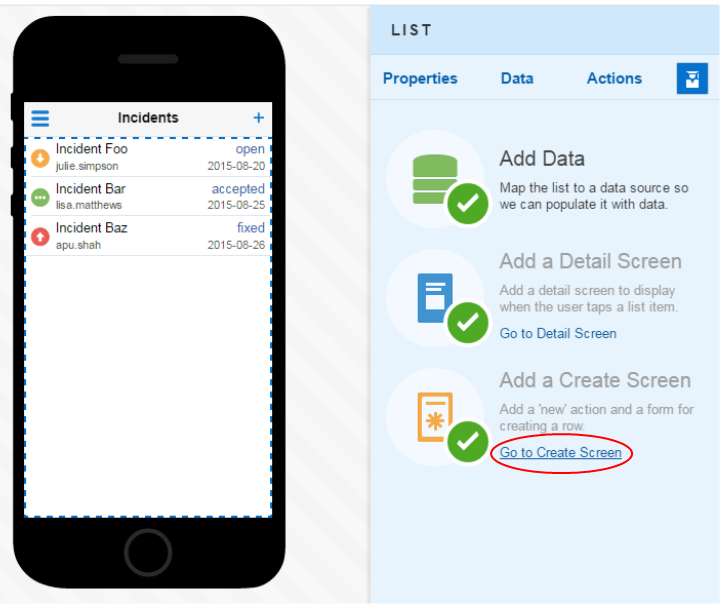
In the Quick Start menu, click the Add a Create Screen area.
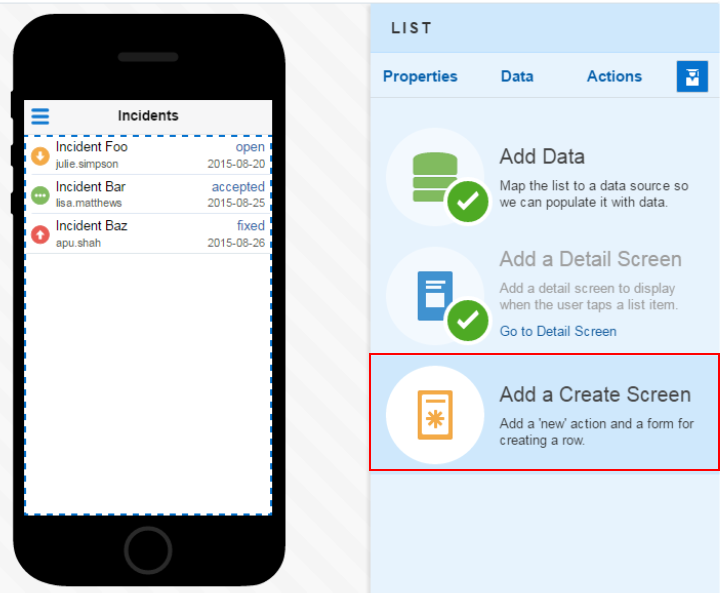
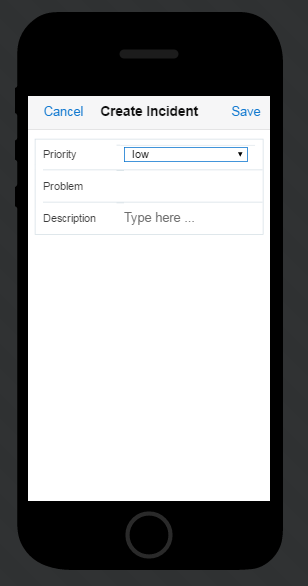
In the Preview, you should see the blue plus sign in the upper right of the screen. Clicking it will invoke the Create screen.
Click the Go to Create Screen text link.
-
In the Create screen, notice the fields that are displayed.
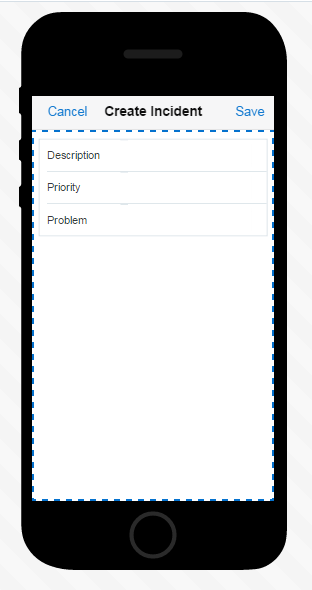
These fields were defined in the new-incident schema from the API:

-
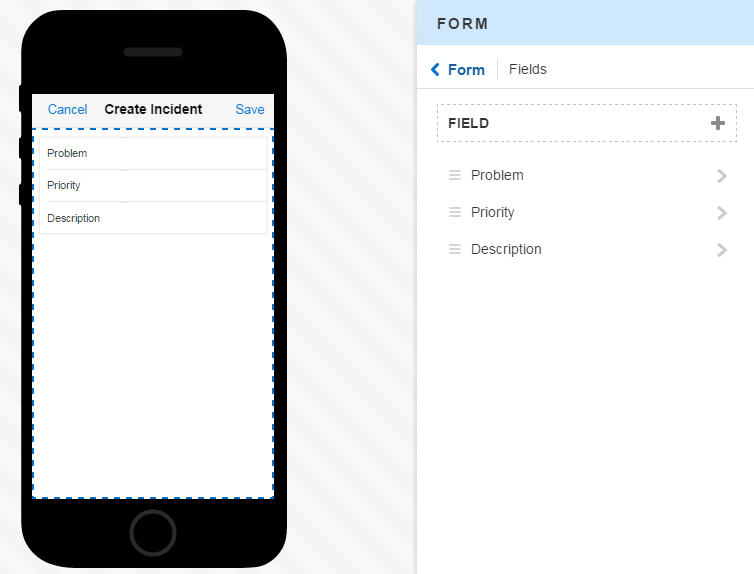
Click the Properties menu, then click the Fields option. In the Preview, notice that Cancel and Save links are automatically added to the screen, just as they were added to the Edit screen.
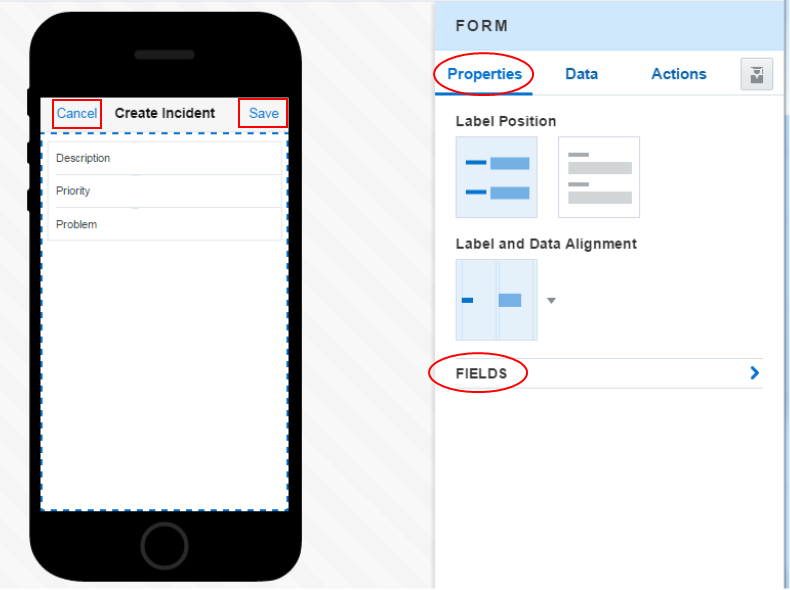
Let's change the order of the fields to Problem, Priority and Description.
-
Now, set the Priority field's Field Type to Select. Notice that you get a default value, which originates from the schema definition.
In the next step, you'll test your MAX application with the built-in test feature.
Step 10: Test your application in a browser
You've created an API, consumed it in a MAX application, and added a schema to the API. Now let's load and test your application in a tester, which is available inside the MAX browser.
-
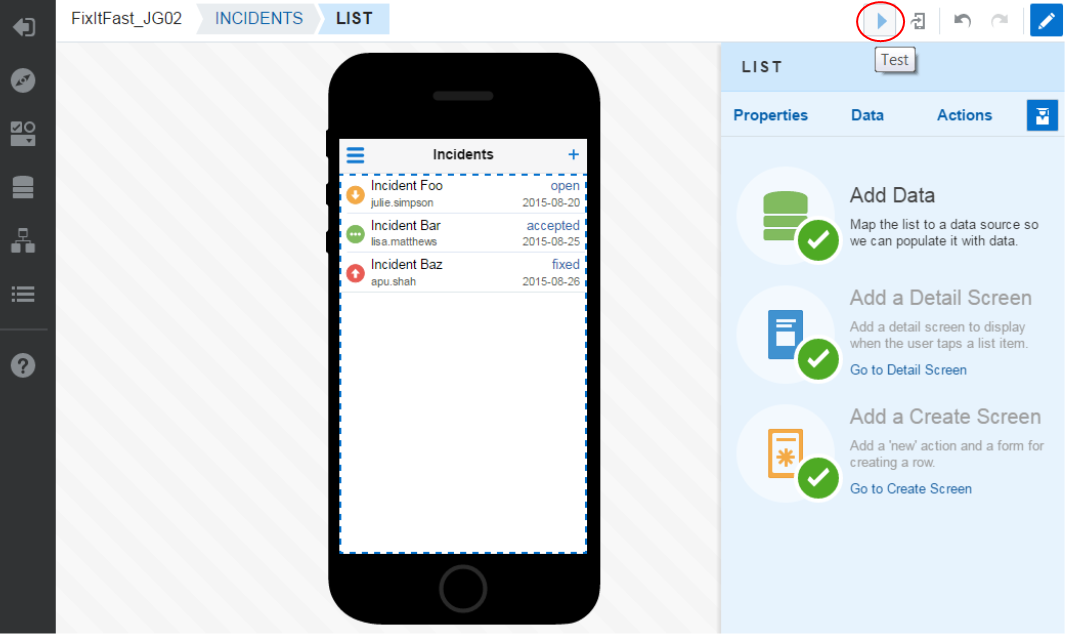
Go back to your MAX application in a browser. In the Designer, click the Test button in the upper right.
-
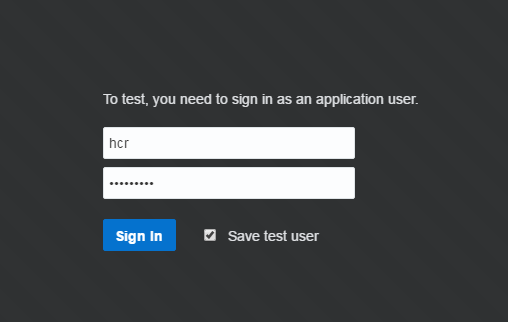
In the Sign In page, set the Username to hcr and the Password to whatever you specified when you created the user.
Click the Sign In button.
-
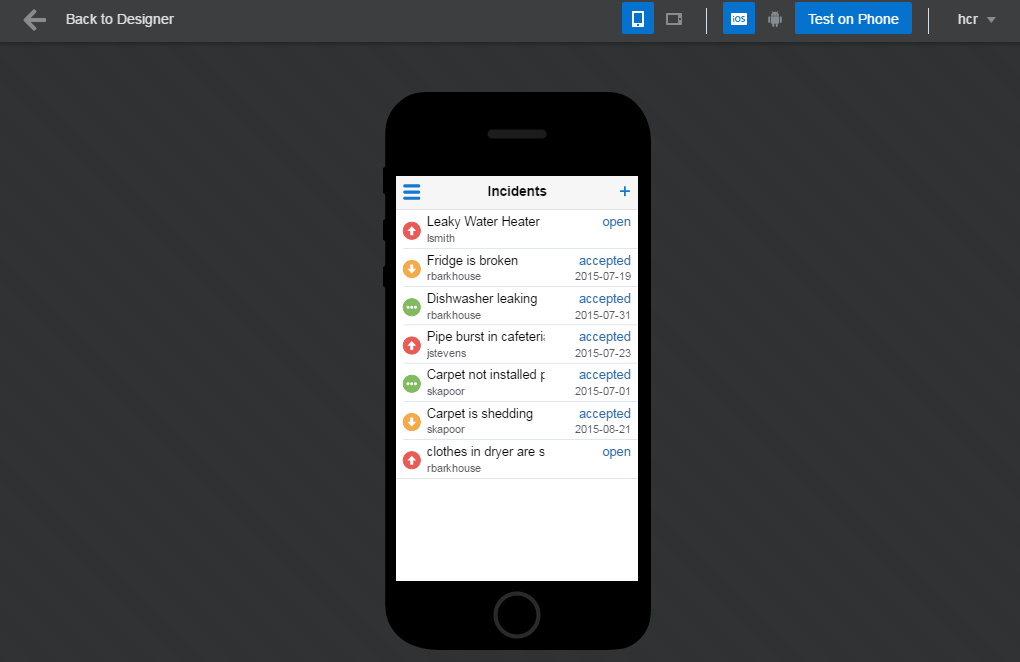
You should see a list of Incidents. Notice there are now colored, circular icons to show the priority of each incident.
-
Click one of the incidents to navigate to the Details page, and check out the values available for priority or status. Click Edit to view the page where you can modify incident details.
-
The Edit screen displays all the fields defined for patch-incident schema, but display in order that you set.
-
Click Cancel in the Edit screen. Then, in the Details screen, click the blue arrow in the upper left to navigate to the main Incidents screen.
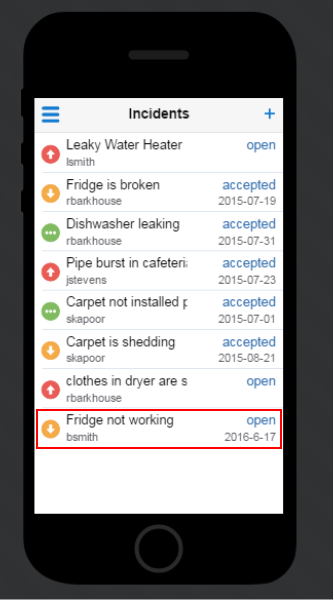
On the main Incident screen, click the blue plus sign in the upper right, which displays the Create screen. Notice there is now a default value, which originates from the schema.
Set the values as shown in the next screen and click Save.
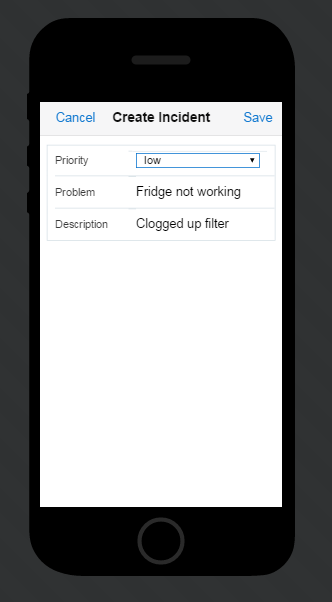
You can see that your new incident has been added to the bottom of the list.
Congratulations! You've now completed this tutorial. By building a custom code API with JSON schemas and a mobile app, you're now familiar with how MCS relates to MAX.