Before You Begin
Purpose
This tutorial guides you through the steps of integrating SMS services with Mobile Cloud Services.
If you want to engage someone and encourage them to act, SMS is a viable option. If you know your user audience, here are some use cases where SMS is valuable.
- Sales Promotions & Marketing Campaigns: You can use SMS to advertise an upcoming sale or to promote a new marketing campaign
- Confirm an Order & Track Shipments: Once an order is places, SMS can be used to confirm the order and allow for it to be tracked
- Product Launches or Discount Coupons: Notifying users of new products they may be interested in and coupons to entice them can be facilitated with SMS
- Short Surveys and Lottery Chances: You can also use SMS for short surveys on how well the company did and to provide chances to win prizes by registering in a lottery
- HR & Recruitment: Human resources can send short details about upcoming holidays, schedule changes or benefit updates along with potential job offerings that might be of interest
To send an SMS message there are three main players: Oracle MCS, Syniverse, and Your Devices. MCS is responsible for defining the message payload and the conditions for it’s delivery. Syniverse directs the message payload to the device and then the device receives the message and displays it in it’s native messaging application.
Step 1: Establish a Syniverse account
In this section, you subscribe to the Syniverse Messaging Service, and create a profile on the Syniverse Developer Community. If you already have a profile, you can skip this step but you will need all of the credentials and channel id when defining the profile in your MBE.
-
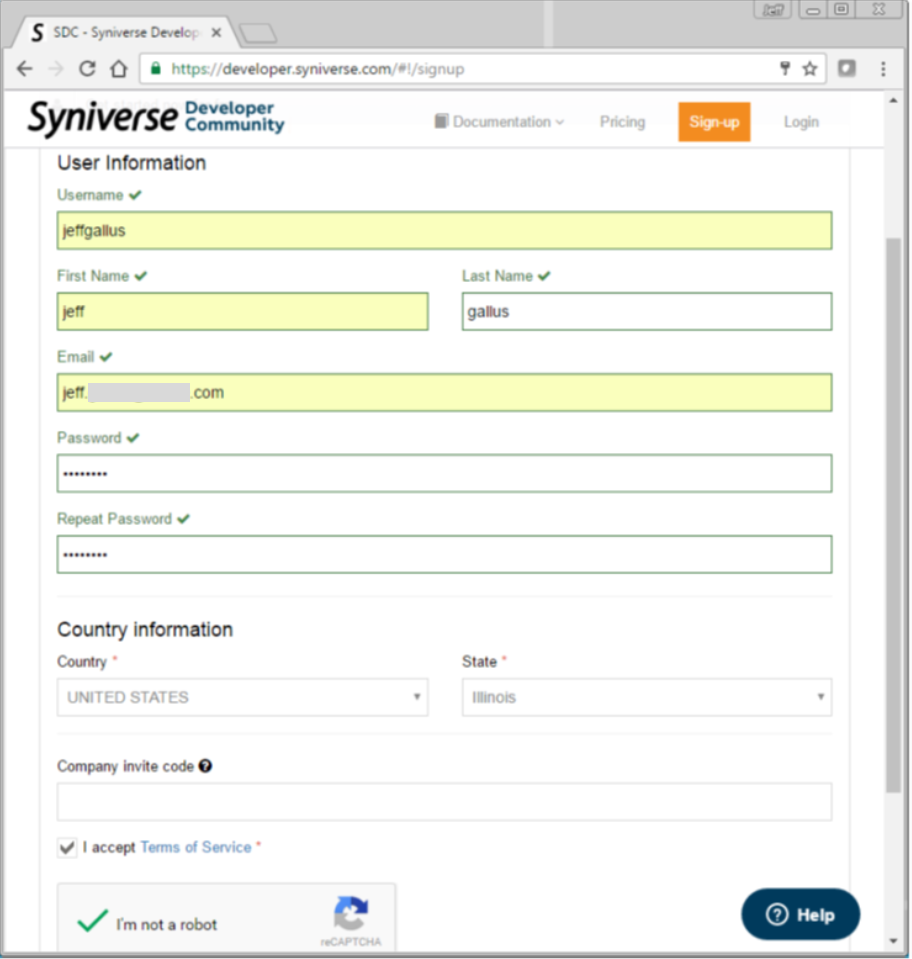
Go to the Syniverse Developer Community (developer.syniverse.com). Click Sign Up in the top right corner of the site and enter the requested information.
-
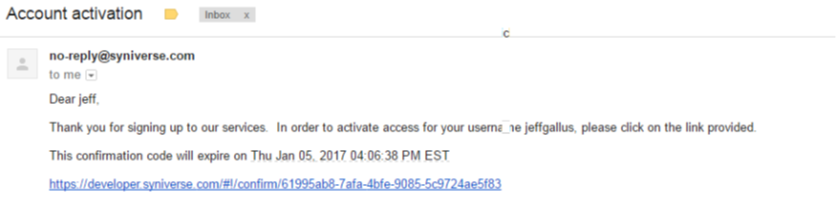
After completing the form, a confirmation email will be sent you to.
When the confirmation email arrives, click the link in the email and verify your user credentials.
-
Next, subscribe to the Syniverse Messaging Service.
To use SMS in your apps using the short code you got from Syniverse, you need to subscribe to the Syniverse Messaging Service. If you’re using a temporary short code from a Syniverse trial to test messages, you also need to add phone numbers to the associated whitelist.
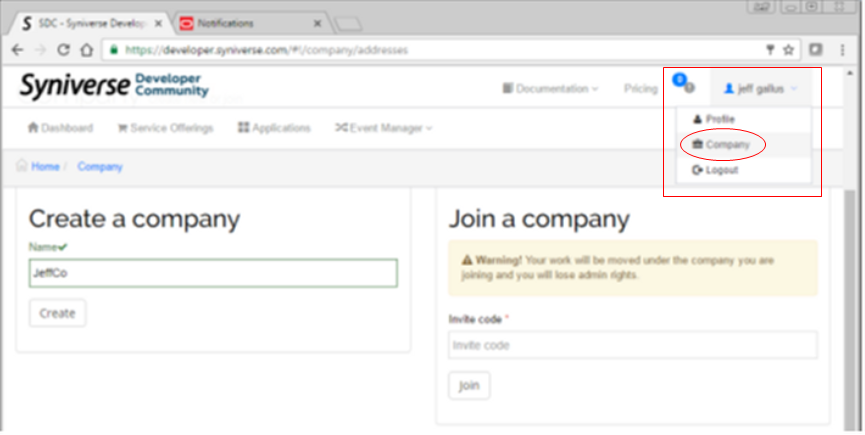
Log back in to the Syniverse Developer Community (developer.syniverse.com). Then, click your user name in the top right corner and select Company. SDC generates an account automatically and provides a default credit of $5 to all users on sign up.
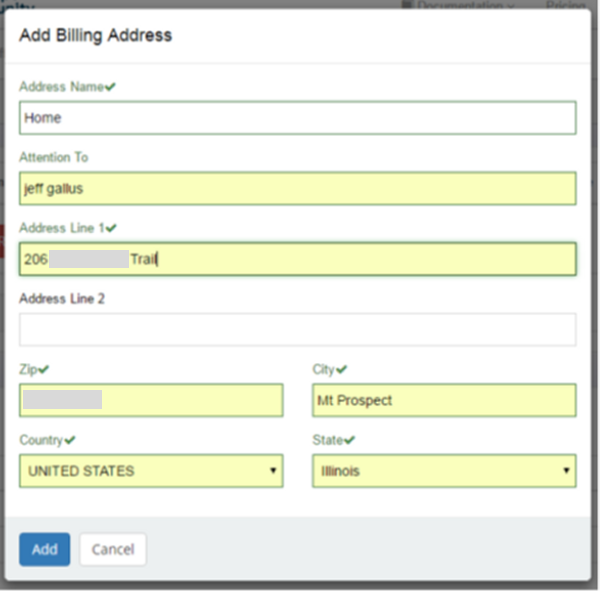
Verify that your accounts have a billing address associated with them..
-
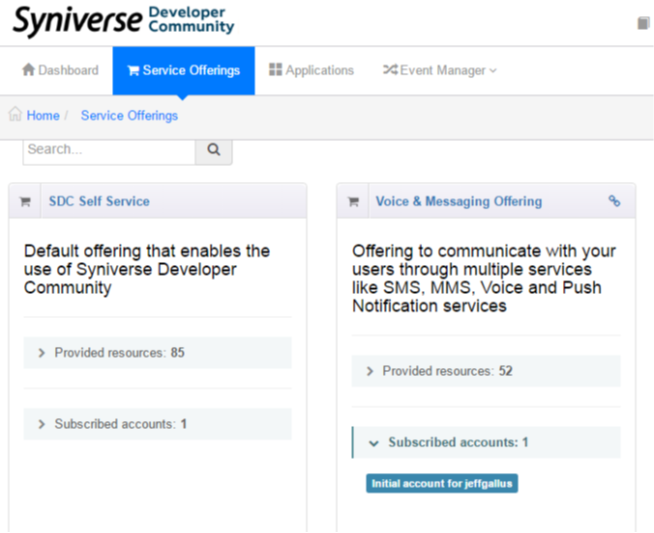
Next, navigate to Service Offerings > Messaging Offering and click Subscriptions. Click the Voice and Messaging Offerings ‘two gears’ in the upper right of the header, then click the Subscriptions option. Click the Subscribe button and select your account from the list.
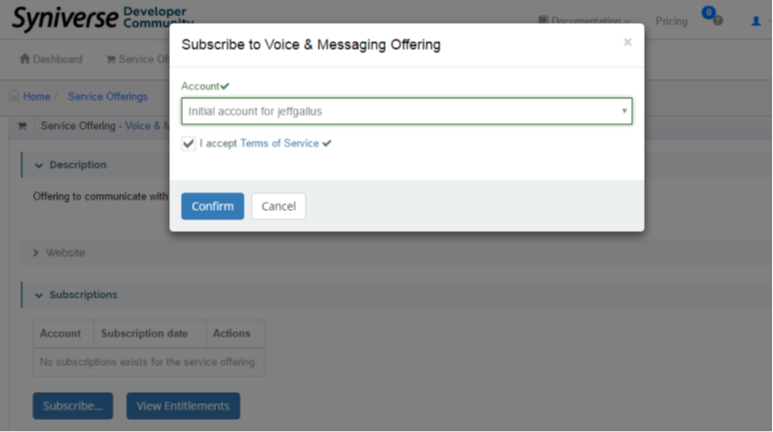
Read and accept the Terms of Service, click Confirm and verify that your account is listed in Subscriptions.
-
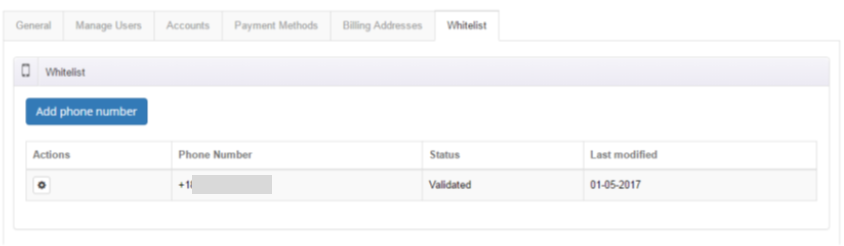
If you’re using a temporary short code from a Syniverse trial to test messages, you need to add test phone numbers to the associated whitelist. (This set of steps aren't necessary in production with your provisioned short code.)
a. Click the Whitelist tab on your Company page.
b. Click Add phone number and enter your phone number in the ITU-T E.164 format (i.e., +11234567890).
c. Click Send confirmation code to send a randomly generated number to the phone number in a text message.
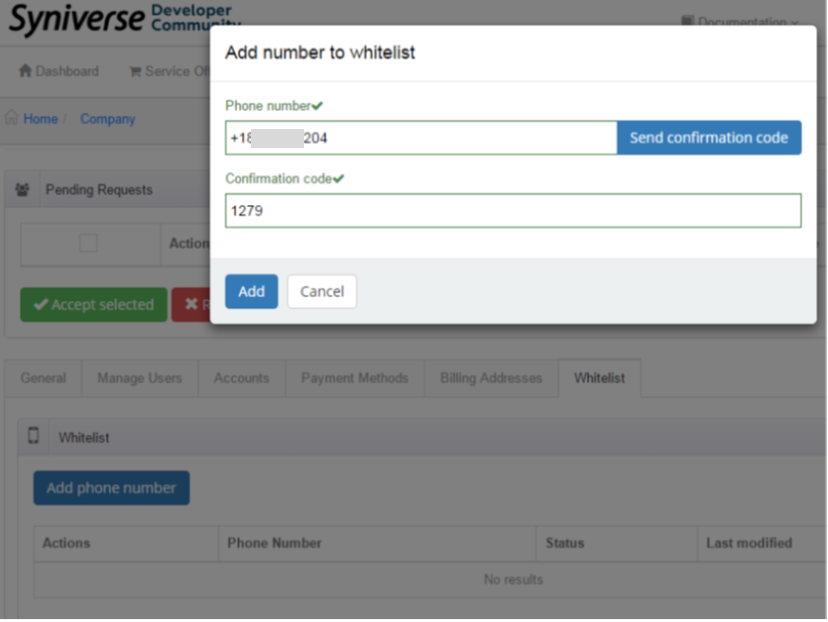
d. Retrieve the confirmation code from the text message and enter it in the Confirmation code field. Click Add to confirm the phone number whitelist.
e. Verify that your phone number is included in the whitelist table with "Validated" status.
-
Next, register your app and get credentials.
In order for MCS to connect over to Syniverse to send the message, you need four credentials. Syniverse will generate three of the credentials you’ll need including a consumer key, consumer secret password and an access token. You also need a channel to deliver the message from Syniverse. For testing purposes, Syniverse provides a public channel you can use but for production applications, you’ll probably wan to create a dedicated channel to communicate with your users. When creating these credentials, you’ll want to save the values as they are needed when specifying the notification definition in MCS.
Before messages can be sent through the Syniverse Messaging Service, there must be an application configured in the SDC platform. Once your app is registered, you can generate the required credentials.
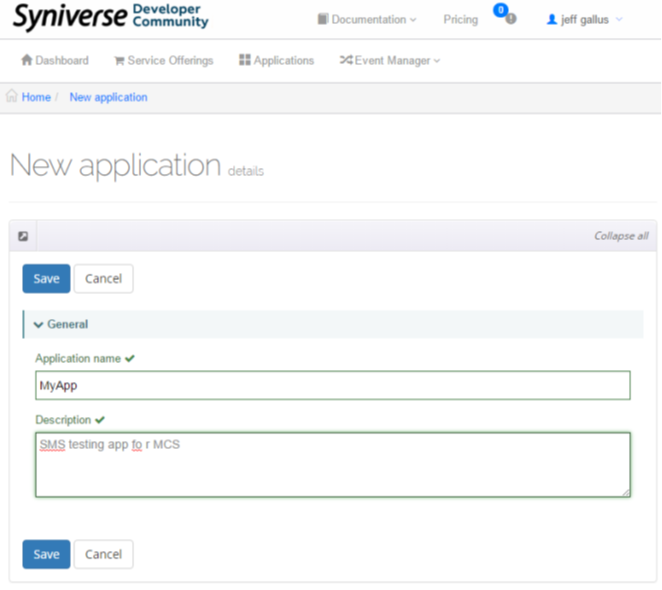
Click Applications and then click New application. Name the application and click Save.
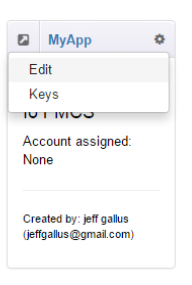
Click the gear icon next to your app name and select Edit..
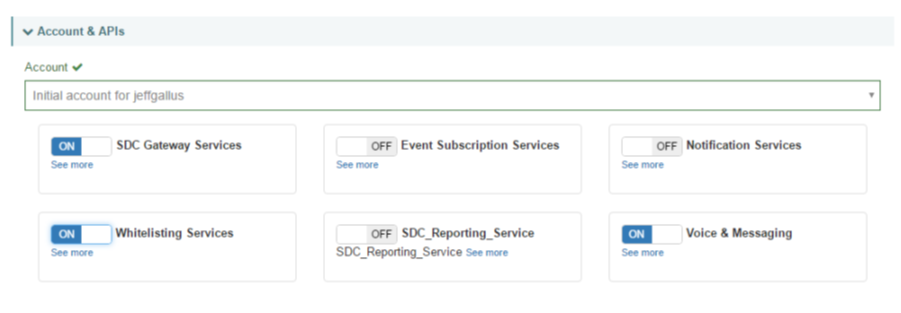
Then, click Account & APIs and select the "Initial account for [Your username]" from the Account drop down. Turn on the following services: Messaging, SDC Gateway Services and Whitelisting Services. Click Save.
-
Next, generate the required credentials.
a. From the Applications page, click the gear icon next to your app name and select Edit.
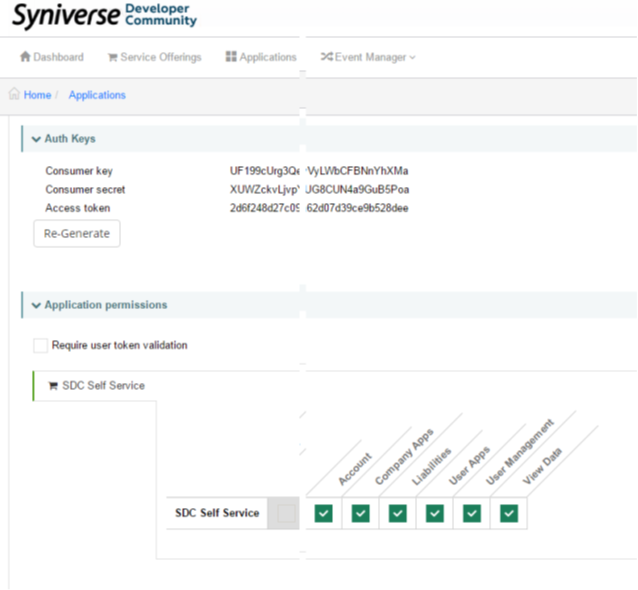
b. Click Application permissions.
c. Click the first check box next to your app name to give your application full entitlements.
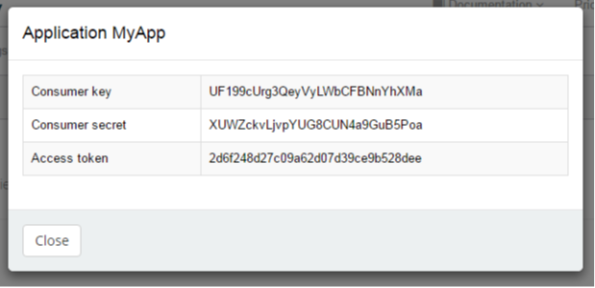
d. Click Auth Keys to generate the credentials.
e. Copy and store the keys to a safe place on your computer.
Consumer key = UF199cUrg3QeyVyLWbCFBNnYhXMa
Consumer secret = XUWZckvLjvpYUG8CUN4a9GuB5Poa
Access token = 2d6f248d27c09a62d07d39ce9b528dee
-
Next retrieve the Channel ID.
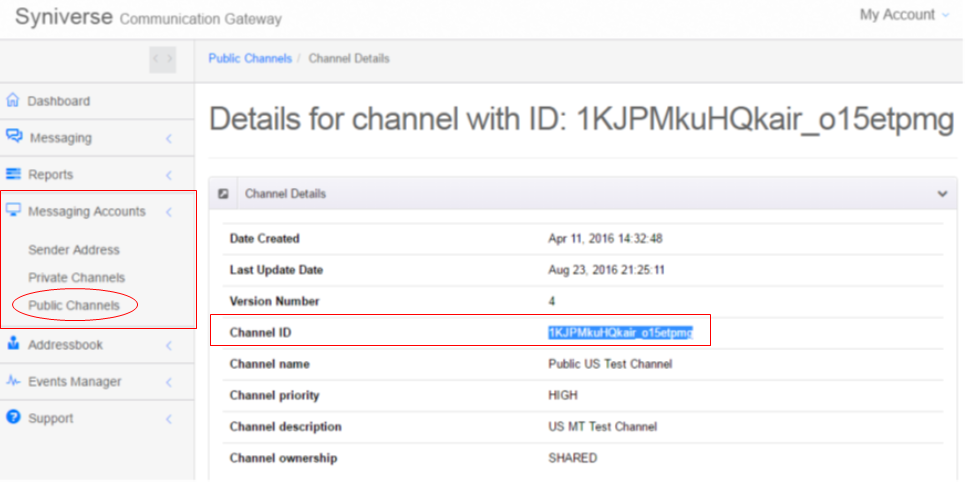
Within Syniverse a "Channel ID" is a code supplied by Syniverse. It represents a code for every country you want to send SMS messages to, where your mobile users reside. Navigate to the Communication Gateway.
a. Select the Service Offerings tab.
b. Locate the Voice & Messaging Offerings box, and click the link button in the top right of the box.
c. This will open the Syniverse Communication Gateway. If it fails to open and you get login error try a different browser. The Gateway shows you information like incoming and outgoing SMS, analytical reports and more.
d. Select the Messaging Accounts then Public Channels option. This displays all the country channels available to use including the relating channel ID that you need for MCS. For testing purposes identify a channel for the country where you and your mobile device reside, and copy down the Channel ID.
You have now completed the necessary steps to set up your Syniverse account.
Step 2: Setup MCS to use the Syniverse Account and Send a Test Message
In this part of the tutorial, setup MCS to use the account information provided by Syniverse to send SMS messages.
-
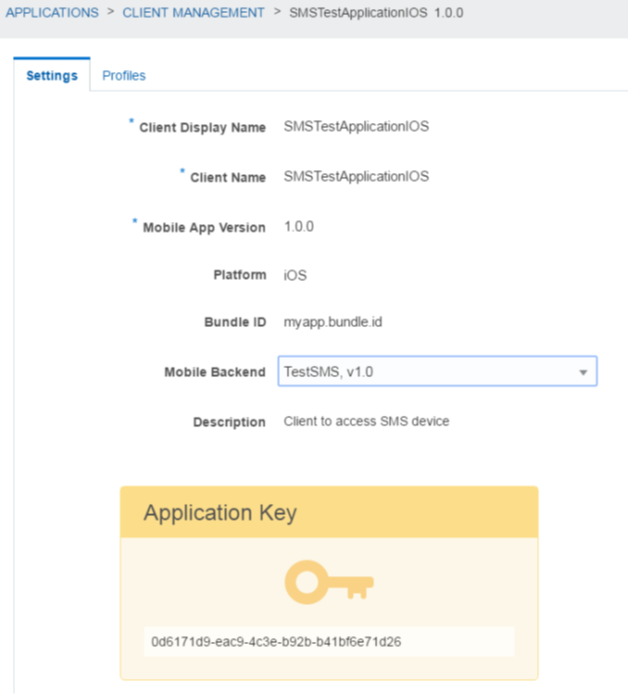
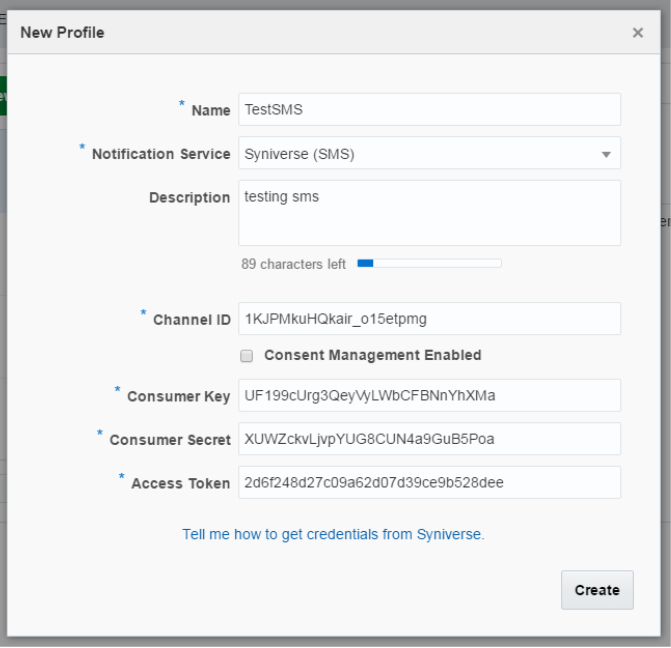
Once you’ve completed the Syniverse definitions, now you can setup the MCS environment. First, like with all MCS access, you need a Mobile Backend to facilitate working with your notifications. Once you’ve created an MBE, then you need to define a client application. The Client Application definition consists of two parts: Settings and Profiles. In the settings you just need to define the platform you’ll be using and the MBE that will manage it. The profile provides the connection to the Syniverse definitions you created. Besides setting the profile to use the Syniverse notification service, here’s where you include the Syniverse credentials including: the Channel ID, Consumer Key, & Secret password and Access Token. The final thing to define are the devices you’ll be sending the message to.
Login to your MCS instance and from the Applications menu, navigate to the mobile backend you wish to support SMS from.
Under the mobile backend configure a new Client.
c. Under the client configure a new Profile using the Syniverse details you captured earlier. For the Content Management Enabled checkbox leave this off for development purposes.
-
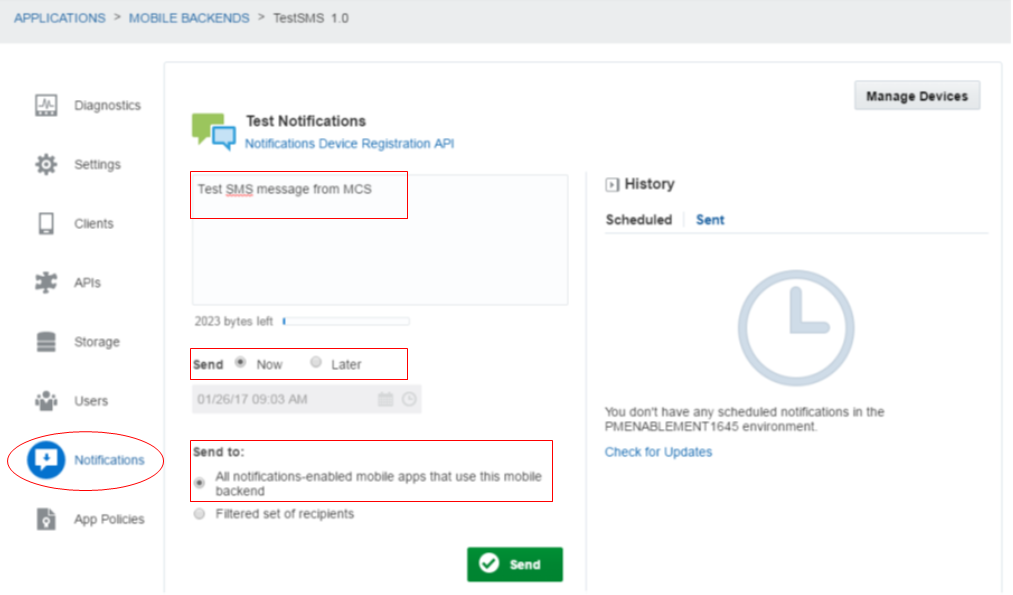
MCS provides a notifications testing UI that allows you to send scheduled notifications to a defined set of recipients.
a. Make sure you’re in the environment where you want to create the notification. Click to open the side menu and select Applications > Mobile Backends.
b. On the Mobile Backends page, select the mobile backend that includes your mobile app and click Open.
c. Click Notifications.
d. Setup a New Device to associate the MBE, Phone Number, and Client Application & Profile.

-
Back on the Test Notification page, you may send in plain text or a JSON payload. If you enter JSON, it must conform to the notification provider’s requirements. If it is not valid JSON, it will be sent as a plain text message. Some options you can set are:
a. Select when to send the message.
o To send the notification immediately, leave the default Now.
o To schedule the notification for a later date and time, choose Later and select the date and time for the notification to be sent.
b. Select who to send the message to.
o To send the notification to everyone in the mobile backend, leave the default All notifications-enabled mobile apps that use this mobile backend. A single mobile backend may contain more than one version of a mobile application, with implementations for different devices and networks. This option sends to all notification-enabled clients, regardless of the network or device.
o To define a filter by user name, platform type, device ID, Facebook ID, or any combination, choose Filtered set of recipients. Under Match all of the following, select the filter type from the drop down list:
• Device ID: Send a notification to a single device ID or to multiple device IDs at the same time. The device ID is a unique number assigned to a mobile device during the device handshake. For SMS, the device ID is a phone number. In general, sending a notification to a device ID is useful for testing your application but not practical in bulk.
• Platform: Send to all recipients running on iOS, Android, Windows or Web.
• Provider: Send to all recipients receiving APNS, GCM, WNS or Syniverse (SMS) notifications.
• User: Send a notification to a single user or to a list of users.
• Facebook Unique ID: Send a notification to a Facebook user, by ID.
-
If your device isn’t registered yet, you can access the Device Registry by clicking Manage Devices.
Then, click Send and the message should be delivered to your device.
In this example, a filter was applied to send the message to a specific phone number.

Congratulations! You've now completed this tutorial. You have now sent a SMS message from MCS.