1 Using Design Studio to Extend Network Integrity
This chapter provides information on Oracle Communications Design Studio, an Eclipse-based integration development environment. Design Studio comes with features specific to Oracle Communications Network Integrity that enable you to extend Network Integrity.
This chapter contains the following sections:
Installing Design Studio
Use Design Studio to extend Oracle products. Different features are available for the different Oracle features, and each feature provides JAR files that are unique to the product.
See Design Studio Installation Guide for information about installing Design Studio and the Design Studio for Network Integrity feature.
Configuring Design Studio for Network Integrity
Configuring Design Studio for Network Integrity requires:
Configuring Network Integrity Preferences
Configuring Network Integrity preferences in Design Studio includes specifying a default cartridge package name for all created cartridge projects and specifying the default MIB directory.
To configure Network Integrity preferences, see the Design Studio Modeling Network Integrity Help.
Network Integrity Project Dependencies
All Network Integrity cartridge projects have dependencies on several other Network Integrity cartridge projects. Before creating a new Network Integrity cartridge project or importing productized Network Integrity cartridge projects, import the following projects into Design Studio:
-
ora_uim_model
-
ora_uim_mds
-
ora_ni_uim_ocim
-
NetworkIntegritySDK: this cartridge project contains common software components and libraries required for creating and extending Network Integrity projects.
These projects are available in the Oracle Communications Network Integrity 7.3.2 Software Developer Kit (included with the Oracle Communications Network Integrity 7.3.2 software) on the Oracle software delivery website:
See the Design Studio Help for information about importing projects into Design Studio.
Configuring Data Dictionary Preference Settings
You configure data dictionary preference settings to specify the horizontal depth to which any data dictionary tree can expand.
To configure data dictionary preferences, see the Design Studio Help.
About Design Studio Perspectives
Perspectives define your Workbench layout and provide different functionality for working with different types of resources. Several perspectives are available within Design Studio. The Java, Studio Design, and Studio Environment perspectives are commonly used when extending Network Integrity.
For instructions on how to open a perspective, see the Design Studio Help.
About Design Studio Views
Within a given perspective, views further define the Workbench layout and provide different presentations of resources. Several views are available within Design Studio, and the available views are dependent upon the perspective.
For instructions on how to open a view in Design Studio, see the Design Studio Help.
About Projects
Projects contain Network Integrity artifacts that you create and define in Design Studio, such as custom actions and processors.
Everything you create in Design Studio resides in a project. The name you choose for the project becomes the name of the integrity archive (IAR) file, and everything you create within that project is automatically placed in the IAR file.
When extending Network Integrity, you can create one or many projects, depending on how you choose to organize the extensions.
Network Integrity projects are packaged extensions to the core application. They represent the necessary components needed for the following:
-
Discovering network elements, either from a Network Management System (NMS) or through direct contact with the Network Element (NE)
-
Importing network elements from an inventory system
-
Assimilating network data using business logic
-
Detecting discrepancies between the network and the inventory system
-
Resolving discrepancies, either within the network, or in the inventory system
Network Integrity projects provide the ability to support new functionality as business cases arise, such as:
-
New protocols, such as Command Line Interface (CLI) and Transport Layer Security (TLS)
-
New standards, such as a new RFC
-
New vendor devices, such as Juniper, Huawei
-
New operational or business support systems
See the Design Studio Help for more information about creating projects.
About the Project Architecture
A Network Integrity cartridge project typically contains the following entities:
-
Zero or more actions:
-
Zero or more discovery actions
-
At least one discovery, file transfer, or file parser processor
-
-
Zero or more assimilation actions
-
At least one assimilation processor
-
-
Zero or more import actions
-
At least one import, file transfer, or file parser processor
-
-
Zero or more discrepancy detection actions
-
At least one discrepancy detection processor
-
-
Zero or more discrepancy resolution actions
-
At least one discrepancy resolution processor
-
-
-
Zero or more model collections
-
Zero or more specifications
-
Zero or more scan parameter groups
Alternatively, your project can contain address handler entities. A project containing address handler entities cannot contain any other entity types. This allows for a clear segregation of responsibility. So, for example, you create a project called Address Handlers where different address handler types exist (for example: IP Address, URL, and so on) and simply reference those from within their discovery and import cartridge projects.Projects can also reuse actions from other projects to extend behavior. For example, a Juniper-specific SNMP cartridge project (that is, containing Juniper MIBs) could extend a generic SNMP cartridge project (MIB II only).After all components are defined, projects are packaged into an IAR file and can be deployed to a running Network Integrity system as a cartridge.
See "Building and Packaging Projects" and "Deploying and Undeploying Cartridges" for more information.
After a cartridge is deployed, it is available to Network Integrity.
To determine whether a cartridge is deployed in Network Integrity:
-
From the Network Integrity main menu, click Help, and then select About.
The Network Integrity components dialog appears.
-
Select the Components tab.
The Network Integrity product version is displayed with the versions of all cartridges deployed in Network Integrity.
Working with Projects
When working with projects, see the following:
Building and Packaging Projects
Design Studio packages project information into cartridges that can be deployed into Network Integrity.
Projects can be developed by customers, systems integrators, Professional Services staff, and third-party vendors.
About the Project Build Order
When Design Studio builds a Network Integrity project, the build process takes place in the following order:
-
Generation of Java source code: Generators are invoked to generate Java source codes from Network Integrity models, EJB descriptor files, XML schemas for the SNMP processor, and the Meta Model XML file.
-
Java Source Compilation: Eclipse compiles the Java source (including generated Java source and implemented Java source) into classes.
-
Building: Builders are invoked to build UI hints, the Data Dictionary, and specifications.
-
Validation: Validators are invoked to validate Network Integrity model entities. Validation errors are raised and an error marker displayed on the related entities in Design Studio. If any validation errors are raised, the packaging stage does not take place.
-
Packaging: Packagers are invoked to package the cartridge deployment model XML file, the UI hints Metadata Archive (MAR) file, specification Data Access Object (DAO) files, dependent JAR files, the manifest file for JAR files library for EJB, and the final IAR file for the Network Integrity cartridge.
About Build Artifacts
Design Studio generates various build artifacts for a Network Integrity project after a successful build. The generated directories are listed in the following order in the directory structure:
-
Out: This directory contains all the compiled Java classes.
-
Generated: Contains the following build artifacts:
-
Generated Java sources for actions and processors. If the project is sealed without Java source, the JAR file is displayed instead.
-
SNMP schema artifacts for the SNMP processor.
-
-
cartridgeBuild: contains various build artifacts for the Network Integrity cartridge.
-
cartridgeBin: contains the final packaged Network Integrity cartridge as an IAR file which can be deployed to the Network Integrity server through the cartridge management web service (CMWS).
The following directories comprise the normal directory structure for a Network Integrity project. Do not modify these directories:
-
dataDictionary: contains the Data dictionary
-
doc: contains documents
-
lib: Copy any third party JAR library into this directory.
Switch to the Packager Explorer view, and modify the Java class path to include any JAR files that have been added to this directory.
Select the project, and click F5 to refresh the project in Design Studio to get the modified Java class path affected.
-
model: contains all Network Integrity models
-
out: output directory for compiled Java classes
-
resources: contains resources related to Network Integrity. This directory is empty by default
-
src: the Java source directory.
Packaging Projects
Packaging a project is the last stage in building a cartridge. The cartridge is packaged as an IAR file, which can be deployed to the Network Integrity server through the CMWS.
The IAR file contains the following build artifacts:
IAR root/
                <cartridge-ejb-jar>.jar - This jar contains manifest.mf file to refer to the jars under cartridgeLib/<cartridgeName>.
                oracle.communications.platform.entity.impl.SpecificationDAO
                oracle.communications.platform.entity.impl.CharacteristicSpecUsageDAO
                oracle.communications.platform.entity.impl.CharacteristicSpecificationDAO
                <cartridgeName_A>.mar
                <cartridgeName_B>.mar
                …
                <cartridgeName_N>.mar - Multiple MAR files if this cartridge is reusing Actions from other cartridges.
                <Action_Name_A>_MetaModel.xml
                <Action_Name_B>_MetaModel.xml
                …
                <Action_Name_N>_MetaModel.xml - Meta Model XML file per Action.
                /META-INF/
                                cartridge.xml
                                manifest.xml
                /cartridgeLib/<cartridgeName>/*.jar (any dependent jar files used by this cartridge, if available)
If a project contains only abstract entities, no IAR file is generated.
Deploying and Undeploying Cartridges
Network Integrity cartridges can be directly deployed or undeployed from Design Studio.
Use the Oracle Cartridge Deployer to deploy or undeploy any productized Network Integrity cartridge into a production system.
Note:
Before deploying or undeploying cartridges, ensure that:-
You are logged out of the WebLogic Server Administration Console.
-
No one else is deploying or undeploying cartridges on the same server.
-
Network Integrity is not running a scan that makes use of the cartridge.
Creating a Design Studio Environment Project
Design Studio projects are collections of folders and files that represent the content you are working on. They are used for builds, version management, sharing, and resource organization. Projects map to directories in the file system. When you create a project, you specify a location for it in the file system. Design Studio uses the files and folders in a project to build a cartridge that you can import into Network Integrity. See "Building and Packaging Projects" for more information. To deploy or undeploy a cartridge from Design Studio, you must first create a Studio Environment Project. When you create a project, you specify its name and location for its corresponding file structure.
See the Design Studio Help for more information on creating an environment project.
Creating a Design Studio Environment For Network Integrity
Having created a Studio Environment Project, you then create the environment. An environment represents a connection to a particular server.
See the Design Studio Modeling Network Integrity Help for more information about creating Design Studio environments.
When creating and working with your environment, consider the following:
-
When specifying the name of your environment, incorporate the name of the server.
-
If you are using SSL, the CMWS URL must be specified with https. Also, you must configure the Environment editor SSL tab with the location of the keystore file.
-
Configure the Environment editor Properties tab for the following properties:
-
wladmin.host.name: The host name or IP address where the Oracle WebLogic Administration Server is running.
-
wladmin.host.port: The port number on which the Oracle WebLogic Administration Server is running.
-
wladmin.server.name: The Oracle WebLogic Administration Server name.
-
Deploying a Cartridge
The Design Studio Network Integrity feature provides the ability to deploy a cartridge into Network Integrity. For instructions on how to deploy a cartridge, see the Design Studio Help.
Undeploying a Cartridge
The Design Studio Network Integrity feature provides the ability to undeploy a cartridge into Network Integrity. For instructions on how to undeploy a cartridge, see the Design Studio Help.
When a cartridge is undeployed, Network Integrity removes all the scan configurations and scan results associated with the cartridge and all the specifications associated with the cartridge (except those specifications still in use by other cartridges).If a cartridge has a dependency on other deployed cartridges, the cartridge cannot be undeployed. For example, you cannot undeploy the Address_Handlers cartridge if the cartridges using Address_Handlers are still deployed in Network Integrity. You must undeploy all dependent cartridges from Network Integrity before Address_Handlers can be undeployed.
The Network Integrity CMWS Adapter automatically performs dependency checks at deployment or undeployment time and returns error messages if deployment or undeployment cannot be performed.
Redeploying a Cartridge
The Design Studio Network Integrity feature provides the ability to deploy a cartridge into Network Integrity, including previously deployed cartridges. For instructions on how to deploy a cartridge, see the Design Studio Help.
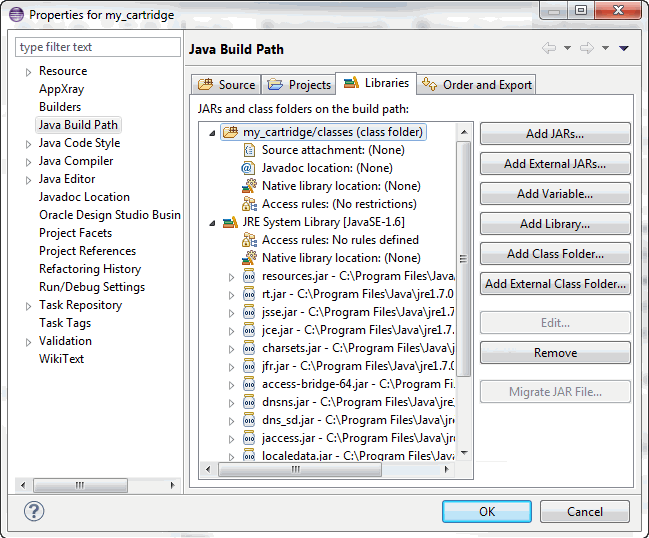
You can redeploy a Network Integrity cartridge using Design Studio only if the version of the redeployed cartridge (build number) is equal to, or greater than, the version of the deployed cartridge. For example, my_cartridge is already deployed with a build number of 28 (b28). If my_cartridge is up-versioned to b30, you can deploy it without undeploying my_cartridge (b28) and deploying it again.
Redeployment removes the deployed cartridge and deploys the new cartridge instead. Network Integrity does not allow more than one version of the same cartridge to be deployed at the same time.
Debugging and Testing Cartridges
This section provides information about debugging and testing cartridges in Network Integrity.
Starting the WebLogic Server in Test Mode
To debug a deployed Network Integrity cartridge, start the WebLogic Managed Server in debug mode (not the Administration Server).
Use the following procedure to start the WebLogic Managed Server in debug mode:
-
Stop both the Administration Server and Managed Server if they are still running.
-
Go to directory <WEBLOGIC_HOME>/user_projects/domains/<DOMAIN>/bin.
-
Copy the existing startWebLogic.sh script to a new script file, startWebLogic_Debug.sh.
-
Use a text editor to open startWebLogic_Debug.sh.
-
After the line
${JAVA_HOME}/bin/java ${JAVA_VM} –version, add the following two lines:echo "Launching Java with debug port: 10171" JAVA_OPTIONS="-Xdebug -Djava.compiler=NONE -Xnoagent -Xrunjdwp:transport=dt_socket,server=y,address=10171,suspend=n $JAVA_OPTIONS"
The debug port does not have to be 10171 if the port specified is available.
-
Save this change.
-
Copy the existing startManagedWebLogic.sh script to a new script file, startManagedWebLogic_Debug.sh.
-
Use a text editor to open startManagedWebLogic_Debug.sh.
-
Find the two lines that are referring to startWebLogic.sh.
-
Replace startWebLogic.sh with startWeblogic_Debug.sh. This change is to start the WebLogic Managed Server in debug mode by invoking the startWebLogic_Debug.sh script.
-
Save this change.
-
Start the Administration Server by running the usual start-up script, startWebLogic.sh.
-
Start the Managed Server in debug mode by running the new script, startManagedWebLogic_Debug.sh.
Configuring Remote Debugger in Design Studio
The Managed Server is now in debug mode. The next step is to configure the debugger in Eclipse to start remote-debugging the Network Integrity cartridges.
-
From the Design Studio main menu, select Run then Debug Configurations, then open the Debug Configurations dialog to switch Design Studio to the Java perspective.
-
From the left panel, select Remote Java Application.
-
Click New to create a remote Java application debug configuration.
-
Enter a name for this new debug configuration.
-
In the Connect tab, click the Browse.
-
Select an available project that contains the cartridge that to debug.
-
Ensure that the default setting for Connection Type is Standard (Socket Attach).
-
Enter the host IP address where the Network Integrity system (WebLogic Managed Server) is running.
-
Enter the debug port, which should match the debug port entered in "Starting the WebLogic Server in Test Mode".
-
Keep the default settings for the rest of the tab.
-
Click Apply to save this new remote Java application debug configuration.
Now the developer can start to debug the Network Integrity cartridge (which should be already deployed on the Network Integrity system) from Design Studio by picking up the debug configuration just created. There is no difference from debugging a normal local Java application in Eclipse. We can put a break point in the cartridge Java source and start debugging from there. For instructions on how to debug a Java program in Eclipse, see the Eclipse Help topics Java development user guide, Getting Started, Basic tutorial, and Debugging your programs.
Sealing and Unsealing Projects
Some Network Integrity production cartridges are distributed as sealed projects. Unsealing Network Integrity production cartridges violates the license, support, and maintenance agreements with Oracle.
You may encounter build problems if you unseal a sealed cartridge in your workspace. The error logs may indicate that some dependent JAR files are missing from the workspace. The main cause for this is that the sealed cartridge may not have included any source code, and that a Clean operation may delete the JAR file, and then is not able to recreate it. The solution is to delete the unsealed cartridge, and re-import the sealed cartridge.
See the Design Studio Help for more information about sealing and unsealing cartridges.
Exporting and Importing Cartridges
This section provides an overview of exporting and importing Network Integrity cartridges.
Cartridge projects can be exported to archive files. This allows the cartridge projects to be distributed as a single or a set of archive files, rather than as the many files of a cartridge project. Once a project is exported to an archive file, the archive file can be distributed and then imported into a different Design Studio or Eclipse workspace.
Before exporting a cartridge project, you should decide whether you want to include your source code in the archive file. Cartridges can be extended without distributing source code. However, if you want to allow the user to modify the actual distributed cartridge, then you must distribute the source code.
Cartridges can also be exported in both sealed and unsealed states. If you are distributing a cartridge without source code, Oracle recommends you seal the cartridge before exporting it. This prevents the user from changing the cartridge model and therefore breaking the cartridge.
See the Design Studio Help for more information about sealing and unsealing cartridges.
Network Integrity production cartridges are distributed as sealed cartridges. Unsealing Network Integrity production cartridges violates the license, support, and maintenance agreements with Oracle.
See the following:
Exporting a Cartridge with Source Code
To export a cartridge project containing source code:
-
From the Design Studio File menu, select Export.
The Export Select dialog appears.
-
From the list of export destinations, expand the General node and select Archive File.
-
Click Next.
The Export Archive file dialog appears.
-
Enter a destination archive file:
-
Select the projects that you want to include in the archive.
-
Specify the name and location of the archive file.
-
In the Options section, accept the defaults.
-
Click Finish to create an archive file containing the exported projects at the specified location.
-
Exporting a Cartridge Without Source Code
Before exporting a cartridge project without source code, the project's classpath must be modified.
See the following:
To modify the classpath:
-
Open the Navigator view.
-
Use the Navigator view to rename the projects output directory out, to classes.
-
From the Design Studio Window menu, select Show View, and select the Package Explorer view.
-
Right-click the project and select Properties.
The Properties dialog appears.
-
From the list of properties, select Java Build Path.
The Properties dialog box displays the Java Build Path information.
-
Select the Source tab.
The Source tab displays the folders on the build path for the selected project.
-
Remove the source directories that are part of the classpath:
-
Select the source folders on the build path.
-
Click Remove.
-
-
Select the Libraries tab, and click Add Class Folder to add the class folder classes to the classpath.
Figure 1-1 shows how the class folder is added to the classpath.
-
Select the Order and Export tab, and check the box corresponding to the classes class folder.
-
Click OK to complete the modification of the project classpath.
After changing the classpath, if you wish to continue development on the cartridge, you should restore the classpath to its original configuration.
To export the cartridge project:
-
From the Design Studio File menu, select Export.
The Export Select dialog appears.
-
From the list of export destinations, expand the General node and select Archive File.
-
Click Next.
The Export Archive file dialog appears.
-
Enter a destination archive file:
-
Select the projects that you want to include in the archive.
-
For the projects for which you are not including source code, expand the project tree and deselect the source directories which you previously removed from the classpath.
-
Specify the name and location of the archive file.
-
In the Options section, accept the defaults.
-
Click Finish to create an archive file containing the exported projects at the specified location.
-
About Specifications
Network Integrity cartridges persist their results to persistent object modeling service (POMS) in the Oracle Communications Information Model. The Information Model defines a base set of entities and their relationships. Use specifications to extend the Information Model. Most cartridges must extend the Information Model entities and therefore must make use of specifications.
Scan parameter groups are a special type of specification. A specification used for model extension is associated with a single Information Model entity type. Multiple specification types can be defined for each Information Model entity type. The elements that comprise the specification are called characteristics.
Specifications can be shared between cartridge projects. Specifications created in a cartridge project are automatically related to all actions in the same cartridge project. You cannot add specifications to a model collection in the same cartridge project, but you can make the cartridge project containing the model collection dependent on another project that contains the specifications you want to add. Network Integrity ensures that when multiple cartridges are deployed together, their shared specifications are compatible.
When cartridge code persist information to POMS, it creates Information Model entities and usually a specific type of specification is attached to each Information Model entity to hold additional attributes. Within the Network Integrity UI, an Information Model entity and its specification are represented as a single object.
All action types must define which specification types (and by extension, which Information Model entities) they use by creating specifications in the cartridge project or adding specifications to the model collection. The Model tab defines the list of model collections on the action. Design Studio generates special classes for specifications, called specification helpers.
Characteristics on specifications appear in the Network Integrity UI as displayed information. Specification characteristics are always read-only in the Network Integrity UI. By configuring characteristics on specification, the following read-only fields can appear in the Network Integrity UI:
-
Label: Specifies the label that displays in the UI
-
Tool Tip: Specifies a short message when the pointer hovers over the field
Working with Specifications
Working with specifications requires the following high-level steps:
-
Add specifications to your cartridge project:
-
Create or copy specifications and configure them to collect the information you want.
-
Add existing specifications from dependent cartridge projects to the model collection.
-
-
Configure characteristics on new and copied specifications to appear in the Network Integrity UI.
To stop using a specification, remove it from the model collection or delete it from the cartridge project.
See the Design Studio Modeling Network Integrity Help for more information about specifications.
About Model Collections
Use model collections to add specifications that exist in other cartridge projects. Specifications from other cartridge projects inherit any changes and configurations you make to them in their original cartridge project.
See the Design Studio Modeling Network Integrity Help for more information about creating and using model collections.
About Specification Helpers
Design Studio generates specification helper classes to the following package:
-
Cartridge Default Package.Model Collection Name.Model Collection Name
The names of the specification helpers are based on the names of the specifications. For example if the name of the specification is deviceGeneric, then the name of the specification helper is DeviceGeneric.
Specification helpers have getter and setter methods for each element in the specification. The specification helper also has a constructor which takes a POMS entity interface object. A code sample which illustrates the use of a specification helper is shown below. In the example, the DeviceGeneric class is the specification helper.
// create a Logical Device entity which uses
// the Device Generic specification.
LogicalDevice logicalDevice = PersistenceHelper.makeEntity(LogicalDevice.class);
DeviceGeneric logicalDeviceExt = new DeviceGeneric(logicalDevice);

// Set static attribute values to LogicalDevice.
logicalDevice.setId(makeLDevID(scanResponse));
logicalDevice.setName(rfc1213Mib.getSysName());
logicalDevice.setDescription(rfc1213Mib.getSysDescr());

// Set dynamic attributes/characteristics.
logicalDeviceExt.setMgmtIPAddress(scanResponse.getManagementIP());
logicalDeviceExt.setSysObjectId(rfc1213Mib.getSysObjectID());
About Source Control
See Design Studio Developer's Guide for information about source control.
Working with Source Control for Network Integrity
When developing cartridge projects for Network Integrity, you may store your work in various source control systems. The eclipse platform, upon which Design Studio is based, provides support for integrating with source control systems. Plug-ins are available for most common source control systems. The exact behavior of Design Studio when used in an environment where the files are backed by a source control system depends on the source control system and the source control Team plug-in that the developer is using.
This section describes which files must be source controlled and which files must be writable to continue working.
Table 1-1 describes the structure of the directories and the files in a Design Studio for Network Integrity project and recommends how they should be handled with respect to a source control system.
Table 1-1 Source Control Handling for Various Files and Directories
| Directory or File | Description | Source Control Handling |
|---|---|---|
|
ProjectDir/ |
Project's top level directory. |
Under source control. All files directly under this directory must be source controlled. |
|
ProjectDir/cartridgeBin/ |
Cartridge bin directory is where the deployable IAR files are located. |
This directory should be source controlled but the contents should not. |
|
ProjectDir/cartridgeBuild/ |
Cartridge build directory contains files which are outputs of the cartridge build process. |
This directory should be source controlled but the contents should not. |
|
ProjectDir/dataDictionary/ |
This directory contains the files where the data dictionary information is stored. |
This directory and its contents should be source controlled. |
|
ProjectDir/doc/ |
This directory contains documentation files. |
This directory and its contents should be source controlled. |
|
ProjectDir/generated/ |
This directory contains generated artifacts of the build process. |
This directory should be source controlled. Except for the src sub-directory, the contents of this directory should not be source controlled. |
|
ProjectDir/generated/src/ |
This directory contains generated artifacts of the build process. |
This directory should be source controlled, but it contents should not. |
|
ProjectDir/integrityLib/ |
This directory contains jars that are part of the Network Integrity server Enterprise Archive (EAR). These jars are in the project's classpath. |
This directory should be source controlled. The files in this directory should not be source controlled. |
|
ProjectDir/integrityLib/ |
This directory contains jars that are created by Design Studio for Network Integrity and which are packaged into the cartridge IAR file. The jars are added to the Network Integrity EAR when the cartridge is deployed. These jars are in the project's classpath. |
This directory should be source controlled. The files in this directory should not be source controlled. |
|
ProjectDir/lib/ |
This directory contains jars and other files that are not part of the Network Integrity server EAR. Some of these files are part of the project classpath. |
This directory should be source controlled. The mds.mar file is output to this directory. The mds.mar file should not be source controlled. The user may also want to source control other files in this directory. |
|
ProjectDir/mdsArtifacts/ |
This directory contains files that are both input and outputs of the UI Hints infrastructure. |
This directory should be source controlled. The following files under this directory should also be source controlled:
The remaining files in this directory should not be source controlled. |
|
ProjectDir/model/ |
This directory contains files that are used to persist the information about cartridges, actions, processors, model collections and address handlers. |
This directory and its contents should be source controlled. |
|
ProjectDir/out/ |
This directory contains output classes. |
This directory should not be source controlled. |
|
ProjectDir/resources/ |
This directory is not used. |
This directory does not need to be source controlled. |
|
ProjectDir/src/ |
This directory contains the user supplied code for the cartridge. |
This directory and its contents should be source controlled. |
Design Studio for Network Integrity assumes that all files and directories of a cartridge project are writable. Some source control systems and team plug-ins automatically manage the files and directories to make them writable as the software needs to write to them. If this is not the case for your chosen source control/Team plug-in combination, then you should manually ensure that this is the case before working with a source controlled project.
Tips and Tricks
This section provides tips and tricks for working with processors in Design Studio and compiling and building Network Integrity cartridges.
About Java Errors in the Generated Controller Class
Compile errors in the generated Controller class of an action usually mean that there are errors in the configuration of the processor table of that action. Look for a Design Studio Error on an action or processor involved in the processor chain. Correct the error, then save all files and perform a clean operation to regenerate all generated files.
Renaming or Deleting Actions and Processors
When renaming an action or a processor, Design Studio only renames and refactors the generated Java source code. Likewise, when deleting an action or a processor, Design Studio only deletes the generated Java source code. These changes result in errors remaining in the processor implementation code and they must be corrected manually.
Adding External Libraries to a Java Build Path
To add an external library to the project for use by a processor, you must first copy the JAR file into the lib directory of the cartridge project. Then, you must add an entry for this library into the project's Java Build Path. This can only be done in the Package Explorer or the Navigator view.
From either view, right-click the project and select Properties. In the Properties dialog, select Java Build Path in the left side, and select the Libraries tab. Now you can select Add External Jars to add your libraries.
About ”Missing Required Library” Errors for External Libraries
You have copied the required library JAR files into the lib directory of your cartridge project, and you have added these libraries into your project's Java Build Path. If you are still getting missing required library errors, refresh your cartridge project to cause Design Studio to notice the added library.
To refresh your project, go to the menu Windows, then Show View, then open Package Explorer, then right-click your project, and select Refresh. Follow this by cleaning and building the project.
Error Marker on Cartridge but not on any Entities
If there is an error marker on the cartridge itself, but there are no error marker on any cartridge entities (actions, processors, Model Collections, and so on), then try checking the cartridge project using the Package Explorer view or the Navigator view. Sometimes the error markers are on some generated artifacts instead.
If there are no error markers on anything else, then try a Refresh and Rebuild operation. Go into Package Explorer or Navigator view, right-click the top-level project, and select Refresh. Then, choose the menu Project, then Clean, and choose to clean and rebuild all projects.