9 Administering Oracle Flow Builder
This chapter explains how to perform administrative tasks within the Oracle Flow Builder application. This chapter contains the following sections:
9.1 Overview
This section provides an overview of the administrative tasks with in the Oracle Flow Builder application. Administrator tasks can be performed by any user with administrator user privileges. However, the administrator user defined during setup of the application performs the initial administrative tasks. The administrative tasks include the following tasks:
-
Setup - define the Release, Product Family, Product, and Features hierarchy of the Component Tree. Define user roles and users. Users can also request registration from the Oracle Flow Builder login pane.
-
Product Family Access Controls - manage user access to specific product families.
-
Tools - import advanced pack
Follow these steps to access the administrative options within the Oracle Flow Builder application:
-
Log in to Oracle Flow Builder using Administrator credentials.
-
Click Administration at the top of the Home page.
The links on the left side of the Administration page provide access to the specific administrative tasks. The following sections explain the specific administrative tasks.

| Step | Tasks | Role |
|---|---|---|
|
1 |
Setting Up Oracle Flow Builder |
Administrator |
|
2 |
Managing Product Family Access |
Administrator |
|
3 |
Importing Advanced Packs |
Administrator |
9.2 Setting Up Oracle Flow Builder
An Administrator defines and manages the component tree hierarchy and users and user roles set up. The following tasks are performed by an administrator:
9.2.1 Setting Up Releases
This section explains the procedures for administering the Releases within Oracle Flow Builder. Releases are the top level of the Component Tree hierarchy within the Oracle Flow Builder application.
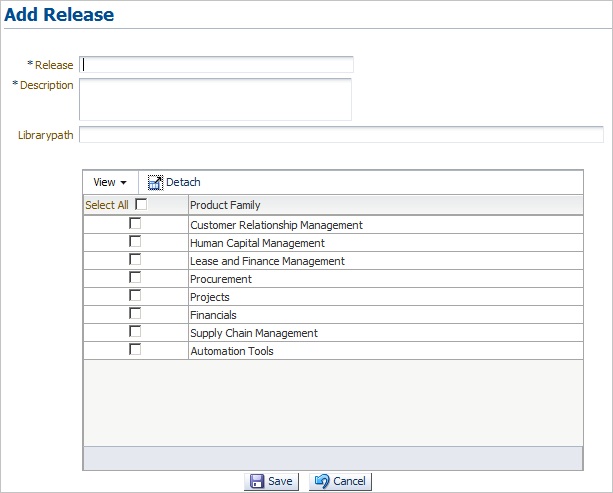
9.2.1.1 Adding Releases
Follow these steps to add a new Release to the Component Tree:
-
Log in using Administrator credentials and go to the Administration page.
-
From Setup, click Releases.
-
Click Add to define the name and description of the Release to make available in the Component Tree.
-
Define the Release name and description.
-
Optionally, enter the path to a custom function library.
Note:
For Oracle Flow Builder Release 12.4.0.2 only the default EBS function library is supported. Future releases may support additional function libraries. -
Select the product family or families to include under the Release in the Component Tree hierarchy and click Save.
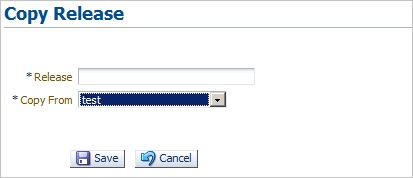
9.2.1.2 Copying Releases
Follow these steps to copy an existing Release to a new Release in the Component Tree:
-
Log in using Administrator credentials and go to the Administration page.
-
From Setup, click Releases.
-
Click Copy to define the name of the new Release and which Release to copy from and make available in the Component Tree.
-
Define the new Release name.
-
Select the Release to copy from and click Save. Copying an existing release may take some time depending upon how many components, component sets, and flows are defined in the Release being copied.
After clicking the Save button, the UI shows a waiting icon until the copy operation finishes. No other operation is allowed. When the Search Release page returns, it indicates the copy operation is finished.
If you open Oracle Flow Builder in another instance of Explorer or another user opens an Explorer instance and attempts to copy a release at the same time, an error appears indicating there is a Copy Release procedure still running, and they must wait until it is finished.
-
After the copy operation finishes, log out of the Oracle Flow Builder application and log back in as an administrator to view the copied release structure.
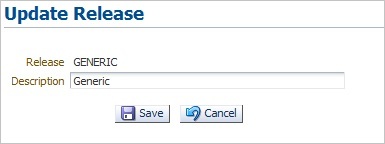
9.2.1.3 Updating Releases
Follow these steps to update a Release in the Component Tree:
-
Log in using Administrator credentials and go to the Administration page.
-
From Setup, click Releases.
-
Enter the name of the Release (or use % wildcard) and click Search to list currently defined Releases.
-
Click the Update icon to view the Release information.
-
Edit the Release information and click Save.
-
Select the product family or families to include in the Component Tree hierarchy and click Save.
9.2.2 Setting Up Product Families
This section explains the procedures for administering the Product Families within Oracle Flow Builder. Product Families are defined to categorize the products and features in a Release hierarchy within the Component Tree.
9.2.2.1 Adding Product Families
Follow these steps to add a new Product Family to a Release in the Component Tree:
-
Log in using Administrator credentials and go to the Administration page.
-
From Setup, click Product Families.
-
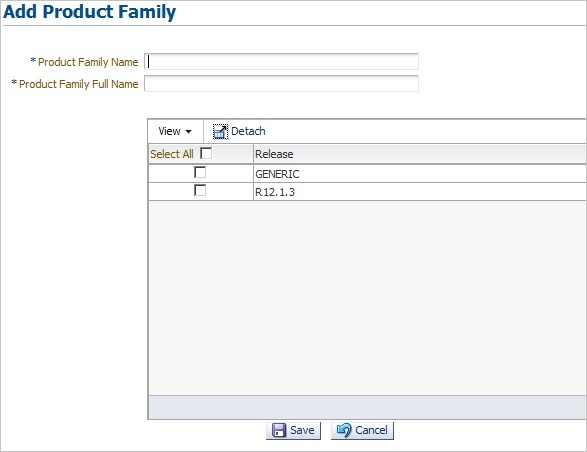
Click Add to define the Product Family to make available in the Component Tree.
-
Define the Product Family Name and Product Family Full Name.
-
Select the Release(s) and click Save.
9.2.2.2 Updating Product Families
Follow these steps to update a Product Family in the Component Tree:
-
Log in using Administrator credentials and go to the Administration page.
-
From Setup, click Releases.
-
Enter the name of the Product Family (or use % wildcard) and click Search to list currently defined Product Families.
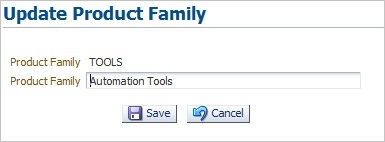
-
Click the Update icon to view the Product Family information.
-
Edit the Product Family information and click Save.
9.2.3 Setting Up Products
This section explains the procedures for administering the Products within Oracle Flow Builder. Products are defined to categorize the features in a Product Family hierarchy within the Component Tree.
9.2.3.1 Adding Products
Follow these steps to add a new Product to a Product Family in the Component Tree:
-
Log in using Administrator credentials and go to the Administration page.
-
From Setup, click Products.
-
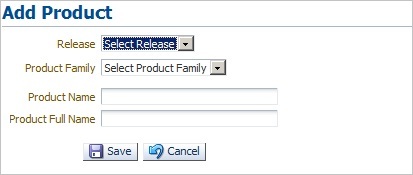
Click Add to define the Product to make available in the Component Tree.
-
Select the Release.
-
Select the Product Family.
-
Define the Product Name and Product Full Name and click Save.
9.2.3.2 Updating Products
Follow these steps to update a Product in the Component Tree:
-
Log in using Administrator credentials and go to the Administration page.
-
From Setup, click Products.
-
Select the Release.
-
Select the Product Family.
-
Enter the name of the Product (or use % wildcard) and click Search to list currently defined Products.
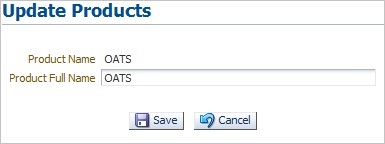
-
Click the Update icon to view the Product information.
-
Edit the Product information and click Save.
9.2.4 Setting Up Features
This section explains the procedures for administering the Features within Oracle Flow Builder. Features define specific features of a Product to test within the Component Tree.
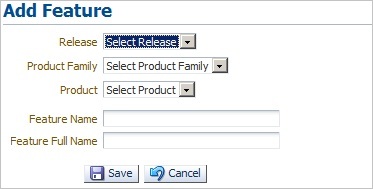
9.2.4.1 Adding Features
Follow these steps to add a new Feature to a Product in the Component Tree:
-
Log in using Administrator credentials and go to the Administration page.
-
From Setup, click Features.
-
Click Add to define the Feature to make available in the Component Tree.
-
Select the Release.
-
Select the Product Family.
-
Select the Product.
-
Define the Feature Name and Feature Full Name and click Save.
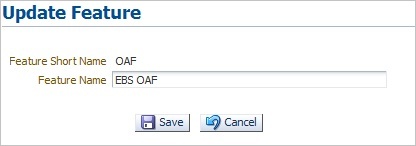
9.2.4.2 Updating Features
Follow these steps to update a Feature in the Component Tree:
-
Log in using Administrator credentials and go to the Administration page.
-
From Setup, click Features.
-
Select the Release.
-
Select the Product Family.
-
Select the Product.
-
Enter the name of the Feature (or use % wildcard) and click Search to list currently defined Products.
-
Click the Update icon to view the Feature information.
-
Edit the Feature information and click Save.
9.2.5 Setting Up Roles
This section explains the procedures for administering the user roles within Oracle Flow Builder. User Roles specify the categories of users and the specific permissions assigned to each user role.
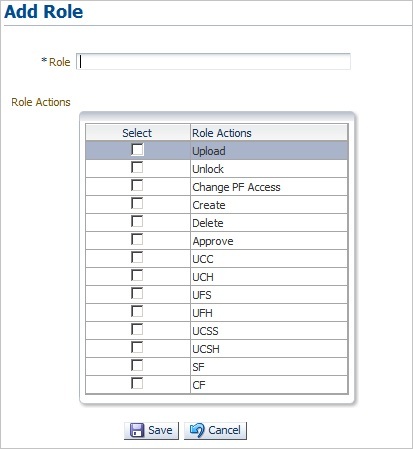
9.2.5.1 Adding Roles
Follow these steps to add a new user role to the Oracle Flow Builder application:
-
Log in using Administrator credentials and go to the Administration page.
-
From Setup, click Roles.
-
Click Add to define the user role name and role actions assigned to that role.
-
Define the Role name.
-
Select the Role Actions to assign to the user role.
Role Action Definition Upload
Permission to upload files.
Unlock
Permission to unlock components.
Change PF Access
Permission to change access to Product Families.
Create
Permission to create components and flows.
Delete
Permission to delete components and flows.
Approve
Permission to approve component changes.
UCC
Permission to Update Component Code.
UCH
Permission to Update Component Headers.
UFS
Permission to Update Flow Structures.
UFH
Permission to Update Flow Headers.
UCSS
Permission to Update Component Set Structures.
UCSH
Permission to Update Component Set Headers.
SF
Permission to Stabilizing Flows.
CF
Permission to Complete Flows.
-
Click Save to add the user role.
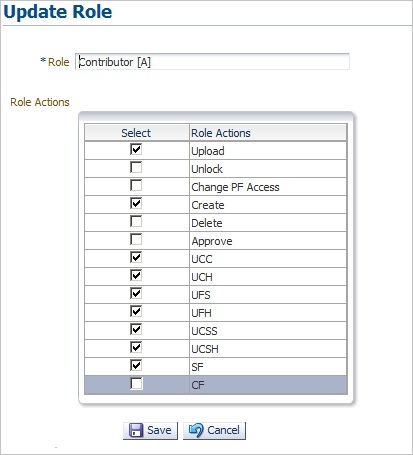
9.2.5.2 Updating Roles
Follow these steps to update user role in the Oracle Flow Builder application:
-
Log in using Administrator credentials and go to the Administration page.
-
From Setup, click Roles.
-
Enter the name of the Role (or use % wildcard) and click Search to list currently defined Roles.
-
Click the Update icon to view the Role information.
-
Edit the Role information and click Save.
9.2.6 Setting Up Users
This section explains the procedures for administering the users within Oracle Flow Builder.
9.2.6.1 Adding Users
Follow these steps to add a new user to the Oracle Flow Builder application:
-
Log in using Administrator credentials and go to the Administration page.
-
From Setup, click Users.
-
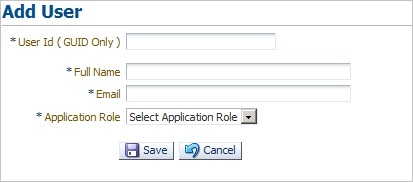
Click Add to define the user information.
-
Define the User ID, full name, and email.
Note:
Make sure the email server has been set up before adding users. An email notification will be sent to newly added users specifying the initial password to use to log in to the application. See Section 9.2.8, "Setting Up Email" for additional information. -
Select the Application Role to assign to the user.
-
Click Save to add the user.
9.2.6.2 Updating Users
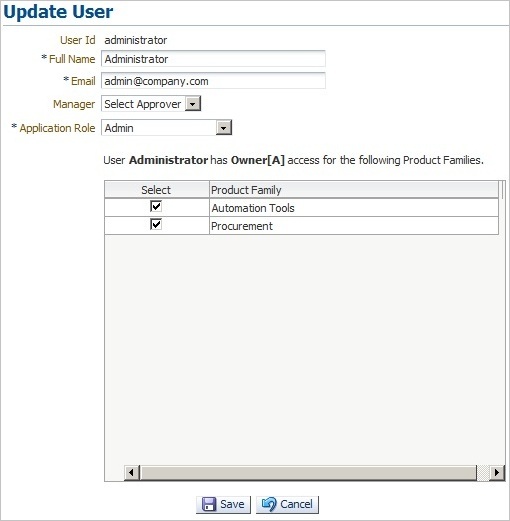
Follow these steps to update users in the Oracle Flow Builder application:
-
Log in using Administrator credentials and go to the Administration page.
-
From Setup, click Users.
-
Enter the ID or name of the User (or use % wildcard) and click Search to list currently defined Users.
-
Click the Update icon to view the User information.
-
Edit the User information and click Save.
9.2.7 Setting Up Function Libraries
This section explains the procedures for administering function libraries within Oracle Flow Builder. Function libraries define the built in and custom functions used with the FUNCTIONCALL keyword to perform specific tasks within component code.
The Oracle Flow Builder application includes a set of function libraries that can be used for specific testing purposes. The following table lists the default function libraries included with the application:
Table 9-4 Function Libraries Installed with Oracle Flow Builder
| Library | Related Application/Description |
|---|---|
|
cRMLIB |
Default function library for Customer Relationship Management application components. |
|
eBSLibrary |
Default function library for E-Business Suite application components. |
|
gENLIB |
Default function library for generic application components. |
|
pRJTBLVERIFYLIB |
Default function library for verification of Projects application components. |
|
pROCLIB |
Default function library for Procurement application components. |
|
pROJLIB |
Default function library for Projects application components. |
|
sCMLIB |
Default function library for Supply Chain Management application components. |
|
tELNETLIB |
Default function library for Telnet application components (requires a third-party Java library to be added to the OpenScript repository where Oracle Flow Builder-generated scripts will be executed. See Adding a Telnet Function Library for additional information). |
|
wEBTABLELIB |
Default function library for Web table application components. |
See Appendix B, "Function Library Reference" for details about the functions available in each function library.
9.2.7.1 Setting Up a Function Library Repository in OpenScript
The Oracle Flow Builder function libraries must be added to the OpenScript installation that users will use to playback functional testing scripts generated by Oracle Flow Builder. The function libraries are added to the repository where the generated Oracle Flow Builder script files will unzipped and executed. This is a one-time setup procedure required for each and any OpenScript installation that will be used to execute Oracle Flow Builder generated functional test scripts in OpenScript.
Note:
Function libraries shipped with Oracle Flow Builder are included in the product download zip file in the following location:<OFB-install-files>/common/install/static/libs/function-libs.zip
To set up a function library repository in OpenScript:
-
Start OpenScript.
-
From the Tools menu, select Manage Repositories.
-
Click Add.
-
Enter
OATSas the Name. -
Enter
<any-location-on-disk>as the Location. -
Click OK.
-
Copy the function libraries (
function-libs.zip) included with the Oracle Flow Builder download zip to the OATS Repository folder and unzip the file.
9.2.7.2 Searching Function Libraries
Follow these steps to search function libraries used with the Oracle Flow Builder application:
-
Log in using Administrator credentials and go to the Administration page.
-
From Setup, click Function Library.
Figure 9-15 Function Library Search Options
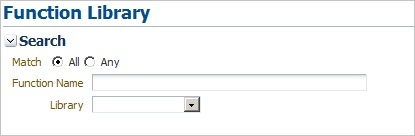
Description of "Figure 9-15 Function Library Search Options"
-
Select the Match type: All or Any.
-
Select a function library or leave blank to search all libraries.
-
Enter all or part of a function name (or use % wildcard) and click Search to list functions within the library.
9.2.7.3 Creating a Function Library Script
Creating a function library requires that you have the OpenScript component of the Oracle Application Testing Suite installed on a Windows machine. This section provides the basic steps for creating a custom dedicated function library script for use in the Oracle Flow Builder application. See the Oracle Functional Testing OpenScript User's Guide for additional information about creating function library scripts and adding functions.
To create a dedicated function library script:
-
Start OpenScript.
-
Select New from the File menu.
-
Select the project type and click Next.
-
Enter a script name for the function library (for example, myScriptLib).
-
Select Create script as a Function Library.
-
Click Next. The script wizard opens the Create Function Library options:
Package: Specifies a unique Package name for the function library. Package must be a valid Java Package name that matches A-Z, a-z, 0-9, _. It must not contain spaces or Double-Byte Character Sets (DBCS). The initial default value is
myCompany.myTeam. Subsequently, the default value will be set to the last value specified.Class: Specifies a unique alias to use as the name (typically the Class name) for the function library script. Class must be a valid Java Class name that matches A-Z, a-z, 0-9, _. It must not contain spaces or Double-Byte Character Sets (DBCS). The Class Name should be:
-
meaningful and provide context as to the purpose of the library,
-
clear and concise so it is easy to read and type in scripts,
-
something unique so it is not confused with other function libraries.
-
-
Enter a unique Package name for the function library in the form:
orgName.groupName.subgroupName
For example:
oracle.oats.dev
-
Enter a unique alias to use as the Class name for the function library to identify the library. For example:
WebFunctLib
-
Click Finish.
-
Add your custom code to the function library script.
-
Use the script recorder to record steps.
-
Switch to the Java Code view and edit the code in the functions.
-
Functions declared public will be imported into Oracle Flow Builder.
-
Supporting functions should be declared private otherwise they will be imported into Oracle Flow Builder if declared public.
-
-
Save the function library script.
-
Select Export from the File menu.
-
Specify a file name for the zip file.
-
Clear the Create self-contained zip file option.
-
Under Additional Files to export, clear the Recorded Data, Playback Results, and Error Log options.
-
Click OK to save the file. This is the file you use to add the function library to the Oracle Flow Builder application. See Section 9.2.7.4, "Adding Function Libraries" for additional information about adding function libraries.
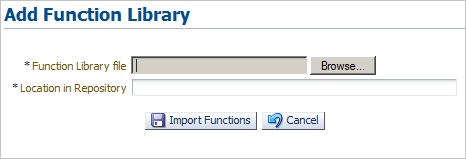
9.2.7.4 Adding Function Libraries
Follow these steps to add a new function library to the Oracle Flow Builder application:
-
Make sure you (or a function library developer) have created the function library script and exported the zip file from your OpenScript installation. See Section 9.2.7.3, "Creating a Function Library Script" for additional information.
-
Make sure you (or an Oracle Flow Builder administrator) have set up the function library repository in the OpenScript installation that will be used to execute the Oracle Flow Builder generated scripts. See Section 9.2.7.1, "Setting Up a Function Library Repository in OpenScript" for additional information.
-
Log in using Administrator credentials and go to the Administration page.
-
From Setup, click Function Library.
-
Click Add New Library.
-
Click Browse and select the function library file.
-
Enter the target location of the function library relative to the main Oracle Application Testing Suite repository. This should be the same location specified in Section 9.2.7.1, "Setting Up a Function Library Repository in OpenScript".
-
Click Import Functions.
The Parameter data is automatically created in Oracle Flow Builder when a new function library is imported. However, if you wish to include Comments and Test Plan description information for the functions in the library after the import has completed you must enter the data manually. See Section 9.2.7.5, "Modifying Functions" for information about modifying functions to add Comments and Test Plan description information.
-
Add the new function library to the
ebs-function-libsfolder in theOATSrepository specified in the OpenScript installation that will be used to play back the functional test scripts that use the new library. See Section 9.2.7.1, "Setting Up a Function Library Repository in OpenScript" for additional information. -
Modify the function library in the Oracle Flow Builder application to add Comments and Test Plan description information for each new function added from the new function library. See Section 9.2.7.5, "Modifying Functions" for additional information.
9.2.7.5 Modifying Functions
To modify functions in a function library:
-
Log in using Administrator credentials and go to the Administration page.
-
From Setup, click Function Library.
-
Select the Match type: All or Any.
-
Select a function library or leave blank to search all libraries.
-
Enter the all or part of a function name (or use % wildcard) and click Search to list functions within the library.
-
Click the Modify link for the function.
-
Enter Comments and Test Plan description information for the function.
-
Click Submit.
9.2.7.6 Adding a Telnet Function Library
The Telnet function library requires a third-party Java library to be added to the OpenScript installation that will be used to playback functional scripts.
To add the Telenet function llibrary:
-
Browse to Java Telnet website at http://javatelnet.org/space/download.
-
Choose the Binary Release jta26.jar (250k) Executable Jar file.
-
Replace the empty stub jta26.jar inside the OATS-Repository/TELNETLIB/jar with the downloaded file.
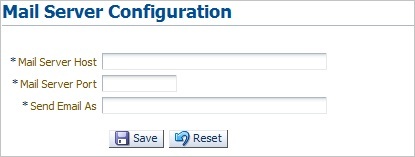
9.2.8 Setting Up Email
This section explains the procedures for administering the mail server within Oracle Flow Builder. The Notifications feature of Oracle Flow Builder uses Email to send notifications to users and administrators. The SMTP mail server must be defined in the Mail Server setup before Email notifications are activated.
Follow these steps to specify the mail server in the Oracle Flow Builder application:
-
Log in using Administrator credentials and go to the Administration page.
-
From Setup, click Mail Server.
Figure 9-17 Mail Server Configuration Options
Description of "Figure 9-17 Mail Server Configuration Options"
-
Enter the name of the mail server host. The mail server host is required for sending Email notifications.
-
Enter a numeric SMTP (Mail) Server Port value. The standard SMTP port is 25, unless some other specific port is in use.
-
Enter an Email address to use as the sent by address. Email Notifications will appear to have been be sent from this address.
-
Click Save.
-
Verify the Email notifications are working correctly by performing an action that will trigger an Email notification. See Chapter 6, "Using Notifications" for additional information.
9.3 Managing Product Family Access
An Administrator sets the access and role users are given for specific product families defined in the Component Tree. The following tasks are performed by an the Product Family owner administrator:
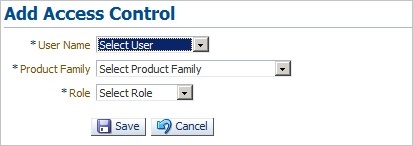
9.3.1 Adding User Access to a Product Family
Users can request access to one or more Product Families using the Request for Access option on the Oracle Flow Builder Home page. The request will be sent to the respective Product Family owner. The Product Family owner uses the Product Family Access Controls on the Administration page to add user access to a Product Family. Upon the approval by the Product Family owner, the user will be notified via an email.
To add user access to a Product Family:
-
Log in using Administrator credentials and go to the Administration page.
-
From Product Family Access Controls, click Users.
-
Click Add.
-
Select the user.
-
Select the Product Family.
-
Select the Role to assign to the user for the Product Family and click Save.
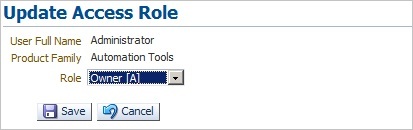
9.3.2 Updating User Access Role for a Product Family
An administrator can update a user's access to Product Families using Product Family Access Controls on the Administration page.
To update user access to a Product Family:
-
Log in using Administrator credentials and go to the Administration page.
-
From Product Family Access Controls, click Users.
-
Select the Product Family.
-
Enter the ID of the user (or use % wildcard).
-
Click Search to list users matching the search criteria.
-
Click the pencil icon in the Update column of the user row.
-
Select the Role and click Save to update the user access role.
9.3.3 Removing User Access
An administrator can remove a user's access to Product Families using Product Family Access Controls on the Administration page.
To remove user access to a Product Family:
-
Log in using Administrator credentials and go to the Administration page.
-
From Product Family Access Controls, click Users.
-
Select the Product Family.
-
Enter the ID of the user (or use % wildcard).
-
Select the check box in the Select column next to the user to remove.
-
Click Remove.
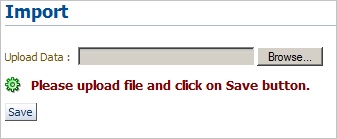
9.4 Importing Advanced Packs
An Administrator can import an Advanced Pack deliverable to apply the data to the Oracle Flow Builder application instance. Advanced Packs may contain additional components, component sets, and flows that can be included as add-ons or updates. The following tasks are performed by an the Oracle Flow Builder administrator: