Release 8.1.5
A67778-01
Library |
Product |
Contents |
Index |
| Oracle8i Parallel Server Concepts and Administration Release 8.1.5 A67778-01 |
|
The planning and allocation of PCM locks is one of the most complex tasks facing the Oracle Parallel Server (OPS) database administrator. This chapter provides a conceptual overview of PCM locks by covering the following topics:
Chapter 15, "Allocating PCM Instance Locks", for details on how to plan and assign these locks and Chapter 8, "Integrated Distributed Lock Manager" for more information about the IDLM facility.
See Also:
This section covers the following topics:
Figure 9-1 highlights PCM locks in relation to other locks used in Oracle.
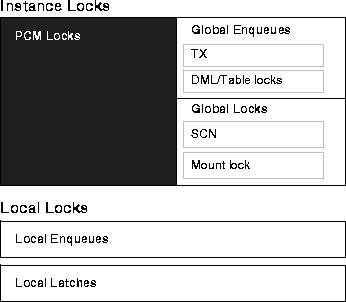
Parallel cache management locks, or PCM locks, are instance locks that manage datafile block locking. PCM locks can cover one or more blocks of any class: data blocks, index blocks, undo blocks, segment headers, and so on. Though there are several types of instance locks, they all serve the same purpose.
OPS uses instance locks to coordinate access to shared resources and the IDLM maintains the statuses of instance locks.
PCM locks ensure cache coherency by forcing requesting instances to acquire locks from holding instances before modifying or reading database blocks. PCM locks allow only one instance at a time to modify a block. If a block is modified by an instance, the block must first be written to disk before another instance can acquire the PCM lock and modify the block.
PCM locks use the minimum amount of communication to ensure cache coherency. The amount of cross-instance activity--and the corresponding performance of OPS--is evaluated in terms of pings. A ping occurs each time a block must be written to disk by one instance so that another instance can read it.
Busy systems can have a great deal of locking activity, but do not necessarily have pinging. If data is well partitioned, then the locking will be local to each node--therefore pinging will not occur.
For optimal performance, the OPS administrator must allocate PCM locks to datafiles. You do this by specifying values for initialization parameters which are read at startup of the database. Chapter 15, "Allocating PCM Instance Locks" describes this procedure in detail.
You use the initialization parameter GC_FILES_TO_LOCKS to specify the number of PCM locks which cover the data blocks in a data file or set of data files. The smallest granularity is one PCM lock per datablock; this is the default. PCM locks usually account for the greatest proportion of instance locks in OPS.
Four types of PCM locks can be allocated. They differ in the method by which they are allocated, and in whether or not they are released.
Fine grain PCM locks are acquired and released as needed. Since they are allocated only as required, the instance can start up much faster than with hashed locks. An IDLM resource is created and an IDLM lock is obtained only when a user actually requests a block. Once a fine grain lock has been created, it can be converted to various modes as required by various instances.
Fine grain locks are releasable: an instance can give up all references to the resource name during normal operation. The IDLM resource is released when it is required for reuse for a different block. This means that sometimes no instance holds a lock on a given resource.
Hashed locks are pre-allocated and statically hashed to blocks at startup time. The first instance which starts up creates an IDLM resource and an IDLM lock (in null mode) on the IDLM resource for each hashed PCM lock. The first instance initializes each lock. The instance then proceeds to convert IDLM locks to other modes as required. When a second instance requires a particular IDLM lock, it waits until the lock is available and then converts the lock to the mode required.
By default, hashed PCM locks are never released; each remains in the mode in which it was last requested. If the lock is required by another instance, it is converted to null mode. These locks are de-allocated only at instance shutdown.
You can specify releasable hashed PCM locks by using the R option with the GC_FILES_TO_LOCKS parameter. Releasable hashed PCM locks are taken from the pool of GC_RELEASABLE_LOCKS.
You can also allocate fixed locks in a fine grained manner. For example, you could set 50,000 PCM locks for a particular file and thus provide 1 fixed lock for each block.
|
See Also:
"GC_FILES_TO_LOCKS Syntax" for a detailed explanation of how to set the GC_FILES_TO_LOCKS parameter. |
Fixed PCM locks are initially acquired in null mode. All specified hashed locks are allocated at instance startup, and de-allocated at instance shutdown. Because of this, hashed locks entail more overhead and longer startup time than fine grain locks. The advantage of fixed hashed PCM locks, however, is that they do not need to be continually acquired and released.
Releasable PCM locking is more dynamic than fixed hashed locking. For example, if you set GC_RELEASABLE_LOCKS to 10000 you can obtain up to ten thousand fine grain PCM locks. However, locks are allocated only as needed by the IDLM. At startup Oracle allocates lock elements that are obtained directly in the requested mode (normally shared or exclusive mode).
Figure 9-2 illustrates how PCM locks work. When instance A reads the black block for modification, it obtains the PCM lock for block. The same scenario occurs with the shaded block and Instance B. If instance B requires the black block, the block must be written to disk because instance A has modified it. The Oracle process communicates with the LMD processes to obtain the instance lock from the IDLM.
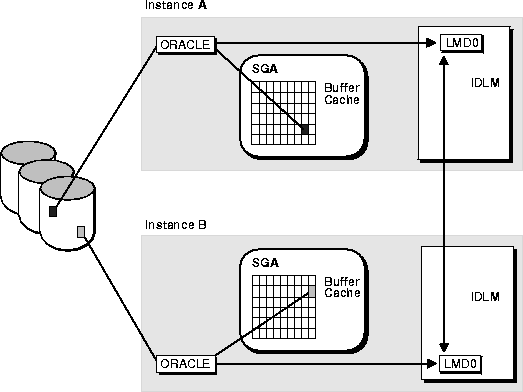
Each instance has at least one LCK background process. If multiple LCK processes exist within the same instance, the PCM locks are divided among the LCK processes. This means that each LCK process is only responsible for a subset of the PCM locks.
A PCM lock is "owned" or controlled by an instance when a block covered by that lock (in shared or exclusive mode) enters the buffer cache belonging to the instance.
A PCM lock owned in shared mode is not disowned by an instance if another instance also requests the PCM lock in shared mode. Thus, two instances may have the same data block in their buffer caches because the copies are shared (no writes occur). Different data blocks covered by the same PCM lock can be contained in the buffer caches of separate instances. This can occur if all the different instances request the PCM lock in shared mode.
The number of PCM locks assigned to datafiles and the number of data blocks in those datafiles determines the number of data blocks covered by a single PCM lock.
If the size of each file, in blocks, is a multiple of the number of PCM locks assigned to it, then each hashed PCM lock covers exactly the number of data blocks given by the equation.
If the file size is not a multiple of the number of PCM locks, then the number of data blocks per hashed PCM lock can vary by one for that datafile. For example, if you assign 400 PCM locks to a datafile which contains 2,500 data blocks, then 100 PCM locks cover 7 data blocks each and 300 PCM locks cover 6 blocks. Any datafiles not specified in the GC_FILES_TO_LOCKS initialization parameter use the remaining PCM locks.
If n files share the same hashed PCM locks, then the number of blocks per lock can vary by as much as n. If you assign locks to individual files, either with separate clauses of GC_FILES_TO_LOCKS or by using the keyword EACH, then the number of blocks per lock does not vary by more than one.
If you assign hashed PCM locks to a set of datafiles collectively, then each lock usually covers one or more blocks in each file. Exceptions can occur when you specify contiguous blocks (using the "!blocks" option) or when a file contains fewer blocks than the number of locks assigned to the set of files.
The following example illustrates how hashed PCM locks can cover multiple blocks in different files. Figure 9-3 assumes 44 PCM locks assigned to 2 files which have a total of 44 blocks. GC_FILES_TO_LOCKS is set to A,B:44
Block 1 of a file does not necessarily begin with lock 1; a hashing function determines which lock a file begins with. In file A, which has 24 blocks, block 1 hashes to lock 32. In file B, which has 20 blocks, block 1 hashes to lock 28.

In Figure 9-3, locks 32 through 44 and 1 through 3 are used to cover 2 blocks each. Locks 4 through 11 and 28 through 31 cover 1 block each; and locks 12 through 27 cover no blocks at all!
In a worst case scenario, if two files hash to the same lock as a starting point, then all the common locks will cover two blocks each. If your files are large and have multiple blocks per lock (on the order of 100 blocks per lock), then this is not an important issue.
You should also consider the periodicity of PCM locks. Figure 9-4 shows a file of 30 blocks which is covered by 6 PCM locks. This file has hashed to begin with lock number 5. As suggested by the shaded blocks covered by PCM lock number 4, use of each lock forms a pattern over the blocks of the file.

In OPS, a particular data block can only be modified by one instance at a time. If one instance modifies a data block that another instance needs, whether pinging is required depends on the type of request the requesting instance submits for the block.
If the requesting instance wants the block for modification, then the holding instance's locks on the data block must be converted accordingly. The first instance must write the block to disk before the requesting instance can read it. This is known as pinging a block.
BSP (Block Server Process) uses the IDLM facility to signal a need between the two instances. If the requesting instance only wants the block in CR mode, the BSP of the holding instance transmits a CR version of the block to the requesting instance by way of the interconnect. In this scenario, pinging is unnecessary.
Data blocks are only pinged when a block held in exclusive current (XCUR) state in the buffer cache of one instance is needed by a different instance for modification. If an instance has a block in SHARE mode, it will be pinged if another instance needs it XCUR. In some cases, therefore, the number of PCM locks covering data blocks may have little effect on whether a block gets pinged.
An instance can relinquish an exclusive lock on a block and still have a row lock on it: pinging is independent of whether a commit has occurred. You can modify a block, but whether it is pinged is independent of whether you have made the commit.
If you have partitioned data across instances and are doing updates, you can have a million blocks on each of the different instances. Each block is covered by one PCM lock yet there are no forced reads or forced writes.
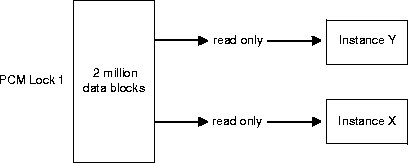
As shown in Figure 9-5, assume a single PCM lock covers one million data blocks in a table and the blocks in that table are read from or written into the SGA of instance X. Assume another single PCM lock covers another million data blocks in the table that are read or written into the SGA of instance Y. Regardless of the number of updates, there will be no forced reads or writes on data blocks between instance X and instance Y.

With read-only data, both instance X and instance Y can hold the PCM lock in shared mode without causing pinging. This scenario is illustrated in Figure 9-6.
The state of a block in the buffer cache relates directly to the mode of the lock held upon it. For example, if a buffer is in exclusive current (XCUR) state, you know that an instance owns the PCM lock in exclusive mode. There can be only one XCUR version of a block in the database, but there can be multiple SCUR versions. To perform a modification, a process must get the block in XCUR mode.
To learn the state of a buffer, check the STATUS column of the V$BH dynamic performance table. This table provides information about each buffer header.
| PCM Lock Mode | Buffer State Name | Description |
|
X |
XCUR |
Instance has an EXCLUSIVE lock for this buffer. |
|
S |
SCUR |
Instance has a SHARED lock for this buffer. |
|
N |
CR |
Instance has a NULL lock for this buffer. |
Figure 9-7 shows how buffer state and lock mode change as instances perform various operations on a given buffer. Lock mode is shown in parentheses.
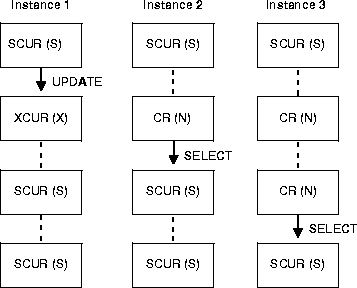
In Figure 9-7, the three instances start out with blocks in shared current mode, and shared locks. When Instance 1 performs an update on the block, its lock mode on the block changes to exclusive mode (X). The shared locks owned by Instance 2 and Instance 3 convert to null mode (N). Meanwhile, the block state in Instance 1 becomes XCUR, and in Instance 2 and Instance 3 becomes CR. These lock modes are compatible. Similar conversions of lock mode and block state occur when Instance 2 performs a SELECT operation on the block, and when Instance 3 performs a SELECT operation on it.
When one process owns a lock in a given mode, another process requesting a lock in any particular mode succeeds or fails as shown in Table 9-2.
This section explains how certain initialization parameters control blocks and PCM locks.
PCM locks are controlled by the initialization parameters listed in Table 9-3. Be sure to set all of these parameters for your application.
|
See Also:
Oracle8i Reference for complete specifications for these parameters and Chapter 15, "Allocating PCM Instance Locks", provides information on how to set these parameters. |
Do not allocate PCM locks for files that only contain the following, because class 1 blocks are not used for these files:
This section compares the two methods for PCM locking: fixed (hashed) and releasable locking. You can use either or both types of PCM locks to protect datafile blocks.
Figure 9-8 illustrates the correspondence of lock elements to blocks in hashed and fine grain locking. A lock element (LE) is an Oracle-specific data structure that represents an IDLM lock. There is a one-to-one correspondence between a lock element and a PCM lock in the IDLM.
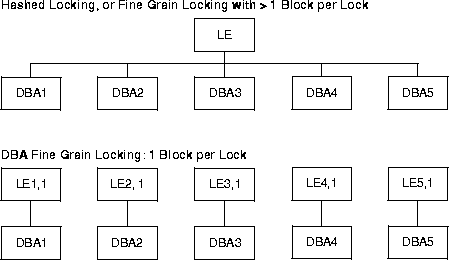
For both fixed PCM locks and fine grain locks, you can specify more than 1 block per lock element. The difference is that by default fixed PCM locks are not releasable; the lock element name is "fixed".
When the lock element is pinged, other modified blocks owned by that lock element are written along with the needed one. For example, in Figure 9-8, if LE is pinged when block DBA2 is needed, blocks DBA1, DBA3, DBA4, and DBA5 are all written to disk as well--if they have been modified.
In fine grain locking, the name of the lock element is the name of the resource inside the IDLM.
Although a fixed number of lock elements cover potentially millions of blocks, the lock element names change over and over again as they are associated with specific blocks that are requested. The lock element name (for example, LE7,1) contains the database block address (7) and class (1) of the block it covers. Before a lock element can be reused, the IDLM lock must be released. You can then rename and reuse the lock element, creating a new resource in the IDLM if necessary.
When using fine grain locking, you can set your system with many more potential lock names, since they do not need to be held concurrently. However, the number of blocks mapped to each lock is configurable in the same way as hashed locking.
In fine grain locking you can set a one-to-one relationship between lock elements and blocks. Such an arrangement, illustrated in Figure 9-8, is called DBA locking. Thus if LE2,1 is pinged, only block DBA2 is written to disk.
This section explains the ways in which hashed locks and fine grain locks can differ in lock granularity.
Fixed PCM locks can protect more than one Oracle database block. The mapping of PCM locks to blocks in the database is determined on a file-by-file basis using initialization parameters specified when the first OPS instance is started. The parameters can specify that the PCM lock protects a range of contiguous blocks within the file.
Hashed locks are useful in the following situations:
Hashed locks may cause extra cross-instance lock activity since conflicts may occur between instances that modify different database blocks. Resolution of this false conflict ("false pinging") may require writing several blocks from the cache of the instance that currently owns the lock.
A fine grain lock can protect one or more Oracle database blocks. If you create a one-to-one correspondence between PCM locks and datablocks, then contention will occur only when instances need data from the same block. This level of fine grain locking is known as DBA locking. (A DBA is the data block address of a single block of data.) If you assign more than one block per lock, then contention will occur as in hashed locking.
On most systems an instance could not possibly hold a lock for each block of a database since SGA memory or IDLM locking capabilities would be exceeded. Therefore, instances acquire and release fine grain locks as required. Since fine grain locks, lock elements, and resources are renamed in the IDLM and reused, a system can employ fewer of them. The value of DB_BLOCK_BUFFERS is the recommended minimum number of releasable locks you should allocate.
DBA fine grain locks are useful when a database object is updated frequently by several instances. This advantage is gained as follows:
A disadvantage of fine grain locking is that overhead is incurred for each block read, and performance will be affected accordingly. (Acquiring a new lock and releasing it each time causes more overhead through the IDLM than converting the mode of an existing lock from null mode to exclusive mode and back, as is done in hashed locking.)
Figure 9-9 shows how fine grain locking operates.

The foreground process checks in the SGA to see if the instance owns a lock on the block.
A lock element is created in either of two modes: fixed or releasable
The V$LOCK_ELEMENT view shows the status of the lock elements.
Releasable locking may affect performance of OPS. Since releasable locks are more expensive (since they may cause a release lock and get lock on a buffer get), some operations may show a decreased level of performance when run in this mode. However, other types of access to the database will improve with releasable fine grain locks. Fine grain locking may have the following results:
Each datafile can use one or the other method of locking. For best results, you may need to use hashed locks on some datafiles, and fine grain locking on other datafiles.
You can selectively apply hashed and fine grain locking on different files. For example, you could apply locks as follows on a set of files:
| File Number | Locking Mode | Value in GC_FILES_TO_LOCKS |
|
1 |
Hashed |
100 |
|
2 |
Fine grain |
0 |
|
3 |
Hashed |
1000 |
|
4 |
Fine grain |
0 |
|
5 |
Fine grain |
0 |
This section explains how hashed locks and fine grain locks are assigned to blocks. (DBA locks, of course, have a one-to-one correspondence to blocks.)
Two data structures in the SGA control file to lock mapping. The first structure maps each file (DB_FILES) to a bucket (index) in the second structure. This structure contains information on the number of locks allocated to this bucket, base lock number and grouping factor. To find the number of locks for a tablespace, you must count the number of actual fixed locks which protect the different files. If files share locks, you count the shared locks only once.
SELECT * FROM FILE_LOCK ORDER BY FILE_ID;
For example, Oracle would respond with something similar to the following if you had set GC_FILES_TO_LOCKS="1=500:5=200":
FILE_ID FILE_NAME       TS_NAME          START_LK     NLOCKS   BLOCKING
------- --------------- -------------- ---------- ---------- ----------
      1 \\.\OPS_SYS01   SYSTEM                100       1500          1
      2 \\.\OPS_USR01   USER_DATA            1600       3000          1
      3 \\.\OPS_RBS01   ROLLBACK_DATA           0        100          1
      4 \\.\OPS_TMP01   TEMPORARY_DATA          0        100          1
      5 \\.\OPS_USR03   TRAVEL_DEMO          4600       4000          1
      6 \\.\PROBLEM_REP PROBLEM_REP             0        100          1

6 rows selected.
In this example, both file1 and file5 have different values for START_LCK. You therefore sum their NLOCKS values for a total of 700 locks.
If, however, you had set GC_FILES_TO_LOCKS="1-2=500:5=200", your results would look like the following:
FILE_ID  FILE_NAME  TABLESPACE_NAME  START_LK  NLOCKS BLOCKING
1        file1      system             1         500    1
1        file2      system             1         500    1
1        file3      system             0
1        file4      system             0
1        file5      system           501         200    1
This time, file1 and file 2 have the same value for START_LCK; this indicates that they share the locks in question. File5 has a different value for START_LCK. You therefore count once the 500 locks shared by files 1 and 2, and add an additional 200 locks for file 5, for a total of 700.
You need only concern yourself with the number of blocks in the data and undo block classes. Data blocks (class 1) contain data from indexes or tables. System undo header blocks (class 10) are also known as the rollback segment headers or transaction tables. System undo blocks (class 11) are part of the rollback segment and provide storage for undo records.
User undo segment n header blocks are identified as class 10 + (n*2), where n represents the rollback segment number. A value of n = 0 indicates a system rollback segment; a value of n > 0 indicates a non-system rollback segment. Similarly, user undo segment n header blocks are identified as class 10 + ( (n*2) + 1).
The following query shows the number of locks allocated per class:
   SELECT CLASS, COUNT(*)
     FROM V$LOCK_ELEMENT
     GROUP BY CLASS
     ORDER BY CLASS;
The following query shows the number of fixed (non-releasable) PCM locks:
   SELECT COUNT(*)
     FROM V$LOCK_ELEMENT
     WHERE bitand(flag, 4)!=0;
The following query shows the number of fine grain PCM locks:
   SELECT COUNT(*)
     FROM V$LOCK_ELEMENT
     WHERE bitand(flag, 4)=0;
For a data class block the file number is determined from the data block address (DBA). The bucket is found through the X$KCLFI dynamic performance table. Data class blocks are hashed to lock element numbers as follows:

Other block classes are hashed to lock element numbers as follows:
(DBA) modulo (locks_in_class)
The following examples show different ways of mapping blocks to PCM locks, and how the same locks are used on multiple datafiles.
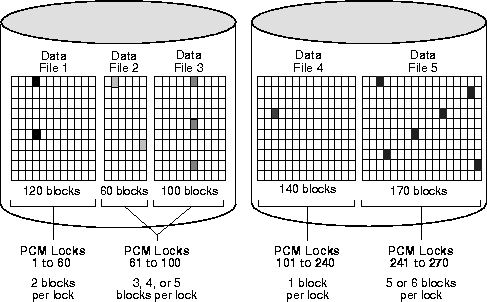
Figure 9-10 shows an example of mapping blocks to PCM locks for the parameter value GC_FILES_TO_LOCKS = "1=60:2-3=40:4=140:5=30".
In datafile 1 shown in Figure 9-10, 60 PCM locks map to 120 blocks, which is a multiple of 60. Each PCM lock therefore covers two data blocks.
In datafiles 2 and 3, 40 PCM locks map to a total of 160 blocks. A PCM lock can cover either one or two data blocks in datafile 2, and two or three data blocks in datafile 3. Thus, one PCM lock may cover three, four, or five data blocks across both datafiles.
In datafile 4, each PCM lock maps exactly to a single data block, since there is the same number of PCM locks as data blocks.
In datafile 5, 30 PCM locks map to 170 blocks, which is not a multiple of 30. Each PCM lock therefore covers five or six data blocks.
Each of the PCM locks illustrated in Figure 9-10 can be held in either read-lock mode or read-exclusive mode.
The following parameter value allocates 500 PCM locks to datafile 1; 400 PCM locks each to files 2, 3, 4, 10, 11, and 12; 150 PCM locks to file 5; 250 PCM locks to file 6; and 300 PCM locks collectively to files 7 through 9:
GC_FILES_TO_LOCKS = "1=500:2-4,10-12=400EACH:5=150:6=250:7-9=300"
This example assigns a total of (500 + (6*400) + 150 + 250 + 300) = 3600 PCM locks. You may specify more than this number of PCM locks if you intend to add more datafiles later.
In Example 2, 300 PCM locks are allocated to datafiles 7, 8, and 9 collectively with the clause "7-9=300". The keyword EACH is omitted. If each of these datafiles contains 900 data blocks, for a total of 2700 data blocks, then each PCM lock covers 9 data blocks. Because the datafiles are multiples of 300, the 9 data blocks covered by the PCM lock are spread across the 3 datafiles; that is, one PCM lock covers 3 data blocks in each datafile.
The following parameter value allocates 200 PCM locks each to files 1 through 3; 50 PCM locks to datafile 4; 100 PCM locks collectively to datafiles 5, 6, 7, and 9; and 20 data locks in contiguous 50-block groups to datafiles 8 and 10 combined:
GC_FILES_TO_LOCKS = "1-3=200EACH 4=50:5-7,9=100:8,10=20!50"
In this example, a PCM lock assigned to the combined datafiles 5, 6, 7, and 9 covers one or more data blocks in each datafile, unless a datafile contains fewer than 100 data blocks. If datafiles 5 to 7 contain 500 data blocks each and datafile 9 contains 100 data blocks, then each PCM lock covers 16 data blocks: one in datafile 9 and five each in the other datafiles. Alternatively, if datafile 9 contained 50 data blocks, half of the PCM locks would cover 16 data blocks (one in datafile 9); the other half of the PCM locks would only cover 15 data blocks (none in datafile 9).
The 20 PCM locks assigned collectively to datafiles 8 and 10 cover contiguous groups of 50 data blocks. If the datafiles contain multiples of 50 data blocks and the total number of data blocks is not greater than 20 times 50 (that is, 1000), then each PCM lock covers data blocks in either datafile 8 or datafile 10, but not in both. This is because each of these PCM locks covers 50 contiguous data blocks. If the size of datafile 8 is not a multiple of 50 data blocks, then one PCM lock must cover data blocks in both files. If the sizes of datafiles 8 and 10 exceed 1000 data blocks, then some PCM locks must cover more than one group of 50 data blocks, and the groups might be in different files.
Examples 5, 6, and 7 show the results of specifying various values of GC_FILES_TO_LOCKS. In the examples, files 1 and 2 each have 16 blocks of data.
GC_FILES_TO_LOCKS="1-2=4"
In this example four locks are specified for files 1 and 2. Therefore, the number of blocks covered by each lock is 8 ((16+16)/4). The blocks are not contiguous.

GC_FILES_TO_LOCKS="1-2=4!8"
In this example four locks are specified for files 1 and 2. However, the locks must cover 8 contiguous blocks.

GC_FILES_TO_LOCKS="1-2=4!4EACH"
In this example four locks are specified for file 1 and four for file 2. The locks must cover 4 contiguous blocks.
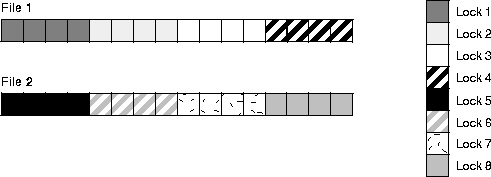
The following example shows fine grain locking mixed with hashed locking.
GC_FILES_TO_LOCKS="1=4:2=0"
File 1 has hashed PCM locking with 4 locks. On file 2, fine grain locks are allocated on demand--none are initially allocated.
