Creating an add to calendar feature for events
You can add a calendar feature for an event so that registrants can click directly on an image in the email to put the event in their Microsoft® Outlook® calendar. Note: This method may work for other email applications. Contact your Solutions Manager for more information.
Create and Post the Calendar Event
Before registrant can add the event, you have to create the calendar event file and upload it to a web server.
To create a calendar event in Outlook:
- In the Calendar section of Outlook, open or create the appointment you want to save. Add in the event details (date, time, call-in number, link, and so on)
-
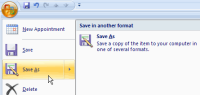
On the File menu (in Outlook 2003 and earlier) or from the function button in the upper left-hand corner (in Outlook 2007), click Save As.
-
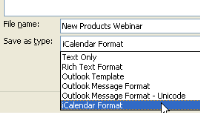
Select iCalendar Format (*.ics) from the Save as type drop-down field.
-
Upload the .ics file to your Web server.
Example: As an example, the URL might be similar to the following:
http://www.eloqua.com/meeting.ics


Distribute the Calendar Event
You can add the link using the URL to your server added to a reminder email and/or a confirmation page. When the user clicks on the link, the calendar item is opened, and they can save it to their calendar in Outlook.
Optionally, you can create a "calendar image" for potential registrants to click on to make it clear how they can add the event to their Outlook calendar.