Managing unmapped registrants
Ideally, custom object records (registrants) are linked to data entity records in your application (for example, contact records) so that you can maintain a unified view of their activities. There are some tools provided for events that help you to locate and manage unmapped registrants (those that have not been matched to data entity records).
Viewing unmapped registrants
To view unmapped registrants in an event:
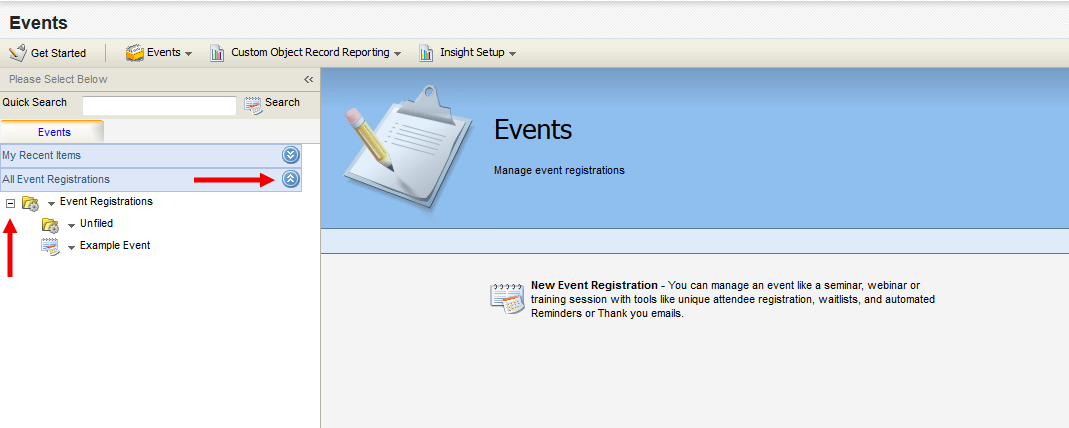
- Navigate to Orchestration
 > Tools, then click Events.
- Locate the desired event under the Events tab on the left panel. You have three options to achieve this:
- Expand the All Event Registrations drop-down. If needed, click the + symbol next to a folder in order to navigate into that folder.

- Expand the My Recent Items drop-down to access a list of recently created or accessed events available to you.
- Type the first few letters of the event into the Quick Search field, then press Enter.
- Expand the All Event Registrations drop-down. If needed, click the + symbol next to a folder in order to navigate into that folder.
- Click the event name to open the Event configuration page on the right panel.
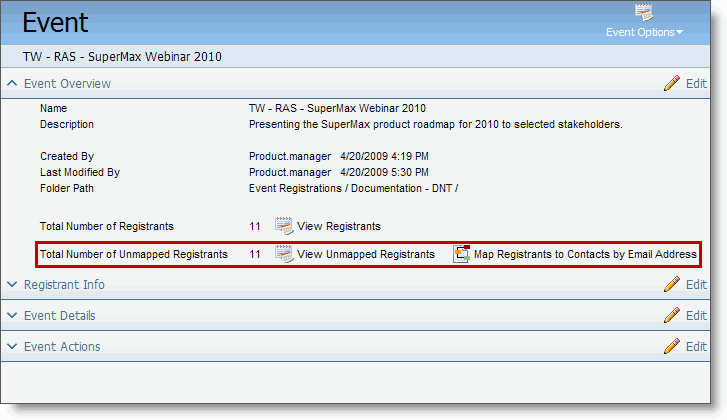
Under the Event Overview section, any unmapped registrants will be indicated by a by a number as well as options for viewing and mapping those registrants.

- From the Event page, do one of the following:
- Click Map Registrants to Contacts by Email Address. The application attempts to match all unmapped registrants to existing contact records using the email address field value. The results of the attempt are shown. Click Close once you have reviewed them.
- Click View Unmapped Registrants. TheRegistrant Search page opens and shows a list of all unmapped registrants. You have a number of options from this page, which are described in the rest of this procedure.


Managing unmapped registrants
You can select an option from the menu next to an individual registrant in the list to do one of the following:
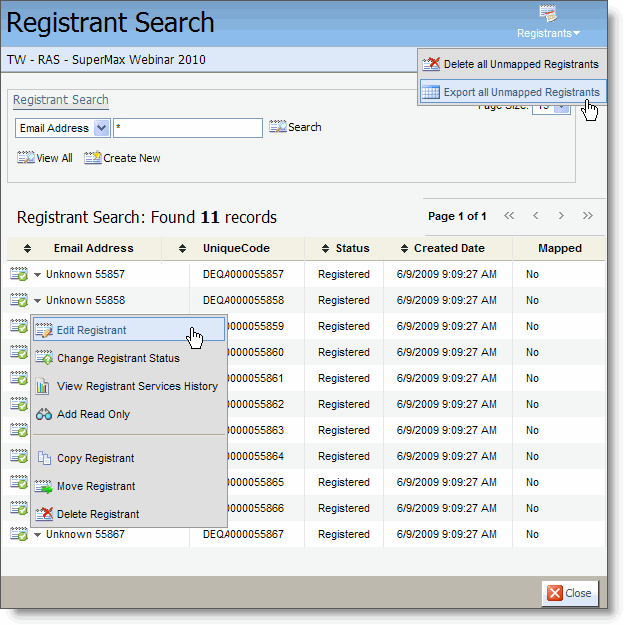
- Edit Registrant: Shows you the registrant Status (for example, Registered or Waitlist), the Header Fields from the event, the available Participant Info, and, at the bottom of the page, tools to map the registrant to an entity (such as contacts).
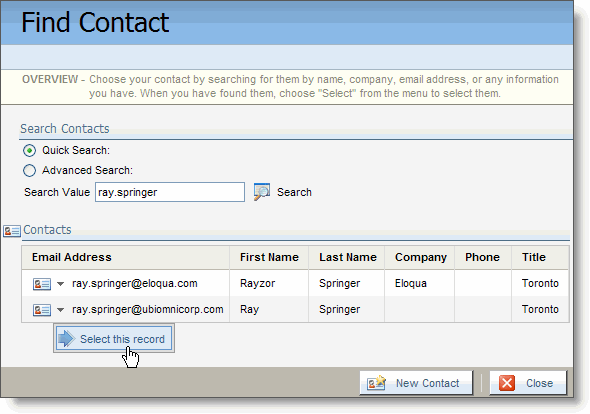
If you want to manually map this registrant to a data entity record, then select the entity type, then click Search. Provide a Search Value in the Find Contact (or other data entity) dialog box, and click Search. If you find a matching contact record, on the menu next to it, click Select this record.
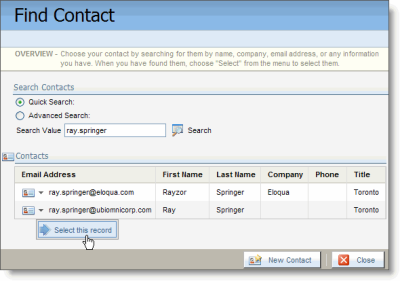
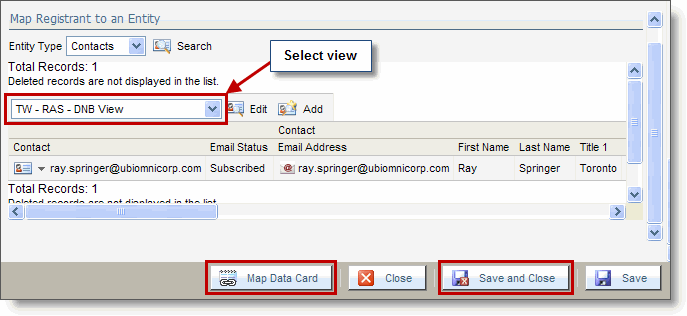
The record is shown in the Edit Registrant dialog box, and you can choose different views of the contact record using the picklist. When you are sure this is the correct record, click Map Custom Object Record on the bottom toolbar, then click Save and Close.

- Change Registrant Status: Change the registrants status for the event. The options are Registered, In Progress, On Hold, Cancelled, or Waitlist. If you change the status, click Save and Close in the Custom Object Record Status dialog box.
- View Registrant Services History: Show a history of the custom object record services used by this registrant. If it is a new registrant that has not used any services, there will be no content in this report.
- Add/Remove Read Only: Select Add Read Only to lock the registrant to prevent deletion by another user, or select Remove Read Only to remove the deletion lock
- Copy Registrant: Copy the registrant to another custom object. Choose the Set, click Select, and map each relevant Source Field in the registrant's record to a Target Field in the target custom object. Click Copy Custom Object Record when you are done, then Close in the Result dialog box once you have viewed the results.
- Move Registrant: Move the registrant to another custom object. Choose the Set, click Select, and map each relevant Source Field in the registrant's record to a Target Field in the target custom object. Click Move Custom Object Record when you are done, then Close in the Result dialog box once you have viewed the results. The registrant (custom object record) is removed from the current set and added to the target set.
- Delete Registrant: Delete the registrant from the event. Click Delete in the confirmation dialog box.